C H A P T E R 5
Creating Tables and Other Objects
In this chapter, you will learn how to create various objects within the SQL Server database. Primarily, we’ll focus on creating tables and objects, such as indexes and constraints, that are closely related to tables. To get the most out of this chapter, you should follow along using SQL Server Management Studio and the instance of SQL Server you installed in Chapter 2. It is important to note that there are multiple ways to create object in SQL Server. Two of the most common ways are by issuing Transact SQL (T-SQL) statements directly to SQL Server using a tool such as SSMS or SQLCMD and by using the management dialogs in a management tool like SSMS.
Navigating the Object Explorer Tree
You can find SQL Server Management Studio in the Microsoft SQL Server 2012 folder in the Start menu. When this application launches, it will ask you for the server you want to connect to. If you need help, please read the “Connecting to SQL Server” section in Chapter 3.
Once you are connected to the SQL Server instance, the Object Explorer tree within SQL Server Management Studio will populate with a root node, which will be the server instance you just connected to. This node will have a series of child nodes all exposing specific objects and features related to the specific SQL Server instance. Figure 5-1 shows the Object Explorer tree just after a connection was made to a local server instance.
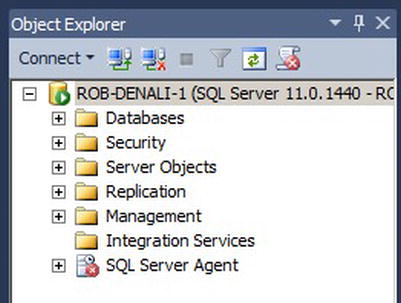
Figure 5-1. Object Explorer showing active connection to the local server instance
As you learned in Chapter 3, expanding any one of these child nodes brings up the specific objects related to the content of that particular child node. Right-clicking the container node or an actual object brings up dynamic context menus that allow you to perform actions on the objects. These context menus change depending on what you select. For example, the context menu for the Databases node gives the ability to launch the Create Database dialog box, while the context menu for the Security node allows you to create a new login to SQL Server. In this chapter, you will learn how to create various objects using both the user interface in SQL Server Management Studio and T-SQL statements.
Scripting the Actions of an SSMS Dialog Box
One of the most useful features within a typical SSMS dialog box is the ability to script the actions of a dialog box instead of actually executing the action against the server. For example, launch the New Database dialog box from the Databases node in Object Explorer. This will launch the dialog box shown in Figure 5-2. As an example, enter SmartCommunityBank in the “Database name” text box.
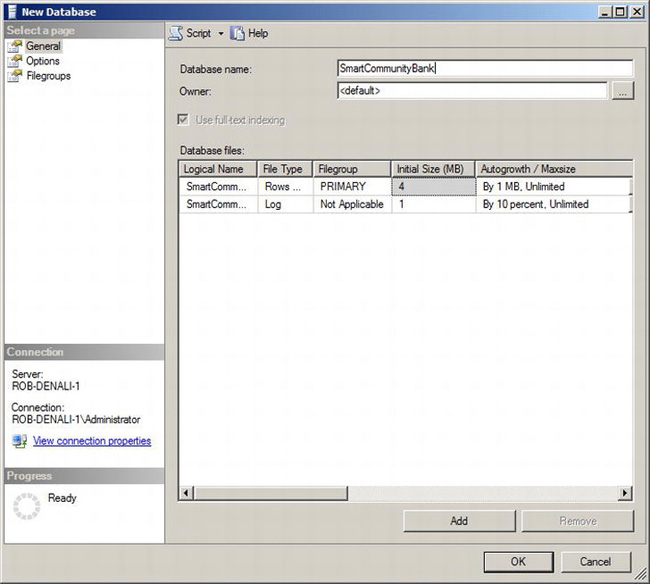
Figure 5-2. New Database dialog box in SQL Server Management Studio
If you click the OK button, the database will be created, and the dialog box will close. However, if you want to know exactly what T-SQL statements will be executed as a result of what you input in this dialog box, click the downward-facing arrow on the Script button at the top of the dialog box. This will pop up a list of destinations for the script, as shown in Figure 5-3.

Figure 5-3. Script options
If you select Script Action to New Query Window, this will open a new Query Editor window and populate it with the CREATE DATABASE script shown here:
CREATE DATABASE [SmartCommunityBank]

 CONTAINMENT = NONE

 ON  PRIMARY

( NAME = N'SmartCommunityBank', FILENAME = N'C:Program FilesMicrosoft SQL Server

MSSQL11.MSSQLSERVERMSSQLDATASmartCommunityBank.mdf' , SIZE = 4096KB , FILEGROWTH

= 1024KB )

 LOG ON

( NAME = N'SmartCommunityBank_log', FILENAME = N'C:Program FilesMicrosoft SQL Server

MSSQL11.MSSQLSERVERMSSQLDATASmartCommunityBank_log.ldf' , SIZE = 1024KB , FILEGROWTH

= 10%)

GO

ALTER DATABASE [SmartCommunityBank] SET COMPATIBILITY_LEVEL = 110

GO

ALTER DATABASE [SmartCommunityBank] SET ANSI_NULL_DEFAULT OFF

GO

ALTER DATABASE [SmartCommunityBank] SET ANSI_NULLS OFF

GO

ALTER DATABASE [SmartCommunityBank] SET ANSI_PADDING OFF

GO

ALTER DATABASE [SmartCommunityBank] SET ANSI_WARNINGS OFF

GO

ALTER DATABASE [SmartCommunityBank] SET ARITHABORT OFF

GO

ALTER DATABASE [SmartCommunityBank] SET AUTO_CLOSE OFF

GO

ALTER DATABASE [SmartCommunityBank] SET AUTO_CREATE_STATISTICS ON

GO

ALTER DATABASE [SmartCommunityBank] SET AUTO_SHRINK OFF

GO

ALTER DATABASE [SmartCommunityBank] SET AUTO_UPDATE_STATISTICS ON

GO
ALTER DATABASE [SmartCommunityBank] SET CURSOR_CLOSE_ON_COMMIT OFF

GO

ALTER DATABASE [SmartCommunityBank] SET CURSOR_DEFAULT  GLOBAL

GO

ALTER DATABASE [SmartCommunityBank] SET CONCAT_NULL_YIELDS_NULL OFF

GO

ALTER DATABASE [SmartCommunityBank] SET NUMERIC_ROUNDABORT OFF

GO

ALTER DATABASE [SmartCommunityBank] SET QUOTED_IDENTIFIER OFF

GO

ALTER DATABASE [SmartCommunityBank] SET RECURSIVE_TRIGGERS OFF

GO

ALTER DATABASE [SmartCommunityBank] SET  DISABLE_BROKER

GO

ALTER DATABASE [SmartCommunityBank] SET AUTO_UPDATE_STATISTICS_ASYNC OFF

GO

ALTER DATABASE [SmartCommunityBank] SET DATE_CORRELATION_OPTIMIZATION OFF

GO

ALTER DATABASE [SmartCommunityBank] SET PARAMETERIZATION SIMPLE

GO

ALTER DATABASE [SmartCommunityBank] SET READ_COMMITTED_SNAPSHOT OFF

GO

ALTER DATABASE [SmartCommunityBank] SET  READ_WRITE

GO

ALTER DATABASE [SmartCommunityBank] SET RECOVERY FULL

GO

ALTER DATABASE [SmartCommunityBank] SET  MULTI_USER

GO

ALTER DATABASE [SmartCommunityBank] SET PAGE_VERIFY CHECKSUM

GO

ALTER DATABASE [SmartCommunityBank] SET TARGET_RECOVERY_TIME = 0 SECONDS

GO

USE [SmartCommunityBank]

GO

IF NOT EXISTS (SELECT name FROM sys.filegroups WHERE is_default=1 AND name = N'PRIMARY')

 ALTER DATABASE [SmartCommunityBank] MODIFY FILEGROUP [PRIMARY] DEFAULT

GO
![]() Note Choosing to script the action of a dialog box is a great way to learn which T-SQL statements perform which actions.
Note Choosing to script the action of a dialog box is a great way to learn which T-SQL statements perform which actions.
In this case, you can see that the CREATE DATABASE statement is used to create a database.
To create the database, click the Execute button the toolbar.
Transact-SQL (T-SQL) Primer
Before you learn how to create various objects within the database, it is important to review the general constructs of the T-SQL language. T-SQL is Microsoft’s version of the Structured Query Language (SQL) programming language. SQL is a declarative programming language, which means that the SQL code describes what information should be returned, or what the end goal is, as opposed to how to go about retrieving information or doing some work. The SQL language contains categories of statements. These categories are Data Definition Language (DDL), Data Manipulation Language (DML), and Data Control Language (DCL).
Data Definition Language (DDL)
DDL statements describe the creation or modification of objects within the database server. In our previous example using SSMS, you noticed that when you created the SmartCommunityBank database, SSMS really executed a T-SQL script using the CREATE DATABASE DDL statement. The script that SSMS generates is sometimes more verbose than what is required at a minimum. For example, the minimum code that is needed to create a database is as follows:
USE [master]

GO

CREATE DATABASE [VetClinic]

GO
This will create a database named VetClinic using default values (you can find the default values for any of the T-SQL statements in SQL Server Books Online).
DDL statements also deal with the modification of objects. An example of modifying an existing object using the ALTER DDL statement is as follows:
USE [master]

GO

ALTER DATABASE VetClinic

SET RECOVERY FULL

GO
The previous example changes the database recovery mode to FULL for an existing database.
DDL statements also apply to the creation of security principals and objects. For example, if you wanted to create a new SQL Server login named ReceptionistUser, you would execute the following script:
USE [master]

GO

CREATE LOGIN ReceptionistUser WITH PASSWORD='hj2(*h2hBM!@jsx'

GO
Data Manipulation Language (DML)
DML statements read and modify the actual data within the database. For example, assume you created the following table using DDL statements within the VetClinic database:
USE [VetClinic]

GO

CREATE TABLE [Pets]

(pet_id      INT  PRIMARY KEY,

pet_name    VARCHAR(50)  NOT NULL,

pet_weight   INT           NOT NULL)

GO
Now, let’s add some data to the Pets table using the INSERT DML statement. The code follows:
USE [VetClinic]

GO

INSERT INTO Pets VALUES

 (1,'Zeus',185),

(2,'Lady',155),

(3,'Deno',50)

GO
If you want to query the data, you can use the SELECT DML statement as follows:
SELECT * FROM Pets
If you execute this statement within SSMS, it will return the three pets defined previously in the results grid. Other DML statements include UPDATE and DELETE, which are two important actions to perform against data.
You can find a more in-depth discussion of these DML statements in Chapter 5.
Data Control Language (DCL)
DCL statements control access to data. For example, if you wanted to give SELECT access to ReceptionistUser, you could use the GRANT DCL statement as follows:
USE [VetClinic]

GO

GRANT SELECT ON Pets TO ReceptionistUser

GO
Other DCL statements include REVOKE and DENY. These are used to either remove a previously granted permission or deny someone access to a particular object. Note that DENY takes precedence over GRANT at a higher scope. For example, ReceptionistUser is granted SELECT on the Pets table. This enables ReceptionistUser to read all the columns within the table. The administration could DENY that user specific access to a column, and even though ReceptionistUser has SELECT access for the entire table, the specific column would not be available.
Creating Tables
You can create tables by using DDL or by using the table designer within SSMS. No matter which approach you choose to use, it all comes down to T-SQL. If you create tables from the table designer, the designer generates and executes T-SQL on your behalf. That’s convenient, because it saves you a lot of tedium in writing the T-SQL yourself. But sometimes writing your own T-SQL has advantages.
Creating Tables from the Table Designer
To launch the table designer, simply navigate to the Tables node of the VetClinic database, right-click the node, and select New Table from the context menu. This will launch the table designer, shown in Figure 5-4.
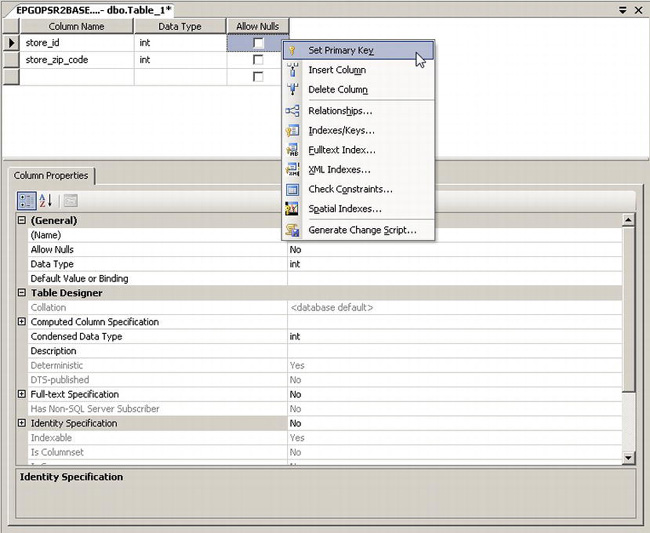
Figure 5-4. Table designer in SSMS
From the options visible in Figure 5-4, you can see that the majority of the common configuration options are available, such as the data type of the column and whether nulls are allowed. Both of these particular concepts will be discussed in detail in Chapter 5. The table designer provides you with the ability to easily configure a new table by exposing the most common options used for table creation.
To start adding columns, click the first empty row. Type store_id in the Column Name column, and select int for the data type. Deselect the Allows Nulls check box. Right-click the row, and select Set Primary Key. You will learn more about primary keys later in this chapter.
In the second row, type store_zip_code in the Column Name column, and select int for the data type.
To create the table, click the disk icon, and press Ctrl+S or select Save Table_1 from the File menu in SSMS. The table designer launches, giving the new table a name of Table_1. When you save the table, SSMS will ask you for a different name. It is in this save dialog box that you can specify Store Location for the table name.
When the table is saved, it is actually now created within the database.
Issuing the CREATE TABLE Statement
To create the Store Location table, you also could have used the CREATE TABLE statement. SSMS allows you to generate scripts based on existing objects. Thus, you can generate a CREATE TABLE script for the table you created with the table designer. To generate the CREATE script, right-click the Store Location table, and go to Script Table as CREATE To New Query Editor Window, as shown in Figure 5-5.
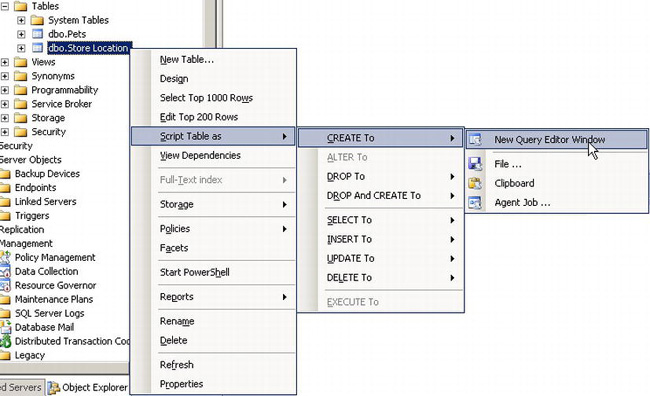
Figure 5-5. Ad hoc scripting options available in SSMS
The action New Query Editor Window will produce the following T-SQL script in a new Query Editor window:
USE [VetClinic]

GO
/****** Object:  Table [dbo].[Store Location]   ******/

SET ANSI_NULLS ON

GO


SET QUOTED_IDENTIFIER ON

GO


CREATE TABLE [dbo].[Store Location](

    [store_id] [int] NOT NULL,

    [store_zip_code] [int] NULL,

 CONSTRAINT [PK_Store Location] PRIMARY KEY CLUSTERED

(

    [store_id] ASC

)WITH (PAD_INDEX  = OFF, STATISTICS_NORECOMPUTE  = OFF,

IGNORE_DUP_KEY = OFF, ALLOW_ROW_LOCKS  = ON,

ALLOW_PAGE_LOCKS  = ON) ON [PRIMARY]

) ON [PRIMARY]


GO
Normally, when you create a table, you do not need to keep specifying the ANSI_NULLS or QUOTED_IDENTIFIER setting. These are in this script only because it was generated by SQL Server. For reference, the SET ANSI_NULL statement tells SQL how to deal with null values when used in equality or comparison operators. In a future version of SQL Server, you will not be able to set this value to OFF, so plan on keeping it set to ON, which is the default value. The QUOTED_IDENTIFER setting tells SQL Server how to handle quotation marks within query strings. You can find more information about this setting in the SQL Server Books Online article “SET QUOTED_IDENTIFIER (Transact-SQL)” located at http://msdn.microsoft.com/en-us/library/ms174393.aspx.
Let’s examine the CREATE TABLE statement generated in the script. As with most DDL statements, the first value you need to specify is the name. In the example, the table name is Store Location, and it is created in the dbo schema.
CREATE TABLE [dbo].[Store Location]
The next two lines in the script supply the column definitions. In this table, we have two integer columns: store_id and store_zip_code. In T-SQL, these are defined within the CREATE TABLE statement as follows:
[store_id]                  [int]   NOT NULL,

[store_zip_code]      [int]    NULL,
The keyword int specifies the integer data type. There are many different types of data types available to use. Data types will be discussed in more detail in Chapter 5. An integer allows the user to specify a number between −2,147,483,648 and 2,147,483,647. Different data types require different amounts of storage space. For example, storing the value of an integer takes 4 bytes. Unless you anticipate there being more than 32,768 stores, you could save 2 bytes of storage by using a smallint instead of an int to define the store_id column. SQL Server Books Online describes data types in the article “Data Types (Transact-SQL)” located at the following URL: http://msdn.microsoft.com/en-us/library/ms187752.aspx.
Altering Tables
Tables can be altered using SSMS or through DDL statements. To alter an existing table using SSMS, simply select Design from the context menu of the desired table. This will launch the table designer shown in Figure 5-4 populated with details from the table definition. You can freely modify the table using the UI, or you can modify a table using a DDL statement.
ALTER TABLE is the DDL statement used to change tables using T-SQL. A plethora of options are available for ALTER TABLE. For a complete list, see the SQL Server Books Online article “ALTER TABLE (Transact-SQL)” located at http://msdn.microsoft.com/en-us/library/ms190273.aspx.
To see ALTER TABLE in action, add a column called Store Manager to the Store Location table you just created:
ALTER TABLE [Store Location]

     ADD [Store Manager] VARCHAR(50)
In the following sections, you will also see other examples of altering a column including adding a constraint to an existing column.
Adding Constraints
With data types, you can limit the kind of data that can be stored within the column. For example, once you defined the store_id column as an integer, you could not insert the word boston for the store_id since a word is a sequence of characters and not an integer value. However, what if you had a column such as the weight of a pet that was an integer, and you knew your application would provide integers, but you wanted to make sure that only realistic or valid values were entered? This is where constraints come into play.
NULL Constraints
The keywords NOT NULL and NULL tell SQL Server whether a null value is allowed to be entered as a valid value for the column.
![]() Note A null value is unknown and not meant to be confused with a zero value or empty value.
Note A null value is unknown and not meant to be confused with a zero value or empty value.
In some cases, you might have required value, such as a store ID, where a null value might not make any sense, because, for example, a store must have one specific ID to be a store. In this case, the column store_id must not allow null values; thus, you give NOT NULL as a parameter to the column definition. In other cases, you might be storing answers to a survey. Perhaps this survey accepts answers of yes or no, but the respondent didn’t answer a particular question. The absence of an answer is a null value, and you should allow the answer column to have NULLs.
CHECK Constraints
Previously, we defined the Pets table as follows:
CREATE TABLE [Pets]

(pet_id      INT    PRIMARY KEY,

pet_name      VARCHAR(50)  NOT NULL,

pet_weight     INT            NOT NULL)
To make sure that the user cannot enter an unrealistic weight for a pet, such as a negative weight or a weight greater than 1,000 pounds, you can define a CHECK constraint. A CHECK constraint requires that the value entered passes an arbitrary expression. To restrict the list of valid values for the pet_weight column, you can apply the CHECK constraint as follows:
ALTER TABLE Pets  WITH CHECK

     ADD  CONSTRAINT [CK_Pets]

         CHECK  (([pet_weight]>0 AND [pet_weight]<1000))

GO
The keyword WITH CHECK means that existing data in the table will be checked against the constraint. If any values violate the constraint, the ALTER TABLE statement will fail. If you wanted to apply this constraint only for new data added to the table, you would specify WITH NOCHECK.
Primary Keys and Unique Constraints
In the Pets table defined earlier, notice pet_id is an integer data type, and it has a PRIMARY KEY constraint defined on it. The purpose of a primary key is to ensure that each row of data is unique for the given column or columns where the primary key is defined. In our example, we want a pet to appear only once in this table, so defining a primary key is one way to ensure this behavior.
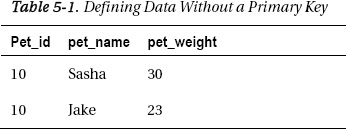
Without a primary key, the data in Table 5-1 would be valid.
If pet_id is used as a reference throughout the database application, how would you know if you were referring to Sasha or Jake, given a pet_id of 10? To mitigate this problem, you would define a primary key or unique constraint.
There can be only one primary key defined on a table, and the row value for a primary key column can never be null. The reason for this is that, when you define a primary key, SQL Server will create an index on the column or columns that you specify. Depending on whether an existing index is already defined, SQL Server may create a clustered index that physically sorts the data within the database files with respect to the key value. If there is already a clustered index defined on the table and you add a primary key, SQL Server will create a UNQIUE constraint to ensure that the values for the primary key column are unique. You will learn more about indexing later in this chapter.
A UNIQUE constraint is similar to a PRIMARY KEY constraint in that it enforces uniqueness of the data. However, the UNIQUE constraint creates a nonclustered index and does not physically change the structure of the data within the data files. You can have multiple unique constraints per table.
To illustrate the UNIQUE constraint, let’s create a table called Medication. Since the veterinary practice can stock drugs from only one manufacturer, you need to define a unique constraint on the med_name column. The code for the table creation is as follows:
CREATE TABLE Medication

(med_id INT PRIMARY KEY,

med_name VARCHAR(50) CONSTRAINT u_med_name UNIQUE,

med_supplier VARCHAR(50) NOT NULL)

GO
From the previous code, you can define constraints at the time of creation and after the fact using the ALTER TABLE statement. Now that the Medication table is created, try to insert a medication that has the same name but from a different manufacturer, as follows:
INSERT INTO Medication VALUES (1, 'Cyclosporine 5mg', 'Generic Drugs Inc')

INSERT INTO Medication VALUES (2, 'Cyclosporine 5mg', 'ACME Vet Drugs')
When this code is executed, the first medication from Generic Drugs Inc will be successfully inserted, but the second will fail because of the violation of the constraint. The actual error message is as follows:
(1 row(s) affected)


Msg 2627, Level 14, State 1, Line 2


Violation of UNIQUE KEY constraint 'u_med_name'.


Cannot insert duplicate key in object 'dbo.Medication'.


The statement has been terminated.
Foreign Key Constraints
Notice that the Pets table you created previously in this chapter contains both primary and unique constraints. Now, you can create an Owners table that will reference the Pets table. The table creation code follows:
CREATE TABLE [Owners]

(owner_id    INT    PRIMARY KEY,

pet_id       INT    REFERENCES Pets(pet_id),

owner_name  VARCHAR(50) NOT NULL)

GO
There can be only one owner for each pet, so you create a primary key on the owner_id column. You create a foreign key on the pet_id column to enforce a link between the Owners table’s pet_id column and the Pets table’s pet_id column. This link is important in this scenario because you always want to ensure that pets belong to owners. There is a logical connection between these two entities. You cannot arbitrarily add a value to the pet_id column in the Owners table; the value must match an existing value in the pet_id column in the Pets table. This behavior is known as referential integrity.
To observe this behavior, add an owner associated with a pet that doesn’t exist yet in the Pets database, as follows:
INSERT INTO Owners VALUES (1,20,'Julie')
Upon execution of the statement, you will get the following error:
Msg 547, Level 16, State 0, Line 1


The INSERT statement conflicted with the FOREIGN KEY constraint


 "FK__Owners__pet_id__1FCDBCEB". The conflict occurred in database


 "VetClinic", table "dbo.Pets", column 'pet_id'.


The statement has been terminated.
Dropping Tables
When you drop a table, you are deleting it from the database. When you perform this action, you are also deleting the table data, indexes, triggers, constraints, and permissions that were defined on the table. In certain circumstances, you are not allowed to drop a table. For example, if your table is referenced by another table via a foreign key constraint, the foreign key constraint must be removed from the referring table first before the table in question can be deleted. Also, any stored procedures or views that reference the table will need to be dropped or changed before the table in question can be dropped.
To help illustrate deleting a table, let’s create two tables: Customers and Accounts. The Accounts table will contain a column customer_id that references the customer_id column in the Customers table. The script to create these tables is as follows:
CREATE TABLE Customers

(customer_id INT PRIMARY KEY,

customer_name NVARCHAR(50) NOT NULL)

GO


CREATE TABLE Accounts

(customer_id INT REFERENCES Customers(customer_id),

account_balance MONEY)

GO
To drop the Customers table using SSMS, simply right-click Customers in Object Explorer and select Delete. This will launch the Delete Object dialog box shown in Figure 5-6.
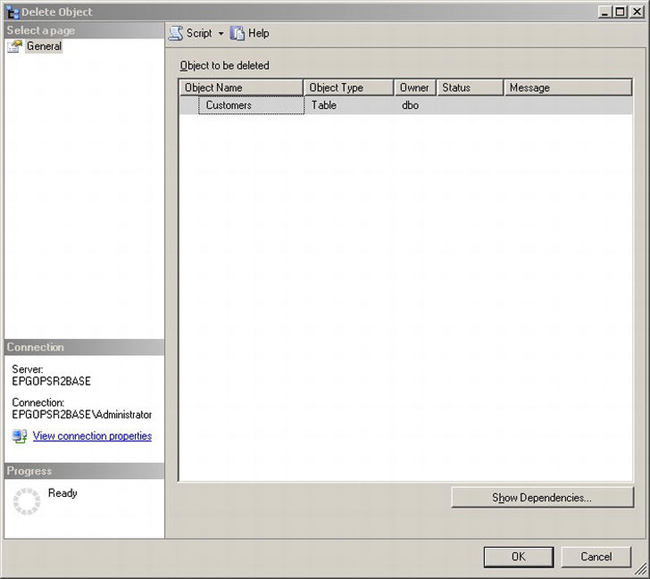
Figure 5-6. Delete Object dialog box
If you click OK to delete, you will get an error stating “Drop failed for Table ‘dbo.Customers’. (Microsoft.SqlServer.Smo).” If you click the error link, you will find more details, including the following text: “Could not drop object ‘dbo.Customers’ because it is referenced by a FOREIGN KEY constraint. (Microsoft SQL Server, Error: 3726).” Since the Customers table is referenced by the Accounts table, you can’t drop it until you address the foreign key reference. To determine these issues before you actually issue the drop command, you can click the Show Dependencies button. This will launch the Customers Dependencies dialog box shown in Figure 5-7.
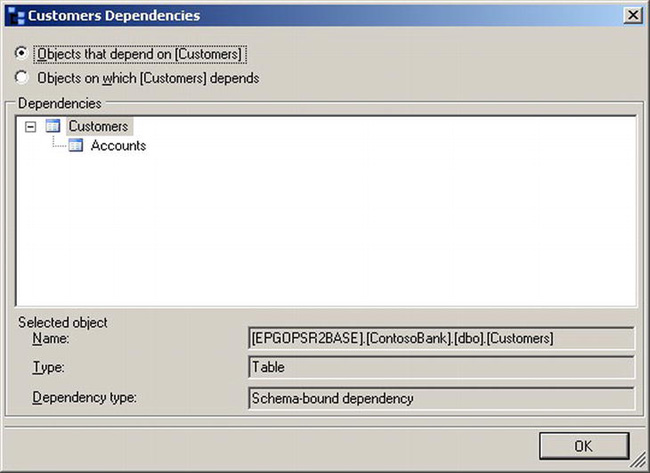
Figure 5-7. Customers Dependencies dialog box
Figure 5-7 clearly shows that the Accounts table references the Customers table.
The DDL statement for dropping a table is the DROP TABLE statement. To drop both tables, use the following script:
DROP TABLE Accounts

GO

DROP TABLE Customers

GO
Creating Indexes
Creating indexes on tables or views provides fast access to data by allowing the data to be organized in a way that allows for optimum query performance. You can think of an index within SQL Server just like the index of a book. If you were looking for the discussion of indexes, you could scan each page in this book, or you could go to the index and look up all the pages where indexes are mentioned. Obviously, looking through every page is tedious and takes the longest time of the two options mentioned. Without an index defined, SQL Server takes longer to do these scans for data as well.
The two most popular types of indexes are clustered and nonclustered. A clustered index physically changes the actual data pages stored in the database files themselves. This allows SQL Server to quickly go directly to the page where the requested data resides. Since we are physically ordering the data, you can have only one clustered index per table. If you wanted to optimize other queries that might not leverage the clustered index, you could create a nonclustered index. A nonclustered index is a separate data structure that keeps pointers to the actual data pages instead of physically changing the data page itself.
To help illustrate the value of the index, let’s use the following script to create a Products table. This table will have an id column and a column for the price of the product. The setup script is as follows:
CREATE TABLE Products

(product_id INT IDENTITY(1,1) NOT NULL,

product_price DECIMAL(9,2) NOT NULL)
Note that you are not going to create a primary key on the product_id column. Instead, the IDENTITY property will be used to ensure every insert into the Products table has a unique value. You are not creating a primary key on the product_id column, because when you create a primary key, SQL Server creates a clustered index for that given key. This clustered index for the primary key would adversely affect your index versus nonindex performance results.
Now that the table is created, you can use the following script to create 100,000 test values:
DECLARE @i INT;

DECLARE @price DECIMAL(9,2);


SET @i=0;

WHILE (@i<100000)

BEGIN

SET @price= ROUND((RAND()*1000),2)


INSERT INTO Products(product_price) VALUES (@price)


SET @i=@i+1


END
The previous script will create 100,000 different prices ranging from 0 to less than 1,000.
![]() Note This query may take a few minutes to run.
Note This query may take a few minutes to run.
At this point, you have not created any indexes on the Products table. To easily determine whether SQL Server is performing a table scan or using an index, you can click the Include Actual Execution Plan button shown in Figure 5-8. Alternatively, you can include the actual execution plan by hitting Ctrl+M or selecting Include Actual Execution Plan from the Query menu in SSMS.

Figure 5-8. Include Actual Execution Plan button
When you include the actual execution plan, SSMS will add an extra tab called Execution Plan to the Results pane. The query results will still be displayed on the Results tab, but you can view the execution plan that SQL Server’s query optimizer generated using the Execution Plan tab.
![]() Note Execution plans are covered in more detail in Chapter 13.
Note Execution plans are covered in more detail in Chapter 13.
Now, let’s find all the products that cost between 400 and 700 using the following query:
SELECT COUNT(product_id) FROM Products WHERE

product_price BETWEEN 400 AND 700
When you click the Execution Plan tab in the Results pane, you will see something similar to Figure 5-9.
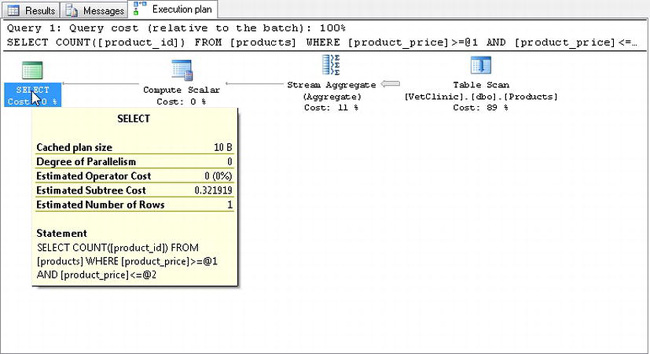
Figure 5-9. Execution plan showing a table scan
You can derive two important pieces of information from Figure 5-4. First, SQL Server performed a table scan. This means that it scanned a large portion of the 100,000 rows to satisfy this query. The second important information is the cost of the query. The estimated subtree cost was .321919 for this query.
Since you are querying based on the product_price column, create a clustered index on the column by issuing the following T-SQL script:
CREATE CLUSTERED INDEX CI_Price ON Products(product_price)
Now, when you reissue the same query:
SELECT COUNT(product_id) FROM Products WHERE

product_price BETWEEN 400 AND 700
the execution plan will show something similar to Figure 5-10.
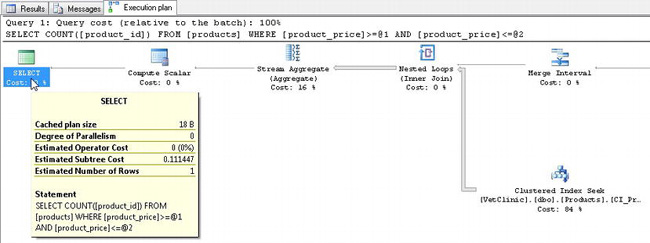
Figure 5-10. Execution plan showing clustered index seek
In this figure, you can see that a clustered index seek was performed instead of a table scan. Second, the estimated cost of the subtree was only .11147. This query executed more than twice as fast as the query without the index.
![]() Note Even though an index may be defined for a given table or view, the SQL Server query optimizer may find it more efficient to just do a table scan for smaller row sizes instead of leveraging the index.
Note Even though an index may be defined for a given table or view, the SQL Server query optimizer may find it more efficient to just do a table scan for smaller row sizes instead of leveraging the index.
In our example, you created a clustered index. This type of index changes the actual data pages stored in the database. Thus, you can have only one clustered index per table. If you wanted to optimize other queries that might not leverage the clustered index, you could create a nonclustered index. Recall that a nonclustered index is a separate data structure that keeps pointers to the actual data pages instead of physically changing the data page itself. You will learn more about index fragmentation and rebuilding indexes in Chapter 10.
Summary
SQL Server Management Studio can be a very helpful tool to use when learning SQL Server. The dialog boxes allow you to script almost all of the actions you’re performing. From these scripts, you can learn how your changes to the dialog box via SSMS affect the actual T-SQL statements. The Object Explorer tree exposes a context menu with a script option that allows you to script the creation, modification, or deletion of the selected objects; it’s another great tool to help you learn T-SQL syntax.
One of the most important concepts to learn as a DBA is proper indexing. It’s a topic that performance tuning and optimization books cover in great depth. Without indexing, SQL Server may have to issue table scans, which are quite costly from a disk I/O standpoint.
A solid understanding of the core relational database principals will help you tremendously in your DBA career. Now that you are finished with this chapter, practice using SSMS to create your own tables and try to integrate them within the Pets database. Practice creating and using indexes. The time you spend on these core concepts will be valuable.
