
WHAT YOU WILL LEARN IN THIS CHAPTER:
What is web content management?
How to use sharePoint to publish web content in a single or multiple languages
How to create custom page layouts and templates
With more and more business activities taking place online, web content management (WCM) has become increasingly important for businesses. WCM is the process of creating and managing web content either on the Internet or an intranet. Where possible, a good web content management system should support a variety of information and provide tools to users for updating this content with minimal effort.
In the past, a major roadblock to managing web content has been the lack of effective tools, which meant relying on expensive, labor-intensive, and time-consuming processes. You don't have these roadblocks using a web content management system such as SharePoint, however. In this chapter, you take a look at WCM and how SharePoint 2010 can make business teams and processes more efficient.
A traditional challenge in many organizations has been the reliance of business users on technical teams to publish new content and to improve communication with stakeholders on the web. SharePoint 2010 makes business users more independent in their content publishing activities, which empowers them to more effectively publish up-to-date information and communicate with their target audience through their website.
So, how can WCM work in your situation? If your company headquarters is in one part of the world, with support teams in other locations, your employees can still collaborate by accessing a company website, regardless of location. Website content owners create lists and libraries and supply employees with the materials they need to perform their day-to-day duties. Managers can create and update a tasks list that outlines what the team needs to do and who is responsible. Teams everywhere can log in to the portal and instantly access important information or even create it for someone in another country. Employees can create email alerts on the important lists and libraries so that colleagues are instantly notified of new or changed content. Specifically, SharePoint has the following features for managing and publishing content:
Page layouts and master pages: Enforce consistency across your website and ensure that all new pages that are created follow your corporate brand.
Creating web pages from the browser: Allows users without knowledge of HTML code to create web pages that inherit the site's look and feel.
Workflows: Automate the process of publishing or approving content. For example, you might create content for a website and then send it through a workflow system where it is approved and finally published to your website.
Content versioning: Ensures that you are always using the most up-to-date versions of your documents and allows you to restore to a previous version by keeping an electronic paper trail as the document evolves.
Reporting dashboards: This is a great way to get a high-level overview of your content.
Check in/check out: Ensures that multiple people are working on the same up-to-date content so that you can check out and in your documents during editing.
Publishing refers to the act of creating content such as a new page in your site or modifying content such as a block of text or a picture. By using built-in publishing tools explained throughout this chapter, you can quickly and easily modify your web content without the need for code. With SharePoint's Publishing feature, you can publish web content for pages and run content approval workflows directly from the browser or use tools like the Enhanced Text Editor to edit text right on the page. SharePoint has various templates, such as the Publishing Portal, that have the Publishing feature already enabled. However, you can enable the Publishing feature on a regular team site, such as a blank site, at any time to give it the publishing capabilities.
If you are planning to create a site that is going to be highly customized and feature many pages of content, you may select the Publishing Portal as the site template for your site collection. You can only select this template as a top-level site within a site collection. In the next Try It Out, you create a Publishing Portal that acts as a sample site for the remainder of this chapter.
TRY IT OUT: Create a Publishing Portal Site
In this example, you create a new site collection that acts as a host for your company's public Internet site. This site contains news articles and company information pages, as well as information on various ski products and services in multiple languages. In the past, creating a public-facing Internet site required in-depth knowledge of HTML and other related technologies.
To create a new site collection, you must visit the Central Administration site of your SharePoint environment. If you are unsure what the address for this site is, you should contact your system administrator or the person who installed SharePoint. You may also access the Central Administration site by logging directly in to the server and selecting SharePoint 2010 Central Administration from the Microsoft SharePoint 2010 Products option on the Programs menu.
Log in to the SharePoint Central Administration site for your server farm.
Select Create Site Collections from the Application Management group of links.
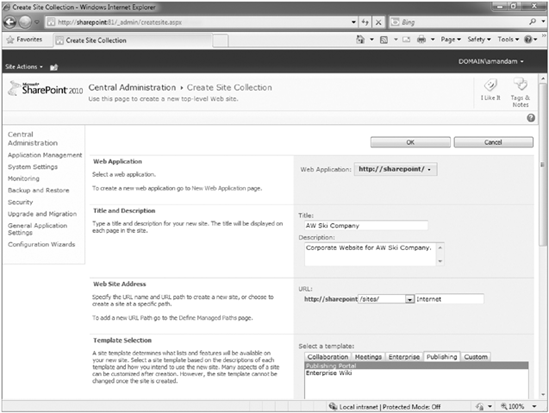
The first item in your list of things to identify is the web application on which you will create the site. Make sure that the web application you select is the correct application. If it is not, you can click the down arrow to the right of the selected web application and click Change Web Application.
You must provide a title, description, and URL for the site. Name the site AW Ski Company, and enter the following description:
Corporate Website for AW Ski Company
For the Web Site Address name, select /sites/ from the drop-down menu and enter internet in the blank field to the right of the drop-down, as shown in Figure 13-1.
Select the Publishing Portal template from the Publishing tab.
Enter your own name as the primary site collection administrator.
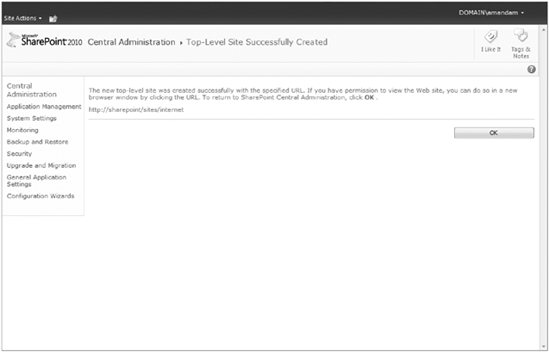
Click OK. The process for creating your site takes a few minutes. After it is completed, you are redirected to a page advising you that the process has completed successfully, and a URL will be displayed for you to select to visit your site, as shown in Figure 13-2.
How It Works
A publishing portal is created with many of the initial lists and libraries that you will need to get started on your website. Figure 13-3 shows an example of how the Internet site will look upon creation.
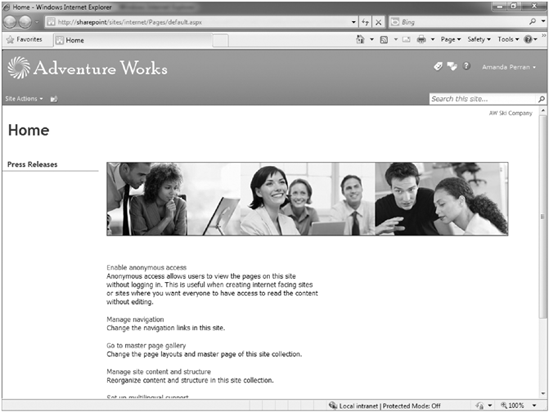
As mentioned in the last Try It Out, a publishing portal comes with lists and libraries to get you started, including the ones shown in the following list. In addition to these lists, the site collection contains two subsites for Press Releases and Search. You can create new subsites to represent the various sections of your company website. So, although you may think of a company website as a single site, in fact, it contains multiple subsites. As you create each subsite, the navigation updates to reflect your changes. The navigation controls allow visitors to your site to browse the various sections in a seamless and intuitive manner that does not make them feel as though are actually visiting multiple sites.
Customized Reports: This document library has the templates to create Web Analytics custom reports for the site collection.
Documents: This library stores documents and files to which your website's various content pages link. You can add columns, content types, or views to suit your specific requirements. By default, this library has versioning and content approval enabled, as well as columns for the publishing start and end dates. A version of this library is created in each publishing subsite for files and documents unique to that site.
Form Templates: Chapter 12 discussed how to publish InfoPath Form templates to a site collection as a Content Type or Administrator Approved Template. This is a useful location for storing central templates used by InfoPath forms utilized throughout your site collection.
Images: This system-generated library stores images for display in the current site that has versioning and content approval enabled. A version of this library is created in each publishing subsite for images unique to the site.
Pages: This holds the various pages you create for the content of your website, including the default page. It has a series of special content types that allow you to create site content and pages. Only one pages library can exist within a single site; however, each subsite will have its own version of this pages library.
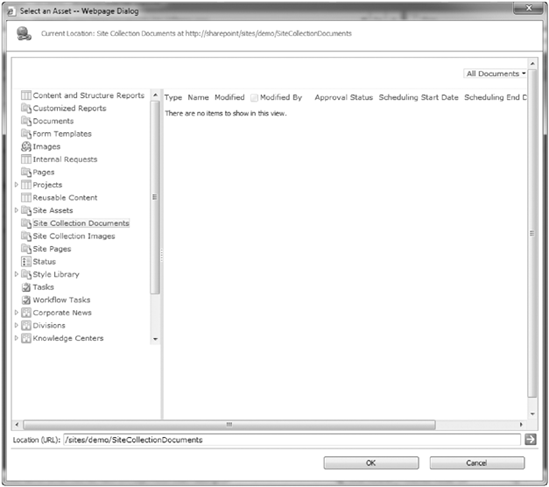
Site Collection Documents: This document library acts as a centralized store for documents and files that are required and accessed throughout the site collection. Various publishing controls, such as the Enhanced Text Editor or Publishing hyperlink, can access documents in this library. You can select Site Collection Documents from the left menu when editing either of these controls, as shown in Figure 13-4.
Site Collection Images: This document library stores the images that a site collection requires. Like the site collection documents library, this is available directly via the interface when you use the various image publishing controls.
Style Library: This system-generated library contains many of the style elements that your site requires, including custom XSL styles and CSS files; however, you can also add your own style sheets, which you can reference from within the site collection. It is considered a best practice to store any of the branding files related to your site within this library.
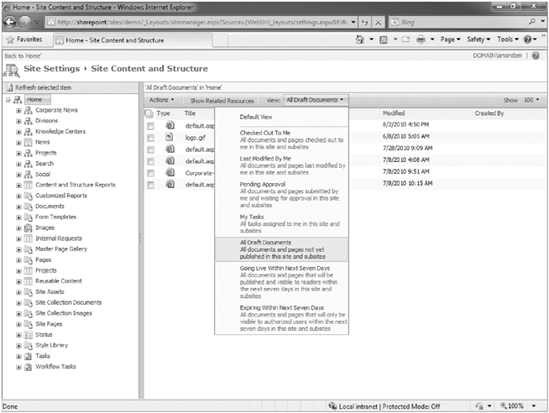
Content and Structure Reports: This system list contains special queries within each list item that help to generate the reports available on a publishing site from the Manage Content and Structure section of the site. Reports are helpful for identifying tasks and content that exists throughout the publishing site collection. An example of such a report is shown in Figure 13-5.
Reusable Content: You may need to display content in multiple web parts or locations that are pulled from a single centralized source. This system-generated list contains content that you can display within specific web parts. You can opt to link it back to the source so that as content updates in the list, the areas within the site that are using this content will also automatically be updated.
Workflow Tasks: This system-generated task list tracks the workflow tasks that are created as a result of the various publishing workflows.
In addition to the seamless navigation experience that SharePoint offers users between sites, it also has support for creating portals in multiple languages. In the next section, you see how to take a company website and configure it so that content users can view it in multiple languages.
When you design an Internet-facing website or corporate intranet, you may need to present it in multiple languages. This may simply mean providing users access to documents in multiple languages, or you may need all your content, including web pages and interface elements, in multiple languages. In the latter case, if your content is in one language, such as English, you must translate documents into other languages, but the system should support and manage this process.
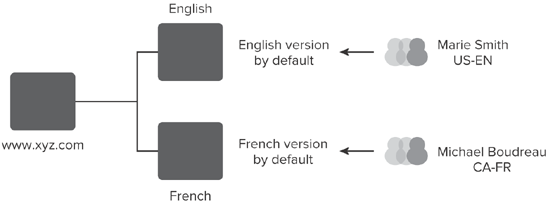
SharePoint has the Variations feature, which you can use to create a website hierarchy for content in multiple languages. For example, the site may be where customers from multiple languages can view information about the company's products and services, or a corporate intranet site where employees live in different regions of the world and need access to information in their primary languages. Although Variations does not actually translate the content for you, it starts a workflow that helps you do this work. Basically, you create content in a source language and then provision the content out to other sites, which represent the other required languages. This happens via workflow, which also notifies appropriate users that they are required to perform the translations. Figure 13-6 represents a site hierarchy with support for English and French versions of the website. Besides English and French, Variations can support any other languages, such as Spanish, Japanese, and German.

In this section, you learn how Variations work, including how to enable this feature. You then learn how to create labels for each language on your site, and then how to manage the workflow so that you have all the pieces you need for a working site with multiple language pages.
After login, the version of the site that users see is determined by their preferred language setting in their browser, as shown in Figure 13-7. If, for some reason, a user has a requirement to change the site language to something other than his or her default language, he or she may do so using the global navigation or a language selection control. If that page does not exist or is not published yet, the user is directed to the next page in the site hierarchy, which is typically the parent page.
For a site to become available in multiple languages, you must first enable the Publishing feature. By default, the Publishing Portal has this feature enabled. Enabling variations on a Publishing site, site collection is fairly simple in comparison to the benefit and functionality it provides an organization. In the next example, you configure a site collection to support this feature. You use the Ski Company site for this example.
TRY IT OUT: Enable Variations on a Site Collection
Your ski company has customers throughout the United States and Canada, which means you need content in both English and French. To do this, you enable the Variations feature. Because this functionality applies to the entire site collection, you enable this feature from the Site Collection Administration page.
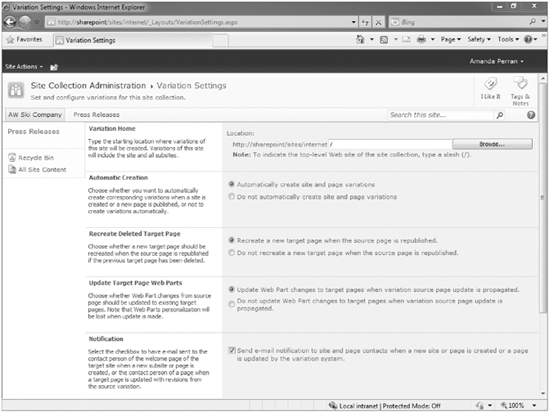
The Variation Settings window has several options. In this example, you start your variations at the root of your site collection, subsequently making English your main language variation, then you opt to automate the creation of pages for other languages. This means that if you create a new page on the English site, a new page is automatically created in the French site. You then select to recreate any deleted target pages when you republish the source page. You also opt to have web part modifications made in one site carry over into the second site. Whether you decide to update web parts has to do with the level of web part customization you plan to do between languages. For example, if you want unique views available on a product's web part for each language, you may opt not to update web parts so that the English web part doesn't overwrite changes you want on the French web part. Finally, you choose to send an email when variation pages have been updated, and choose to share resources with the source variation rather than creating new copies.
From the main page of your AW Ski Company site collection created in the first Try It Out of this chapter, select Site Settings from the Site Actions menu.
From the Site Collection Administration set of links, select Variations.
Enter a "/" for the Variation Home field, as shown in Figure 13-8. This indicates that the Variations feature should be enabled at the root of the site collection.
Select the option to Automatically create site and page variations. This setting is likely already selected by default.
Select the option to Recreate a new target page when the source page is republished. This setting is likely already selected by default.
Select the Do not update Web Part changes to target pages when variation source page update is propagated option for Update Target Page Web Parts.
Select the checkbox to send an email notification to site and page contacts when a new site or page is created or a page is updated by the Variation system. This setting is likely already selected by default.
Select the option to Reference existing resources.
Click OK. The variations feature will be enabled, and you will be redirected to the Site Settings page of your site.
The variations feature is enabled for your site collection with the options you selected in this exercise. Once you enable Variations, the next step is to create labels to represent the sites for the various languages you want to support. This is the subject of the next section of the chapter.
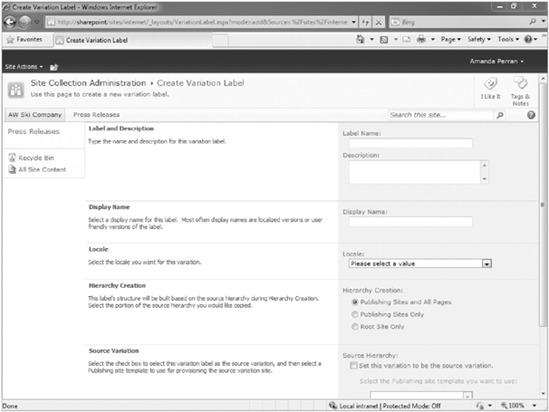
In Variations, you create a label for each language you want to represent within the site collection. The label defines the language of the site, the display name, the locale, as well as the hierarchy and source hierarchy.
Label name and description: These values are for organizational purposes only. It is important to be descriptive when entering a description for your label so that it is clearly understood by all site administrators.
Display Name: You next define the display name for each site hierarchy. This is the name as it displays in the navigation menu. You generally make the display name the name of the language as it would appear to native speakers, so that they can recognize it and select it. For example, for the French display name, you enter Français, which is the word for "French" in the French language. This is particularly helpful for viewing the structure of the site in reports such as the Manage Content and Structure Report shown in Figure 13-9.
Locale: This further tailors your site to reflect the nuances in variations on the same language. For example, you can define whether your French-speaking audience is French Canadian or from France. Likewise, you can distinguish between an English speaker from the United States and a speaker from Great Britain.
Hierarchy Creation: For each language you want to represent on your website, a subhierarchy is created below the root site.
Source Variation: You must choose the main language for your variations. This will be the initial language in which all content is created before translation and should be based on the majority of your user's first language.

TRY IT OUT: Create Labels for Each Language
In this example, you create labels for each of the languages in which you want your Ski Company site to be available. Each label represents a major language, which in turn represents a unique site hierarchy containing all the elements related to that language. In this example, you make the Ski Company site available in both English and French, but you can expand into other languages later by adding additional labels.
Return to the site settings page of your site collection. You may already be there after completing the previous exercise.
Select Variation Labels from the Site Collection Administration links.
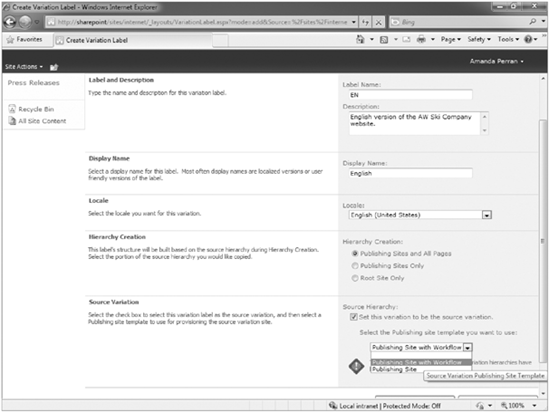
Click the New Label button from the toolbar. The Create Variation Label window appears, as shown in Figure 13-10.
Because the first language you define is English, enter EN for the Label name.
For Display Name, enter English. This is the value that end users see on the site.
Specify the locale of the site to be English (United States).
Specify the language to be English.
For Hierarchy Creation, select Publishing Sites and All Pages.
Check the checkbox to Set this variation to be the source variation. A message window appears to advise you that this action cannot be undone. Click OK to continue.
For Publishing Site Template, select Publishing Site with Workflow, as shown in Figure 13-11.
Click OK.
Select New Label from toolbar once more.
Enter FR for the Label Name.
For Display Name, enter Français.
Specify the locale of the site to be French (Canada). You do this because you expect that many of the French visitors to your site are French Canadian.
Specify the language to be French. This setting requires that you have the French Language Pack installed on your server. If you do not have the French Language Pack installed, your new label will be automatically created in English.
Click OK.
From the Variation Labels page, select Create Hierarchies from the toolbar. Upon completion, a message window will appear stating that the variation hierarchy will be created, as shown in Figure 13-12.

How It Works
Depending on the language preference that a user has set in the browser, a user is taken to the site with the appropriate language, which, in this example, is English. If a user defines a language preference that does not exist on the site, he or she is redirected to the source language.
In this example, although you created labels for two languages, you can still add new languages later. So, if you were to develop a requirement to offer the Ski Company website in Spanish, you could do so by creating a label for Spanish and then clicking the Create Site Hierarchies button again. Any content contained in your English site, which is the source site, would be copied into the Spanish site and queued for translation.
The hierarchy will be created based on the configuration of the Variations Create Hierarchies Job Definition Timer job on your server. By default, this job is scheduled to run daily; however, it can be updated from the Central Administration site to run more frequently as required or set to run on demand, as shown in Figure 13-13.

To ensure that pages are translated into the required language of the destination sites as they are created, you can tie your site to a special workflow. As the last section showed, pages are automatically created in the language of the source site. The process works something like this: you create content for the source language page. When you check the page in, this automatically launches an approval process. The group that is to approve the page is automatically notified and a task is assigned in their task list. When the source language page is approved, Variations automatically creates the pages for other languages, and email notifications are sent to translators notifying them that new content has been added to their sites. They translate the page to the appropriate language and, upon checking in the page, start a second approval process.
This section features three Try It Outs that show you the inner workings of the workflow. In the first Try It Out, you create a new page in the source site, which is English. The page is created in the French site, and both sites go through the content editing and approval stages. In the second Try It Out, you create the site's hierarchy by adding a series of subsites that reflect the two main sections of the website: About Us and Products.
Finally, in the third Try It Out, you move the Press Releases site from the root structure of the site into the English version of your site. Once you do this, SharePoint automatically creates a French version of the Press Releases site, just as it did with the Products, About Us, and Custom Contact page from the first and second Try It Outs.
TRY IT OUT: Create a New Page in the Source Site
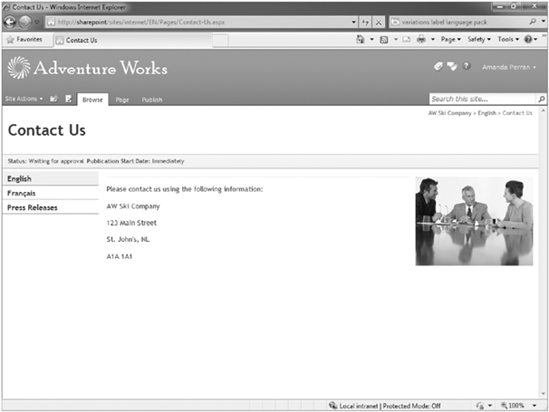
In this example, you create a contact information page in your English site and check it back in to the system to launch an approval workflow. Because you are a member of the Approvers group, you would normally receive an email notification and task assignment, but for the sake of this example, you can clearly see that the page is pending approval based on the Approve and Reject buttons that are displayed in the toolbar.
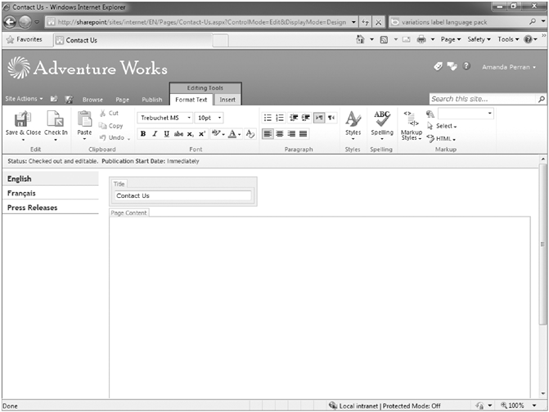
From the home page of your Ski Company website, select New Page from the Site Actions menu.
Enter Contact Us for the name of the page.
Click Create. You are redirected to an empty page, as shown in Figure 13-14.
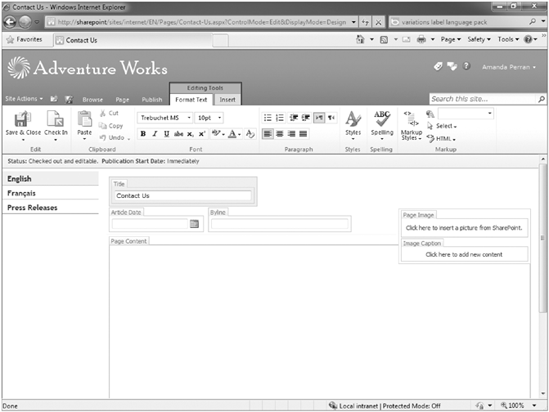
From the page tab of the Ribbon, expand the Page Layout option and select Image on Right. The page will reformat to display a layout containing a Page Image control on the right, as shown in Figure 13-15.
Enter some content into the page using the various controls and select Check In from the Ribbon.
Add some comments, as these will be useful to yourself and others later when reviewing the page's version history, as discussed in Chapter 3.
Click the Continue button.
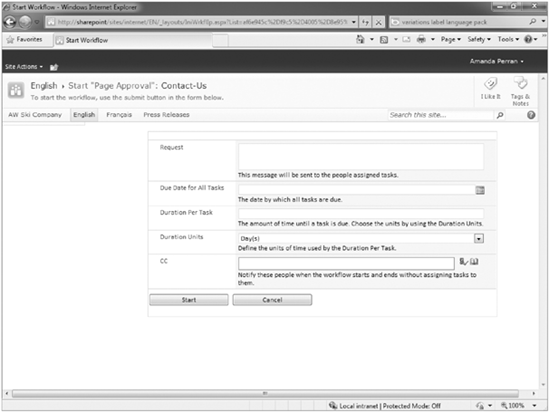
From the Publish tab of the Ribbon, select the Submit button. A workflow form will appear, as shown in Figure 13-16.
Enter details to describe your workflow, including Request and Duration per Task, and click the Start button.
Click Approve from the Publish tab. You will be redirected to the workflow approval form.
Add comments related to your approval of the page, and click the Approve button.
How It Works
Once the workflow has run, a yellow bar will appear at the top of the page, as shown in Figure 13-17, indicating that the page is waiting for approval.
The workflow was automatically assigned to the built-in Approvers group. Upon approval of the English page, the French page for Contact Us will be created, and content owners from the French site receive email notifications. This process may take a few minutes, depending on the configuration of your server. They can then edit a draft page that the system creates, and then publish the page. Content approval workflows are also launched for this page, and the approvers of this page are notified.
TRY IT OUT: Create a Site Hierarchy of Publishing Sites
In this example, you walk through the steps of creating two subsites for your publishing site collection. For the first site, you use the Create Site command from the Site Actions menu, which is the easiest way to create a single site from within a publishing site. Notice that this option along with several others on the Site Actions menu did not exist in the previous examples when you worked on sites without the Publishing feature enabled.
Because you need to create multiple subsites, you should use the Manage Content and Structure interface, shown in this example. From this interface, you can activate many administrative functions such as copying or moving a site, or creating new content. In addition, you can manage security or content across multiple sites very conveniently from this section. The Manage Content and Structure window, shown in Figure 13-14, provides a good visual diagram of the entire site collection and its various content elements.
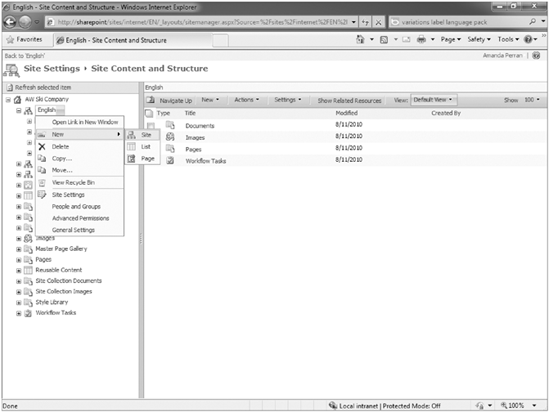
From the main page of your AW Ski Settings website, select Manage Content and Structure from the Site Actions menu.
Expand the menu associated with the English site and select the option to create a New Site, as shown in Figure 13-18.
Enter a title and URL for the site. For this example, enter About Us for the title and aboutus for the URL.
Select the option to use the same permissions as the parent site.
Select the Yes option for Use the Top Link Bar from the Parent Site.
Click Create.
Repeat steps 2 through 6, but this time, enter Products for the Title and products for the URL Name in step 3.
How It Works
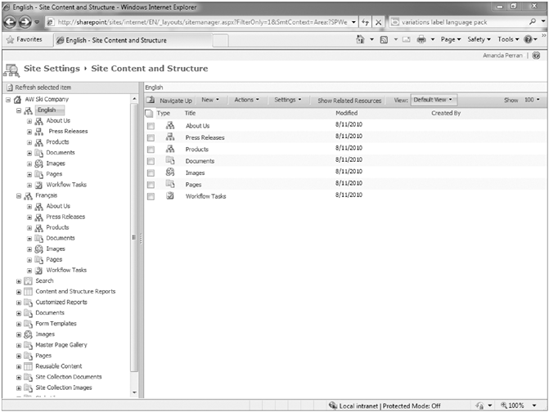
As you create the new sites, these sites are also created in the French version of your site based upon the configured schedule of your server. The manage Content and Structure view will clearly outline the hierarchy of your site, including the multilingual branches.
TRY IT OUT: Move a Site within a Site Collection
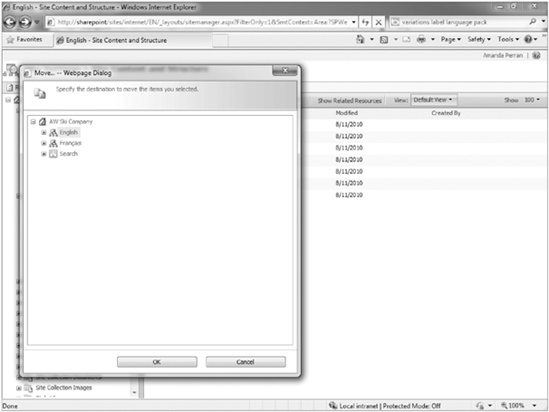
From the Manage Content and Structure section, you can perform many administrative functions such as moving sites. In this example, you move the Press Releases site under the English site hierarchy.
From the home page of your Ski Company website, select Site Actions then Manage Content and Structure. The Site Content and Structure window appears.
Hover over the Press Releases site to expose the Administrative drop-down menu.
Select the Move option. The Move Site dialog appears, as shown in Figure 13-19.
Click OK.
How It Works
Because Variations is enabled, moving the site triggers the creation of the Press Releases site under the French hierarchy. At this point, French content translators can go into the French version of the site and rename pages and update content to reflect the appropriate language. Figure 13-20 shows how the site hierarchy looks with the creation of the additional subsites in both languages.
Page layouts control the type of content that can be created on a page as well as where and how that content is displayed. Page layouts are built on content types, which were discussed in Chapter 6. A content type has one or more metadata columns associated with it, and these metadata columns ultimately control the type of information associated with that particular content type, things such as rich HTML fields or images. You can also place web part zones on the page to allow for web part placement.
You define page layouts either through Microsoft Office SharePoint Designer 2010 or via the browser. By default, when you use the browser method, which is described in the first Try It Out in this section, the controls are all added to the page from the top down, stacked one after another, with little control over how the various controls on the page are presented or positioned.
When you require full control over the layout of the page, you can use SharePoint Designer 2010 to create the page layout. If you are comfortable editing a page in SharePoint Designer, you can get started by following the steps in the second Try It Out in this section.
Because SharePoint Designer 2010 is required, it's recommended that only experienced web developers or professionals attempt this type of customization.
In the final Try It Out, you learn how to create a custom page based on your new layout.
TRY IT OUT: Create a Page Layout Based on a Content Type
In this example, you will create a new content type using the methods described in Chapter 6, which includes columns that describe the products your company sells. You create a Product Details page layout based on this content type.
Select Site Settings from the English site of your AW Ski Company site collection.
Select Go to top-level site settings from the Site Collection Administration section.
Click Create.
Create your content type with the following settings:
PROPERTY
VALUE
Name
Product Details
Description
Information page on AW Ski Company Products
Select Parent Content Type From
Page Layout Content Types
Parent Content Type
Article Page
New Group
Marketing
Click Create.
Create site columns within your content type based on the following:
COLUMN NAME
COLUMN TYPE
Product Name
Single Line of Text
Product Category
Choice
Product Description
Full HTML content with formatting and constraints for publishing
Product Image
Image with formatting and constraints for publishing
Promo Video
Rich media data for publishing
Click on each of the following columns and change the Column Setting to Hidden. These columns will not be required in your page layout.
Page Content
Page Image
Contact
Contact E-Mail Address
Contact Name
Contact Picture
Byline
Article Date
Return to the Site Settings page for your site.
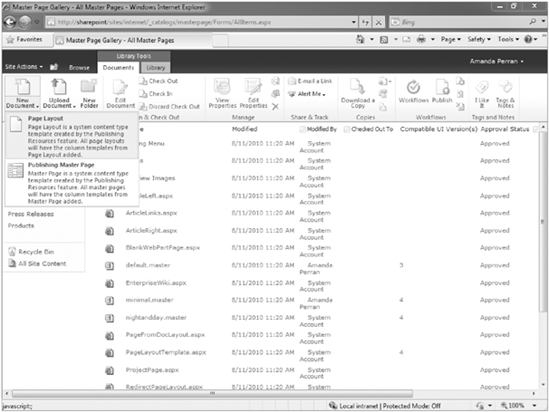
From the Galleries section, select Master Pages and Page Layouts.
Select New Page Layout from the Ribbon, as shown in Figure 13-21.
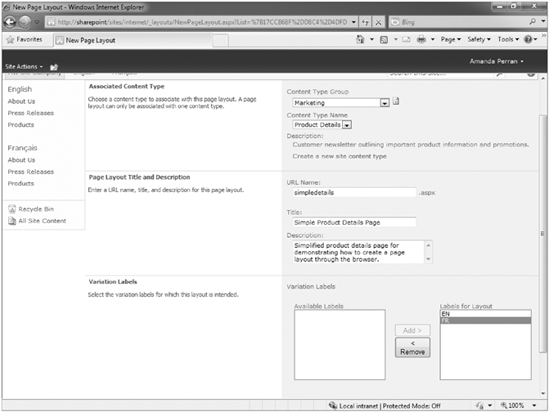
You must first associate your page layout with a content type. The columns defined in your content type become the content allowed on the page. In the Content Type group, select Marketing. Any custom content type groups you may have created become accessible in the menu.
Select Product Details for the Content Type Name.
In the Page Layout Title and Description section, enter simpledetails in the URL Name field.
In the Title field, enter Simple Product Details Page.
In the Description field, enter Simplified product details page for demonstrating how to create a page layout through the browser.
Select EN and FR, and click the Add button for the Variations Labels field as shown in Figure 13-22.
Click OK.
How It Works
Once you have created a page layout, it becomes visible in the list of Layouts on the Create Page window. You can view this list by clicking New Page from the Ribbon of the Pages library of your site. The New Page is shown in Figure 13-23.

TRY IT OUT: Create a Page Layout Using SharePoint Designer 2010
Page layouts set the stage for the type of content you want to allow on a particular page. For example, you might allow someone to place an image and description on a page. These pieces of content are actually columns in the content type on which you built your page layout. These columns are accessible in SharePoint Designer as content controls in the SharePoint Controls section of the Ribbon.
Using SharePoint Designer, you can place content controls on the page by selecting them from the Controls to be added to the page where you want to display them. It is important to note that the content controls should be placed inside the placeholder labeled PlaceHolderMain.
In SharePoint Designer 2010, open your AW Ski Company website.
Select Page Layouts from the left-hand navigation.
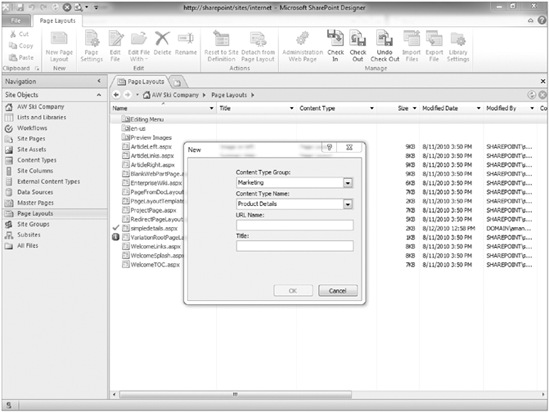
Click the New Page Layout option from the Ribbon menu. A dialog will appear, as shown in Figure 13-24.
From the Content Type Name, select Product Details.
In the URL Name field, enter productpage.
In the Title field, enter Product Details Page.
Click OK.
Your page layout should open for editing. What you have just done is create a blank page layout ready for customization.
Enter code view by selecting code at the bottom of the editing window, locate the PlaceHolderMain tag. This is the main content area of the page where you want to make any layout changes, as well as accept particular types of content.
Add the following table code between the PlaceHolderMain tags. This is the area where you allow content to be created.
<table width="100%">
<tr>
<td valign="top"></td>
<td valign="top"></td>
</tr>
<tr>
<td valign="top"></td>
<td valign="top"></td>
</tr>
<tr>
<td valign="top"></td>
<td valign="top"></td>
</tr>
</table>
When you create a content type, you attach metadata columns to the content type. These columns are the content you place in your page layout that ultimately becomes the content that the users will add to the page. These columns are visible from the Insert tab of the Ribbon, as shown in Figure 13-25. It is recommended that you select the Show Toolbox link at the bottom of the menu to add the Toolbox to the right-hand panel of your screen.
Switch to Design mode by selecting the Design tab at the bottom of the editing window. Select the first column within the first row in the table you created. From the Toolbox, locate Content Fields, right-click the Product Name field, and select Insert to add it to the selected cell of the table, as shown in Figure 13-26.
Select the First column of the second row in the table you created. From the Toolbox, locate Content Fields, right-click the Product Description field, and select Insert to add it to the selected cell of the table.
Select the second column of the second row in the table you created. From the Toolbox, locate Content Fields, right-click the Product Image field, and select Insert to add it to the selected cell of the table.
Select the first column of the third row in the table you created. From the Toolbox, locate Content Fields, right-click the Promo Video field, and select Insert to add it to the selected cell of the table.
Save and close the page layout.
Page layouts are located under source control, and you need to check them out for editing, and check them in and publish them when they are final. From the Page Layouts tab of SharePoint Designer, right-click productpage.aspx and choose Check In.
Select Publish a Major Version, and click OK. Select Yes for content approval when prompted.
Hover over the productdetails.aspx file, which is currently pending, and select Approve/Reject from the drop-down menu.
Select Approved and then click OK.


How It Works
You can now put your page layouts to work by creating new pages based on these layouts. To create a new page, you must specify a page layout. By selecting the product details page that you just created, you generate a page to which you can add a title and page content, just as you specified in the page layout. See Figure 13-26.
TRY IT OUT: Create a Page Using a Custom Page Layout
As shown previously in Figures 13-15 and 13-23, you may select from a number of page layouts when creating a page. However, the page layouts that are available for selection can be limited by the site administrator. In this example, you will configure your Products site to allow the use of your Product Details page layout only to create new pages. You will then create a new page on the site using the Product Details page layout.
Select Site Settings from the Products subsite of the English site of your AW Ski Company site collection.
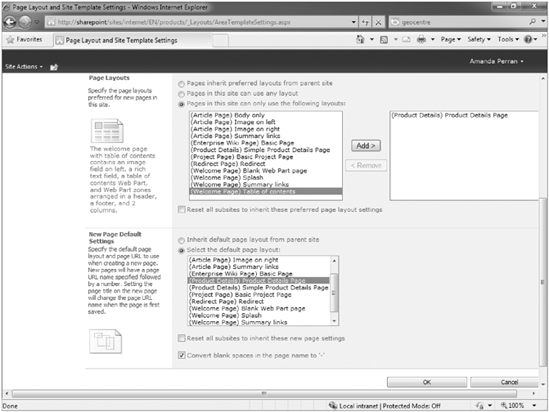
Select Page Layouts and Site Templates from the Look and Feel section. The Page Layout and Site Template Settings page will appear, as shown in Figure 13-27.
From the Page Layouts section of the screen, select the Pages in this site can only use the following layouts option, and remove all layouts from the right-hand side, except the Product Details Page, as shown in Figure 13-28.
In the New Page Default Settings section, select the Product Details Page as the default page layout.
Click OK.
Return to the main page of your Products site by clicking the Products link in the breadcrumb trail.
Select New Page from the Site Actions menu. The New Page dialog will appear.
Enter Bamboo Skis as the New Page Name, and click Create.

How It Works
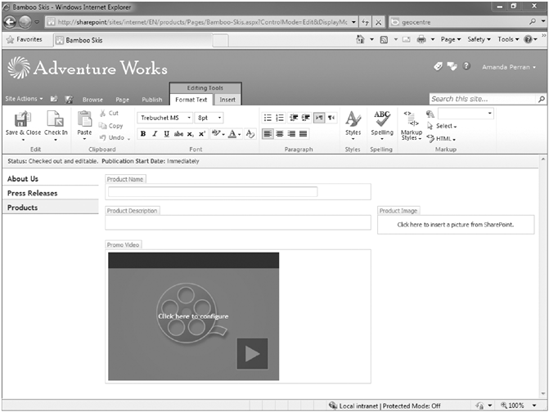
Your new page will be created, and you will be able to specify content in the associated content areas as defined in your page layout. An example of the page is shown in Figure 13-29.
Many organizations create and store a great deal of information in popular file formats, such as Word or InfoPath. Because the information already exists in a format with which users are familiar, it does not always make sense to repeat the authoring process when this content needs to go on a website. Instead, it's faster to create web content directly from these files. Further, if you present this content within the corporate website, you would want to maintain the corporate look and feel. SharePoint supports a document conversion feature that allows users to create web pages of content directly from specific file types. SharePoint supports document conversion for the following formats:
In addition, developers can write their own converters and install them. This becomes relevant only if you have a large amount of data in files on your SharePoint server that you want to make available as web content, while avoiding the publishing and duplication processes.
Before you can convert a document, which you do directly from the document libraries, you must first configure this service and then enable the feature via the Central Administration site, which are the subjects of the first and second Try It Outs in this section. In the third Try It Out, you learn how to convert a document into a web page.
TRY IT OUT: Configure Document Conversion
In this example, you learn how a server farm administrator enables document conversion. You start this process by visiting the Central Administration site to ensure that the Load Balancer and Document Conversion services are enabled on the server. You then visit the Document Conversion Configuration page and select the settings required to enable the service. These settings control which server acts as the load balancer server and the interval by which the document conversion timer job runs. In this example, four document converters have been installed on the system, and you can configure each of these to define maximum file size, time-out length, and maximum retries.
From the Central Administration site of your SharePoint environment, select Application Management.
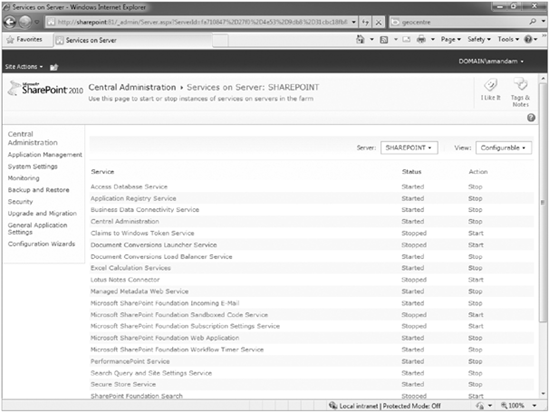
Select the Manage Services on Server link from the Service Applications group.
Click the Start link for the Document Conversions Load Balancer Service. The page will refresh and the service will appear as started, as shown in Figure 13-30.
Click the Start link for the Document Conversions Launcher Service.
Select the server you want to use for the launch server as well as the load balancer server, and click OK.
Select General Application Settings from the left-hand navigation.
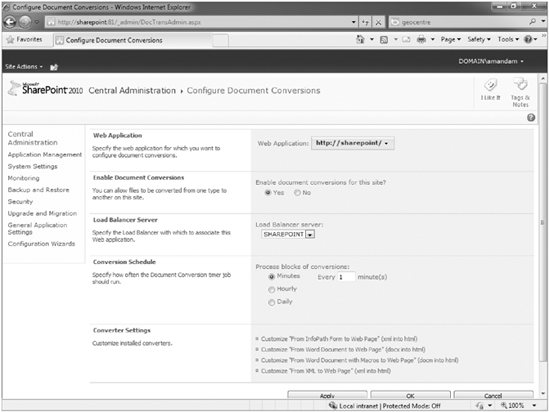
Select Configure Document Conversions. The Configure Document Conversions window appears, as shown in Figure 13-31.
Select the appropriate web application from the list. In many cases, the web application you will be working with will be hosted on port 80. Confirm with your server administrator if you are unsure.
Select the server that will act as the load balancer server. Depending on the type of configuration of your server farm, the server name may be already populated in the drop-down box.
Specify an appropriate interval for the document conversion process to run. Depending on your requirements, your selection here may vary. For an environment that anticipates many documents being converted on a regular basis, the interval may be more frequent. For an environment with few documents and a requirement to ensure optimal performance, the timer job may run less frequently and perhaps be scheduled on a daily basis for when the server does not anticipate a great deal of load.
Select the hyperlink for the From Word Document to Web Page.
Change the time-out length to 240 seconds.
Click OK.
Click Apply.
Click OK.
How It Works
Once you configure the service on the server, you can enable it on specific content types so that it's available to users in document libraries as an action on the Send to Menu of a document, as shown in Figure 13-32.
TRY IT OUT: Enable Document Conversion on a Content Type
In this example, you configure document conversion on a content type so that users can convert a Word document for your ski company to a web page. The users have a Word document template that they've been using for years to fill out on the company's various products, and it keeps information current. These users have exceptional skills with Word, but very little web publishing or coding skills. By converting the Word document to web content, you allow them to keep their familiar tool while converting content to the company's unique look and feel for the web.
Select Site Settings from the English site of your AW Ski Company site collection.
Select Go to top level site settings from the Site Collection Administration section.
Click the Create button from the toolbar. The New Site Content Type window appears.
Type a name for the content type. For this example, enter Product Details Document.
Select Document as the parent content type from the Documents Content Types group.
Enter a group name for the content type. This group name helps organize your content types. For this example, select Marketing.
Click OK. You are returned to the Site Content Type administration page.
Click the Advanced Settings link.
Select upload a new document template, and click Browse to locate the file ski product information.docx from the resources outlined for this chapter.
Click OK. You are returned to the Site Content Type administration page.
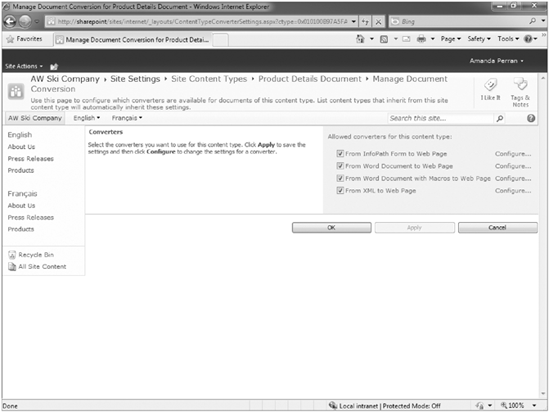
Select Manage Document Conversion for This Content Type. The Manage Document Conversion for Product Details window appears, as shown earlier in Figure 13-32.
Unselect all checkboxes except the one for the conversion of a Word Document to a Web page.
Click Apply.
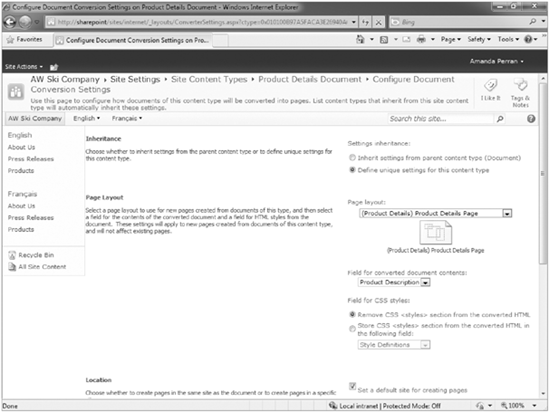
Click the Configure link to the right of the Word Document to a Web page item. You will be redirected to the Configure Document Conversion Settings page, as shown in Figure 13-33.
Select Define Unique Settings for This Content Type.
Select the Product Details Page layout from the page layout drop-down menu.
For field for Converted Document Contents, select Product Description.
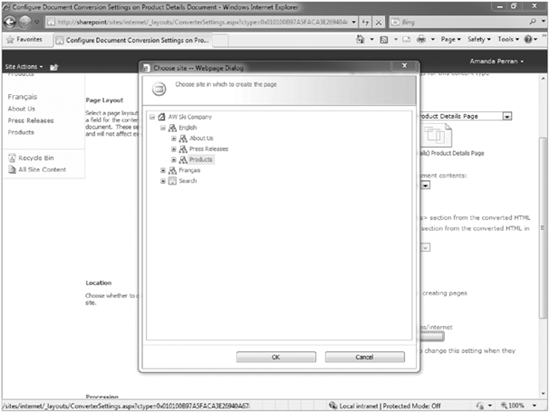
For the Location section, select the checkbox to set a default site for creating pages. Because the content you are creating is related to the products site, you need to create all pages there. Click the Browse button to open the Choose Site Dialog, as shown in Figure 13-34, then click the Products site and click OK.
Keep the default setting for processing, which is Create Pages One at a Time, and Take Users to the Page Once It Is Created.
Click OK.
From the Products site, select View All Site Content from the Site Actions menu.
Select the Documents library.
Select Advanced Settings.
Select Yes to allow management of content types.
Click OK.
Select the Add from Existing Site Content Types option.
Select Marketing from the Groups drop-down.
Select the Product Details Document content type, and click the Add button to add your content type to the library.
Click OK.
How It Works
In step 19, you specified that the newly created web pages should be published to the Products Site Pages library regardless of where the documents themselves exist. This means that users can create their content in a collaborative area or other area where they have access, and have the pages automatically go to the appropriate site. Because you define the document conversion process at the content-type level, it's convenient for a site administrator to determine the publishing location based on the type of content that is being created; the users creating the content don't have to be concerned with this.
TRY IT OUT: Convert a Document to a Web Page
This example shows you how to convert a document to a web page. This involves creating a document from a document library based on a content type, following the same procedure covered in Chapter 6. Once you create the content, you then convert it to a web page that you can publish to a site.
From the main page of your Products website, select View All Site Content from the Site Actions menu.
Select the Documents library.
Select New Product Details Document from the toolbar.
Fill in the details for your new product as follows:
DOCUMENT SECTION
DETAILS
Product Description
These revolutionary new skis are the latest innovation in cross-country and downhill skiing. Using these skis, you will be able to cover miles of trail without feeling like you left the comfort of your living room.
Price
$1999 USD
Save the file as APJ Bamboo Skis.docx.
Close the document, and check it in as a major version of the document using the process reviewed in Chapter 3.
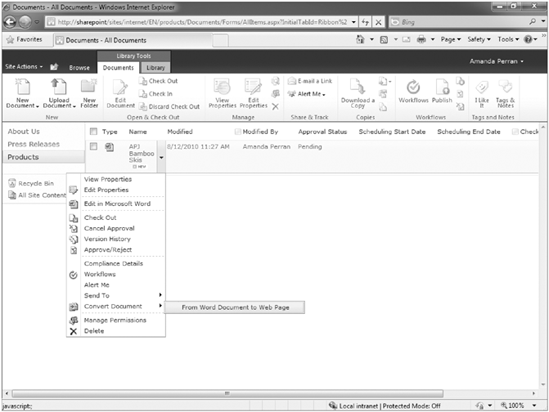
Return to the document library. Hover over the document to expose the menu.
Select Convert Document from Word Document to Web Page, as shown in Figure 13-35.
Enter a title for the web page. For this example, enter APJ Bamboo Skis.
Select the Create This Page for Me Now, and Take Me to the Page When It Is Created option.
Click Create.
How It Works
Notice how the page automatically appears in the navigation control of the site, and how the URL illustrates how the page is stored in the Pages library of the Products site, even though the original document is located at the top level of the site collection in the site collection documents library.
So far, the examples in this chapter have worked with the Publishing Portal site template. This is primarily because this template contains many of the components and elements you need to create a web-facing site. However, you may need to make use of publishing features within a standard team site or workspace, and to do so means you have to enable the Publishing feature. Switching on the publishing features means you can transform any team site into a publishing site, complete with content approval workflow and new lists and libraries.
As your business publishes more and more content online, you need tools to efficiently accomplish this task. This chapter covers one of the core features of SharePoint Server known as web content management (WCM). Using the WCM, users can perform tasks that once required the expertise of a skilled programmer. From this chapter, you learned the following:
You can use publishing features to create web content without any web programming skills.
Using content types, you can fully control what content a user creates. These content types can be attached to lists, document libraries, and even web pages.
You can create page layouts based on content types. While content type controls the type of content that you can have on the page, the page layout itself can be customized to position and style the content. Users can later create content or pages in the site based on these page layouts.
Doing business internationally means having sites that are in multiple languages. SharePoint can help you set up different calendars and local settings in various languages using Variations, regional settings, resource files, and language packs.