
WHAT YOU WILL LEARN IN THIS CHAPTER
SharePoint 2010 is fast becoming the preferred front-end application for many companies. The need for representation of all sorts of data — from both inside and outside of SharePoint — is paramount. The main method that SharePoint uses to expose data is with the use of web parts. The two main categories of web parts are:
Those that are created programmatically (either those with which SharePoint ships or those that developers create)
Those that use XSLT to display data
This chapter focuses on the XSLT web parts, discussing and demonstrating how these web parts have been considered the Swiss army knife of all web parts because of the variety of possibilities they offer to expose and style data from disparate sources.
One of the most common things that site administrators want to do is display data on SharePoint pages. The data can be from a variety of sources, including SharePoint lists and libraries, XML files, databases, web services, or more. The two main web parts that you can deploy to show data are
Both can be deployed using SharePoint Designer 2010 (SPD 2010). After they are deployed, you can configure them further using SPD 2010 or the browser.
The list view web parts are used by SharePoint inherently to show list and library data. When a new list is created, the web part for the list is also created automatically and made available for use on the site. List view web parts can show one view at a time from the list or library to which it is pointing. If you want to change how the information is displayed to the end users, you make those changes at the view level of the list or library. Then, you deploy that view encapsulated in the list view web part on the site. If you want to show more than one view of a list or library on the same page, just deploy a new list view web part pointing to the same list, then configure it to show a different view of the list. For example, you can add two instances of the Shared Documents library to the page and apply a view to the first that shows only documents created by Tim, and another view to the second that displays only those documents created by Irene. It's that easy!
After you insert them on the page, these web parts are easily customizable using the browser and contain properties similar to all other web parts that ship with SharePoint. Customizations such as changing the title, description, width and height, border around the web part, and a whole lot more can be made quickly and easily using the browser.
List view web parts (LVWP) have been around since Windows SharePoint Services v2 (released in 2003). They are written in a language called Collaborative Application Markup Language (CAML). CAML is an XML-based markup language that's used prevalently throughout SharePoint products and technologies to define and display data on web pages. It is a very powerful language yet very difficult to work with directly. You can find more information about CAML at http://en.wikipedia.org/wiki/Collaborative_Application_Markup_Language.
The use of this language in this web part has limited its extensibility opportunity through SharePoint Designer 2007 to a minimum. The main restrictions it imposes are the following:
Changing the data points at a granular level — When your data is displayed in this web part, you can only change its formatting at the entire web part level and not at the column level. For example, you are unable to change a column that displays a Date to another format (February 21, 1977 instead of 2/21/1977).
Styling the web part — This is very difficult because the web part uses the Microsoft proprietary CAML language, which is difficult to work with and does not rely on industry standards.
SharePoint Designer 2007 offers a way to convert these web parts to an XSLT Data View web part (covered later in the chapter), which provides a much more robust set of options for customizations. However, after you have converted this web part to a data view, you lose the option to further customize this web part through the browser (unless you want to get your hands dirty directly coding in XSL — not a good proposition for most people). Essentially you find yourself stuck between a rock and a hard place when trying to customize the display of your data.
The list view web part has now been retired. A brand-new web part, called XSLT List View Web Part (XLV), takes its place in SharePoint 2010.
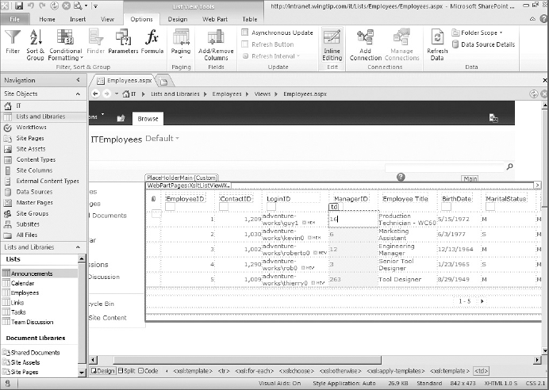
You deploy the XLV web part on any SharePoint page by using either the browser or SPD 2010. Adding it using the browser is as simple as using the ribbon on the page to point to and insert the web part on the page, as shown in Figure 8-1.
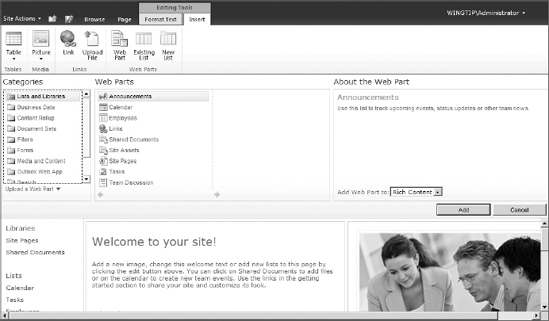
This web part works very much like the XSLT Data View web part. It first queries the list or library data and retrieves it as XML. Then it uses industry-standard eXtensible Stylesheet Language Transformation (XSLT), which is a style sheet language for XML documents, to convert the XML data into HTML that the browser can understand and display to the end user. The best part of this whole process is that you don't have to dive in and edit raw XML or XSL. Instead, SharePoint Designer 2010 provides you a great WYSIWYG (What You See Is What You Get) experience for editing the XSLT views. Furthermore, it gives you live data preview so you know exactly how your data will look to the end user viewing it in the browser.
XLV uses shared XSLT style sheets that reside in the _layouts directory on the server. Every standard list view on the entire server uses the same set of shared XSLT templates. An XLV uses one template to format each field (or column), one template to format the row, and one template to format the table. When you customize the appearance of an XLV, you generate overriding XSL templates only for the specific templates that you modify. For example, if you highlight a field, you generate XSLT that overrides just the shared template for that specific field.
Although working with this web part in the browser is good, working with it through SPD 2010 takes it to another level. Because SPD 2010 is an application that's running on your client computer, you can perform actions on SharePoint a lot faster and don't have to live with inherent browser limitations or server postback delays. SPD 2010 gives you the power you need to customize the data and the look and feel of this web part. Later in this chapter, you use the XSLT List View web part when customizing SharePoint list views.
The XSLT Data Form Web Part (DFWP) came into existence with SharePoint Designer 2007 (SPD 2007). This web part is not available through the Web Part Gallery and thus cannot be added using the browser. The birth of this web part's true parent predates SPD 2007. The true beginning of this magnificent web part was with FrontPage 2003 when it was called the XSLT Data View Web Part (DVWP). Granted, FrontPage was not very popular with many developers in those days, but one good thing that came out of that product was the ability to get to data from disparate sources using the XSLT Data View Web Part, the parent of both XSLT Data Form Web Part and the XSLT List View Web Part. This web part was way ahead of its time, providing developers and non-developers alike a quick and easy way to pull their data from a variety of sources such as databases, XML files, server-side scripts, web services, and SharePoint lists and libraries. After the data was retrieved, you could style that data, conditionally format it, manage groupings of metadata, and a whole lot more to present it in the best way possible to your users.
When the XSLT Data Form Web Part was introduced in SharePoint Designer 2007, it had kept all the functionality of the XSLT Data View Web Part in addition to now having the facility to write back to the data source, leading to the introduction of the word Form in the name instead of View. That said, the words Data View are still used in a few places within SharePoint to refer to Data Form. You will see evidence of this usage later in this chapter.
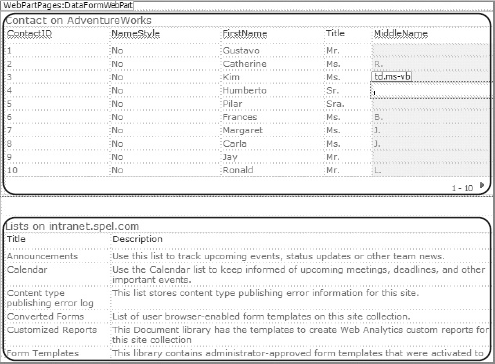
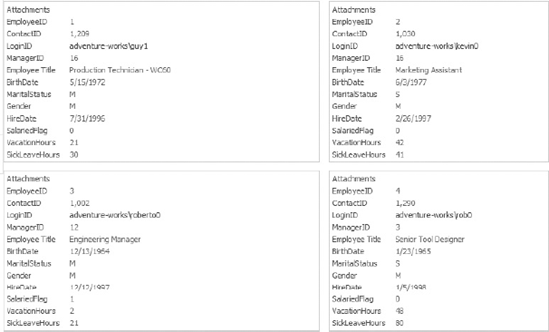
In SharePoint 2010, the DFWP appears in a variety of places. Whenever SPD 2010 is used to display data on a page from anywhere outside of SharePoint (XML files, databases, web services), the DFWP is the one that displays that data. Figure 8-2 shows a couple of DFWPs deployed on the page. The top web part shows data from a database table while the bottom one shows data retrieved from a query to a web service.
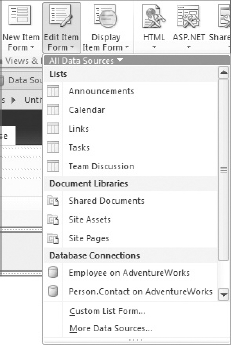
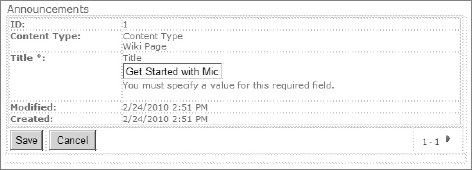
As you may recall from the previous section, the XLV is the web part that is primarily used to display list or library data. However, this web part is unable to allow form functionality, which would let the user manipulate the list data. This is where the DFWP comes into the picture. The DFWP is utilized when a form capability is required for a SharePoint list or library. For example, if you insert an edit item form for the Announcements list on a site page by clicking on the Insert tab and then clicking the Edit Item Form button (see Figure 8-3) on the ribbon and selecting Announcements, SPD 2010 automatically displays the form in a DFWP as shown in Figure 8-4.
The DFWP showing the announcement list is now "live" and ready to accept any changes you want to make to the announcement list items. Later in the chapter, you will get a chance to try out this functionality by inserting the edit form for a list on a site page.
The DFWP is a great solution for several situations, but it does come with a cost. Unlike XLV, after you deploy the DFWP to the SharePoint page, you can visually enhance it further only using SPD 2010. If you try to edit this web part in the browser, you are presented with the option to dive into the XSL editor and make your changes manually as shown in Figure 8-5.

The following table shows a comparison of features between DFWP and XLV web parts.
This section is dedicated to showing how you can manage the information that's displayed for any type of data on a SharePoint page, whether the information is coming from inside or outside of SharePoint.
When you place a view of data on a page, SPD 2010 automatically determines which web part is needed to display that data and takes care of it for you. For views of SharePoint lists and libraries, the XLV is deployed. When you put this web part in context by clicking on it, the contextually sensitive ribbon shows the List View Tools, as shown in Figure 8-6.

When you place data from external sources, such as databases or web services, on a page, it is displayed with a DFWP. The customization options for DFWP appear in the Data View Tools section of the ribbon (see Figure 8-7) when that web part is in context.

Both List View Tools and Data View Tools are very similar in nature. Both menus have four tabs: Options, Design, Web Part, and Table. Each of these tabs contains a variety of functionality that you can choose from. They surface up the options that are available to be executed on the type of data that currently is in focus. The remainder of this section explores many of these features to show you the possibilities available for displaying your data.
Creating a new view for a list is as simple as navigating to that list's summary page in SPD 2010 and then clicking on the New button in the Views section. You can then define the name for the view and designate it as a default view if you want. Chapter 6 discusses and demonstrates this procedure. Building on that knowledge, you will now see the options available for customizing the XLV within this view further.
Work with List Metadata
In this exercise, you work on an XLV for a view. You first adjust the columns of data as necessary. Then you configure sorting and grouping options on the data. For this exercise and the next, you need the sample data in the Employee.xlsx file (provided as a resource for this book on Wiley's site) The first few steps guide you to setup a list called Employees using that data.
Using the browser, go to Site Actions

Another screen, titled New, should appear. Enter Employees in the Name field. Use the Browse button to browse to and select the Employees.xlsx file on your computer. Then click the Import button on the page.
The Excel icon should appear in your taskbar. Click on it. You should see the Excel application and a dialog box titled Import to Windows SharePoint Services list. Click the drop-down list for Select Range and select the only choice that should be present (Employee!Table1). Then click the Import button in the dialog. The Employees list should now appear in the browser.
Open up SharePoint Designer 2010. Open the site with the Employees list in SPD. Click on Lists and Libraries in the navigation pane and then click the Employees list to bring up the summary page for the Employees list.
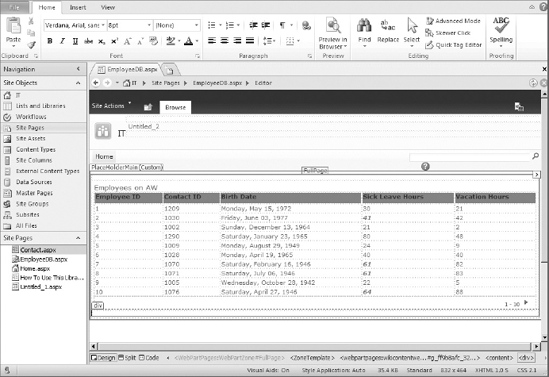
Create a new view page for the Employees list by clicking on the New button in the Views section. Name the new view Employees. You should now see that view open up in SPD as shown in Figure 8-8.
Click anywhere within the Employees list of data in the view. Doing that shows up the List View Tools menu in the ribbon. From the Options tab of List View Tools, click on Add/Remove Columns. Then from the Displayed Fields dialog that appears, remove the following columns: Attachments, SalariedFlag, VacationHours, and SickLeaveHours, then click OK.
Change the pagination of the records: Click the Paging button on the same tab and click on the option to Display Sets of 10 Items.
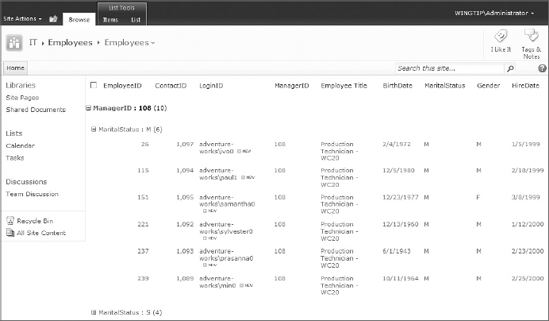
To group and sort the data, click on the Sort & Group button. In the Sort and Group dialog that appears, add the following fields to the Sort order pane: ManagerID, MaritalStatus, and HireDate.
Select the ManagerID field in the Sort order pane and choose to Show group header. Also, select the Collapse group by default option. Repeat the same procedure for the MaritalStatus field, and click OK.
Save all your changes to the view page and navigate to it in the browser. It should look similar to the one in Figure 8-9.
How It Works
The options on the List View Tools menu let you change the presentation of the underlying data. In the exercise above, you cleaned up the list view by removing the unnecessary fields, changing the amount of records that should be shown at one time and configuring the sort and order options as needed.
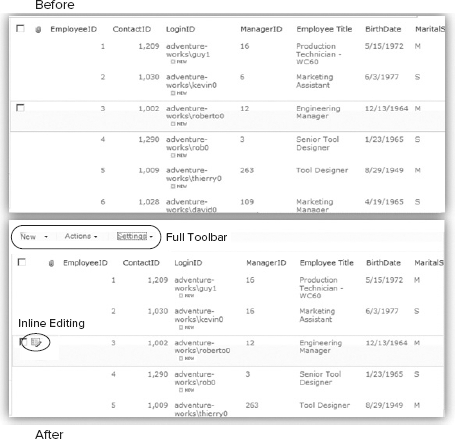
When you are looking at a list view in the browser, the ribbon provides access to all the actions that you would need to act upon the list or its list items. SharePoint 2007 had a toolbar that appeared on top of the list that provided these options. This toolbar is still available and can be turned on for a list using SPD 2010. The Design tab of List View Tools has a button labeled Options. Clicking on it presents a drop-down with two choices: Full Toolbar and Summary Toolbar. Turning on the full toolbar here makes it available on top of the list right below the ribbon.
Aside from the ribbon and the toolbar, another option for letting users access an item for editing is a new feature called inline editing. In SPD 2010, you can turn on this functionality for a list view by toggling the Inline Editing button on the Options tab. Using the browser, users can then click on the edit icon that appears when they hover the cursor over the item in the list and edit the list item data directly inline. Figure 8-10 shows the before and after pictures of the effects of turning on both inline editing and the toolbar.
Another feature to discuss is formatting your data based on predefined criteria. If you have not had the need to do this already, chances are that you will in the future. Consider this example: You are showing company revenue on a list. Some regions in the company are doing poorly whereas others have exceeded their goals. How do you visually draw attention to both types of results? You might want to pinpoint the regions of the company that are doing poorly by showing them in red and the regions that are doing great financially in green. You can make this type of visual enhancement of data fairly easily using the conditional formatting options in SPD 2010. The following exercise demonstrates this functionality.
Configure Conditional Formatting on a List
This exercise uses conditional formatting techniques to highlight data matching certain criteria. In addition, it also shows how you can hide data based on predefined conditions. The data used in the list in this example, Employees, is the same list that was utilized in the first exercise.
Using SharePoint Designer 2010, create a new view page for the Employee list.
To format the whole row based on a criteria, click anywhere within the web part and from the Options tab, click Conditional Formatting
In the Condition Criteria dialog that appears, set the following condition and then click on Set Style.
FIELD NAME
COMPARISON
VALUE
AND/OR
MaritalStatus
Equals
M
And
Note: For the Value field, you have to type in the value M directly within the field.
In the Modify Style dialog that appears, click on the Background category and select any light color in the Background-color field. After you click OK on this dialog, you will see that all the rows with MaritalStatus M now have a background color applied to them.
Now, conditionally hide data based on the BirthDate column. Highlight one of the rows (any row is fine) in the web part, and then click on Conditional Formatting
In the Condition Criteria dialog that appears, set the following conditions and then click on OK.
FIELD NAME
COMPARISON
VALUE
AND/OR
BirthDate
Greater Than
1/1/1960
And
BirthDate
Less Than
1/1/1970
And
Note: For the Value field, click on the Choose a date option from the drop down menu and then type in the specific dates listed in the preceding table.
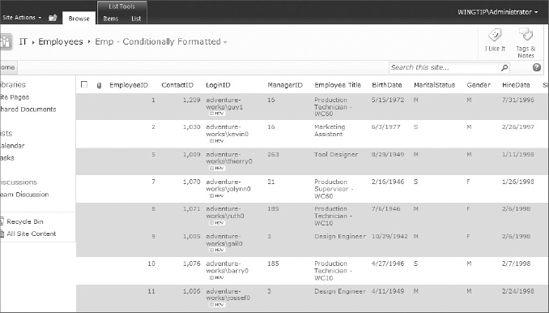
Save all your changes to the view page and navigate to it in the browser. It should look similar to the one in Figure 8-11. You should not see any records with the BirthDate between 1/1/1960 and 1/1/1970.
How It Works
Conditional formatting is implemented in XSL using conditional logic, just as a programmer would define it in code. When a condition criterion is defined by a user, the underlying XSL code reacts by creating a new "test" condition. If the condition resolves true then it performs the styling defined by the user. For example, the test for determining whether the MaritalStatus field is equal to M is the following:
<xsl:if test=normalize-space($thisNode/@MaritalStatus) = 'M'"
Another feature to mention here that deals with the look and feel of your data is the availability of several predefined styles in the Design tab. All the available styles are prepackaged XSL transformations that can be applied to the data with the click of a button, transforming it to display in a variety of ways. Aside from the traditional tabular views of the list data, it can also be represented in a Boxed view, as shown in Figure 8-12 for the Employee list data.
You can manipulate the views of data in libraries exactly like the lists as shown in the preceding exercises. A feature in the library that is used quite often is the arrangement of files in folders. Many people starting out with SharePoint libraries prefer the use of folders to organize their documents just like they have done in the past within their file shares. On the other hand, some people (and also many SharePoint experts) frown upon the use of folders. They argue that the proper use of metadata (columns) in the lists should eliminate the need for using folders for file organization. Also, folders create a nested hierarchy that becomes painful to traverse when looking for documents.
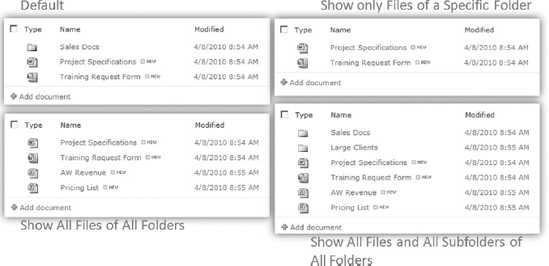
To the rescue comes the Folder Scope feature available in the List View Tools. This feature allows designing a variety of views of files with or without folders. Figure 8-13 shows the four options available for folder scopes.

Consider the following file structure in a library:
Shared Documents Library
- Files in root
— Project Specifications.docx, Training Request Form.xsn
- Folder
— Sales Docs
- File in folder
— AW Revenue.xlsx
- Subfolder
— Large Clients
- File in subfolder
— Pricing List.xlsx
Each of the folder scope settings, when applied to the view of this library, will produce different results. Figure 8-14 shows how the view of this library looks when each of the folder scopes is applied.
Now that you have seen a variety of ways that list and library data can be modified, the next section discusses the manipulation of external data on SharePoint pages.
SPD 2010 can tap into many sources of data. Databases, XML files, RSS feeds, web services, and more are all possible content sources. Chapter 7 covers connecting to these data sources so there is no need to repeat that information here. The focus of this section is to explore the different possibilities of the display of that external data.
External data can be shown on any page within a SharePoint site; for example, a Wiki page, a web part page, or even list view pages. When you decide to deploy the data on the page, the XSLT Data Form Web Part gets deployed automatically to display the data.
Display Database Data on SharePoint Pages and Customize It to Your Needs
In this exercise, you display and then customize data from a database table using various available options. The prerequisite for this exercise is to make a connection to the Employee table in the sample AdventureWorks database through the Data Source in the navigation pane (refer to Chapter 7 for making connections to databases). The connection is automatically named Employee on AW.
In SharePoint Designer 2010, create a new web part page in the Site Pages library. You can do this by clicking on the Web Part Page button and selecting the desired web part page layout from the choices in the drop-down list. For this example, name this new page EmployeeDB.aspx.
Click on the
EmployeeDB.aspxfile to get to its summary page. Then click on Edit File under the Customization section to start editing the page.Click inside one of the web part zones on the page and then from the Insert tab in the ribbon, click on Data View
Click on the Add/Remove Columns button in the Options tab and then using the Add and Remove buttons as needed, move the following fields to the Displayed Columns pane: EmployeeID, ContactID, BirthDate, SickLeaveHours, and VacationHours. Click OK and you should see only these fields appear now.
To make the headings of the table in the web part more readable, add spaces as necessary. For example, change EmployeeID to Employee ID.
Drag your mouse over to select the whole header row. From the Home tab in the ribbon, change the font to bold. Also, use the text highlight color button (right next to the font color button) to change the text highlight to a shade of gray color.
The ContactID currently has a comma (,) in the number. To get rid of it, click any one of the contact ID numbers and click on the small arrow that appears to the right (officially called a chevron). A pop-up should appear showing you that the Data Field is ContactID and the Format is Number.
Click on the Number formatting options link and deselect the checkbox for Use 1000 separator. Click OK and you should see that the comma is now gone.
The BirthDate field currently shows time as well as date. However, the time for every record is set to 12:00 AM because the time value is not stored in the database. To change the formatting, click on any one of the birth dates and then click the chevron.
In the pop-up that appears, click the DateTime formatting options link. Deselect the checkbox for Show Time. Optional: You can also pick a different formatting option for the date from the drop-down list box.
To configure conditional formatting on a field, select any one of the numbers in the Sick Leave Hours column. In the Options tab, click Conditional Formatting
In the Condition Criteria dialog that appears, set the following:
FIELD NAME
COMPARISON
AND/OR
SickLeaveHours
Less Than
And
For the Value field, select More Fields from the drop-down list. A More Fields dialog appears, showing all fields in the data source. Select VacationHours, click OK, and then click the Set Style button.
In the Modify Style dialog that appears, change the font weight to bold, font style to italic, and color to red. After you click OK on this dialog, you will see all the changes you have made to this web part, as shown in Figure 8-15
Because SharePoint Designer 2010 is a WYSIWYG environment, you will see the same data if you navigate to this page in the browser.
How It Works
Just like any other data source, database data can be fetched by a connection on a SharePoint site. The return data set is all XML, which you then manipulate using the Data View Tools menu.
During the XSLT transformation process, the DFWP uses an XSLT extension object that provides access to several functions. These functions help you transform your data at a very granular level. For example, one of the functions available is called FormatDate. You can use this function to change a date field to be represented in a variety of different formats (for example, July 27, 2004, 7/27/2004, and so on). These functions are accessible through the XPath editor window, which you can access by clicking on the Formula button in the ribbon.
Note
The XSLT extension object referenced earlier provides the functions from the DDWRT namespace. This namespace is defined within SharePoint's main assembly (Microsoft.SharePoint.dll). When implemented within a DFWP, a function will look something like this:
<xsl:value-of select="ddwrt:FormatDate(string(@HireDate), 1033, 1)" />
The second parameter defines the language (1033 means U.S. English) and the last parameter in the function defines the format of the date. For example, 1 is equal to 2/16/2007 whereas 3 is equal to Friday, February 16, 2007.
Work with XPath Expressions
In this exercise, you work with the XPath expression builder to manipulate the presentation of external data in the DFWP. The prerequisite for this exercise is to first make a connection to the Contact table in the sample AdventureWorks database through the Data Source in the navigation pane (refer to Chapter 7 for making connections to databases). The connection is automatically named Contact on AW.
In SharePoint Designer 2010, create a new web part page in the Site Pages library. You can do this by clicking on the Web Part Page button and selecting the desired web part page layout from the choices in the drop-down list. For this example, name this new page ContactDB.aspx.
Click on the
ContactDB.aspxfile to get to its summary page. Then click on Edit File under the Customization section to start editing the page.Click inside one of the web part zones on the page and then from the Insert tab in the ribbon, click on Data View
Click on the Add/Remove Columns button in the Options tab and using the Add and Remove buttons, move the following fields in the Displayed Columns pane: ContactID, FirstName, and EmailAddress. Click OK and you should see only these fields appear now.
Now click and select any of the values in the FirstName field. Then click the fx Formula button in the Options tab of the ribbon.
Within the Insert Formula dialog that appears, delete the @ FirstName value from the XPath expression area.
Using the drop-down menu for the function category, select Text/String, then double-click the
concatfunction to have it appear in the XPath expression area.When the
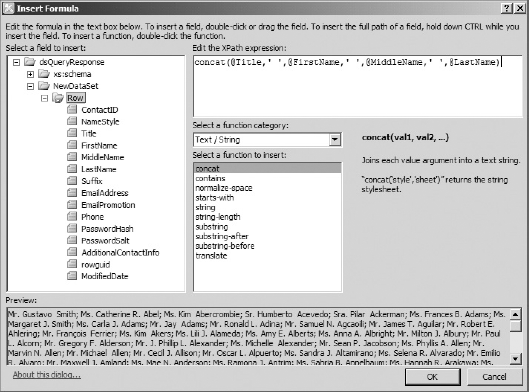
concatfunction appears, it presents you with all the fields available in a drop-down menu. Double-click to select the @ Title field. Fill out the rest of theconcatfunction to look as follows:Concat(@Title,' ',@FirstName,' ',@MiddleName,' ',@LastName)
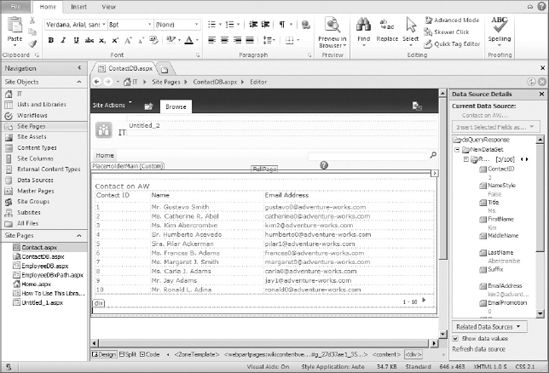
Figure 8-16 shows the completed XPath expression. The Preview pane in the figure shows how the expression will render.
Click OK to return to the Data Form web part.
Change the FirstName heading to just Name because it now lists the whole name of the individual. To make other headings of the table in the web part more readable, add spaces as necessary. For example, change ContactID to Contact ID. Figure 8-17 shows the finished product.
Because SharePoint Designer 2010 is a WYSIWYG environment, you will see the same data if you navigate to this page in the browser.
How It Works
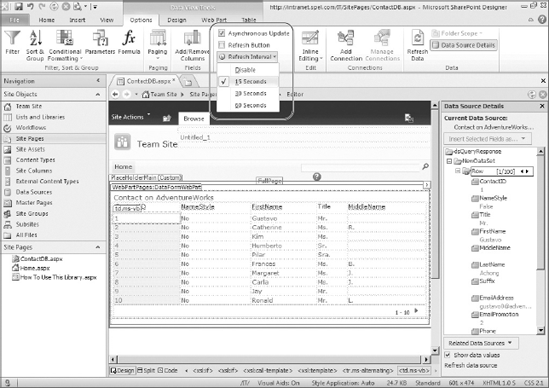
The xPath expression window used in the exercise above makes it very easy to work with and manipulate XML as needed without having to really get into code. The concat function used above works the same way as it would in the Microsoft Excel application. Data Form web parts inherently are synchronized with the data they display. If the data that it is displaying changes in the backend, the data in the web part will also change the next time you come back to that page. However, you can do even better than that. In SPD, the Update section within the Options tab provides the facility to set up asynchronous updates to the web part. This means that the Data Form web part can dynamically refresh its contents without requiring the browser to refresh the entire page. Simply clicking on the Asynchronous Update checkbox enables this functionality. After it is enabled, you need some sort of a way to execute the refresh to the web part. There are a couple of ways to make this happen. One options is that you can select the checkbox for Refresh Button, and it will render a button right above the web part that an end user can click to refresh the web part. Another option is to set an automatic refresh of the data by clicking on Refresh Interval and picking the appropriate option from the drop-down menu, as shown in Figure 8-18.
Note
If you do choose to go with setting the refresh interval, your web part will automatically make a call to your backend data source at the specified interval. If you are retrieving a lot of data and have multiple connections set up in this manner, this option could potentially have a detrimental effect in your environment. Consider using this functionality sparingly.
A form is simply a way to present a customized display of data to users who can then write back to the data source. SharePoint Designer 2010 can create two types of forms: list forms and data forms. Both of them use the Data Form Web Part.
List forms are associated directly with a list. The basic forms that ship out of the box for most lists are used to display data, add new data, and edit existing data. Data forms serve the same purpose as list forms by providing forms to view, add, and edit data. However, these types of forms are hosted within a site page.
The subsequent sections discuss and show the process for creating data and list forms using SPD 2010.
Data management in SharePoint lists can be done directly through the forms attached to the lists. However, at times you will want to provide a form to manage list data on a site page. For example, if you do not want your end users to have to navigate to the list page to manage its data, you can provide them a list form directly on a site page. The form will have a direct link to the list and can provide the necessary controls (such as textbox, checkbox, or button) needed to manage the list data.
The Insert tab lists the New Item, Edit Item, and Display Item Form buttons that can be used to create the desired form. Figure 8-19 shows the three buttons on the ribbon.

Create a Data Form
In this exercise, you create a data form for the Announcements list. This data form can then be used to add new announcements.
In SharePoint Designer 2010, create a new web part page in the Site Pages library. You can do this by clicking on the Web Part Page button and selecting the desired web part page layout from the choices in the drop-down menu. For this example, name this new page AddNewAnnouncements.aspx.
Click on the
AddNewAnnouncements.aspxfile to get to its summary page. Then click on Edit File under the Customization section to start editing the page.Click inside one of the web part zones on the page and then from the Insert tab in the ribbon, click on New Item Form
From the Options tab of Data View Tools, click on Add/Remove Columns. In the Edit Columns dialog that appears, remove the following from Displayed Columns: Modified By and Modified. Then add the Body column to the Displayed Columns pane. Click OK.
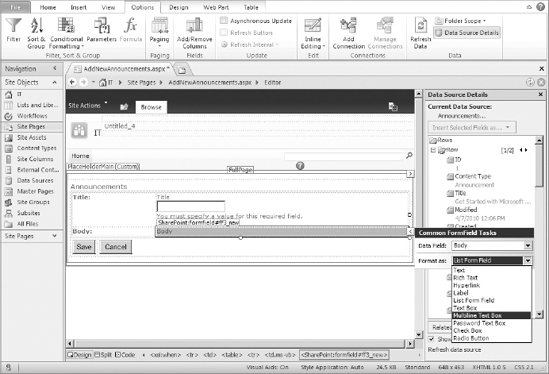
Click on the Body form field and then click on the arrow (chevron) that appears to the right to display the pop-up for Common FormField Tasks. Change the Format as field to Multiline Text Box, as shown in Figure 8-20.
Save the page and navigate to it in the browser.
To test out the functionality, add some text in the Title and Body fields and then click the Save button. Now navigate to the Announcements list to look for the new announcement.
You can use the DFWP to create a form for any list on the site. After the form is created, the rendering for each of the data points on the form can be changed as needed, as in the preceding exercise (where you changed the Body field from a label to a multiline text box). The Save and Cancel buttons are automatically created on the form to execute the commit and cancel form actions, respectively.
Every list and library in a site provides built-in forms to manage its metadata. You can discover these forms by going to the list/library summary page in SharePoint Designer. The forms appear in the Forms section of the page. These built-in forms use List Form Web Parts (LFWP) to display list data. LFWPs are built using CAML/ASP.NET rendering technology. The limitations for this web part are similar to the List View Web Part, which is discussed earlier in this chapter.
You can create new forms by clicking on the New button in the Forms section. When a new form is created, it does not use LFWP. Instead, it uses the DFWP to render list or library data. This is definitely good news because, as discussed earlier in this chapter, DFWP is a far more powerful web part that facilitates deep customization of data displayed within it. The following exercise walks you through creating a new item form that utilizes this web part.
Create a New Item Form
In this exercise, you create a new item form for the Tasks list. You also add a picture to the top of the form.
In SharePoint Designer 2010, click on Lists and Libraries and then click the Tasks list to get to its summary page.
To create a new form, click on the New button in the Forms section of the page.
In the Create New List Form that appears, provide the filename NewTask. Leave the type of form as New Item Form. Select the checkbox for making this a default form and click on OK.
Click on the
NewTask.aspxform page to open it up. You should see the DFWP on this page showing the form to create new Tasks.When the form opens, the cursor should be blinking at the top of the form. Click on the Insert tab and then click the Picture button. Navigate to select any picture from your computer to insert on this page.
Note: When you insert the image, the Accessibility Properties dialog appears; provide any alternative text here that you want to appear in place of the picture if it doesn't successfully load in the browser.
When the picture appears at the top of the page, click the Save button to save the page. A dialog box appears to notify you that the picture on your page will be saved in the Site Assets library. Click on OK to accept.
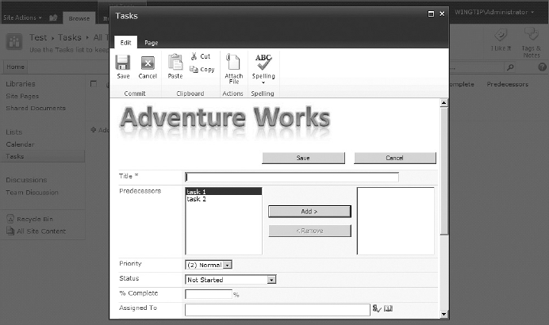
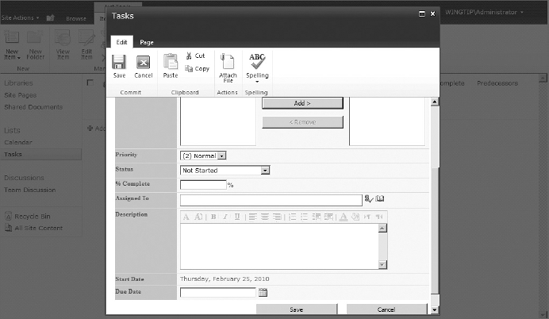
Navigate to the Tasks list in the browser. Click on the Add new item link. You should see the new list form, as shown in Figure 8-21.
How It Works
In this exercise, a new item form is created using SPD. This is a new ASP.NET page that serves as the form to create new task items. When this form is created, the DFWP automatically shows up on the page with the capability to add new task items. You can customize the form created in the preceding exercise significantly. Because all the data that's being shown in the form is XML in the backend, you can use XSLT to transform that data as needed. The Data View Tools menu provides a variety of options to perform this transformation.
Customize the List Form
In this exercise, you customize the new list form for the Tasks list by changing font properties of labels then adding and removing some fields from the form. The starting point for this exercise is where the previous exercise left off.
In SharePoint Designer 2010, click on Lists and Libraries and then the Tasks list to get to its summary page.
Click on the NewTask.aspx form page to open it. You should see the DFWP on this page, showing the form to create new Tasks.
Put your cursor on the very last field, which is Attachments. Click on the Table tab then click Delete
Now select the first column containing the labels (such as Title, Predecessors, Priority, and so on). After all the cells are selected, using the Home tab, change the font to Times New Roman and make the font Bold. Then click on the Table tab and change the Shading of the cells to a light shade of gray.
Next, click on the form field Start Date (not the label, but the actual field control on the form). Click the Table tab and then click Delete Delete Cells to delete the field.
While the cursor is blinking where the Start Date used to be, click on the Start Date field in the Data Source Details task pane and then click on Insert Selected Fields as
Note: If the Data Source Details task pane is not already open, click the Options tab and then click the Data Source Details button to make it appear.
In the Format Date and Time dialog that appears, deselect the Show Time checkbox, then use the Date Format drop-down list to pick the second formatting option available. Click OK. The date should appear in the table cell as a label. Save the page.
Navigate to the Tasks list in the browser. Click on the Add new item link. You should see the new list form, as shown in Figure 8-22.
Note in the preceding figure that the Start Date field is now a label and is no longer editable.
How It Works
You customized the preceding list item form in the same manner you customized a data form earlier in this section. Just like the data form, XSLT is used to transform the XML data that is being fetched from the list and being displayed in the DFWP within the list form.
Note
Although SharePoint Designer 2010 supports implementing web forms, many circumstances exist where common types of forms need to be completed, both on the web and off. Microsoft's tool for working with such forms is called InfoPath. InfoPath maintains its own mechanisms for supporting workflow, data validation, conditional formatting, and more.
All editions of SharePoint support a Forms Library, which is designed specifically to hold the XML results of InfoPath forms created using the InfoPath client. In addition, SharePoint Server 2010 Enterprise Edition supports web-based forms created using InfoPath. Chapter 9 covers InfoPath 2010 thoroughly.
Enabling end users to easily discover the actions they can take on an item in a list or library is important. The two obvious places that a user will look at are the ribbon and the context menu (also referred to as Edit Control Block (ECB)) of the item. SharePoint Designer 2010 offers an easy way to add customized actions to appear in both of these places. The functionality is called Custom Actions and it appears in the summary page of every list and library. You can create Custom Actions to do the following things:
Navigate to an existing list/library form
Start a workflow on an item
Navigate to a URL
Custom Actions basically make solutions easier for people to use by providing the right actions in the correct context.
Create a Custom Action to Show a List Form
In this exercise, you create a new custom action on the Tasks list. This custom action will show an existing list form of the Tasks list.
In SharePoint Designer 2010, click on Lists and Libraries and then click the Tasks list to get to its summary page.
Click on the New button in the Custom Actions section.
In the Create Custom Action dialog that appears, enter the name Edit Task. Use the Navigate to Form drop-down menu and select the entry pointing to the EditForm.aspx form. Click OK.
Navigate to the Tasks list in the browser. If no tasks are present in the list, create a task first. Then hover over the task and click the downward arrow to show the context menu for the item. You should see the Edit Task link in the menu, as displayed in Figure 8-23.
Clicking on the Edit Task link makes the task appear in the edit form.

How It Works
The custom action is created to access functionality. In the case above, the Edit Task action is created to provide quick access to the EditForm.aspx.
Although other possibilities exist for data presentation on SharePoint pages, the data manipulation possibilities built into SharePoint Designer 2010 make it a very appealing solution for site administrators and power users. Especially now with the availability of XSLT web parts on every page within SharePoint, turning to this application to build robust data-driven solutions is an easy decision for those with little or no programming background.