
WHAT YOU WILL LEARN IN THIS CHAPTER
The different types of data that SharePoint can access
How to display data from your SharePoint list and libraries
The methods SharePoint supports to access remote data
How to make external data sources appear as lists in your SharePoint site
In the previous chapter, you saw how SharePoint can store your data and documents. This chapter covers reusing your lists and libraries and integrating the rest of your data into SharePoint.
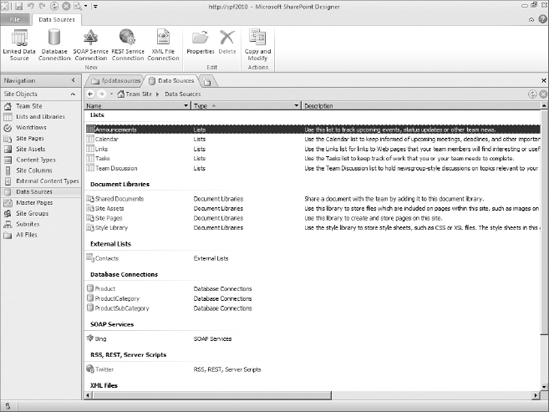
SharePoint supports several types of data sources, including lists and libraries in SharePoint itself and databases and data from web pages and web services. When you have a site open in SharePoint Designer, click Data Sources in the navigation bar to list the data sources available for your use. In Figure 7-1, you can see how the data sources are automatically grouped by type.
The following table lists the various types of data sources and their characteristics.
In Figure 7-1, you can also see the different types of data sources that you can create by clicking the buttons in the ribbon. After filling in the definition forms (except for lists and libraries), an XML file defining the data source will be saved in the /_catalogs/fpdatasources library.
Note
XML definition files are not grouped within the fpdatasources library folder to match the grouping in the Data Source Library task pane. They are all simply stored at the root level.
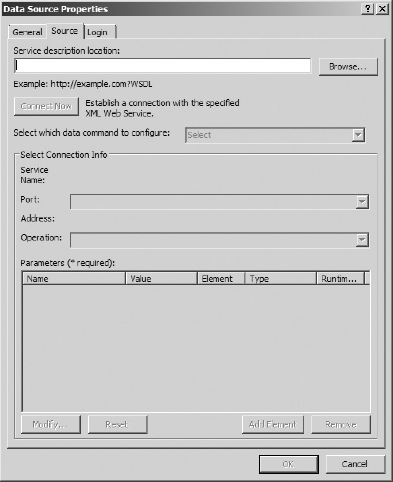
Each type of data source has slightly different configuration requirements and therefore different forms for filling in the details. Nevertheless, certain information is similar for any data source, and you enter that information on the General tab of the Data Source Properties dialog box, as shown in Figure 7-2.
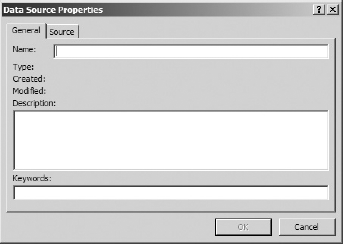
To enter or edit any of this information, switch to the General tab (when you create a new data source by clicking on the buttons in the New section of the ribbon in Figure 7-1, or edit an existing data source, the Source tab is displayed first when the dialog opens). You are not required to enter any information on the General tab; however, if you do not enter a friendly name, an arbitrary generic name such as NewDataSource1 is created when you save the data source for the first time.
SharePoint lists and libraries are automatically added to the Data Sources tab when they are created. You do not need to create entries for them. In addition, unlike most data source definitions, these automatic entries have direct links to the underlying list or library, and therefore are not normally listed in the fpdatasources folder.
Right-clicking any data source and choosing the Properties window normally opens the Data Source Properties dialog shown in Figure 7-2, but for lists and libraries, SharePoint Designer opens a new tab for the list's properties. This is the same tab that opens if you open the list from Lists and Libraries in the navigation bar on the left.
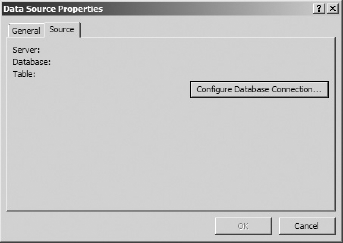
To create a database connection, click the Database Connection button on the ribbon. In Figure 7-3, you can see the Source tab and the Configure Database Connection button. Clicking this button displays the Configure Database Connection wizard shown in Figure 7-4.
Note
If you are using SharePoint Foundation instead of SharePoint Server, you will not see the option for Single Sign-On authentication in the dialog in Figure 7-4.
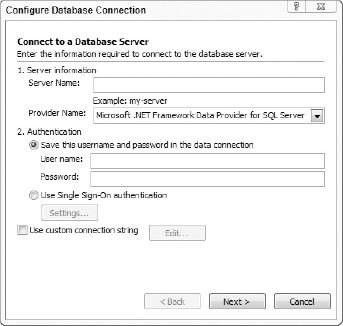
In the first step of the wizard, you must specify the server name, provider name, and credentials for accessing the database. If you are not connecting to a SQL Server database, change the provider name to Microsoft .Net Framework Data Provider for OLE DB. Alternatively, you can select the Use custom connection string checkbox and click the Edit button to specify a connection string manually. This method is helpful when you are connecting to an uncommon data source or when you must specify additional connection settings.
Warning
Your credentials and connection string will be stored unencrypted in the database connection XML file. Other authors of this SharePoint site will have the ability to read this password. Be sure to use an account with the least amount of privileges required to access your data.
After you have configured the first step of the wizard, click the Next button to display the second step shown in Figure 7-5. Before the second step displays, a warning message appears to remind you that the username and password you enter will not be encrypted. Click the OK button to continue.
Note
Accessing the data source may take up to a minute and SharePoint Designer may appear to be idle. You can check the right side of the status bar at the bottom of the screen to see whether SharePoint Designer is still talking to the server.
Note
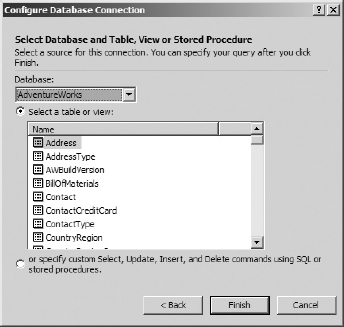
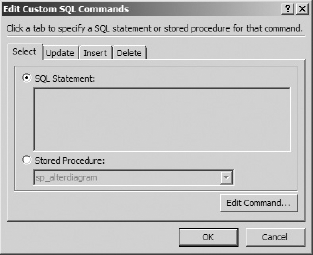
Ensuring that both the SharePoint server(s) and the client running SharePoint Designer have access to the database server is important for this process to succeed. This includes both network access and appropriate client drivers. Visitors to the site will not need client drivers. They may require appropriate credentials if common credentials or anonymous access to the database is not provided. In the second and final step of the wizard, you can select your database and a table or view from the list box. At this point, clicking the Finish button closes the wizard and saves your settings. If you want to filter the data returned or call a stored procedure, select the second radio button instead. Afterward, click the Finish button to display the dialog in Figure 7-6.
After you close the Configure Database Connection wizard, you return to the Source tab of the Data Source Properties dialog. The empty bottom half of the tab is now populated with options to control which fields are returned by the connection. You can also add filters and sort orders for the returned data. Specifying options here can save you valuable time later when using this data source on a web page because you will not have to configure as many options every time you use this connection. When you are satisfied with your settings, click the OK button to save the database connection to SharePoint.
Creating a new XML reference is very straightforward. You can either import an XML file into your SharePoint site, or, if the XML file is stored online, simply create a link to it. An online XML file does not need to be within a SharePoint site, but it does need to be accessible via either http or https. To create a new XML reference, select XML File Connection from the ribbon in Figure 7-1.
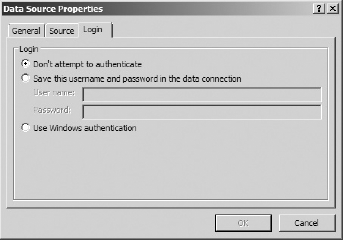
If the server containing the file does not allow anonymous access, you can provide login information on the Login tab of the data source definition, shown in Figure 7-7.
Note
The XML file does not have to be static and the URL does not have to end with XML. Any URL that returns XML, even if the XML changes over time, will work.
Most web pages, such as traditional .asp, .php, and Cold Fusion (.cfm), are designed to accept parameters from the URL used to access the web page or from the user's filling out another web page and clicking a submit button. If the web page can return results in XML format, you can create a connection to that web page that provides the input parameters it expects and then returns the XML to SharePoint.
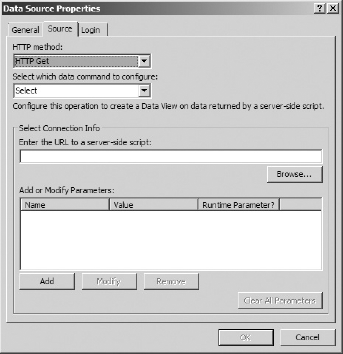
To create a connection based on a REST web service, click the REST Service Connection button on the ribbon; the Data Source Properties dialog shown in Figure 7-8 appears.
Two methods exist for sending parameters to a REST-based web services: GET and POST. The HTTP GET method supplies the parameters at the end of the web service's URL. For instance, given a URL of http://www.demo.com/MyWebService.php, a parameter named CustomerID with a value of 123, and a parameter named Region with a value of SouthWest, the resulting URL for an HTTP GET would be http://www.demo.com/MyWebService.php?CustomerID=123&Region=SouthWest.
Note
One drawback of the HTTP GET method is that the total length of the URL cannot exceed 260 characters. That limits the number and size of the parameters you can supply with this method.
The HTTP POST method differs from the HTTP GET method in that the URL is never modified. Parameters are posted (sent) to the URL directly, which allows any number of parameters. The small drawback of this method is that you must know the parameters ahead of time by talking to the web developer who created the web service or searching the website for documentation on how to use it. Most websites that allow their web services to be used by the public have abundant documentation including example usage. Some websites also have online forums where users can help each other in using the web service. An example of such a site is Twitter (http://www.twitter.com), which you will use in a later activity.
Note
A few, very rare scripts depend on certain parameters to be submitted with each method. SharePoint Designer cannot configure connections for scripts that require parameters from both methods simultaneously.
Most of the time, you only want to read and display (that is, Select) information from your external data source, so you simply leave the default Select option chosen (refer to Figure 7-8). In addition to querying, however, some web services allow you to insert, update, or delete the underlying data. To implement those functions in your Data view or forms, select the appropriate command from the data command dropdown. Each of the functions has its own set of parameters defined.
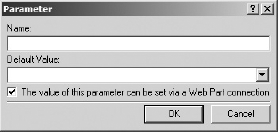
After you determine the HTTP method and data command, you can add any required parameters to the parameter table by clicking the Add button in Figure 7-8. In the Parameter dialog that appears, you can specify both the name and a default value for each parameter. In addition, you can designate a parameter at run time by selecting the following box: The value of this parameter can be set via a Web Part connection. Figure 7-9 shows the dialog to add or modify a parameter.
SOAP-based web services are like an enhancement of REST-based web services, with a major exception — most REST-based web services are meant to be called from other pages within the same application. Web services, on the other hand, are designed specifically to be called by other applications, so some key differences exist between setting up a REST-based web service data source and setting up a SOAP-based web service data source. Select SOAP Service Connection from the ribbon in Figure 7-1 to show the Source configuration screen for a SOAP-based web service in Figure 7-10.
As you did for the REST-based web service, you must provide a URL to access a web service. For a SOAP-based web service, however, the URL you enter here typically will include the specific parameter ?WSDL, which means Web Services Description Language, or Web Service Definition Language. This parameter instructs the web service to return information about how it is used in a standardized XML form. SharePoint Designer then uses that information to provide the options for the remainder of the configuration.
Note
You can see the WSDL yourself by pasting the URL into a browser. The result will look like XML.
As with the REST-based web service, you configure Select, Insert, Update, and Delete commands independently. Most of the time, you only configure a Select command. If the SOAP-based web service provides operations for the other commands, simply configure the remaining sections appropriately for each command.
If a SOAP-based web service supports multiple interfaces, the Port option allows you to specify which interface to use. You typically use the first option provided, unless the web service provider gives specific instruction to the contrary.
When you click the Connect Now button, SharePoint Designer downloads the WSDL file and populates the Operation dropdown menu with the supported functions of the web service. Select the operation you want to perform to implement the current command.
After you select an operation, SharePoint Designer populates the Parameters table. This is much simpler than discovering the parameters for a REST-based web service because you do not have to guess or dig through possibly unobtainable documentation to determine what the functions expect.
Parameters to a SOAP-based web service may be optional or required. Required parameters are indicated by an asterisk (*). As with REST-based web service parameters, you may predefine a default value for a parameter and also make it configurable at runtime (through a Web Part connection, for instance). Unlike REST-based web service parameters, these values can be complex entities that contain many elements, such as arrays, and have data types that can be enforced. For complex data types, each element can have a default value or runtime source specified.
You cannot add parameters to or remove parameters from a web service data source, because they are predefined in the WSDL. For optional parameters, just leave the configuration elements blank if you are not going to use them.
Business Connectivity Services (BCS) provides read and write access to your back-end line of business systems. These systems can be databases, web services, or completely custom integrations. In a custom integration, a .NET developer can write code that will expose the external system in a format that BCS can use.
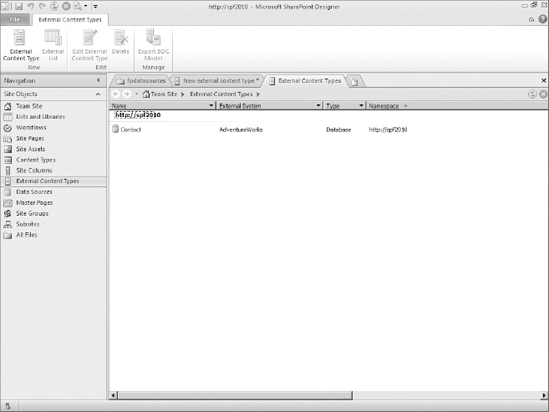
One of the most powerful features of BCS is the ability to make an external data source look like a list. This type of list is called an external list and is based on an external content type. To see the list of external content types in your site, click External Content Types in the navigation bar in SharePoint Designer. Figure 7-11 shows the External Content Types list.
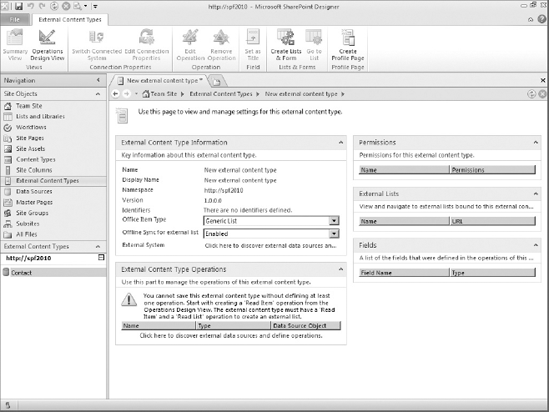
To create an external content type, click the External Content Type button on the ribbon; a new tab appears. In Figure 7-12, you can see the various settings that you must configure before the external content type can be used. To specify the name of the external content type, click the hyperlink next to Name. Display Name will be filled in automatically, but you can change it.
Because all content types, including external content types, must inherit from a parent content type, you must choose a parent content type from the Office Item Type dropdown list. Generic List is chosen by default, but a best practice is to choose the parent content type that matches your external content type the closest.
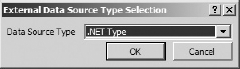
The next step is to configure an external data source for the external content type. Choose the Operations Designer View button from the ribbon; the tab changes to show the screen shown in Figure 7-13. The Data Source Explorer tab contains the list of data sources you have used so far. You can choose one of these data sources or click the Add Connection button to create a new one. In Figure 7-14, you can see the first dialog for adding a new connection.
You will likely choose SQL Server or WCF Service because .Net Type is meant for developers. If you choose SQL Server, the dialog in Figure 7-15 appears. In this dialog, you must specify the server and database names. If you do not specify a name for the connection, it will use the database name value for display purposes.

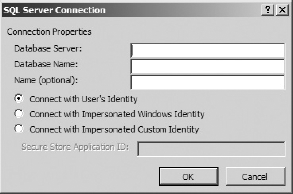
For configuring security, you can either pass the user's credentials to the database server or use credentials from the Secure Store in SharePoint Central Administration. The Secure Store is a central location to store usernames and passwords for accessing external systems through SharePoint. To manage the Secure Store, open SharePoint Central Administration from the Start menu. Then, click Manage service applications
If you choose WCF Service, the dialog in Figure 7-16 appears. In this dialog, you must specify a URL for getting metadata about the service and the connection mode to get the metadata. In practice, using WSDL as the connection mode is much more common than using Metadata Exchange. You must also specify the service endpoint URL. This is the actual URL that SharePoint must use when communicating with the service. Many times this URL is very similar to the URL for metadata.

If you must use a proxy to access the service, you can specify that information here, too. Unless you have an uncommon proxy configuration, you will likely not have to provide this information here. For security, you have the same options as those for SQL Server, but you can specify different options for accessing the service versus getting the metadata. Usually, you will use the same security settings for both. After you click OK to save the connection, SharePoint Designer validates your settings and, if it's successful, adds the connection to the Data Source Explorer tab as shown in Figure 7-17.
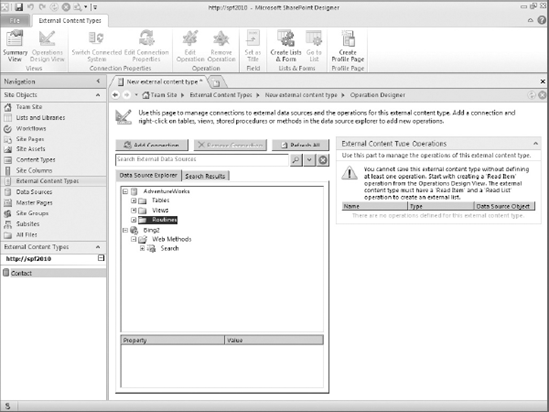
For database connections, folders exist for tables, views, and routines. Routines are the user-defined functions and stored procedures in the database. For WCF service connections, a single folder exists for all the service's operations. When you are ready to define the operations for your external content type, expand the tree and find the object upon which you want to create the operation(s). Right-click the object and you will be presented options for creating all operations or single operations like Read Item, Read List, Update, or Delete. You can also create a new association, which allows you to link external content types together in a similar manner as foreign key relationships in a database.
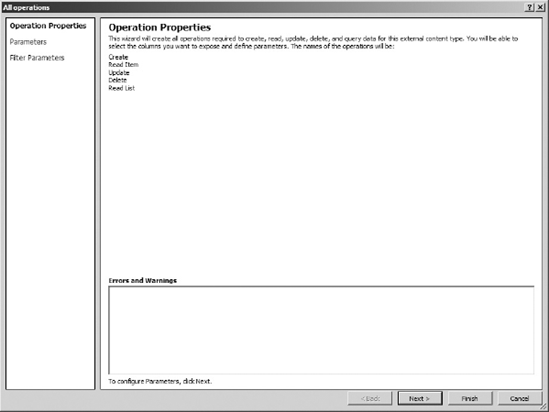
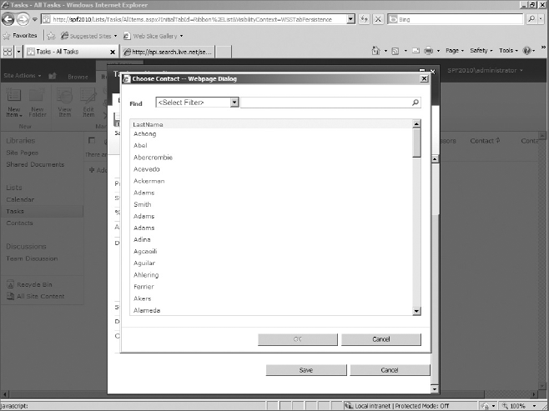
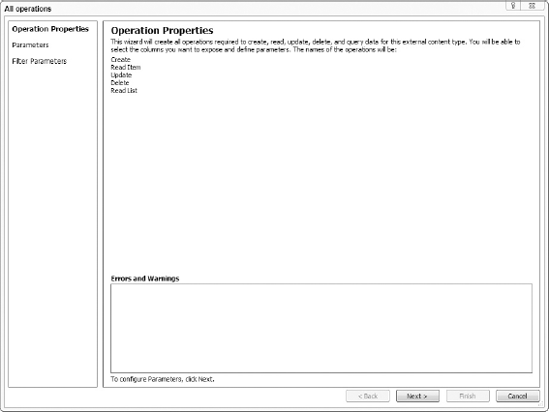
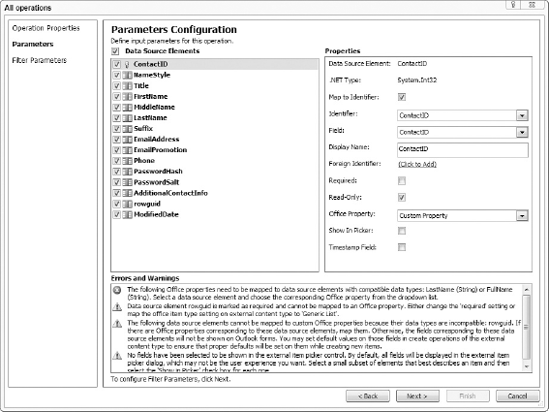
After you choose the operation(s) to create, the All operations dialog shown in Figure 7-18 appears. When you click the Next button, the wizard allows you to map the external object to the parent content type you chose earlier. Any unmapped elements will be created as custom SharePoint fields if their data type is supported in SharePoint. Otherwise, that data will not be shown nor will it be updateable through SharePoint. The two main requirements for this screen are making sure one element has the Map to Identifier checkbox selected and that at least one element has the Show In Picker checkbox selected. The Show In Picker checkbox indicates which elements will appear in the external item picker shown in Figure 7-19.
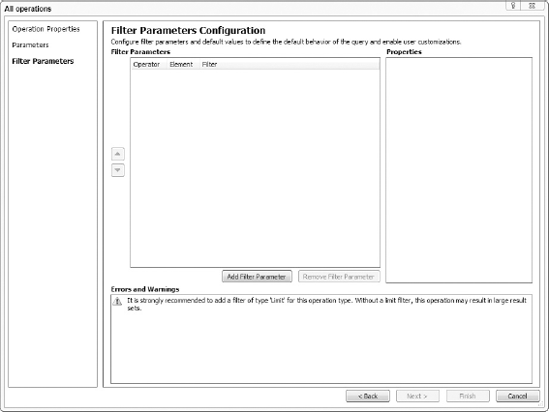
The last step of the wizard allows you to configure filters for the data connection. Though you may not want to filter the data, adding a Limit filter to prevent large amounts of data from being returned and negatively impacting performance is a good idea. The next Try It Out shows how to create such a filter. When you are satisfied, click the Finish button to create your operation(s).
After the operations dialog closes, you still must click the Save button in the Quick Access Toolbar at the top of the screen to commit your changes. Now that you have created an external content type, you must create an external list to allow users to access the content type in SharePoint. To create an external list, click the Create Lists & Forms button in the ribbon; the dialog shown in Figure 7-20 appears.
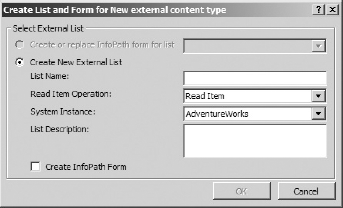
To finish creating your external list, enter a unique name for List Name and click the OK button. After the list is created, you can click Lists and Libraries in the navigation bar and see your list in the External Lists section. If you select the list, you can click the Preview in Browser button on the ribbon to see your list in action.
Create an External Content Type for a Database Table
In this activity, you create an external content type that represents the Contact table in the AdventureWorks database.
Open SharePoint Designer from your Start menu.
Click the Open Site button.
When the Open Site dialog appears, enter the URL to your site in the Site name textbox and click the OK button.
If a Windows Security dialog appears, enter your username and password for the SharePoint site and click the OK button.
After the site opens, choose External Content Types from the navigation bar on the left.
Click the External Content Type button from the ribbon.
Enter Contact as the value for the Name and Display Name fields. Click the hyperlink beside the field to edit it.
Choose Contact from the Office Item Type dropdown list.
Click the Operations Design View button from the ribbon.
Click the Add Connection button.
In the External Data Source Type Selection dialog (Figure 7-14), choose SQL Server from the Data Source Type dropdown list and click OK.
In the SQL Server Connection dialog (Figure 7-15), enter the name of the server you used to install the AdventureWorks databases in the Set Up Databases activity (previous in the chapter) in the Database Server textbox.
Enter AdventureWorks for Database Name and Name, and click OK.
In the Data Source Explorer tab, expand the AdventureWorks tree node and the Tables tree node.
Right-click the Contact table, and choose Create All Operations.
In the All operations dialog (Figure 7-21), click the Next button.
Notice the messages in the Errors and Warnings textbox (Figure 7-22). The next few steps will resolve these messages.
Configure the following columns by choosing each column and selecting the matching value from the Office Property drop down list:
COLUMN
OFFICE PROPERTY
Title
Job Title
FirstName
First Name
MiddleName
Middle Name
LastName
Last Name
Suffix
Suffix
EmailAddress
Email 1 Address
Phone
Business Telephone Number
Choose the LastName column, and select the check box for Show in Picker.
Choose the rowguid column, and unselect the check box for Required.
Click the Next button.
Click the Add Filter Parameter button (Figure 7-23).
Click the "Click to Add" hyperlink next to the Filter property.
Select Limit from the Filter Type dropdown list and click the OK button.
Enter 100 in the Default Value drop-down list.
Click the Finish button.
Click the Save button in the Quick Access Toolbar.
How It Works
Choosing Contact as the parent content type allows you to map its SharePoint fields to the Contact table from the AdventureWorks database. Creating all operations on that table will allow it to function fully as a list in SharePoint with the ability to create, read, update, and delete items using the built-in forms or your custom forms. Selecting the LastName column as one of the fields to show in the picker dialog will have that column displayed when a user creates or edits an item in an external list with this content type.
Set Permissions on an External Content Type
In this activity, you change the permissions on an external content type.
From the Start menu of your SharePoint server, choose All Programs

Under the Application Management section, click the Manage service applications hyperlink.
When the page loads, click the Business Data Connectivity Service hyperlink that appears next to the Business Data Connectivity Service Application Proxy type.
After the View External Content Types page loads, right-click the Contact external content type and choose Set Permissions.
Click the Address Book icon and choose All Users from the dialog.
Choose All Authenticated Users and click the Add button.
Click the OK button to confirm your selection and close the dialog.
Click the Add button in the Set Object Permissions dialog.
Select the Edit, Execute, Selectable In Clients and Set Permissions checkboxes and click the OK button.
Close SharePoint Central Administration and return to the browser you left open in step 12 of the preceding Try It Out.
Press F5 to refresh the page; the rows from the database table appear.
How It Works
By default, users will not have access to your external content type. By granting the All Authentication Users group access, all users who are authenticated using Windows Authentication or Forms-Based Authentication will be able to use the external content type when it is added to an external list.
Previously in the chapter, you saw how you can configure SharePoint to access your lists, libraries, databases, and web services. One powerful way to use these data sources is to join them using a linked data source. A linked data source enables you to define a relationship between two or more existing data sources and present them as a single unit.
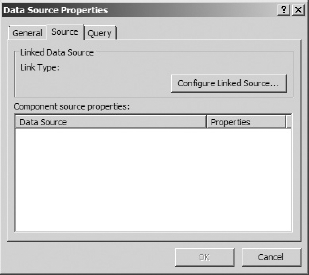
To create a linked data source, click the Linked Data Source button on the ribbon. When the Data Source Properties dialog appears (see Figure 7-24), click the Configure Linked Source button to display the Linked Data Sources Wizard dialog shown in Figure 7-25.
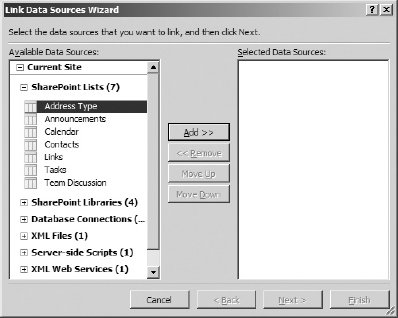
In the Linked Data Sources Wizard dialog, the list of data sources in your site appears in the Available Data Sources list box on the left. Select the data sources you want to join, and click the Add button to add them to the Selected Data Sources on the right. After you have selected your data sources, you can use the Move Up and Move Down buttons to order them appropriately. The order of the data sources is important when you want to display the linked data source in a hierarchical fashion. When you are finished, click the Next button to continue to the next step in the wizard.
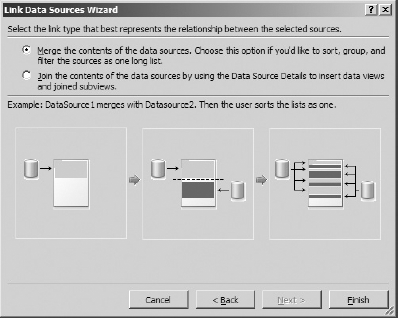
Figure 7-26 displays the two options for relating the data sources you chose in the previous step. If you want to merge the data sources, choose the first option. Merging the data sources is similar to using the UNION clause in a SQL statement. If you want to join the data sources, choose the second option. Joining the data sources is useful for displaying the data in a hierarchical fashion. After you make your selection, click the Finish button to return to the Data Source Properties dialog.
This chapter explored the many methods you can use to access data outside SharePoint, including:
How to connect to data sources including databases and web services
How to create external content types and external lists that represent external data sources
How to grant permissions on external content types
How to join data sources into a linked data source
The next chapter shows how to add these data sources to your web pages and format the way the data is displayed.