
WHAT YOU WILL LEARN IN THIS CHAPTER
Note
You can do the activities in this chapter with either JavaScript or Silverlight, with the exception of querying the SharePoint Client Object Model using LINQ to Objects. LINQ is only supported in Silverlight via LINQ to Objects. LINQ to SharePoint is only supported with the Server Object Model.
Silverlight gives you the ability to build applications rich with functionality and usability far beyond what is possible in JavaScript alone. With Silverlight, you can create C# and VB.Net applications that run in the browser as part of your SharePoint site. Like JavaScript, Silverlight has its own libraries for accessing SharePoint via the Client Object Model. Whether you are using JavaScript or Silverlight, they both communicate with SharePoint via the client.svc web service. The URL for this web service is located at http://yoursiteurl_vti_bin/client.svc where yoursiteurl is the URL of your SharePoint site.
One of the advantages of the Client Object Model is that you can supplement the functionality of the sandbox solutions in SharePoint. In some environments, developers do not need or are restricted from using certain, possibly-unsafe functionality in their SharePoint code. SharePoint addresses these problems by providing a "sandbox" inside which a developer's code can run. This sandbox runs outside of the main SharePoint web application and protects the web site from being unavailable if the developer's code crashes or uses too many server resources. To safely circumvent some of the restrictions of sandbox solutions, you could include JavaScript or Silverlight code that uses the Client Object Model.
Another reason to use Silverlight is its ability to process and display large amounts of data on the screen, and generally, it performs faster than JavaScript. The real trade-off is your ramp-up time to become proficient in Silverlight versus using the JavaScript experience you already have. Now that you have a good understanding of some of the issues and opportunities around using Silverlight inside SharePoint, continue to the next section to get started.
Before you jump in and get busy with Silverlight, you must install a few things:
Microsoft Silverlight 4 Tools for Visual Studio 2010
http://www.microsoft.com/downloads/details.aspx?FamilyID=40ef0f31-cb95-426d-9ce0-00dcfabf3df5Silverlight Toolkit
http://silverlight.codeplex.com—containsmany useful, free controls for your Silverlight projects.
If you are new to Silverlight development, visit www.silverlight.net/getstarted/ for videos, tutorials, and other resources to get you up and running quickly.
Tip
The Silverlight.net website has many free samples, examples, and tutorials available for your use. If you do not have much experience with Silverlight, doing the tutorials on the website before continuing further in the chapter would be a good idea.
After you have installed the requisite software, the last thing you need is the Silverlight Client Object Model, which is contained in these two files:
Microsoft.SharePoint.Client.Silverlight.dllMicrosoft.SharePoint.Client.Silverlight.Runtime.dll
These files are located on your SharePoint server at C:Program FilesCommon FilesMicrosoft SharedWeb Server Extensions14TEMPLATELAYOUTSClientBin. Copy these files to your local machine because you will need to use them in your Silverlight projects.
To create a new Silverlight application, follow these steps:
Open Visual Studio 2010 from your Start menu, and select File

Note
Depending on which settings you chose when you first opened Visual Studio, your New Project dialog may look different from the one shown in Figure 14-1.
Select Silverlight from the templates on the left, and select Silverlight Application from the list of projects.
Enter a name for your project and click the OK button. The New Silverlight Application dialog shown in Figure 14-2 appears.
Uncheck the "Host the Silverlight application in a new Web Site" checkbox and ensure Silverlight 4 is selected in the Silverlight Version drop-down list. Click the OK button.


Note
If you get the message "An update to Microsoft Visual Studio is required to target Silverlight 4" when the project opens, make sure you have installed Microsoft Silverlight 4 Tools for Visual Studio 2010.
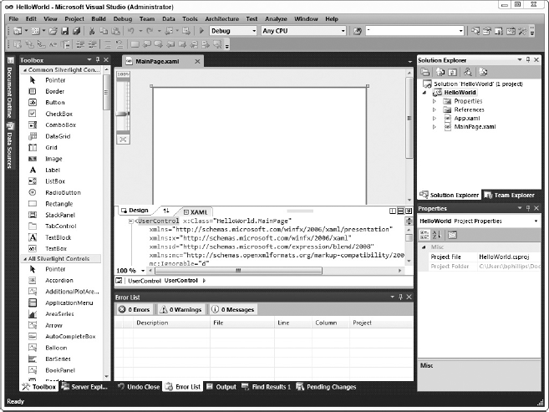
After the project is created, the screen shown in Figure 14-3 appears. Notice the Toolbox pane containing the available Silverlight controls on the left side of the screen. Depending on whether you installed the Silverlight Toolkit or controls from a third-party vendor, you may have more or fewer controls.
On the right side of the screen, you see the Solution Explorer pane, which contains the files in the Silverlight project. Underneath the Solution Explorer pane, the Properties pane shows you the properties of the object you have selected in the IDE. When designing controls in Silverlight, you use the Properties pane to configure the controls you use in the project.
The center of the screen contains the Error List pane at the bottom and the design area at the top. The Error List pane displays any errors, warnings, or messages from Visual Studio while you write code and whenever you compile the project. The design area displays the documents you have open. When you open an XAML file, the design area is split into two sections: the WYSIWYG (What You See Is What You Get) designer and the text editor containing the corresponding XML. In the WYSIWYG designer, the Silverlight screens you design in Visual Studio will look the same as when they run in the browser.
Whenever you want to test your code, you must compile it and deploy it to a SharePoint document library. To compile your project, select Build
When you compile a Silverlight application project, it creates an XAP file, which contains the code and resources of your project. Any zip file–compatible application can open this XAP file.
The location of the XAP file is located in the BinDebug or BinRelease folder under the folder where your project is located. If you chose to compile your code in Debug mode, your XAP file will be in the BinDebug folder. Otherwise, it will be in the BinRelease folder.
Note
If you compile the project in Debug mode, you can attach Visual Studio to your project and debug the project. The drawback of Debug mode is that the XAP file will be much larger and the code will run slower due to the inclusion of the information Visual Studio needs to allow you to debug your code. When you are satisfied with your project, compile the project in Release mode before you deploy it to production.
Note
You can easily get the location of the XAP file by clicking the Show All Files button in the toolbar of the Solution Explorer pane. The Bin folder will appear, and you can navigate to the XAP file. When you select the XAP file, the Properties pane displays the full path to the file. Copy this path to paste into the upload file dialog in SharePoint.
After you have uploaded the XAP file to a document library in your site, you must add your Silverlight control to a web page. SharePoint has a convenient way to display Silverlight controls: the Silverlight Web Part. The Silverlight Web Part allows you to add your Silverlight control to any web part page. To add the Silverlight Web Part to a page, follow these steps:
Navigate to a web part page in your site and select Edit Page from the Site Actions menu to put the page in Edit mode.
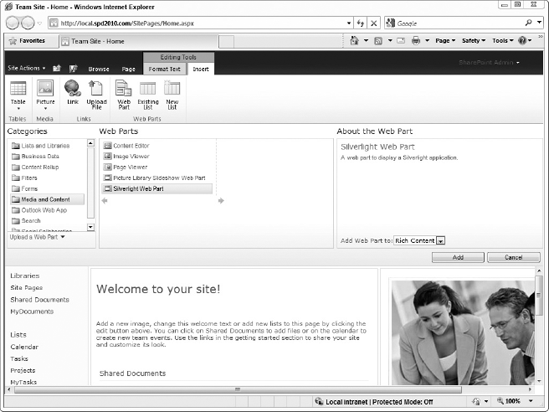
Select Web Part from the Insert tab on the ribbon. The web part catalog appears, as shown in Figure 14-4.
Choose Media and Content from the Categories list and select Silverlight Web Part from the Web Parts list.
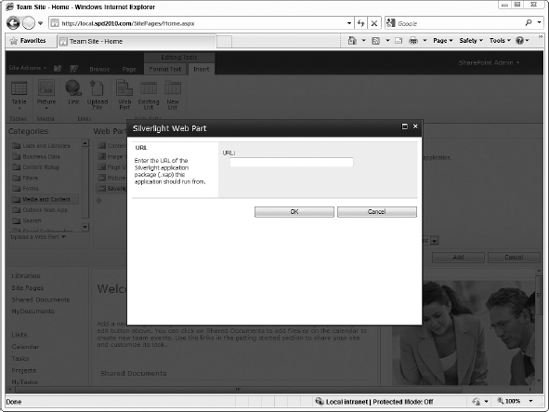
Select the appropriate location from the Add Web Part To drop-down list and click the Add button. The Silverlight Web Part dialog shown in Figure 14-5 appears.
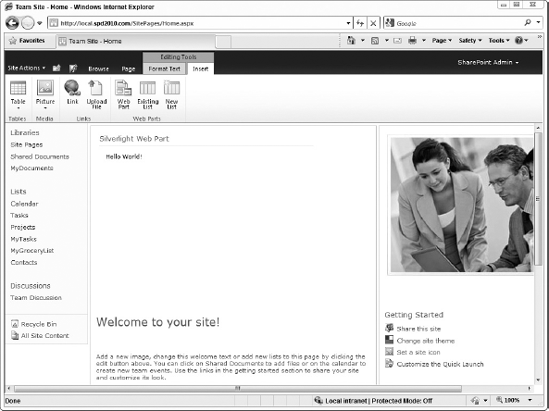
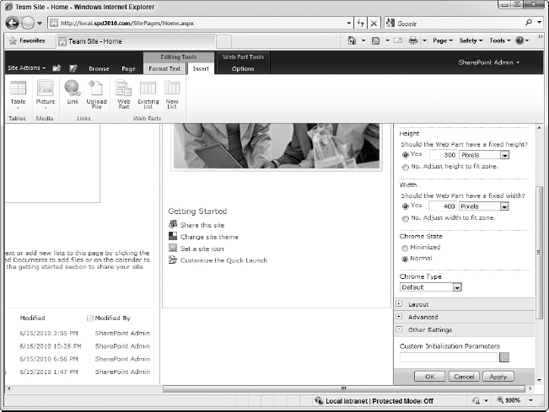
Enter the URL to the XAP file you uploaded earlier and click the OK button. After the web part is added, a page similar to the one shown in Figure 14-6 appears. By default, the web part has a height of 300 pixels and a width of 400 pixels. If your web part is larger than these dimensions, edit the web part's properties and adjust accordingly.
Note
If your Silverlight application needs initialization parameters configured, you can scroll to the bottom of the web part properties window and put them in the Custom Initialization parameters textbox, shown in Figure 14-7.
Every now and then, you may need to debug your Silverlight code. You cannot just run your Silverlight project by choosing Debug
Deploy your XAP file to a document library and add it to a web part page as shown previously in the chapter.
Select Debug
Choose the "Debug these code types" radio button and ensure that only Silverlight is selected in the list box. This makes Visual Studio load fewer debug symbol files after you attach to your browser.
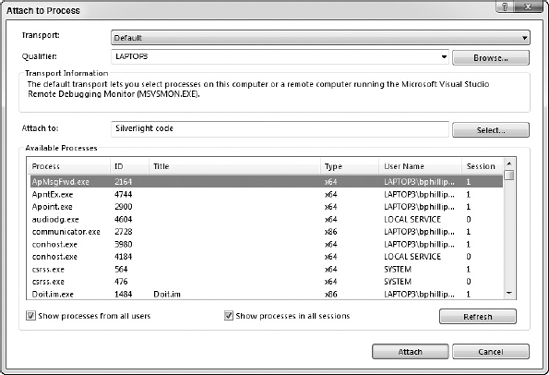
Click OK to return to the Attach to Process dialog shown in Figure 14-8. In the Available Processes list box, select all the processes for your browser where Silverlight is listed in the Type column. If you are using Internet Explorer, look for processes named iexplore.exe. If you are using Firefox, look for processes named firefox.exe.
Click the Attach button. You are ready to debug.

The code you write to retrieve data in Silverlight is almost the same as the code you write in JavaScript. The main difference is that in JavaScript, you must access the properties of an object by calling set_propertyname and get_propertyname styled methods. In Silverlight, you only need to use the name of the property itself.
As in JavaScript, you must get an instance of the ClientContext class before you can do anything with the Client Object Model. To get the current ClientContext object, call the Current property of the ClientContext class:
ClientContext context = ClientContext.Current;
If you want to get a different ClientContext object, you can use the following code snippet, supplying the full URL of the site:
ClientContext context = new ClientContext(fullsiteurl);After you get the ClientContext object, you can use the following methods and properties:
You may notice that the names of all properties and methods in the Silverlight Client Object Model are proper cased. One interesting feature of the Client Object Model in Silverlight is that you can use LINQ in a very limited manner to query lists and libraries. Without LINQ, you would write the following code snippet to query the Tasks list:
ClientContext context = ClientContext.Current;
Web site = context.Web;

List tasks = site.Lists.GetByTitle("MyTasks");
this.items = tasks.GetItems(new CamlQuery());

context.Load(this.items);

context.ExecuteQueryAsync(OnSuccess, OnFailure);
You get the list and call the GetItems method, passing in an instance of the CamlQuery class. Notice that a blank CamlQuery class was passed into the method. That just means that SharePoint will return all items from the list. With LINQ, you could write the following code snippet instead:
ClientContext context = ClientContext.Current;
Web site = context.Web;

this.tasks = site.Lists.GetByTitle("MyTasks");
ListItemCollection items = tasks.GetItems(new CamlQuery());


var query = from t in items
      select t;

this.results = context.LoadQuery(query);

context.ExecuteQueryAsync(OnSuccess, OnFailure);
In the code snippet, the LINQ query is highlighted. Essentially, it creates a query that returns all the items in the list. You could add a filter to the query based on one of the built-in properties of the ListItem class. You cannot add a filter on one of the columns in the list, though. Here is an example of using LINQ to return the item whose ID equals 5:
var query = from t in items
      where t.Id == 5
      select t;
After you get your results back from SharePoint, you may be tempted to bind the list of ListItem objects directly to a control like the DataGrid control. That will not work because the list item's field values are actually stored in the ListItem's default property, which is actually a Dictionary object. You cannot bind to a Dictionary object, but you can convert it to something else using LINQ.
To bind to your list items, create a class with similar properties and data types as their parent list. Here is an example for a few columns from a Task list:
public class Task {
  public int Id { get; set; }
  public string Title { get; set; }
  public string Status { get; set; }
  public string Priority { get; set; }
}
With the Task class, you can use LINQ to convert the ListItem objects to Task objects, which you can bind to a control such as the DataGrid control. The following code snippet shows this in action:
var data = from t in this.results
      select new Task {
        Id = t.Id,
        Title = (string)t.FieldValues["Title"],
        Status = (string)t.FieldValues["Status"],
        Priority = (string)t.FieldValues["Priority"]
      };

dataGrid1.ItemsSource = data;
One additional caveat is that Silverlight is multi-threaded, which is great for performance, but it requires you to add some additional code before you can bind your data. All controls in the UI run on the main thread, which is the first thread created when the application starts. When you call SharePoint, the Client Object Model creates a background thread to send the request to SharePoint and wait for a response. After the call succeeds or fails, the corresponding method you passed to the ExecuteQueryAsync method of the ClientContext class executes. The execution occurs on the background thread instead of the main UI thread, and you cannot update the UI from a background thread.
To resolve this problem, you can use a control's Dispatcher property to execute your code and update the UI. The Dispatcher will run the code you give it on the main UI thread. The Dispatcher class has the BeginInvoke method you use to supply the code to execute. You only need to give it the name of a method in your class or an anonymous method. Delivering your code via an anonymous method is faster because you can add your code on the spot instead of creating a new method and passing the method to the BeginInvoke method. The following code snippet shows using an anonymous method with the Dispatcher property:
dataGrid1.Dispatcher.BeginInvoke(delegate() {
  var data = from t in this.results
        select new Task {
          Id = t.Id,
          Title = (string)t.FieldValues["Title"],
Status = (string)t.FieldValues["Status"],
Priority = (string)t.FieldValues["Priority"]
};
dataGrid1.ItemsSource = data;
});
In the code snippet, delegate() {} creates an anonymous method that is passed to the BeginInvoke method of the Dispatcher class. You need only place your UI-updating code between the two curly braces. One neat feature of anonymous methods is that you can still access the local variables and parameters of the method containing this code. In the following activity, you use these classes to query a SharePoint list.
Query a List using Silverlight
In this activity, you query a list and bind it to a Silverlight control. You must complete the "Prep Work for Querying a SharePoint List" activity in Chapter 13, "Client-side Programming in JavaScript," before proceeding.
Open Visual Studio 2010 from your Start menu.
Select File
Choose Silverlight from the list of templates and select Silverlight Application from the list of applications.
Enter a name for your project and click the OK button.
In the New Silverlight Application dialog (Figure 14-2), uncheck the "Host the Silverlight application in a new Web site" checkbox, ensure that Silverlight 4 is selected in the drop-down list, and click the OK button.
After the project loads, the
MainPage.xamlfile should automatically open. If it does not open, double-click the file in the Solution Explorer pane (Figure 14-3).Right-click the References folder in the Solution Explorer pane and choose Add Reference.
Click the Browse button and navigate to the location of the
Microsoft.SharePoint.Client.Silverlight.dllandMicrosoft.SharePoint.Client.Silverlight.Runtime.dllfiles. (These files are located on your SharePoint server at C:Program FilesCommon FilesMicrosoft SharedWeb Server Extensions14TEMPLATELAYOUTSClientBin.)Click the Open button to return to the Add Reference dialog.
Click the Add button to add the references to the project.
Drag the DataGrid control from the Toolbox pane and drop it on the white area of the
MainPage.xamldesigner surface. This adds the control to the page.In the text editor, remove all attributes on the
DataGridtag except for theNameattribute. If you do not see the text editor, click the XAML tab as shown in Figure 14-3.In the text editor, click the
UserControltag and, in the Properties pane, click the Events button.Locate the
Loadedevent and double-click it to create an event handler in theMainPage.xaml.csfile. TheMainPage.xaml.csfile should automatically open.In the
MainPage.xaml.csfile, add the followingusingstatements to the top of the screen:using Microsoft.SharePoint.Client; using System.Collections;
Add the following private fields to the
MainPageclass just before thepublic MainPage() {line:private List tasks; private IEnumerable<ListItem> results;
In the
UserControl_Loadedmethod, type the following code to request the MyTasks list from SharePoint:ClientContext context = ClientContext.Current; Web site = context.Web; this.tasks = site.Lists.GetByTitle("MyTasks"); ListItemCollection items = tasks.GetItems(new CamlQuery()); var query = from t in items select t; this.results = context.LoadQuery(query); context.ExecuteQueryAsync(OnSuccess, OnFailure);Note
The MyTasks list is simply a Tasks list named MyTasks. Create that list in your site in order to use this activity's code without changing it.
Add the following two methods before the
UserControl_Loadedmethod:void OnSuccess(object sender, ClientRequestSucceededEventArgs e) { } void OnFailure(object sender, ClientRequestFailedEventArgs e) { }In the
OnSuccessmethod, type the following code to convert the list items to Task objects and bind it to the DataGrid control:dataGrid1.Dispatcher.BeginInvoke(delegate() { var data = from t in this.results select new Task { Id = t.Id, Title = (string)t.FieldValues["Title"], Status = (string)t.FieldValues["Status"], Priority = (string)t.FieldValues["Priority"] };dataGrid1.ItemsSource = data; });
In the
OnFailuremethod, type the following code to display any errors that occur during the call to SharePoint:this.Dispatcher.BeginInvoke(delegate() { TextBlock textBlock = new TextBlock(); textBlock.Text = e.Exception.ToString(); this.Content = textBlock; });Add a new class to the project by right-clicking the project in Solution Explorer and choosing Add
Enter Task.cs as the name of the class file.
When the Task.cs file opens, update the Task class to include the properties as shown here:
public class Task {
  public int Id { get; set; }
  public string Title { get; set; }
  public string Status { get; set; }
  public string Priority { get; set; }
}
Compile the project by selecting Build
Check the Error List pane for any errors and fix them before continuing.
Click the Show All Files button in the Solution Explorer pane.
In the Solution Explorer pane, expand the
BinandDebugfolders and select the XAP file.Double-click the value of the Full Path property in the Properties pane to select it and press Ctrl+C to copy the path to the clipboard.
Navigate your browser to a document library in your SharePoint site.
Select Upload Document from the Documents tab on the ribbon.
In the Upload Document dialog that appears, click the Browse button.
Paste the file path from Step 28 and click Open.
Click the OK button to close the Upload Document dialog and upload the XAP file to SharePoint.
When the document library is updated with your file, right-click its name and choose Copy Hyperlink to copy the URL of your XAP file.
Navigate your browser to a web part page in your site.
Select Edit Page from the Site Actions menu.
Select Web Part from the Insert tab on the ribbon.
Choose Media and Content from the Categories list and select Silverlight Web Part from the Web Parts list (Figure 14-4).
Select the location to put the web part from the "Add Web Part to" drop-down list and click the Add button.
In the Silverlight Web Part dialog, paste the URL from step 34 and click the OK button (Figure 14-5).
Select Save & Close from the Page tab on the ribbon.
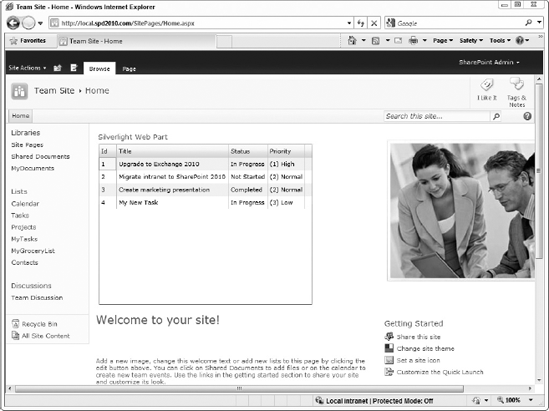
Verify that your Silverlight control displays data, as shown in Figure 14-10.
How It Works
When the Silverlight control loads on the web page, the UserControl_Loaded method is called. Inside the method, the current ClientContext object is used to get the current site and, in turn, the MyTasks list. With the MyTasks list, the GetItems method is called with a blank CamlQuery object to get all the items in the list.
Afterwards, the list items are processed by the LINQ query and queued for retrieval from SharePoint by passing the LINQ query to the LoadQuery method of the ClientContext object. The LoadQuery method returns an IEnumerable object of ListItems, which is stored in a private class field.
After the ExecuteQueryAsync method is called, the Client Object Model requests the data from SharePoint, populates the private class field, and calls the OnSuccess method.
Inside the OnSuccess method, LINQ transforms the non-bindable ListItem objects into new Task objects. Finally, the Task objects are bound to the DataGrid control, which displays the information you see in Figure 14-10.
The Client Object Model also allows you to create, modify, and delete lists and document libraries in your SharePoint site. To get a list of the lists and libraries in a site, you use the Lists property of the Web class. You can also use LINQ to filter the lists and libraries returned from the site by using the following code snippet:
var query = from l in site.Lists
      where !l.Hidden
      select l;

this.listResults = context.LoadQuery(query);
Warning
In general, avoid displaying hidden lists and libraries to the user because modifying them could irreparably break functionality in your site.
In the code snippet, the Lists property is filtered for only the lists and libraries that are not hidden in the browser UI. Afterwards, the LINQ query is passed to the LoadQuery method for retrieval from SharePoint. In the following code snippet, the result of the query from SharePoint is bound directly to a DataGrid control:
listsDataGrid.Dispatcher.BeginInvoke(delegate() {
  listsDataGrid.ItemsSource = listResults;
});
Note that you must still use the Dispatcher property of a control to update it from the background thread that called your OnSuccess method. Unlike the ListItem class, the List class has many useful properties that you can directly bind to. In the following table, you can see some of the most common properties and methods that you will use when dealing with lists and libraries.
The following table displays commonly used List properties:
NAME | DESCRIPTION |
|---|---|
If true, the content types associated with the list or library can be managed via the browser. | |
Indicates which list template was used to create the list. A list of common list template types appears later in the chapter. | |
| The collection of |
When the list or library was created. | |
The description for the list or library. | |
If true, the list supports attaching files to list items. Only applies to lists, not document libraries. | |
If true, users can create folders inside the list or library. | |
The collection of | |
If true, the list is an external list. | |
If true, the list does not appear in the browser. | |
| The GUID identifier of the list. |
The number of items or documents in the list or library. | |
Specifies the last time a list or document was deleted from the list. This is useful for checking if you need to refresh your data from SharePoint. | |
Specifies the last time the list or its contents was modified. This is useful for checking if you need to refresh your data from SharePoint. | |
If true, the list will appear in the Quick Launch bar on the left side of the screen. | |
The root folder of the list. Use this to get the files and folders in a document library. | |
The display name of the list. |
The following table displays commonly used List methods:
NAME | DESCRIPTION |
|---|---|
Adds an item to the list. | |
Deletes the list permanently. | |
Gets an item from the list using the item's ID. | |
Gets a collection of items based on the supplied | |
Sends the list to the Recycle Bin. This is what happens when you delete a list via the browser. | |
Saves your changes to the list, which are applied the next time |
To create a new list or library, you use the ListCreationInformation class. The ListCreationInformation class has various properties you must populate before passing it to the Add method on the Lists collection of the site. At a minimum, you must populate the Title and TemplateType properties as shown in the following code snippet:
ListCreationInformation info = new ListCreationInformation();
info.Title = "My New List";
info.TemplateType = (int)ListTemplateType.Tasks;

site.Lists.Add(info);

context.ExecuteQueryAsync(OnListCreated, OnFailure);
In the code snippet, the new list is named "My New List" and the template type is Tasks. After the ListCreationInformation object is configured, pass it to the Add method on the site's Lists property. After the ExecuteQueryAsync method is called, SharePoint will create the list. Notice that the TemplateType property is set to the ListTemplateType.Tasks enumeration value. You must cast the ListTemplateType enumeration value to the int (integer) data type when setting the value of the TemplateType property. The following table lists the values of the ListTemplateType enumeration and their descriptions:
NAME |
|
|---|---|
Announcements | Announcements |
Calendar | Events |
Contacts | Contacts |
Custom List | GenericList |
Discussion Board | DiscussionBoard |
Document Library | DocumentLibrary |
Form Library | XMLForm |
Issue Tracking | IssueTracking |
Links | Links |
Picture Library | PictureLibrary |
Project Tasks | GanttTasks |
Survey | Survey |
Tasks | Tasks |
Wiki Page Library | WebPageLibrary |
To modify a list or library, you must call the GetByTitle method of the Lists collection to get the List object. Afterwards, you can modify the list's properties and call the list's Update method to save your changes. To delete a list, call the Recycle method of the list, which sends the list to the Recycle Bin. To permanently delete the list, call the DeleteObject method instead.
Other than managing the items or documents in a list or library, managing the fields in a list or library will be your most common list-related task. The Fields property on the List class returns a collection of field properties that you can use to add new fields, remove fields, or access the properties of the fields themselves. All Field objects have the following properties and methods:
PROPERTY | |
|---|---|
If true, the field can be removed from the list. | |
The default value, if any, for the field. | |
| The description for the field. |
The type of field. There is a list of field types later in the chapter. | |
If true, the field can be used to filter the list. Some fields, including "Multiple lines of text" fields, cannot be used as filters. | |
If true, the field does not appear in the browser UI. | |
| The GUID identifier for the field. |
The original name of the field. The internal name can never be changed after the field is created. | |
If true, the field is read-only. | |
If true, the field cannot be deleted or modified in any way. | |
If true, the field can be used to sort the list. Some fields, including "Multiple lines of text" fields, cannot be used to sort the list. | |
The display name of the field. | |
| The display name for the field's type. |
METHOD | DESCRIPTION |
|---|---|
| Deletes the field permanently from the list. |
Saves your changes to the field, which are applied the next time |
You may have noticed that the previous tables of field properties and methods did not include any of the settings you have used to add a field via the browser. This is because the Field class is the parent or base class of the various classes used to create fields. When you want to add or modify a field in a list, you use one of the following classes that matches the type of your field:
To add a field to a list, you must call the AddFieldAsXml method on the list's Fields collection. The AddFieldAsXml method takes primarily a string parameter with the XML of the field definition and returns a Field object that you can cast to one of the classes in the previous table to configure extra settings. The AddFieldAsXml method also takes a Boolean parameter for adding the field to the list's default view and an AddFieldOptions value to specify additional options for the field. Consider the following code snippet:
Field field = list.Fields.AddFieldAsXml(@"<Field DisplayName='My New Field'
  Type='Note' />", true, AddFieldOptions.DefaultValue);

FieldMultiLineText textField = context.CastTo<FieldMultiLineText>(field);
textField.NumberOfLines = 6;
textField.RichText = true;
textField.Update();

context.ExecuteQueryAsync(OnFieldCreated, OnFailure);
The AddFieldAsXml method is called to create a rich text field using the field XML string with the default options. The field is added to the list and its default view. The AddFieldAsXml method returns a Field object, which is subsequently cast to a FieldMultiLineText object by calling the CastTo<> method on the ClientContext class. The previous table contains a list of the valid values you use for the Type attribute in your field XML.
Using the FieldMultiLineText object, the number of lines and rich text support is configured for the field as in the browser UI. Finally, the Update method is called on the field to save your changes. After the ExecuteQueryAsync method is called, SharePoint adds the field to the list.
To modify a field, you call either the GetByInternalNameOrTitle or GetByTitle method on the Fields property of the list. Afterwards, you can cast it to the appropriate field class as shown in the previous code snippet. When you are finished with your changes, call the Update method on the field and the ExecuteQueryAsync method on the ClientContext class. To delete a field, you call the DeleteObject method on the field. In the next activity, you will use these List and Field classes to display, modify, and create lists in your site.
Warning
There is no Recycle method on the Field class so when you delete the field, it is permanent. When you delete a field, the values for the deleted field in the existing items and documents are permanently deleted, too.
Manage Lists and Libraries
In this activity, you create a simple Silverlight control to display your site's lists and libraries and their fields. You will also create a list and a field using the Client Object Model.
Open Visual Studio 2010 from your Start menu.
Select File
Choose Silverlight from the list of templates and select Silverlight Application from the list of applications.
Enter a name for your project and click the OK button.
In the New Silverlight Application dialog, uncheck the "Host the Silverlight application in a new Web site" checkbox, ensure that Silverlight 4 is selected in the drop-down list, and click the OK button.
When the project is loaded, the
MainPage.xamlfile should automatically open. If it does not open, double-click the file in the Solution Explorer pane.Right-click the
Referencesfolder in the Solution Explorer pane and choose Add Reference. The Add Reference dialog appears.Click the Browse button and navigate to the location of the
Microsoft.SharePoint.Client.Silverlight.dllandMicrosoft.SharePoint.Client.Silverlight.Runtime.dllfiles.Click the Open button to return to the Add Reference dialog.
Click the Add button to add the references to the project.
In
MainPage.xaml, set the following property values on theUserControltag:PROPERTY
VALUE
d:DesignHeight
400
d:DesignWidth
600
With the
UserControlselected, click the Events button in the Properties window and double-click theLoadedevent.In
MainPage.xaml, set the following property values on theGridtag:PROPERTY
VALUE
Width
600
Height
400
In
MainPage.xaml, add a DataGrid from the toolbox and configure the following properties:PROPERTY
VALUE
HorizontalAlignment
Stretch
Name
listsDataGrid
VerticalAlignment
Top
Height
164
AutoGenerateColumns
False
With the DataGrid selected, click the Events button in the Properties window and double-click the
SelectionChangedevent.In
MainPage.xaml, add a Button from the toolbox and configure the following properties:PROPERTY
VALUE
Content
Add List
Height
23
HorizontalAlignment
Left
Margin
12,170,0,0
Name
addListButton
VerticalAlignment
Top
Width
75
In
MainPage.xaml, add a Button from the toolbox and configure the following properties:PROPERTY
VALUE
Content
Delete List
Height
23
HorizontalAlignment
Left
Margin
93,170,0,0
Name
deleteListButton
VerticalAlignment
Top
Width
75
In
MainPage.xaml, add a Button from the toolbox and configure the following properties:PROPERTY
VALUE
Content
Add Field
Height
23
HorizontalAlignment
Left
Margin
12,369,0,0
Name
addFieldButton
VerticalAlignment
Top
Width
75
In
MainPage.xaml, add a Button from the toolbox and configure the following properties:PROPERTY
VALUE
Content
Delete Field
Height
23
HorizontalAlignment
Left
Margin
93,369,0,0
Name
deleteFieldButton
VerticalAlignment
Top
Width
75
Add event handlers for each of the buttons created in Steps 16–19 by selecting the button, clicking the Events button in the Properties pane, and double-clicking the
Clickevent.In
MainPage.xaml, add a DataGrid from the toolbox and configure the following properties:PROPERTY
VALUE
AutoGenerateColumns
False
Height
164
HorizontalAlignment
Stretch
Margin
0,199,0,0
Name
fieldsDataGrid
VerticalAlignment
Top
Inside the
listsDataGridtag, insert the following code:<sdk:DataGrid.Columns> <sdk:DataGridTextColumn Binding="{Binding Title}" Header="Title" /> <sdk:DataGridTextColumn Binding="{Binding BaseType}" Header="Base Type" /> <sdk:DataGridTextColumn Binding="{Binding Description}" Header="Description" /> </sdk:DataGrid.Columns>Inside the
fieldsDataGridtag, insert the following code:<sdk:DataGrid.Columns> <sdk:DataGridTextColumn Binding="{Binding Title}" Header="Title" /> <sdk:DataGridTextColumn Binding="{Binding Description}" Header="Description" /> <sdk:DataGridTextColumn Binding="{Binding TypeDisplayName}" Header="TypeDisplayName" /> <sdk:DataGridTextColumn Binding="{Binding TypeAsString}" Header="TypeAsString" /> </sdk:DataGrid.Columns>Compare the layout of your
MainPage.xamlfile with the one shown in Figure 14-11 and make any necessary changes.In
MainPage.xaml.cs, add the followingusingstatement at the top of the page:using Microsoft.SharePoint.Client;
Add the following
privatefields inside theMainPageclass:private IEnumerable<List> listResults; private IEnumerable<Field> fieldResults;
Add the following methods inside the
MainPageclass:private void OnFailure(object sender, ClientRequestFailedEventArgs e) { } private void RefreshLists() { }private void OnListsSuccess(object sender, ClientRequestSucceededEventArgs e) { } private void OnListCreated(object sender, ClientRequestSucceededEventArgs e) { } private void OnListDeleted(object sender, ClientRequestSucceededEventArgs e) { } private void RefreshFields() { } private void OnFieldsSuccess(object sender, ClientRequestSucceededEventArgs e) { } private void OnFieldCreated(object sender, ClientRequestSucceededEventArgs e) { } private void OnFieldDeleted(object sender, ClientRequestSucceededEventArgs e) { }In the
addFieldButton_Clickmethod, insert the following code to add a field to the selected list in the listsDataGrid control:ClientContext context = ClientContext.Current; if (listsDataGrid.SelectedItem is List) { List list = (List)listsDataGrid.SelectedItem; Field field = list.Fields.AddFieldAsXml(@"<Field DisplayName='My New Field' Type='Note' />", true, AddFieldOptions.DefaultValue); FieldMultiLineText textField = context.CastTo<FieldMultiLineText>(field); textField.NumberOfLines = 6; textField.RichText = true; textField.Update(); context.ExecuteQueryAsync(OnFieldCreated, OnFailure); }In the
addListButton_Clickmethod, insert the following code to add a new list to the site:ClientContext context = ClientContext.Current; Web site = context.Web; ListCreationInformation info = new ListCreationInformation(); info.Title = "My New List"; info.Description = "List created using the Silverlight Client Object Model."; info.TemplateType = (int)ListTemplateType.Tasks; site.Lists.Add(info); context.ExecuteQueryAsync(OnListCreated, OnFailure);
In the
deleteFieldButton_Clickmethod, insert the following code to delete the selected field in the fieldsDataGrid control:ClientContext context = ClientContext.Current; if (fieldsDataGrid.SelectedItem is Field) { Field field = (Field)fieldsDataGrid.SelectedItem; field.DeleteObject(); context.ExecuteQueryAsync(OnFieldDeleted, OnFailure); }In the
deleteListButton_Clickmethod, insert the following code to delete the selected list in the listsDataGrid control:ClientContext context = ClientContext.Current; if (listsDataGrid.SelectedItem is List) { List list = (List)listsDataGrid.SelectedItem; list.DeleteObject(); context.ExecuteQueryAsync(OnListDeleted, OnFailure); }In the
listsDataGrid_SelectionChangedmethod, insert the following code to call theRefreshFieldsmethod when a list is selected in the listsDataGrid control:RefreshFields();
In the
OnFailuremethod, insert the following code to display any errors from the call to SharePoint:this.Dispatcher.BeginInvoke(delegate() { MessageBox.Show(e.Message); });In the
OnFieldCreatedmethod, insert the following code to call theRefreshFieldsmethod:fieldsDataGrid.Dispatcher.BeginInvoke(delegate() { RefreshFields(); });In the
OnFieldDeletedmethod, insert the following code to call theRefreshFieldsmethod:fieldsDataGrid.Dispatcher.BeginInvoke(delegate() { RefreshFields(); });In the
OnFieldsSuccessmethod, insert the following code to bind the fields from SharePoint to the fieldsDataGrid control:fieldsDataGrid.Dispatcher.BeginInvoke(delegate() { fieldsDataGrid.ItemsSource = fieldResults; });In the
OnListCreatedmethod, insert the following code to call theRefreshListsmethod:listsDataGrid.Dispatcher.BeginInvoke(delegate() { RefreshLists(); });In the
OnListDeletedmethod, insert the following code to call theRefreshListsmethod:listsDataGrid.Dispatcher.BeginInvoke(delegate() { RefreshLists(); });In the
OnListsSuccessmethod, insert the following code to bind the lists from SharePoint to the listsDataGrid control:listsDataGrid.Dispatcher.BeginInvoke(delegate() { listsDataGrid.ItemsSource = listResults; });In the
RefreshFieldsmethod, insert the following code to request the fields for the selected list in the listsDataGrid control:fieldsDataGrid.ItemsSource = null; if (listsDataGrid.SelectedItem is List) { List list = (List)listsDataGrid.SelectedItem; ClientContext context = ClientContext.Current;var query = from f in list.Fields where !f.Hidden select f; this.fieldResults = context.LoadQuery(query); context.ExecuteQueryAsync(OnFieldsSuccess, OnFailure); }In the
RefreshListsmethod, insert the following code to request the lists for the current site:ClientContext context = ClientContext.Current; Web site = context.Web; var query = from l in site.Lists where !l.Hidden select l; this.listResults = context.LoadQuery(query); context.ExecuteQueryAsync(OnListsSuccess, OnFailure);In the
UserControl_Loadedmethod, insert the following code to call theRefreshListsmethod:RefreshLists();
Compile the project by selecting Build XXX Build Solution from the menu bar.
Check the Error List pane for any errors and fix them before continuing.
Click the Show All Files button in the Solution Explorer pane.
In the Solution Explorer pane, expand the
BinandDebugfolders and select the XAP file.Double-click the value of the Full Path property in the Properties pane to select it and press Ctrl+C to copy the path to the clipboard.
Navigate your browser to a document library in your SharePoint site.
Select Upload Document from the Documents tab on the ribbon.
In the Upload Document dialog, click the Browse button.
Paste the file path from Step 47 and click Open.
Click the OK button to close the Upload Document dialog and upload the XAP file to SharePoint.
When the document library is updated with your file, right-click its name and choose Copy Hyperlink to copy the URL of your XAP file.
Navigate your browser to a web part page in your site.
Select Edit Page from the Site Actions menu to place the page in Edit mode.
Select Web Part from the Insert tab on the ribbon.
Choose Media and Content from the Categories list and select Silverlight Web Part from the Web Parts list.
Select the location to put the web part from the "Add Web Part to" drop-down list and click the Add button.
In the Silverlight Web Part dialog, paste the URL from Step 53 and click the OK button.
Configure the web part properties as follows:
Height
400
Width
600
Select Save & Close from the Page tab on the ribbon.
Refresh the page in your browser.
Wait until the upper DataGrid control is populated with the non-hidden lists in the site.
Select various lists from the upper DataGrid control and watch the non-hidden fields in the list populate the bottom DataGrid control.
Click the Add List button, and the new list "My New List" appears in the upper DataGrid control.
Select the "My New List" list in the upper DataGrid control and click the Add Field button.
Notice the new field "My New Field" in the bottom DataGrid control.
Select the "My New Field" field in the bottom DataGrid control and click the Delete Field button.
Notice the "My New Field" field disappear from the list.
Select the "My New List" list in the upper DataGrid control and click the Delete List button.
Notice the "My New List" list disappear from the site.

How It Works
When the Silverlight control loads, it calls SharePoint to get the non-hidden lists and libraries in the site. The list is bound to the upper DataGrid control. When you select a list in the upper DataGrid control, the control calls SharePoint to get the non-hidden fields for the selected list and bind them to the bottom DataGrid control. When you click the Add List button, a Tasks list is added to the site. When you click the Add Field button, a rich text field is added to the selected list. The Delete List and Delete Field buttons delete the selected list and field, respectively.
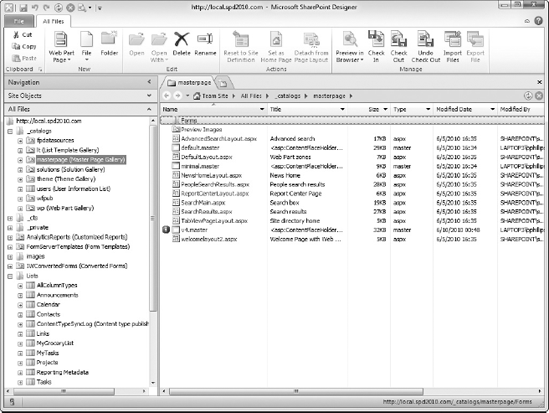
In Figure 14-12, you see the virtual file system of SharePoint that appears when you pin the All Files window in SharePoint Designer. Many files and folders do not appear in the UI. At times, you may need to manipulate files and folders using the Client Object Model, especially if you want to upload documents or create folders inside a document library.
In the Client Object Model, folders are represented by the Folder class and files are represented by the File class. Not all files and folders are in a document library but you can still access them using the Client Object Model. You can get a Folder object by using one of the following:
Calling the
Webclass'sRootFolderproperty, which returns the folder at the root of the SharePoint site.Calling the
Listclass'sRootFolderproperty, which returns the folder at the root of the SharePoint list.Calling the
Webclass'sGetFolderByServerRelativeUrlmethod, passing in the server-relative URL of the folder.
If you already have a Folder object, you can get its parent folder using the ParentFolder property or its subfolders using the Folders property. The Folder class also has a Files property that returns a list of File objects for the files in the folder.
You create a folder by calling the Add method on the Folders property on an existing Folder object, passing in the name of the new folder. The Add method returns a Folder object, which you can use to create subfolders or add files.
To rename a folder, you get the Folder object representing the folder and modify its Name property. Afterwards, you call the Folder object's Update method. To delete a folder, you call the Folder object's Recycle method, which sends the folder to the Recycle Bin. To permanently delete a folder, call the DeleteObject method instead, which also permanently deletes the folder's contents.
The File object represents a file in the virtual file system whether the file is located in a document library or not. The File object is interesting because you can modify its properties, including its name, and you can modify its contents. The File class has the following properties and methods:
PROPERTY | DESCRIPTION |
|---|---|
Author | The user who created the file |
CheckedOutByUser | The user who has the file checked out |
CustomizedPageStatus | Whether the page has been customized or not |
Level | |
MajorVersion | The major version of the file |
MinorVersion | The minor version of the file |
ModifiedBy | The user who last modified the file |
Name | The name of the file |
ServerRelativeUrl | The URL of the file relative to the server name |
Title | The display name of the file |
Versions | The previous versions of the file |
METHOD | DESCRIPTION |
|---|---|
Checks in the file. | |
Checks out the file so nobody else can modify it. | |
Copies the file to another location. | |
| Deletes the file permanently. |
Returns a | |
Moves a file. | |
Gets the contents of the file itself. | |
| Publishes the file for approval. |
| Sends the file to the Recycle Bin. |
Method | Description |
Updates the contents of an existing file. | |
Reverses a checkout and any pending file changes. | |
If the file is submitted for approval, this method un-submits the file. Otherwise, this method rolls back to the previous major version of the file. |
To add a file to a folder, you create a FileCreationInformation object and configure its properties. Afterwards, you call the Add method on the Files property for a Folder object passing in the FileCreationInformation object. The following code snippet shows this in action:
foreach (System.IO.FileInfo file in files) {
  using (System.IO.FileStream fs = file.OpenRead()) {
    byte[] b = new byte[fs.Length];
    fs.Read(b, 0, (int)fs.Length);
    fs.Close();

    FileCreationInformation info = new FileCreationInformation();
    info.Content = b;
    info.Overwrite = false;
    info.Url = file.Name;

    folder.Files.Add(info);
  }
}

context.ExecuteQueryAsync(OnUploadedSuccess, OnFailure);
In the snippet, a foreach loop is used to iterate a list of FileInfo objects that represent files on a workstation. Inside the loop, the OpenRead method is called on the FileInfo object to get a FileStream object and load the file's contents into a byte array. Next, the FileCreationInformation object is created and populated with the file's name and contents. The FileCreationInformation object is also configured to not override an existing file. Finally, the FileCreationInformation object is added to the Folder object's Files property via the Add method. Like everything else in this chapter, you still must call the ExecuteQueryAsync method for SharePoint to process any of these operations.
To modify a file, you loop through the Files property on a folder or, more commonly, call the GetFileByServerRelativeUrl method on the Web class, passing in the server relative URL of the file. With the File object, you can rename it using the Name property, read its contents using the OpenBinaryDirect method, or update its contents using the SaveBinary method. Afterwards, call the Update method to save your changes. With the File and Folder classes, you can create a tree displaying the content and structure of your site as shown in the following activity.
Warning
Calling the Update method on a File object is the same as clicking the Save button in SharePoint Designer when a file is opened in Advanced mode. This causes the file to become customized. For updating files in a document library, this is normal behavior. But using this method to update ASPX or master pages can negatively impact performance, especially on sites with heavy usage.
Manage Files and Folders
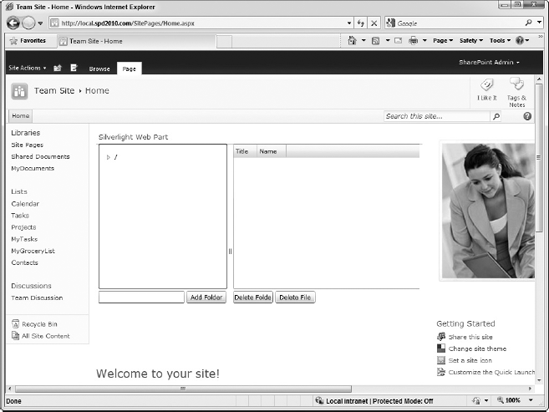
In this activity, you create a Silverlight control that you can use to display the virtual file system of the SharePoint site and drag and drop files into any folder in the site.
Open Visual Studio 2010 from your Start menu.
Select File
Choose Silverlight from the list of templates and select Silverlight Application from the list of applications.
Enter a name for your project and click the OK button.
In the New Silverlight Application dialog, uncheck the "Host the Silverlight application in a new Web site" checkbox, ensure that Silverlight 4 is selected in the drop-down list, and click the OK button.
When the project is loaded, the
MainPage.xamlfile should automatically open. If it does not open, double-click the file in the Solution Explorer pane.Right-click the
Referencesfolder in the Solution Explorer pane and choose Add Reference. The Add Reference dialog appears.Click the Browse button and navigate to the location of the
Microsoft.SharePoint.Client.Silverlight.dllandMicrosoft.SharePoint.Client.Silverlight.Runtime.dllfiles.Click the Open button to return to the Add Reference dialog.
Click the Add button to add the references to the project.
In
MainPage.xaml, select theUserControltag and set its width to 700, then click the Events button in the Properties window, and double-click theLoadedevent.Select the Grid control and click the Ellipsis button next to ColumnDefinitions in the Properties pane.
When the Collection Editor dialog appears, add three column definitions with the following widths:
35*
10
65*
Click the OK button to save the column definitions.
Add a StackPanel to the Grid control. In the text editor, remove any attributes on the newly added
StackPaneltag.Add a TreeView to the StackPanel control and set its Height to 270. In the text editor, remove any other attributes on the newly added
TreeViewtag.Insert the following code just after the TreeView control:
<StackPanel Orientation="Horizontal" Margin="0,4,0,0">
  <TextBox Height="23" Name="nameTextBox" Width="160" />
  <Button Content="Add Folder" Height="23" Name="addFolderButton" Width="75"
    Margin="4,0,0,0" />
</StackPanel>
With the addFolderButton selected, click the Events button in the Properties window and double-click the
Clickevent.Add a GridSplitter to the Grid control and configure the following properties and remove any other properties:
PROPERTY
VALUE
Width
10
Grid.Column
1
Add a StackPanel to the Grid control and set its
Grid.Columnproperty to 2 and remove any other properties.Inside the recently added StackPanel control, insert the following code:
<sdk:DataGrid Name="dataGrid1" AutoGenerateColumns="False" AllowDrop="True"
  Drop="dataGrid1_Drop" Height="270">
  <sdk:DataGrid.Columns>
    <sdk:DataGridTextColumn Header="Title" Binding="{Binding Title}" />
    <sdk:DataGridTextColumn Header="Name" Binding="{Binding Name}" />
  </sdk:DataGrid.Columns>
</sdk:DataGrid>
<StackPanel Orientation="Horizontal" Margin="0,4,0,0">
  <Button Content="Delete Folder" Height="23" Name="deleteFolderButton"
    Width="75" />
  <Button Content="Delete File" Height="23" Name="deleteFileButton"
    Width="75" Margin="4,0,0,0" />
</StackPanel>
Double-click each of the deleteFolderButton and deleteFileButton controls to add event handlers for their
Clickevents.Compare your MainPage control with Figure 14-13 and make any adjustments.
In the
MainPage.xaml.csfile, add the followingusingstatement at the top of the file:using Microsoft.SharePoint.Client;
Add the following fields inside the
MainPageclass:private TreeViewItem lastExpanded; private TreeViewItem lastSelected;
Add the following methods inside the
MainPageclass:private void AddFolderToTree(Folder folder, ItemCollection parentCollection) { } private void AddLoadingNode(TreeViewItem parent) { } private void OnFailure(object sender, ClientRequestFailedEventArgs e) { } private void OnFileSuccess(object sender, ClientRequestSucceededEventArgs e) { } private void OnFolderSuccess(object sender, ClientRequestSucceededEventArgs e) { }private void OnUploadedSuccess(object sender, ClientRequestSucceededEventArgs e) { } private void RefreshFiles(TreeViewItem item) { } private void item_Selected(object sender, RoutedEventArgs e) { } private void treeViewItem_Expanded(object sender, RoutedEventArgs e) { } private void dataGrid1_Drop(object sender, DragEventArgs e) { }Inside the
addFolderButton_Clickmethod, insert the following code to add a new subfolder to the selected folder:ClientContext context = ClientContext.Current; if (treeView1.SelectedItem != null) { TreeViewItem item = (TreeViewItem)treeView1.SelectedItem; Folder folder = (Folder)item.Tag; if (!string.IsNullOrEmpty(nameTextBox.Text)) { folder.Folders.Add(nameTextBox.Text); context.ExecuteQueryAsync(OnFolderSuccess, OnFailure); } }Inside the
AddFolderToTreemethod, insert the following code to add folders to the TreeView control:TreeViewItem item = new TreeViewItem(); item.Header = folder.Name; item.Tag = folder; item.Expanded += new RoutedEventHandler(treeViewItem_Expanded); item.Selected += new RoutedEventHandler(item_Selected); item.Dispatcher.BeginInvoke(delegate() { AddLoadingNode(item); lastExpanded.Items.Add(item); });In the
AddLoadingNodemethod, insert the following code to add a dummy node to unexpanded folders so that the expand icon appears in case the folder has subfolders:TreeViewItem loading = new TreeViewItem(); loading.Header = "Loading..."; parent.Items.Add(loading);
In the
dataGrid1_Dropmethod, insert the following code to upload any files that are dropped on the DataGrid control to the selected folder:ClientContext context = ClientContext.Current; if (treeView1.SelectedItem != null) { TreeViewItem item = (TreeViewItem)treeView1.SelectedItem; Folder folder = (Folder)item.Tag; if (e.Data != null && e.Data.GetDataPresent(DataFormats.FileDrop)) { System.IO.FileInfo[] files = e.Data.GetData(DataFormats.FileDrop) as System.IO.FileInfo[]; if (files != null) { foreach (System.IO.FileInfo file in files) { using (System.IO.FileStream fs = file.OpenRead()) { byte[] b = new byte[fs.Length]; fs.Read(b, 0, (int)fs.Length); fs.Close(); FileCreationInformation info = new FileCreationInformation(); info.Content = b; info.Overwrite = false; info.Url = file.Name; folder.Files.Add(info); } } context.ExecuteQueryAsync(OnUploadedSuccess, OnFailure); } } }In the
deleteFileButton_Clickmethod, insert the following code to delete the selected file in the DataGrid control:ClientContext context = ClientContext.Current; if (dataGrid1.SelectedItem is File) { File file = (File)dataGrid1.SelectedItem; file.DeleteObject(); context.ExecuteQueryAsync(OnFolderSuccess, OnFailure); }In the
deleteFolderButton_Clickmethod, insert the following code to delete the selected folder in the TreeView control:ClientContext context = ClientContext.Current; if (treeView1.SelectedItem != null) { TreeViewItem item = (TreeViewItem)treeView1.SelectedItem; Folder folder = (Folder)item.Tag; folder.DeleteObject(); context.ExecuteQueryAsync(OnFolderSuccess, OnFailure); }In the
item_Selectedmethod, insert the following code to call theRefreshFilesmethod when a folder is selected in the TreeView control:TreeViewItem item = (TreeViewItem)sender; RefreshFiles(item);
In the
OnFailuremethod, insert the following code to display any error messages from the call to SharePoint:this.Dispatcher.BeginInvoke(delegate() { MessageBox.Show(e.Message); });In the
OnFileSuccessmethod, insert the following code to bind the list of files for the selected folder to the DataGrid control:lastSelected.Dispatcher.BeginInvoke(delegate() { Folder folder = (Folder)lastSelected.Tag; dataGrid1.ItemsSource = folder.Files; });In the
OnFolderSuccessmethod, insert the following code to add the subfolders for the expanded folder to the TreeView control:lastExpanded.Dispatcher.BeginInvoke(delegate() { Folder folder = (Folder)lastExpanded.Tag; lastExpanded.Items.Clear(); var results = from f in folder.Folders.ToArray() orderby f.Name select f; foreach (Folder child in results) { AddFolderToTree(child, lastExpanded.Items); } });In the
OnUploadedSuccessmethod, insert the following code to refresh the files in the DataGrid control after a file has been uploaded to the folder:treeView1.Dispatcher.BeginInvoke(delegate() { if (treeView1.SelectedItem != null) { RefreshFiles((TreeViewItem)treeView1.SelectedItem); } });In the
RefreshFilesmethod, insert the following code to request the files in the selected folder from SharePoint:ClientContext context = ClientContext.Current; Folder folder = (Folder)item.Tag; lastSelected = item; dataGrid1.ItemsSource = null;
context.Load(folder.Files);
context.ExecuteQueryAsync(OnFileSuccess, OnFailure);
In the
treeViewItem_Expandedmethod, insert the following code to request the subfolders for the expanded folder in the TreeView control:TreeViewItem item = (TreeViewItem)sender; if (item.Items.Count > 0 && (item.Items[0] as TreeViewItem).Tag == null) { ClientContext context = ClientContext.Current; Folder folder = (Folder)item.Tag; lastExpanded = item; context.Load(folder.Folders); context.ExecuteQueryAsync(OnFolderSuccess, OnFailure); }In the
UserControl_Loadedmethod, insert the following code to add the root node to the TreeView control and request the subfolders of the site's root folder from SharePoint:ClientContext context = ClientContext.Current; TreeViewItem root = new TreeViewItem(); root.Header = "/"; root.Tag = context.Web.RootFolder; root.Expanded += new RoutedEventHandler(treeViewItem_Expanded); root.Selected += new RoutedEventHandler(item_Selected); AddLoadingNode(root); treeView1.Items.Add(root);
Compile the project by selecting Build
Check the Error List pane for any errors and fix them before continuing.
Click the Show All Files button in the Solution Explorer pane.
In the Solution Explorer pane, expand the
BinandDebugfolders and select the XAP file.Double-click the value of the Full Path property in the Properties pane to select it and press Ctrl+C to copy the path to the clipboard.
Navigate your browser to a document library in your SharePoint site.
Select Upload Document from the Documents tab on the ribbon.
In the Upload Document dialog, click the Browse button.
Paste the file path from Step 45 and click Open.
Click the OK button to close the Upload Document dialog and upload the XAP file to SharePoint.
When the document library is updated with your file, right-click its name and choose Copy Hyperlink to copy the URL of your XAP file.
Navigate your browser to a web part page in your site.
Select Edit Page from the Site Actions menu.
Select Web Part from the Insert tab on the ribbon.
Choose Forms from the Categories list and select HTML Form Web Part from the Web Parts list.
Edit the web part's properties and click the Source Editor button.
In the Text Editor dialog, insert the following code, replacing
XAPFileUrlSiteUrl<div id="SilverlightObjectDiv" style="display:block"> <object id="SilverlightObjectTag" data="data:application/x-silverlight-2," type="application/x-silverlight-2" style="display:block" height="400px" width="600px" class="ms-dlgDisable"> <param name="source" value="
XAPFileUrlSiteUrlSelect the location to put the web part from the "Add Web Part to" drop-down list and click the Add button.
In the Silverlight Web Part dialog, paste the URL from Step 51 and click the OK button.
Configure the web part properties as follows:
Height
400
Width
600
Select Save & Close from the Page tab on the ribbon.
Refresh the page in your browser.
Expand the folders in the TreeView control to show the subfolders loading dynamically.
Select some of the folders in the TreeView control and watch the files appear in the DataGrid control.
Select one of the folders in the TreeView control, enter the name for a folder in the textbox under the TreeView control, and click the Add Folder button.
Select the newly created folder.
Drag some files from your workstation and drop them on top of the DataGrid control.
Watch the DataGrid refresh with the addition of your files.
Select the root folder for a document library and repeat Step 67.
Open a new browser window and navigate to the document library from Step 69.
Notice that the files are in the document library.
Select each of the files you uploaded in the DataGrid control and click the Delete File button.
Watch the files disappear from the DataGrid control and from the document library.
Select the folder you created in Step 65 and click the Delete Folder button.
How It Works
When the Silverlight control loads, the subfolders of the root folder of the website are requested from SharePoint and added to the TreeView control. When you expand a folder in the TreeView control, its subfolders are requested from SharePoint if they have not already been loaded. When you select a folder in the TreeView control, its files are requested from SharePoint and bound to the DataGrid control. Clicking the Add Folder button adds a new folder to the selected folder in the TreeView control using the value entered into the textbox and the name of the folder. Dragging and dropping files on the DataGrid control causes Silverlight to read the contents of those files and add them to the selected folder in the TreeView control. Finally, the Delete Folder and Delete File buttons delete the selected folder and file, respectively.
Note
If you are wondering why you used the HTML Form Web Part instead of the Silverlight Web Part, here is the reason: the Silverlight Web Part configures the Silverlight object tag to run in windowless mode. This allows the web part menu to appear on top of the Silverlight control when the menu is displayed. If the Silverlight object tag were not running in windowless mode, the web part menu would appear behind the Silverlight control the same way an HTML element does when it overlaps space with a listbox or drop-down list. One of the disadvantages of running in windowless mode is that drag-and-drop events are not supported. You still can use the Silverlight Web Part to host the control from this activity, and all the functionality will still work except for dragging and dropping files.
You can also use the object model to modify the Quick Launch and Top Navigation bars in your site. You access the Quick Launch and Top Navigation bars via the following code snippet:
ClientContext context = ClientContext.Current;
Web site = context.Web;
context.Load(site.Navigation.QuickLaunch);
context.Load(site.Navigation.TopNavigationBar);

context.ExecuteQueryAsync(OnSuccess, OnFailure);
When the OnSuccess method is called, the site.Navigation.QuickLaunch and site.Navigation.TopNavigationBar properties are populated with the NavigationNode objects that correspond to the clickable items on both bars. The NavigationNode object has the following properties and methods:
PROPERTY | DESCRIPTION |
|---|---|
| The text displayed for the navigation node |
The URL for the navigation node's hyperlink | |
The list of child navigation nodes |
METHOD | DESCRIPTION |
|---|---|
| Deletes the navigation node and its children |
| Saves your changes to the navigation node |
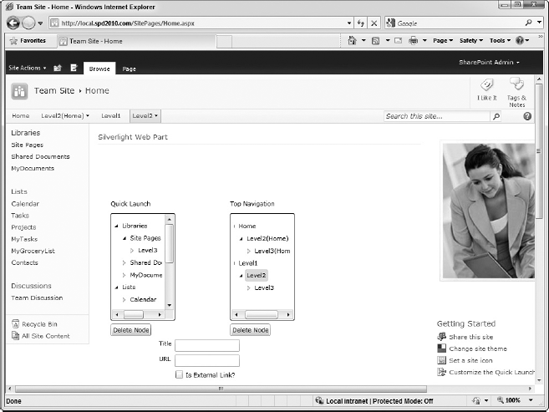
When you start using the Client Object Model to modify these bars, determining where to put the nodes to make them appear where you want on the screen may be a little difficult. Take a look at Figure 14-14.
In the figure, the Quick Launch bar is organized with Libraries, Lists, and Discussions at the top levels and the individual lists and libraries underneath the appropriate top level. If you look at the tree control for the Quick Launch, you will notice that it matches the structure of the Quick Launch bar except that it does not display any nodes lower than two levels deep. The node named Level3 does not appear at all under Site Pages in the Quick Launch bar.
If you look at the Top Navigation bar, you see these four tabs:
Home
Level2(Home)
Level1
Level2
But in the tree control for the Top Navigation bar, you see only the Home and Level1 nodes at the top level. This means that all nodes at levels 1 and 2 will appear as tabs on the Top Navigation bar. Nodes at level 3 will appear as menu items under their parent node's tab. Nodes at levels 4 and below will not appear at all.
To create a navigation node, you must create a NavigationNodeCreationInformation object. The NavigationNodeCreationInformation class has the same properties as the NavigationNode, including the following additional properties:
NAME | DESCRIPTION |
|---|---|
If true, the | |
Specifies the node after which the new node should be inserted. | |
If you set this to true, the node is added at the end of the list. Otherwise, it is added at the beginning of the list if |
After you have configured the NavigationNodeCreationInformation object, you call the Add method on the Children property of a NavigationNode object or the Add method on the Navigation.QuickLaunch or Navigation.TopNavigation properties of the Web object.
To update a NavigationNode, you will need to programmatically traverse the NavigationNode objects until you get to your target. Then, you can update its properties and call the Update method to save your changes. To delete a NavigationNode, simply call its DeleteObject method. Now that you have been introduced to the Navigation and NavigationNode classes, you can modify your site's navigation by following the steps in the next activity.
Manage Navigation
In this activity, you create a Silverlight control to modify the Quick Launch and Top Navigation bars of your SharePoint site.
Open Visual Studio 2010 from your Start menu.
Select File
Choose Silverlight from the list of templates and select Silverlight Application from the list of applications.
Enter a name for your project and click the OK button.
In the New Silverlight Application dialog, uncheck the "Host the Silverlight application in a new Web site" checkbox, ensure that Silverlight 4 is selected in the drop-down list, and click the OK button.
When the project is loaded, the
MainPage.xamlfile should automatically open. If it does not open, double-click the file in the Solution Explorer pane.Right-click the
Referencesfolder in the Solution Explorer pane and choose Add Reference. The Add Reference dialog appears.Click the Browse button and navigate to the location of the
Microsoft.SharePoint.Client.Silverlight.dllandMicrosoft.SharePoint.Client.Silverlight.Runtime.dllfiles.Click the Open button to return to the Add Reference dialog.
Click the Add button to add the references to the project.
In
MainPage.xaml, set the following property values on theUserControltag:PROPERTY
VALUE
d:DesignHeight
450
d:DesignWidth
400
With the UserControl selected, click the Events button in the Properties window and double-click the
Loadedevent.In
MainPage.xaml, set the following property values on theGridtag:PROPERTY
VALUE
Width
400
Height
450
Add a TreeView control to the Grid control and set the following properties:
PROPERTY
VALUE
Height
200
HorizontalAlignment
Left
Margin
23,54,0,0
Name
quickLaunchTreeView
VerticalAlignment
Top
Width
120
Add another TreeView control to the Grid control and set the following properties:
PROPERTY
VALUE
Height
200
HorizontalAlignment
Left
Margin
246,54,0,0
Name
topNavTreeView
VerticalAlignment
Top
Width
120
Add a Label to the Grid control and set the following properties:
PROPERTY
VALUE
Height
28
HorizontalAlignment
Left
Margin
23,28,0,0
VerticalAlignment
Top
Width
120
Content
Quick Launch
Add another Label to the Grid control and set the following properties:
PROPERTY
VALUE
Height
28
HorizontalAlignment
Left
Margin
246,28,0,0
Name
label2
VerticalAlignment
Top
Width
120
Content
Top Navigation
Add a Button to the Grid control and set the following properties:
PROPERTY
VALUE
Content
Delete Node
Height
23
HorizontalAlignment
Left
Margin
23,260,0,0
Name
deleteQuickLaunchButton
VerticalAlignment
Top
Width
75
Add another Button to the Grid control and set the following properties:
PROPERTY
VALUE
Content
Delete Node
Height
23
HorizontalAlignment
Left
Margin
246,260,0,0
Name
deleteTopNavButton
VerticalAlignment
Top
Width
75
Add another Button to the Grid control and set the following properties:
PROPERTY
VALUE
Content
Add Quick Launch
Height
23
HorizontalAlignment
Left
Margin
23,390,0,0
Name
addQuickLaunchButton
VerticalAlignment
Top
Width
120
Add another Button to the Grid control and set the following properties:
PROPERTY
VALUE
Content
Add Top Nav
Height
23
HorizontalAlignment
Left
Margin
246,390,0,0
Name
addTopNavButton
VerticalAlignment
Top
Width
120
Add another Label to the Grid control and set the following properties:
PROPERTY
VALUE
Height
28
HorizontalAlignment
Left
Margin
113,289,0,0
Name
label3
VerticalAlignment
Top
Content
Title
Add another Label to the Grid control and set the following properties:
PROPERTY
VALUE
Content
URL
Height
28
HorizontalAlignment
Left
Margin
113,318,0,0
Name
label4
VerticalAlignment
Top
Add a TextBox to the Grid control and set the following properties:
PROPERTY
VALUE
Height
23
HorizontalAlignment
Left
Margin
143,289,0,0
Name
titleTextBox
VerticalAlignment
Top
Width
120
Add another TextBox to the Grid control and set the following properties:
PROPERTY
VALUE
Height
23
HorizontalAlignment
Left
Margin
143,318,0,0
Name
urlTextBox
VerticalAlignment
Top
Width
120
Add a checkbox to the Grid control and set the following properties:
PROPERTY
VALUE
Content
Is External Link?
Height
16
HorizontalAlignment
Left
Margin
143,347,0,0
Name
isExternalLinkCheckBox
VerticalAlignment
Top
Double-click each of the buttons to generate event handlers for their
Clickevents.Compare your MainPage control with Figure 14-15 and make any necessary modifications.
In the
MainPage.xaml.csfile, add the followingusingstatement to the top of the page:using Microsoft.SharePoint.Client;
Add the following field to the
MainPageclass:private TreeViewItem lastExpanded;
Insert the following methods inside the
MainPageclass:void AddLoadingNode(TreeViewItem parent) { } void AddNodeToTree(NavigationNode node, ItemCollection parentCollection) { } void OnFailure(object sender, ClientRequestFailedEventArgs e) { } void OnNodeSuccess(object sender, ClientRequestSucceededEventArgs e) { }void OnSuccess(object sender, ClientRequestSucceededEventArgs e) { } void treeViewItem_Expanded(object sender, RoutedEventArgs e) { }In the
AddLoadingNodemethod, insert the following code to add a dummy node to the TreeView control so that the expand icon appears next to the node:TreeViewItem loading = new TreeViewItem(); loading.Header = "Loading..."; parent.Items.Add(loading);
In the
AddNodeToTreemethod, insert the following code to add aNavigateNodeto the TreeView control and set the new node's tooltip to the value of theNavigateNode'sUrlproperty:TreeViewItem item = new TreeViewItem(); item.Header = node.Title; item.Tag = node; ToolTipService.SetToolTip(item, "Url = " + node.Url); item.Expanded += new RoutedEventHandler(treeViewItem_Expanded); item.Dispatcher.BeginInvoke(delegate() { AddLoadingNode(item); parentCollection.Add(item); });In the
addQuickLaunchButton_Clickmethod, insert the following code to add aNavigationNodeto the selected node in the TreeView control:ClientContext context = ClientContext.Current; Web site = context.Web; if (!string.IsNullOrEmpty(titleTextBox.Text)) { NavigationNodeCollection nodes; if (quickLaunchTreeView.SelectedItem == null) { nodes = site.Navigation.QuickLaunch; } else { TreeViewItem item = (TreeViewItem)quickLaunchTreeView.SelectedItem; NavigationNode parentNode = (NavigationNode)item.Tag; nodes = parentNode.Children; } NavigationNodeCreationInformation info = new NavigationNodeCreationInformation(); info.Title = titleTextBox.Text; info.Url = urlTextBox.Text; info.AsLastNode = true; if (isExternalLinkCheckBox.IsChecked.HasValue && isExternalLinkCheckBox.IsChecked.Value) { info.IsExternal = true; } else { info.IsExternal = false; } nodes.Add(info);context.ExecuteQueryAsync(OnSuccess, OnFailure); }
In the
addTopNavButton_Clickmethod, insert the following code to add aNavigationNodeto the selected node in the TreeView control:ClientContext context = ClientContext.Current; Web site = context.Web; if (!string.IsNullOrEmpty(titleTextBox.Text)) { NavigationNodeCollection nodes; if (topNavTreeView.SelectedItem == null) { nodes = site.Navigation.TopNavigationBar; } else { TreeViewItem item = (TreeViewItem)topNavTreeView.SelectedItem; NavigationNode parentNode = (NavigationNode)item.Tag; nodes = parentNode.Children; } NavigationNodeCreationInformation info = new NavigationNodeCreationInformation(); info.Title = titleTextBox.Text; info.Url = urlTextBox.Text; info.AsLastNode = true; if (isExternalLinkCheckBox.IsChecked.HasValue && isExternalLinkCheckBox.IsChecked.Value) { info.IsExternal = true; } else { info.IsExternal = false; } nodes.Add(info); context.ExecuteQueryAsync(OnSuccess, OnFailure); }In the
deleteQuickLaunchButton_Clickmethod, insert the following code to delete the selected node and its children from the Quick Launch bar:ClientContext context = ClientContext.Current; if (quickLaunchTreeView.SelectedItem != null) { TreeViewItem item = (TreeViewItem)quickLaunchTreeView.SelectedItem; NavigationNode node = (NavigationNode)item.Tag; node.DeleteObject(); context.ExecuteQueryAsync(OnSuccess, OnFailure); }In the
deleteTopNavButton_Clickmethod, insert the following code to delete the selected node and its children from the Top Navigation bar:ClientContext context = ClientContext.Current; if (topNavTreeView.SelectedItem != null) { TreeViewItem item = (TreeViewItem)topNavTreeView.SelectedItem;NavigationNode node = (NavigationNode)item.Tag; node.DeleteObject(); context.ExecuteQueryAsync(OnSuccess, OnFailure); }
In the
OnFailuremethod, insert the following code to display any error messages from the call to SharePoint:this.Dispatcher.BeginInvoke(delegate() { MessageBox.Show(e.Message); });In the
OnNodeSuccessmethod, insert the following code to populate the expanded node with its children:lastExpanded.Dispatcher.BeginInvoke(delegate() { NavigationNode node = (NavigationNode)lastExpanded.Tag; lastExpanded.Items.Clear(); foreach (NavigationNode child in node.Children) { AddNodeToTree(child, lastExpanded.Items); } });In the
OnSuccessmethod, insert the following code to populate the TreeViews with the Quick Launch bar and Top Navigation barNavigationNodeobjects:ClientContext context = ClientContext.Current; Web site = context.Web; quickLaunchTreeView.Dispatcher.BeginInvoke(delegate() { quickLaunchTreeView.Items.Clear(); foreach (NavigationNode node in site.Navigation.QuickLaunch) { AddNodeToTree(node, quickLaunchTreeView.Items); } }); topNavTreeView.Dispatcher.BeginInvoke(delegate() { topNavTreeView.Items.Clear(); foreach (NavigationNode node in site.Navigation.TopNavigationBar) { AddNodeToTree(node, topNavTreeView.Items); } });In the
treeViewItem_Expandedmethod, insert the following code to request the children of the node that is expanded:TreeViewItem item = (TreeViewItem)sender; if (item.Items.Count > 0 && (item.Items[0] as TreeViewItem).Tag == null) { ClientContext context = ClientContext.Current; NavigationNode node = (NavigationNode)item.Tag;lastExpanded = item; context.Load(node.Children); context.ExecuteQueryAsync(OnNodeSuccess, OnFailure); }
In the
UserControl_Loadedmethod, insert the following code to request the Quick Launch and Top Navigation bars from SharePoint:ClientContext context = ClientContext.Current; Web site = context.Web; context.Load(site.Navigation.QuickLaunch); context.Load(site.Navigation.TopNavigationBar); context.ExecuteQueryAsync(OnSuccess, OnFailure);
Compile the project by selecting Build
Check the Error List pane for any errors and fix them before continuing.
Click the Show All Files button in the Solution Explorer pane.
In the Solution Explorer pane, expand the
BinandDebugfolders and select the XAP file.Double-click the value of the Full Path property in the Properties pane to select it and press Ctrl+C to copy the path to the clipboard.
Navigate your browser to a document library in your SharePoint site.
Select Upload Document from the Documents tab on the ribbon.
In the Upload Document dialog, click the Browse button.
Paste the file path from Step 47 and click Open.
Click the OK button to close the Upload Document dialog and upload the XAP file to SharePoint.
When the document library is updated with your file, right-click its name and choose Copy Hyperlink to copy the URL of your XAP file.
Navigate your browser to a web part page in your site.
Select Edit Page from the Site Actions menu to place the page in Edit mode.
Select Web Part from the Insert tab on the ribbon.
Choose Media and Content from the Categories list and select Silverlight Web Part from the Web Parts list.
Select the location to put the web part from the "Add Web Part to" drop-down list and click the Add button.
In the Silverlight Web Part dialog, paste the URL from Step 53 and click the OK button.
Configure the web part properties as follows:
Height
500
Width
400
Select Save & Close from the Page tab on the ribbon.
Refresh the page in your browser.
Enter the following values in the Silverlight control and click the Add Quick Launch button:
TITLE
LEVEL 1
URL
http://www.microsoft.comIs External Link?
Checked
Select the newly created node, enter the following values in the Silverlight control, and click the Add Quick Launch button:
TITLE
LEVEL 2
URL
http://www.wrox.comIs External Link?
Checked
Refresh the page to see the Quick Launch bar updated with your changes.
Select the Level 1 node and click the Delete Node button.
Refresh the page to see the Quick Launch bar updated with your changes.
Select the Home node, enter the following values in the Silverlight control, and click the Add Top Nav button. (Note that URL should be left blank.):
TITLE
Useful Sites
URL
Is External Link?
Unchecked
Select the newly created node, enter the following values in the Silverlight control, and click the Add Top Nav button:
TITLE
End User Sharepoint
URL
http://www.endusersharepoint.comIs External Link?
Checked
Select the newly created node, enter the following values in the Silverlight control, and click the Add Top Nav button:
Title
Woody's Blog
URL
http://www.thesanitypoint.comIs External Link?
Checked
Select the newly created node, enter the following values in the Silverlight control, and click the Add Top Nav button:
Title
Asif's Blog
URL
http://blog.sharepointelearning.comIs External Link?
Checked
Refresh the page to see the Top Navigation bar updated with your changes.
Select the Useful Sites node and click the Delete Node button.
Refresh the page to see the Top Navigation bar updated with your changes.
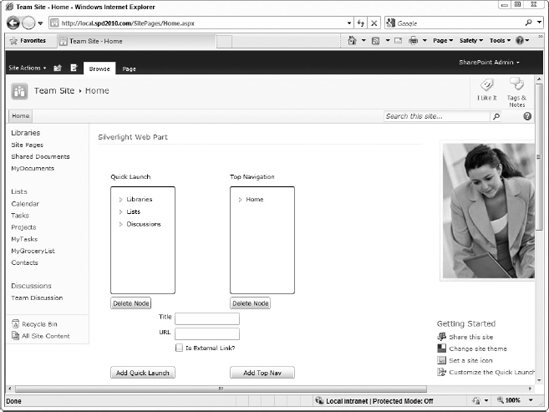
How It Works
The QuickLaunch and TopNavigation properties are actually NavigationNodeCollection objects. That is why you can call the Add method on them to add top-level nodes to the Quick Launch and Top Navigation bars. Clicking one of the Add buttons creates a new NavigationNode and adds it as a child of the selected node. Clicking one of the Delete Node buttons deletes the selected node. As described earlier, the Quick Launch bar only looks at the first two levels of nodes. The Top Navigation bar creates tabs for the first two levels of nodes and adds menu items for the third level of nodes.
No discussion about any functionality this powerful would be complete without covering its limitations. Whether you are using JavaScript or Silverlight, these are some of the limitations you will face:
Your code can access any site collection as long as it is in the same SharePoint web application as the one where the code is running.
Only Windows, Forms Based, and Anonymous authentication are supported.
If you are using Silverlight and the site uses Forms Based Authentication, you must manually change the authentication mode of the ClientContext class and specify a username and password as shown in the following code snippet:
ClientContext context = ClientContext.Current;
context.AuthenticationMode = ClientAuthenticationMode.FormsAuthentication;
clientContext.FormsAuthenticationLoginInfo =
  new FormsAuthenticationLoginInfo("yourusername", "yourpassword");
Note
The username and password are sent in "clear text" and can be viewed by anybody monitoring your server or network traffic. If you must use Silverlight in conjunction with Forms Based Authentication, make sure you secure the site with an SSL certificate to encrypt the traffic between the web server and the user's browser.
If you query an external list using the Client Object Model, you must specify the columns to return in your CAML query and the call to the
Loadmethod of theClientContextclass. Otherwise, you will get the error message "The given key was not present in the dictionary."If you are using JavaScript with the Client Object Model, you must include the FormDigest control in the master page. By default, this control is already in the site's master pages, but it could be accidently removed or you could create a page that does not use the site's master page.
If you intend to update list items or documents in the site, you may need to re-query the list or library before performing your update. Another user may have updated your list item or document after you queried the list or library but before your code tried to execute an update. If that is the case, you will get an error message stating the item or document has been updated since you last retrieved it.
In this chapter, you have seen how to use Silverlight to greatly extend the functionality of your SharePoint sites. Practically nothing has been taken off the table in terms of what you are able to do in the Client Object Model versus the Server Object Model. With the Client Object Model, your SharePoint sites no longer have to be used out-of-the-box, even if they are hosted by a third party that does not allow the traditional methods of customization used by SharePoint developers. With the techniques you learned in this chapter, you should be able to increase the ROI value of your SharePoint investment by several orders of magnitude.