
WHAT YOU WILL LEARN IN THIS CHAPTER
The ability to create powerful and robust workflows is one of the most promising features of SharePoint Designer 2010. If you are familiar with the workflow story in SharePoint Designer 2007, much has changed since those days. This chapter explores all the workflow fundamentals as they exist in SharePoint Designer 2010 such as the ability to create list, reusable, and site based workflows. The story continues in Chapter 12 where you will dive even deeper into workflows with more advanced functionality and integration with other Microsoft Office applications.
Workflow components come bundled with the .NET 3.5 framework. When the .NET framework (a prerequisite for installing SharePoint) gets installed on top of Windows Server 2008, the building blocks of workflow get baked into the platform. Because SharePoint sits on top of Windows, it is able to utilize these building blocks to create the workflows.
There are two types of workflows: sequential and state machine. Sequential workflows are those that follow a prescribed path with a definite beginning and end. State machine workflows, on the other hand, are typically much more complex. They are based on the concept of conditions and transitions. A condition is a set of circumstances that indicate the current status or situation of the process being modeled. Events occur and cause a transition from one condition to another. There is no prescribed path for the workflow. The path taken by the workflow is determined by the events that occur as the workflow is processing.
SharePoint workflows can be created in a variety of ways. The tool of choice depends on the person creating the workflow and the complexity required for the steps in the workflow. The following sections briefly describe the three ways in which workflows can be built on SharePoint.
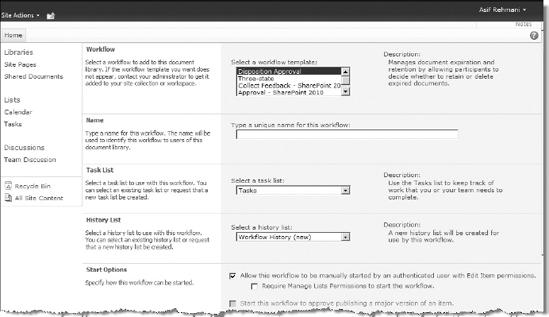
SharePoint foundation ships with one workflow template (Three-state workflow). If you have the SharePoint Server Standard or Enterprise license, you get four more templates to work with. You can start taking advantage of these workflow templates right away by using the browser and building your workflows, as shown in Figure 11-1. No special software is required to build these workflows. All of these workflows are sequential workflows.
Most of these workflows are geared toward typical document or list management tasks. These will not serve all your workflow needs, but they still are a good start toward satisfying many of the existing processes in the organization. In addition, because they are created directly using the browser, creating them quickly without any prior training on creating workflows is easy for any site administrator.
At times, you might want to perform a task based on a value entered by your user, such as creating a new item in a different list, or escalating an issue after a certain amount of time has passed and an action has not been taken. Although SharePoint's workflow engine is capable of such things, no web interface exists for creating these more sophisticated functions.
That's where the SharePoint Designer 2010 Workflow Designer comes in. The Workflow Designer is a tool that enables you to create a sequence of actions (executed serially or in parallel) that must be taken when certain conditions are met for a document or list item. It provides pre-built building blocks in forms of conditions and actions that you can use to create your flexible yet powerful workflow scenarios. The tool resembles an e-mail inbox rules wizard, making it easy for people without a procedural programming background to produce sophisticated workflow applications. Site administrators and power users can use SharePoint Designer 2010 to create powerful workflows. Having said that, keep in mind that only sequential workflows (as discussed in the last section) are created using SharePoint Designer 2010. This workflow designer environment does not support creating state machine workflows.
You find many examples later in this chapter on how to create the various types of workflows available within SharePoint Designer 2010. The following example gives you a taste of how to create a simple list workflow.
Create a List Workflow Using SharePoint Designer 2010
In this exercise, you will create a simple workflow using the Workflow Designer interface in SharePoint Designer 2010. This workflow will look at the Title field of a document being uploaded to a library, and, if it's not already populated, it will populate it with the information in the Name field of the document.
Open any Team Site in SharePoint Designer 2010, and click on Workflows in the navigation pane.
Click the List Workflow button in the ribbon and from the drop-down select Shared Documents.
In the Create List Workflow dialog that appears, name the workflow Populate Title and click OK. The Workflow Designer interface appears.
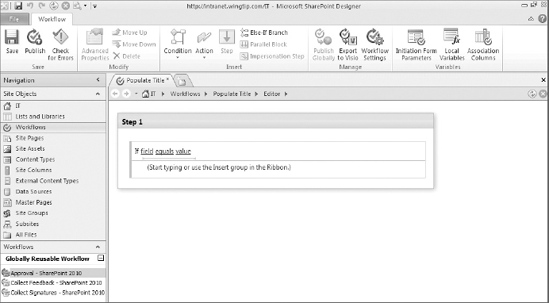
Click the Condition button in the ribbon and from the drop-down select "If current item field equals value." This inserts the condition on the Workflow Designer as shown in Figure 11-2.
Click the
fieldlink and from the drop-down, select Title. Click theequalslink and then select "is empty" from the drop-down.Click right below the condition to place the cursor (the orange blinking line) there and then (in the ribbon) click Action

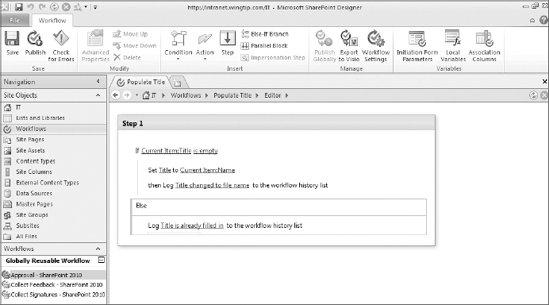
Click the
fieldlink and select Title. Click value, and then click the fx button. From the dialog box that appears, click the drop-down for Field from source, select the Name field, and then click OK.Put the cursor right underneath this action and click Action
Click the
this messagelink and type in Title changed to file name.Put the cursor right underneath and click the Else-If Branch button in the ribbon.
Click right under the text "Start typing or use the Insert group in the Ribbon." Type in log. Press Enter on your keyboard to see the "Log this message" action appear.
Click the
this messagelink and type in Title is already filled in. Your workflow should now look like the one in Figure 11-3.Click the Check for Errors button on the ribbon. If any errors are in the workflow, you will see a warning icon next to the condition or action where the problem exists. Otherwise, a dialog box will notify you that no errors exist in the workflow.
Click the Workflow Settings button on the ribbon and from the settings page, select the checkbox for Start workflow automatically when an item is created.
Click Save button to save this workflow and then click the Publish button to publish it to the Shared Documents library.
How It Works
The workflow designed in this exercise is a fairly simple workflow that solves a very common need. All files have a name because that's a requirement for them to exist; however, often the titles for the files are not populated by the end users. This workflow executes every time a new file is uploaded to the Shared Documents library. If the Title field is empty, it automatically fills it in with the name of the file. In either case, it logs a statement of what it did in the history list.
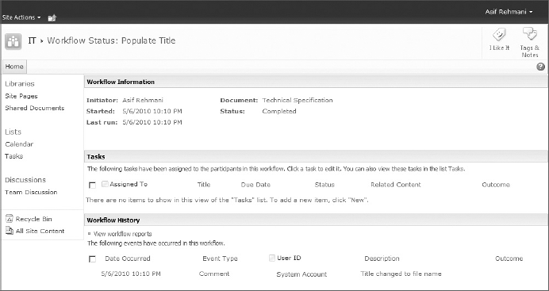
You can verify that this workflow actually works by going to the Shared Documents library and uploading a document that does not have the Title property filled in. After the document is uploaded, the workflow should run automatically and set the title for this document. The name of the workflow is displayed as a new column in the library, and when the workflow finishes, the status Completed appears under the column. When you click the Completed link, it takes you to a workflow status page that looks like the one in Figure 11-4.
A bit later in this chapter, all the components of the Workflow Designer interface are dissected and explained.
Workflows in SharePoint are based on the Windows Workflow Foundation (WF). Although many powerful actions are available to you in SharePoint Designer, these are but a sample of the kinds of functions the WF can be programmed to perform. By using Microsoft Visual Studio, you can create custom workflows programmatically to take full advantage of the workflow objects in WF. You can also use Visual Studio to build your own custom conditions and actions, and make them available for use within SharePoint Designer 2010. Both sequential and state machine workflows can be created using Visual Studio.
Visual Studio workflows are best left alone for developers to create. Remember that when you create your workflows in this manner, you also must manage the code (at least, someone has to, if it's not you).
The Workflow Designer has a lot of moving parts. It will benefit you to get accustomed to these parts before venturing on to making your own workflows. This section explores the elements available in the Workflow Designer interface. Use this section as a reference when building your workflows.
The summary page of the workflow is the Workflow Settings page. You get to this page by clicking on any of the existing workflows or clicking on the Workflow Settings button on the ribbon when you are editing a workflow. Figure 11-5 shows the Workflow Settings page.
Following is an explanation of each of the sections within this page.
This section shows the name and description of the workflow. Both can be changed from this interface (just don't forget to click on the Save button to save your changes). In addition, you can also see what type of workflow it is and whether it is associated with a list or a library.
Clicking on Edit Workflow in this section takes you to the Workflow Designer interface. You can also see several other links here. These links provide you an easy way to navigate to the related components of this workflow.
The Task List and History List drop-downs in this section show the lists that will contain the tasks and the history logs (respectively) that this workflow might generate. You can use the drop-downs to select lists other than the default ones selected already.
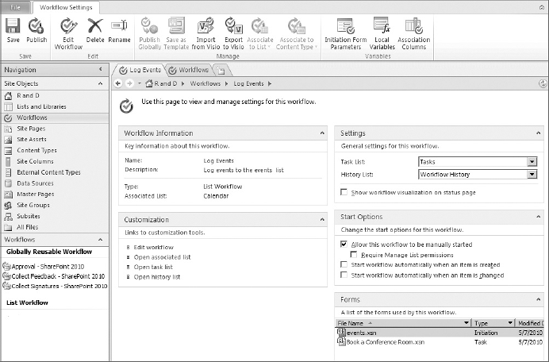
You use the checkbox below the drop-down lists that states "Show workflow visualization on status page" to turn on visualization of the workflow using Visio services. This visualization is then presented on the workflow history page. Chapter 12 covers the Visio integration with workflows.
You start running a SharePoint Designer workflow in one of three ways:
Allow your user to start the workflow manually (selected by default).
Start the workflow automatically when a new item is created.
Start the workflow automatically when an item is edited.
When the workflow is automatically started, no workflow form is presented—execution simply proceeds to the first step in the workflow. However, when starting a workflow manually, the initiation form for the workflow is presented to the user. Initiation forms are discussed a bit later in this section.
By default, a user has two ways to invoke a workflow through the browser:
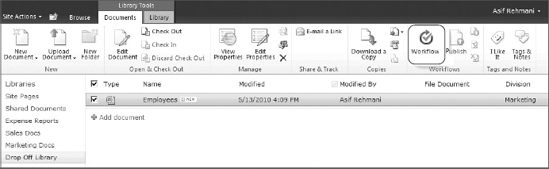
The Workflows command button on the ribbon, as shown in Figure 11-6

In either case, the user is presented with a page showing a list of workflows available to items in the list or library, and the status of any workflows currently associated with the item.
Workflows utilize various forms, such as initiation, association, and task forms, to interact with the end user. This section displays those forms. If you are running SharePoint Foundation 2010 on the server, these forms will be ASPX forms. On the other hand, if SharePoint Server 2010 is on the server then these forms are XSN (the extension for Microsoft InfoPath) forms. In both cases, these forms can be customized. Chapter 12 shows how to customize the workflow forms.
Occasionally, you may want to start your workflow with information that isn't already in SharePoint. Workflow initiation parameters enable you to provide (or request) that information from the user. When you define a parameter, you give it a name and a data type. Initiation parameters are accessed in the Workflow Designer by clicking the Initiation button on the ribbon.
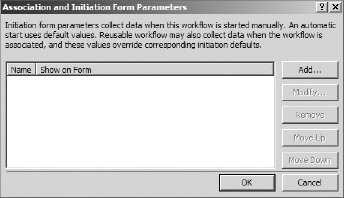
When you click the Initiation button, the Workflow Association and Initiation parameters dialog appears, as shown in Figure 11-7.
You can click the Add button here to open the Add Field wizard where you can add or remove parameters, or change the order in which they will appear on the initiation form.
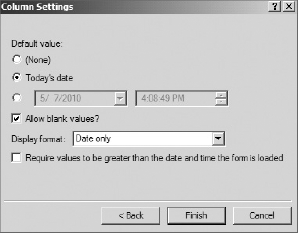
The Add Field wizard first asks for the name of the field, and provides a dropdown for the type of data. Click Next, and a form appropriate for selecting a default value for your field appears. This is provided because the initiation form is not displayed if the workflow is started automatically and the default value (if provided) is automatically used. Figure 11-8 shows the Default value entry form for a Date and Time field.
Initiation parameters can each be any of the following types:
Single line of text
Multiple lines of text
Number
Date and time
Choice (a list of preset values to choose from)
Yes/No (a Boolean/checkbox)
Person or Group
Hyperlink or Picture
Assignment Stages (used in the Task Process Designer)
An initiation form is created automatically by the Workflow Designer when you save your workflow. It is used to allow the user to enter the initiation parameters you have defined (if any), as well as to verify that the user actually wants to start processing a workflow that was initiated manually. An example initiation form is shown in Figure 11-9.

If your server is running SharePoint Server 2010, then all the forms that are generated automatically by workflows will be InfoPath forms (Chapter 9 covers InfoPath thoroughly). You can easily use InfoPath 2010 to change the appearance and layout of the form. You can also add validation and formatting rules to an InfoPath form. You can simply click on the form in the Workflow Designer and it opens it up in InfoPath 2010 (provided that InfoPath is installed on your computer). This point of integration is discussed in much more depth in Chapter 12.
The initiation form in a server running SharePoint Foundation 2010 is a SharePoint ASPX page. It contains a static Data Form Web Part (not a Web Part Zone) to support the entry of the initiation information. This form is customizable, as well. Chapter 8 describes in detail the customization of Data Form Web Parts.
Columns (or fields) called association columns can be declared within reusable workflows. The benefit of doing this is that when the workflow is deployed to a list or library, the association columns get added to that list or library, as well.
Variables in a workflow give you a place to store values, such as for storing information between steps, holding interim calculation results, or just about anything else. In the workflow, information held in variables and initiation parameters is accessed in the same way. The key difference is that users have the opportunity to interact directly with initiation parameters, whereas variables are used only within your workflow.
You can create variables by clicking the Local Variables button on the ribbon in Workflow Designer interface, or when configuring an action that can use a variable as an information target. Although similarities exist between variables and initiation parameters, some significant differences also exist.
Like an initiation parameter, a variable has a name (otherwise you couldn't refer to it) and a data type. Your workflow can read variables' current values in conditions, and set their values as actions. Unlike initiation parameters, variables do not have a default value, nor is a data entry form automatically generated for them.
Slight differences also exist in the data types available. The variable data types are:
Boolean
Date/Time
Integer
List Item ID
Number
String
Because users do not enter variables directly, and no form is generated to represent them, there is a single String data type instead of the Choice, Single line of text, and Multiple lines of text types seen in initiation parameters.
Steps are the major blocks of instructions for a workflow. They contain the conditions and actions that are executed to perform the workflow's functions. Each step is executed in sequence, unless a Stop Workflow action is executed.
A workflow always has at least one step. For simple workflows, that may be all that is needed. For more complex workflows, however, they provide an intuitive separation of logic. You should give steps descriptive names, so that when you or someone else comes back to manage the items within the step, the purpose of the step is readily apparent.
Steps can be nested within other steps as well and act as substeps, as shown in Figure 11-10.
Just like with regular steps, you can place impersonation steps on the Workflow Designer environment with conditions and actions encapsulated within. These also execute sequentially. However, a major difference exists between the impersonation step and a regular step.
At times, the workflow might need to perform certain actions that are above the permission level of the person who initiated the workflow. For these times, you use the impersonation step when designing your workflow to ensure that any conditions and actions that get inserted within the impersonation step will automatically run under the identity of the user who authored the workflow. Having said that, recognize that this can be an extremely dangerous proposition, because the workflow now has a higher permission level than the person who kicked it off. This functionality, therefore, should be used with extreme care. In fact, when you're trying to save a workflow with an impersonation step, SharePoint Designer 2010 will warn you, as is shown in Figure 11-11, and ask you to confirm that you understand the ramifications of using an impersonation step.

Encapsulating your actions within a condition allows you to control the execution of the actions in your workflow. They provide the if-else construct that developers have been using for decades now. Conditions can be nested within other conditions, as well. You will see an example of nesting an If statement within another in one of the later examples in the chapter.
The types of conditions you can set in a workflow include:
Comparisons to fields in the current list or library
Comparisons between any two data sources internal to the site (including lists, libraries, workflow variables, or initiation parameters, but not external data sources like XML files and web services)
Checking whether the file was created or modified, either by a specific person or within a specific date range
Checking whether a person is a valid SharePoint user
Checking the file type[1]
Checking the size of the file[2]
Checking list item permission or permission levels[3]
Notice that several of these conditions could be interpreted as subsets of others. In those cases, the selection user interface is streamlined and tailored specifically to the comparison at hand. For example, comparisons among "any" data sources require you to choose not only the data sources, but the values for each side of the comparison.
Actions are the key elements of a workflow. Although every workflow has at least one step, and conditions are optional, nothing happens unless an action is defined.
The default actions provided with SharePoint fall into six categories:
Core actions—These revolve around manipulating a particular piece of information (a variable or list field, for instance), or control overall workflow execution.
List actions—These work on an entire list item at one time.
Task actions—These manipulate the Tasks list and pause the workflow until completed.
Document Set actions—These work on an entire document set once. A document set has to be defined ahead of time before you can use these actions on the set.
Utility actions—These actions lets you perform utility types of functions such as working with string values.
Relational actions—Only one action is available in this group. It deals with finding relational data for a user.
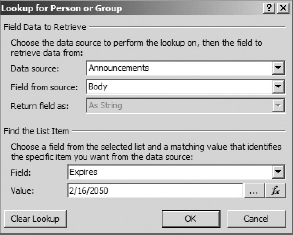
In many conditions and actions, you have the capability to look up or update information in other lists or libraries on the site. To access an item in another list or library, you must provide some query information to determine the particular item you want to read or modify. Such a lookup is shown in Figure 11-12.
If you have ever used a Select statement to query a database, consider the following example to understand the dialog box in Figure 11-12:
SELECT Body FROM Announcements
WHERE Expires = '2/16/2050'
Note that if the query you entered results in more than one list or library item being returned, only the first result is used for the action.
Core actions let you set values, send e-mails, pause, or even prematurely end the workflow. They are described in the following table.
CORE ACTION | DESCRIPTION |
|---|---|
This is analogous to commenting your code in a programming environment. It's for reference within the workflow design and does not actually perform an action. | |
Enables you to perform date arithmetic. You can add a specified amount of time to an existing date/time element, and store the results in a workflow variable. Adding a negative unit of time results in subtracting time. You can add Minutes, Hours, Days, Months, and Years. | |
Performs a simple arithmetic operation (add, subtract, multiply, divide, or mod/remainder) on two values, and stores the result in a workflow variable. | |
Enables you to write an item to the hidden list (History list) that stores workflow history information. | |
One of the timer actions. It causes the workflow to wait a specified amount of time before proceeding to the next action in the workflow. | |
Causes the workflow to wait until a specified date and time before continuing to the next action. The date may be hard-coded into the workflow, or it may be a lookup value. | |
Enables you to send an e-mail to a user or a set of users. The body of the e-mail is sent as HTML. | |
Send the document to another repository (for example, another document library in a different site collection). | |
Overrides the current time in a date/time lookup value, leaving the date intact. It then stores the new date/time value into a date/time variable. | |
Although several other actions set the values of workflow variables with their results, this one enables you to directly set the value of a variable or Initiation Form field. You can set it to either a static value or a lookup. | |
Use this action to set the status of the workflow. The built-in choices are Canceled, Approved, and Rejected. You could also type in a custom status if you wanted. | |
Stops the execution of the workflow immediately and logs a specified message into the Workflow History list. No further steps or actions are performed. |
The List actions let you perform such tasks as checking items in or out; creating new items; and copying, editing, or deleting items. Many of these actions default to acting on the current item (the one for which the workflow was initiated), although in most cases you can specify a different item—even one in a different list. If you want to act on an item other than the current item, you are presented with the Choose List Item dialog shown in Figure 11-13.

The Value field will be compared to the field selected. You can use a lookup, or enter a specific value to compare. If multiple items match your query, the action will take place on the first matching item, so try to ensure that your queries will return a single item. Otherwise, you could end up deleting the wrong document, for instance.
The following table shows the descriptions of all List actions.
LIST ACTION | DESCRIPTION |
|---|---|
Add List Item Permissions [a] | Specify users/groups and give them a specified level of permissions on any item on the site. |
Checks in the specified item and sets the check-in comment appropriately. | |
Locks an item so that only the person who has it checked out can make changes. There is no comment on a check out. | |
Copies items between almost any two lists on the site. The lists must be of compatible types (both must be document libraries, for instance) or allow mixed content types. The default source is the current list item. | |
Enables you to create a new item in any list. Each field in the list may be populated from a different source. The ID code of the item created is returned to create a new workflow variable. | |
Declare the current item as a record. Depending on record declaration settings set at the site collection or list/library level, the record can then be protected from being edited or deleted. | |
Delete all drafts (or minor versions) of the current item. | |
Removes the specified item from the list. | |
Delete all previous versions of the item. | |
Undoes any changes made since the item was checked out and removes the change lock. | |
Inherit List Item Parent Permissions[a] | Inherit the permission of the immediate parent object. |
Remove List Item Permissions[a] | Specify users/groups and remove specified level of permissions for them on any item on the site. |
Replace List Item Permissions[a] | Replace the permission level of the specified item on the site. |
Set Content Approval Status | When content approval is turned on for the list, this action enables you to change the status of the current item directly and set the approval comment. The comment may be static text or a lookup value. |
Sets the specified field to either a static or lookup value. | |
Undeclare the current item as a record and make it behave like all other items in the list/library. | |
Enables you to change the fields of an existing item. The interface for setting the field values is the same as that used in the Create List Item action. | |
Wait for the document to be in a certain checkout status (Checked Out, Checked In, Unlocked by document editor, or Discarded) | |
Pauses the workflow until a field matches a particular condition. | |
[a] These actions are only available within an impersonation step. | |
Task actions enable you to pause a workflow for more user input. The kind of input, and who must provide it, varies from action to action.
Because these tasks pause your workflow, you cannot use the current workflow to set the task fields dynamically on initiation. You can, however, create a separate workflow on the Tasks list, which is invoked by the creation of the task item by this action. This is called a secondary workflow. The ramifications of secondary workflows are discussed later in the "SharePoint Designer 2010 Workflow Considerations" section.
Task actions are described in the following table:
TASK ACTION | DESCRIPTION |
|---|---|
Enables you to create a survey that everyone in a group needs to complete in order for the workflow to continue to the next action. The results are stored as items in the Task list. | |
Creates a standard task that must be marked as Complete before the workflow will continue. The Custom Task wizard shows the same initiation form as for the Group form, but does not call for the addition of any fields. | |
Similar to the Assign a Form to a Group action. The primary differences are that the survey form is targeted to a single user, rather than a group, and that because only one instance of the form is created, its ID is available to be assigned to a workflow variable. | |
This one action is actually an entire task process and is based on the built-in Approval workflow template. When deployed, it lets you define various pieces of the process using the Task Process Designer. Chapter 12 provides more information on this process. | |
This action provides a Task Process Designer environment much like the Approval process. However, this action lets you build the process from scratch. Chapter 12 provides more information on this topic. | |
This one action is actually an entire task process and is based on the built-in Collect Feedback workflow template. When deployed, it lets you define various pieces of the process using the Task Process Designer. Chapter 12 provides more information on this process. |
Users who are assigned a task receive an e-mail. They need to click the Edit this Task link in the e-mail to see any instructions or fill in any requested information. This takes them to the edit form defined for the task. In the case of Assign a To-do Item, it is simply the standard edit form for the Tasks list. For the Assign a Form to a Group or Collect Data from a User actions, you create a custom form for the user to fill in.
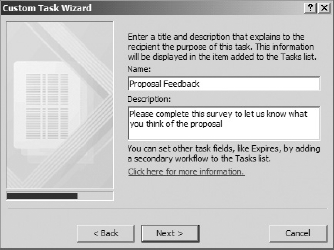
If you click the A Custom Form link (for the Group action) or the Data link (for the User action) in the action definition window, the Custom Task Wizard launches. That's where you define your form. The first page of the wizard describes how the form you are about to create is used. Click Next to begin entering information.
The first real step of the Custom Task Wizard (see Figure 11-14) enables you to provide some descriptive information about the form for your users.
After clicking Next, you add the fields/questions to which you want your users to respond. This operates just like selecting Initiation form fields, except that you can provide additional descriptive text for each field. The following field types are available:
Single line of text
Multiple lines of text
Number
Currency
Date and Time
Choice
Yes/No
Person or Group
Hyperlink or Picture
The field types available are the same for the actions Assign a Form to a Group and Collect Data from a User.
Utility actions are available to work with any workflow or site data. They are there to support data manipulation (mainly strings) and feed the result back into the workflow as a variable to be used by some other condition or action.
TASK ACTION | DESCRIPTION |
|---|---|
Copy specified number of characters from the end of a string and save the resulting string in a variable. | |
Copy a part of the string starting after a specified number of characters. Save the resulting string in a variable. | |
Copy a specified number of characters from the start of a string and save the resulting string in a variable. | |
Copy a part of the string starting after a specified number of characters and ending after a specified number of characters. Save the resulting string in a variable. | |
Determine an interval (in minutes, hours, or days) between two specified dates. Save the result in a variable. |
Only one action is available in the Relational actions group. The action deals with retrieving relational data from the user profile database.
Document sets pull multiple items together to create a single work product. For example, think of document set as a package of related documents (like a loan application). This set of documents then can be managed, edited, and worked on as a single entity. You can find more information on document sets at http://msdn.microsoft.com/en-us/library/ee559339(v=office.14).aspx.
TASK ACTION | DESCRIPTION |
|---|---|
Create a new version for the document set. You can specify to take either the last major or the last minor version of each document in the set to create your version. | |
Send the document set to another repository (for example, another document library in a different site collection) | |
When content approval is turned on for the list, this action enables you to directly change the status of the document set and also create a comment. The comment may be static text or a lookup value. | |
This one action is an entire task process and is based on the built-in Approval workflow template. However, this processes actions on a document set instead of a single document. When deployed, it lets you define various pieces of the process using the Task Process Designer. Chapter 12 provides more information on this process. |
By default, when you place conditions and actions on the Workflow Designer, they are set to execute in serial—one after another. However, you can configure conditions/actions to execute in parallel by first clicking on the parallel Block button on the ribbon and then creating your conditions/actions within it. Alternatively, you can place a parallel block on the design surface and then move within it the conditions/actions that you want to execute in parallel.
This functionality can be useful for scenarios where you don't want the workflow execution to be paused waiting for a certain task to finish. For example, when you use the Collect Data From User action, it creates a sort of survey form that the user has to fill out. Until the user fills out the form and submits it, the execution will not proceed to the next action unless these actions have been put into a parallel block, as shown in Figure 11-15.

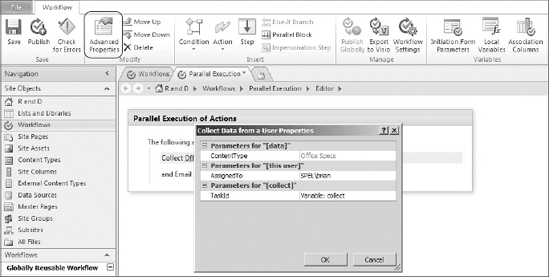
The Advanced Properties button in the ribbon simply shows the properties of the selected action or condition. These properties can then be managed in this screen much like you would manage it in the Workflow Designer surface itself. Figure 11-16 shows the Advanced Properties dialog box.
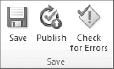
When you are done designing a workflow, it needs to be published somewhere (a list, library, or the site). You can simply click on the Publish button (see Figure 11-17) to publish the workflow and make it "Live on the current site." The publishing process will check the workflow for errors, save the workflow, create any necessary forms needed for the workflow, and then finally publish it to the site. If you are not ready to publish the workflow yet, you can click the Check For Errors button to check whether you must attend to any errors. Also, you can use a Save button to save the workflow in a draft state to which you can later come back.
In the SharePoint Designer 2010 environment, you can create three types of workflows: List, Reusable, and Site. Each one serves a different purpose and is important in its own right. The following sections provide an explanation and an example of each of these workflows.
A list workflow is associated with a list or library directly when it is created in SharePoint Designer 2010. It then becomes tightly coupled with that list and cannot be moved to any other list. You should create these workflows only when you are sure that they will not need to be relocated later.
The benefit of making a list workflow is that you have access to all the specific metadata (columns) of that list. In other words, the list workflow has an inherent understanding of the schema of that specific list and any custom columns that have been created on that list.
You saw an example of a simple list workflow at the beginning of this chapter. The workflow was attached to the Shared Documents library and it populated the title of documents that were uploaded without a title. The following exercise is another example. This one is associated with the Calendar list.
Create a List Workflow on the Calendar List
In this exercise, you will create a list workflow associated with the Calendar list. This workflow will make use of the parallel branch and nested conditional statement.
Open any team site in SharePoint Designer 2010 and click on Workflows in the navigation pane.
Click the List Workflow button in the ribbon and from the dropdown select Calendar.
In the Create List Workflow dialog that appears, name the workflow Event Announcements and click OK. The Workflow Designer interface appears.
Click Step 1 and change the name of the step to Announce the Event.
Place the cursor within the workflow design environment, click the Condition button in the ribbon, and from the dropdown select "If current item field equals value." This inserts the condition on the Workflow Designer.
Click the
fieldlink and from the drop-down, select Category. Click thevaluelink and then select Business from the drop-down.Click and place the cursor below where it says "(Start typing or use...)." Click Condition
Place the cursor right below this condition and click the parallel Block button on the ribbon.
Click to place the cursor underneath where it says "The following actions will run in parallel." Click Action
Click below this action and then click Action
In the Create New List Item dialog, choose the Announcements list from the dropdown. Click the Title (*) field and then click Modify. In the dialog that pops up, click fx. In the lookup dialog, click the Field from source dropdown and select Title. Click OK on the opened dialog boxes to get back to the Create New List Item dialog. Click the Add button, and from the dialog that appears, select Body field in the first drop-down. Click fx and in the lookup dialog, click Field from source drop-down and select Description. Click OK on all opened dialog boxes to get back to the Workflow Designer interface.
Click and highlight the condition If Current Item: Category equals Business. Then, click on the Else-If Branch button on the ribbon to create the
else-ifbranch for this conditional logic.Click Condition
Click below this condition and then click Action
In the Create New List Item dialog, choose the Announcements list from the drop-down. Click the Title (*) field and then click Modify. In the dialog that pops up, click fx. In the lookup dialog, click the Field from source drop-down and select Title. Click OK on the opened dialog boxes to get back to the Create New List Item dialog. Click the Add button and from the dialog that appears, and select Body field in the first dropdown. Click fx and in the lookup dialog, click the Field from source drop-down and select Description. Click OK on all opened dialog boxes to get back to the Workflow Designer interface.
Place the cursor below the Announce the Event step and then click on the Step button on the ribbon to insert another step below it. Name this step Set Workflow Status.
Click inside the step and then click Action
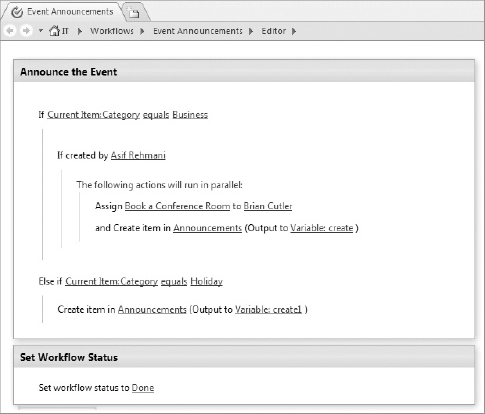
Save the workflow by clicking on the Save icon. Your workflow should now look similar to the one shown in Figure 11-18.
Click the Workflow Settings button on the ribbon and from the Settings page, select the checkbox for Start workflow automatically when an item is created, and then click the Publish button to publish the workflow to the Calendar list.
How It Works
The workflow designed in this exercise is attached to the Calendar list. It is activated and executed automatically when a new item is created in the Calendar list. The field that this workflow monitors is the Category field in the calendar item.
If the category is Business then the nested conditional logic kicks in and it looks to see who created the event (in the preceding workflow, for example, it's looking to see whether Asif Rehmani created the workflow). If the conditional logic here returns true then it executes a couple of actions in parallel—assign a person (Brian Cutler in the preceding example) to book a conference room and create an announcement in the Announcements list with the information from the calendar item. The reason these actions execute in parallel using the parallel block is so that the workflow doesn't wait for Brian to complete the task before announcing the new event in the announcements list.
If the category for the new calendar item is Holiday, then an announcement is created directly with the information from the calendar item. If the category is neither Business nor Holiday then the execution of the workflow goes directly to the next step. The next step (Set Workflow Status) is a logical separation of the execution of the workflow. This step has only one action, which sets the status of the workflow to Done.
The list workflow created in the preceding Try It Out is designed specifically for this Calendar list and is not meant to be portable. However, in many instances, you will want a workflow that can be moved around and be made reusable. That is the focus of the next section.
Reusable workflows are exactly what they sound like—reusable. You can create these workflows once and reuse them by attaching them to a list, library, or a content type. If you update the workflow, it gets updated everywhere the workflow is being used.
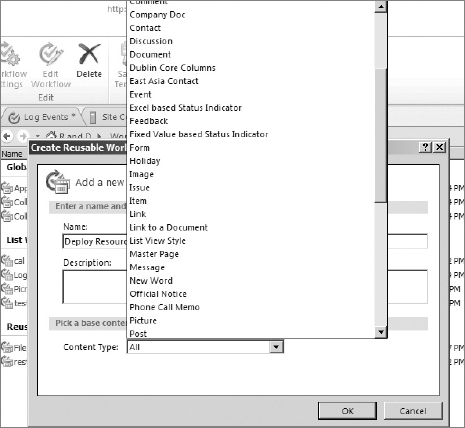
Creating a reusable workflow is a very similar process to creating a list workflow with the exception that you don't pick a list or library at the onset to attach to. What you do have to decide, though, is a base content type scope of this workflow. Content types in SharePoint can be simply described as a reusable collection of settings and columns. You can define a content type once and use it several times in lists and libraries throughout your site collection. You can find more information on content types in SharePoint at http://msdn.microsoft.com/en-us/library/ms472236.aspx.
When creating a reusable workflow, you scope it to be used by a specific content type and all of its child content types (see Figure 11-19). Later when ready, you can associate the workflow with that specific content type or with any content type that inherits from that content type. The benefit of attaching reusable workflows to content types is that the workflow will then travel with that content type wherever it goes, which means that this workflow will be available in all lists and libraries where this content type is being used. Later, if you need to change the workflow, your modifications need to be made only in one place, the original workflow, and all lists/libraries using this workflow will automatically be updated.
Reusable workflows can be made at any site within the site collection. If you create a reusable workflow at the top site of the site collection, it becomes globally available and reusable to be attached to lists, libraries, and content types within the site collection. If you make the reusable workflow at a subsite in a site collection, then the scope of that workflow is that particular subsite. It cannot be used in any other site unless it's packaged and exported to that site. The packaging and portability of reusable workflows is covered as an advanced workflow subject in Chapter 12.
Create a Reusable Workflow and Attach It to a Content Type
In this exercise, you create a reusable workflow and associate it with a content type. This workflow will utilize the impersonation step to move documents from one library to another with the authority of the author of the workflow. You also make use of the association column in this workflow.
Make sure you are logged in to your machine as an owner of a SharePoint site and then open that team site in SharePoint Designer 2010. Click on Lists and Libraries in the navigation pane.
Click the Document Library button on the ribbon and then click Document Library selection from the dropdown. Name the new library Marketing Docs and click OK.
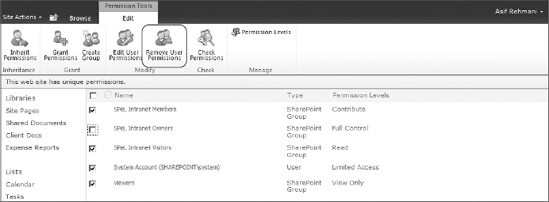
Click on Marketing Docs to go to the summary page of this library and then click Permissions for this list, which opens the browser and navigates you to the permissions page of the library. Click on the Stop Inheriting Permissions button and then click OK on the dialog that appears.
Select the checkboxes for all groups except the Owners group and click Remove User Permissions button to revoke their permissions, as shown in Figure 11-20. Click OK to the dialog that opens to confirm your action.
Perform Steps 1–4 to create and configure another document library named Sales Docs.
Click on Site Columns in the navigation pane. Click New Column
Click on Content Types in the navigation pane. Click new Content Type button. Name the content type AW Document. Choose the Parent content type from the Document Content Types and then choose the Document content type. Click OK.
Click on the AW Document content type then click the
Edit content type columnslink. Use the Add Existing Site Column button to add the Division site column and click the Save icon to save the changes to the content type.To start creating the workflow, click on Workflows in the navigation pane and then click the Reusable Workflow button on the ribbon.
Name the workflow File Document and choose the content type AW Document, from the dropdown as the base content type. Click OK, and the Workflow Designer interface should open.
Click underneath Step 1 and then click on the Impersonation Step button on the ribbon. Click on Step 1 and click Delete in the ribbon to delete it.
Click the Association Columns button on the ribbon. Click the Select Site Column button and select the Division site column. Click OK in this dialog and the next to return to the Workflow Designer environment.
Click within the impersonation step and click Condition
Put the cursor below the
Ifstatement and type in Comment. Then press Enter on the keyboard to have the Add a Comment action autocompleted. Clickcomment textand type in Move Marketing documents to Marketing Docs.Click below the comment action and click Action
Click below the action and then choose Action
Click below the action and then click the Else-If Branch button. Click Condition
Put the cursor below the
Ifstatement and click ActionClick below the comment action and click Action
Click below the action and then click Action
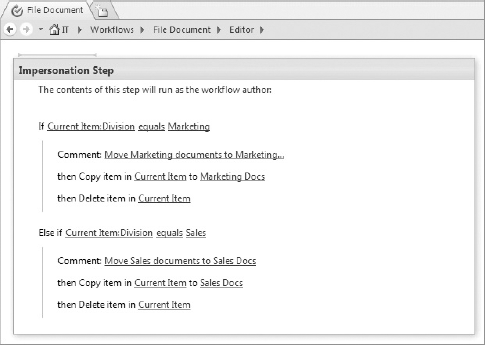
Your workflow should look like the one shown in Figure 11-21.
Click the Publish button to publish the workflow and make it available at the site level. You will see a warning dialog appear to warn you about the use of the impersonation step. Click OK on it to acknowledge it, and the workflow will be published.
Click the Workflow Settings button. Then click Associate to Content Type
Close the browser to return to SharePoint Designer 2010. Click on Lists and Libraries in the navigation pane. Click on Document Library
Click Drop Off Library to go to its summary page. In the Settings section, click the checkbox for Allow management of content types. Then click on the Add button in the Content Types section. Choose the AW Document content type and click OK.
Click to highlight the AW Document row (don't click on the AW Document link itself). Click the Set as Default button. Then click the save icon to save your changes.
Click on the All Documents view in the Views section. The XSLT List View Web Part (covered in Chapter 8) should be highlighted. Click the Add/Remove Columns button in the ribbon, add the Division column in the Displayed fields section, and then click OK. Save this list view page by clicking the save icon.
How It Works
The workflow created in the preceding example will allow end users to start this workflow on any item in the Drop Off Library. The end user will select the document and click the Workflows button in the ribbon, as shown in Figure 11-22, and then choose the File Document workflow and click the Start button on the next screen to start the workflow.
When the workflow is run on a document, depending on the selected choice in the Division column of the document, it will get routed to either the Sales Docs or Marketing Docs library. Subsequently, the original document will be deleted from the Drop Off Library.
Because the workflow is associated with the content type, this same functionality can now be reused throughout the site by associating the AW Document content type to any library within the site. Also, in the next chapter you will see how easy it is to even package up this functionality and deploy it to another site collection.
All workflows talked about this far need a list, library, or content type to host them. Site workflows on the other hand are general site-wide processes that do not need a list, library, or content type attachment. They are simply published and attached to the site itself and can work upon any object within the site. A user manually executes this workflow by going to the All Site Content page. The following exercise provides an example of how this type of workflow can be utilized.
Create a Site Workflow
In this exercise, you create a site workflow that will serve as a survey for the SharePoint site.
Open a team site in SharePoint Designer 2010. Click on Workflows in the navigation pane.
Click the Site Workflow button. Name the workflow Site Suggestions and click OK. The Workflow Designer interface appears.
Click the Initiation Form parameters button. In the dialog that appears, click the Add button. Set the Field name to Name, click Next, and then click Finish on the next screen.
Click the Add button to add a second parameter named Suggestion. Change the Information type dropdown to say Multiple lines of text. Click Next and then click Finish on the next screen. Click OK on the Form parameters dialog to return to the Workflow Designer.
Click inside the step; then click Action
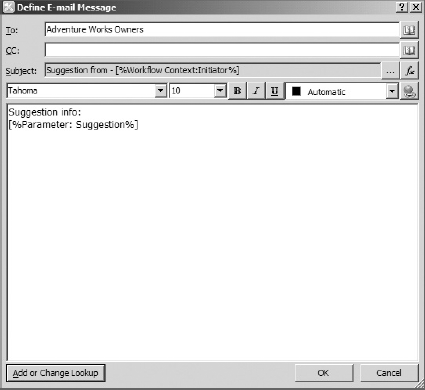
Click the address book icon for the To field, select the owners group as Selected Users, and then click OK. For the Subject, click on the ellipsis button (...) to open the String Builder window. Type in Suggestion from, then click on Add or Change Lookup. Select Data source as Workflow Context (this is a new functionality in SPD 2010). Click the Field from source dropdown and select Initiator. Click the Return field as dropdown and select Display Name. Click OK and then click OK once more to get back to the e-mail window. Click in the body of the e-mail and type in Suggestion Info: and then press Enter to go to the next line. Click on the Add or Change Lookup button. Select Data source as Workflow Variables and parameters, and Field from source as parameter: Suggestion. Leave the last dropdown as it is and click OK. Your e-mail window should look like that shown in Figure 11-23.
Click OK in the e-mail window to return to the Workflow Designer interface and then click the Publish button to publish the workflow.
How It Works
The site workflow designed in the exercise makes use of initiation form parameters. These parameters appear to the user when the workflow starts. Because a site workflow is always going to be started manually by a user, you can take this opportunity to ask the user some questions through these parameters.
To execute this workflow, navigate to this team site in the browser. Then click on the All Site Content link in the Quick Launch bar. Click on the Site Workflows link here to go to the page where all site workflows are listed. The Site Suggestion workflow should be listed. When the workflow is clicked, it presents the Initiation Form that looks like the one in Figure 11-24.
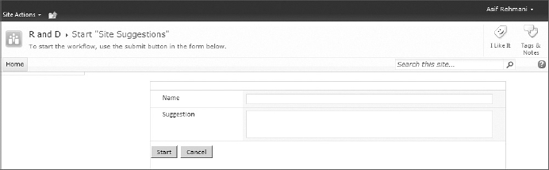
When you fill out the Name and Suggestion parameters and then click the Start button, the workflow starts and sends the e-mail with the site suggestion to all the owners of the site.
Although this chapter covers a lot of workflow fundamentals, looking for supplemental sources to enhance your knowledge further on this topic is still advisable. The SharePoint Designer team blog is a great resource for this sort of information and you should visit it often to see how the SharePoint Designer team recommends using various features. Also, to see many of the exercises covered in this chapter in action, you can watch the workflow-related screencasts (videos) at www.sharepoint-videos.com.
As you have seen, SharePoint Designer workflows provide many powerful actions for manipulating the information in your site. This functionality has limits, however, as well as some areas where you should be cautious of the ramifications of your choices.
SharePoint Designer creates workflows that can execute actions either in sequence or in parallel. Although SharePoint's built-in workflows offer a state-based execution flow, SharePoint Designer workflows do not. There is no built-in looping or iteration mechanism. For example, you cannot create a SharePoint Designer workflow that automatically performs an action on every item in a list.
If you have multiple workflows defined on a list or library, and you invoke a workflow on an item in that list (whether manually or automatically), you cannot invoke a second workflow on the same item until the first completes.
As you have seen, a SharePoint Designer 2010 workflow can make changes to information anywhere on a site. Some of the items a workflow can change may themselves start another workflow associated with that item. If a SharePoint Designer 2010 workflow makes a change to such a list, the workflow that is triggered is considered a secondary workflow to the workflow that triggered it.
Secondary workflows can be a powerful tool. For example, although the Task actions described earlier in this chapter will stop executing until their associated tasks have been completed, you can place a workflow on the Tasks list that will pick up where the primary workflow leaves off. Such a workflow might set an expiration date on the task, thus allowing the original workflow to continue if the task is never acted upon by the user.
This brings up an important point about workflows: Your users may not always behave in the way you expect. Whenever you implement a workflow that requires user input, test it thoroughly to see how it behaves if the user inserts incorrect or invalid data, or if the user completely ignores it. Otherwise, you may find your system littered with partially executed workflows. On a busy site, and a list with frequent additions and changes, this could potentially cause performance issues, as the lists used to control workflows grow to thousands of active and unresolved items.
Another potential issue is the circular reference, which can lead to an infinite loop. A circular reference occurs when an item refers to another, which in turn refers back to the original item. It may be a direct reference, as just described, or the reference may pass through several other items, but it always gets back to the item that originally started the chain, which then starts the chain all over again. If these references trigger actions and no mechanisms are set up to stop them (a passage of time, for instance, or a comparison to some maximum or minimum value that is incremented or decremented by the chain itself), the result is never-ending activity—the infinite loop.
Consider the case where a workflow makes a change to a list that triggers an automatic workflow. That secondary workflow makes a change to the original list, triggering the workflow that changes the secondary list again. If you do not detect this condition and stop the workflows, it can quickly result in thousands of workflow instances, absorbing system resources and ultimately leading to a system crash—and a nightmare to clean up.
One way to build in some control over runaway workflows is to create a list with a known item in it for your workflow. The item should contain a number field to use as a counter. When you create a workflow that you believe has the potential to "run away," the first action should test the list item for the current value of the counter. If it is not over some reasonable value (which only you can determine, based upon your environment), the next action increments the counter, and you then proceed with the workflow. The last action of any step that terminates the workflow should decrement that counter. If the initial comparison is greater than your threshold, end the workflow immediately. (You may opt to send an e-mail notice of the termination to the site owner, but that may be problematic if the runaway process is not controlled by your workflow.)
You learned earlier that SharePoint Designer 2010 workflows do not have a built-in mechanism for loops or state-based control flow. If you build appropriate logic into your workflows, and are careful to avoid infinite loops, circular references and secondary workflows can be used to work around this limit. You can deliberately create loops to execute a certain number of times, or until other desired conditions are met.
This chapter discussed many aspects of the foundation of workflow design using SharePoint Designer 2010. You were exposed to the various elements in the Workflow Designer environment and also the different types of workflows you can create using this product. The next chapter picks up where this chapter leaves off and discusses advanced workflow methods as well as the packaging of workflows and the integration of the SharePoint Designer 2010 workflows with Microsoft Visio 2010 and InfoPath 2010.