
Every iOS device has the ability to determine where in the world it is, using a framework called Core Location. iOS also includes the Map Kit framework , which lets you easily create a live interactive map that shows any locations you like, including, of course, the user’s location. In this chapter, we’ll work with both of these frameworks. Core Location can actually leverage three technologies to do this: GPS, cell ID location, and Wi-Fi Positioning Service (WPS). GPS provides the most accurate positioning of the three technologies, but it is not available on first-generation iPhones, iPod touches, or Wi-Fi-only iPads. In short, any device with at least a 3G data connection also contains a GPS unit. GPS reads microwave signals from multiple satellites to determine the current location.
Note
Apple uses a version of GPS called Assisted GPS, also known as A-GPS. A-GPS uses network resources to help improve the performance of stand-alone GPS. The basic idea is that the telephony provider deploys services on its network that mobile devices will automatically find and collect some data from. This allows a mobile device to determine its starting location much more quickly than if it were relying on the GPS satellites alone.
Cell ID location lookup gives a rough approximation of the current location based on the physical location of the cellular base station that the device is currently in contact with. Since each base station can cover a fairly large area, there is a fairly large margin of error here. Cell ID location lookup requires a cell radio connection, so it works only on the iPhone (all models, including the very first) and any iPad with a 3G data connection. The WPS option uses the media access control (MAC) addresses from nearby Wi-Fi access points to make a guess at your location by referencing a large database of known service providers and the areas they service, but can have a mile or more inaccuracy.
All three methods significantly drain the battery, so keep that in mind when using Core Location. Your application shouldn’t poll for location any more often than is absolutely necessary. When using Core Location, you have the option of specifying a desired accuracy. By carefully specifying the absolute minimum accuracy level you need, you can prevent unnecessary battery drain. The technologies that Core Location depends on are hidden from your application. We don’t tell Core Location whether to use GPS, triangulation, or WPS. We just tell it how accurate we would like it to be, and it will decide from the technologies available to it which is best for fulfilling our request.
The Location Manager
Apple provides a fairly easy to use Core Location API. The main class we’ll work with is CLLocationManager, usually referred to as the location manager . To interact with Core Location, you need to create an instance of the location manager:
let locationManager = CLLocationManager()This creates an instance of the location manager, but it doesn’t actually start polling for your location. You must create an object that conforms to the CLLocationManagerDelegate protocol and assign it as the location manager’s delegate. The location manager will call delegate methods when location information becomes available or changes. The process of determining location may take some time—even a few seconds.
Setting the Desired Accuracy
After you set the delegate, you also want to set the desired accuracy. As mentioned, don’t specify a degree of accuracy any greater than you absolutely need. If you’re writing an application that just needs to know which state or country the phone is in, don’t specify a high level of precision. Remember that the more accuracy you demand of Core Location, the more power you’re likely to use. Also, keep in mind that there is no guarantee that you will get the level of accuracy you have requested. Listing 19-1 shows an example of setting the delegate and requesting a specific accuracy.
Listing 19-1. Setting the Delegate and Desired Accuracy
locationManager.delegate = selflocationManager.desiredAccuracy = kCLLocationAccuracyBest
The accuracy is set using a CLLocationAccuracy value, a type that’s defined as a Double. The value is in meters, so if you specify a desiredAccuracy of 10, you’re telling Core Location that you want it to try to determine the current location within 10 meters, if possible. Specifying kCLLocationAccuracyBest (as we did previously) or specifying kCLLocationAccuracyBestForNavigation (where it uses other sensor data as well) tells Core Location to use the most accurate method that’s currently available. In addition, you can also use: kCLLocationAccuracyNearestTenMeters, kCLLocationAccuracyHundredMeters, kCLLocationAccuracy Kilometer, and kCLLocationAccuracyThreeKilometers.
Setting the Distance Filter
By default, the location manager will notify the delegate of any detected change in the device’s location. By specifying a distance filter, you are telling the location manager not to notify you of every change, but instead to notify you only when the location changes by more than a certain amount. Setting up a distance filter can reduce the amount of polling your application does. Distance filters are also set in meters. Specifying a distance filter of 1000 tells the location manager not to notify its delegate until the iPhone has moved at least 1,000 meters from its previously reported position as in locationManager.distanceFilter = 1000.
If you ever want to return the location manager to the default setting, which applies no filter, you can use the constant kCLDistanceFilterNone, like this:
locationManager.distanceFilter = kCLDistanceFilterNone.Just as when specifying the desired accuracy, you should take care to avoid getting updates any more frequently than you really need them; otherwise, you waste battery power. A speedometer app that’s calculating the user’s velocity based on location changes will probably want to have updates as quickly as possible, but an app that’s going to show the nearest fast-food restaurant can get by with a lot fewer updates.
Getting Permission to Use Location Services
Before your application can use location services, you need to get the user’s permission to do so. Core Location offers several different services, some of which can be used when your application is in the background—in fact, you can even request to have your application launched when certain events happen while it is not running. Depending on your application’s functionality, it may be enough to request permission to access location services only while the user is using your application, or it might need to always be able to use the service. When writing an application, you need to decide which type of permission you require and make the request before initiating the services that you need. You’ll see how to do this in the course of creating the example application for this chapter.
Starting the Location Manager
When you’re ready to start polling for location, and after you request from the user to access location services, you tell the location manager to start. It will go off and do its thing, and then call a delegate method when it has determined the current location. Until you tell it to stop, it will continue to call your delegate method whenever it senses a change that exceeds the current distance filter. Here’s how you start the location manager:
locationManager.startUpdatingLocation() Using the Location Manager Wisely
If you need to determine the current location only and you don’t need continuous updates, you can use the requestLocation() method instead of startUpdatingLocation().This method automatically stops location polling as soon as the user’s position has been determined. On the other hand, if you need to poll, make sure you stop polling as soon as you possibly can. Remember that as long as you are getting updates from the location manager, you are putting a strain on the user’s battery. To tell the location manager to stop sending updates to its delegate, call stopUpdatingLocation(),like this:
locationManager.stopUpdatingLocation()It’s not necessary to call this method if you use requestLocation() instead of startUpdatingLocation().
The Location Manager Delegate
The location manager delegate must conform to the CLLocationManagerDelegate protocol, which defines several methods, all of them optional. One of these methods is called by the location manager when the availability of user authorization to use location services changes, another when it has determined the current location or when it detects a change in location. Yet another method gets called when the location manager encounters an error. We’ll implement all of these delegate methods in this chapter’s project.
Getting Location Updates
When the location manager wants to inform its delegate of the current location, it calls the locationManager(_:didUpdateLocations:) method. This method takes two parameters :
The first parameter references the location manager that called the method.
The second parameter contains an array of CLLocation objects representing the current location of the device and perhaps a few previous locations. If several location updates occur in a short period of time, they may be reported all at once with a single call to this method. In any case, the most recent location is always the last item in this array.
Getting Latitude and Longitude Using CLLocation
Location information gets passed from the location manager using instances of the CLLocation class. This class provides seven properties that might be of interest to your application:
coordinate
horizontalAccuracy
altitude
verticalAccuracy
floor
timestamp
description
The latitude and longitude are stored in a property called coordinate. To get the latitude and longitude in degrees, use the code in Listing 19-2.
Listing 19-2. Getting Latitude and Longitude
let latitude = theLocation.coordinate.latitudelet longitude = theLocation.coordinate.longitude
The latitude and longitude variables will be inferred to be of type CLLocationDegrees. The CLLocation object can also tell you how confident the location manager is in its latitude and longitude calculations. The horizontalAccuracy property describes the radius of a circle (in meters, like all Core Location measurements) with the coordinate as its center. The larger the value in horizontalAccuracy, the less certain Core Location is of the location. A very small radius indicates a high level of confidence in the determined location.
You can see a graphic representation of horizontalAccuracy in the Maps application, as shown in Figure 19-1. The circle shown in Maps uses horizontalAccuracy for its radius when it detects your location. The location manager thinks you are at the center of that circle. If you’re not, you’re almost certainly somewhere inside the circle. A negative value in horizontalAccuracy is an indication that you cannot rely on the values in coordinate for some reason.
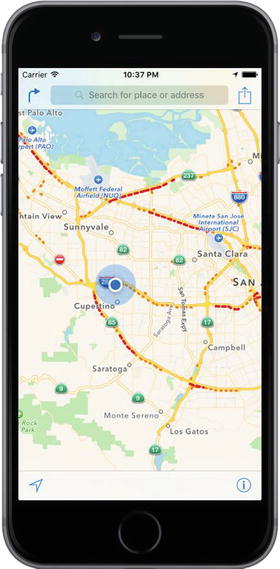
Figure 19-1. The Maps application uses Core Location to determine your current position. The outer circle is a visual representation of the horizontal accuracy.
The CLLocation object also has a property called altitude, of type CLLocationDistance, that tells you how many meters above (or below) sea level you are:
let altitude = theLocation.altitudeEach CLLocation object maintains a property called verticalAccuracy that is an indication of how confident Core Location is in its determination of altitude. The value in altitude could be off by as many meters as the value in verticalAccuracy. If the verticalAccuracy value is negative, Core Location is telling you it could not determine a valid altitude.
The floor property gives the floor within the building in which the user is located. This value is only valid in buildings that are able to provide the information, so you should not rely on its availability.
CLLocation objects include a timestamp that tells when the location manager made the location determination.
In addition to these properties, CLLocation has a useful instance method that will let you determine the distance between two CLLocation objects. The method is called distanceFromLocation() and it returns a value of type CLLocationDistance, which is just a Double, so you can use it in arithmetic calculations, as you’ll see in the application we’re about to create. Here’s how you use this method:
let distance = fromLocation.distanceFromLocation(toLocation)The preceding line of code returns the distance between two CLLocation objects: fromLocation and toLocation. This distance value returned contains the result of a great-circle distance calculation that ignores the altitude property and calculates the distance as if both points were at sea level. For most purposes, a great-circle calculation provides more than sufficient information; however, if you do want to take altitude into account when calculating distances, you’ll need to write your own code to do it.
Note
If you’re not sure what’s meant by great-circle distance, the idea is that the shortest distance between any two points on the earth’s surface will be found along a path that would, if extended, go the entire way around the earth: a “great circle.” The most obvious great circles are perhaps the ones you’ve seen on maps: the equator and the longitudinal lines. However, such a circle can be found for any two points on the surface of the earth. The calculation performed by CLLocation determines the distance between two points along such a route, taking the curvature of the earth into account. Without accounting for that curvature, you would end up with the length of a straight line connecting the two points, which isn’t much use, since that line would invariably go straight through some amount of the earth.
Error Notifications
If Core Location needs to report an error to your application, it will call a delegate method named locationManager(_:didFailWithError:). One possible cause of an error is that the user denied access to location services, in which case the method will be called with the error code CLError.Denied. Another commonly encountered error code supported by the location manager is CLError.LocationUnknown, which indicates that Core Location was unable to determine the location but that it will keep trying. While a CLError.LocationUnknown error indicates a problem that may be temporary, CLError.Denied and other errors may indicate that your application will not be able to access Core Location any time during the remainder of the current session.
Note
The simulator has no way to determine your current location, but you can choose one (such as Apple’s HQ, which is the default) or set your own, from the simulator’s Debug ➤ Location menu.
Creating the WhereAmI Application
Let’s build a small application to detect your device’s current location and the total distance traveled while the program has been running. You can see what the first version of our application will look like in Figure 19-2.
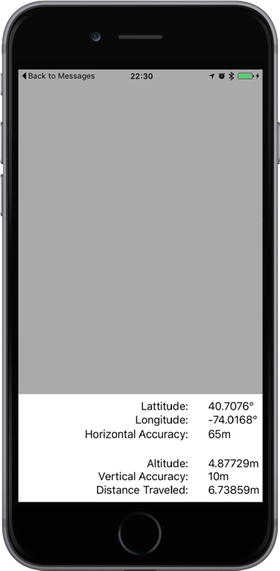
Figure 19-2. The WhereAmI application in action
In Xcode, create a new project using the Single View Application template and call it WhereAmI. When the project window opens, select ViewController.swift, and make the following changes:
import UIKitimport CoreLocationimport MapKitclass ViewController: UIViewController, CLLocationManagerDelegate {
First, notice that we’ve imported the Core Location framework. Core Location is not part of either UIKit or Foundation, so we need to import it manually. Next, we conform this class to the CLLocationManagerDelegate method , so that we can receive location information from the location manager.
Now add these property declarations:
private let locationManager = CLLocationManager()private var previousPoint: CLLocation?private var totalMovementDistance = CLLocationDistance(0)@IBOutlet var latitudeLabel: UILabel!@IBOutlet var longitudeLabel: UILabel!@IBOutlet var horizontalAccuracyLabel: UILabel!@IBOutlet var altitudeLabel: UILabel!@IBOutlet var verticalAccuracyLabel: UILabel!@IBOutlet var distanceTraveledLabel: UILabel!@IBOutlet var mapView:MKMapView!
The locationManager property holds the reference to the CLLocationManager instance that we’ll be using. The previousPoint property will keep track of the location from the last update we received from the location manager. This way, each time the user moves far enough to trigger an update, we’ll be able to add the latest movement distance to our running total, which we’ll keep in the totalMovementDistance property. The remaining properties are outlets that will be used to update labels on the user interface .
Now select Main.storyboard and let’s start creating the user interface. First, expand the view controller hierarchy in the Document Outline, select the View item, and in the Attributes Inspector, change its background color to light gray. Next, drag a UIView from the object library, drop it onto the existing view, and then position and size it so that it covers the bottom part of the Main View. Make sure that the bottom, left, and right sides of the view exactly match those of the gray view. You are aiming to create something like the arrangement shown in Figure 19-2, where the view that you just dropped is the one at the bottom of the figure with the white background.
In the Document Outline, select the view that you just added, Control-drag from it to its parent view and release the mouse. In the pop-up menu that appears, hold down the Shift key and click Leading Space to Container Margin, Trailing Space to Container Margin, and Vertical Spacing to Bottom Layout Guide. This pins the view in place, but does not yet set its height. To fix that, with the view still selected in the Document Outline, click the Pin button. In the pop-up, select the Height check box, set the height to 166, set Update Frames to Items of New Constraint, and then press Add 1 Constraint to set the height. That should do the job.
Next, we’ll create the rightmost column of labels shown in Figure 19-2. Drag a label from the object library and drop it a little way below the top of the white view. Resize it to a width of about 80 points and move it so that it is close to the right edge of the view. Option-drag a copy of this label downward five times to create a stack of labels, as shown in Figure 19-2. Now let’s fix the labels’ sizes and positions relative to their parent view.
Starting with the topmost label in the Document Outline , Control-drag from the label to its parent view. Release the mouse. Hold down the Shift key, select Top Space to Container and Trailing Space to Container, and then press Return. To set the label’s size, click the Pin button to open the Add New Constraints pop-up menu, click the Width and Height check boxes to select them, enter 80 as the width and 21 as the height (if they are not already set), and click Add 2 Constraints. You have now fixed the size and position of the top label. Repeat the same procedure for the other five labels.
Next, we’ll add the second column of labels. Drag a label from the object library and place it to the left of the topmost label, leaving a small horizontal gap between them. Drag the left side of the label so that it almost reaches the left edge of the white view, and then in the Attributes Inspector , set the Alignment so that the label text is right-aligned. Make five copies of this label by Option-dragging downward, aligning each of them with the corresponding label on the right, to make the arrangement in Figure 19-3.
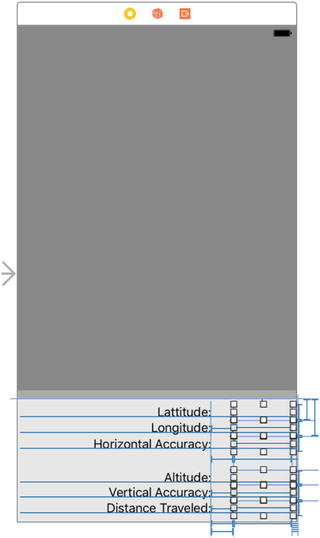
Figure 19-3. Our UI layout goal
Select the top label in the left column and Control-drag from its left side to the left side of the white view. Release the mouse and, in the context menu, select Leading Space to Container. Next, Control-drag from the same label to the matching label in the right-hand column. Release the mouse to open the context menu, hold down the Shift key, select Horizontal Spacing and Baseline, and press Return. Do the same for the other five labels in the left column. Finally, select the View Controller icon in the Document Outline, click the Resolve Auto Layout Issues button, and select Update Frames, if it’s enabled.
We are almost there. We now need to connect the labels in the right column to the outlets in the view controller. Control-drag from the yellow view controller icon in the Document Outline to the top label in the right column and release the mouse. In the pop-up that appears, select latitudeLabel. Control-drag from the view controller icon to the second label to connect it to the longitudeLabel outlet, to the third label to connect it to horizontalAccuracyLabel, to the fourth to connect it to altitudeLabel, to the fifth to connect it to verticalAccuracyLabel, and to the bottom label to connect it to the distanceTraveledLabel outlet. You have now connected all six outlets.
Finally, clear the text from all of the labels in the right column, and change the text of the labels in the left column to match that shown in Figure 19-3; the top label’s text should be Latitude:, the next one down should be Longitude:, and so on.
Now let’s write the code to display some useful information in all those labels. Select ViewController.swift and insert the following lines in viewDidLoad() to configure the location manager:
override func viewDidLoad() {super.viewDidLoad()// Do any additional setup after loading the view, typically from a nib.locationManager.delegate = selflocationManager.desiredAccuracy = kCLLocationAccuracyBestlocationManager.requestWhenInUseAuthorization()
We assign our controller class as the location manager’s delegate, set the desired accuracy to the best available, and then request permission to use the location service while the user is using our application. This is sufficient authorization for the purposes of this example. To use some of the more advanced features of Core Location, which are beyond the scope of this book, you will probably need to request permission to use Core Location at any time by calling the requestAlwaysAuthorization() method instead.
Note
In this simple example, the request for authorization is made as the application starts up, but Apple recommends that, in a real application, you should delay making the request until you actually need to use location services. The reason for this is that the user is more likely to agree if it’s obvious why you need access to the device’s location, based on operation that has been requested, than if an application, probably one that the user has just installed, requests permission as soon as it launches.
The first time this application runs, iOS will display an alert asking the user whether your application should be allowed to use your location. You need to supply a short piece of text that iOS will include in the alert pop-up, explaining why your application needs to know the user’s location. Open the Info.plist file and add the text you’d like to have displayed under the key NSLocationWhenInUseUsageDescription (if you need to request permission to use location services even when the application is not actively being used, the text should be added under the key NSLocationWhenInUseUsageDescription instead. For the purposes of this example, use something like “This application needs to know your location to update your position on a map”.
Caution
In some earlier versions of iOS, supplying text to qualify the permission request was optional. Beginning with iOS 8, it became mandatory. If you don’t supply any text, the permission request will not be made.
If you run the application now, you’ll see that iOS uses your text in the permission request, as shown in Figure 19-4. If the prompt does not appear, make sure that you have spelled the name of the key in Info.plist properly. Because we haven’t completed our app yet at this point in time, you won’t see the map yet in the background. But, Figure 19-4 gives you an idea of where we are headed.
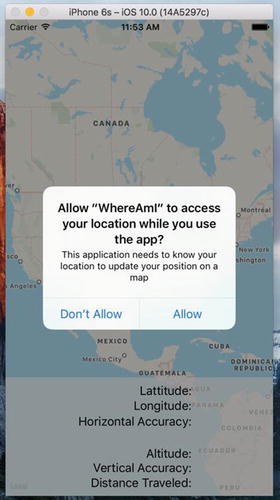
Figure 19-4. Prompting the user for permission to use location services
This prompt appears only once in the lifetime of the application. Whether or not the user allows your application to use location services, this request will never be made again, no matter how many times the application is run. That’s not to say that the user can’t change his mind about this, of course. We’ll say more about that in the upcoming “Changing Location Service Permissions” section. As far as testing is concerned, rerunning the application from Xcode has no effect on the user’s saved response—to get a clean state for testing, you have to delete the application from the simulator or device. If you do that, iOS will prompt for permission again when you reinstall and relaunch the application. For now, reply “Allow” to the prompt and let’s continue writing our application.
You probably noticed that the viewDidLoad() method did not call the location manager’s startUpdatingLocation() method immediately after calling requestWhenInUseAuthorization(). There is, in fact, no point in doing so, because the authorization process does not take place immediately. At some point after viewDidLoad() returns, the location manager delegate’s locationManager(_:didChangeAuthorizationStatus:) method will be called with the application’s authorization status. This may be the result of the user’s reply to the permission request pop-up, or it may be the saved authorization state from when the application last executed. Either way, this method is an ideal place to start listening for location updates or request the user’s location, assuming you are authorized to. Add the following implementation of this method to the ViewController.swift file :
func locationManager(_ manager: CLLocationManager,didChangeAuthorization status: CLAuthorizationStatus) {print("Authorization status changed to (status.rawValue)")switch status {case .authorizedAlways, .authorizedWhenInUse:locationManager.startUpdatingLocation()default:locationManager.stopUpdatingLocation()}}
This code starts by listening for location updates if authorization was granted, and stops listening if it was not. Since we don’t start listening unless we have authorization, what’s the point of calling stopUpdatingLocation()if we didn’t get permission? That’s a good question. The reason this code is required is because the user can give your application permission to use Core Location and then later revoke it. In that case, we need to stop listening for updates. For more on this, see “Changing Location Service Permissions” later in this chapter.
If your application tries to use location services when it doesn’t have permission to do so, or if an error occurs at any time, the location manager calls its delegate’s locationManager(_:didFailWithError:) method . Let’s add an implementation of that method to the view controller:
func locationManager(_ manager: CLLocationManager,didFailWithError error: NSError) {let errorType = error.code == CLError.denied.rawValue? "Access Denied": "Error (error.code)"let alertController = UIAlertController(title: "Location Manager Error",message: errorType, preferredStyle: .alert)let okAction = UIAlertAction(title: "OK", style: .cancel,handler: { action in })alertController.addAction(okAction)present(alertController, animated: true,completion: nil)}
For the purposes of this example, when an error occurs, we just alert the user. In a real application, you would use a more meaningful error message and clean up the application state as required.
Using Location Manager Updates
Now that we’ve dealt with getting permission to use the user’s location, let’s do something with that information. Insert this implementation (see Listing 19-3), of the delegate’s locationManager(_:didUpdateLocations:) method in ViewController.swift.
Listing 19-3. Our didUpateLocations Location Manager Delegate Method
func locationManager(_ manager: CLLocationManager, didUpdateLocationslocations: [CLLocation]) {if let newLocation = locations.last {let latitudeString = String(format: "%gu{00B0}",newLocation.coordinate.latitude)latitudeLabel.text = latitudeStringlet longitudeString = String(format: "%gu{00B0}",newLocation.coordinate.longitude)longitudeLabel.text = longitudeStringlet horizontalAccuracyString = String(format:"%gm",newLocation.horizontalAccuracy)horizontalAccuracyLabel.text = horizontalAccuracyStringlet altitudeString = String(format:"%gm", newLocation.altitude)altitudeLabel.text = altitudeStringlet verticalAccuracyString = String(format:"%gm",newLocation.verticalAccuracy)verticalAccuracyLabel.text = verticalAccuracyStringif newLocation.horizontalAccuracy < 0 {// invalid accuracyreturn}if newLocation.horizontalAccuracy > 100 ||newLocation.verticalAccuracy > 50 {// accuracy radius is so large, we don't want to use itreturn}if previousPoint == nil {totalMovementDistance = 0} else {print("movement distance: " +"(newLocation.distance(from: previousPoint!))")totalMovementDistance +=newLocation.distance(from: previousPoint!)}previousPoint = newLocationlet distanceString = String(format:"%gm", totalMovementDistance)distanceTraveledLabel.text = distanceString}}
The first thing we do in the delegate method is to update the first five labels in the second column of Figure 19-3 with values from the CLLocation objects passed in the locations argument. The array could contain more than one location update, but we always use the last entry, which represents the most recent information.
Note
Both the longitude and latitude are displayed in formatting strings containing the cryptic-looking u{00B0}. This is the hexadecimal value of the Unicode representation of the degree symbol (°). It’s never a good idea to put anything other than ASCII characters directly in a source code file, but including the hex value in a string is just fine, and that’s what we’ve done here.
Next, we check the accuracy of the values that the location manager gives us. High accuracy values indicate that the location manager isn’t quite sure about the location, while negative accuracy values indicate that the location is actually invalid. Some devices do not have the hardware required to determine vertical position. On these devices, and on the simulator, the verticalAccuracy property will always be –1, so we don’t exclude position reports that have this value. The accuracy values are in meters and indicate the radius of a circle from the location we’re given, meaning that the true location could be anywhere in that circle. Our code checks to see whether these values are acceptably accurate; if not, it simply returns from this method rather than doing anything more with garbage data:
if newLocation.horizontalAccuracy < 0 {// invalid accuracyreturn}if newLocation.horizontalAccuracy > 100 ||newLocation.verticalAccuracy > 50 {// accuracy radius is so large, we don't want to use itreturn}
Next, we check whether previousPoint is nil. If it is, then this update is the first valid one we’ve gotten from the location manager, so we zero out the distanceFromStart property. Otherwise, we add the latest location’s distance from the previous point to the total distance. In either case, we update previousPoint to contain the current location:
if previousPoint == nil {totalMovementDistance = 0} else {print("movement distance: " +"(newLocation.distance(from: previousPoint!))")totalMovementDistance +=newLocation.distance(from: previousPoint!)}previousPoint = newLocation
After that, we populate the final label with the total distance that we’ve traveled from the start point. While this application runs, if the user moves far enough for the location manager to detect the change, the Distance Traveled: field will be continually updated with the distance the user has moved since the application started:
let distanceString = String(format:"%gm", totalMovementDistance)distanceTraveledLabel.text = distanceString
And there you have it. Core Location is fairly straightforward and easy to use. Compile and run the application, and then try it. If you have the ability to run the application on your iPhone or iPad, try going for a drive, having someone else doing the driving, with the application running and watch the values change as you move around.
Visualizing Your Movement on a Map
What we’ve done so far is pretty interesting, but wouldn’t it be nice if we could visualize our travel on a map? Fortunately, iOS includes the Map Kit framework to help us out here. Map Kit utilizes the same back-end services that Apple’s Maps app uses, which means it’s fairly robust and improving all the time. It contains a view class that presents a map, which responds to user gestures just as you’d expect of any modern mapping app. This view also lets us insert annotations for any locations we want to show up on our map, which by default show up as “pins” that can be touched to reveal some more info. We’re going to extend our WhereAmI app to display the user’s starting position and current position on a map.
Select ViewController.swift and add the following line to import the Map Kit framework :
import UIKitimport CoreLocationimport MapKit
Now add a new property declaration for the Map View that will display the user’s location:
Now select Main.storyboard to edit the view. Drag a Map View from the object library and drop it onto the top half of the user interface. Resize the Map View so that it covers the whole screen, including the view that we added earlier and all of its labels, and then choose Editor ➤ Arrange ➤ Send to Back to move the Map View behind the other view.
Tip
If the Send to Back option is not enabled, you can get the same effect by dragging the Map View in the Document Outline upward, so that it appears before the view that contains the labels in its parent’s child list.
In the Document Outline, Control-drag from the Map View to its parent view and, in the context menu, hold down the Shift key and select Leading Space to Container Margin, Trailing Space to Container Margin, Vertical Spacing to Top Layout Guide, and Vertical Spacing to Bottom Layout Guide, and then press the Return key.
The Map View is now locked in place, but the bottom part of it is obscured. We can fix that by making the view at the bottom partly transparent. To do that, select it in the Document Outline, open the Attributes Inspector, click the Background color editor, and, in the pop-up that appears, choose Other… to open a color chooser. Select a white background and move the Opacity slider to about 70%. Finally, Control-drag from the view controller icon in the Document Outline to the Map View and select mapView in the pop-up that appears to connect the map to its outlet.
Now that these preliminaries are in place, it’s time to write a little code that will make the map do some work for us. Before dealing with the code required in the view controller, we need to set up a sort of model class to represent our starting point. MKMapView is built as the View part of an MVC (Model-View-Controller) architecture. It works best if we have distinct classes to represent markers on the map. We can pass model objects off to the map view and it will query them for coordinates, a title, and so on, using a protocol defined in the Map Kit framework.
Press ⌘N to bring up the new file assistant, and in the iOS Source section, choose Cocoa Touch Class. Name the class Place and make it a subclass of NSObject. Open Place.swift and modify it as shown next. You need to import the Map Kit framework, specify a protocol that the new class conforms to, and specify the properties as shown in Listing 19-4.
Listing 19-4. Our New Place Class in the Place.swift File
import UIKitimport MapKitclass Place: NSObject, MKAnnotation {let title: String?let subtitle: String?var coordinate: CLLocationCoordinate2Dinit(title:String, subtitle:String, coordinate:CLLocationCoordinate2D) {self.title = titleself.subtitle = subtitleself.coordinate = coordinate}}
This is a fairly “dumb” class that acts solely as a holder for these properties. In a real-world example, you may have real model classes that need to be shown on a map as an annotation, and the MKAnnotation protocol lets you add this capability to any class of your own without messing up any existing class hierarchies. Select ViewController.swift and add the two bold lines to the locationManager(_:didChangeAuthorizationStatus:) method:
func locationManager(_ manager: CLLocationManager,didChangeAuthorization status: CLAuthorizationStatus) {print("Authorization status changed to (status.rawValue)")switch status {case .authorizedAlways, .authorizedWhenInUse:locationManager.startUpdatingLocation()mapView.showsUserLocation = truedefault:locationManager.stopUpdatingLocation()mapView.showsUserLocation = false}}
The Map View’s showsUserLocation property does just what you probably imagine: it saves us the hassle of manually moving a marker around as the user moves by automatically drawing one for us. It uses Core Location to get the user’s location and it works only if your application is authorized for that; so we enable the property when we are told that we have permission to use Core Location and then disable it again if we lose permission.
Now let’s revisit the locationManager(_:didUpdateLocations:) method . We’ve already got some code in there that notices the first valid location data we receive and establishes our start point. We’re also going to allocate a new instance of our Place class. We set its properties, giving it a location. We also add a title and subtitle that we want to appear when a marker for this location is displayed. Finally, we pass this object off to the map view. We also create an instance of MKCoordinateRegion, a struct included in Map Kit that lets us tell the view which section of the map we want it to display. MKCoordinateRegion uses our new location’s coordinates and a pair of distances in meters (100, 100) that specify how wide and tall the displayed map portion should be. We pass this off to the map view as well, telling it to animate the change. All of this is done by adding the bold lines shown here:
if previousPoint == nil {totalMovementDistance = 0let start = Place(title:"Start Point",subtitle:"This is where we started",coordinate:newLocation.coordinate)mapView.addAnnotation(start)let region = MKCoordinateRegionMakeWithDistance(newLocation.coordinate,100, 100)mapView.setRegion(region, animated: true)} else {print("movement distance: " +"(newLocation.distance(from: previousPoint!))")totalMovementDistance +=newLocation.distance(from: previousPoint!)}
So now we’ve told the map view that we have an annotation (i.e., a visible placemark) that we want the user to see. But how should it be displayed? Well, the map view figures out what sort of view to display for each annotation by asking its delegate. In a more complex app, that would work for us. But in this example we haven’t made ourselves a delegate, simply because it’s not necessary for our simple use case. Unlike UITableView, which requires its data source to supply cells for display, MKMapView has a different strategy: if it’s not provided with annotation views by a delegate, it simply displays a default sort of view represented by a red “pin” on the map that reveals some more information when touched.
There’s one final thing you need to do—enable your application to use Map Kit. To do this, select the project in the Project Navigator and then select the WhereAmI target. At the top of editor area, select Capabilities, locate the Maps section, and move the selector switch on the right from OFF to ON. Now build and run your app, and you’ll see the map view load. As soon as it gets valid position data, you’ll see it scroll to the right location, drop a pin at your starting point, and mark your current location with a glowing blue dot (see Figure 19-5). Not bad for a few dozen lines of code.
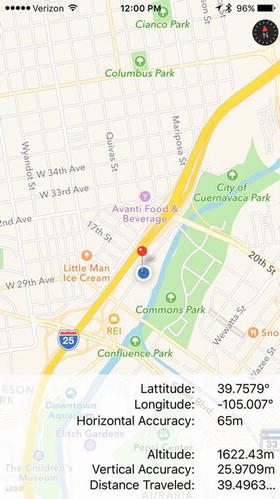
Figure 19-5. The red pin marks our starting location, and the blue dot shows how far we’ve gotten—in this case, no distance at all
Tip
If you are using a real device and the map does not zoom to show your current position, it’s because Core Location can’t figure out where you are to within 100 meters. You might be able to help it out by enabling Wi-Fi, which can sometimes improve Core Location’s accuracy.
Changing Location Service Permissions
When your application runs for the first time, you hope the user will give it permission to use location services. Whether you get permission or not, you can’t assume that nothing changes. The user can grant or revoke location permission via the Settings app. You can test this on the simulator. Launch the app and grant yourself permission to use Core Location (if you’ve previously denied permission, you’ll need to remove and reinstall the app first). You should see your location on the map. Now go to the Settings app and choose Privacy ➤ Location Services. At the top of the screen is a switch that turns location services on or off. Turn the switch to OFF and go back to your application. You’ll see that the map no longer shows your position. That’s because the location manager called the locationManager(_:didChangeAuthorizationStatus:) method with authorization code CLAuthorizationStatus.denied, in response to which the application stops receiving position updates and tells Map Kit to stop tracking the user’s position. Now go back to the Settings app, re-enable Core Location in Locations Services, and come back to your application; you’ll find that it’s tracking your position again.
Switching Location Services off is not the only way for the user to change your app’s ability to use Core Location. Go back to the Settings app. Below the switch that enables Location Services, you’ll see a list of all the apps that are using it, including WhereAmI, as shown on the left in Figure 19-6. Clicking the application name takes you to another page where you can allow or deny access to your application, which you can see on the right in Figure 19-6. At the moment, the application can use location services while the user is using the app. If you click Never, that permission is revoked, as you can prove by returning to the application again. This demonstrates that it’s important to code the application so that it can detect and respond properly to changes in its authorization status.
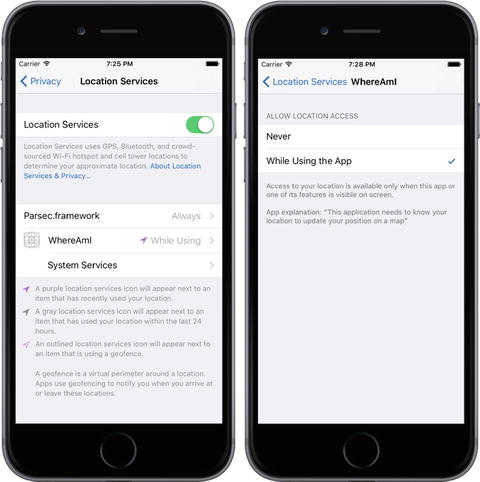
Figure 19-6. Changing Core Location access permission for the WhereAmI app
Summary
That’s the end of our introduction to Core Location and Map Kit. There is quite a lot more to be discovered about both of these frameworks. Here are just a few of the highlights:
Instead of closely tracking the user’s location using the startUpdatingLocation() method, applications that need less positional accuracy and/or less frequent updates, such as Weather apps, can use the Significant Location Updates service. You should use this service if at all possible, because it can significantly reduce power consumption.
On devices that have a magnetometer, Core Location can report the user’s heading. If the device also has a GPS, it can report the direction in which the user is moving.
Core Location can report when the user enters or leaves application-defined geographical regions (defined as a circle of a given radius and center) or when the application is in the vicinity of an iBeacon.
You can convert between the coordinates reported by Core Location and a user-friendly placemark object and vice versa, using the Geocoding service. In addition to this, Map Kit includes an API that lets you search for locations by name or address.
Core Location monitors the user’s movement and can determine when the user stops for a period of time at a location. When this happens, the user is assumed to be “visiting” that location. Your application can receive notification when the user arrives at and departs from a visited location.
The best source of information for all of these features is Apple’s Location and Maps Programming Guide.
Although the underlying technologies are quite complex, Apple has provided simple interfaces that hide most of the complexity, making it quite easy to add location-related and mapping features to your applications so that you can tell where the users are, notice when they move, and mark their location (and any other locations) on a map. And speaking of moving, in the next chapter we’ll explore the iPhone’s built-in accelerometer.