Up until this point, we’ve written applications using a single view controller. While single view apps can often do what you need them to, the real power of the iOS platform emerges when you switch out views based on user input. Multiview applications come in several different flavors, but the underlying mechanism functions the same, regardless of how the app appears on the screen. In this chapter, we’ll focus on the structure of multiview applications and the basics of swapping content views by building our own multiview app from scratch. Writing our own custom controller class that switches between two different content views, we’ll establishing a strong foundation for taking advantage of the various multiview controllers provided by Apple.
First, let’s look at some examples of our new area of exploration…multiviews.
Common Types of Multiview Apps
Strictly speaking, we have worked with multiple views in our previous applications, since buttons, labels, and other controls are all subclasses of UIView and they can all go into the view hierarchy. But when Apple uses the term view in documentation, they refer to a UIView or one of its subclasses having a corresponding view controller. These types of views are also sometimes referred to as content views because they are the primary container for the content of your application.
A utility app provides the simplest example of how a multiview application appears. It focuses primarily on a single view, but offers a second view typically used to configure the application or to provide more detail than the primary view. The Stocks application that ships with iPhone shows a good example of this (see Figure 6-1). Clicking button in the lower-right corner, the view transitions to a new view that lets you set the list of stocks tracked by the application.
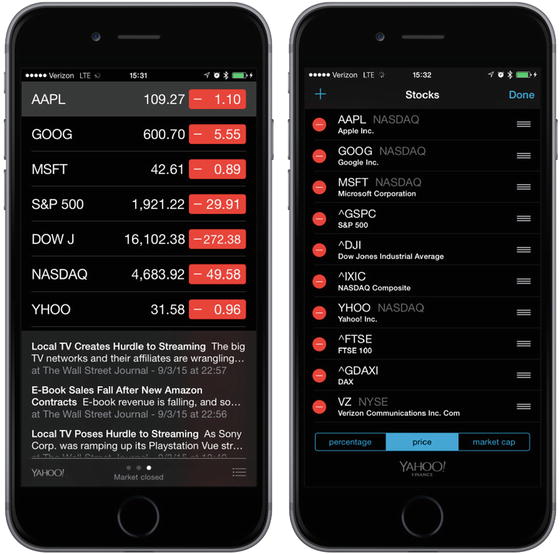
Figure 6-1. The Stocks application that ships with iPhone provides two views: one to display the data and another to configure the stock list
Several tab bar applications ship with the iPhone, including the Phone application (see Figure 6-2) and the Clock application. A tab bar application displays a row of buttons, called the tab bar, at the bottom of the screen. Tapping one of the buttons causes a new view controller to become active and a new view to be shown. In the Phone application, for example, tapping Contacts shows a different view than the one shown when you tap Keypad.

Figure 6-2. The Phone application provides an example of a multiview application using a tab bar
Another common type of multiview app uses a navigation-based mechanism featuring a navigation controller that uses a bar to control a hierarchical series of views, as seen in the Settings app (see Figure 6-3). In Settings, you first see a series of rows, each row corresponding to a cluster of settings or a specific app. Touching one of those rows takes you to a new view where you might customize one particular set of settings. Some views present a list that allows you to dive even deeper. The navigation controller keeps track of how deep you go and gives you a control to let you make your way back to the previous view.
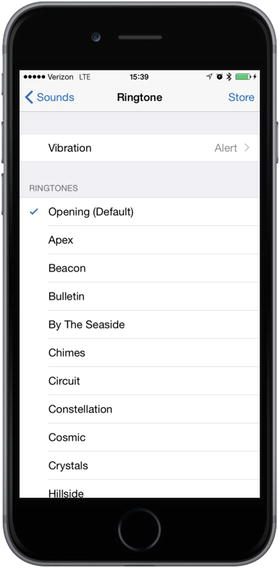
Figure 6-3. The iPhone Settings application provides a great example of a multiview application using a navigation bar
For example, selecting the Sounds preference takes you to a view with a list of sound-related options. The top of that view displays a navigation bar with a left arrow labeled Settings that takes you back to the previous view if you tap it. Within the sound options you’ll see a row labeled Ringtone. Tap Ringtone. You’re taken to a new view featuring a list of ringtones and a navigation bar that takes you back to the main Sounds preference view, as shown in Figure 6-4. A navigation-based application provides a useful mechanism when you want to present a hierarchy of views.

Figure 6-4. The Music application uses both a navigation bar and a tab bar
On the iPad, we implement most navigation-based applications, such as Mail, using a split view, where the navigation elements appear on the left side of the screen, and the item you select to view or edit appears on the right. We’ll talk about split views in Chapter 11.
Because views are themselves hierarchical in nature, we might combine different mechanisms for swapping views within a single application. For example, the iPhone’s Music application uses a tab bar to switch between different methods of organizing your music. It also uses a navigation controller and its associated navigation bar to allow you to browse your music based on that selection. In Figure 6-4, the tab bar is at the bottom of the screen and the navigation bar is at the top of the screen.
Some applications use a toolbar , which is often confused with a tab bar. A tab bar selects one and only one choice from among two or more options. A toolbar holds buttons and certain other controls, but those items are not mutually exclusive. A perfect example of a toolbar is at the bottom of the main Safari view, as shown in Figure 6-5. If you compare the toolbar at the bottom of the Safari view with the tab bar at the bottom of the Phone or Music application , you’ll find the two pretty easy to tell apart. The tab bar has multiple segments, exactly one of which (the selected one) is highlighted with a tint color; but on a toolbar, normally every enabled button is highlighted.

Figure 6-5. Mobile Safari features a toolbar at the bottom, acting like a free-form bar that allows you to include a variety of controls
Each of these multiview application types uses a specific controller class from the UIKit. Tab bar interfaces are implemented using the UITabBarController class and navigation interfaces are implemented using UINavigationController. We’ll describe their use in detail in the next few chapters.
The Architecture of a Multiview Application
The application we’re going to build in this chapter, View Switcher, exhibits a fairly simple appearance; however, in terms of the code this is the most complex application we’ve yet tackled. View Switcher consists of three different controllers, a storyboard, and an application delegate.
When first launched, View Switcher appears, as shown in Figure 6-6, with a toolbar at the bottom containing a single button. The rest of the view displays a blue background and a button to be pressed.

Figure 6-6. When you first launch the View Switcher application , you’ll see a blue view with a button and a toolbar with its own button
Pressing the Switch Views button causes the background to turn yellow and the button’s title to change, as shown in Figure 6-7.
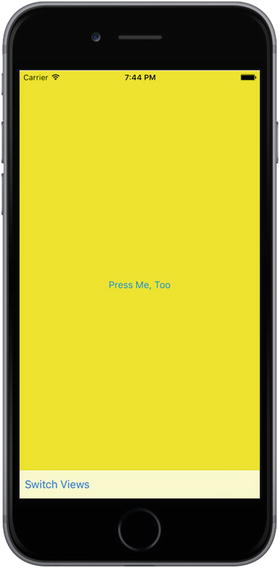
Figure 6-7. Pressing the Switch Views button causes the blue view to flip, revealing the yellow view
If either the Press Me or Press Me, Too button activates, an alert appears indicating which view’s button was pressed, as shown in Figure 6-8.
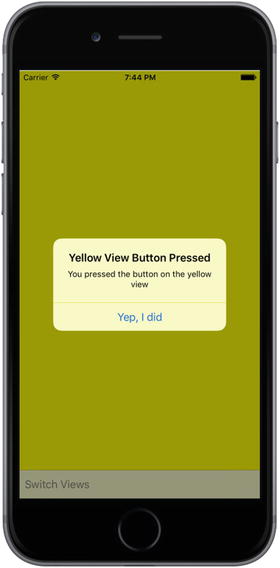
Figure 6-8. Pressing the Press Me or Press Me, Too button displays the alert
Although we could achieve this same functionality writing a single-view application , I took this more complex approach to demonstrate the actual mechanics of a multiview application. Three view controllers interact in this simple application: one controlling the blue view, one, the yellow view, and a third special controller that swaps the other two in and out when the Switch Views button is pressed.
Before we start building our application, let’s discuss how iOS multiview applications get put together. Most multiview applications use the same basic pattern.
The Root Controller
The storyboard acts as the key player here since it contains all the views and view controllers for our application. We’ll create a storyboard with an instance of a controller class that is responsible for managing which other view currently appears to the user. We call this controller the root controller (as in “the root of the tree”) because it is the first controller the user sees and the controller that is loaded when the application loads. This root controller often acts as an instance of UINavigationController or UITabBarController, although it can also be a custom subclass of UIViewController.
In a multiview application, the root controller takes two or more other views and presents them to the user as appropriate, based on the user’s input. A tab bar controller, for example, swaps in different views and view controllers based on which tab bar item was last tapped. A navigation controller does the same thing when the user drills down and backs up through hierarchical data.
Note
The root controller provides the primary view controller for the application and, as such, specifies whether it is OK to automatically rotate to a new orientation. However, the root controller may pass responsibility for tasks like that to the currently active controller.
In multiview applications, the content view takes up most of the screen and each content view has its own view controller containing outlets and actions. In a tab bar application, for example, taps on the tab bar will go to the tab bar controller, but taps anywhere else on the screen get processed by the controller corresponding to the content view currently displayed.
Content View Anatomy
In a multiview application, each view controller (Swift code ) manages a content view, and these content views are where the bulk of your application’s user interface resides. Taken together, each of these pairings is called a scene within a storyboard. Each scene consists of a view controller and a content view, which may be an instance of UIView or one of its subclasses. Although you can create your interface in code rather than using Interface Builder, the power, flexibility, and stability of the tools preclude ever needing to do that.
In this project, we’ll create a new controller class for each content view. Our root controller manages a content view consisting of a toolbar that occupies the bottom of the screen. The root controller then loads a blue view controller, placing the blue content view as a subview to the root controller view. When you press the root controller’s Switch Views button (the button is in the toolbar), the root controller swaps out the blue view controller and swaps in a yellow view controller, instantiating that controller if it needs to do so. Let’s build the project and see this all become much clearer.
Creating the View Switcher Application
To start our project, in Xcode: File ➤ New ➤ Project… or press ··N. When the template selection sheet opens, select Single View Application and then click Next. On the next page of the assistant, enter View Switcher as the Product Name, set the Language to Swift and the Devices pop-up button to Universal. When everything is set up correctly, click Next to continue. On the next screen, navigate to wherever you’re saving your projects on disk and click the Create button to create a new project directory.
Renaming the View Controller
As you’ve already seen, the Single View Application template supplies an application delegate, a view controller, and a storyboard. The view controller class is called ViewController. In this application, we are going to be dealing with three view controllers, but most of the logic will be in the main view controller. Its task will be to switch the display so that the view from one of the other view controllers is showing at all times. To make the role of the main view controller clear, we’d like to give it a better name, such as SwitchingViewController. There are several places in the project where the view controller’s class name is referenced. To change its name, we would need to update all of those places. Xcode has a nifty feature called refactoringthat would do that for us, but, at the time of writing, refactoring is not supported for Swift projects in the Xcode beta I’m using. Instead, we’re going to delete the controller that the template created for us and add a new one.
Start by selecting ViewController.swift in the Project Navigator. Right-click it and select Delete in the pop-up (see Figure 6-9). When prompted, choose to move the source file to the Trash.

Figure 6-9. Deleting the template view controller
Now right-click the View Switcher group and select New File.... In the template chooser, select Cocoa Touch Class from the iOS Source section. Name the class SwitchingViewController and make it a subclass of ViewController. Make sure that Also create XIB fileis not checked, since we are going to add this controller to the storyboard a little later and that Language is set to Swift, as shown in Figure 6-10, and then press Next followed by Create .

Figure 6-10. Creating the SwitchingViewController class
Now that we have our new view controller, we need to add it to the storyboard. Select Main.storyboard in the Document Outline to open the storyboard for editing. You’ll see that the template created a view controller for us—we just need to link it to our SwitchingViewController class. Select the view controller in the Document Outline and open the Identity Inspector. In the Custom Class section, change the class from UIViewController to SwitchingViewController, as shown in Figure 6-11.
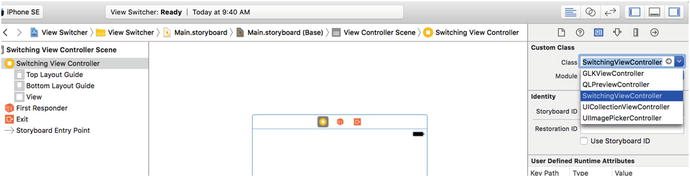
Figure 6-11. Changing the view controller class in the storyboard
Now if you check the Document Outline, you should see that the view controller’s name has changed to Switching View Controller, as shown in Figure 6-12.

Figure 6-12. The new view controller in the Document Outline
Adding the Content View Controllers
We’ll need two additional view controllers to display the content views. In the Project Navigator, right-click the View Switcher group and select New File…. In the template dialog, choose Cocoa Touch Class from the iOS Source section and press Next. Name the new class BlueViewController, make it a subclass of UIViewController, and make sure that the Also create XIB file check box is not checked. Press Next and then press Create to save the files for the new view controller. Repeat this process to create the second content view controller, giving it the name YellowViewController. To keep things organized you may want to move the files under the View Switcher folder in the Project Navigator, as shown in Figure 6-13.

Figure 6-13. You may want to move the new swift files under the View Switcher folder in the Xcode Project Navigator
Modifying SwitchingViewController.swift
The SwitchingViewController class will need an action method that will toggle between the blue and yellow views. We won’t create any outlets, but we will need two properties—one for each of the view controllers that we’ll be swapping in and out. These don’t need to be outlets because we’re going to create the view controllers in code rather than in the storyboard. Add the following property declarations to SwitchingViewController.swift:
private var blueViewController: BlueViewController!private var yellowViewController: YellowViewController!
Add the following method at the bottom of the class:
@IBAction func switchViews(sender: UIBarButtonItem) {}
Previously, we added action methods by Control-dragging from a view to the view controller’s source code, but here you’ll see that we can work the other way around just as well, since IB can see what outlets and actions are already defined in our source code. Now that we’ve declared the action we need, we can set up the minimal user interface for this controller in our storyboard.
Building a View with a Toolbar
We now need to set up the view for SwitchingViewController. As a reminder, this view controller will be our root view controller—the controller that is in play when our application is launched. SwitchingViewController’s content view will consist of a toolbar that occupies the bottom of the screen and the view from either the yellow or blue view controller. Its job is to switch between the blue view and the yellow view, so it will need a way for the user to change the views. For that, we’re going to use a toolbar with a button. Let’s build the toolbar now.
In the Project Navigator, select Main.storyboard. In the IB editor view, you’ll see our switching view controller. As you can see in Figure 6-14, it’s currently empty and quite dull. This is where we’ll start building our GUI.

Figure 6-14. Our empty root view controller (Switching View Controller) Storyboard
Grab a Toolbar from the library, drag it onto your view, and place it at the bottom so that it looks like Figure 6-15.

Figure 6-15. Add a toolbar to the bottom of our root view controller
We want to keep this toolbar stretched across the bottom of the content view no matter what size the view has. To do that, we need to add three layout constraints—one that pins the toolbar to the bottom of the view and another two that pin it to the view’s left and right sides. To do this, select the toolbar in the Document Outline, click the Pin button on the toolbar beneath the storyboard, and change the values in the pop-up, as shown in Figure 6-16.

Figure 6-16. Constrain the toolbar to the bottom, left, and right of its containing view
Uncheck the Constrain to margins check box, because we want to position the toolbar relative to the edges of the content view, not the blue guidelines that appear near its edges. Next, set the distances to the nearest left, right, and bottom neighbors to zero (if you have correctly positioned the toolbar, they should already be zero). In this case, the nearest neighbor of the toolbar is the content view. You can see this by clicking the small arrow in one of the distance boxes. It opens a pop-up that shows the nearest neighbor and any other neighbors relative to which you could place the toolbar; in this case, there are no neighbors. To indicate that these distance constraints should be active, click the three dashed red lines that link the distance boxes to the small square in the center, so that they become solid lines. Finally, change Update Frames to Items of New Constraints (so that the toolbar’s representation in the storyboard moves to its new constrained location) and click Add 3 Constraints.
Now, to make sure you’re on the right track, click the Run button to make this app launch in the iOS simulator. You should see a plain white app start up, with a pale gray toolbar at the bottom containing a lone button. If not, go back and retrace your steps to see what you missed. Rotate the simulator. Verify that the toolbar stays fixed at the bottom of the view and stretched right across the screen. If this doesn’t happen, you need to fix the constraints that you just applied to the toolbar.
Linking the Toolbar Button to the View Controller
You can see that the toolbar has a single button and we’ll use that button to switch between the different content views. Double-click the button in the storyboard, as shown in Figure 6-17, and change its title to Switch Views. Press the Return key to commit your change. Now we can link the toolbar button to our action method in SwitchingViewController. Before doing that, though, you should be aware that toolbar buttons aren’t like other iOS controls. They support only a single target action, and they trigger that action only at one well-defined moment—the equivalent of a touch up inside event on other iOS controls.

Figure 6-17. Change the title of the button in the toolbar to Switch Views
Selecting a toolbar button in Interface Builder can be tricky. The easiest way to do it is to expand the Switching View Controller icon in the Document Outline until you can see the button, which is now labeled Switch Views, and then click it. Once you have the Switch Views button selected, Control-drag from it over to the yellow Switching View Controller icon at the top of the scene, as shown in Figure 6-18. Release the mouse and select the switchViewsWithSender: action from the pop-up. If the switchViewsWithSender: action doesn’t appear, and instead you see an outlet called delegate, you’ve most likely Control-dragged from the toolbar rather than the button. To fix it, just make sure you have the button rather than the toolbar selected, and then redo your Control-drag.

Figure 6-18. Linking the toolbar button to the switchViewsWithSender: method in the view controller class
Note
You may have noticed that when we entered the function manually earlier we called it switchViews, but because this is an Action, we get the sender parameter added for us whether or not we actually decide to use the parameter.
We have one more thing to point out in this scene, which is SwitchingViewController’s view outlet. This outlet is already connected to the view in the scene. The view outlet is inherited from the parent class, UIViewController, and gives the controller access to the view it controls. When we created the project, Xcode created both the controller and its view, and hooked them up for us. That’s all we need to do here, so save your work. Next, let’s get started writing our implementation code in the SwitchingViewController.
Writing the Root View Controller Implementation
In the Project Navigator, select SwitchingViewController.swift and modify the viewDidLoad() method to set some things up by adding the lines shown in Listing 6-1.
Listing 6-1. The Code for the viewDidLoad Method of Our Root View Controller
override func viewDidLoad() {super.viewDidLoad()// Do any additional setup after loading the view.blueViewController =storyboard?.instantiateViewController(withIdentifier: "Blue")as! BlueViewControllerblueViewController.view.frame = view.frameswitchViewController(from: nil, to: blueViewController) // helper method}
Note
When you enter the code into the Swift file, as shown in Listing 6-1, you’ll get an error on the line containing the call to switchViewController. This is because we have not written that helper method yet, which we’ll do shortly.
Our implementation of viewDidLoad() overrides a UIViewController method that is called when the storyboard is loaded. How could we tell? Hold down the ⌥ key (the Option key) and single-click the method named viewDidLoad(). A documentation pop-up window will appear, as shown in Figure 6-19. Alternatively, you can select View ➤ Utilities ➤ Show Quick Help Inspector to view similar information in the Quick Help panel. viewDidLoad() is defined in our superclass, UIViewController, and is intended to be overridden by classes that need to be notified when the view has finished loading.

Figure 6-19. This documentation window appears when you Option-click the viewDidLoad method name
This version of viewDidLoad() creates an instance of BlueViewController. We use the instantiateViewController(withIdentifier:) method to load the BlueViewController instance from the same storyboard that contains our root view controller. To access a particular view controller from a storyboard, we use a string as an identifier—in this case "Blue" —which we’ll set up when we configure our storyboard a little more. Once the BlueViewControlleris created, we assign this new instance to our blueViewController property:
blueViewController =storyboard?.instantiateViewController(withIdentifier: "Blue")as! BlueViewController
Next, we set the frame of the blue view controller’s view to be the same as that of the switch view controller’s content view, and switch to the blue view controller so that its view appears on the screen:
blueViewController.view.frame = view.frameswitchViewController(from: nil, to: blueViewController)
Since we need to perform a view controller switch in several places, the code to do this is in the helper method switchViewController(from:, to:) that we’ll write shortly.
Now, why didn’t we load the yellow view controller here also? We’re going to need to load it at some point, so why not do it now? Good question. The answer is that the user may never tap the Switch Views button. The user might just use the view that’s visible when the application launches, and then quit. In that case, why use resources to load the yellow view and its controller? Instead, we’ll load the yellow view the first time we actually need it. This is called lazy loading, which is a standard way of keeping memory overhead down. The actual loading of the yellow view happens in the switchViews() method. Fill in the stub of this method that you created earlier by adding the code shown in Listing 6-2.
Listing 6-2. Our switchViews Implementation
@IBAction func switchViews(sender: UIBarButtonItem) {// Create the new view controller, if requiredif yellowViewController?.view.superview == nil {if yellowViewController == nil {yellowViewController =storyboard?.instantiateViewController(withIdentifier: "Yellow")as! YellowViewController}} else if blueViewController?.view.superview == nil {if blueViewController == nil {blueViewController =storyboard?.instantiateViewController(withIdentifier: "Blue")as! BlueViewController}}// Switch view controllersif blueViewController != nil&& blueViewController!.view.superview != nil {yellowViewController.view.frame = view.frameswitchViewController(from: blueViewController,to: yellowViewController)} else {blueViewController.view.frame = view.frameswitchViewController(from: yellowViewController,to: blueViewController)}}
switchViews() first checks which view is being swapped in by seeing whether yellowViewController’s view’s superview is nil. This will be true if one of two things is true:
If yellowViewControllerexists, but its view is not being shown to the user, that view will not have a superview because it’s not presently in the view hierarchy, and the expression will evaluate to true.
If yellowViewController doesn’t exist because it hasn’t been created yet or was flushed from memory, it will also return true.
We then check to see whether yellowViewController exists:
if yellowViewController?.view.superview == nil {If the result is nil, that means there is no instance of yellowViewController, so we need to create one. This could happen because it’s the first time the button has been pressed or because the system ran low on memory and it was flushed. In this case, we need to create an instance of YellowViewController as we did for the BlueViewController in the viewDidLoad method:
if yellowViewController == nil {yellowViewController =storyboard?.instantiateViewController(withIdentifier: "Yellow")as! YellowViewController}
If we’re switching in the blue controller , we need to perform the same check to see whether it still exists (since it could have been flushed from memory) and create it if it does not. This is just the same code again, referencing the blue controller instead:
} else if blueViewController?.view.superview == nil {if blueViewController == nil {blueViewController =storyboard?.instantiateViewController(withIdentifier: "Blue")as! BlueViewController}}
At this point, we know that we have a view controller instance because either we already had one or we just created it. We then set the view controller’s frame to match that of the switch view controller’s content view and then we use our switchViewController(from:, to:) method to actually perform the switch, as shown in Listing 6-3.
Listing 6-3. Switching View Controllers Depending On Which One We’re Currently Presenting
// Switch view controllersif blueViewController != nil&& blueViewController!.view.superview != nil {yellowViewController.view.frame = view.frameswitchViewController(from: blueViewController,to: yellowViewController)} else {blueViewController.view.frame = view.frameswitchViewController(from: yellowViewController,to: blueViewController)}}
The first branch of the if statement is taken if we are switching from the blue view controller to the yellow and vice versa for the else branch.
In addition to not using resources for the yellow view and controller if the Switch Views button is never tapped, lazy loading also gives us the ability to release whichever view is not being shown to free up its memory. iOS will call the UIViewController method didReceiveMemoryWarning(), which is inherited by every view controller, when memory drops below a system-determined level.
Since we know that either view will be reloaded the next time it is shown to the user, we can safely release either controller, provided it is not currently on display. We can do this by adding a few lines to the existing didReceiveMemoryWarning() method, as shown in Listing 6-4.
Listing 6-4. Safely Releasing Unneeded Controllers During Low Memory Conditions
override func didReceiveMemoryWarning() {super.didReceiveMemoryWarning()// Dispose of any resources that can be recreated.if blueViewController != nil&& blueViewController!.view.superview == nil {blueViewController = nil}if yellowViewController != nil&& yellowViewController!.view.superview == nil {yellowViewController = nil}}
This newly added code checks to see which view is currently shown to the user, and then releases the controller for the other view by assigning nil to its property. This will cause the controller, along with the view it controls, to be deallocated, freeing up its memory.
Tip
Lazy loading is a key component of resource management on iOS, which you should implement anywhere you can. In a complex, multiview application, being responsible and flushing unused objects from memory can be the difference between an application that works well and one that crashes periodically because it runs out of memory.
The final piece of the puzzle is the switchViewController(from:, to:) method, which is responsible for the view controller switch. Switching view controllers is a two-step process. First, we need to remove the view for the controller that’s currently displayed, and then we need to add the view for the new view controller. But that’s not quite all—we need to take care of some housekeeping as well. Add the implementation of this method, as shown in Listing 6-5.
Listing 6-5. The switchViewController Helper Method
private func switchViewController(from fromVC:UIViewController?,to toVC:UIViewController?) {if fromVC != nil {fromVC!.willMove(toParentViewController: nil)fromVC!.view.removeFromSuperview()fromVC!.removeFromParentViewController()}if toVC != nil {self.addChildViewController(toVC!)self.view.insertSubview(toVC!.view, at: 0)toVC!.didMove(toParentViewController: self)}}
The first block of code removes the outgoing view controller; but let’s look at the second block first, where we add the incoming view controller. Here’s the first line of code in that block:
self.addChildViewController(toVC!)This code makes the incoming view controller a child of the switching view controller. View controllers like SwitchingViewController that manage other view controllers are referred to as container view controllers. The standard classes UITabBarController and UINavigationController are both container view controllers and they have code that does something similar to what the switchViewController(from:, to:) method is doing. Making the new view controller a child of the SwitchingViewController ensures that certain events that are delivered to the root view controller are correctly passed to the child controller when required—for example, making sure that rotation is handled properly.
Next, the child view controller’s view is added to that of the SwitchingViewController:
self.view.insertSubview(toVC!.view, atIndex: 0)Note that the view is inserted in the subviews list of SwitchingViewController at index zero, which tells iOS to put this view behind everything else. Sending the view to the back ensures that the toolbar we created in Interface Builder a moment ago will always be visible on the screen, since we’re inserting the content views behind it.
Finally, we notify the incoming view controller that it has been added as the child of another controller:
toVC!.didMoveToParentViewController(self)This is necessary in case the child view controller overrides this method to take some action when it becomes the child of another controller.
Now that you’ve seen how a view controller is added, the code that removes a view controller from its parent is much easier to understand—all we do is reverse each of the steps that we performed when adding it:
if fromVC != nil {fromVC!.willMoveToParentViewController(nil)fromVC!.view.removeFromSuperview()fromVC!.removeFromParentViewController()}
Implementing the Content Views
At this point, the code is complete, but we can’t run the application yet because we don’t have the blue and yellow content controllers in the storyboard. These two controllers are extremely simple. They each have one action method that is triggered by a button, and neither one needs any outlets. The two views are also nearly identical. In fact, they are so similar that they could have been represented by the same class. We chose to make them two separate classes because that’s how most multiview applications are constructed.
The two action methods we’re going to implement do nothing more than show an alert (as we did in Chapter 4’s Control Fun application), so go ahead and add method in Listing 6-6 to BlueViewController.swift.
Listing 6-6. Pressing the Button on Our Blue Controller Presents an Alert
@IBAction func blueButtonPressed(sender: UIButton) {let alert = UIAlertController(title: "Blue View Button Pressed",message: "You pressed the button on the blue view",preferredStyle: .alert)let action = UIAlertAction(title: "Yes, I did", style: .default,handler: nil)alert.addAction(action)present(alert, animated: true, completion: nil)}
Save the file. Next, switch over to YellowViewController.swift and add this very similar method—shown in Listing 6-7—to that file, and save it as well.
Listing 6-7. Pressing the Button on Our Yellow Controller also Presents an Alert
@IBAction func yellowButtonPressed(sender: UIButton) {let alert = UIAlertController(title: "Yellow View Button Pressed",message: "You pressed the button on the yellow view",preferredStyle: .alert)let action = UIAlertAction(title: "Yes, I did", style: .default,handler: nil)alert.addAction(action)present(alert, animated: true, completion: nil)}
Next, select Main.storyboard to open it in Interface Builder so that we can make a few changes. First, we need to add a new scene for BlueViewController. Up until now, each storyboard we’ve dealt with contained just a single controller-view pairing, but the storyboard has more tricks up its sleeve, and holding multiple scenes is one of them. From the Object Library, drag out another View Controller and drop it in the editing area next to the existing one. Now your storyboard has two scenes, each of which can be loaded dynamically and independently while your application is running. In the row of icons at the top of the new scene, single-click the yellow View Controller icon and press ⌥⌘3 to bring up the Identity Inspector . In the Custom Class section, the Class menu defaults to UIViewController; change it to BlueViewController, as shown in Figure 6-20.

Figure 6-20. Add our new view controller and associate it with the BlueViewController class file
We also need to create an identifier for this new view controller so that our code can find it inside the storyboard. Just below the Custom Class section in the Identity Inspector, you’ll see a Storyboard ID field. Click there and type Blue to match what we used in our code, as shown in Figure 6-21.
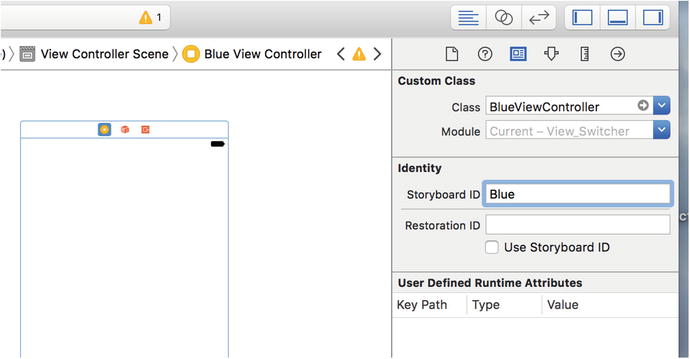
Figure 6-21. Set the Storyboard ID of our Blue View Controller Storyboard to Blue
So now you have two scenes. We showed you earlier how to configure your app to load this storyboard at launch time, but we didn’t mention anything about scenes there. How will the app know which of these two views to show? The answer lies in the big arrow pointing at the first scene, as shown in Figure 6-22. That arrow points out the storyboard’s default scene, which is what the app shows when it starts up. If you want to choose a different default scene, all you have to do is drag the arrow to point at the scene you want.

Figure 6-22. We just added a second scene to our storyboard. The big arrow points at the default scene
Single-click the big square view in the new scene you just added and then press ⌥⌘4 to bring up the Attributes Inspector. In the inspector’s View section, click the color picker that’s labeled Background, and use the pop-up color picker to change the background color of this view to a nice shade of blue. Once you are happy with your blue, close the color picker.
Drag a button from the library over to the view, using the guidelines to center it in the view, both vertically and horizontally. We want to make sure that the button stays centered no matter what, so make two constraints to that effect. With the button selected, click the Align icon below the storyboard. In the pop-up, check Horizontally in Container and Vertically in Container, change Update Frames to Items of New Constraints, and then click Add 2 Constraints (see Figure 6-23). It may help to change the background back to white for the alignment, and then back to blue once you’re finished. Also, because of the blue background you might want to change the button text to white to be more visible.
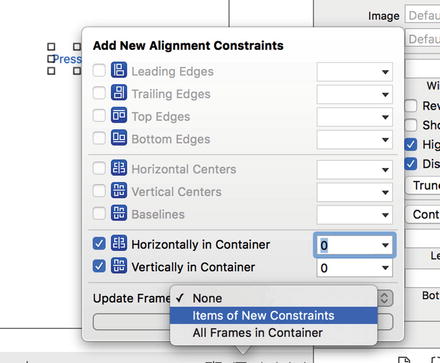
Figure 6-23. Aligning the button to the center of the view
Double-click the button and change its title to Press Me. Next, with the button still selected, switch to the connections inspector (by pressing ⌥⌘6), drag from the Touch Up Inside event to the yellow View Controller icon at the top of the scene, and connect to the blueButtonPressedWithSender action method.
Now it’s time to do pretty much the same set of things for YellowViewController. Grab yet another View Controller from the object library and drag it into the editor area. Don’t worry if things are getting crowded; you can stack those scenes on top of each other if necessary. Click the View Controller icon for the new scene in the Document Outline and use the Identity Inspector to change its class to YellowViewControllerand its Storyboard ID to Yellow.
Next, select the YellowViewController’s view and switch to the Attributes Inspector. There, click the Background color picker, select a yellow, and then close the picker.
Next, drag out a Button from the library and use the guidelines to center it in the view. Use the Align icon pop-up to create constraints aligning its horizontal and vertical center , just like for the last button. Now change its title to Press Me, Too. With the button still selected, use the Connections Inspector to drag from the Touch Up Inside event to the View Controller icon, and connect to the yellowButtonPressedWithSender action method.
When you’re finished, save the storyboard and hit the Run button in Xcode to start the app presenting a full screen of blue. When you tap the Switch Views button, it will change to show the yellow view that we built. Tap it again and it goes back to the blue view. If you tap the button centered on the blue or yellow view, you’ll get an alert view with a message indicating which button was pressed. This alert shows that the correct controller class is being called for the view that is being shown.
The transition between the two views is kind of abrupt, so we’re going to animate the transition to give the user a better visual feedback of the change.
Animating the Transition
UIView has several class methods we can call to indicate that the transition between views should be animated, to indicate the type of transition that should be used, and to specify how long the transition should take.
Go back to SwitchingViewController.swift and enhance your switchViews() method by changing it, as shown in Listing 6-8.
Listing 6-8. Our Modified switchViews Method with Animation Added
@IBAction func switchViews(sender: UIBarButtonItem) {// Create the new view controller, if requiredif yellowViewController?.view.superview == nil {if yellowViewController == nil {yellowViewController =storyboard?.instantiateViewController(withIdentifier: "Yellow")as! YellowViewController}} else if blueViewController?.view.superview == nil {if blueViewController == nil {blueViewController =storyboard?.instantiateViewController(withIdentifier: "Blue")as! BlueViewController}}UIView.beginAnimations("View Flip", context: nil)UIView.setAnimationDuration(0.4)UIView.setAnimationCurve(.easeInOut)// Switch view controllersif blueViewController != nil&& blueViewController!.view.superview != nil {UIView.setAnimationTransition(.flipFromRight,for: view, cache: true)yellowViewController.view.frame = view.frameswitchViewController(from: blueViewController,to: yellowViewController)} else {UIView.setAnimationTransition(.flipFromLeft,for: view, cache: true)blueViewController.view.frame = view.frameswitchViewController(from: yellowViewController,to: blueViewController)}UIView.commitAnimations()}
Build and run this version. When you tap the Switch Views button, instead of the new view just snapping into place, the old view will flip over to reveal the new view.
To tell iOS that we want a change animated, we need to declare an animation block and specify how long the animation should take. Animation blocks are declared by using the UIView class method presentViewController(_:animated:completion:), like so:
UIView.beginAnimations("View Flip", context: nil)UIView.setAnimationDuration(0.4)
presentViewController(_:animated:completion:) takes two parameters. The first is an animation block title. This title comes into play only if you take more direct advantage of Core Animation, the framework behind this animation. For our purposes, we could have used nil. The second parameter is a pointer that allows you to specify an object (or any other C data type) whose address you would like associated with this animation block. It is possible to add some code of our own that will be run during the transition, but we’re not doing that here, so we set this parameter to nil. We also set the duration of the animation, which tells UIView how long (in seconds) the animation should last.
After that, we set the animation curve, which determines the timing of the animation. The default, which is a linear curve, causes the animation to happen at a constant speed. The option we set here, UIViewAnimationCurve.EaseInOut, specifies that the animation should start slow but speed up in the middle, and then slow down again at the end. This gives the animation a more natural, less mechanical appearance:
UIView.setAnimationCurve(.easeInOut)Next, we need to specify the transition to use. At the time of this writing, five iOS view transitions are available:
UIViewAnimationTransition.flipFromLeft
UIViewAnimationTransition.flipFromRight
UIViewAnimationTransition.curlUp
UIViewAnimationTransition.curlDown
UIViewAnimationTransition.none
We chose to use two different effects, depending on which view was being swapped in. Using a left flip for one transition and a right flip for the other makes the view seem to flip back and forth. The value UIViewAnimationTransition.none causes an abrupt transition from one view controller to another. Of course, if you wanted that effect, you wouldn’t bother creating an animation block at all.
The cache option speeds up drawing by taking a snapshot of the view when the animation begins, and uses that image rather than redrawing the view at each step of the animation. You should always cache the animation unless the appearance of the view needs to change during the animation:
UIView.setAnimationTransition(.flipFromRight,forView: view, cache: true)
When we’re finished specifying the changes to be animated, we call commitAnimations() on UIView. Everything between the start of the animation block and the call to commitAnimations() animates together.
Thanks to Cocoa Touch’s use of Core Animation under the hood, we’re able to do fairly sophisticated animation with only a handful of code.
Summary
You should now have a very good grasp of how multiview applications are put together, now that you’ve built one from scratch. Although Xcode contains project templates for the most common types of multiview applications, we needed to understand the overall structure of these types of applications so we can build them ourselves from the ground up. The standard container controllers ( UITabBarController, UINavigationController, and UIPageViewController) are incredible time-savers that you should use when you can, but at times, they simply won’t meet your needs.
In the next few chapters, we’re going to continue building multiview applications to reinforce the concepts from this chapter and to give you a feel for how more complex applications are put together. In Chapter 7, we’ll construct a tab bar application.