So far, we’ve focused on the controller and view aspects of the MVC paradigm . Although several of our applications read data from their own application bundle, only the Bridge Control example in Chapter 12 places any data in persistent storage. When any of our other apps launched, they appeared with exactly the same data they had when first launched. That approach worked up to this point, but in the real world, your apps need to persist data. When users make changes, they want to see those changes when they launch the program again.
A number of different mechanisms exist for persisting data on an iOS device. If you’ve programmed in Cocoa for macOS, you’ve likely used some or all of these techniques. In this chapter, we’ll look at four different mechanisms for persisting data to the iOS file system:
Property lists
Object archives (or archiving)
SQLite3 (iOS’s embedded relational database)
Core Data (Apple’s provided persistence tool)
Note
Property lists, object archives, SQLite3, and Core Data are not the only ways you can persist data on iOS; they are just the most common and easiest. You always have the option of using traditional C I/O calls like fopen() to read and write data. You can also use Cocoa’s low-level file-management tools. In almost every case, doing so will result in a lot more coding effort and is rarely necessary, but those tools are there if you want them.
Your Application’s Sandbox
All four of this chapter’s data-persistence mechanisms share an important common element : your application’s Documents folder. Every application gets its own Documents folder, and applications are allowed to read and write from their own Documents directory.
First, let’s look at how applications are organized in iOS by examining the folder layout used by the iPhone simulator . To see this, you’ll need to look inside the Library directory contained in your home directory. On OS X 10.6 and earlier, this was no problem; however, starting with OS X 10.7, Apple decided to make the Library folder hidden by default, so there’s a small extra hoop to jump through. Open a Finder window and navigate to your home directory. If you can see your Library folder, that’s great. If not, hold down the Option key (⌥) and select Go ➤ Library. The Library option is hidden unless you hold down the Option key.
Within the Library folder, drill down into Developer/CoreSimulator/Devices/. Within that directory, you’ll see one subdirectory for each simulator in your current Xcode installation. The subdirectory names are globally unique identifiers (GUIDs) that are generated automatically by Xcode, so it’s impossible to know just by looking at them which directory corresponds to which simulator. To find out, look for a file called device.plist in any of the simulator directories and open it. You’ll find a key that maps to the simulated device’s name. Figure 13-1 shows the device.plist file for the iPad Pro simulator.

Figure 13-1. Using the device.plist file to map a directory to a simulator
Choose a device and drill down into its data directory until you reach the subdirectory data/Containers/Data/Application. Here again you’ll see subdirectories with names that are GUIDs. In this case, each one of them represents either a preinstalled application or an application that you have run on that simulator. Select one of the directories and open it. You’ll see something like Figure 13-2.
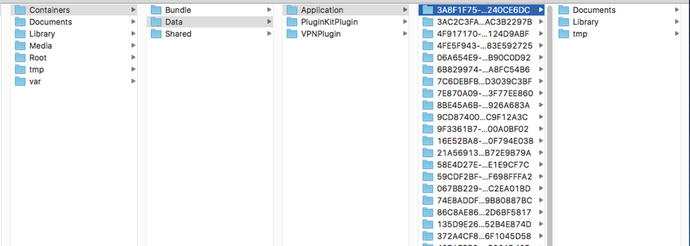
Figure 13-2. The sandbox for an application on the simulator
Note
It may take a little searching when starting from the Devices in Figure 13-1 to find a Containers subdirectory. If you don’t see it at first, keep going down the list of device GUIDs and you should eventually find your way to the Containers subdirectory.
Although the previous listing represents the simulator, the file structure functions similarly to what’s on an actual device. To see the sandbox for an application on a device, plug it onto your Mac and open the Xcode Devices window (Window ➤ Devices). You should see your device in the window sidebar. Select it and then choose an application from the Installed Apps table. Near the bottom of the window on the right-hand side, you’ll see a section called Installed Apps (you may have to click a down arrow near the bottom of the window to see this section) that contains a table with a row for each of the apps you have installed from Xcode. Below the table, there’s an icon that looks like a gear. Click it and select Show Container from the pop-up to see the contents of the sandbox for whichever application you select in the table (see Figure 13-3). You can also download everything in the sandbox to your Mac. Figure 13-4 shows the application sandbox for an application called townslot2 from my book App Development Recipes for iOS and watchOS (Apress, 2016).

Figure 13-3. Configuration and contents of an actual device showing the townslot2 app

Figure 13-4. The sandbox for the townslot2 application on an iPhone 6s
Every application sandbox contains these three directories:
Documents: Your application stores data in the Documents directory. If you enable iTunes file sharing for your application, the user can see the contents of this directory (and any subdirectories that your application creates) in iTunes and may upload files to it.
Tip
To enable file sharing for your application, open its Info.plist file and add the key Application supports iTunes file sharing with the value YES.
Library : This provides another place that your application stores data. Use it for files that you do not want to share with the user. You can create your own subdirectories if required. As you can see in Figure 13-4, the system creates subdirectories called Cache and Preferences which contains the .plist file storing the application’s preferences, and sets using the UserDefaults class, which we discussed in Chapter 12.
tmp: The tmp directory offers a place where your application can store temporary files. Files written into tmp will not be backed up by iTunes when your iOS device syncs; but to avoid filling up the file system, your application does need to take responsibility for deleting the files in tmp once they are no longer needed.
Getting the Documents and Library Directories
Although our application exists in a folder with a seemingly random name, it’s quite easy to retrieve the full path to the Documents directory so that we can read and write our files using this method urls(for:in:) of the FileManager class locates the various directories for you. FileManager is a Foundation class, so it is shared with Cocoa for OS X. Many of its available options are designed for macOS and some of the return values on iOS that aren’t very useful, because your application doesn’t have rights to access the directory due to iOS’s sandboxing mechanism. Listing 13-1 shows an example code snippet in Swift 3 to access the iOS Documents directory.
Listing 13-1. Code to Get an NSURL that Points to the Documents Directory
let urls = FileManager.default.urls(for:.documentDirectory, ins: .userDomainMask)if let documentUrl = urls.first {print(documentUrl)
The first argument to the urlsForDirectory(_:in:) method specifies which directory we are looking for. The searchPathDirectory enumeration defines the possible values; here, we use the value SearchPathDirectory.documentDirectory (shortened to .documentDirectory) indicating that we are looking for the Documents directory. The second argument gives the domain or domains (called the domainMask in the Apple documentation) to be used for the search. The possible domains are all values of the SearchPathDomainMask enumeration and here we specify .userDomainMask. On iOS, this domain maps to the running application’s sandbox. The urls(for: in:) method returns an array containing one or more URLs that map to the requested directory in the specified domain. On iOS, there is always only one Documents directory for each application, so we can safely assume that exactly one NSURL object will be returned, but just be on the safe side, we use an if let construction to safely access the first element of the NSURL array, just in case it happens to be empty. On a real iOS device, the URL for the Documents directory would be something like file:///var/mobile/Containers/Data/Application/69BFDDB0-E4A8-4359-8382-F6DDDF031481/Documents/.
We can create a URL for a file in the Documents directory by appending another component onto the end of the URL we just retrieved. We’ll use an NSURL method called appendingPathComponent(), which was designed for just that purpose:
let fileUrl = try documentUrl.appendingPathComponent("theFile.txt")Note
Error handling in Swift 3 operates similar to other languages that use the try, catch, and throw keywords.
After this call, fileUrl should contain the full URL (see Listing 13-2) for a file called theFile.txt in our application’s Documents directory, and we can use this URL to create, read, and write from that file. It’s important to note that the file doesn’t need to exist for you to be able to get an NSURL object for it.
Listing 13-2. You can use the same method with first argument .libraryDirectory to locate the application’s Library directory.
let urls = FileManager.default.urls(for:
    .libraryDirectory, in: .userDomainMask)
if let libraryUrl = urls.first {
    print(libraryUrl)
}
This code would return a URL like this:
file:///var/mobile/Containers/Data/Application/69BFDDB0-E4A8-4359-8382-F6DDDF031481/Library/.It’s possible to specify more than one search domain. When you do so, FileManager looks for the directory in all of the domains and may return more than one NSURL. For reasons already explained, this is not really very useful on iOS but for the sake of completeness, consider the example in Listing 13-3.
Listing 13-3. Getting Multiple URLs
let urls = FileManager.default.urls(for:
    .libraryDirectory,in: [.userDomainMask, .systemDomainMask])
print(urls)
Here, we ask FileManager to look for the Library directory in both the user and system domains and the result is that we get back an array containing two NSURLs:
file:///var/mobile/Containers/Data/Application/69BFDDB0-E4A8-4359-8382-F6DDDF031481/Library/
file:///System/Library/
The second URL refers to the system’s Library directory, which, of course, we can’t access. When more than one URL is returned, the order in which they appear in the returned array is undefined.
Notice how we wrote the value of the inDomains argument in Listing 13-3:
[.userDomainMask, .systemDomainMask]This might look like an initializer for an array but it’s actually creating a set—the syntax for initializing an array and a set in Swift are the same.
Getting the tmp Directory
Getting a reference to your application’s temporary directory is even easier than getting a reference to the Documents directory. The Foundation function called NSTemporaryDirectory()returns a string containing the full path to your application’s temporary directory. To create an NSURL for a file that will be stored in the temporary directory, first find the temporary directory:
let tempDirPath = NSTemporaryDirectory()Next, convert the path to a URL and create a path to a file in the temporary directory by appending a path component to it as we did before, as shown in Listing 13-4.
Listing 13-4. Appending a Path Component to a URL
let tempDirUrl = NSURL(fileURLWithPath: tempDirPath)let tempFileUrl = tempDirUrl.appendingPathComponent("tempFile.txt")
The resulting URL will be something like this:
file:///private/var/mobile/Containers/Data/Application/29233884-23EB-4267-8CC9-86DCD507D84C/tmp/tempFile.txtFile-Saving Strategies
All four persistence approaches we’re going to look at in this chapter use the iOS file system. In the case of SQLite3 , we’ll create a single SQLite3 database file and let SQLite3 worry about storing and retrieving your data. In its simplest form, Core Data takes care of all the file system management for you. With the other two persistence mechanisms—property lists and archiving—you need to put some thought into whether you are going to store your data in a single file or in multiple files.
Single-File Persistence
Using a single file for data storage provides the easiest approach and with many applications, a perfectly acceptable one. You start by creating a root object, usually an Array or Dictionary (your root object can also be based on a custom class when using archiving). Next, you populate your root object with all the program data that needs to be persisted. Whenever you need to save, your code rewrites the entire contents of that root object to a single file. When your application launches, it reads the entire contents of that file into memory. When it quits, it writes out the entire contents. This is the approach we’ll use.
The downside of using a single file is that you need to load all of your application’s data into memory and that you must write all of it to the file system for even the smallest changes. But if your application isn’t likely to manage more than a few megabytes of data, this approach works fine and its simplicity certainly makes things easier.
Multiple-File Persistence
Using multiple files for persistence provides another approach. For example, an e-mail application might store each e-mail message in its own file.
There are obvious advantages to this method. It allows the application to load only data that the user has requested (another form of lazy loading); and when the user makes a change, only the files that changed need to be saved. This method also gives you the opportunity to free up memory when you receive a low-memory notification. Any memory that is being used to store data that the user is not currently viewing can be flushed and then simply reloaded from the file system the next time it’s needed. The downside of multiple-file persistence is that it adds a fair amount of complexity to your application. For now, we’ll work with single-file persistence.
Next, we’ll get into the specifics of each of our persistence methods: property lists, object archives, SQLite3, and Core Data. We’ll explore each of these in turn and build an application that uses each mechanism to save some data to the device’s file system. We’ll start with property lists.
Using Property Lists
Several of our sample applications have used property lists, most recently when we created a property list to specify our application settings and preferences in Chapter 12. Property lists provide convenience in that they can be edited manually using Xcode or the Property List Editor application. Also, both Dictionary and Array instances can be written to and created from property lists, as long as they contain only specific serializable objects.
Property List Serialization
A serialized objectis one that has been converted into a stream of bytes so that it can be stored in a file or transferred over a network. Although any object can be made serializable, only certain objects can be placed into a collection class, such as an NSDictionary or NSArray, and then stored to a property list using the collection class’s writeToURL(_:atomically:) or writeToFile(_:atomically:) methods. The following classes can be serialized this way:
Array or NSArray
NSMutableArray
Dictionary or NSDictionary
NSMutableDictionary
NSData
NSMutableData
String or NSString
NSMutableString
NSNumber
Date or NSDate
If you can build your data model from just these objects, you can use property lists to save and load your data.
Note
The writeToURL(_:atomically:) and writeToFile(_:atomically:) methods do the same thing, but the first requires you to give the file location as an NSURL, the second as a String. Previously, file locations were always given as string paths, but more recently Apple started preferring to use NSURLs instead, so the examples in this book do the same, except where there is only an API that requires a path. You can easily get the path for a file-based NSURL from its path property, as you’ll see in the first example in this chapter.
If you’re going to use property lists for persisting application data, use either an Array or a Dictionary to hold the data that needs to be persisted. Assuming that all the objects that you put into the Array or Dictionary are serializable objects from the preceding list, you can write out a property list by calling the write(to url: URL , atomically: Bool ) -> Bool method on the dictionary or array instance, as shown in Listing 13-5.
Listing 13-5. Writing to a Property List
let array: NSArray = [1,2,3]let tempDirPath = NSTemporaryDirectory()let tempDirUrl = NSURL(fileURLWithPath: tempDirPath)let tempFileUrl = tempDirUrl.appendingPathComponent("tempFile.txt")array.write(to: tempFileUrl!, atomically:true)
Note
The atomically parameter causes the method to first write the data to an auxiliary file, not to the specified location and after successfully being written to that file, gets a copy to the location specified by the first parameter. This provides a safer way to write a file, because if the application crashes during the save, the existing file (if there was one) will not be corrupted. It adds a bit of overhead; but in most situations, it’s worth the cost.
One problem with the property list approach is that custom objects cannot be serialized into property lists. You also can’t use other classes from Cocoa Touch, which means that classes like NSURL, UIImage, and UIColor cannot be used directly.
Apart from the serialization issue, keeping all your model data in the form of property lists means you can’t easily create derived or calculated properties (such as a property that is the sum of two other properties), and some of your code that really should be contained in model classes must be moved to your controller classes. Again, these restrictions work for simple data models and apps. But most of the time your app will be much easier to maintain by creating dedicated model classes.
Simple property lists still provide usefulness in complex applications as they are a great way to include static data in your application. For example, when your application includes a picker, often the best way to include the list of items for it is to create a .plist file placing that file into your project’s Resources folder causing it to be compiled into your application.
We’ll now build a simple application that uses property lists to store its data.
Creating the First Version of a Persistence Application
We’re going to build a program that lets you enter data into four text fields, saves those fields to a .plist file when the application quits, and then reloads the data back from that .plist file the next time the application launches (see Figure 13-5).

Figure 13-5. Our Persistence application
Note
In this chapter’s applications, we won’t be taking the time to set up all the user interface niceties that we have added in previous examples. Tapping the Return key, for example, will neither dismiss the keyboard nor take you to the next field. If you want to add such polish to the application, doing so would be good practice, so we encourage you to do that on your own.
In Xcode, create a new project using the Single View Application template and name it Persistence. Before we build the view with the four text fields, let’s create the single outlet we need. In the Project Navigator, single-click the ViewController.swift file and add the following outlet:
class ViewController: UIViewController {@IBOutlet var lineFields:[UITextField]!
Designing the Persistence Application View
Now select Main.storyboard to edit the GUI. Once Xcode switches over to Interface Builder mode, you’ll see the View Controller scene in the editing pane. Drag a Text Field from the library and place it against the top and right blue guidelines. Bring up the Attributes Inspector. Make sure the box labeled Clear When Editing Begins is unchecked.
Now drag a Label to the window and place it to the left of the text field using the left blue guideline, and then use the horizontal blue guideline to line up the label’s vertical center with that of the text field. Double-click the label and change it to say Line 1:. Finally, resize the text field using the left resize handle to bring it close to the label. Use Figure 13-6 as a guide. Next, select the label and text field, hold down the Option key, and drag down to make a copy below the first set. Use the blue guidelines to guide your placement. Now select both labels and both text fields, hold down the Option key, and drag down again. You should now have four labels next to four text fields. Double-click each of the remaining labels and change their names to Line 2:, Line 3:, and Line 4:. Again, compare your results with Figure 13-6.

Figure 13-6. Designing the Persistence application’s view
Once you have all four text fields and labels placed, Control-drag from the View Controller icon in the Document Outline to each of the four text fields. Connect them all to the lineFields outlet collection, making sure to connect them in order from top to bottom. Save the changes you made to Main.storyboard.
Now let’s add the Auto Layout constraints to make sure that the design works the same way on all devices. Starting by Control-dragging from the Line 1 label to the text field to its right, and then release the mouse. Hold down the Shift key and select Horizontal Spacing and Baseline, and then click the Return key. Do the same for the other three labels and text fields.
Next, we’ll fix the positions of the text fields. In the Document Outline, Control-drag from the top text field to its parent View icon, release the mouse, hold down the Shift key, and select Trailing Space to Container Margin and Vertical Spacing to Top Layout Guide. Do the same for the other three text fields.
We need to fix the widths of the labels so that they don’t resize if the user types more text than will fit in any of the text fields. Select the top label and click the Pin button below the storyboard editor. In the pop-up, select the Width check box and press Add 1 Constraint. Do the same for all of the labels.
Finally, back in the Document Outline, Control-drag from the Line 1 label to the View icon, release the mouse, and select Leading Space to Container Margin. Do the same for all of the labels and that’s it—all the required Auto Layout constraints have been set. Select the view controller icon in the Document Outline followed by Editor ➤ Resolve Auto Layout Issues ➤ Update Frames in the menu to remove the warnings in the Xcode Activity View. Now build and run the application and compare the result with Figure 13-6.
Editing the Persistence Classes
In the Project Navigator, select ViewController.swift and add the code in Listing 13-6.
Listing 13-6. Getting the URL for Our data.plist File
func dataFileURL() -> NSURL {let urls = FileManager.default.urls(for:.documentDirectory, in: .userDomainMask)var url:NSURL?url = URL(fileURLWithPath: "") // create a blank pathdo {try url = urls.first!.appendingPathComponent("data.plist")} catch {print("Error is (error)")}return url!}
The dataFileURL() method returns the URL of the data file that we’ll be creating in this example by finding the Documents directory and appending the file name to it. This method will be called from any code that needs to load or save data. We are playing it a little loose here with the url. Note that we’ve encapsulated the appendingPathComponent method within a Swift do-catch block. We have to do this because the append method throws an error that needs to be caught. But since we know that our app bundle must have a document directory and we’re creating the data.plist file ourselves, we’re not going to see this error as long as we write the code correctly. Normally, we want to handle things a little more securely so our customers don’t see crashes, but for the sake of brevity we’re not going to deal with that here since it’s not the subject of our discussion.
Note
In Swift we use a do-catch block (which can be found in the Xcode code snippet library) to try a method call that throws an exception (an error) and then “catch” that exception and handle it in some way that prevents the app from crashing.
Find the viewDidLoad() method and add the following code to it, as well as a new method for receiving notifications named applicationWillResignActive() just below it, as shown in Listing 13-7.
Listing 13-7. The viewDidLoad method in the ViewController.swift file and the applicationWillResignActive method.
override func viewDidLoad() {super.viewDidLoad()// Do any additional setup after loading the view, typically from a nib.let fileURL = self.dataFileURL()if (FileManager.default.fileExists(atPath: fileURL.path!)) {if let array = NSArray(contentsOf: fileURL as URL) as? [String] {for i in 0..<array.count {lineFields[i].text = array[i]}}}let app = UIApplication.shared()NotificationCenter.default.addObserver(self, selector: #selector(self.applicationWillResignActive(notification:)), name: Notification.Name.UIApplicationWillResignActive, object: app)}func applicationWillResignActive(notification:NSNotification) {let fileURL = self.dataFileURL()let array = (self.lineFields as NSArray).value(forKey: "text") as! NSArrayarray.write(to: fileURL as URL, atomically: true)}
In the viewDidLoad() method , we do a few more things. First, we use the fileExists(atPath:) method of the FileManager class to check whether our data file already exists, which would be the case if we have already run the application at least once. This method requires the file’s path name, which we get from the path property of its URL (unfortunately, there isn’t a variant of this method that accepts a URL argument). If there isn’t one, we don’t want to bother trying to load it. If the file does exist, we instantiate an array with the contents of that file, and then copy the objects from that array to our four text fields. Because arrays are ordered lists, we copy them in the same order as we saved them
To read the file, we use an Array initializer that creates an NSArray object from the contents of a file at a given URL. The Array initializer expects the file content to be in property list format, which is fine because that’s the form in which it is saved, in the code we’ll write shortly.
Our application needs to save its data before it is terminated or sent to the background, so we are interested in the notification called applicationWillResignActive. This notification is posted whenever an app is no longer the one with which the user is interacting. This happens when the user taps the Home button, as well as when the application is pushed to the background by some other event, such as an incoming phone call. We can find out that this has happened by registering for a notification from iOS’s notification center. The notification center delivers a notification by calling a method that you register with it, passing an argument of type Notification that includes the details of the event that’s being notified. To register for this notification, we get a reference to our application instance and use that to subscribe to UIApplicationWillResignActive, using the default NotificationCenter instance and a method called addObserver(_:selector:name:object:). We pass self as the first parameter, specifying that our ViewController instance is the observer that should be notified. For the second parameter, we pass a selector to the applicationWillResignActive() method , telling the notification center to call that method when the notification is posted. The third parameter, UIApplicationWillResignActive, is the name of the notification that we’re interested in receiving. This is a string constant defined by the UIApplication class.
Finally, we added the implementation of the applicationWillResignActive() method , which the notification center will call:
func applicationWillResignActive(notification:NSNotification) {let fileURL = self.dataFileURL()let array = (self.lineFields as NSArray).value(forKey: "text") as! NSArrayarray.write(to: fileURL as URL, atomically: true)}
This method is pretty short, but really does a lot with just a few method calls. We construct an array of strings by calling the text method on each of the text fields in our lineFields array. To accomplish this, we use a clever shortcut: instead of explicitly iterating through our array of text fields, asking each for its text value, and adding that value to a new array, we cast the Swift lineFields array (of UITextFields) to an NSArray and call value(forKey:) on it, passing "text" as a parameter. The NSArray implementation of valueForKey()does the iteration for us, asks each UITextField instance it contains for its text value, and returns a new NSArray containing all the values. After that, we write the contents of that array out to our .plist file in property list format, using the write(_ to:atomically:) method . That’s all there is to saving our data using property lists.
Let’s summarize how this works. When our main view is finished loading, we look for a .plist file. If it exists, we copy data from it into our text fields. Next, we register to be notified when the application becomes inactive (either by being quit or pushed to the background). When that happens, we gather the values from our four text fields, stick them in a mutable array, and write that mutable array to a property list.
Build and run the application. It should build and then launch in the simulator. Once it comes up, you should be able to type into any of the four text fields. When you’ve typed something in them, press ⌘⇧H (Command-Shift-H) to return to the home screen. It’s very important that you do this. If you just exit the simulator, that’s the equivalent of forcibly quitting your application. In that case, the view controller will never receive the notification that the application is going inactive, and your data will not be saved. After returning to the home screen, you may then quit the simulator, or stop the app from Xcode and run it again. Your text will be restored and will appear in the text fields the next time the app starts.
Note
It’s important to understand that returning to the home screen doesn’t typically quit the app—at least not at first. The app is put into a background state, ready to be instantly reactivated in case the user switches back to it. We’ll dig into the details of these states and their implications for running and quitting apps in Chapter 15.
Property list serialization is pretty cool and easy to use. However, it’s a little limiting, since only a small selection of objects can be stored in property lists. Let’s look at a somewhat more robust approach.
Archiving Model Objects
In the Cocoa world, the term archiving refers to another form of serialization , but it’s a more generic type that any object can implement. Any model object specifically written to hold data should support archiving. The technique of archiving model objects lets you easily write complex objects to a file and then read them back in. As long as every property you implement in your class is either a scalar (e.g., Int or Float) or an instance of a class that conforms to the NSCoding protocol, you can archive your objects completely. Since most Foundation and Cocoa Touch classes capable of storing data do conform to NSCoding (though there are a few noteworthy exceptions, such as UIImage), archiving is relatively easy to implement for most classes.
Although not strictly required to make archiving work, another protocol should be implemented along with NSCoding: the NSCopying protocol, which allows your object to be copied. Being able to copy an object gives you a lot more flexibility when using data model objects.
Conforming to NSCoding
The NSCoding protocol declares two methods, which are both required. One encodes your object into an archive; the other one creates a new object by decoding an archive. Both methods are passed an instance of NSCoder, which you work with in very much the same way as NSUserDefaults, introduced in the previous chapter. You can encode and decode both objects and native data types like Int and Float values using key-value coding.
To support archiving in an object, we need to make it a subclass of NSObject (or any other class that is derived from NSObject) and we need to encode each of our instance variables into encoder using the appropriate encoding method. Let’s see how this works. Suppose we create a simple container class, like this:
class MyObject : NSObject, NSCoding, NSCopying {var number = 0;var string = ""var child: MyObject?override init() {}}
This class contains an integer property, a string property, and a reference to another instance of the same class. It is derived from NSObject and conforms to the NSCoding and NSCopying protocols. The NSCoding protocol method to encode an object of type MyObject might look like this:
func encode(with aCoder: NSCoder) {aCoder.encode(string, forKey: "stringKey")aCoder.encode(32, forKey: "intKey")if let myChild = child {aCoder.encode(myChild, forKey: "childKey")}}
If MyObject were a subclass of a class that also conforms to NSCoding, we would need to make sure that also we called encodeWithCoder()on its superclass to ensure that the superclass encodes its data. In that case, this method would look like this instead:
func encode(with aCoder: NSCoder) {super.encode(with aCoder: NSCoder)aCoder.encode(string, forKey: "stringKey")aCoder.encode(32, forKey: "intKey")if let myChild = child {aCoder.encode(myChild, forKey: "childKey")}}
The NSCoding protocol also requires us to implement an initializer that initializes an object from an NSCoder, allowing us to restore an object that was previously archived. Implementing this method is very similar to implementing encodeWithCoder(). If your object has no base class or you are subclassing some other class that doesn’t conform to NSCoding, your initializer would look something like the following:
required init?(coder aDecoder: NSCoder) {string = aDecoder.decodeObject(forKey: "stringKey") as! Stringnumber = aDecoder.decodeInteger(forKey: "intKey")child = aDecoder.decodeObject(forKey: "childKey") as? MyObject}
The initializer sets the properties of the object being initialized by decoding values from the passed-in instance of NSCoder. Since we are allowing the child property of the original object to be nil, we need to use conditional casting when assigning to the decoded object’s child property because the archived object may not have a stored child object.
When implementing NSCoding for a class with a superclass that also conforms to NSCoding, you need to add an extra line to allow the superclass to initialize its own state:
required init?(coder aDecoder: NSCoder) {string = aDecoder.decodeObject(forKey: "stringKey") as! Stringnumber = aDecoder.decodeInteger(forKey: "intKey")child = aDecoder.decodeObject(forKey: "childKey") as? MyObjectsuper.init(code: aDecoder)}
And that’s basically it. As long as you implement these two methods to encode and decode all your object’s properties, your object is archivable and can be written to and read from archives.
Implementing NSCopying
As mentioned earlier, conforming to NSCopying is a very good idea for any data model objects. NSCopying has one method, called copyWithZone(), which allows objects to be copied. Implementing NSCopying is similar to implementing init(coder: ). You just need to create a new instance of the same class, and then set all of that new instance’s properties to the same values as this object’s properties. Even though you implement the copy(with zone: ) method , the application code actually calls a method called copy(), which forwards the operation to copy(with zone: ):
let anObject = MyObject()let objectCopy = anObject.copy() as! MyObject
Here’s what the copy(withZone: ) method for the MyObject class would look like:
func copy(with zone: NSZone? = nil) -> AnyObject {let copy = MyObject()copy.number = numbercopy.string = stringcopy.child = child?.copy() as? MyObjectreturn copy}
Notice that with this implementation, if there is a property that references a child object (such as the child property in this example), the new object will have a copy of that child, not the original one. If the child object is of a type that is immutable, or if you only need to provide a shallow copy of the object, then you would simply assign the original child object reference to the new object.
Note
Don’t worry too much about the NSZone parameter . This pointer is to a struct that is used by the system to manage memory. Only in rare circumstances did developers ever need to worry about zones or create their own, and nowadays, it’s almost unheard of to have multiple zones. Calling copy on an object is the same as calling copy(with zone: )using the default zone, which is always what you want. In fact, on the modern iOS, zones are completely ignored. The fact that NSCopying uses zones at all is a historical oddity for the sake of backward compatibility.
Archiving and Unarchiving Data Objects
Creating an archive from an object (or objects) that conforms to NSCoding is relatively easy. First, we create an instance of the Foundation class NSMutableData to hold the encoded data, and then we create an NSKeyedArchiver instance to archive objects into that NSMutableData instance:
let data = NSMutableData()let archiver = NSKeyedArchiver(forWritingWith: data)
After creating both of those, we then use key-value coding to archive any objects we wish to include in the archive, like this:
archiver.encode(anObject, forKey: "keyValueString")Once we’ve encoded all the objects we want to include, we just tell the archiver we’re finished, and then we write the NSMutableData instance to the file system:
archiver.finishEncoding()let success = data.write(to: archiveUrl as URL, atomically: true)
If you’re feeling a little overwhelmed by archiving, don’t worry. It’s actually fairly straightforward. We’re going to retrofit our Persistence application to use archiving, so you’ll get to see it in action. Once you’ve done it a few times, archiving will become second nature, as all you’re really doing is storing and retrieving your object’s properties using key-value coding .
The Archiving Application
Let’s redo the Persistence application, so that it uses archiving instead of property lists. We’re going to be making some fairly significant changes to the Persistence source code, so you should make a copy of your entire project folder before continuing. I’ve compressed it before making any changes—using the property list technique—to PersistencePL.zip.
Implementing the FourLines Class
Once you’re ready to proceed and have a copy of your Persistence project open in Xcode, press ⌘N or select File ➤ New ➤ File.... When the new file assistant comes up, from the iOS section, select Swift File and click Next. On the next screen, name the file FourLines.swift, choose the Persistence folder to save it, and then click Create. This class is going to be our data model. It will hold the data that we’re currently storing in a dictionary in the property list application.
Single-click FourLines.swift and add the code in Listing 13-8.
Listing 13-8. Our FourLines Class
class FourLines : NSObject, NSCoding, NSCopying {private static let linesKey = "linesKey"var lines:[String]?override init() {}required init?(coder aDecoder: NSCoder) {lines = aDecoder.decodeObject(forKey: FourLines.linesKey) as? [String]}func encode(with aCoder: NSCoder) {if let saveLines = lines {aCoder.encode(saveLines, forKey: FourLines.linesKey)}}func copy(with zone: NSZone? = nil) -> AnyObject {let copy = FourLines()if let linesToCopy = lines {var newLines = Array<String>()for line in linesToCopy {newLines.append(line)}copy.lines = newLines}return copy}}
We just implemented all the methods necessary to conform to the NSCoding and NSCopying protocols. We encoded the lines property in encode(with aCoder:) and decoded it using the same key value in init(with aCoder: ). In copy(with zone: ), we created a new FourLines object and copied the string array to it, carefully making a deep copy so that changes to the original will not affect the new object. See? It’s not hard at all; just make sure you did not forget to change anything if you did a lot of copying and pasting.
Implementing the ViewController Class
Now that we have an archivable data object, let’s use it to persist our application data. Select ViewController.swift and make the changes in Listing 13-9.
Listing 13-9. Our Save and Retrieve Code for Archiving Object in ViewController.swift
override func viewDidLoad() {super.viewDidLoad()// Do any additional setup after loading the view, typically from a nib.let fileURL = self.dataFileURL()if (FileManager.default.fileExists(atPath: fileURL.path!)) {if let array = NSArray(contentsOf: fileURL as URL) as? [String] {for i in 0..<array.count {lineFields[i].text = array[i]}}let data = NSMutableData(contentsOf: fileURL as URL)let unarchiver = NSKeyedUnarchiver(forReadingWith: data as! Data)let fourLines = unarchiver.decodeObject(forKey: ViewController.rootKey) as! FourLinesunarchiver.finishDecoding()if let newLines = fourLines.lines {for i in 0..<newLines.count {lineFields[i].text = newLines[i]}}}let app = UIApplication.shared()NotificationCenter.default.addObserver(self, selector: #selector(self.applicationWillResignActive(notification:)), name: Notification.Name.UIApplicationWillResignActive, object: app)}func applicationWillResignActive(notification:NSNotification) {let fileURL = self.dataFileURL()let fourLines = FourLines()let array = (self.lineFields as NSArray).value(forKey: "text")as! [String]fourLines.lines = arraylet data = NSMutableData()let archiver = NSKeyedArchiver(forWritingWith: data)archiver.encode(fourLines, forKey: ViewController.rootKey)archiver.finishEncoding()data.write(to: fileURL as URL, atomically: true)}func dataFileURL() -> NSURL {let urls = FileManager.default.urls(for:.documentDirectory, in: .userDomainMask)var url:NSURL?url = URL(fileURLWithPath: "") // create a blank pathdo {try url = urls.first!.appendingPathComponent("data.archive")} catch {print("Error is (error)")}return url!}
Save your changes, then build and run this version of the app. Not very much has changed, really. We started off by specifying a new file name in the dataFileURL() method, so that our program doesn’t try to load the old property list as an archive. We also defined a new constant that will be the key value we use to encode and decode our object. Next, we redefined the loading and saving by using FourLines to hold the data and using its NSCoding methods to do the actual loading and saving. The GUI is identical to the previous version.
This new version takes several more lines of code to implement than property list serialization, so you might be wondering if there really is an advantage to using archiving over just serializing property lists. For this application, the answer is simple: no, there really isn’t any advantage. But imagine we had an array of archivable objects, such as the FourLines class that we just built, we could archive the entire array by archiving the array instance itself. Collection classes like Array, when archived, archive all of the objects they contain. As long as every object you put into an array or dictionary conforms to NSCoding, you can archive the array or dictionary and restore it so that all the objects that were in it when you archived it will be in the restored array or dictionary. The same is not true of property link persistence, which only works for a small set of Foundation object types—you cannot use it to persist custom classes without writing additional code to convert instances of those classes to and from a Dictionary, with one key for each object property.
In other words, the NSCoding approach scales beautifully (in terms of code size, at least). No matter how many objects you add, the work to write those objects to disk (assuming you’re using single-file persistence) is exactly the same. With property lists , the amount of work increases with every object you add.
Using iOS’s Embedded SQLite3
The third persistence option we’re going to discuss is using iOS’s embedded SQL database, called SQLite3. SQLite3 is very efficient at storing and retrieving large amounts of data. It’s also capable of doing complex aggregations on your data, with much faster results than you would get doing the same thing using objects . Consider a couple scenarios. What if you need to calculate the sum of a particular field across all the objects in your application? Or, what if you need the sum from just the objects that meet certain criteria? SQLite3 allows you to get this information without loading every object into memory. Getting aggregations from SQLite3 is several orders of magnitude faster than loading all the objects into memory and summing their values. Being a full-fledged embedded database, SQLite3 contains tools to make it even faster by, for example, creating table indexes that can speed up your queries.
SQLite3 uses the Structured Query Language (SQL), the standard language used to interact with relational databases. Whole books have been written on the syntax of SQL (hundreds of them, in fact), as well as on SQLite itself. So if you don’t already know SQL and you want to use SQLite3 in your application, you have a little work ahead of you. I’ll show you how to set up and interact with the SQLite database from your iOS applications. I’ll also show you some of the basics of the syntax in this chapter. But to really make the most of SQLite3, you’ll need to do some additional research and exploration. A couple of good starting points are “An Introduction to the SQLite3 C/C++ Interface” ( www.sqlite.org/cintro.html ) and “SQL As Understood by SQLite” ( www.sqlite.org/lang.html ).
Relational databases (including SQLite3) and object-oriented programming languages use fundamentally different approaches to storing and organizing data. The approaches are different enough that numerous techniques and many libraries and tools for converting between the two have been developed. These different techniques are collectively called object-relational mapping (ORM). There are currently several ORM tools available for Cocoa Touch. In fact, we’ll look at one ORM solution provided by Apple, called Core Data, later in the chapter.
But before we do that, we’re going to focus on the SQLite3 basics, including setting it up, creating a table to hold your data, and using the database in an application. Obviously, in the real world, an application as simple as the one we’re working on wouldn’t warrant the investment in SQLite3. But this application’s simplicity is exactly what makes it a good learning example.
Creating or Opening the Database
Before you can use SQLite3, you must open the database. The function that’s used to do that, sqlite3_open(), will open an existing database; or, if none exists at the specified location, the function will create a new one. Here’s what the code to open a database might look like:
var database:OpaquePointer? = nillet result = sqlite3_open("/path/to/database/file", &database)
If result is equal to the constant SQLITE_OK, then the database was successfully opened. Notice the type of the database variable. In the SQLite3 API, this variable is a C language structure of type sqlite3. When this C API is imported into Swift, this variable is mapped to UnsafeMutablePointer<COpaquePointer>, which is how Swift expresses the C pointer type void *. This means that we have to treat it as an opaque pointer. That’s OK, because we won’t need to access the internals of this structure from our Swift code—we just need to pass the pointer to other SQLite3 functions, like sqlite3_close().
sqlite3_close(database)Databases store all their data in tables. You can create a new table by crafting an SQL CREATE statement and passing it in to an open database using the function sqlite3_exec, like so:
let createSQL = "CREATE TABLE IF NOT EXISTS PEOPLE" +"(ID INTEGER PRIMARY KEY AUTOINCREMENT, FIELD_DATA TEXT)"var errMsg:UnsafeMutablePointer<Int8> = nilresult = sqlite3_exec(database, createSQL, nil, nil, &errMsg)
The function sqlite3_exec is used to run any command against SQLite3 that doesn’t return data, including updates, inserts, and deletes. Retrieving data from the database is a little more involved. You first need to prepare the statement by feeding it your SQL SELECT command:
let createSQL = "SELECT ID, FIELD_DATA FROM FIELDS ORDER BY ROW"var statement: OpaquePointer? = nilresult = sqlite3_prepare_v2(database, createSQL, -1, &statement, nil)
If result equals SQLITE_OK, your statement was successfully prepared, and you can start stepping through the result set. This code shows another instance where we have to treat an SQLIte3 structure as an opaque pointer—in the SQLite3 API, the statement variable would be of type sqlite3_stmt.
Here is an example of stepping through a result set and retrieving an Int and a String from the database:
while sqlite3_step(statement) == SQLITE_ROW {let row = Int(sqlite3_column_int(statement, 0))let rowData = sqlite3_column_text(statement, 1)let fieldValue = String.init(cString: UnsafePointer<CChar>(rowData!))lineFields[row].text = fieldValue!}sqlite3_finalize(statement)
Once again, we have to take care to bridge between the requirements of a C language API and what Swift supports. In this case, the sqlite3_column_text() function returns a value of type const unsigned char *, which Swift translates to UnsafePointer<UInt8>. We need to create a String from the returned character data and we can do this by using the method String.init(cString: ) (UnsafePointer<CChar>). We have an UnsafePointer<UInt8> instead of an UnsafePointer<CChar>, but fortunately there is an initializer that lets us create the latter from the former. Once we’ve got the String, we assign it to the UITextField’s text property.
Using Bind Variables
Although it’s possible to construct SQL strings to insert values, it is common practice to use something called bind variablesfor this purpose. Handling strings correctly—making sure they don’t have invalid characters and that quotes are inserted properly—can be quite a chore. With bind variables, those issues are taken care of for us.
To insert a value using a bind variable, you create your SQL statement as normal, but put a question mark (?) into the SQL string. Each question mark represents one variable that must be bound before the statement can be executed. Next, you prepare the SQL statement, bind a value to each of the variables, and execute the command.
Here’s an example that prepares an SQL statement with two bind variables, binds an Int to the first variable and a string to the second variable, and then executes and finalizes the statement:
var statement:OpaquePointer? = nillet sql = "INSERT INTO FOO VALUES (?, ?);"if sqlite3_prepare_v2(database, sql, -1, &statement, nil)== SQLITE_OK {sqlite3_bind_int(statement, 1, 235)sqlite3_bind_text(statement, 2, "Bar", -1, nil)}if sqlite3_step(statement) != SQLITE_DONE {print("This should be real error checking!")}sqlite3_finalize(statement);
There are multiple bind statements available, depending on the data type that you wish to use. Most bind functions take only three parameters :
The first parameter to any bind function, regardless of the data type, is a pointer to the sqlite3_stmt used previously in the sqlite3_prepare_v2() call.
The second parameter is the index of the variable to which you’re binding. This is a one-indexed value, meaning that the first question mark in the SQL statement has index 1, and each one after it is one higher than the one to its left.
The third parameter is always the value that should be substituted for the question mark.
A few bind functions, such as those for binding text and binary data, have two additional parameters :
The first additional parameter is the length of the data being passed in the third parameter. In the case of C strings, you can pass -1 instead of the string’s length, and the function will use the entire string. In all other cases, you need to tell it the length of the data being passed in.
The final parameter is an optional function callback in case you need to do any memory cleanup after the statement is executed. Typically, such a function would be used to free memory allocated using malloc().
The syntax that follows the bind statements may seem a little odd since we’re doing an insert. When using bind variables, the same syntax is used for both queries and updates. If the SQL string had an SQL query, rather than an update, we would need to call sqlite3_step() multiple times until it returned SQLITE_DONE. Since this is an update, we call it only once.
Creating the SQLite3 Application
In Xcode, create a new project using the Single View Application template and name it SQLite Persistence. This project will start off identical to the previous project, so begin by opening the ViewController.swift file, and add an outlet:
class ViewController: UIViewController {@IBOutlet var lineFields:[UITextField]!
Next, select Main.storyboard. Design the view and connect the outlet collection by following the instructions in the “Designing the Persistence Application View” section earlier in this chapter. Once your design is complete, save the storyboard file.
We’ve covered the basics, so let’s see how this would work in practice. We’re going to modify our Persistence application again, this time storing its data using SQLite3. We’ll use a single table and store the field values in four different rows of that table. We’ll also give each row a row number that corresponds to its field. For example, the value from the first line will get stored in the table with a row number of 0, the next line will be row number 1, and so on. Let’s get started.
Linking to the SQLite3 Library
SQLite 3 is accessed through a procedural API that provides interfaces to a number of C function calls. To use this API, we’ll need to link our application to a dynamic library called libsqlite3.dylib . Select the SQLite Persistence item at the very top of the Project Navigator list (leftmost pane), and then select SQLite Persistence from the TARGETS section in the main area (see Figure 13-7, middle pane). (Be careful that you have selected SQLite Persistence from the TARGETS section, not from the PROJECT section.)

Figure 13-7. Selecting the SQLite Persistence project in the Project Navigator ; selecting the SQLite Persistence target; and finally, selecting the Build Phases tab
With the SQLite Persistence target selected, click the Build Phases tab in the rightmost pane. You’ll see a list of items, initially all collapsed, which represent the various steps Xcode goes through to build the application. Expand the item labeled Link Binary With Libraries. This section contains the libraries and frameworks that Xcode links with your application. By default, it’s empty because the compiler automatically links with any iOS frameworks that your application uses, but the compiler doesn’t know anything about the SQLite3 library, so we need to add it here.
Click the + button at the bottom of the linked frameworks list, and you’ll be presented with a sheet that lists all available frameworks and libraries. Find libsqlite3.tbd in the list (or use the handy search field) and click the Add button. Note that there may be several other entries in that directory that start with libsqlite3. Be sure you select libsqlite3.tbd. It is an alias that always points to the latest version of the SQLite3 library.
Modifying the Persistence View Controller
Next, we need to import the header files for SQLite3 into the view controller so that the compiler can see the function and other definitions that make up the API. There is no way to directly import the header file into Swift code, because the SQLite3 library is not packaged as a framework. The easiest way to deal with this is to add a bridging headerto the project. Once you have a bridging header, you can add other header files to it, and those header files will be read by the Swift compiler. There are a couple of ways to add a bridging file. We’ll use the simpler of the two, which is to temporarily add an Objective-C class to the project. Let’s do that now.
Press ⌘N or select File ➤ New ➤ File.... In the iOS Source section of the dialog, choose Cocoa Touch Class and press Next. Name the class Temporary, make it a subclass of NSObject, change the language to Objective-C, and press Next. In the next screen, press the Create button. When you do this, Xcode will pop up a window asking whether you want to create a bridging header. Click Create Bridging Header. Now, in the Project Navigator, you’ll see the files for the new class (Temporary.m and Temporary.h) and the bridging header, which is called SQLite Persistence-Bridging-Header.h . Delete the Temporary.m and Temporary.h files—you don’t need them anymore. Select the bridging header to open it in the editor, and then add the following line to it:
#import <sqlite3.h>Now that the compiler can see the SQLite3 library and header files, we can write some more code. Select ViewController.swift and make the changes shown in Listing 13-10.
Listing 13-10. Using SQLite3 to Save and Retrieve Our Information
override func viewDidLoad() {super.viewDidLoad()// Do any additional setup after loading the view, typically from a nib.var database:OpaquePointer? = nilvar result = sqlite3_open(dataFilePath(), &database)if result != SQLITE_OK {sqlite3_close(database)print("Failed to open database")return}let createSQL = "CREATE TABLE IF NOT EXISTS FIELDS " +"(ROW INTEGER PRIMARY KEY, FIELD_DATA TEXT);"var errMsg:UnsafeMutablePointer<Int8>? = nilresult = sqlite3_exec(database, createSQL, nil, nil, &errMsg)if (result != SQLITE_OK) {sqlite3_close(database)print("Failed to create table")return}let query = "SELECT ROW, FIELD_DATA FROM FIELDS ORDER BY ROW"var statement:OpaquePointer? = nilif sqlite3_prepare_v2(database, query, -1, &statement, nil) == SQLITE_OK {while sqlite3_step(statement) == SQLITE_ROW {let row = Int(sqlite3_column_int(statement, 0))let rowData = sqlite3_column_text(statement, 1)let fieldValue = String.init(cString: UnsafePointer<CChar>(rowData!))lineFields[row].text = fieldValue}sqlite3_finalize(statement)}sqlite3_close(database)let app = UIApplication.shared()NotificationCenter.default.addObserver(self, selector: #selector(self.applicationWillResignActive(notification:)), name: Notification.Name.UIApplicationWillResignActive, object: app)}func dataFilePath() -> String {let urls = FileManager.default.urls(for:.documentDirectory, in: .userDomainMask)var url:String?url = "" // create a blank pathdo {try url = urls.first?.appendingPathComponent("data.plist").path!} catch {print("Error is (error)")}return url!}func applicationWillResignActive(notification:NSNotification) {var database:OpaquePointer? = nillet result = sqlite3_open(dataFilePath(), &database)if result != SQLITE_OK {sqlite3_close(database)print("Failed to open database")return}for i in 0..<lineFields.count {let field = lineFields[i]let update = "INSERT OR REPLACE INTO FIELDS (ROW, FIELD_DATA) " +"VALUES (?, ?);"var statement:OpaquePointer? = nilif sqlite3_prepare_v2(database, update, -1, &statement, nil) == SQLITE_OK {let text = field.textsqlite3_bind_int(statement, 1, Int32(i))sqlite3_bind_text(statement, 2, text!, -1, nil)}if sqlite3_step(statement) != SQLITE_DONE {print("Error updating table")sqlite3_close(database)return}sqlite3_finalize(statement)}sqlite3_close(database)}
The first piece of new code is in the viewDidLoad() method . We begin by getting the path to the database file using the dataFilePath() method that we added. This is just like the dataFileURL() method that we added to our earlier examples, except that it returns the file’s path not its URL. That’s because the SQLite3 APIs that work with files require paths, not URLs. Next, we use the path to open the database, creating it if it does not exist. If we hit a problem with opening the database, we close it, print an error message , and return:
var database:OpaquePointer? = nilvar result = sqlite3_open(dataFilePath(), &database)if result != SQLITE_OK {sqlite3_close(database)print("Failed to open database")return}
Next, we need to make sure that we have a table to hold our data. We use an SQL CREATE TABLE statement to do that. By specifying IF NOT EXISTS, we prevent the database from overwriting existing data—if there is already a table with the same name, this command quietly completes without doing anything. That means it’s safe to use it every time our application launches without explicitly checking to see if a table exists:
let createSQL = "CREATE TABLE IF NOT EXISTS FIELDS " +"(ROW INTEGER PRIMARY KEY, FIELD_DATA TEXT);"var errMsg:UnsafeMutablePointer<Int8>? = nilresult = sqlite3_exec(database, createSQL, nil, nil, &errMsg)if (result != SQLITE_OK) {sqlite3_close(database)print("Failed to create table")return}
Each row in the database table contains an integer and a string. The integer is the number of the row in the GUI from which the data was obtained (starting from zero), and the string is the content of the text field on that row. Finally, we need to load our data. We do this using an SQL SELECT statement . In this simple example, we create an SQL SELECT statement that requests all the rows from the database and then we ask SQLite3 to prepare our SELECT. We also tell SQLite3 to order the rows by the row number, so that we always get them back in the same order. Absent this, SQLite3 will return the rows in the order in which they are stored internally.
let query = "SELECT ROW, FIELD_DATA FROM FIELDS ORDER BY ROW"var statement:OpaquePointer? = nilif sqlite3_prepare_v2(database, query, -1, &statement, nil) == SQLITE_OK {
Next, we use the sqlite3_step() function to execute the SELECT statement and step through each of the returned rows:
while sqlite3_step(statement) == SQLITE_ROW {Now we grab the row number, store it in an int, and then grab the field data as a C string, which we then convert to a Swift String, as described earlier in the chapter:
let row = Int(sqlite3_column_int(statement, 0))let rowData = sqlite3_column_text(statement, 1)let fieldValue = String.init(cString: UnsafePointer<CChar>(rowData!))
Next, we set the appropriate field with the value retrieved from the database:
lineFields[row].text = fieldValueFinally, we close the database connection , and we’re finished:
}sqlite3_finalize(statement)}sqlite3_close(database)
Note that we close the database connection as soon as we’re finished creating the table and loading any data it contains, rather than keeping it open the entire time the application is running. It’s the simplest way of managing the connection; and in this little app, we can just open the connection those few times we need it. In a more database-intensive app, you might want to keep the connection open all the time.
The other changes we made are in the applicationWillResignActive() method , where we need to save our application data.
The applicationWillResignActive() method starts by once again opening the database. To save the data, we loop through all four fields and issue a separate command to update each row of the database:
for i in 0..<lineFields.count {let field = lineFields[i]
We craft an INSERT OR REPLACE SQL statement with two bind variables. The first represents the row that’s being stored; the second is for the actual string value to be stored. By using INSERT OR REPLACE instead of the more standard INSERT, we don’t need to worry about whether a row already exists:
let update = "INSERT OR REPLACE INTO FIELDS (ROW, FIELD_DATA) " +"VALUES (?, ?);"
Next, we declare a pointer to a statement, prepare our statement with the bind variables, and bind values to both of the bind variables :
var statement:OpaquePointer? = nilif sqlite3_prepare_v2(database, update, -1, &statement, nil) == SQLITE_OK {let text = field.textsqlite3_bind_int(statement, 1, Int32(i))sqlite3_bind_text(statement, 2, text!, -1, nil)}
Now we call sqlite3_step to execute the update, check to make sure it worked, and finalize the statement, ending the loop:
if sqlite3_step(statement) != SQLITE_DONE {print("Error updating table")sqlite3_close(database)return}sqlite3_finalize(statement)
Notice that we simply print an error message here if anything goes wrong. In a real application, if an error condition is one that a user might reasonably experience, you should use some other form of error reporting, such as popping up an alert box .
sqlite3_close(database)Note
There is one condition that could cause an error to occur in the preceding SQLite code that is not a programmer error. If the device’s storage is completely full—to the extent that SQLite can’t save its changes to the database—then an error will occur here, as well. However, this condition is fairly rare and will probably result in deeper problems for the user, outside the scope of our app’s data. Our app probably wouldn’t even launch successfully if the system were in that state. So we’re going to just sidestep the issue entirely.
Build and run the app. Enter some data and then press the iPhone simulator’s Home button. Quit the simulator (to force the app to actually quit), and then relaunch the SQLite Persistence application. That data should be right where you left it. As far as the user is concerned, there’s absolutely no difference between the various versions of this application; however, each version uses a different persistence mechanism.
Using Core Data
The final technique demonstrated in this chapter shows how to implement persistence using Apple’s Core Data framework. Core Data is a robust, full-featured persistence tool. Here, I will show you how to use Core Data to re-create the same persistence you’ve seen in our Persistence application so far.
Note
For more comprehensive coverage of Core Data, check out Pro iOS Persistence: Using Core Data by Michael Privet and Robert Warner (Apress, 2014).
In Xcode, create a new project. Select the Single View Application template from the iOS section and click Next. Name the product Core Data Persistence, make sure that Swift is selected as the language and choose Universal in the Devices control but don’t click the Next button just yet. If you look just below the Devices control , you’ll see a check box labeled Use Core Data. There’s a certain amount of complexity involved in adding Core Data to an existing project, so Apple has kindly provided an application project template to do much of the work for you. Check the Use Core Data check box (see Figure 13-8), and then click the Next button. When prompted, choose a directory to store your project and then click Create.
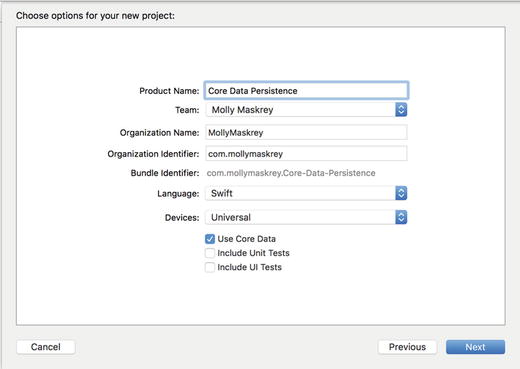
Figure 13-8. Select Single View Application and the option to use Core Data for persistence
Before we move on to our code, let’s take a look at the project window, which contains some new items. Expand the Core Data Persistence folder if it’s closed (see Figure 13-9).
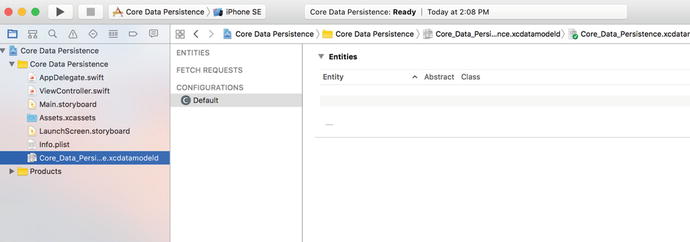
Figure 13-9. Our project template with the files needed for Core Data. The Core Data model is selected, and the data model editor is shown in the editing pane
Entities and Managed Objects
Most of what you see in the Project Navigator should be familiar: the application delegate, the view controller, two storyboards and the assets catalog. In addition, you’ll find a file called Core_Data_Persistence.xcdatamodeld , which contains our data model. Within Xcode, Core Data lets us design our data models visually, without writing code, and stores that data model in the .xcdatamodeld file.
Single-click the .xcdatamodeld file now, and you will be presented with the data model editor(see the right side of Figure 13-9). The data model editor gives you two distinct views into your data model, depending on the setting of the Editor Style control in the lower-right corner of the project window. In Table mode, the mode shown in Figure 13-9, the elements that make up your data model will be shown in a series of editable tables. In Graph mode, you’ll see a graphical depiction of the same elements. At the moment, both views reflect the same empty data model.
Before Core Data, the traditional way to create data models was to create subclasses of NSObject and conform them to NSCoding and NSCopyingso that they could be archived, as we did earlier in this chapter. Core Data uses a fundamentally different approach. Instead of classes, you begin by creating entities here in the data model editor and then, in your code, you create managed objects from those entities.
Note
The terms entity and managed object can be a little confusing, since both refer to data model objects. Entity refers to the description of an object. Managed object refers to actual concrete instances of that entity created at runtime. So, in the data model editor, you create entities; but in your code, you create and retrieve managed objects. The distinction between entities and managed objects is similar to the distinction between a class and instances of that class.
An entity is made up of properties. There are three types of properties:
Attributes: An attribute serves the same function in a Core Data entity as a property does in a Swift class. They both hold the data.
Relationships: As the name implies, a relationship defines the relationship between entities. For example, to create a Person entity, you might start by defining a few attributes such as hairColor, eyeColor, height, and weight. You might also define address attributes, such as state and zipCode, or you might embed them in a separate HomeAddress entity. Using the latter approach, you would then create a relationship between a Person and a HomeAddress. Relationships can be to-one and to-many. The relationship from Person to HomeAddress is probably to-one, since most people have only a single home address. The relationship from HomeAddress to Person might be to-many, since there may be more than one Person living at that HomeAddress.
Fetched properties: A fetched property is an alternative to a relationship. Fetched properties allow you to create a query that is evaluated at fetch time to see which objects belong to the relationship. To extend our earlier example, a Person object could have a fetched property called Neighbors that finds all HomeAddress objects in the data store that have the same ZIP code as the Person’s own HomeAddress. Due to the nature of how fetched properties are constructed and used, they are always one-way relationships. Fetched properties are also the only kind of relationship that lets you traverse multiple data stores.
Typically, attributes, relationships, and fetched properties are defined using Xcode’s data model editor. In our Core Data Persistence application, we’ll build a simple entity, so you can get a sense of how this all works together.
Key-Value Coding
In your code, instead of using accessors and mutators, you will use key-value coding to set properties or retrieve their existing values. Key-value coding may sound intimidating, but you’ve already used it quite a bit in this book. Every time we used Dictionary, for example, we were using a form of key-value coding because every object in a dictionary is stored under a unique key value. The key-value coding used by Core Data is a bit more complex than that used by Dictionary, but the basic concept is the same. When working with a managed object, the key you will use to set or retrieve a property’s value is the name of the attribute you wish to set. So, here’s how to retrieve the value stored in the attribute called name from a managed object:
let name = myManagedObject.valueForKey("name")Similarly, to set a new value for a managed object’s property, do this:
myManagedObject.setValue("Gregor Overlander", forKey:"name")Putting It All in Context
So where do these managed objects live? They live in something called a persistent store, also referred to as a backing store. Persistent stores can take several different forms. By default, a Core Data application implements a backing store as an SQLite database stored in the application’s Documents directory. Even though your data is stored via SQLite, classes in the Core Data framework do all the work associated with loading and saving your data. If you use Core Data, you don’t need to write any SQL statements like the ones you saw in the SQLite Persistence application. You just work with objects, and Core Data figures out what it needs to do behind the scenes.
SQLite isn’t the only option Core Data has for storage. Backing stores can also be implemented as binary flat files or even stored in an XML format. Another option is to create an in-memory store, which you might use if you’re writing a caching mechanism; however, it doesn’t save data beyond the end of the current session. In almost all situations, you should just leave it as the default and use SQLite as your persistent store.
Although most applications will have only one persistent store, it is possible to have multiple persistent stores within the same application. If you’re curious about how the backing store is created and configured, take a look at the file AppDelegate.swift in your Xcode project. The Xcode project template we chose provided us with all the code needed to set up a single persistent store for our application.
Other than creating it, you generally won’t work with your persistent store directly. Rather, you will use something called a managed object context, often referred to as just a context. The context manages access to the persistent store and maintains information about which properties have changed since the last time an object was saved. The context also registers all changes with the undo manager, which means that you always have the ability to undo a single change or roll back all the way to the last time data was saved.
Note
You can have multiple contexts pointing to the same persistent store, though most iOS applications will use only one.
Many Core Data method calls require an NSManagedObjectContextas a parameter or must be executed against a context. With the exception of more complicated, multithreaded iOS applications, you can just use the managedObjectContext property provided by your application delegate, which is a default context that is created for you automatically, also courtesy of the Xcode project template.
You may notice that in addition to a managed object context and a persistent store coordinator, the provided application delegate also contains an instance of NSManagedObjectModel. This class is responsible for loading and representing, at runtime, the data model you will create using the data model editor in Xcode. You generally won’t need to interact directly with this class. It’s used behind the scenes by the other Core Data classes, so they can identify which entities and properties you’ve defined in your data model. As long as you create your data model using the provided file, there’s no need to worry about this class at all.
Creating New Managed Objects
Creating a new instance of a managed object is pretty easy, though not quite as straightforward as creating a normal object instance. Instead, you use the insertNewObject( forEntityName: into:) factory method in a class called NSEntityDescription. NSEntityDescription’s job is to keep track of all the entities defined in the app’s data model and to let you create instances of those entities. This method creates and returns an instance representing a single entity in memory. It returns either an instance of NSManagedObject that is set up with the correct properties for that particular entity; or, if you’ve configured your entity to be implemented with a specific subclass of NSManagedObject, an instance of that class. Remember that entities are like classes. An entity is a description of an object and defines which properties a particular entity has.
To create a new object, do this:
let thing = NSEntityDescription.insertNewObject (forEntityName: "Thing",into:managedObjectContext)
The method is called insertNewObject( forEntityName: into:)because, in addition to creating the object, it inserts the newly created object into the context and then returns that object. After this call, the object exists in the context, but is not yet part of the persistent store. The object will be added to the persistent store the next time the managed object context’s save() method is called.
Retrieving Managed Objects
To retrieve managed objects from the persistent store, you’ll use a fetch request, which is Core Data’s way of handling a predefined query. For example, you might say, “Give me every Person whose eyeColor is blue.” To create a fetch request, you provide it with an NSEntityDescription that specifies the entity of the object or objects you wish to retrieve. Here is an example that creates a fetch request:
let context = appDelegate.managedObjectContextlet request: NSFetchRequest<NSFetchRequestResult> = NSFetchRequest(entityName:”Thing”)
You execute the fetch request using an instance method on NSManagedObjectContext:
do {let objects = try context.fetch(request)// No error - use "objects"} catch {// Error - the "error" variable contains an NSError objectprint(error)}
fetch() will load the specified objects from the persistent store and return them in an optional array. If an error is encountered, fetch() throws an NSError object that describes the specific problem. You need to either catch this error and handle it if at all possible, or let it propagate to the caller of the function that contains this code. Here, we just write the error to the console. If you are not familiar with Swift’s error handling mechanisms, refer to the section “Error Handling” in the Appendix. If no error occurs, you will get a valid array, though it may not have any objects in it since it is possible that none meets the specified criteria. From this point on, any changes you make to the managed objects returned in that array will be tracked by the managed object context you executed the request against, and saved when you send that context a save: message.
The Core Data Application
Before getting into the code, we’ll create our data model.
Designing the Data Model
Select Core_Data_Persistence.xcdatamodel to open Xcode’s data model editor. The data model editing pane shows all the entities, fetch requests, and configurations that are contained within your data model.
Note
The Core Data concept of configurationslets you define one or more named subsets of the entities contained in your data model, which can be useful in certain situations. For example, if you want to create a suite of apps that shares the same data model, but some apps shouldn’t have access to everything (perhaps there’s one app for normal users and another for administrators), this approach lets you do that. You can also use multiple configurations within a single app as it switches between different modes of operation. In this book, we’re not going to deal with configurations at all; but since the list of configurations (including the single default configuration that contains everything in your model) is right there, staring you in the face beneath the entities and fetch requests, we thought it was worth a mention here.
As shown in Figure 13-9, those lists are empty now because we haven’t created anything yet. Remedy that by clicking the plus icon labeled Add Entity in the lower-left corner of the editor pane. This will create a brand-new entity with the name Entity, as shown in Figure 13-10.
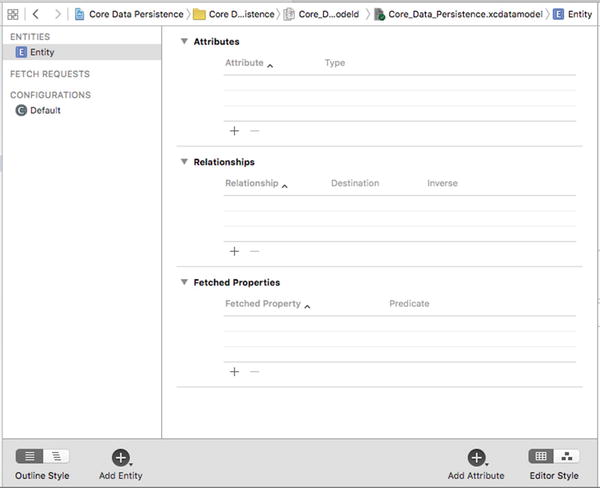
Figure 13-10. The data model editor, showing our newly added entity
As you build your data model, you’ll probably find yourself switching between Table view and Graph view using the Editor Style control at the bottom right of the editing area. Switch to Graph view now. Graph view presents a little box representing our entity, which itself contains sections for showing the entity’s attributes and relationships, also currently empty (see Figure 13-11). Graph view is really useful if your model contains multiple entities, because it shows a graphic representation of all the relationships between your entities.

Figure 13-11. Using the control in the lower-right corner, we switched the data model editor into Graph mode. Note that Graph mode shows the same entities as Table mode , just in a graphic form. This is useful if you have multiple entities with relationships between them
Note
If you prefer working graphically, you can actually build your entire model in Graph view. We’re going to stick with Table view in this chapter because it’s easier to explain. When you’re creating your own data models, feel free to work in Graph view if that approach suits you better.
Whether you’re using Table view or Graph view for designing your data model, you’ll almost always want to bring up the Core Data data model inspector. This inspector lets you view and edit relevant details for whatever item is selected in the data model editor—whether it’s an entity, attribute, relationship, or anything else. You can browse an existing model without the data model inspector; but to really work on a model, you’ll invariably need to use this inspector, much as you frequently use the Attributes Inspector when editing nib files.
Press ⌥⌘3 to open the data model inspector. At the moment, the inspector shows information about the entity we just added. The single entity in our model contains the data from one line on the GUI, so we’ll call it Line. Change the Name field from Entity to Line , as shown in Figure 13-12.
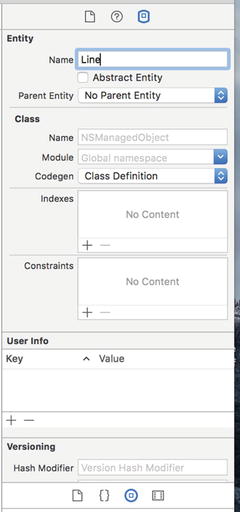
Figure 13-12. Using the data model inspector to change our entity’s name to Line
If you’re currently in Graph view, use the Editor Style control to switch back to Table view. Table view shows more details for each piece of the entity we’re working on, so it’s usually more useful than Graph view when creating a new entity. In Table view, most of the data model editor is taken up by the table showing the entity’s attributes, relationships, and fetched properties. This is where we’ll set up our entity.
Notice that at the lower right of the editing area, next to the Editor Style control , there’s an icon containing a plus sign, labeled Add Attribute. If you select your entity and then hold down the mouse button over this control, a pop-up menu will appear, allowing you to add an attribute, relationship, or fetched property to your entity (see Figure 13-13). Alternatively, if you just want to add an attribute, you can simply click the plus icon.

Figure 13-13. With an entity selected, press and hold the right plus-sign icon to add an attribute, relationship, or fetched property to your entity
Go ahead and use this technique to add an attribute to your Line entity. A new attribute, creatively named attribute, is added to the Attributes section of the table and selected. In the table, you’ll see that not only is the row selected, but the attribute’s name is selected as well. This means that immediately after clicking the plus sign, you can start typing the name of the new attribute without further clicking. Change the new attribute’s name from attribute to lineNumber , and click the pop-up next to the name to change its Type from Undefined to Integer 16 . Doing so turns this attribute into one that will hold an integer value. We will be using this attribute to identify which of the managed object’s four fields holds data. Since we have only four options, we selected the smallest integer type available.
Now direct your attention to the data model inspector, which is in the pane to the right of the editor area. Here, additional details can be configured. The inspector should be showing properties for the attribute you just added. If it’s still showing details of the Line entity , click the attribute row in the editor to select it and the inspector should switch its focus to the attribute. The check box below the Name field on the right, Optional, is selected by default. Click it to deselect it. We don’t want this attribute to be optional—a line that doesn’t correspond to a label on our interface is useless.
Selecting the Transient check box creates a transient attribute. This attribute is used to specify a value that is held by managed objects while the app is running, but is never saved to the data store. We do want the line number saved to the data store, so leave the Transient check box unchecked. Selecting the Indexed check box will cause an index in the underlying SQL database to be created on the column that holds this attribute’s data. Leave the Indexed check box unchecked. The amount of data is small and we won’t provide the user with a search capability; therefore, there’s no need for an index.
Beneath that are more settings that allow us to do some simple data validation by specifying minimum and maximum values for the integer, a default value, and more. We won’t be using any of these settings in this example.
Now make sure the Line entity is selected and click the Add Attribute control to add a second attribute. Change the name of your new attribute to lineTextand change its Type to String. This attribute will hold the actual data from the text field. Leave the Optional check box checked for this one; it is altogether possible that the user won’t enter a value for a given field.
Note
When you change the Type to String, you’ll notice that the inspector shows a slightly different set of options for setting a default value or limiting the length of the string. Although we won’t be using any of those options for this application, it’s nice to know they’re there.
Our data model is complete. That’s all there is to it. Core Data lets you point and click your way to an application data model. Let’s finish building the application so you can see how to use our data model from our code.
Modifying the AppDelegate.swift File
Locate the following line in the AppDelegate.swift file:
// MARK: - Core Data stackBelow this line you should see two sections of code. The first creates an NSPersistentContainer, a new feature that essentially provides a wrapper around a lot of the Core Data structure. We won’t be using that in this example so delete that section of code.
Note
The new container feature is a good thing that will eventually make life easier as you develop Core Data applications, however, at the time of writing, I found it to not be consistently stable and as such will follow the methods of creating our project as was done in the previous version of this book. The approach we’ll be using works just fine.
Also delete the template saveContext method and replace it with that shown in Listing 13-11. This is where all our “stuff” gets saved. We’ll call it from our View Controller when we are ready to resign active status of our app.
Listing 13-11. Our saveContext Method in the AppDelegate.swift File
func saveContext () {if managedObjectContext.hasChanges {do {try managedObjectContext.save()} catch {// Replace this implementation with code to handle the error appropriately.// abort() causes the application to generate a crash log and terminate. You should not use this function in a shipping application, although it may be useful during development.let nserror = error as NSErrorNSLog("Unresolved error (nserror), (nserror.userInfo)")abort()}}}
Next, add the following methods in Listing 13-12 to the AppDelegate.swift file below the following line:
// MARK: - Core Data stackListing 13-12. Our Core Data Stack
// MARK: - Core Data stacklazy var applicationDocumentsDirectory: URL = {// The directory the application uses to store the Core Data store file. This code uses a directory in the application's documents Application Support directory.let urls = FileManager.default.urls(for: .documentDirectory, in: .userDomainMask)return urls[urls.count-1]}()lazy var managedObjectModel: NSManagedObjectModel = {// The managed object model for the application. This property is not optional. It is a fatal error for the application not to be able to find and load its model.let modelURL = Bundle.main.url(forResource: "Core_Data_Persistence", withExtension: "momd")!return NSManagedObjectModel(contentsOf: modelURL)!}()lazy var persistentStoreCoordinator: NSPersistentStoreCoordinator = {// The persistent store coordinator for the application. This implementation creates and returns a coordinator, having added the store for the application to it. This property is optional since there are legitimate error conditions that could cause the creation of the store to fail.// Create the coordinator and storelet coordinator = NSPersistentStoreCoordinator(managedObjectModel: self.managedObjectModel)let url = try! self.applicationDocumentsDirectory.appendingPathComponent("SingleViewCoreData.sqlite")var failureReason = "There was an error creating or loading the application's saved data."do {try coordinator.addPersistentStore(ofType: NSSQLiteStoreType, configurationName: nil, at: url, options: nil)} catch {// Report any error we got.var dict = [String: AnyObject]()dict[NSLocalizedDescriptionKey] = "Failed to initialize the application's saved data"dict[NSLocalizedFailureReasonErrorKey] = failureReasondict[NSUnderlyingErrorKey] = error as NSErrorlet wrappedError = NSError(domain: "YOUR_ERROR_DOMAIN", code: 9999, userInfo: dict)// Replace this with code to handle the error appropriately.// abort() causes the application to generate a crash log and terminate. You should not use this function in a shipping application, although it may be useful during development.NSLog("Unresolved error (wrappedError), (wrappedError.userInfo)")abort()}return coordinator}()lazy var managedObjectContext: NSManagedObjectContext = {// Returns the managed object context for the application (which is already bound to the persistent store coordinator for the application.) This property is optional since there are legitimate error conditions that could cause the creation of the context to fail.let coordinator = self.persistentStoreCoordinatorvar managedObjectContext = NSManagedObjectContext(concurrencyType: .mainQueueConcurrencyType)managedObjectContext.persistentStoreCoordinator = coordinatorreturn managedObjectContext}()
Note
In previous versions of Xcode, the Single View template generated much of this code. Whether a change or a bug, we found that most of this was not generated for a Single View in the beta release of Xcode. However, if you were to select Master-Detail to create a project, you will find that much more of this is provided by Xcode.
The following line defines the path to the Core Data store file :
lazy var applicationDocumentsDirectory: URL = {This variable represents our managed object model:
lazy var managedObjectModel: NSManagedObjectModel = {// The managed object model for the application.// This property is not optional. It is a fatal error for//the application not to be able to find and load its model.let modelURL = Bundle.main.url(forResource: "Core_Data_Persistence", withExtension: "momd")!return NSManagedObjectModel(contentsOf: modelURL)!}()
Similarly, the following section of code provides the reference to our persistent store coordinator :
lazy var persistentStoreCoordinator: NSPersistentStoreCoordinator = {// The persistent store coordinator for the application. This implementation creates and returns a coordinator, having added the store for the application to it. This property is optional since there are legitimate error conditions that could cause the creation of the store to fail.// Create the coordinator and storelet coordinator = NSPersistentStoreCoordinator(managedObjectModel: self.managedObjectModel)let url = try! self.applicationDocumentsDirectory.appendingPathComponent("SingleViewCoreData.sqlite")var failureReason = "There was an error creating or loading the application's saved data."do {try coordinator.addPersistentStore(ofType: NSSQLiteStoreType, configurationName: nil, at: url, options: nil)} catch {// Report any error we got.var dict = [String: AnyObject]()dict[NSLocalizedDescriptionKey] = "Failed to initialize the application's saved data"dict[NSLocalizedFailureReasonErrorKey] = failureReasondict[NSUnderlyingErrorKey] = error as NSErrorlet wrappedError = NSError(domain: "YOUR_ERROR_DOMAIN", code: 9999, userInfo: dict)// Replace this with code to handle the error appropriately.// abort() causes the application to generate a crash log and terminate. You should not use this function in a shipping application, although it may be useful during development.NSLog("Unresolved error (wrappedError), (wrappedError.userInfo)")abort()}return coordinator}()
Finally, the last remaining piece is our managed object context shown here :
lazy var managedObjectContext: NSManagedObjectContext = {// Returns the managed object context for the application (which is already bound to the persistent store coordinator for the application.) This property is optional since there are legitimate error conditions that could cause the creation of the context to fail.let coordinator = self.persistentStoreCoordinatorvar managedObjectContext = NSManagedObjectContext(concurrencyType: .mainQueueConcurrencyType)managedObjectContext.persistentStoreCoordinator = coordinatorreturn managedObjectContext}()
That’s really all we need for our application delegate. We create the various bits and pieces needed so the rest of our app can have access to the Core Data capabilities.
Creating the Persistence View
Select ViewController.swift and make the following change shown in bold:
class ViewController: UIViewController {@IBOutlet var lineFields:[UITextField]!
Save this file. Next, select Main.storyboard to edit the GUI in Interface Builder. Design the view and connect the outlet collection by following the instructions in the “Designing the Persistence Application View” section earlier in this chapter. You might also find it useful to refer back to Figure 13-6. Once your design is complete, save the storyboard file.
Now go back to ViewController.swift, and make the changes in Listing 13-13.
Listing 13-13. Modifying Our ViewController.swift file to Use Core Data
import UIKitimport CoreDataclass ViewController: UIViewController {private static let lineEntityName = "Line"private static let lineNumberKey = "lineNumber"private static let lineTextKey = "lineText"@IBOutlet var lineFields:[UITextField]!override func viewDidLoad() {super.viewDidLoad()// Do any additional setup after loading the view, typically from a nib.let appDelegate =UIApplication.shared().delegate as! AppDelegatelet context = appDelegate.managedObjectContextlet request: NSFetchRequest<NSFetchRequestResult> = NSFetchRequest(entityName: ViewController.lineEntityName)do {let objects = try context.fetch(request)for object in objects {let lineNum: Int = object.value(forKey: ViewController.lineNumberKey)! as! Intlet lineText = object.value(forKey: ViewController.lineTextKey) as? String ?? ""let textField = lineFields[lineNum]textField.text = lineText}let app = UIApplication.shared()NotificationCenter.default.addObserver(self,selector: #selector(UIApplicationDelegate.applicationWillResignActive(_:)),name: NSNotification.Name.UIApplicationWillResignActive,object: app)} catch {// Error thrown from executeFetchRequest()print("There was an error in executeFetchRequest(): (error)")}}func applicationWillResignActive(_ notification:Notification) {let appDelegate =UIApplication.shared().delegate as! AppDelegatelet context = appDelegate.managedObjectContextfor i in 0 ..< lineFields.count {let textField = lineFields[i]let request: NSFetchRequest<NSFetchRequestResult> = NSFetchRequest(entityName: ViewController.lineEntityName)let pred = Predicate(format: "%K = %d", ViewController.lineNumberKey, i)request.predicate = preddo {let objects = try context.fetch(request)var theLine:NSManagedObject! = objects.first as? NSManagedObjectif theLine == nil {// No existing data for this row – insert a new managed object for ittheLine =NSEntityDescription.insertNewObject(forEntityName: ViewController.lineEntityName,into: context)as NSManagedObject}theLine.setValue(i, forKey: ViewController.lineNumberKey)theLine.setValue(textField.text, forKey: ViewController.lineTextKey)} catch {print("There was an error in executeFetchRequest(): (error)")}}appDelegate.saveContext()}}
So that we can use Core Data, we imported the Core Data framework. Next, we modified the viewDidLoad() method , which needs to check whether there is any existing data in the persistent store. If there is, it should load the data and populate the text fields with it. The first thing we do in that method is get a reference to our application delegate, which we then use to get the managed object context (of type NSManagedObjectContext) that was created for us:
let appDelegate =UIApplication.shared().delegate as! AppDelegatelet context = appDelegate.managedObjectContext
The next order of business is to create a fetch request and pass it the entity name, so it knows which type of objects to retrieve:
let request: NSFetchRequest<NSFetchRequestResult> =NSFetchRequest(entityName: ViewController.lineEntityName)
Since we want to retrieve all Line objects in the persistent store, we do not create a predicate. By executing a request without a predicate, we’re telling the context to give us every Line object in the store. Having created the fetch request, we use the fetch() method of the managed object context to execute it. Since fetch() can throw an error, we place the call and the code that uses its results in a do-catch block, so that we can log the error, if there is one:
do {let objects = try context.fetch(request)
Next, we loop through the array of retrieved managed objects, pull the lineNum and lineText values from each managed object, and use that information to update one of the text fields on our user interface :
for object in objects {let lineNum: Int = object.value(forKey: ViewController.lineNumberKey)! as! Intlet lineText = object.value(forKey: ViewController.lineTextKey) as? String ?? ""let textField = lineFields[lineNum]textField.text = lineText}
Of course, the first time we execute this code, we won’t have saved anything in the data store, so the objects list will be empty.
Next, just as with all the other applications in this chapter, we register to be notified when the application is about to move out of the active state (either by being shuffled to the background or exited completely), so we can save any changes the user has made to the data:
let app = UIApplication.shared()NotificationCenter.default.addObserver(self,selector: #selector(UIApplicationDelegate.applicationWillResignActive(_:)),name: NSNotification.Name.UIApplicationWillResignActive,object: app)
Finally, the catch clause prints any error that is thrown from the fetch() method :
} catch {// Error thrown from executeFetchRequest()print("There was an error in executeFetchRequest(): (error)")}
Now let’s look at applicationWillResignActive() . We start out the same way as the previous method: by getting a reference to the application delegate and using that to get a pointer to our application’s default managed object context :
let appDelegate =UIApplication.shared().delegate as! AppDelegatelet context = appDelegate.managedObjectContext
After that, we go into a loop that executes once for each text field, and then get a reference to the correct field:
for i in 0 ..< lineFields.count {let textField = lineFields[i]
Next, we create our fetch request for our Line entry. We need to find out if there’s already a managed object in the persistent store that corresponds to this field, so we create a predicate that identifies the correct object for the field by using the index of the text field as the record key :
let request: NSFetchRequest<NSFetchRequestResult> =let pred = Predicate(format: "%K = %d", ViewController.lineNumberKey, i)request.predicate = pred
Now we execute the fetch request against the context. As before, we wrap this code in a do-catch block so that we can report any error that is reported by Core Data:
do {let objects = try context.fetch(request)
After that, we declare a variable called theLineof type NSManagedObject that will reference the managed object for this row’s data. We may not have previously stored any data for this row, so at this point, we don’t know whether we’re going to get a managed object for it from the persistent store. For that reason, theLine needs to be declared as optional. But for convenience, we’ll make it force unwrapped, since we’re going to use the insertNewObject ( forEntityName: inManagedObjectContext:) method to create a new managed object for this row in the persistent store if we didn’t get one. We’ll use that managed object to initialize theLine in that case:
var theLine:NSManagedObject! = objects.first as? NSManagedObjectif theLine == nil {// No existing data for this row – insert a new managed object for ittheLine =NSEntityDescription.insertNewObject(forEntityName: ViewController.lineEntityName,into: context)as NSManagedObject
Next, we use key-value coding to set the line number and text for this managed object. We log any error that was caught in the catch clause:
theLine.setValue(i, forKey: ViewController.lineNumberKey)theLine.setValue(textField.text, forKey: ViewController.lineTextKey)
Finally, once we’re finished looping, we tell the context to save its changes:
appDelegate.saveContext()That’s it. Build and run the app to make sure it works. The Core Data version of your application should behave exactly the same as the previous versions.
Summary
You should now have a solid handle on four different ways of preserving your application data between sessions—five ways if you include the user defaults that you learned how to use in the previous chapter. We built an application that persisted data using property lists and modified the application to save its data using object archives. We then made a change and used the iOS’s built-in SQLite3 mechanism to save the application data. Finally, we rebuilt the same application using Core Data. These mechanisms are the basic building blocks for saving and loading data in almost all iOS applications.