
I want to get you started right away with a feel for what this is all about and to motivate your continued progress toward being a great developer, so let’s get to it and do something with our iPhone (see Figure 2-1). In this chapter, using Xcode, let’s create a small iOS application that will display Hello, World!. We’ll look at what’s involved in creating the project in Xcode, work through the specifics of using Xcode’s Interface Builder to design our application’s user interface , and then execute our application on the iOS simulator and an actual device. We’ll finish up by giving our application an icon to make it feel more like a real iOS application.

Figure 2-1. The results of the app we create in this chapter might seem simple, but our work will start us down the road to potential iOS greatness
Creating the Hello World Project
By now, you should have installed Xcode 8 and the iOS SDK onto your Mac. You can also download the book’s source code archive from the Apress web site ( www.apress.com ). While you’re at it, take a look at the book forums at http://forum.learncocoa.org . The book forums are a great place to discuss iOS development, get your questions answered, and meet up with like-minded people.
Note
Even though you have the complete set of project files at your disposal in this book’s source code archive, you’ll get more out of the book if you create each project by hand, rather than simply running the version you downloaded. By doing that, you’ll gain familiarity and expertise working with the various application development tools.
The project we’re going to build in this chapter is contained in the 02 - Hello World folder of the source code archive.
Before we can start, we need to launch Xcode, the tool that we’ll use to do most of what we do in this book. After downloading it from the Mac App Store or the Apple Developer site, you’ll find it installed in the /Applications folder, as with most Mac applications. You’ll be using Xcode a lot, so you might want to consider dragging it to your dock so you’ll have ready access to it.
If this is your first time using Xcode, don’t worry; we’ll walk you through every step involved in creating a new project. If you’re already an old hand but haven’t worked with Xcode 7, you may find that some things have changed (mostly for the better, I think).
When you first launch Xcode, you’ll be presented with a welcome window like the one shown in Figure 2-2. From here, you can choose to create a new project, connect to a version-control system to check out an existing project, or select from a list of recently opened projects. The welcome window gives you a nice starting point, covering some of the most common tasks you might do after starting Xcode. All of these actions can be accessed through the menu as well, so close the window and we’ll proceed. If you would rather not see this window in the future, just uncheck the Show this window when Xcode launches check box at the bottom of the window before closing it.

Figure 2-2. The Xcode welcome window
Create a new project by selecting New ➤ Project… from the File menu (or by pressing Shift-Command-N). A new project window will open, showing you the project template selection sheet (see Figure 2-3) . From this sheet, you’ll choose a project template to use as a starting point for building your application. The bar at the top is divided into five sections: iOS, watchOS, tvOS, macOS, and Cross-platform. Since we’re building an iOS application, select the iOS button to reveal the application templates.

Figure 2-3. The project template selection sheet lets you select from various templates when creating a new project
Each of the icons shown in the upper-right pane in Figure 2-3 represents a separate project template that can be used as a starting point for your iOS applications. The icon labeled Single View Application contains the simplest template and the one we’ll be using for the first several chapters. The other templates provide additional code and/or resources needed to create common iPhone and iPad application interfaces, as you’ll see in later chapters.
Click the Single View Application (see Figure 2-3), and then click the Next button. You’ll see the project options sheet, which should look like Figure 2-4. On this sheet, you need to specify the Product Name and Company Identifier for your project. Xcode will combine these to generate a unique bundle identifier for your app. You’ll also see a field that lets you enter an Organization Name, which Xcode will use to automatically insert a copyright notice into every source code file you create. Name your product Hello World and enter an organization name and identifier in the Organization Name and Organization Identifier fields, as shown in Figure 2-4. Don’t use the same name and identifier as the ones shown in Figure 2-4—for reasons that you’ll see when we try to run this application on a real device at the end of the chapter, you’ll need to choose an identifier that’s unique to you (or your company).
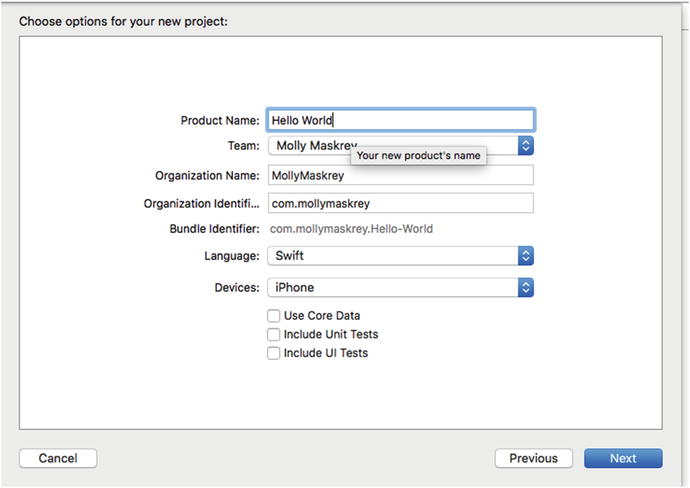
Figure 2-4. Selecting a product name and organization identifier for your project
The Language field lets you select the programming language that you want to use, choosing between Objective-C and Swift , but since all of the examples in the book are in Swift, the appropriate choice here is, of course, Swift.
We also need to specify the devices. In other words, Xcode wants to know if we’re building an app for the iPhone and iPod touch, if we’re building an app for the iPad, or if we’re building a universal application that will run on all iOS devices. Select iPhone in the Devices drop-down menu if it’s not already selected. This tells Xcode that we’ll be targeting this particular app at the iPhone and iPod touch , which have roughly the same screen size and form factor. For the first few chapters of the book, we’ll be using the iPhone device, but don’t worry—we’ll cover the iPad also.
Leave the Core Data check box unchecked—we’ll make use of it in Chapter 13. We’ll also leave the Include Unit Tests and Include UI Tests check boxes unchecked. Xcode has very good support for testing of your applications, but that’s outside the scope of this book, so we don’t need Xcode to include support for them in our project. Click Next again and you’ll be asked where to save your new project using a standard save sheet (see Figure 2-5). If you haven’t already done so, use the New Folder button to create a new master directory for these book projects, and then return to Xcode and navigate into that directory. Before you click the Create button, take note of the Source Control check box. Git isn’t covered in this book, but Xcode includes some support for using Git and other kinds of source control management (SCM) tools. If you are already familiar with Git and want to use it, enable this check box; otherwise, feel free to turn it off.

Figure 2-5. Saving your project in a project folder on your hard drive
The Xcode Project Window
After you dismiss the save sheet, Xcode will create and then open your project. You will see a new project window, as shown in Figure 2-6. There’s a lot of information in this window; it’s where we’ll spend a lot of iOS development time.

Figure 2-6. The Hello World project in Xcode
The Toolbar
The top of the Xcode project window is called the toolbar (see Figure 2-7). On the left side of the toolbar you’ll see controls to start and stop running your project, as well as a pop-up menu to select the scheme you want to run. A scheme brings together target and build settings, and the toolbar pop-up menus let you select a specific setup quickly and easily.

Figure 2-7. The Xcode toolbar
The big box in the middle of the toolbar is the Activity View. As its name implies, the activity view displays any actions or processes that are currently happening. For example, when you run your project, the activity view gives you a running commentary on the various steps it’s taking to build your application. If you encounter any errors or warnings, that information is displayed here, as well. If you click the warning or error, you’ll go directly to the Issue Navigator, which provides more information about the warning or error, as described in the next section.
On the right side of the toolbar are two sets of buttons. The left set lets you switch between three different editor configurations:
The Editor Area gives you a single pane dedicated to editing a file or project-specific configuration values.
The powerful Assistant Editor splits the Editor Area into multiple panes, left, right, top, and bottom. The pane on the right is generally used to display a file that relates to the file on the left, or that you might need to refer to while editing the file on the left. You can manually specify what goes into each pane, or you can let Xcode decide what’s most appropriate for the task at hand. For example, if you’re designing your user interface on the left, Xcode will show you the code that the user interface is able to interact with on the right. You’ll see the Assistant Editor at work throughout the book.
The Version Editor button converts the editor pane into a time machine–like comparison view that works with version control systems like Git. You can compare the current version of a source file with a previously committed version or compare any two earlier versions with each other.
To the right of the editor buttons is a set of toggle buttons that show and hide large panes on the left and right sides of the editor view, as well as the debug area at the bottom of the window. Click each of those buttons a few times to see these panes in action. We’ll explore how these are used soon.
The Navigator
Just below the toolbar on the left side of the project window is the Navigator. The Navigator offers eight views that show you different aspects of your project. Click each of the icons at the top of the navigator to switch among the following navigators, going from left to right:
Project Navigator: This view contains a list of files in your project, as shown in Figure 2-8. You can store references to everything you expect—from source code files to artwork, data models, property list (or .plist) files (discussed in the “A Closer Look at the Hello World Project” section later in this chapter), and even other project files. By storing multiple projects in a single workspace, those projects can easily share resources. If you click any file in the navigator view, that file will display in the Editor Area. In addition to viewing the file, you can also edit it, if it’s a file that Xcode knows how to edit.
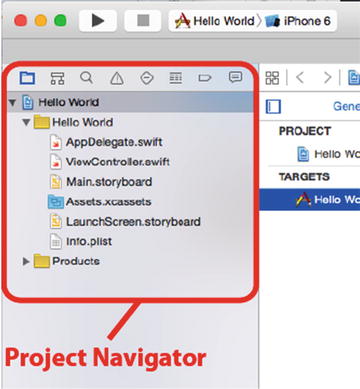
Figure 2-8. The Xcode Project Navigator . Click one of the eight icons at the top of the view to switch navigators
Symbol Navigator: As its name implies, this navigator focuses on the symbols defined in the workspace (see Figure 2-9). Symbols are basically the items that the compiler recognizes, such as classes, enumerations, structs, and global variables.

Figure 2-9. The Xcode Symbol Navigator. Open the disclosure triangle to explore the classes, methods, and other symbols defined within each group
Find Navigator: You’ll use this navigator to perform searches on all the files in your workspace (see Figure 2-10). At the top of this pane is a multileveled pop-up control letting you select Replace instead of Find, along with other options for applying search criteria to the text you enter. Below the text field, other controls let you choose to search in the entire project or just a portion of it, and specify whether searching should be case-sensitive.

Figure 2-10. The Xcode Find Navigator. Be sure to check out the pop-up menus hidden under the word Find and under the buttons that are below the search field
Issue Navigator: When you build your project, any errors or warnings will appear in this navigator, and a message detailing the number of errors will appear in the activity view at the top of the window (see Figure 2-11). When you click an error in the issue navigator, you’ll jump to the appropriate line of code in the editor.

Figure 2-11. The Xcode Issue Navigator. This is where you’ll find your compiler errors and warnings
Test Navigator: If you’re using Xcode’s integrated unit testing capabilities (a topic that isn’t covered in this book), this is where you’ll see the results of your unit tests. Since we didn’t include unit tests in the project, this navigator is empty (see Figure 2-12).

Figure 2-12. The Xcode Test Navigator . The output of your unit tests will appear here
Debug Navigator: This navigator provides your main view into the debugging process (see Figure 2-13). If you are new to debugging, you might check out this part of the Xcode Overview ( https://developer.apple.com/library/prerelease/content/documentation/ToolsLanguages/Conceptual/Xcode_Overview/UsingtheDebugger.html ). The Debug Navigator lists the stack frame for each active thread. A stack frame is a list of the functions or methods that have been called previously, in the order they were called. Click a method, and the associated code appears in the editor pane. In the editor, there will be a second pane that lets you control the debugging process, display and modify data values, and access the low-level debugger. A button at the bottom of the debug navigator allows you to control which stack frames are visible. Another button lets you choose whether to show all threads or just the threads that have crashed or stopped on a breakpoint. Hover your mouse over each of these buttons in turn to see which is which.

Figure 2-13. The Xcode Debug Navigator . Controls at the bottom of the navigator let you control the level of detail you want to see
Breakpoint Navigator: The breakpoint navigator lets you see all the breakpoints that you’ve set, as shown in Figure 2-14. Breakpoints are, as the name suggests, points in your code where the application will stop running (or break), so that you can look at the values in variables and do other tasks needed to debug your application. The list of breakpoints in this navigator is organized by file. Click a breakpoint in the list and that line will appear in the editor pane. Be sure to check out the plus sign (+) button at the lower-left corner of the project window when in the breakpoint navigator. This button opens a pop-up that lets you add four different types of breakpoints, including symbolic breakpoints, which are the ones that you will use most often.
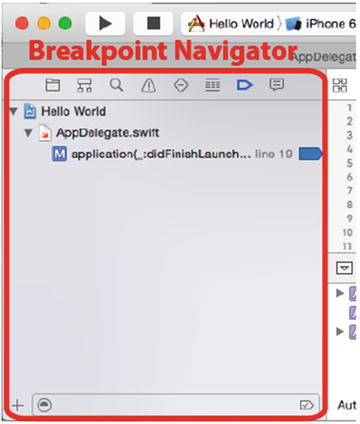
Figure 2-14. The Xcode Breakpoint Navigator. The list of breakpoints is organized by file
Report Navigator: This navigator keeps a history of your recent build results and run logs, as shown in Figure 2-15. Click a specific log, and the build command and any build issues are displayed in the edit pane.

Figure 2-15. The Xcode Report Navigator. The Report Navigator displays a list of builds, with the details associated with a selected view displayed in the editor pane
The Jump Bar
Across the top of the editor, you’ll find a control called the jump bar. With a single click, the jump bar allows you to jump to a specific element in the hierarchy you are currently navigating. For example, Figure 2-16 shows a source file being edited in the editor pane.

Figure 2-16. The Xcode editor pane showing the jump bar, with a source code file selected. The submenu shows the list of methods in the selected file
The jump bar sits just above the source code. Here’s how it breaks down:
The funky-looking icon at the left end of the jump bar is actually a pop-up menu that displays submenus listing recent files, counterparts, superclasses, and subclasses, siblings, categories, includes, and more. The submenus shown here will take you to just about any other code that touches the code currently open in the editor.
To the right of the menu are left and right arrows that take you back to the previous file and return you to the next file, respectively.
The jump bar includes a segmented pop-up that displays the hierarchical path to reach the selected file in the project. You can click any segment showing the name of a group or a file to see all the other files and groups located at the same point in the hierarchy. The final segment shows a list of items within the selected file. In Figure 2-16, you see that the tail end of the jump bar is a pop-up that shows the methods and other symbols contained within the currently selected file. The jump bar shows the AppDelegate.swift file with a submenu listing the symbols defined in that file.
Look for the jump bar as you make your way through the various interface elements that make up Xcode.
Tip
Like most of Apple’s macOS applications, Xcode includes full support for full-screen mode. Just click the full-screen button in the upper right of the project window to try out distraction-free, full-screen coding!
The Utilities Area
As mentioned earlier, the second-to-last button on the right side of the Xcode toolbar opens and closes the utilities area. The upper part of the utilities area is a context-sensitive inspector panel, with contents that change depending on what is being displayed in the editor pane. The lower part of the utility area contains a few different kinds of resources that you can drag into your project. We’ll see examples of this throughout the book.
Interface Builder
Earlier versions of Xcode included a separate interface design application called Interface Builder (IB), which allowed you to build and customize your project’s user interface. One of the major changes introduced in later versions of Xcode integrated Interface Builder into the workspace itself. Interface Builder is no longer a separate stand-alone application, which means you don’t need to jump back and forth between Xcode and Interface Builder as your code and interface evolve.
We’ll be working extensively with Xcode’s interface-building functionality throughout the book, digging into all the various details. In fact, we’ll start working with Interface Builder later in this chapter.
Integrated Compiler and Debugger
Among the most important changes that were brought in by Xcode 4 lies under the hood: a brand-new compiler and a low-level debugger. Both are significantly faster and smarter than their predecessors, and each release since then has added improvements.
For many years, Apple used GCC (the GNU Compiler Collection) as the basis for its compiler technology. But over the course of the past few years, it has shifted over completely to the LLVM (Low Level Virtual Machine) compiler. LLVM generates code that is faster by far than that generated by the traditional GCC. In addition to creating faster code, LLVM also knows more about your code, so it can generate smarter, more precise error messages and warnings.
Xcode is also tightly integrated with LLVM, which gives it some new superpowers. Xcode can offer more precise code completion and it can make educated guesses as to the actual intent of a piece of code when it produces a warning and offers a pop-up menu of likely fixes. This makes errors like misspelled symbol names and mismatched parentheses a breeze to find and fix.
LLVM brings to the table a sophisticated static analyzer that can scan your code for a wide variety of potential problems, including problems with memory management. In fact, LLVM is so smart about this that it can handle most memory management tasks for you, as long as you abide by a few simple rules when writing your code. We’ll begin looking at the new feature called Automatic Reference Counting (ARC) in the next chapter.
A Closer Look at the Hello World Project
Now that we’ve explored the Xcode project window, let’s take a look at the files that make up our new Hello World project. Switch to the Project Navigator by clicking the leftmost of the eight navigator icons on the left side of your workspace (as discussed in the “The Navigator” section earlier in the chapter) or by pressing ⌘1.
Note
The eight navigator configurations can be accessed using the keyboard shortcuts ⌘1 to ⌘8. The numbers correspond to the icons starting on the left, so ⌘1 is the Project Navigator, ⌘2 is the Symbol Navigator, and so on up to ⌘8, which takes you to the Report Navigator.
The first item in the Project Navigator list bears the same name as your project—in this case, Hello World. This item represents your entire project and it’s also where project-specific configuration can be done. If you single-click it, you’ll be able to edit a number of project configuration settings in Xcode’s editor. You don’t need to worry about those project-specific settings now, however. At the moment, the defaults will work fine.
Flip back to Figure 2-8. Notice that the disclosure triangle to the left of Hello World is open, showing a number of subfolders (which are called groups in Xcode):
Hello World: The first group, which is always named after your project, is where you will spend the bulk of your time. This is where most of the code that you write will go, as will the files that make up your application’s user interface. You are free to create subgroups under the Hello World group to help organize your code. You’re even allowed to add groups of your own if you prefer a different organizational approach. While we won’t touch most of the files in this folder until the next chapter, there is one file we will explore when we use Interface Builder in the next section. That file is called Main.storyboard and it contains the user interface elements specific to your project’s main view controller. The Hello World group also contains files and resources that aren’t Swift source files, but that are necessary to your project. Among these files is one called Info.plist, which contains important information about the application, such as its name, whether it requires any specific features to be present on the devices on which it is run, and so on. In earlier versions of Xcode, these files were placed into a separate group called Supporting Files.
Hello WorldTests: This group is created if you enable unit testing for the project (we didn’t, so it’s not there for our project) and it contains the initial files you’ll need if you want to write some unit tests for your application code. We’re not going to talk about unit testing in this book, but it’s nice that Xcode can set up some of these things for you in each new project you create if you want it to. Like the Hello World folder, this one contains its own Info.plist file.
Products: This group contains the application that this project produces when it is built. If you expand Products, you’ll see an item called Hello World.app, which is the application that this particular project creates. If the project had been created with unit testing enabled, it would also contain an item called Hello WorldTests.xctest, which represents the testing code. Both of these items are called build targets. Because we have never built either of these, they’re both red, which is Xcode’s way of telling you that a file reference points to something that is not there.
Note
The “folders” in the navigator area do not necessarily correspond to folders in your Mac’s file system. They are just logical groupings within Xcode that help you keep everything organized and make it faster and easier to find what you’re looking for while working on your application. Often, the items contained in those groups are stored directly in the project’s directory, but you can store them anywhere—even outside your project folder if you want. The hierarchy inside Xcode is completely independent of the file system hierarchy, so moving a file out of the Hello World group in Xcode, for example, will not change the file’s location on your hard drive.
Introducing Xcode’s Interface Builder
In your project window’s Project Navigator, expand the Hello World group, if it’s not already open, and then select the Main.storyboard file . As soon as you do, the file will open in the editor pane, as shown in Figure 2-17. You should see something resembling an all-white iOS device centered on a plain white background, which makes a nice backdrop for editing interfaces. This is Xcode’s Interface Builder, which is where we’ll design our application’s user interface.

Figure 2-17. Selecting Main.storyboard in the Project Navigator opens the file in Interface Builder
Interface Builder has a long history. It has been around since 1988 and has been used to develop applications for NeXTSTEP, OpenStep, OS X, macOS, and now iOS devices such as the iPhone, iPad, Apple TV, and also for the Apple Watch.
File Formats
Interface Builder supports a few different file types. The oldest is a binary format that uses the extension .nib, now an XML-based format using the .xib extension. Both of these formats contain exactly the same sort of document, but the .xib version, being a text-based format, has many advantages, especially when you’re using any sort of source control software. For the first 20 years of Interface Builder’s life, all of its files had the .nib extension. As a result, most developers took to calling Interface Builder files nib files. Interface Builder files are often called nib files, regardless of whether the extension actually used for the file is .xib or .nib. In fact, Apple sometimes uses the terms nib and nib file interspersed through its documentation.
Each nib file can contain any number of objects, but when working on iOS projects, each one will usually contain a single view (often a full-screen view) and the controllers or other objects to which it connects. This lets us compartmentalize our applications, only loading the nib file for a view when it’s needed for display. The end result: we save memory when our app is running on a memory-constrained iOS device. A newly-created iOS project contains a nib file called LaunchScreen.xib that contains a screen layout that will be shown, by default, when your application launches. We’ll talk more about this file at the end of the chapter.
The other file format that IB has supported for the past few years is the storyboard. You can think of a storyboard as a “meta-nib file” since it can contain several view controllers, as well as information about how they are connected to each other when the application runs. Unlike a nib file, the contents of which are loaded all at once, a storyboard cannot contain freestanding views and it never loads all of its contents at once. Instead, you ask it to load particular controllers when you need them. The iOS project templates in Xcode 8 all use storyboards, so all of the examples in this book will start with a storyboard. Although you only get one storyboard for free, you can add more if you need them. Now let’s go back to Interface Builder and the Main.storyboard file for our Hello World application (see Figure 2-17).
The Storyboard
We’re now looking at the primary tool for building user interfaces for iOS apps. Let’s say that you want to create an instance of a button. You could create that button by writing code, but creating an interface object by dragging a button out of a library and specifying its attributes is so much simpler, and it results in exactly the same thing happening at runtime.
The Main.storyboard file we are looking at right now loads automatically when your application launches (for the moment, don’t worry about how), so it is the right place to add the objects that make up your application’s user interface. When you create objects in Interface Builder, they’re instantiated in your program when the storyboard or nib file that you added them loads. We’ll see many examples of this process throughout the book.
Every storyboard gets compartmentalized into one or more view controllers and each view controller has at least one view. The view is the part you can see graphically and edit in Interface Builder, while the controller is application code you will write to make things happen when a user interacts with your app. The controllers are where the real action of your application happens.
In IB, you often see a view represented by a rectangle representing the screen of an iOS device (actually, it represents a view controller, a concept that you’ll be introduced to in the next chapter, but this particular view controller covers the whole screen of the device, so it’s pretty much the same thing). Near the bottom of the IB window you’ll see a drop-down control that begins with View as: with a default device type. Click the device type. You can choose which device that we’ll be creating the layout for, as shown in Figure 2-18.

Figure 2-18. In Xcode 8, IB lets you select the device type and orientation that you work in
Returning to our storyboard, click anywhere in the outline and you’ll see a row of three icons at the top of it, like those shown in Figure 2-17. Move your mouse over each of them and you’ll see tooltips pop up with their names: View Controller, First Responder, and Exit. Forget about Exit for now and focus instead on the other two.
View Controller represents a controller object that is loaded from file storage along with its associated view. The task of the view controller is to manage what the user sees on the screen. A typical application has several view controllers, one for each of its screens. It is perfectly possible to write an application with just one screen, and hence one view controller, and many of the examples in this book have only one view controller.
First Responder is, in very basic terms, the object with which the user is currently interacting. If, for example, the user is currently entering data into a text field, that field is the current first responder. The first responder changes as the user interacts with the user interface, and the First Responder icon gives you a convenient way to communicate with whatever control or other object is the current first responder, without needing to write code to determine which control or view that might be.
We’ll talk more about these objects starting in the next chapter, so don’t worry if it’s a bit confusing right now determining when you would use First Responder or how a View Controller gets loaded.
Apart from those icons, the rest of what you see in the editing area is the space where you can place graphical objects. But before we get to that, there’s one more thing you should see about IB’s editor area: its hierarchy view—or the Document Outline to give it its correct name. The Document Outline is shown in Figure 2-19.

Figure 2-19. The Document Outline contains a useful hierarchical representation of the storyboard contents
If the Document Outline is not visible, click the little button in the lower-left corner of the editing area and you’ll see it slide in from the left. It shows everything in the storyboard, split up into scenes containing chunks of related content. In our case, we have just one scene, called the View Controller Scene. We see that it contains an item called View Controller, which in turn contains an item called the View (along with some other things you’ll learn about later). This provides a good way to get an overview of the content where everything you see in the main editing area is mirrored here.
The View icon represents an instance of the UIView class. A UIView object is an area that a user can see and interact with. In this application, we currently have only one view, so this icon represents everything that the user can see in our application. Later, we’ll build more complex applications that have several views. For now, just think of this view as an object that the user can see when using your application.
If you click the View icon, Xcode will automatically highlight the square screen outline that we were talking about earlier. This is where you can design your user interface graphically.
The Utilities Area
The Utilities area makes up the right side of the workspace. If it’s not currently selected, click the rightmost of the three View buttons in the toolbar, select View ➤ Utilities ➤ Show Utilities, or press ⌥⌘0 (Option-Command-Zero). The bottom half of the Utilities area, shown in Figure 2-20, is called the Library pane, or just plain Library.

Figure 2-20. In the Library you’ll find stock objects from the UIKit that are available for use in Interface Builder. Everything above the Library but below the toolbar is known collectively as the Inspector
The Library provides a collection of reusable items for use in your own programs. The four icons in the bar at the top of the library pane divide it into four sections. Click each icon in turn to see what’s in each section:
File Template Library: This section contains a collection of file templates you can use when you need to add a new file to your project. For example, if you want to add a new Swift source file to your project, one way to do it is to drag one type from the file template library and drop it onto the Project Navigator.
Code Snippet Library: This section features a collection of code snippets you can drag into your source code files. If you’ve written something you think you’ll want to use again later, select it in your text editor and drag it to the Code Snippet Library.
Object Library: This section contains reusable objects, such as text fields, labels, sliders, buttons, and just about any object you would ever need to design your iOS interface. We’ll use the Object Library extensively in this book to build the interfaces for our sample programs.
Media Library: As its name implies, this section is for all your media, including pictures, sounds, and movies. It’s empty until you add something to it.
Note
The items in the Object Library come from the iOS UIKit, which is a framework of objects used to create an app’s user interface. UIKit fulfills the same role in Cocoa Touch and as AppKit does in Cocoa on macOS. The two frameworks are similar conceptually; however, because of differences in the platforms, there are obviously many differences between them. On the other hand, the Foundation framework classes, such as NSString and NSArray, are shared between Cocoa and Cocoa Touch.
Note the search field at the bottom of the library. If you want to find a button, type button in the search field; the current library will show only items with “button” in the name. Don’t forget to clear the search field when you are finished searching, otherwise not all the available items will be shown.
Adding a Label to the View
Let’s start working with IB. Click the Object Library icon (it looks like a circle with a square in the center—you can see it in Figure 2-20) at the top of the library area to bring up the Object Library. Just for fun, scroll through the library to find a Table View. That’s it—keep scrolling and you’ll find it. But, there’s a better way: just type the words Table View in the search field and you’ll see it appear.
Tip
Here’s a useful shortcut: press ^||⌘3 to jump to the search field and highlight its contents. Next, you can just type the name for the item you wish to search.
Now find a Label in the library. Next, drag the label onto the view we saw earlier. (If you don’t see the view in your editor pane, click the View icon in the Interface Builder Document Outline). As your cursor appears over the view, it will turn into the standard, “I’m making a copy of something” green plus sign you know from the Finder. Drag the label to the center of the view. A pair of blue guidelines—one vertical and one horizontal—will appear when your label is centered. It’s not vital that the label be centered, but it’s good to know that those guidelines are there, when you drop the label it should appear, as shown in Figure 2-21.

Figure 2-21. We’ve found a label in our library and dragged it onto our view
User interface items are stored in a hierarchy. Most views can contain subviews; however, there are some, like buttons and most other controls, that can’t. Interface Builder is smart. If an object does not accept subviews, you will not be able to drag other objects onto it.
By dragging a label directly to the view we’re editing, we add it as a subview of that main view (the view named View), which will cause it to show up automatically when that view is displayed to the user. Dragging a label from the library to the view called View adds an instance of UILabel as a subview of our application’s main view.
Let’s edit the label so it says something profound. Double-click the label that you just created, and then type Hello, World!. Next, click off the label, and then reselect it and drag the label to re-center it or position it wherever you want it to appear on the screen.
We’ve completed this part, now let’s save it to finish up. Select File ➤ Save, or press ⌘S. Now check out the pop-up menu at the upper left of the Xcode project window, the one that says Hello World. This is actually a multi-segment pop-up control. The left side lets you choose a different compilation target and do a few other things, but we’re interested in the right side, which lets you pick which device you want to run on. Click the right side and you’ll see a list of available devices. At the top, if you have any iOS device plugged in and ready to go, you’ll see it listed. Otherwise, you’ll just see a generic iOS Device entry. Below that, you’ll see a whole section, headed by iOS Simulator, listing all the kinds of devices that can be used with the iOS simulator. From that lower section, choose iPhone 6/6s, so that our app will run in the simulator, configured as if it were an iPhone 6/6s.
There are several ways to launch your application: you can select Product ➤ Run, press ⌘R, or press the Run button that’s just to the left of the simulator pop-up menu. Xcode will compile your app and launch it in the iOS simulator (see Figure 2-22).

Figure 2-22. Here’s our Hello, World! program running in the iPhone 6s simulator
Note
Prior to the added features of Xcode 8, the text would not automatically center and you would need to work with Auto Layout to add in things called constraints to make sure that it was centered on any device.
That’s really all there is to our first app at its most basic level—and notice that we wrote no Swift code at all.
Changing Attributes
Back in Xcode single-click the Hello World label to select it and notice the area above the library pane. This part of the utility pane is called the Inspector. The Inspector pane is topped by a series of icons, each of which changes the Inspector to view a specific type of data. To change the attributes of the label, we’ll need the fourth icon from the left, which brings up the Attributes Inspector (see Figure 2-23).

Figure 2-23. The Attributes Inspector showing our label’s attributes
Tip
The Inspector, like the Project Navigator, has keyboard shortcuts corresponding to each of its icons. The Inspector’s keyboard shortcuts start with ||⌘1 for the leftmost icon, ||⌘2 for the next icon, and so on. Unlike the Project Navigator, the number of icons in the Inspector is context-sensitive, and it changes depending on which object is selected in the navigator and/or editor. Note that your keyboard may not have a key that’s marked ||. If it doesn’t, use the Option key instead.
Change the label’s appearance any way you like, feeling free to play around with the font, size, and color of the text. Note that if you change the font size, you’ll need to add an auto layout constraint to make sure that it has the correct size at run time. To do that, select the label, and then choose Editor ➤ Size to Fit Content from the Xcode menu (see Figure 2-24). Once you’ve finished playing, save the file and select Run again. The changes you made should show up in your application, once again without writing any code.

Figure 2-24. Changing the font size larger will force you to change the layout constraints by selecting Size to Fit Content from the Editor drop-down menu
Note
Don’t worry too much about what all of the fields in the Attributes Inspector mean because as you make your way through the book, you’ll learn a lot about the Attributes Inspector and what most of the fields do.
By letting us design our interface graphically, Interface Builder frees us to spend time writing the code that is specific to your application, instead of writing tedious code to construct your user interface.
Most modern application development environments have some tool that lets you build your user interface graphically. One distinction between Interface Builder and many of these other tools is that Interface Builder does not generate any code that must be maintained. Instead, Interface Builder creates user interface objects, just as you would in your own code, and then serializes those objects into the storyboard or nib file so that they can be loaded directly into memory at runtime. This avoids many of the problems associated with code generation and is, overall, a more powerful approach.
Finishing Touches
Now let’s refine our application making it feel more like an authentic iPhone app. First, run your project again. When the simulator window appears, press ⇧⌘H. That will bring you back to the iPhone home screen, as shown in Figure 2-25. Notice that the app icon now shows as a plain, default image.

Figure 2-25. The Hello World application shown on the home screen
Take a look at the Hello World icon at the top of the screen. To change from this boring, default image, we need to create an icon and save it as a portable network graphic (.png) file. Actually, for best results you should create five icons for the iPhone in the following: sizes 180 × 180 pixels, 120 × 120 pixels, 87 × 87 pixels, 80 × 80 pixels, and 58 × 58 pixels. There’s another set of four icons that are required if you plan to release your application for the iPad. You’ll also need an image that is 187 × 187 pixels for the iPad Pro. The reason for so many icons is because they are used on the home screen, in the Settings app and in the results list for a Spotlight search. That accounts for three of them, but that’s not the end of the story—the iPhone 6/6s Plus, with its larger screen, requires higher resolution icons, adding another three to the list. Fortunately, one of these is the same size as an icon from the other set, so you actually only need to create five versions of your application icon for the iPhone. If you don’t supply some of the smaller ones, a larger one will be scaled down appropriately; but for best results, you (or a graphic artist on your team) should probably scale it in advance.
Note
The issue of icon sizes is even more complex than this. Before iOS 7, the side dimension of an icon for all modern iPhones was 114 × 114 pixels. But if you wanted to support older, non-Retina iPhones, you needed to include an icon at half that resolution, or 57 × 57. Then there’s the issue of the iPad, which has other icons sizes, both Retina and non-Retina, for both iOS 10 and for earlier versions of iOS.
Do not try to match the style of the buttons that are already on the device when you create the icons; your iPhone or iPad automatically rounds the edges. Just create normal, square images. You’ll find a set of suitable icon images in the project archive 02 - Hello World - icons folder.
Note
For your application’s icon, you must use .png images; in fact, you should actually use that format for all images in your iOS projects. Xcode automatically optimizes .png images at build time, which makes them the fastest and most efficient image type for use in iOS apps. Even though most common image formats will display correctly, use .png files unless you have a compelling reason to use another format.
Press ⌘1 to open the Project Navigator, and look inside the Hello World group for an item called Assets.xcassets. This is something called an asset catalog. By default, each new Xcode project is created with an asset catalog, ready to hold your app icons and other resource files. Select Assets.xcassets and turn your attention to the editor pane.
On the left side of the editor pane, you’ll see a column with an entry labeled AppIcon . Select this item and to the right you’ll see an area with the text AppIcon in the upper-left corner, as well as dashed-line squares for the icons we just talked about (see Figure 2-26). This is where we’ll drag all of our app icons.

Figure 2-26. The AppIcon boxes on your project’s assets catalog. This is where you set your application’s icon
In the Finder, open the 02 - Hello World - icons folder, select all the files, and drag the bunch of them to IB. Most of the icons should automatically fill with the correct name. You’ll likely have a few empty squares left over where you’ll find the right file and drag them individually to make sure that there are no empty squares. You do this by comparing the file size as part of the name to the number of points on the square. Note that you’ll need to find the double or triple size file if a square has 2x or 3x below it. For example, note in Figure 2-27 that the icon for iPhone Spotlight iOS 7-9 is empty and also says t. Also see that the square has a 3x label. This means that you’ll need to find the file that corresponds to 120pts; that is, 3 × 40pts.

Figure 2-27. Be sure to match .png files to the proper size requirement for the icon
Now compile and run your app. When the simulator has finished launching, press ⇧⌘![]() to go to the home screen, and check out your icon (see Figure 2-28). To see one of the smaller icons in use, swipe down inside the home screen to bring up the spotlight search field, and start typing the word Hello—you’ll see your new app’s icon appear immediately.
to go to the home screen, and check out your icon (see Figure 2-28). To see one of the smaller icons in use, swipe down inside the home screen to bring up the spotlight search field, and start typing the word Hello—you’ll see your new app’s icon appear immediately.

Figure 2-28. The new app icon for our Hello World app
Note
As we work through this book, our simulator’s home screen will get cluttered with the icons for the example applications that we’ll be running. If you want to clear out old applications from the home screen, choose iOS Simulator ➤ Reset Content and Settings… from the iOS simulator’s application menu.
The Launch Screen
When you launched your application, you may have noticed the white launch screen that appeared while the application was being loaded. iOS applications have always had a launch screen. Since the process of loading an application into memory takes time (and the larger the application, the longer it takes), the purpose of this screen is to let the user see as quickly as possible that something is happening. Prior to iOS 8, you could supply an image (in fact, several images of different sizes) to act as your app’s launch screen. iOS would load the correct image and immediately display it before loading the rest of your application. Starting with iOS 8, you still have that option, but Apple now strongly recommends that you use a launch file instead of a launch image, or as well as a launch image if your application still needs to support earlier releases.
A launch file is a storyboard that contains the user interface for your launch screen. On devices running iOS 8 and later, if a launch file is found, it is used in preference to a launch image. Look in the Project Navigator and you’ll see that you already have a launch file in your project—it’s called LaunchScreen.storyboard. If you open it in Interface Builder, you’ll see that it just contains a blank view, as shown in Figure 2-29.

Figure 2-29. Our application’s default launch file
Apple expects you to build your own launch screen using Interface Builder, in the same way as you would construct any other part of your application’s user interface. Apple recommends that you don’t try to create a complex or visually impressive launch screen, so we’ll follow those guidelines. Instead, we’re just going to add a label to the storyboard and change the background color of the main view, so that you can distinguish the launch screen from the application itself. As before, drag a label onto the storyboard, change its text to Hello World, and then use the Attributes Inspector (see Figure 2-23) to change its font to System Bold 32. Making sure that the label is selected, click Editor ➤ Size to Fit Content in the Xcode menu. Now center the label in the view and click Editor ➤Resolve Auto Layout Issues ➤Add Missing Constraints to add layout constraints that make sure that it stays there. Next, select the main view by clicking on it in the storyboard or in the Document Outline and use the Attributes Inspector to change its background color. To do that, locate the control labeled Background and choose any color you like—since this is an Apress book, I chose yellow. Now just run the application again. You’ll see the launch screen appear and then fade away as the application itself appears, as shown in Figure 2-30.

Figure 2-30. A yellow launch screen for the Hello World application
You can read more about the launch file, launch images and application icons in Apple’s iOS Human Interface Guidelines document, which you’ll find online at https://developer.apple.com/library/ios/documentation/UserExperience/Conceptual/MobileHIG/LaunchImages.html .
Running the Application on a Device
Before we bring this chapter to a close, there’s one more thing we should do. Let’s load our app and run it on an actual device. The first step is to connect an iOS device to your Mac using its charging cable. When you do that, Xcode should recognize it and will spend some time reading symbol information from it. You may also see security prompts on both your Mac and your device asking whether you want one to trust the other. Wait until Xcode finishes processing symbol files from the device (check the Activity View to see that), and then open the device selector in the toolbar. You should see your device listed there, as shown in Figure 2-31.

Figure 2-31. The list of devices and simulators now includes the author’s iPhone 6s
Select the device and click the Run button on the toolbar to start the process of installing and running the application on it. Xcode will rebuild the application and run it on your device. However, because I’m using an early Beta release of Xcode 8 , you may see a prompt like the one shown in Figure 2-32.

Figure 2-32. If the automated provision features fail, you may see this message
Note
Apple has made improvements to the provisioning system in Xcode 8 and many of these “fix issue” features have become obsolete, and the process more seamless and successful. Here, we address the topic in a way to make sure that we complete the provisioning to get the app to run on our actual device.
Before you can install an application on an iOS device, it has to have a provisioning profile and it needs to be signed. Signing the application allows the device to identify the author of the application and to check that the binary has not been tampered with since it was created. The provisioning profile contains information that tells iOS which capabilities, such as iCloud access, your application needs to have and which individual devices it can run on. To sign the application, Xcode needs a certificate and a private key.
Tip
You can read about code signing, provisioning profiles, certificates, and private keys in Apple’s App Distribution Workflows in the App Distribution Guide at https://developer.apple.com/library/ios/documentation/IDEs/Conceptual/AppDistributionGuide .
In the early days of iOS development, you had to sign in to your developer program account and manually create both of these items, and then register the test devices on which you want to install the application. This was a non-trivial and frustrating process . Xcode 7 was improved to be smart enough to do this for you, and Xcode 8 has improved things even more so this should all just work when all you need do is to put an app on a device for testing. In some cases, for different specialized builds to be distributed to particular users, we’ll want to customize our provisioning process, but for our learning process, the default, easy-to-use mechanisms work just fine.
There are a couple of things that can go wrong. First, if you see a message saying that your App ID is not available, you’ll need to choose a different one. The App ID is based on the project name and the Organization Identifier that you chose when you created the project (see Figure 2-4). You’ll see this message if you used com.beginningiphone or another identifier that somebody else has already registered. To fix it, open the Project Navigator and select the Hello World node at the top of the project tree. Then click the Hello World node under the TARGETS section in the Document Outline. Finally, click the General button at the top of the editor area (see Figure 2-33).

Figure 2-33. Changing your application’s bundle identifier
The App ID that Xcode uses for signing is taken from the Bundle Identifier field in the editor. You’ll see that it contains the Organization Identifier that you selected when you created the project—it’s the part of the field that’s highlighted in Figure 2-33. Choose another value and try building again. Eventually, you should find an identifier that hasn’t already been used. When you’ve done that, make a note of it and be sure to use it to fill in the Organization Identifier field whenever you create a new project. Once you’ve done that correctly once, Xcode will remember it so you shouldn’t have to do it again.
The other thing that can go wrong is shown in Figure 2-34.

Figure 2-34. Failure to launch in iOS 9 or 10
You’ll see this message only if you are not enrolled in the developer program. It means that your iOS device does not trust you to run applications signed with your Apple ID. To fix this, open the Settings application on the device, and then go to General ➤ Profile. You’ll reach a page with a table that contains your Apple ID. Tap the table row to open another page that looks like Figure 2-35.

Figure 2-35. On iOS 9 and above, developers without a developer program membership are not trusted by default
Chapter Summary
We should be pleased with the progress we’ve made in this chapter. Although it may not seem like we accomplished all that much, we actually covered a lot of ground. You learned about the iOS project templates, created an application, learned key knowledge about Xcode8, started using Interface Builder, learned how to set your application icon and how to run your application on the simulator and on a real device.
The Hello World program, however, is a strictly one-way application. We show some information to the users, but we never get any input from them. In the next chapter, we’ll look at how to go about getting input from the user of an iOS device and taking actions based on that input.