In Chapter 9, we spent a lot of time dealing with app navigation based on selections in table views, where each selection causes the top-level view, which filled the entire screen, to slide left and bring in the next view in the hierarchy. Many iPhone and iPod touch apps work this way such as Mail, which lets you drill down through mail accounts and folders until you make your way to the message. Although, this approach works on the iPad, it leads to a user interaction problem.
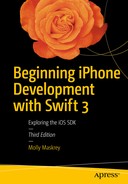
On a screen the size of the iPhone or iPod touch, having a screen-sized view slide away to reveal another screen-sized view works well. But with an iPad, that same interaction can seem less smooth, perhaps a little exaggerated, and even a little overwhelming. Consuming such a large display with a single table view wastes space. As a result, you’ll see that the built-in iPad apps don’t behave this way. Instead, any drill-down navigation functionality, like that used in Mail, becomes relegated to a narrow column whose contents slide left or right as the user drills down into or backs out of the hierarchy. With the iPad in landscape mode, the navigation column stays at a fixed position on the left, with the content of the selected item displayed on the right in what’s known as a split-view (see Figure 11-1), and applications built this way are called master-detail applications .

Figure 11-1. This iPad, in landscape mode, shows a split view with the navigation column on the left. Tap an item in the navigation column and that item’s content displays in the area on the right
Split view provides a perfect visual for developing master-detail applications like Mail. Prior to iOS 8, the split view class, UISplitViewController, was only available on the iPad, meaning that if you wanted to build a universal master-detail application, you had to do it one way on the iPad and another way on the iPhone. Now, with UISplitViewController available everywhere, you no longer need to write special code to handle the iPhone.
When used on the iPad, the left side of the split view provides a width of 320 points by default. The split view itself, with navigation and content side by side, typically appears only in landscape mode. If you turn the device to portrait orientation , the split view still functions, but it’s no longer visible in the same way. The navigation view loses its permanent location. It can be activated only by swiping in from the left side of the view or by pressing a toolbar button, causing it to slide in from the left in a view that floats in front of everything else on the screen, as shown in Figure 11-2.

Figure 11-2. Split view on an iPad in portrait mode appears differently from landscape mode , in that the information from th e left side of the spl it view in landscape mode appears only when the user swipes in from the left or taps a toolbar button
Some applications don’t strictly follow this rule such as the iPad Settings app which uses a split view visible all the time. The left side neither disappears nor covers the content view on the right. But for this chapter’s project we’ll stick to the standard usage pattern.
We’ll create a master-detail application using a split view controller, and then we’ll test the application on the iPad simulator. But when it’s finished, we’ll see that the same code also works on the iPhone, although it doesn’t quite look the same. You’ll learn how to customize the split view’s appearance and behavior, and create and display a popover that’s like the one that we saw in Chapter 4 when we discussed alert views and action sheets. Unlike the popover in Figure 4-29, which wrapped an action sheet , this one will contain content that is specific to the example application—specifically, a list of presidents, as shown in Figure 11-3.

Figure 11-3. A popover visually appears to sprout from the button that triggered it
Building Master-Detail Applications with UISplitViewController
We’re going to start off with an easy task: taking advantage of one of Xcode’s predefined templates to create a split view project. We’ll build an app that lists all the US presidents and shows the Wikipedia entry for whichever one you select.
Open Xcode and select File ➤ New ➤ Project.... From the iOS Application section, select Master-Detail Application and click Next. On the next screen, name the new project Presidents, set the Language to Swift and Devices to Universal. Make sure that all of the check boxes are unchecked. Click Next, choose the location for your project, and then click Create. Xcode will do its usual thing, creating a handful of classes and a storyboard file for you, and then showing the project. If it’s not already open, expand the Presidents folder and take a look at what it contains.
From the start, the project contains an app delegate (as usual), a class called MasterViewController, and a class called DetailViewController. Those two view controllers represent, respectively, the views that will appear on the left and right sides of the split view in landscape orientation. MasterViewController defines the top level of a navigation structure and DetailViewController defines what’s displayed in the larger area when a navigation element is selected. When the app launches, both of these are contained inside a split view, which, as you may recall, does a bit of shape-shifting as the device is rotated.
To see what this particular application template gives you in terms of functionality, build the app and run it in the iPad simulator . If the application launches into portrait mode, you’ll see just the detail view controller, as shown on the left in Figure 11-4. Tap the Master button on the toolbar or swipe from the left edge of the view to the right to slide in the master view controller over the top of the detail view, as shown on the right in Figure 11-4.

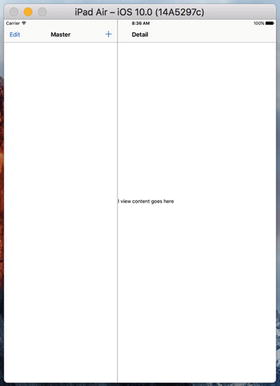
Figure 11-4. The default master-detail application in portrait mode . The layout on the right is similar to Figure 11-2
Rotate the simulator left or right, into landscape orientation. In this mode, the split view works by showing the navigation view on the left and the detail view on the right, as shown in Figure 11-5.
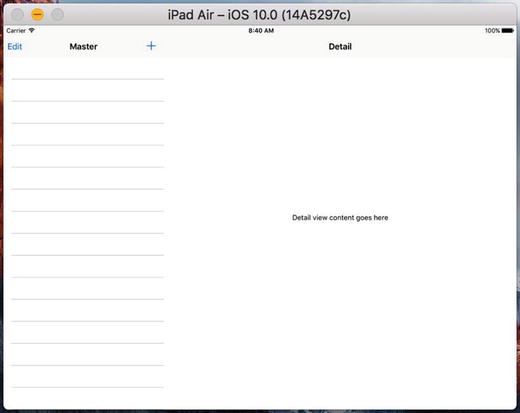
Figure 11-5. The default master-detail application in landscape mode . Note the similar layouts shown in this figure and Figure 11-1
The Storyboard Defines the Structure
From the onset, you have a pretty complex set of view controllers in play:
A split view controller that contains all the elements
A navigation controller to handle what’s happening on the left side of the split
A master view controller (displaying a master list of items) inside the navigation controller
A detail view controller on the right
Another navigation controller as a container for the detail view controller on the right
In the default master-detail application template that we used, these view controllers are set up and interconnected in the main storyboard file, rather than in code. Apart from doing GUI layout, Interface Builder functions as a way of letting you connect different components without writing a bunch of code establishing relationships. Let’s look at the project’s storyboard to see how things are set up.
Select Main.storyboard to open it in Interface Builder. This storyboard really has a lot of stuff going on. You’ll definitely want to open the Document Outline for the best results, as shown in Figure 11-6. Zooming out can also help you see the big picture .

Figure 11-6. Main.storyboard open in Interface Builder . This complex object hierarchy can be best viewed using the Document Outline on the left
To get a better sense of how these controllers relate to one another, open the Connections Inspector, and then spend some time clicking each of the view controllers in turn. Here’s a quick summary of what you’ll find:
The UISplitViewController has relationship segues called master view controller and detail view controller to two UINavigationControllers . These are used to tell the UISplitViewController what it should use for the narrow strip it displays on the left (the master view controller) and for the larger display area (the detail view controller).
The UINavigationController linked via the master view controller segue has a root view controller relationship to its own root view controller, which is the MasterViewController class generated by the template. The master view controller is a subclass of UITableViewController, which you should be familiar with from Chapter 9.
Similarly, the other UINavigationController has a root view controller relationshipto the detail view controller, which is the template’s DetailVIewController class. The detail view controller generated by the template is a plain UIViewController subclass, but you are at liberty to use any view controller that meets your application’s requirements.
There is a storyboard segue from the cells in the master view controller to the detail view controller, of type showDetail. This segue causes the item in the clicked cell to be shown in the detail view. More about this later when we take a more detailed look at the master view controller.
At this point, the content of Main.storyboard provides a definition of how the app’s various controllers are interconnected. As in most cases where you’re using storyboards, this eliminates a lot of code, which is usually a good thing.
The Code Defines the Functionality
One of the main reasons for keeping the view controller interconnections in a storyboard is that they don’t clutter up your source code with configuration information that doesn’t need to be there. What’s left is just the code that defines the actual functionality. Let’s look at what we have as a starting point. Xcode defined several classes for us when the project was created. We’re going to peek into each of them before we start making any changes.
The App Delegate
F irst up is AppDelegate.swift, the application delegate. Its source file starts something like Listing 11-1.
Listing 11-1. AppDelegate.swift
import UIKit@UIApplicationMainclass AppDelegate: UIResponder, UIApplicationDelegate, UISplitViewControllerDelegate {var window: UIWindow?func application(_ application: UIApplication, didFinishLaunchingWithOptions launchOptions: [NSObject: AnyObject]?) -> Bool {// Override point for customization after application launch.let splitViewController = self.window!.rootViewController as! UISplitViewControllerlet navigationController = splitViewController.viewControllers[splitViewController.viewControllers.count-1] as! UINavigationControllernavigationController.topViewController!.navigationItem.leftBarButtonItem = splitViewController.displayModeButtonItem()splitViewController.delegate = selfreturn true}
Let’s look at the last part of this code first:
splitViewController.delegate = self; This line sets the UISplitViewController’s delegate property , pointing it at the application delegate itself. But why make this connection here in code, instead of having it hooked up directly in the storyboard? After all, just a few paragraphs ago, you were told that elimination of boring code—“connect this thing to that thing”—is one of the main benefits of both XIBs and storyboards. And we’ve hooked up delegates in Interface Builder plenty of times, so why can’t we do that here?
To understand why using a storyboard to make the connections can’t really work here, you need to consider how a storyboard differs from a XIB file . A XIB file is really a frozen object graph. When you load a XIB into a running application, the objects it contains all “thaw out” and spring into existence, including all the interconnections specified in the file. The system creates a fresh instance of every single object in the file, one after another, and connects all the outlets and connections between objects. A storyboard, however, is something more than that. You could say that each scene in a storyboard corresponds roughly to a XIB file. When you add in the metadata describing how the scenes are connected via segues, you end up with a storyboard. However, unlike a single XIB, a complex storyboard is not normally loaded all at once. Instead, any activity that causes a new scene to be activated will end up loading that particular scene’s frozen object graph from the storyboard. This means that the objects you see when looking at a storyboard won’t necessarily all exist at the same time.
Since Interface Builder has no way of knowing which scenes will coexist, it actually forbids you from making any outlet or target/action connections from an object in one scene to an object in another scene. In fact, segues are the only connection that it allows you to make from one scene to another.
You can try this for yourself. First, select the Split View Controller in the storyboard (you’ll find it within the dock in the Split View Controller Scene). Now bring up the Connections Inspector and try to drag a connection from the delegate outlet to another view controller or object. You can drag all over the layout view and the list view, and you won’t find any spot that highlights (which would indicate it was ready to accept a drag). The only way to make this connection is in code. All in all, this extra bit of code is a small price to pay, considering how much other code is eliminated by our use of storyboards.
Now let’s rewind and look at what happens at the start of the application(_:didFinishLaunchingWithOptions:) method:
let splitViewController = self.window!.rootViewController as! UISplitViewControllerThis grabs the window’s rootViewController, which is the one indicated in the storyboard by the free-floating arrow. If you look back at Figure 11-6, you’ll see that the arrow points at our UISplitViewController instance. This code comes next:
let navigationController = splitViewController.viewControllers[splitViewController.viewControllers.count-1] as! UINavigationControllerOn this line, we dig into the UISplitViewController’s viewControllers array. When the split view is loaded from the storyboard, this array has references to the navigation controllers , wrapping the master and detail view controllers. We grab the last item in this array, which points to the UINavigationController for our detail view. Finally, we see this:
navigationController.topViewController!.navigationItem.leftBarButtonItem =splitViewController.displayModeButtonItem()
This assigns the displayModeButtonItemof the split view controller to the navigation bar of the detail view controller. The displayModeButtonItemis a bar button item that is created and managed by the split view itself. This code is actually adding the Master button that you can see on the navigation bar on the left in Figure 11-4. On the iPad, the split view shows this button when the device is in portrait mode and the master view controller is not visible. When the device rotates to landscape orientation or the user presses the button to make the master view controller visible, the button is hidden.
The Master View Controller
Now, let’s take a look at MasterViewController, which controls the setup of the table view containing the app’s navigation. Listing 11-2 shows the code from the top of the file MasterViewController.swift.
Listing 11-2. MasterViewController.swift
import UIKitclass MasterViewController: UITableViewController {var detailViewController: DetailViewController? = nilvar objects = [AnyObject]()override func viewDidLoad() {super.viewDidLoad()// Do any additional setup after loading the view, typically from a nib.self.navigationItem.leftBarButtonItem = self.editButtonItem()let addButton = UIBarButtonItem(barButtonSystemItem: .add, target: self, action: #selector(insertNewObject(_:)))self.navigationItem.rightBarButtonItem = addButtonif let split = self.splitViewController {let controllers = split.viewControllersself.detailViewController = (controllers[controllers.count-1] as! UINavigationController).topViewController as? DetailViewController}}
The main point of interest here is the viewDidLoad() method. In previous chapters, when you implemented a table view controller that responded to a user row selection, you typically created a new view controller and pushed it onto the navigation controller’s stack. In this app, however, the view controller we want to show is already in place and it will be reused each time the user makes a selection on the left. It’s the instance of DetailViewController contained in the storyboard file. Here, we’re grabbing that DetailViewController instance and saving it in a property, anticipating that we’ll want to use it later, although, this property is not used in the rest of the template code.
The viewDidLoad() method also adds a button to the toolbar. This is the + button that you can see on the right of master view controller’s navigation bar in Figure 11-4 and Figure 11-5. The template application uses this button to create and add a new entry to the master view controller’s table view. Since we don’t need this button in our Presidents application, we’ll be removing this code shortly.
There are several more methods included in the template for this class, but don’t worry about those right now. We’re going to delete some of those and rewrite the others, but only after taking a look at the detail view controller.
The Detail View Controller
The final class created for us by Xcode is DetailViewController, which takes care of the actual display of the item the user chooses from the table in the master view controller. Here’s what you’ll find in DetailViewController.swift, as shown in Listing 11-3.
Listing 11-3. DetailViewController.swift
import UIKitclass DetailViewController: UIViewController {@IBOutlet weak var detailDescriptionLabel: UILabel!func configureView() {// Update the user interface for the detail item.if let detail = self.detailItem {if let label = self.detailDescriptionLabel {label.text = detail.description}}}override func viewDidLoad() {super.viewDidLoad()// Do any additional setup after loading the view, typically from a nib.self.configureView()}override func didReceiveMemoryWarning() {super.didReceiveMemoryWarning()// Dispose of any resources that can be recreated.}var detailItem: NSDate? {didSet {// Update the view.self.configureView()}}}
The detailDescriptionLabel property is an outlet that connects to a label in the storyboard. In the template application, the label simply displays a description of the object in the detailItem property. The detailItem property itself is where the view controller stores its reference to the object that the user selected in the master view controller. Its property observer (the code in the didSet block), which is called after its value has been changed, calls configureView(), another method that’s generated for us. All it does is call the description method of the detail object and then uses the result to set the text property of the label in the storyboard:
func configureView() {// Update the user interface for the detail item.if let detail = self.detailItem {if let label = self.detailDescriptionLabel {label.text = detail.description}}}
The description method is implemented by every subclass of NSObject. If your class doesn’t override it, it returns a default value that’s probably not very useful. However, in the template code, the detail objects are all instances of the NSDate, class and NSDate’s implementation of the description method returns the date and time, formatted in a generic way.
How the Master-Detail Template Application Works
Now you’ve seen all of the pieces of the template application, but you’re probably still not very clear on how it works, so let’s run it and take a look at what it actually does. Run the application on an iPad simulator and rotate the device to landscape mode so that the master view controller appears. You can see that the label in the detail view controller currently has the default text that’s assigned to it in the storyboard. What we’re going to see in this section is how the act of selecting an item in the master view controller causes that text to change. There currently aren’t any items in the master view controller. To fix that, press the + button at the top right of its navigation bar a few times. Every time you do that, a new item is added to the controller’s table view, as shown in Figure 11-7.

Figure 11-7. The template application with an item selected in the master view controller and displayed in the detail view controller
All of the items in the master view controller table are dates. Select one of them, and the label in the detail view updates to show the same date. You’ve already seen the code that does this—it’s the configureView method in DetailViewController.swift, which is called when a new value is stored in the detail view controller’s detailItem property . What is it that causes a new value of the detailItem property to be set? Take a look back at the storyboard in Figure 11-6. There’s a segue that links the prototype table cell in the master view controller’s table cell to the detail view controller. If you click this segue and open the Attributes Inspector, you’ll see that this is a Show Detail segue with the identifier showDetail, as shown in Figure 11-8.

Figure 11-8. The Show Detail segue linking the master and detail view controllers
As you saw in Chapter 9, a segue that’s linked to a table view cell is triggered when that cell is selected, so when you select a row in the master view controller’s table view, iOS performs the Show Detail segue , with the navigation controller wrapping the detail view controller as the segue destination. This causes two things to happen:
A new instance of the detail view controller is created and its view is added to the view hierarchy.
The prepareForSegue(_:sender:) method in the master view controller is called.
The first step takes care of making sure the detail view controller is visible. In the second step, your master view controller needs to display the object selected in the master view controller in some way. Here’s how the template code in MasterViewController.swift handles this, as shown in Listing 11-4.
Listing 11-4. The MasterViewcontroller.swift File’s prepare ( forSegue: )
// MARK: - Seguesoverride func prepare(for segue: UIStoryboardSegue, sender: AnyObject?) {if segue.identifier == "showDetail" {if let indexPath = self.tableView.indexPathForSelectedRow {let object = objects[indexPath.row] as! NSDatelet controller = (segue.destinationViewController as! UINavigationController).topViewController as! DetailViewControllercontroller.detailItem = objectcontroller.navigationItem.leftBarButtonItem = self.splitViewController?.displayModeButtonItem()controller.navigationItem.leftItemsSupplementBackButton = true}}}
First, the segue identifier is checked to make sure that it’s the one that is expected and that the NSDate object from the selected object in the view controller’s table is obtained. Next, the master view controller finds the DetailViewController instance from the topViewController property of the destination view controller in the segue that caused this method to be called. Now that we have both the selected object and the detail view controller, all we have to do is set the detail view controller’s detailItem property to cause the detail view to be updated. The final two lines of the prepare( forSegue: ) method add the display mode button to the detail view controller’s navigation bar . When the device is in landscape mode, this doesn’t do anything because the display mode button isn’t visible, but if you rotate to portrait orientation, you’ll see that the button (it’s the Master button) appears.
So now you know how the selected item in the master view controller gets displayed in the detail view controller. Although it doesn’t look like much is going on here, in fact there is a great deal happening under the hood to make this work correctly on both the iPad and the iPhone, in portrait and landscape orientations. The beauty of the split view controller is that it takes care of all the details and leaves you free to worry about how to implement your custom master and detail view controllers.
That concludes the overview of what the Xcode Master-Detail Application template provides. It might be a lot to understand at first, but, ideally, presenting it one piece at a time has helped you understand how all the pieces fit together.
Adding the President Data
Now that you’ve seen the basic layout of our project, it’s time to fill in the blanks and turn the template app into something all your own. Start by looking in the book’s source code archive, where the folder 11 – Presidents Data contains a file called PresidentList.plist . Drag that file into your project’s Presidents folder in Xcode to add it to the project, making sure that the check box telling Xcode to copy the file itself is checked. This file contains information about all the US presidents so far, consisting of just the name and the Wikipedia entry URL for each of them.
Now, let’s look at the master view controller and see how we need to modify it to handle the presidential data properly. It’s going to be a simple matter of loading the list of presidents, presenting them in the table view, and passing a URL to the detail view for display. In MasterViewController.swift , start off by adding the bold line shown here at the top of the class and removing the crossed-out line:
class MasterViewController: UITableViewController {var detailViewController: DetailViewController? = nilvar objects = [AnyObject]()var presidents: [[String: String]]!
Now look at the viewDidLoad() method , where the changes are a little more involved (but still not too bad). You’re going to add a few lines to load the list of presidents, and then remove a few other lines that set up edit and insertion buttons in the toolbar, as shown in Listing 11-5.
Listing 11-5. The MasterViewController.swift viewDidLoad Method
override func viewDidLoad() {super.viewDidLoad()// Do any additional setup after loading the view, typically from a nib.let path = Bundle.main.path(forResource: "PresidentList", ofType: "plist")let presidentInfo = NSDictionary(contentsOfFile: path)!presidents = presidentInfo["presidents"]! as! [[String: String]]if let split = self.splitViewController {let controllers = split.viewControllersself.detailViewController = (controllers[controllers.count-1] as! UINavigationController).topViewController as? DetailViewController}}
This code may be a little confusing at first:
let path = Bundle.main.path(forResource:"PresidentList", ofType: "plist")!let presidentInfo = NSDictionary(contentsOfFile: path)!presidents = presidentInfo["presidents"]! as! [[String: String]]
The Bundle.main pathForResource(_:ofType:) method gets the path to the PresidentList.plist file, the content of which is then loaded into an NSDictionary. This dictionary has one entry, with key “presidents”. The value of that entry is an array, which has one NSDictionary for each president; that dictionary contains key-value pairs, where both the key and value are strings. We cast the array to the correct Swift type, [[String: String]], and assign it to the presidents variable.
This template-generated class also includes a method called insertNewObject() for adding items to the objects array. We don’t even have that array anymore, so delete the entire method.
Also, we have a couple of data source methods that deal with letting users edit rows in the table view. We’re not going to allow any editing of rows in this app, so let’s just remove the canEditRowAt and commit editingStyle: methods.
Now it’s time to get to the main table view data source methods, adapting them for our purposes. Let’s start by editing the method that tells the table view how many rows to display:
override func tableView(_ tableView: UITableView, numberOfRowsInSection section: Int) -> Int {return presidents.count}
After that, edit the tableView(_:cellForRowAtIndexPath:) method to make each cell display a president’s name:
override func tableView(_ tableView: UITableView, cellForRowAt indexPath: IndexPath) -> UITableViewCell {let cell = tableView.dequeueReusableCell(withIdentifier: "Cell", for: indexPath)let president = presidents[indexPath.row]cell.textLabel!.text = president["name"]return cell}
Finally, edit the prepareForSegue(_:sender: )method to pass the data for the selected president (which, as described earlier, is a dictionary of type [String: String]) to the detail view controller, as in Listing 11-6.
Listing 11-6. The prepare (forSegue: ) Method
// MARK: - Seguesoverride func prepare(for segue: UIStoryboardSegue, sender: AnyObject?) {if segue.identifier == "showDetail" {if let indexPath = self.tableView.indexPathForSelectedRow {let object = presidents[indexPath.row]let controller = (segue.destinationViewControlleras! UINavigationController).topViewController as! DetailViewControllercontroller.detailItem = objectcontroller.navigationItem.leftBarButtonItem =self.splitViewController?.displayModeButtonItem()controller.navigationItem.leftItemsSupplementBackButton = true}}}
Note
If your template for the DetailViewController.swift file’s detailItem method had the value NSDate or similar, you should change it to ‘AnyObject?’ to remove potential errors.
That’s all we need to do in the master view controller.
Next, select Main.storyboard and click the Master icon in the Master Scene in the Document Outline to select the master view controller (it’s the one on the right of the top row of the storyboard), and then double-click its title bar and replace Master with Presidents, and save the storyboard.
At this point, you can build and run the app. Switch to landscape mode to bring up the master view controller, showing a list of presidents, as in Figure 11-9. Tap a president’s name to display a not-very-useful string in the detail view.

Figure 11-9. Our first run of the app, showing a list of presidents in the master view controller, but nothing in the detail view
Let’s finish this example by making the detail view do something a little more useful with the data that it’s given. Add the following line shown in bold t o DetailViewContoller.swift to create an outlet for a web view to display the Wikipedia page for the selected president:
class DetailViewController: UIViewController {@IBOutlet weak var detailDescriptionLabel: UILabel!@IBOutlet weak var webView: UIWebView!
Next, scroll down to the configureView() method and replace it with the code in Listing 11-7.
Listing 11-7. The configureView Method
func configureView() {// Update the user interface for the detail item.if let detail = self.detailItem {if let label = self.detailDescriptionLabel {let dict = detail as! [String: String]let urlString = dict["url"]!label.text = urlStringlet url = NSURL(string: urlString)!let request = URLRequest(url: url as URL)webView.loadRequest(request)let name = dict["name"]!title = name}}}
The detailItem that was set by the master view controller is a dictionary containing two key-value pairs: one with a key name that stores the president’s name and another with a key url that gives the URL of the president’s Wikipedia page. We use the URL to set the text of the detail description label and to construct an URLRequest that the UIWebView will use to load the page. We use the name to set the detail view controller’s title. When a view controller is a container in a UINavigationController, the value in its title property is displayed in the navigation controller’s navigation bar. That’s all we need to get our web view to load the requested page.
The final changes we need to make are in Main.storyboard. Open it for editing and find the detail view at the lower right. Let’s first take care of the label in the GUI (the text of which reads, “Detail view content goes here”). Start by selecting the label. You might find it easiest to select the label in the Document Outline, in the section labeled Detail Scene. Once the label is selected, drag it to the top of the window. The label should run from the left-to-right blue guideline and fit snugly under the navigation bar (resize it to make sure that is the case). This label is being repurposed to show the current URL. But when the application launches, before the user has chosen a president, we want this field to give the user a hint about what to do.
Double-click the label and change its text to Select a President. You should also use the Size Inspector to make sure that the label’s position is constrained to both the left and right sides of its superview, as well as the top edge, as shown in Figure 11-10. If you need to a djust these constraints, use the methods described earlier to set them up. You can probably get almost exactly what you want by selecting the label and then choosing Editor ➤ Resolve Auto Layout Issues ➤ Reset to Suggested Constraints from the menu.

Figure 11-10. The Size Inspector, showing the constraints settings for the “Select a President” label
Next, find a UIWebView in the Object Library and drag it into the space below the label you just moved. After dropping the web view there, use the resize handles to make it fill the rest of the view below the label. Make it go from the left edge to the right edge, and from the blue guideline just below the bottom of the label all the way to the very bottom of the window. Now use the Size Inspector to constrain the web view to the left, bottom, and right edges of the superview, as well as to the label for the top edge. Once again, you can probably get exactly what you need by selecting Editor ➤ Resolve Auto Layout Issues ➤ Reset to Suggested Constraints from the menu.
Now select the Master view controller in the Document Outline and open the Attributes Inspector. In the View Controller section, change the Title from Master to Presidents. This changes the title of the navigation button at the top of the detail view controller to something more useful.
We have one last step to complete. To hook up the outlet for the web view that you created, Control-drag from the Detail icon (the one immediately below the Detail Scene icon in the Document Outline) to our new Web View (same section, just below the label in the Document Outline, or in the storyboard), and connect the webView outlet. Save your changes.
Now you can build and run the app. It will let you see the Wikipedia entries for each of the presidents, as shown in Figure 11-11. Rot ate the display between the two orientations. You’ll see how the split view controller takes care of everything for you, with a little help from the detail view controller.
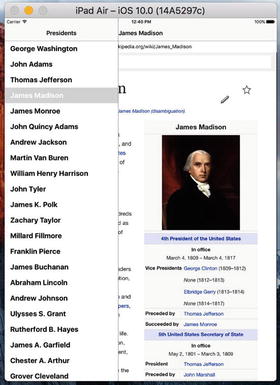
Figure 11-11. The Presidents application, showing the Wikipedia page for James Madison
Creating Your Own Popover
Back in Chapter 4, we saw that we can display an action sheet in what looks like a cartoon speech bubble (see Figure 4-29). That speech bubble is the visual representation of a popover controller, or popover for short. The popover that you get with an action sheet is created for you when the action sheet is presented by a UIPopoverPresentationController. It turns out that you can use the same controller to create popovers of your own.
To see how this works, we’re going to add a popover that will be activated by a permanent toolbar item (unlike the one in the UISplitView, which is meant to come and go). This popover will display a table view containing a list of languages. If the user picks a language from the list, the web view will load whatever Wikipedia entry that was already showing, in the new language. This is simple enough to do, since switching from one language to another in Wikipedia is just a matter of changing a small piece of the URL that contains an embedded country code. Figure 11-3 shows what we are aiming for.
Note
In this example, we’re using a UIPopoverPresentationControllerto display a table view controller, but don’t let that mislead you—it can be used to handle the display of any view controller content you like. We’re sticking with table views for this example because it’s a common use case, it’s easy to show in a relatively small amount of code, and it’s something with which you should already be quite familiar.
Start by right-clicking the Presidents folder in Xcode and selecting New File… from the pop-up menu. When the assistant appears, select Cocoa Touch Class from the iOS Source section, and then click Next. On the next screen, name the new class LanguageListControllerand select UITableViewControllerfrom the Subclass of field. Click Next, double-check the location where you’re saving the file, and click Create.
The LanguageListController will be a pretty standard table view controller class. It will display a list of items and let the detail view controller know when a choice is made, by using a pointer back to the detail view controller. Edit LanguageListController.swift, adding the three lines shown below the class name:
class LanguageListController: UITableViewController {weak var detailViewController: DetailViewController? = nilprivate let languageNames: [String] = ["English", "French", "German", "Spanish"]private let languageCodes: [String] = ["en", "fr", "de", "es"]
These additions define a pointer back to the detail view controller (which we’ll set from code in the detail view controller itself when we’re about to display the language list), as well as a pair of arrays containing the values that will be displayed (English, French, etc.) and the underlying values that will be used to build an URL from the chosen language (en, fr, and so on).
If you copied and pasted this code from the book’s source archive (or e-book) into your own project or typed it yourself a little sloppily, you may not have noticed an important difference in how the detailViewController property was declared earlier. Unlike most properties that reference an object pointer, we declared this one using weak instead of strong. This is something that we must do to avoid a retain cycle.
What’s a retain cycle ? It’s a situation where a set of two or more objects have references to each other, in a circular fashion. Each object is keeping the memory of the other object from being freed. Most potential retain cycles can be avoided by carefully considering the creation of your objects, often by trying to figure out which object “owns” which. In this sense, an instance of DetailViewController owns an instance of LanguageListController because it’s the DetailViewController that actually creates the LanguageListControllerto get a piece of work done. Whenever you have a pair of objects that need to refer to one another, you’ll usually want the owner object to retain the other object, while the other object should specifically not retain its owner. Since we’re using the ARC feature that Apple introduced way back in Xcode 4.2, the compiler does most of the work for us. Instead of paying attention to the details about releasing and retaining objects, all we need to do is declare a property that refers to an object that we do not own with the weak keyword instead of strong. ARC does the rest.
Next, scroll down a bit t o the viewDidLoad() method and add this setup code:
override func viewDidLoad() {super.viewDidLoad()clearsSelectionOnViewWillAppear = falsepreferredContentSize = CGSize(width: 320, height: (languageCodes.count * 44))tableView.register(UITableViewCell.self, forCellReuseIdentifier: "Cell")}
Here, we define the size that the view controller’s view will use if shown in a popover (which, as we know, it will be). Without defining the size, we would end up with a popover stretching vertically to fill nearly the whole screen, even if it can be displayed in full with a much smaller view. And finally, we register a default table view cell class to use, as explained in Chapter 8.
Further down, we have a few methods generated by Xcode’s template that don’t contain particularly useful code—just a warning and some placeholder text. Let’s replace those with something real:
override func numberOfSections(in tableView: UITableView) -> Int {return 1}override func tableView(_ tableView: UITableView, numberOfRowsInSection section: Int) -> Int {return languageCodes.count}
Now implement the tableView(_:cellForRow atIndexPath:) method to get a cell object and put a language name into a cell, as shown in Listing 11-8.
Listing 11-8. Getting Our Cell for the Table View
override func tableView(_ tableView: UITableView, cellForRowAt indexPath: IndexPath) -> UITableViewCell {let cell = tableView.dequeueReusableCell(withIdentifier: "Cell", for: indexPath)// Configure the cell...cell.textLabel!.text = languageNames[indexPath.row]return cell}
Next, implement tableView(_:didSelectRowAtIndexPath:) so that you can respond to a user’s touch by passing the language selection back to the detail view controller and dismissing the presented LanguageListController by calling its dismissViewControllerAnimated(_:completion:) method :
override func tableView(_ tableView: UITableView, didSelectRowAt indexPath: IndexPath) {detailViewController?.languageString = languageCodes[indexPath.row]dismiss(animated: true, completion: nil)}
Note
DetailViewController doesn’t actually have a languageString property yet, so you will see a compiler error. We’ll take care of that in just a bit.
Now it’s time to make the changes required for DetailViewController to display the popover, as well as to generate the correct URL whenever the user either changes the display language or picks a different president. Start by adding the following three lines of code in DetailViewController.swift below the UIWebView declaration .
private var languageListController: LanguageListController?private var languageButton: UIBarButtonItem?var languageString = ""
We added some properties to keep track of the GUI components required for the popover and the user’s selected language. All that we need to do now is fix DetailViewController.swift so that it can handle the language popover and the URL construction.
Start by adding a function that takes as arguments a URL pointing to a Wikipedia page and a two-letter language code, and then returns a URL that combines the two. We’ll use this at appropriate spots in our controller code later, as shown in Listing 11-9.
Listing 11-9. Function to Get Our Language-Specific URL
private func modifyUrlForLanguage(url: String, language lang: String?) -> String {var newUrl = url// We're relying on a particular Wikipedia URL format here. This// is a bit fragile!if let langStr = lang {// URL is like https://en.wikipedia...let range = NSMakeRange(8, 2)if !langStr.isEmpty && (url as NSString).substring(with: range) != langStr {newUrl = (url as NSString).replacingCharacters(in: range,with: langStr)}}return newUrl}
Our next move is to update the configureView() method . This method will use the function we just defined to combine the URL that’s passed in with the chosen languageStringto generate the correct URL, as shown in Listing 11-10.
Listing 11-10. Update configureView Method for the Language-Specific URL
func configureView() {// Update the user interface for the detail item.if let detail = self.detailItem {if let label = self.detailDescriptionLabel {let dict = detail as! [String: String]// let urlString = dict["url"]!let urlString = modifyUrlForLanguage(url: dict["url"]!, language: languageString)label.text = urlStringlet url = URL(string: urlString)!let request = URLRequest(url: url )webView.loadRequest(request)let name = dict["name"]!title = name}}}
Now let’s update the viewDidLoad() method . Here, we’re going to create a UIBarButtonItem and put it into the UINavigationItem at the top of the screen. The button will call the controller’s showLanguagePopover() method , which we’ll implement shortly, when it is clicked, as shown in Listing 11-11.
Listing 11-11. The Modified viewDidLoad Method
override func viewDidLoad() {super.viewDidLoad()// Do any additional setup after loading the view, typically from a nib.self.configureView()languageButton = UIBarButtonItem(title: "Choose Language", style: .plain,target: self, action:#selector(DetailViewController.showLanguagePopover))navigationItem.rightBarButtonItem = languageButton}
Next, we implement a property observer for the languageString property, which is called when the value of the property is changed. The property observer calls configureView()so that the URL is regenerated to include the selected language and the new page loaded:
var languageString = "" {didSet {if languageString != oldValue {configureView()}}}
Now, let’s implement the method that’s called when the user taps the Choose Language button. Simply put, we display the LanguageListController, creating it the first time we do so. Then, we get its popover presentation controller and set the properties that control where the popover will appear. Place this method after the viewDidLoad() method, as shown in Listing 11-12.
Listing 11-12. The showLanguagePopover Method
func showLanguagePopover() {if languageListController == nil {// Lazy creation when used for the first timelanguageListController = LanguageListController()languageListController!.detailViewController = selflanguageListController!.modalPresentationStyle = .popover}present(languageListController!, animated: true, completion: nil)if let ppc = languageListController?.popoverPresentationController {ppc.barButtonItem = languageButton}}
In the first part of this method, we check whether we have already created the LanguageListController. If we haven’t, we create an instance and then set its detailViewController property to point to ourselves. We also set its modalPresentationStyle property to .popover. This property determines how the controller is displayed when it is modally presented. There are several possible values, which you can read about on the documentation page for the UIViewController class. Not surprisingly, the value .popover is the one you need to use if you want the controller to be presented in a popover.
Next, we use the presentViewController(_:animated:completion:) method to make the LanguageListController visible, just as we did when displaying an alert back in Chapter 4. Calling this method does not make the controller visible immediately—UIKit does that when it’s finished processing the button click event—but it does create the UIPopoverPresentationControllerthat will manage the controller’s popover. Before the popover appears, we need to tell UIKit where it should appear. In Chapter 4, we used this technique to place a popover near a specific view by setting its UIPopoverPresentationController’s sourceRect and sourceView properties. In this example, we want the popover to appear near the language button and we can do that by assigning a reference to that button to the controller’s barButtonItem property.
Now run the example on the iPad simulator and press the Choose Language button. You’ll find that the language list controller is displayed in a popover, as shown in Figure 11-12. You should be able to use the language pop-up to select any of the four available languages and watch the web view update to show the version of the President’s page for that language.
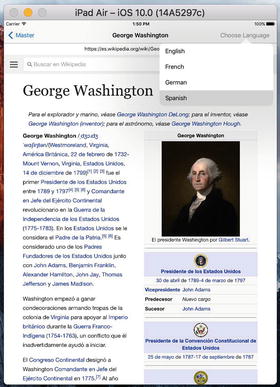
Figure 11-12. Choosing to load a page in a different language
Switching from one language to another should always leave the chosen president intact. Likewise, switching from one president to another should leave the language intact—but actually, it doesn’t. Try this: choose a president, change the language to (say) Spanish, and then choose another president. Unfortunately, the language is no longer Spanish.
Why did this happen? The Show Detail segue creates a new instance of the detail view controller every time it’s called. That means that the language setting , which is stored as a property of the detail view controller, is going to be lost each time a new president is selected. To fix it, we need to add a few lines of code in the master view controller. Open MasterViewController.swift and make the changes in Listing 11-13 to the prepareForSegue method .
Listing 11-13. Updated prepareForSegue Method
override func prepare(for segue: UIStoryboardSegue, sender: AnyObject?) {if segue.identifier == "showDetail" {if let indexPath = self.tableView.indexPathForSelectedRow {let object = presidents[indexPath.row]let controller = (segue.destinationViewController as!UINavigationController).topViewController as! DetailViewControllerif let oldController = detailViewController {controller.languageString = oldController.languageString}controller.detailItem = objectcontroller.navigationItem.leftBarButtonItem =self.splitViewController?.displayModeButtonItem()controller.navigationItem.leftItemsSupplementBackButton = truedetailViewController = controller}}}
Summary
In this chapter, you learned about the split view controller and its role in the creation of Master-Detail applications. You also saw that a complex application with several interconnected view controllers can be configured entirely within Interface Builder. Although split views are now available on all devices, they are probably still most useful in the larger screen space of the iPhone 6/6s Plus and the iPad.