Creating Content Using Archetypes
When you created content/_index.md, you created the file manually. You can tell Hugo to create content pages that contain placeholder content. This way, you never have to start with a blank slate when creating content. Hugo uses archetypes to define this default content.
The file archetypes/default.md—which was generated when you ran the hugo new site command—contains the following code:
| | --- |
| | title: "{{ replace .Name "-" " " | title }}" |
| | date: {{ .Date }} |
| | draft: true |
| | --- |
This is a Markdown file with YAML front matter and a little bit of templating code that will generate the title from the filename you specify, and fill in the date the file is generated. Hugo uses the front matter of each file when it generates pages. You’ll dig into front matter a lot more in Populating Page Content Using Data in Front Matter. Front matter isn’t required in either content pages or archetypes, but you’ll find it useful in many places as you build out your site. In this case, there’s a draft field set to true. When Hugo generates pages, it will skip pages marked as drafts.
The hugo new command uses this file as a template to create a new Markdown file. Try it out. Create a new “About” page with this command:
| | $ hugo new about.md |
| | /Users/brianhogan/portfolio/content/about.md created |
This generates the file content/about.md. Open the file in your editor, and you’ll see this code:
| | --- |
| | title: "About" |
| | date: 2020-01-01T12:40:44-05:00 |
| | draft: true |
| | --- |
The title is filled in, and the front matter also includes the date and time the file was created. It also has a draft status of true. Modify the draft status to false or remove the line entirely so that Hugo will generate this page. Then, below the front matter, add some additional content. When you’re done, your file will look like this:
| | --- |
| | title: "About" |
| | date: 2020-01-01T12:40:44-05:00 |
| | draft: false |
| | --- |
| | |
| | This is my About page. |
In order for Hugo to generate this page, you need another layout file. Remember that the layout you created, index.html, is only for the home page of the site. The “About” page you just created is an example of what Hugo calls a “single” page. As such, you need a “single page” layout to display it.
You can create different single page layouts for each content type. These get stored in subdirectories of the layouts directory. You’re not going to do anything that complex yet. To create a default single page layout that every content page will use, store it in the layouts/_default directory. Create that directory now, either in your text editor or on the command line like this:
| | $ mkdir layouts/_default/ |
Now, create the file layouts/_default/single.html by copying the existing layouts/index.html file. Again, you can do this in your editor or the CLI:
| | $ cp layouts/index.html layouts/_default/single.html |
Let’s make a slight modification to this file; you’ll have it display the page title in addition to the content. Open the single.html file in your editor and add the title like this:
| | <body> |
| | |
| | <h1>{{ .Site.Title}}</h1> |
| | |
| » | <h2>{{ .Title }}</h2> |
| | |
| | {{ .Content }} |
| | |
| | </body> |
Save the file and exit the editor. Then, start up the development server again:
| | $ hugo server |
Visit http://localhost:1313/about and you’ll see your new page:
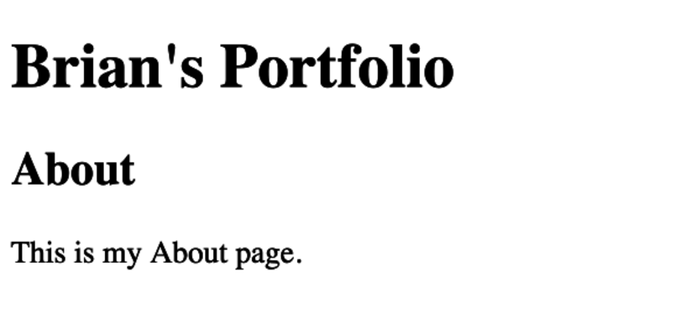
The site title, page title, and page content are all visible. The page title comes from the about.md file’s front matter, while the site title comes from the config.toml file. This is a small example of how you can use data from various locations to build your pages.
Stop the Hugo server with CTRL+C. Let’s explore what Hugo creates for you and look at a few options to control it.