Understand the fundamentals of a particle, a particle emitter, and a particle system
Appreciate that many interesting physical effects can be modeled based on a collection of dedicated particles
Approximate the basic behavior of a particle such that the rendition of a collection of these particles resemble a simple explosion-like effect
Implement a straightforward particle system that is integrated with the RigidShape system of the physics component
Introduction
So far in your game engine, it is assumed that the game world can be described by a collection of geometries where all objects are Renderable instances with texture, or animated sprite, and potentially illuminated by light sources. This game engine is powerful and capable of describing a significant portion of objects in the real world. However, it is also true that it can be challenging for your game engine to describe many everyday encounters, for example, sparks, fire, explosions, dirt, dust, etc. Many of these observations are transient effects resulting from matters changing physical states or a collection of very small-size entities reacting to physical disturbances. Collectively, these observations are often referred to as special effects and in general do not lend themselves well to being represented by fixed-shape geometries with textures.
Particle systems describe special effects by emitting a collection of particles with properties that may include position, size, color, lifetime, and strategically selected texture maps. These particles are defined with specific behaviors where once emitted, their properties are updated to simulate a physical effect. For example, a fire particle may be emitted to move in an upward direction with reddish color. As time progresses, the particle may decrease in size, slow the upward motion, change its color toward yellow, and eventually disappear after certain number of updates. With strategically designed update functions, the rendition of a collection of such particles can resemble a fire burning.
In this chapter, you will study, design, and create a simple and flexible particle system that includes the basic functionality required to achieve common effects, such as explosions and magical spell effects. Additionally, you will implement a particle shader to properly integrate your particles within your scenes. The particles will collide and interact accordingly with the RigidShape objects. You will also discover the need for and define particle emitters to generate particles over a period of time such as a campfire or torch.
The main goal of this chapter is to understand the fundamentals of a particle system: attributes and behaviors of simple particles, details of a particle emitter, and the integration with the rest of the game engine. This chapter does not lead you to create any specific types of special effects. This is analogous to learning an illumination model in Chapter 8 without the details of creating any lighting effects. The manipulation of light source parameters and material properties to create engaging lighting conditions and the modeling of particle behaviors that resemble specific physical effects are the responsibilities of the game developers. The basic responsibility of the game engine is to define sufficient fundamental functionality to ensure that the game developers can accomplish their job.
Particles and Particle Systems
A particle is a textured position without dimensions. This description may seem contradictory because you have learned that a texture is an image and images are always defined by a width and height and will definitely occupy an area. The important clarification is that the game engine logic processes a particle as a position with no area, while the drawing system displays the particle as a texture with proper dimensions. In this way, even though an actual displayed area is shown, the width and height dimensions of the texture are ignored by the underlying logic.
In addition to a position, a particle also has properties such as size (for scaling the texture), color (for tinting the texture), and life span. Similar to a typical game object, each particle is defined with behaviors that modify its properties during each update. It is the responsibility of this update function to ensure that the rendition of a collection of particles resembles a familiar physical effect. A particle system is the entity that controls the spawning, updating, and removal of each individual particle. In your game engine, particle systems will be defined as a separate component, just like the physics component.
In the following project, you will first learn about the support required for drawing a particle object. After that, you will examine the details of how to create an actual particle object and define its behaviors. A particle is a new type of object for your game engine and requires the support of the entire drawing system, including custom GLSL shaders, default sharable shader instance, and a new Renderable pair.
The Particles Project
Running the Particles project
Q key: To spawn particles at the current mouse position
E key: To toggle the drawing of particle bounds
To understand the details of how to draw a particle and define its behavior
To implement a simple particle system
minion_sprite.png defines the sprite elements for the hero and the minions.
platform.png defines the platforms, floor, and ceiling tiles.
wall.png defines the walls.
target.png identifies the currently selected object.
Supporting Drawing of a Particle
Particles are textured positions with no area. However, as discussed in the introduction, your engine will draw each particle as a textured rectangle. For this reason, you can simply reuse the existing texture vertex shader texture_vs.glsl.
Creating GLSL Particle Fragment Shader
- 1.
Under the src/glsl_shaders folder, create a new file and name it particle_fs.glsl.
- 2.
Similar to the texture fragment shader defined in texture_fs.glsl, you need to declare uPixelColor and vTexCoord to receive these values from the game engine and define the uSampler to sample the texture:
- 3.
Now implement the main function to accumulate colors without considering global ambient effect. This serves as one approach for computing the colors of the particles. This function can be modified to support different kinds of particle effects.
Defining a Default ParticleShader Instance
- 1.
Begin by editing the shader_resources.js file in the src/engine/core folder to define the constant, variable, and accessing function for the default particle shader:
- 2.
In the init() function, make sure to load the newly defined particle_fs GLSL fragment shader:
- 3.
With the new GLSL fragment shader, particle_fs, properly loaded, you can instantiate a new particle shader when the createShaders() function is called:
- 4.
In the cleanUp() function, remember to perform the proper cleanup and unload operations:
- 5.
Lastly, do not forget to export the newly defined function:
Creating the ParticleRenderable Object
With the default particle shader class defined to interface to the GLSL particle_fs shader, you can now create a new Renderable object type to support the drawing of particles. Fortunately, the detailed behaviors of a particle, or a textured position, are identical to that of a TextureRenderable with the exception of the different shader. As such, the definition of the ParticleRenderable object is trivial.
Loading the Default Particle Texture
- 1.
Edit default_resources.js in the src/engine/resources folder, add an import from texture.js to access the texture loading functionality, and define a constant string for the location of the particle texture map and an accessor for this string:
- 2.
In the init() function, call the texture.load() function to load the default particle texture map:
- 3.
In the cleanUp() function, make sure to unload the default texture:
- 4.
Finally, remember to export the accessor:
With this integration, the default particle texture file will be loaded into the resource_map during system initialization. This default texture map can be readily accessed with the returned value from the getDefaultPSTexture() function .
Defining the Engine Particle Component
With the drawing infrastructure defined, you can now define the engine component to manage the behavior of the particle system. For now, the only functionality required is to include a default system acceleration for all particles.
Before continuing, make sure to update the engine access file, index.js, to allow game developer access to the newly defined functionality.
Defining the Particle and Particle Game Classes
You are now ready to define the actual particle, its default behaviors, and the class for a collection of particles.
Creating a Particle
Particles are lightweight game objects with simple properties wrapping around ParticleRenderable for drawing. To properly support motion, particles also implement movement approximation with the Symplectic Euler Integration.
- 1.
Begin by creating the particles subfolder in the src/engine folder. This folder will contain particle-specific implementation files.
- 2.
In the src/engine/particles folder, create particle.js, and define the constructor to include variables for position, velocity, acceleration, drag, and drawing parameters for debugging:
- 3.
Define the draw() function to draw the particle as a TextureRenderable and a drawMarker() debug function to draw an X marker at the position of the particle:
- 4.
You can now implement the update() function to compute the position of the particle based on Symplectic Euler Integration, where the scaling with the mDrag variable simulates drags on the particles. Notice that this function also performs incremental changes to the other parameters including color and size. The mCyclesToLive variable informs the particle system when it is appropriate to remove this particle.
- 5.
Define simple get and set accessors. These functions are straightforward and are not listed here.
Creating the ParticleSet
- 1.
In the src/engine/particles folder, create particle_set.js, and define ParticleSet to be a subclass of GameObjectSet:
- 2.
Override the draw() function of GameObjectSet to ensure particles are drawn with additive blending:
Recall from Chapter 5 that the default gl.blendFunc() setting implements transparency by blending according to the alpha channel values. This is referred to as alpha blending. In this case, the gl.blendFunc() setting simply accumulates colors without considering the alpha channel. This is referred to as additive blending. Additive blending often results in oversaturation of pixel colors, that is, RGB components with values of greater than the maximum displayable value of 1.0. The oversaturation of pixel color is often desirable when simulating intense brightness of fire and explosions.
- 3.
Override the update() function to ensure expired particles are removed:
Lastly, remember to update the engine access file, index.js, to forward the newly defined functionality to the client.
Testing the Particle System
There are two important observations to be made on the _createParticle() function. First, the random() function is used many times to configure each created Particle. Particle systems utilize large numbers of similar particles with slight differences to build and convey the desired visual effect. It is important to avoid any patterns by using randomness. Second, there are many seemingly arbitrary numbers used in the configuration, such as setting the life of the particle to be between 30 and 230 or setting the final red component to a number between 3.5 and 4.5. This is unfortunately the nature of working with particle systems. There is often quite a bit of ad hoc experimentation. Commercial game engines typically alleviate this difficulty by releasing a collection of preset values for their particle systems. In this way, game designers can fine-tune specific desired effects by adjusting the provided presets.
Observations
Run the project and press the Q key to observe the generated particles. It appears as though there is combustion occurring underneath the mouse pointer. Hold the Q key and move the mouse pointer around slowly to observe the combustion as though there is an engine generating flames beneath the mouse. Type the E key to toggle the drawing of individual particle positions. Now you can observe a green X marking the position of each of the generated particles.
If you move the mouse pointer rapidly, you can observe individual pink circles with green X centers changing color while dropping toward the floor. Although all particles are created by the _createParticle() function and share the similar behaviors of falling toward the floor while changing color, every particle appears slightly different and does not exhibit any behavior patterns. You can now clearly observe the importance of integrating randomness in the created particles.
There are limitless variations to how you can modify the _createParticle() function. For example, you can change the explosion-like effect to steam or smoke simply by changing the initial and final color to different shades of gray and transparencies. Additionally, you can modify the default particle texture by inverting the color to create black smoke effects. You could also modify the size change delta to be greater than 1 to increase the size of the particles over time. There are literally no limits to how particles can be created. The particle system you have implemented allows the game developer to create particles with customized behaviors that are most suitable to the game that they are building.
Lastly, notice that the generated particles do not interact with the RigidShape objects and appears as though the particles are drawn over the rest of the objects in the game scene. This issue will be examined and resolved in the next project.
Particle Collisions
An approach to integrate particles into a game scene is for the particles to follow the implied rules of the scene and interact with the non-particle objects accordingly. The ability to detect collisions is the foundation for interactions between objects. For this reason, it is sometimes important to support particle collisions with the other, non-particle game objects.
Since particles are defined only by their positions with no dimensions, the actual collision computations can be relatively straightforward. However, there are typically a large number of particles; as such, the number of collisions to be performed can also be numerous. As a compromise and optimization in computational costs, particles collisions can be based on RigidShape instead of the actual Renderable objects. This is similar to the case of the physics component where the actual simulation is based on simple rigid shapes in approximating the potentially geometrically complicated Renderable objects.
The Particle Collisions Project

Running the Particle Collisions project
Q key: To spawn particles at the current mouse position
E key: To toggle the drawing of particle bounds
1 key: To toggle Particle/RigidShape collisions
To understand and resolve collisions between individual particle positions and RigidShape objects
To build a particle engine component that supports interaction with RigidShape
Modifying the Particle System
- 1.
Edit particle_system.js to define and initialize temporary local variables for resolving collisions with RigidShape objects. The mCircleCollider object will be used to represent individual particles in collisions.
- 2.
Define the resolveCirclePos() function to resolve the collision between a RigidCircle and a position by pushing the position outside of the circle shape:
- 3.
Define the resolveRectPos() function to resolve the collision between a RigidRectangle and a position by wrapping the mCircleCollider local variable around the position and invoking the RigidCircle to RigidRectangle collision function. When interpenetration is detected, the position is pushed outside of the rectangle shape according to the computed mCollisionInfo.
- 4.
Implement resolveRigidShapeCollision() and resolveRigidShapeSetCollision() to allow convenient invocation by client game developers. These functions resolve collisions between a single or a set of RigidShape objects and a ParticleSet object.
- 5.
Lastly, remember to export the newly defined functions:
Initializing the Particle System
Testing the Particle System
Observations
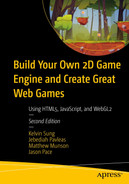
As in previous projects, you can run the project and create particles with the Q and E keys. However, notice that the generated particles do not overlap with any of the objects. You can even try moving your mouse pointer to within the bounds of one of the RigidShape objects and then type the Q key. Notice that in all cases, the particles are generated outside of the shapes.
You can try typing the 1 key to toggle collisions with the rigid shapes. Note that with collisions enabled, the particles somewhat resemble the amber particles from a fire or an explosion where they bounce off the surfaces of RigidShape objects in the scene. When collision is toggled off, as you have observed from the previous project, the particles appear to be burning or exploding in front of the other objects. In this way, collision is simply another parameter for controlling the integration of the particle system with the rest of the game engine.
You may find it troublesome to continue to press the Q key to generate particles. In the next project, you will learn about generation of particles over a fixed period of time.
Particle Emitters
With your current particle system implementation, you can create particles at a specific point and time. These particles can move and change based on their properties. However, particles can be created only when there is an explicit state change such as a key click. This becomes restricting when it is desirable to persist the generation of particles after the state change, such as an explosion or firework that persists for a short while after the creation of a new RigidShape object. A particle emitter addresses this issue by defining the functionality of generating particles over a time period.
The Particle Emitters Project
Running the Particle Emitters project
Q key: To spawn particles at the current mouse position
E key: To toggle the drawing of particle bounds
1 key: To toggle Particle/RigidShape collisions
To understand the need for particle emitters
To experience implementing particle emitters
Defining the ParticleEmitter Class
- 1.
In the src/engine/particles folder, create particle_emitter.js; define the ParticleEmitter class with a constructor that receives the location, number, and how to emit new particles. Note that the mParticleCreator variable expects a callback function. When required, this function will be invoked to create a particle.
- 2.
Define a function to return the current status of the emitter. When there are no more particles to emit, the emitters should be removed.
- 3.
Create a function to actually create or emit particles. Take note of the randomness in the number of particles that are actually emitted and the invocation of the mParticleCreator() callback function. With this design, it is unlikely to encounter patterns in the number of particles that are created over time. In addition, the emitter defines only the mechanisms of how, when, and where particles will be emitted and does not define the characteristics of the created particles. The function pointed to by mParticleCreator is responsible for defining the actual behavior of each particle .
Lastly, remember to update the engine access file, index.js, to allow game developer access to the ParticleEmitter class.
Modifying the Particle Set
- 1.
Edit particle_set.js in the src/engine/particles folder, and define a new variable for maintaining emitters:
- 2.
Define a function for instantiating a new emitter. Take note of the func parameter. This is the callback function that is responsible for the actual creation of individual Particle objects.
- 3.
Modify the update function to loop through the emitter set to generate new particles and to remove expired emitters:
Testing the Particle Emitter
This is a straightforward test of the correct functioning of the ParticleEmitter object. The MyGame class update() function is modified to create a new ParticleEmitter at the position of the RigidShape object when the G or H key is pressed. In this way, it will appear as though an explosion has occurred when a new RigidShape object is created or when RigidShape objects are assigned new velocities.
In both cases, the _createParticle() function discussed in the first project of this chapter is passed as the argument for the createrFunc callback function parameter in the ParticleEmitter constructor.
Observations
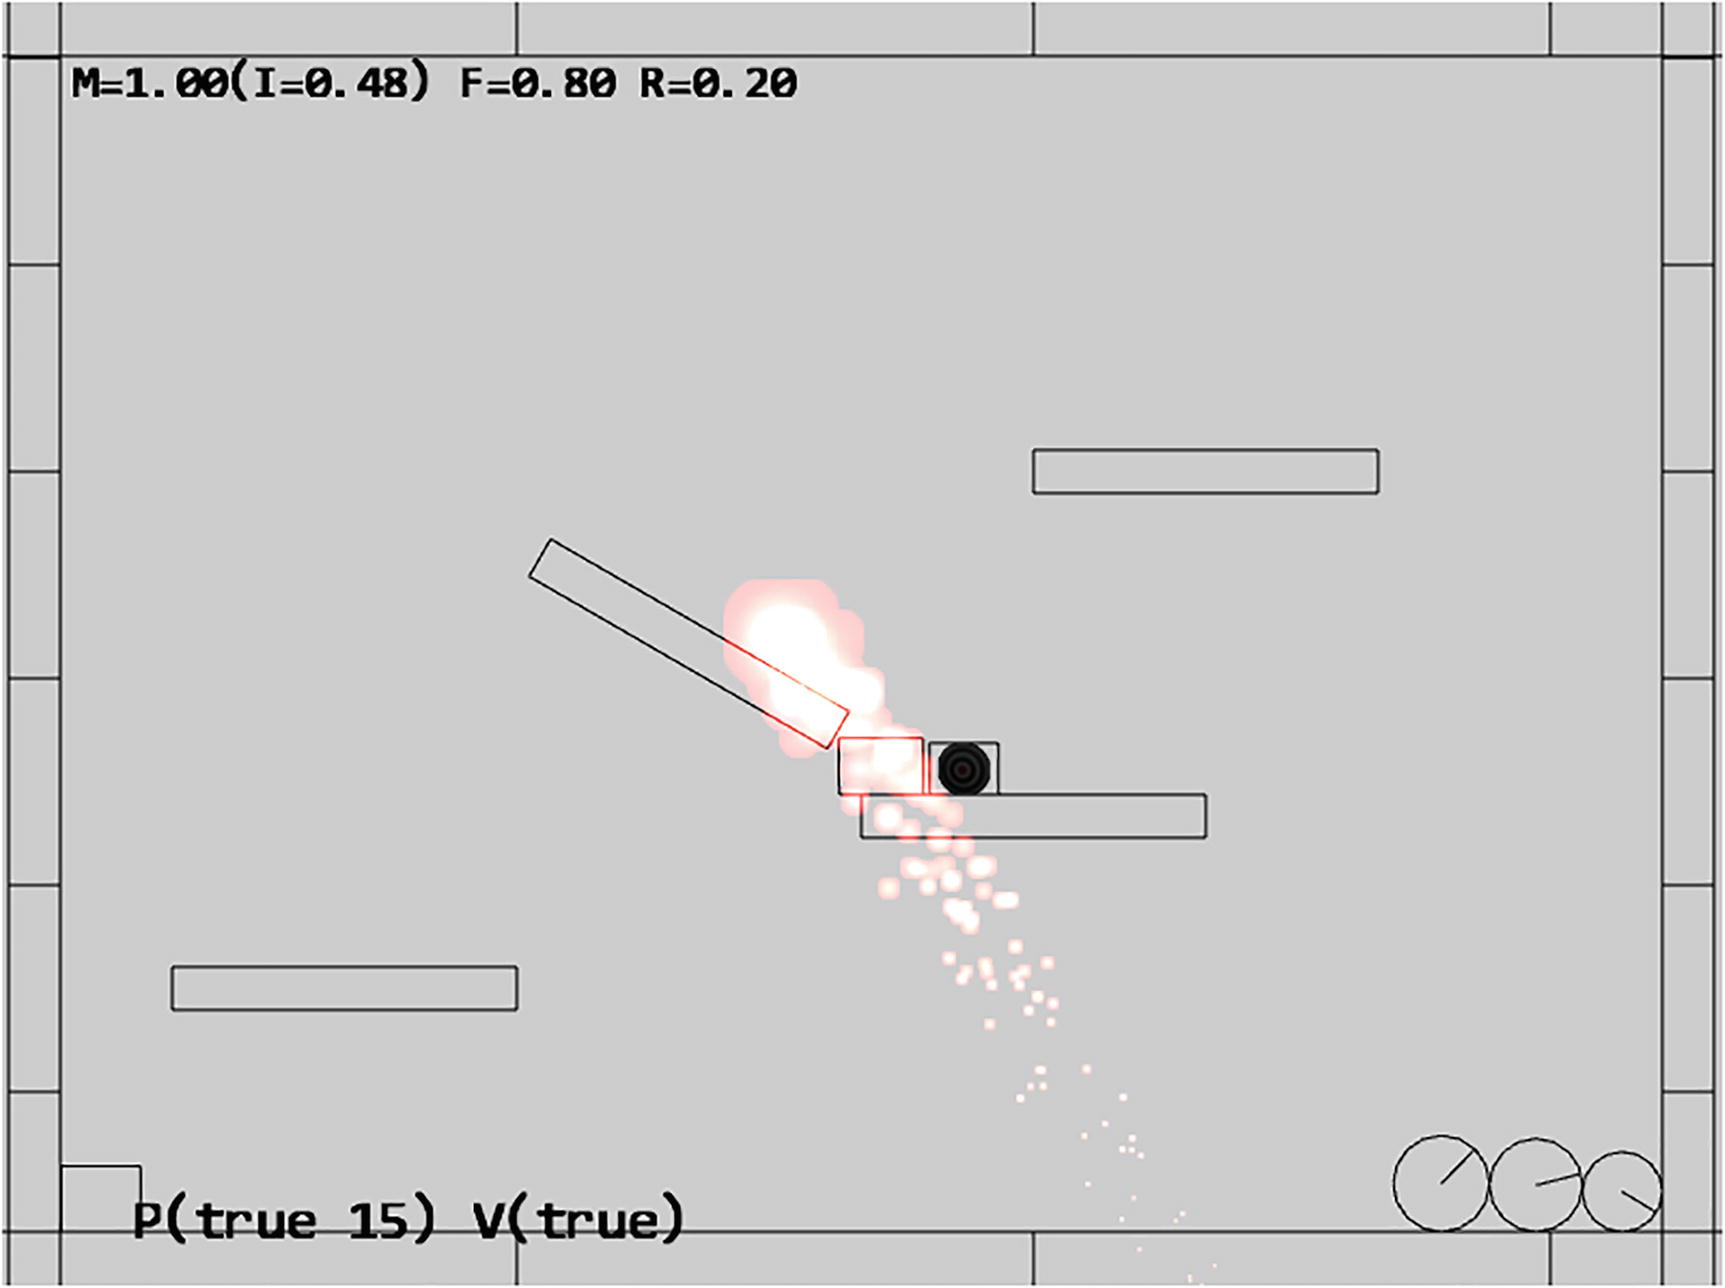
Run the project and observe the initial firework-like explosions at the locations where the initial RigidShape objects are created. Type the G key to observe the accompanied explosion in the general vicinity of the newly created RigidShape object. Alternatively, you can type the H key to apply velocities to all the shapes and observe explosion-like effects next to each RigidShape object. For a very rough sense of what this particle system may look like in a game, you can try enabling texturing (with the T key), disabling RigidShape drawing (with the R key), and typing the H key to apply velocities. Observe that it appears as though the Renderable objects are being blasted by the explosions.
Notice how each explosion persists for a short while before disappearing gradually. Compare this effect with the one resulting from a short tapping of the Q key, and observe that without a dedicated particle emitter, the explosion seems to have fizzled before it begins.
Allowing the position of the emitter to change over time, for example, attaching the emitter to the end of a rocket
Allowing emitter to affect the properties of the created particles, for example, changing the acceleration or velocity of all created particles to simulate wind effects
Based on the simple and yet flexible particle system you have implemented, you can now experiment with all these ideas in a straightforward manner.
Summary
There are three simple takeaways from this chapter. First, you have learned that particles, positions with an appropriate texture and no dimensions, can be useful in describing interesting physical effects. Second, the capability to collide and interact with other objects assists with the integration and placement of particles in game scenes. Lastly, in order to achieve the appearance of familiar physical effects, the emitting of particles should persist over some period of time.
You have developed a simple and yet flexible particle system to support the consistent management of individual particles and their emitters. Your system is simple because it consists of a single component, defined in particle_system.js, with only three simple supporting classes defined in the src/engine/particles folder. The system is flexible because of the callback mechanism for the actual creation of particles where the game developers are free to define and generate particles with any arbitrary behaviors.
The particle system you have built serves to demonstrate the fundamentals. To increase the sophistication of particle behaviors, you can subclass from the simple Particle class, define additional parameters, and amend the update() function accordingly. To support additional physical effects, you can consider modifying or subclassing from the ParticleEmitter class and emit particles according to your desired formulations.
Game Design Considerations

Visual techniques like those shown in this graphic are often used in graphic novels to represent various fast-moving or high-impact actions like explosions, punches, crashes, and the like; similar visual techniques have also been used quite effectively in film and video games
Particle effects can also be used either in realistic ways that mimic how we’d expect them to behave in the real world or in more creative ways that have no connection to real-world physics. Try using what you’ve learned from the examples in this chapter and experiment with particles in your current game prototype as we left it in Chapter 9: can you think of some uses for particles in the current level that might support and reinforce the presence of existing game elements (e.g., sparks flying if the player character touches the force field)? What about introducing particle effects that might not directly relate to gameplay but enhance and add interest to the game setting?