The projects included in the main sections of Chapters 1 to 11 began with simple shapes and slowly introduced characters and environments to illustrate the concepts of each chapter; those projects focused on individual behaviors and techniques (such as collision detection, object physics, lighting, and the like) but lacked the kind of structured challenges necessary to deliver a full gameplay experience. The projects in the “Design Considerations” sections demonstrate how to introduce the types of logical rules and challenges required to turn basic behaviors into well-formed game mechanics. This chapter now changes the focus to emphasize the design process from an early concept through a functional prototype, bringing together and extending the work done in earlier projects by using some characters and environments from prior chapters along with the basic idea for the unlocking platform game from the “Design Considerations” section of Chapter 11. As with earlier chapters, the design framework utilized here begins with a simple and flexible starting template and adds complexity incrementally and intentionally to allow the game to grow in a controlled manner.
The design exercises have until now avoided consideration of most of the nine elements of game design described in the “How Do You Make a Great Video Game?” section of Chapter 1 and instead focused on crafting the basic game mechanic in order to clearly define and refine the core characteristics of the game itself. The design approach used in this book is a ground-up framework that emphasizes first working with an isolated game mechanic prior to the consideration of the game’s genre or setting; when you begin incorporating a setting and building out levels that include additional design elements on top of the core mechanic, the gameplay will grow and evolve in unique directions as you grow the game world. There are endless potential variations for a game’s mechanic and the associated gameplay loops you design. You’ll be surprised by how differently the same foundational elements of gameplay develop and evolve based on the kind of creative choices you make.
Part 1: Refining the Concept
The 2D implementation from Chapter 11
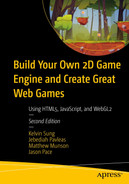
- 1.
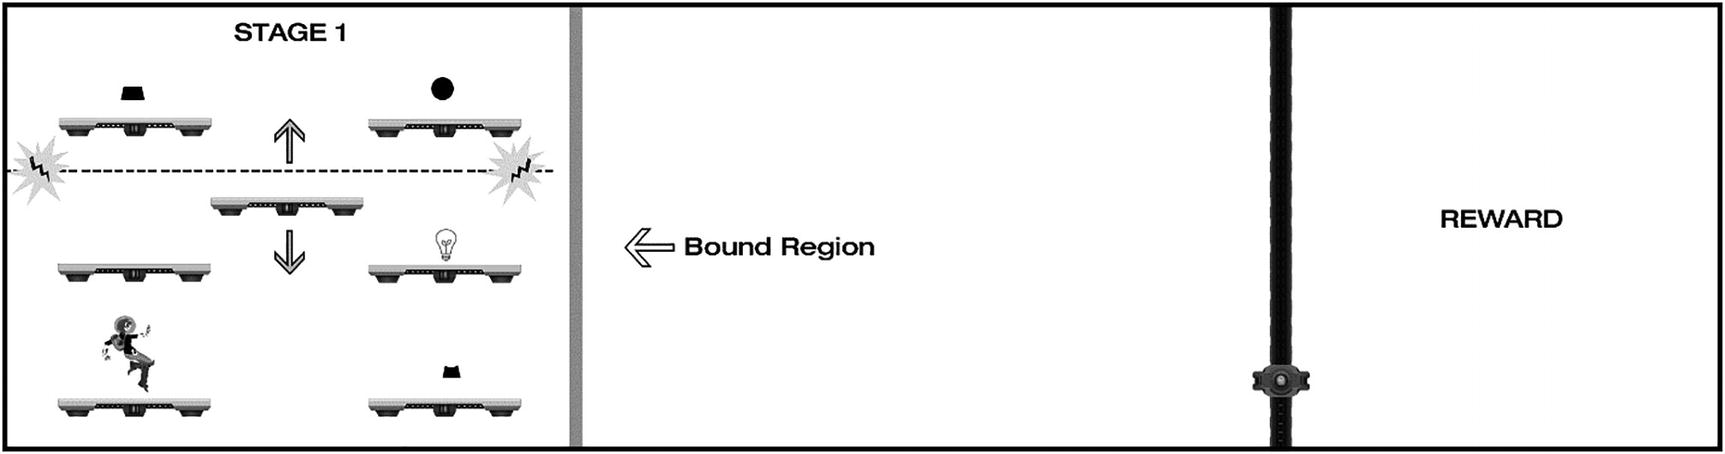
The player must jump the hero character (the circle with the letter p in the center of Figure 12-1) on the moving elevator platform (#1 in Figure 12-1) and jump off to the middle platform of the right column before touching the energy field.
- 2.
The player activates the off switch for the energy field by colliding the hero character with it (#2, represented by the lightbulb icon in Figure 12-1).
- 3.
When the energy field is switched off, the player rides the elevator platform to the top (#3) and jumps the hero to the top platform in the right column.
- 4.
The player collides the hero with the small circle that represents the top third of the lock icon (#4), activating the corresponding part of the lock icon and making it glow.
- 5.
The player jumps the hero back on the elevator platform (#5) and then jumps the hero to the bottom platform in the right column.
- 6.
The player collides the hero with the shape corresponding to the middle section of the lock icon (#6), activating the corresponding part of the lock icon and making it glow. Two-thirds of the lock icon now glows, signaling progress.
- 7.
The player jumps the hero on the elevator platform once again (#7) and then jumps the hero to the top platform in the left column.
- 8.
The player collides the hero with the shape corresponding to the bottom section of the lock icon (#8), activating the final section of the icon and unlocking the barrier.
Writing out this sequence (or game flow diagram) may seem unnecessary given the mock-up screens you’ve created. It’s important, however, for designers to understand everything the player must do in exact order and detail to ensure you’re able to tune, balance, and evolve the gameplay without becoming mired in complexity or losing sight of how the player makes their way through the level. It’s clear from diagramming the previous game flow, for example, that the elevator platform is the centerpiece of this level and is required to complete every action; this is great information to have available in a schematic representation and game flow description because it provides an opportunity to intelligently refine the gameplay logic in a way that allows you to visualize the effect of each change on the overall flow of the level.
You could continue building out the mechanic to make the level more interesting and challenging (e.g., you might include a timer on the energy field’s off switch requiring players to collide with all the lock parts within a limited amount of time). However, at this stage of concept development, it’s often helpful to take a step back from gameplay and begin considering game setting and genre, using those elements to help inform how the game mechanic evolves from here.
Concepts from Chapter 11
Note there isn’t anything specific about the game mechanic you’ve been creating that would necessarily lead you in a sci-fi direction; game mechanics are abstract interactive structures and can typically integrate with any kind of setting or visual style. In this case, the authors chose a setting that takes place on a spaceship, so this chapter will use that motif as the setting for the game prototype. As you proceed through the design process, consider exploring alternate settings: how might the game mechanic from Chapter 11 be adapted to a jungle setting, a contemporary urban location, a medieval fantasy world, or an underwater metropolis?
Part 2: Integrating a Setting
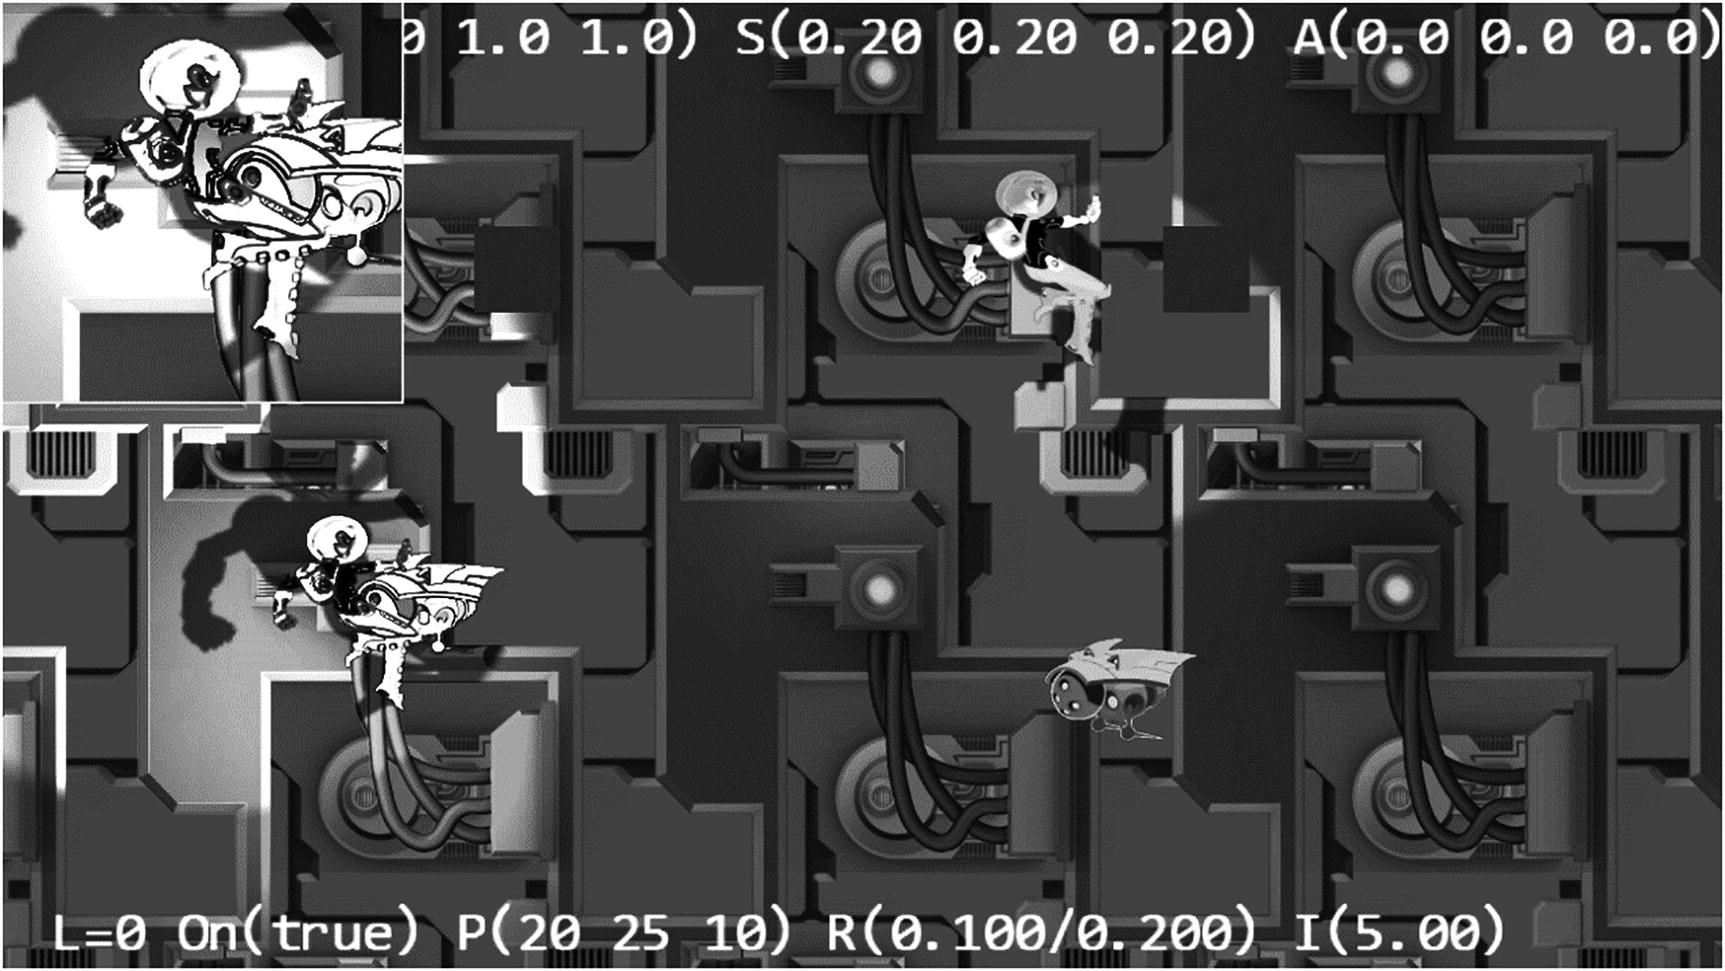
Now is a good time to begin assigning some basic fictional background to evolve and extend the game mechanic in unique ways that enhance the setting you choose (don’t worry if this is unclear at the moment; the mechanism will become more apparent as you proceed with the level design). Imagine, for example, that the hero character is a member of the crew on a large spaceship and that she must complete a number of objectives to save the ship from exploding. Again, there is nothing about the current state of the game mechanic driving this narrative; the design task at this stage includes brainstorming some fictional context that propels the player through the game and captures their imagination. Using the few concept art assets already created/provided, the hero could just as easily be participating in a race, looking for something that was lost, exploring an abandoned alien vessel, or any of a million other possibilities.
Contextual Images Bring the Setting to Life
The introduction of several visual design elements supporting the game setting and evolving narrative
Although you’ve made only a few minor substitutions and don’t yet have the visual elements anchored in an environment, Figure 12-3 conveys quite a bit more fictional context and contributes significantly more to presence than the abstract shapes of Figure 12-1. The hero character now suggests a scale that will naturally be contextualized as players benchmark relative sizes against the human figure, which brings the relative size of the entire game environment into focus for players. The implementation of object physics for the hero character as described in Chapter 10 also becomes an important component of play: simulated gravity, momentum, and the like connect players viscerally to the hero character as they move them through the game world. By implementing the design as described in Figure 12-3, you’ve already accomplished some impressive cognitive feats that support presence simply by adding a few visual elements and some object physics.
Defining the Playable Space
At this point in the design process , you’ve sufficiently described the game’s core mechanic and setting to begin expanding the single screen into a full-level concept. It’s not critical at this stage to have a final visual style defined, but including some concept art will help guide how the level grows. (Figure 12-3 provides a good visual representation for the amount of gameplay that will take place on a single screen given the scale of objects.) This is also a good stage to “block in” the elements from Figure 12-3 in a working prototype to begin getting a sense for how movement feels (e.g., the speed the hero character runs, the height the hero can jump, and so on), the scale of objects in the environment, the zoom level of the camera, and the like. There’s no need to include interactions and behaviors such as the lock components or the energy field at this stage because you haven’t yet designed how the level will play. For now you’re experimenting with basic hero character movement, object placement, and collision. The next set of tasks includes laying out the full level and tuning all the interactions.
The level design grows to include an additional playable area
Recall from the Simple Camera Manipulations project in Chapter 7 that you can “push” the game screen forward by moving the character close to the edge of the bound region, which allows you to design a level that extends far beyond the dimensions of a single static screen. You might choose to keep this level contained to the original game screen size, of course, and increase the complexity of the timing-based agility and logical sequence challenges (and indeed it’s a good design exercise to challenge yourself to work within space constraints), but for the purposes of this design a horizontal scrolling presentation adds interest and challenge.
Adding Layout to the Playable Space
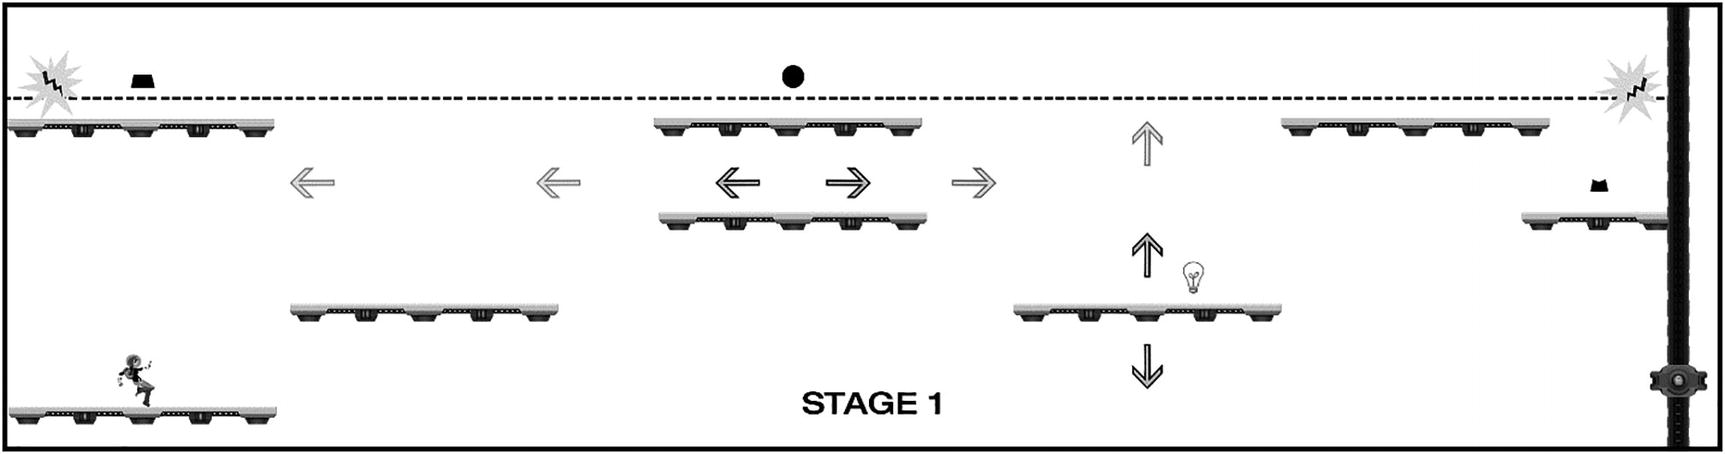
Expands the layout to use the additional screen real estate, the diagram represents the entire length of stage 1 with the player able to see approximately 50 percent of the full level at any time. The camera scrolls the screen forward or backward as the player moves the hero character toward the screen bound regions. Note: for the moving platforms shown, darker arrows represent direction, and lighter arrows represent the range of the platform’s movement
Now that the level has some additional space to work with, there are several factors to evaluate and tune. For example, the scale of the hero character in Figure 12-5 has been reduced to increase the number of vertical jumps that can be executed on a single screen. Note that at this point you also have the opportunity to include additional vertical gameplay in the design if desired, implementing the same mechanism used to move the camera up and down that you used to move it left and right; many 2D platformer games allow players to move through the game world both horizontally and vertically. This level prototype will limit movement to the x plane (left and right) for simplicity although you can easily extend the level design to include vertical play in future iterations and/or subsequent levels.

The most efficient sequence to unlock the barrier
Did your sequence match Figure 12-6, or did you have extra steps? There are many potential paths players can take to complete this level, and it’s likely that no two players will take the same route (the only requirement from the mechanic design is that the lock sections be activated in order from top to bottom).
Tuning the Challenge and Adding Fun
In this stage of the design is when the puzzle-making process really begins to open up; Figure 12-6 shows the potential to create highly engaging gameplay with only the few basic elements you’ve been working with. The authors use the previous template and similar variations in brainstorming sessions for many kinds of games—introducing one or two novel elements to a well-understood mechanic and exploring the impact new additions have on gameplay—and the results often open exciting new directions. As an example, you might introduce platforms that appear and disappear, platforms that rotate after a switch is activated, a moving energy field, teleporting stations, and so on. The list of ways you can build out this mechanic is of course limitless, but there is enough definition with the current template that adding a single new element is fairly easy to experiment with and test, even on paper.
There are two factors with the newly expanded level design that increase the challenge. First, the addition of the horizontally moving platform requires players to time the jump to the “elevator” platform more precisely (if they jump while the platform is ascending, there is little time to deactivate the energy field before it zaps them). The second factor is less immediately evident but equally challenging: only a portion of the level is visible at any time, so the player is not able to easily create a mental model of the entire level sequence, like they can when the entire layout is visible on a single screen. It’s important for designers to understand both explicit challenges (such as requiring players to time jumps between two moving platforms) and less obvious (and often unintentional) challenges such as being able to see only part of the level at any given time. Think back to a game you’ve played where it felt like the designers expected you remember too many elements; that kind of frustration is often the result of unintentional challenges overburdening what the player can reasonably hold in short-term memory.
As a designer you need to be aware of hidden challenges and areas of unintentional frustration or difficulty; these are key reasons why it’s vital to observe people playing your game as early and often as possible. As a general rule, any time you’re 100 percent certain you’ve designed something that makes perfect sense, at least half the people who play your game will tell you exactly the opposite. Although a detailed discussion of the benefits of user testing is outside the scope of this book, you should plan to observe people playing your game from the earliest proof of concept all the way to final release. There is no substitute for the insights you’ll gain from watching different people play what you’ve designed.
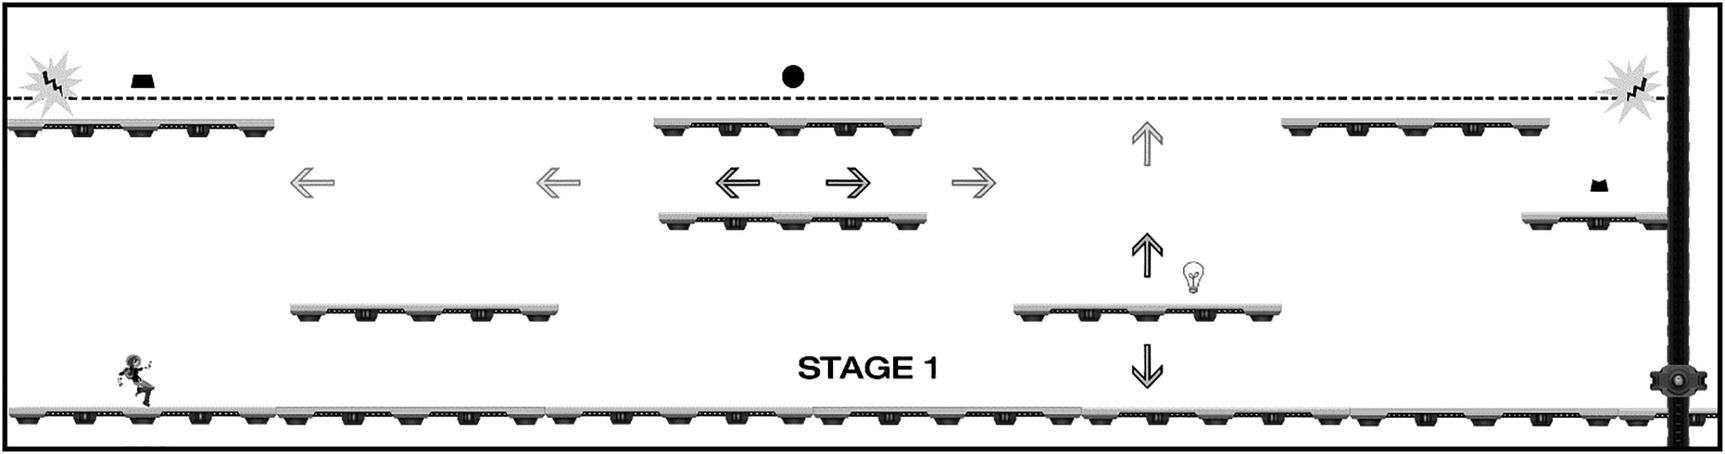
The addition of a “floor” to the game world significantly changes the level challenge
Further Tuning: Introducing Enemies

Two new object types are introduced to the level: a shooting robot (#1) that moves vertically and fires at a constant rate and a patrolling robot (#2) that moves back and forth in a specific range
You’ve now reached a turning point in the design of this level, where the setting is starting to exert a significant influence on the evolution of the mechanic and game loop. The core of the mechanic hasn’t changed from Chapter 11, and this level is still fundamentally about activating sections of a lock in the proper sequence to remove a barrier, but the moving platforms and attacking enemies are additional obstacles and are strongly influenced by the particular setting you’ve chosen.
Of course, you certainly could have added the attacking enemy behavior while still working with abstract shapes and pure mechanics. It’s worth noting, however, that the more complex and multistaged a mechanic becomes, the more the setting will need to conform to the implementation; this is why transitioning from purely abstract mechanic design to laying out a level (or part of a level) in the context of a particular setting when the mechanic is still fairly elemental is helpful. Designers typically want the game mechanic to feel deeply integrated with the game setting, so it’s beneficial to allow both to develop in tandem. Finding that sweet spot can be challenging: sometimes the mechanic leads the design, but as the setting evolves, it often will move into the driver’s seat. Bring in the setting too soon and you lose focus on refining pure gameplay; bring in the setting too late and game world may feel like an afterthought or something that’s bolted on.
General Considerations
Returning to the current design as represented in Figure 12-8, you now have all the elements required to create a truly engaging sequence situated in an emerging setting. You can also fairly easily tune the movement and placement of individual units to make things more or less challenging. Players will need to observe patterns of movement for both platforms and enemies to time their jumps so they can navigate the level without getting zapped or rammed, all while discovering and solving the unlocking puzzle. Note how quickly the level went from trivially easy to complete to potentially quite challenging: working with multiple moving platforms adds an element of complexity, and the need to use timing for jumps and to avoid attacking enemies—even the simple enemies from Figure 12-8 that are locked into basic movement patterns—opens nearly unlimited possibilities to create devious puzzles in a controlled and intentional way.
If you haven’t already, now is a good time to prototype your level design (including interactions) in code to validate gameplay. For this early-level prototype, it’s only important that major behaviors (running, jumping, projectile firing, moving platforms, object activations, and the like) and steps required to complete the level (puzzle sequences) are properly implemented. Some designers insist at this stage that players who have never encountered the level before should be able to play through the entire experience and fully understand what they need to do with little or no assistance, while others are willing to provide direction and fill in gaps around missing onscreen UI and incomplete puzzle sequences. It’s common practice to playtest and validate major sections of gameplay at this stage and provide playtesters with additional guidance to compensate for incomplete UI or unimplemented parts of a sequence. As a general rule, the less you need to rely on over-the-shoulder guidance for players at this stage, the better your insights into the overall design will be. The amount of the early-level prototype you’ll implement at this stage also depends on the size and complexity of your design. Large and highly complex levels may be implemented and tested in several (or many) pieces before the entire level can be played through at once, but even in the case of large and complex levels, the goal is to have the full experience playable as early as possible.
If you’ve been exploring the working prototype included with this book, you’ll discover some minor variations between the design concepts in this chapter and the playable level (the energy field was not included in the working prototype, e.g.). Consider exploring alternate design implementations with the included assets; exploration and improvisation are key elements of the creative-level design process. How many extensions of the current mechanic can you create?
Part 3: Integrating Additional Design Elements
The prototype you’ve been building in this chapter would serve as an effective proof of concept for a full game at its current level of development, but it’s still missing many elements typically required for a complete game experience (including visual detail and animations, sounds, scoring systems, win conditions, menus and user interface [UI] elements, and the like). In game parlance, the prototype level is now at the blockout-plus stage (blockout is a term used to describe a prototype that includes layout and functional gameplay but lacks other design elements; the inclusion of some additional concept art is the “plus” here). It’s now a good time to begin exploring audio, scoring systems, menu and onscreen UI, and the like. If this prototype were in production at a game studio, a small group might take the current level to a final production level of polish and completeness while another team worked to design and prototype additional levels. A single level or a part of a level that’s taken to final production is referred to as a vertical slice, meaning that one small section of the game includes everything that will ship with the final product. Creating a vertical slice is helpful to focus the team on what the final experience will look, feel, and sound like and can be used to validate the creative direction with playtesters.
Visual Design
Although you’ve begun integrating some visual design assets that align with the setting and narrative, the game typically will have few (if any) final production assets at this time and any animations will be either rough or not yet implemented (the same is true for game audio). While it’s good practice to have gameplay evolve in parallel with the game setting, studios don’t want to burn time and resources creating production assets until the team is confident that the level design is locked and they know what objects are needed and where they’ll be placed.
You should now have a fairly well-described layout and sequence for your level design (if you’ve been experimenting with a different layout compared to what’s shown in the examples, make sure you have a complete game flow described as in Figures 12-1 and 12-6.) At this point in the project, you can confidently begin “rezzing in” production assets (rezzing in is a term used by game studios to mean increasing the resolution—in this case, the visual polish and overall production quality of the level—over time). Rezzing-in is typically a multistage process that begins when the major elements of the level design are locked, and it can continue for most of the active production schedule. There are often hundreds (or thousands) of individual assets, animations, icons, and the like that will typically need to be adjusted multiple times based on the difference between how they appear outside the game build and inside the game build. Elements that appear to harmonize well in isolation and in mockups often appear quite differently after being integrated into the game.
The process of rezzing-in assets can be tedious and frustrating (there always seems to be an order of magnitude more assets than you think there will be). It can also be challenging to make things look as awesome in the game as they do in an artist’s mockups. However, it’s typically a satisfying experience when it all start to come together: something magical happens to a level design as it transitions from blockout to polished production level, and there will usually be one build where a few key visual assets have come in that make the team remark “Wow, now this feels like our game!” For AAA 3D games, these “wow” moments frequently happen as high-resolution textures are added to 3D models and as complex animations, lighting, and shadows bring the world to life; for the current prototype level, adding a parallaxing background and some localized lighting effects should really make the spaceship setting pop.
The working prototype included with this book represents a build of the final game that would typically be midway between blockout and production polish. The hero character includes several animation states (idle, run, jump), localized lighting on the hero and robots adds visual interest and drama, the level features a two-layer parallaxing background with normal maps that respond to the lighting, and major game behaviors are in place. You can build upon this prototype and continue to polish the game or modify it how you see fit.
Game Audio
Many new game designers (and even some veteran designers) make the mistake of treating audio as less important than the visual design, but as every gamer knows, bad audio in some cases can mean the difference between a game you love and a game you stop playing after a short time. As with visual design, audio often contributes directly to the game mechanic (e.g., countdown timers, warning sirens, positional audio that signals enemy location), and background scores enhance drama and emotion in the same way that directors use musical scores to support the action on film). However, audio in mobile games is often considered optional because many players mute the sound on their mobile devices. Well-designed audio, however, can have a dramatic impact on presence even for mobile games. In addition to sounds corresponding to game objects (walking sounds for characters who walk, shooting sounds for enemies who fire, popping sounds for things that pop, and the like), contextual audio attached to in-game actions is an important feedback mechanism for players. Menu selections, activating in-game switches, and the like should all be evaluated for potential audio support. As a general rule, if an in-game object responds to player interaction, it should be evaluated for contextual audio.
Audio designers work with level designers to create a comprehensive review of game objects and events that require sounds, and as the visuals rezz in, the associated sounds will typically follow. Game sounds often lag behind visual design because audio designers want to see what they’re creating sounds for; it’s difficult to create a “robot walking” sound, for example, if you can’t see what the robot looks like or how it moves. In much the same way that designers want to tightly integrate the game setting and mechanic, audio engineers want to ensure that the visual and audio design work well together.
Interaction Model
The current prototype uses a common interaction model: A and D keys on the keyboard move the character right and left, and the spacebar is used to jump. Object activations in the world happen simply by colliding the hero character with the object, and the design complexity is fairly low for those interactions. Imagine, however, that as you continue building out the mechanic (perhaps in later levels), you include the ability for the character to launch projectiles and collect game objects to store in inventory. As the range of possible interactions in the game expands, complexity can increase dramatically and unintentional challenges (as mentioned previously) can begin to accumulate, which can lead to bad player frustration (as opposed to “good” player frustration, which as discussed earlier results from intentionally designed challenges).
It’s also important to be aware of the challenges encountered when adapting interaction models between different platforms. Interactions designed initially for mouse and keyboard often face considerable difficulty when moving to a game console or touch-based mobile device. Mice and keyboard interaction schemes allow for extreme precision and speed of movement compared to the imprecise thumb sticks of game controllers, and although touch interactions can be precise, mobile screens tend to be significantly smaller and obscured by fingers covering the play area. The industry took many years and iterations to adapt the first-person-shooter (FPS) genre from using mice and keyboards to game consoles, and FPS conventions for touch devices remain highly variable more than a decade after the first mobile FPS experiences launched (driven in part by the differences in processing capabilities and screen sizes of the many phones and tablets on the market). If you plan to deliver a game across platforms, make sure you consider the unique requirements of each as you’re developing the game.
Game Systems and Meta-game
The current prototype has few systems to balance and does not yet incorporate a meta-game, but imagine adding elements that require balancing such as variable-length timers for object activations or the energy field. If you’re unsure what this means, consider the following scenario: the hero character has two potential ways to deactivate the energy field, and each option is a trade-off. The first option perhaps deactivates the energy field permanently but spawns more enemy robots and considerably increases the difficulty in reaching the target object, while the second option does not spawn additional robots but only deactivates the energy field for a short time, requiring players to choose the most efficient path and execute nearly perfect timing. To balance effectively between the two options, you need to understand the design and degree of challenge associated with each system (unlimited vs. limited time). Similarly, if you added hit points to the hero character and made the firing robot create x amount of damage while the charging minion creates y amount of damage per hit, you’d want to understand the relative trade-offs between paths to objectives, perhaps making some paths less dangerous but more complex to navigate, while others might be faster to navigate but more dangerous.
As with most other aspects of the current design, there are many directions you could choose to pursue in the development of a meta-game; what might you provide to players for additional positive reinforcement or overarching context as they played through a full game created in the style of the prototype level? As one example, imagine that players must collect a certain number of objects to access the final area and prevent the ship from exploding. Perhaps each level has one object that required players to solve a puzzle of some kind before they could access it, and only after collecting the object would they then be able to solve the door-unlocking component of the level. Alternatively, perhaps each level has an object players can access to unlock cinematics and learn more about what happened on the ship for it to reach such a dire state. Or perhaps players are able to disable enemy robots in some way and collect points, with a goal to collect as many points as possible by the end of the game. Perhaps you’ll choose to forego traditional win and loss conditions entirely. Games don’t always focus on explicit win and loss conditions as a core component of the meta-game, and for a growing number of contemporary titles, especially indie games, it’s more about the journey than the competitive experience (or the competitive element becomes optional). Perhaps you can find a way to incorporate both a competitive aspect (e.g., score the most points or complete each level in the shortest time) and meta-game elements that focus more on enhancing play.
A final note on systems and meta-game: player education (frequently achieved by in-game tutorials) is often an important component of these processes. Designers become intimately acquainted with how the mechanics they design function and how the controls work, and it’s easy (and common) to lose awareness of how the game will appear to someone who encounters it for the first time. Early and frequent playtests help provide information about how much explanation players will require in order to understand what they need to do, but most games require some level of tutorial support to help teach the rules of the game world. Tutorial design techniques are outside the scope of this book, but it’s often most effective to teach players the logical rules and interactions of the game as they play through an introductory level or levels. It’s also more effective to show players what you want them to do rather than making them read long blocks of text (research shows that many players never access optional tutorials and will dismiss tutorials with excessive text without reading them; one or two very short sentences per tutorial event are a reasonable target). If you were creating an in-level tutorial system for your prototype, how would you implement it? What do you think players would reasonably discover on their own vs. what you might need to surface for them in a tutorial experience?
User Interface (UI) Design
Game UI design is important not just from a functionality perspective (in-game menus, tutorials, and contextually important information such as health, score, and the like) but also as a contributor to the overall setting and visual design of the experience. Game UI is a core component of visual game design that’s frequently overlooked by new designers and can mean the difference between a game people love and a game nobody plays. Think back to games you’ve played that make use of complex inventory systems or that have many levels of menus you must navigate through before you can access common functions or items; can you recall games where you were frequently required to navigate through multiple sublevels to complete often-used tasks? Or perhaps games that required you to remember elaborate button combinations to access common game objects?
Most UI elements in Visceral Games’ Dead Space 3 are represented completely within the game setting and fiction, with menus appearing as holographic projections invoked by the hero character or on objects in the game world (image copyright Electronic Arts)
Many games choose to house their UI elements in reserved areas of the game screen (typically around the outer edges) that don’t directly interact with the game world; however, integrating the visual aesthetic with the game setting is another way to contribute directly to the presence of the game. Imagine the current sci-fi prototype example with a fantasy-themed UI and menu system, using the kind of medieval aesthetic design and calligraphic fonts used for a game like Bioware’s Dragon Age, for example; the resulting mismatch would be jarring and likely to pull players out of the game setting. User interface design is a complex discipline that can be challenging to master; you’ll be well served, however, by spending focused time to ensure intuitive, usable, and aesthetically appropriate UI integration into the game worlds you create.
Game Narrative
At this stage, you’ve added just a basic narrative wrapper to the prototype example: a hero character must complete a number of objectives to prevent their spaceship from exploding. At the moment, you haven’t explicitly shared this narrative with players at all, and they have no way of knowing the environment is on a spaceship or what the objective might be other than perhaps eventually unlocking the door at the far right of the screen. Designers have a number of options for exposing the game narrative to players; you might create an introductory cinematic or animated sequence that introduces players to the hero character, their ship, and the crisis, perhaps choosing something simple like a pop-up window at the start of the level with brief introduction text that provides players with the required information. Alternatively, you might not provide any information about what’s happening when the game starts but instead choose to slowly reveal the dire situation of the ship and the objectives over time as the player proceeds through the game world. You could even choose to keep any narrative elements implied, allowing players to overlay their own interpretation. As with many other aspects of game design, there’s no single way to introduce players to a narrative and no universal guidance for how much (or how little) narrative might be required for a satisfying experience.
Narrative can also be used by designers to influence the way levels are evolved and built out even if those elements are never exposed to players. In the case of this prototype, it’s helpful as the designer to visualize the threat of an exploding ship to propel the hero character through a series of challenges with a sense of urgency; players however might experience a well-constructed side-scrolling action platformer only with a series of devilishly clever levels. You might create additional fiction around robots that have been infected with a virus, causing them to turn against the hero as a reason for their attack behavior (as just one example). By creating a narrative framework for the action to unfold within, you’re able to make informed decisions about ways to extend the mechanic that feel nicely integrated into the setting even if you don’t share all the background with players.
Of course, some game experiences have virtually no explicit narrative elements either exposed to players or not and are simply implementations of novel mechanics. Games like Zynga’s Words with Friends and Gabriele Cirulli’s hyper-casual 2048 are examples of game experiences purely based on a mechanic with no narrative wrapper.
If you continue developing this prototype, how much narrative would you choose to include, and how much would you want to expose to players to make the game come alive?
Bonus Content: Adding a Second Stage to the Level
If you’ve completed playing through stage 1 of the included prototype, you’ll enter a second room with a large moving unit; this is a sandbox with a set of assets for you to explore. The prototype implementation includes just some basic behaviors to spark your imagination: a large, animated level boss unit hovers in the chamber and produces a new kind of enemy robot that seeks out the hero character, spawning a new unit every few seconds.
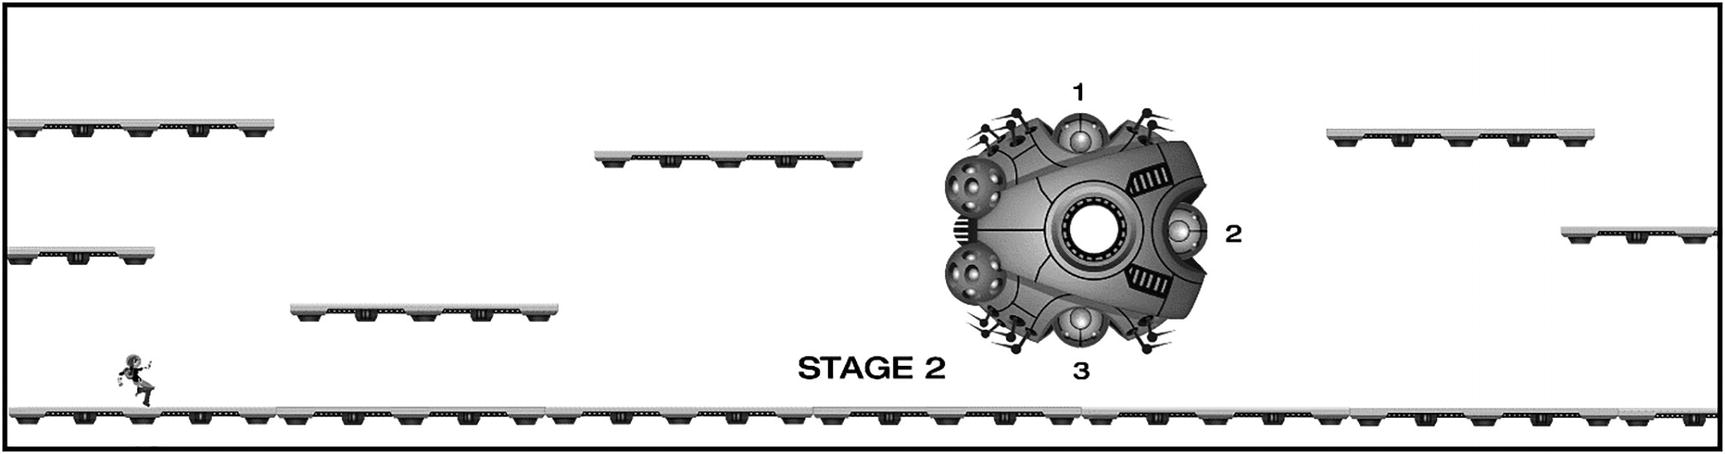
A possible second stage the hero character can enter after unlocking the door in stage 1. This concept includes a large “boss” unit with three nodes; one objective for this stage might be to disable each of the nodes to shut the boss down
It’s a bit of a shortcut to begin the mechanic exploration with the diagram in Figure 12-10, but because you’ve already identified the setting and a number of visual elements, it can be helpful to continue developing new stages with some of the visual assets already in place. The diagram includes the same kind of platforms used in stage 1, but what if, for example, this area had no gravity and the hero character was able to fly freely? Compare this area with stage 1, and think about how you might slightly alter the experience to mix things up a bit without fundamentally changing the game; you’ve ideally become fairly fluent with the sequencing mechanic from stage 1, and the experience in stage 2 can be a greater or lesser evolution of that mechanic.
If you choose to include the hero-seeking flying robot units, the game flow diagram will become more complex than the model used in stage 1 because of the unpredictable movement of the new robot types. You may also want to consider a mechanism for the hero character to eliminate the robot units (perhaps even working the removal of robot units into the mechanic for disabling the nodes on the boss). If you find your designs becoming difficult to describe as part of an explicit and repeatable game flow, it may signal that you’re working with more complex systems and may need to evaluate them in a playable prototype before you can effectively balance their integration with other components of the level. Of course, you can also reuse conventions and units from stage 1; you might choose to combine patrolling robots with hero-seeking robots and an energy field, for example, creating a challenging web of potential risks for the player to navigate as they work to disable the boss nodes.
You might also decide that the main objective for the level is to enable the boss nodes in order to unlock the next stage or level of the game. You can extend the narrative in any direction you like, so units can be helpful or harmful, objectives can involve disabling or enabling, the hero character can be running toward something or away from something, or any other possible scenario you can imagine. Remember, narrative development and the level design will play on each other to drive the experience forward, so stay alert for inspiration as you become increasingly fluent with the level designs for this prototype.
Summary
Game design is unique among the creative arts in the ways it requires players to become active partners in the experience, which can change dramatically depending on who the player is. Although some games share quite a bit in common with cinema (especially as story-driven games have become more popular), there’s always an unpredictable element when the player controls the on-screen action to a greater or lesser extent. Unlike movies and books, video games are interactive experiences that demand constant two-way engagement with players, and poorly designed mechanics or levels with unclear rules can block players from enjoying the experience you’ve created.
The design methodology presented in this book focuses first on teaching you the letters of the design alphabet (basic interactions), leading into the creation of words (game mechanics and gameplay), followed by sentences (levels); we hope you’ll take the next step and begin writing the next great novel (full-game experiences in existing or entirely new genres). The “escape the room” design template featured here can be used to quickly prototype a wide range of mechanics for many kinds of game experiences, from the included 2D side-scroller to isometric games to first-person experiences and more. Remember, game mechanics are fundamentally well-formed abstract puzzles that can be adapted as needed. If you find yourself having difficulty brainstorming new mechanics in the beginning, borrow some simple existing mechanics from common casual games (“match 3” variants are a great source for inspiration) and start there, adding one or two simple variations as you go. As with any creative discipline, the more you practice the basics the more fluent you’ll become with the process, and after you’ve gained some experience with simple mechanics and systems you’ll likely be surprised by the number of interesting variations you can quickly create. Some of those variations might just contribute to the next breakthrough title.
This book demonstrates the relationship between the technical and experiential aspects of game design. Designers, developers, artists, and audio engineers must work in close partnership to deliver the best experiences, taking issues such as performance/responsiveness, user inputs, system stability, and the like into consideration throughout production. The game engine you’ve developed in this book is well-matched for the type of game described in this chapter (and many others). You should now be ready to explore your own game designs with a strong technical foundation to build upon and a global understanding of how the nine elements of game design work together to create experiences that players love.