
Chapter 3: Moving Forward/Backward Without Wheels
I am sure that building and coding the table-top fan in the previous chapter was fun for you.In this chapter, we will be building a robot that can move without wheels both forward and backward. Have you ever thought about how to make things move from one place to another without wheels? Hint – it is there in your surroundings itself. Try to answer these questions:
- How do we, human beings, move? __________________________________
- How does a snake move? __________________________________
- How does a frog move? __________________________________
There are other forms of movement as well, such as wiggling, jiggling, creep, leap, and bouncing, which we will explore later. Walking, hopping, slithering, and rolling are some of the most common locomotion techniques used by robots today, and we shall learn about these forms of movement in detail in this chapter.
In this chapter, we shall focus on the core robotics model and eventually increase the complexity of programming as well. In this chapter, you will build a robot that moves with the help of legs and linkages. Furthermore, you will strengthen your construction skills by building this robot using your LEGO BOOST kit.
In this chapter, we will cover the following topics:
- Building a robot without wheels
- Let's code the robot without wheels
- Time for a challenge
We will end the chapter with some captivating challenges for you to solve. Let's discuss types of movement first.
Different types of movement
Let's first try to understand the various ways in which we can make our robot move. These movements are like some animals' locomotion methods:
- Walk – This type of movement is the human method of moving around. Observe the movement of your legs when you move. They have various linkages, such as the knees, ankles, toes, and so on. All these things in coordination ensure that we can move smoothly across most types of terrain. Can you name at least three animals that use walking as their mode of movement? ______________________________
- Hop – Hopping is basically jumping on either both your feet or on one foot. Animals such as frogs, kangaroos, and grasshoppers hop! MIT started developing hopping robots in the 1980s.
- Slither – Snakes slither. Robots can also move in this way. The Japanese ACM-R5 snake robot can navigate both on land and water.
- Rolling – Any robot that uses wheels to move is a rolling robot. They are most efficient on smooth surfaces.
Let's move on to building this robot now.
Technical requirements
In this chapter, you will need the following:
- LEGO BOOST kit with 6 AAA batteries, fully charged
- Laptop/desktop with Scratch 3.0 programming and an internet connection
- A ruler, pencil, and paper, along with some small, colorful sticky notes
Building a robot without wheels
In this section, we are going to build a robot that can hop, as shown in the following image:

Figure 3.1
Let's build the robot by following these building instructions:
- Take your BOOST Hub. Ensure that all six batteries are fully charged:
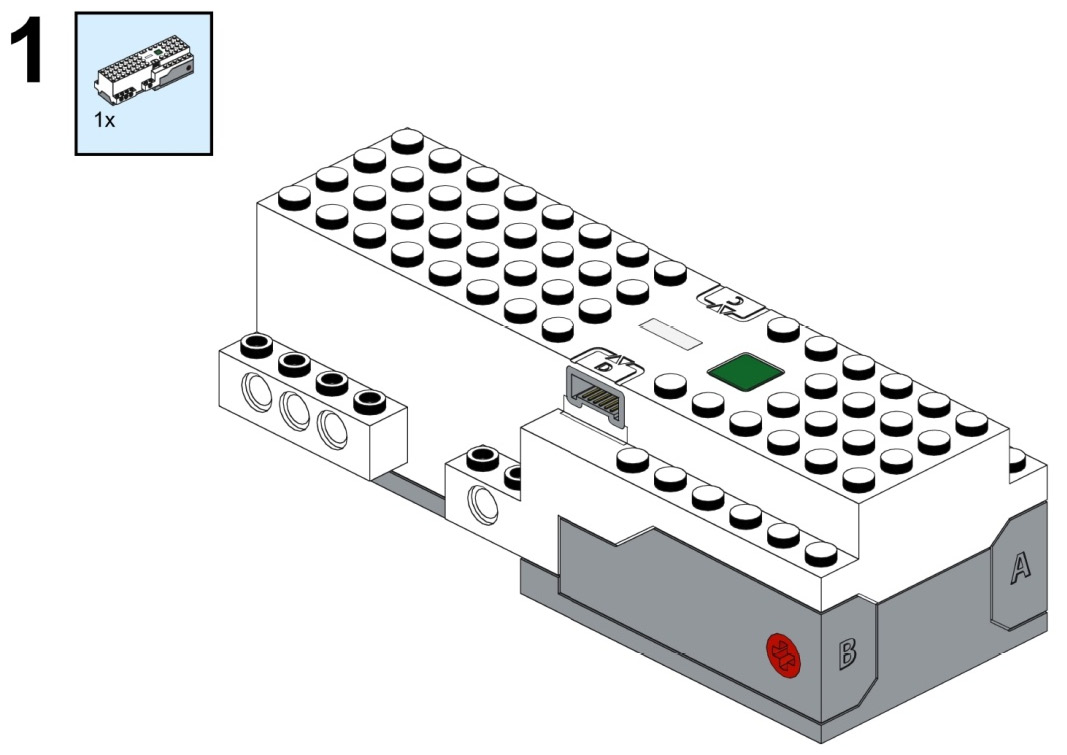
Figure 3.2
- Take two 3M pegs and connect them with the BOOST Hub:

Figure 3.3
- Now take a 7M beam and connect it to the pegs that you just attached to the BOOST Hub:

Figure 3.4
- Now take a 16M Technic beam and connect it to the 7M beam:
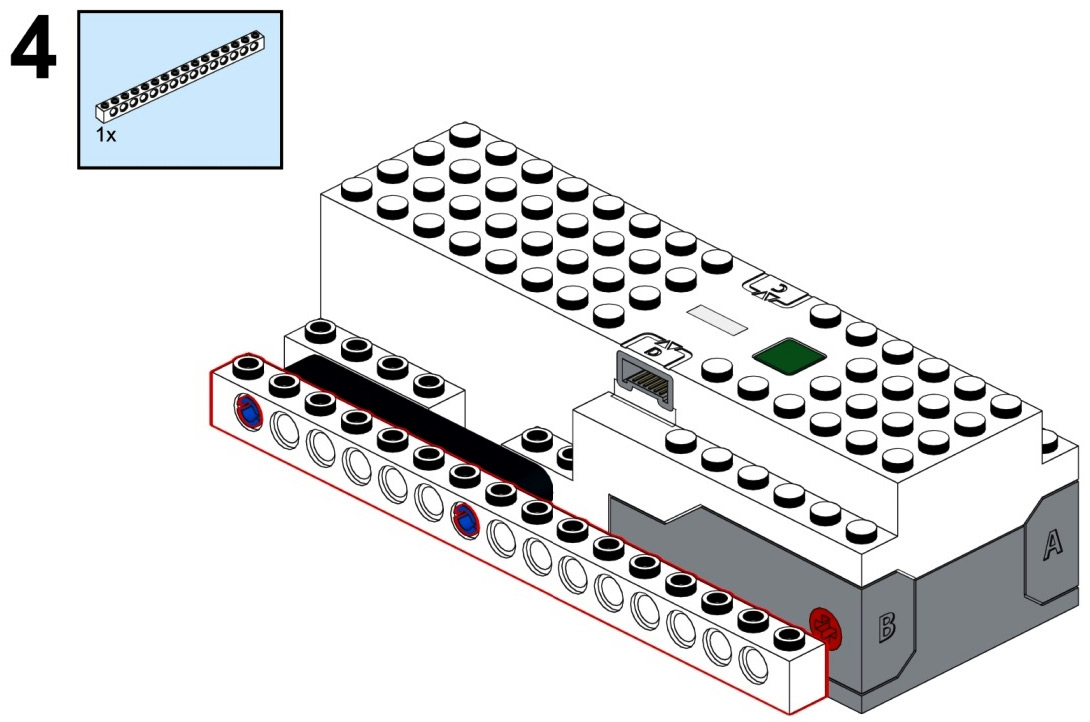
Figure 3.5
- Now, take a full bushing, a 1x2 beam with cross and hole, a 5M cross axle with an end stop, and a 4x4 Technic angular beam. Take this angular beam and the 1x2 beam and pass your 5M cross axle through this. Make sure that this axle passes through the cross of the 1x2 beam. Now, place the full bushing between the hub and the Technic beam and push the axle in until it is connected with motor port B:
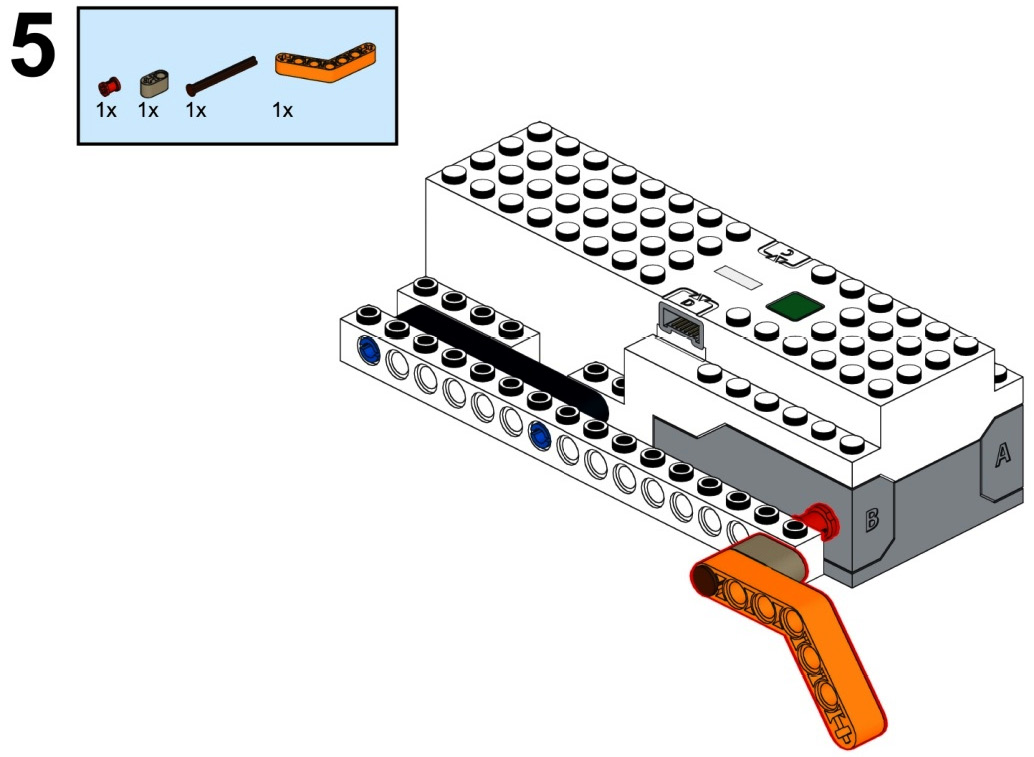
Figure 3.6
- Let's build a similar structure on the other side. Turn the BOOST Hub around. Take two 3M pegs and connect them to the hub as shown:
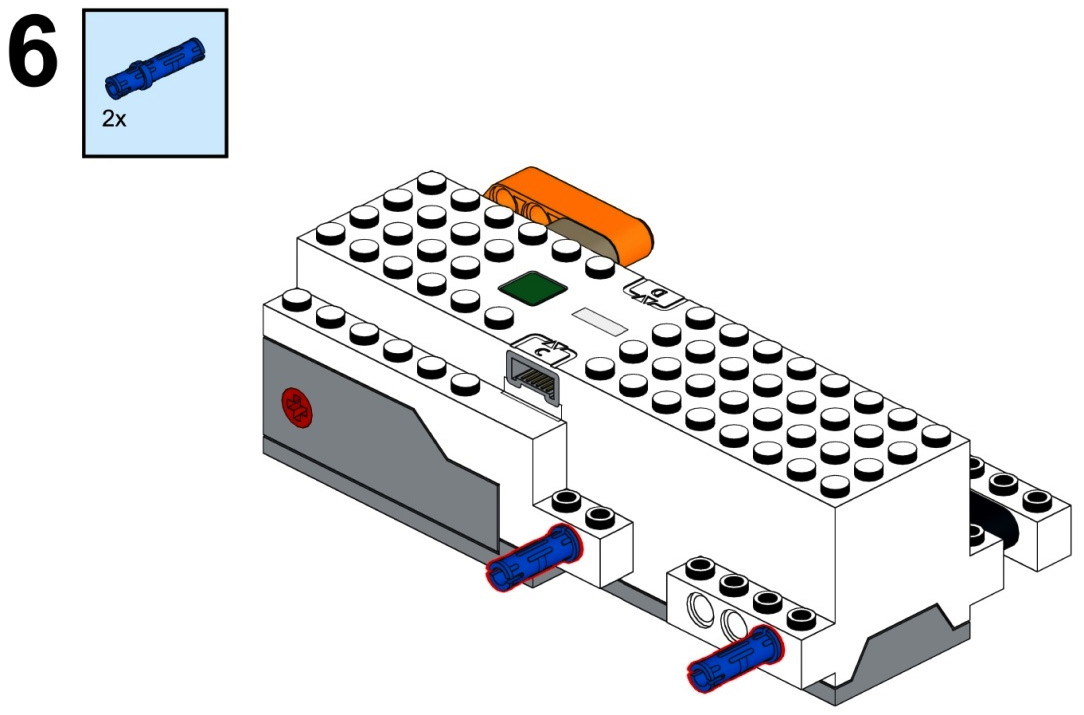
Figure 3.7
- Now, take a 7M beam and connect it to the pegs:
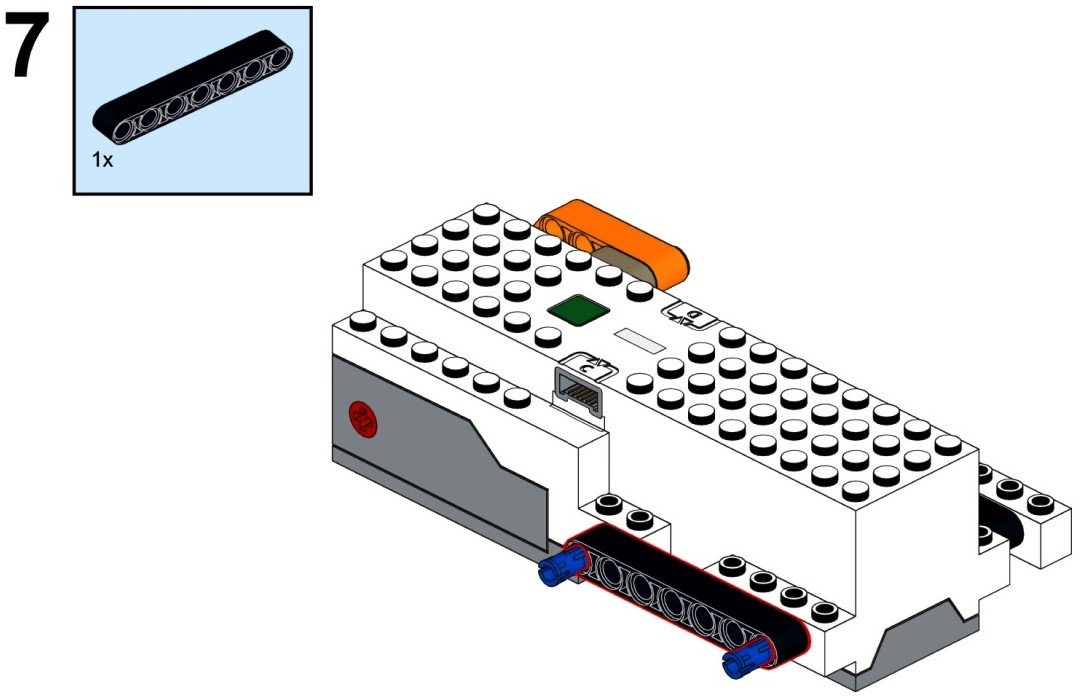
Figure 3.8
- Now take a 16M technic beam and connect it to the 7M beam:

Figure 3.9
- Now take a full bushing, a 1x2 beam with cross and hole, a 5M cross axle with end stop, and a 4x4 Technic angular beam. Take this angular beam and the 1x2 beam and pass your 5M cross axle through it. Make sure that this axle passes through the cross of the 1x2 beam. Now, place the full bushing between the hub and the Technic beam and push the axle in until it is connected to motor port A:
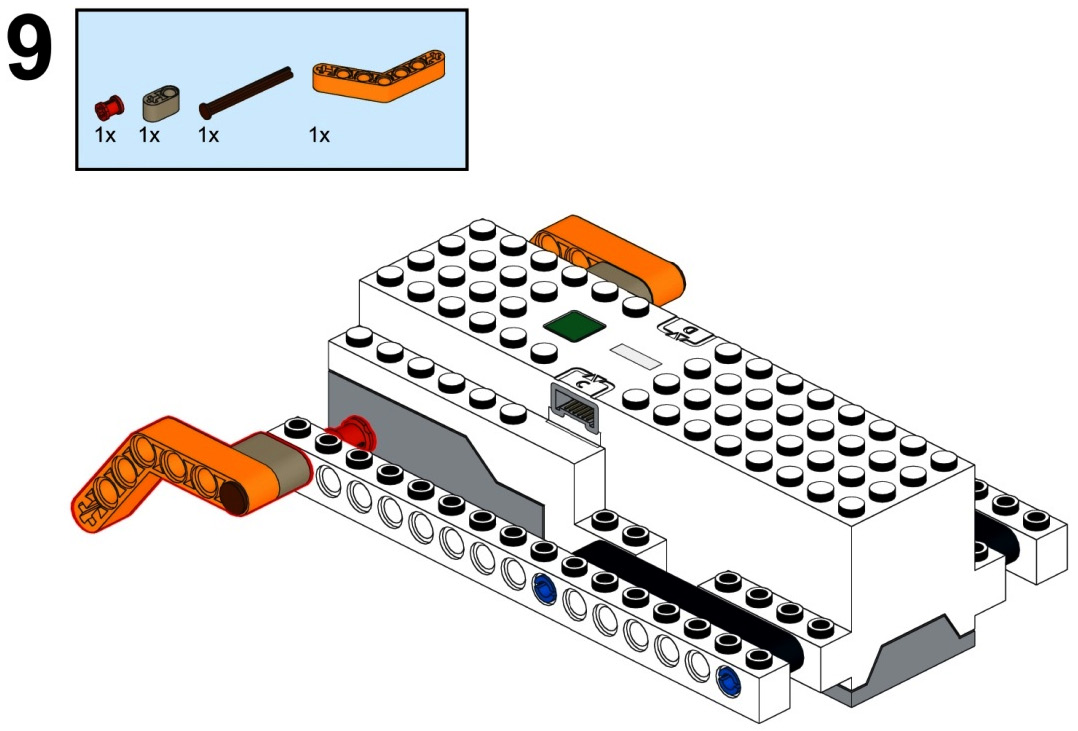
Figure 3.10
- Now, flip your BOOST Hub upside down. Take two 2x3 plates and connect them to the BOOST Hub:
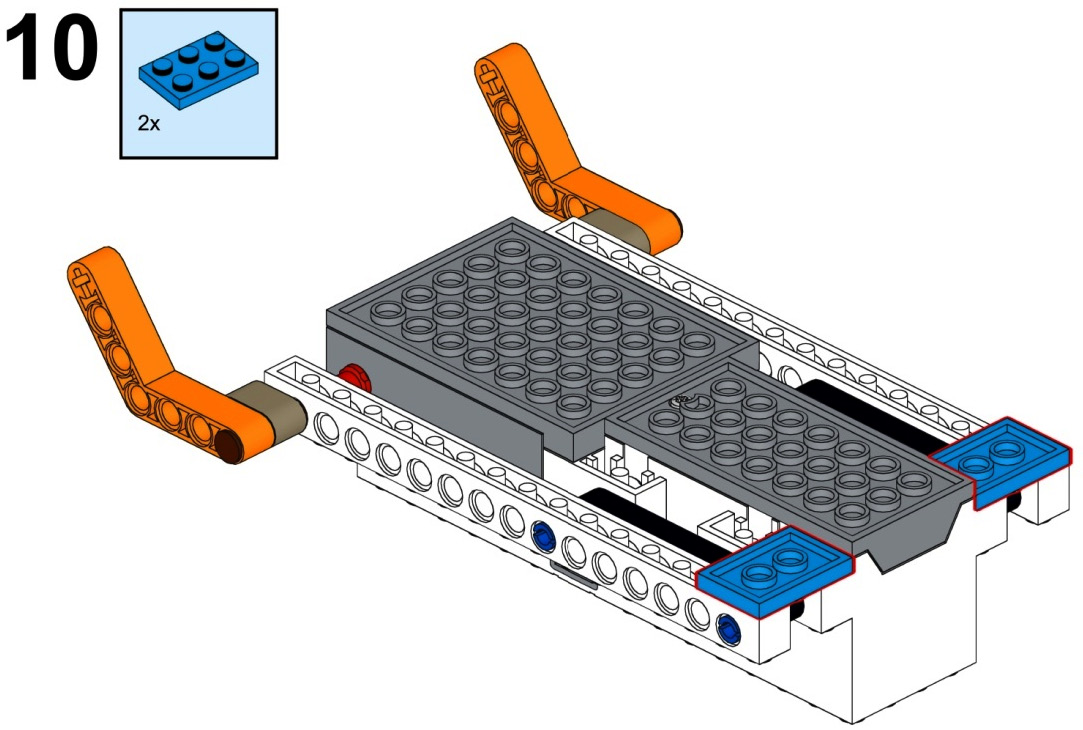
Figure 3.11
- Now take four 1x2 plates, a 2M axle, and one damper. Stack two 1x2 plates, such that they make a pair. Connect them on both sides of the hub as shown. Also, connect the damper to the 2M axle and connect this axle to the cross hole of the 4x4 angular beam:
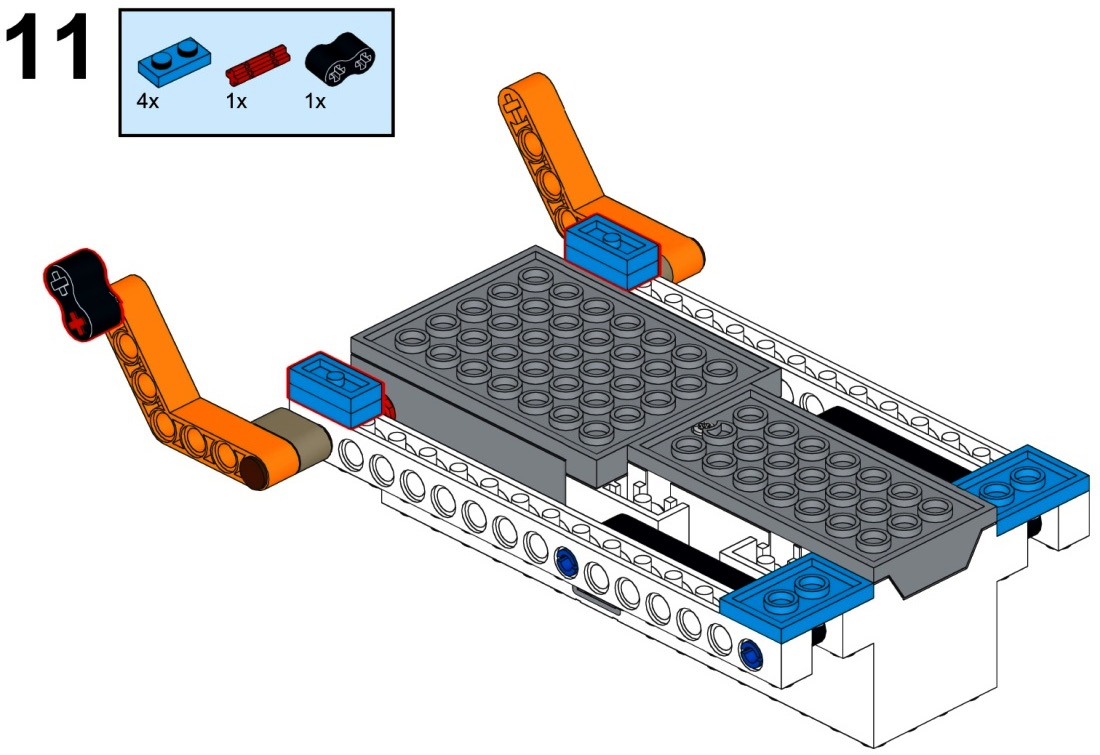
Figure 3.12
- Take a damper and a 2M axle. Connect them to the other leg with the cross hole of the 4x4 angular beam:
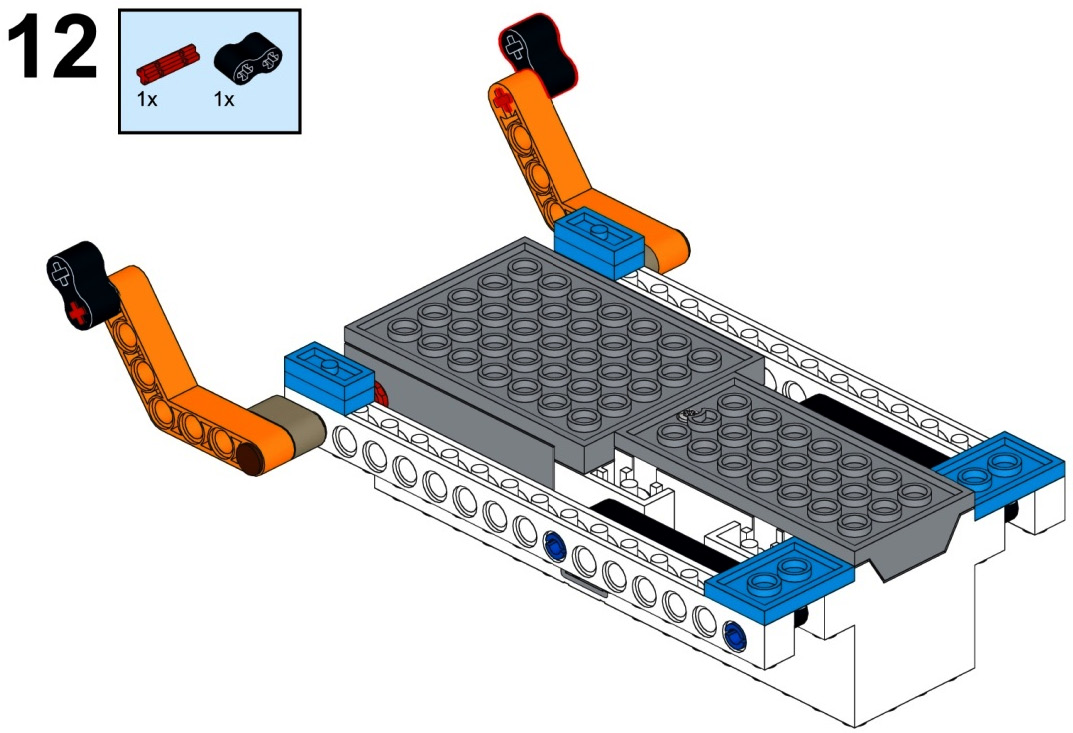
Figure 3.13
- Get your BOOST Hub in the upright position again. Take a 2x6 brick with a bow and attach it to the hub:
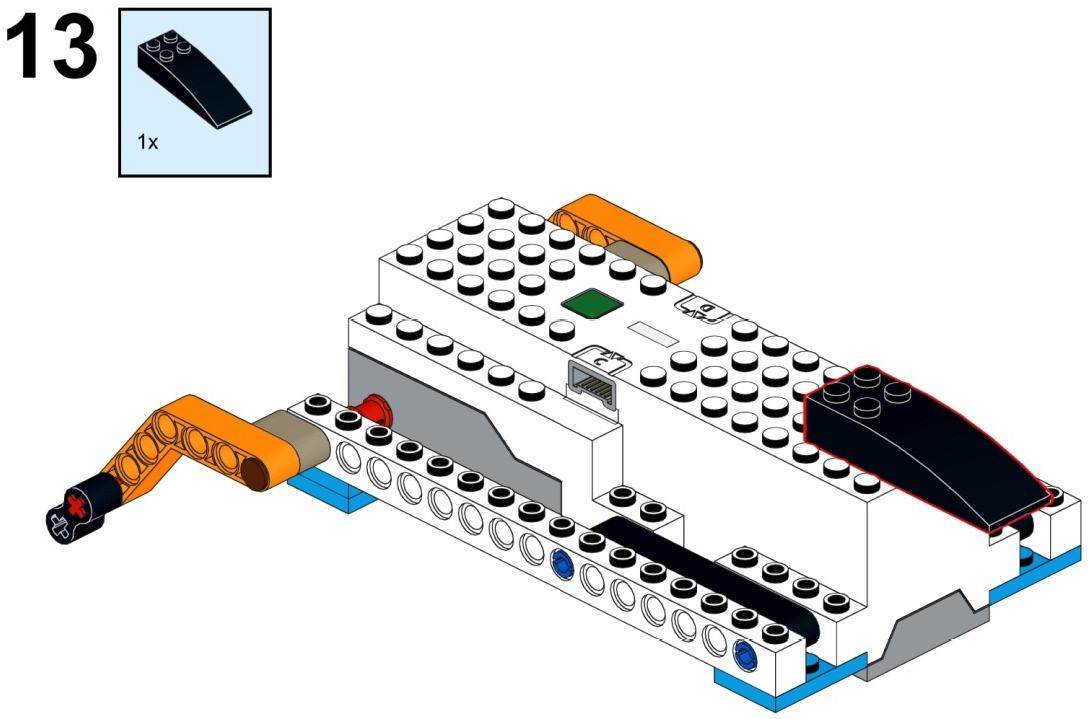
Figure 3.14
- Take two 2x2 roof tiles and connect them to the hub as shown:
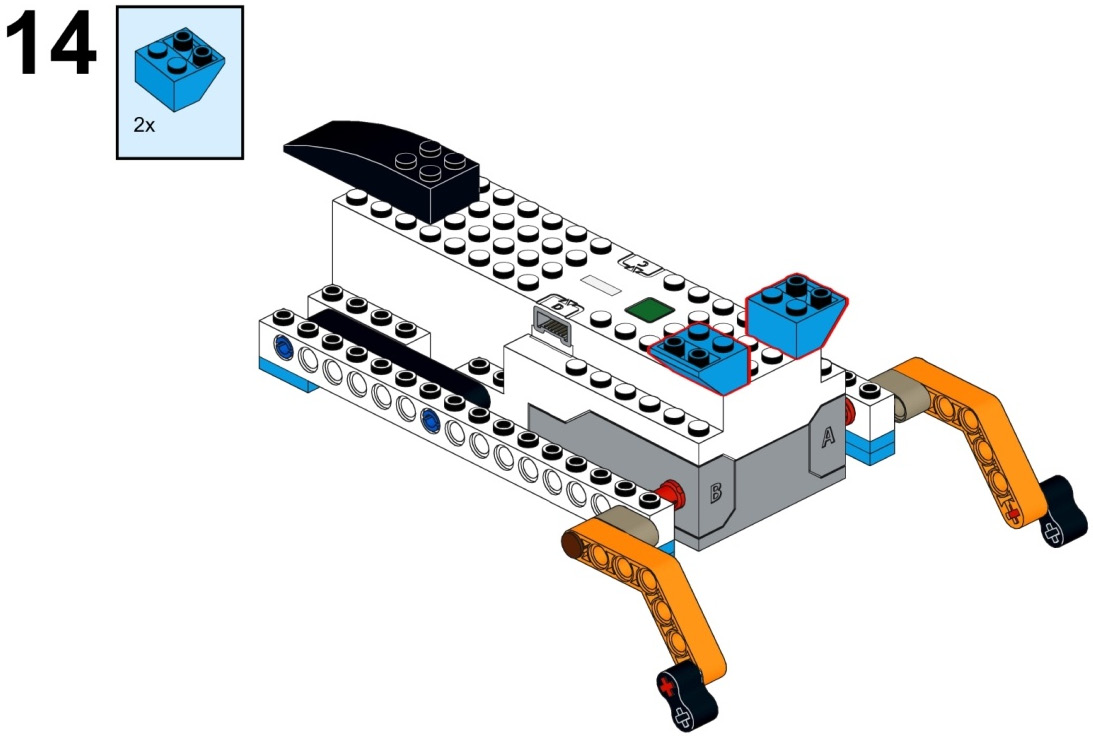
Figure 3.15
- Now take two 1x2 bricks and connect them in between the roof tiles on the BOOST Hub:
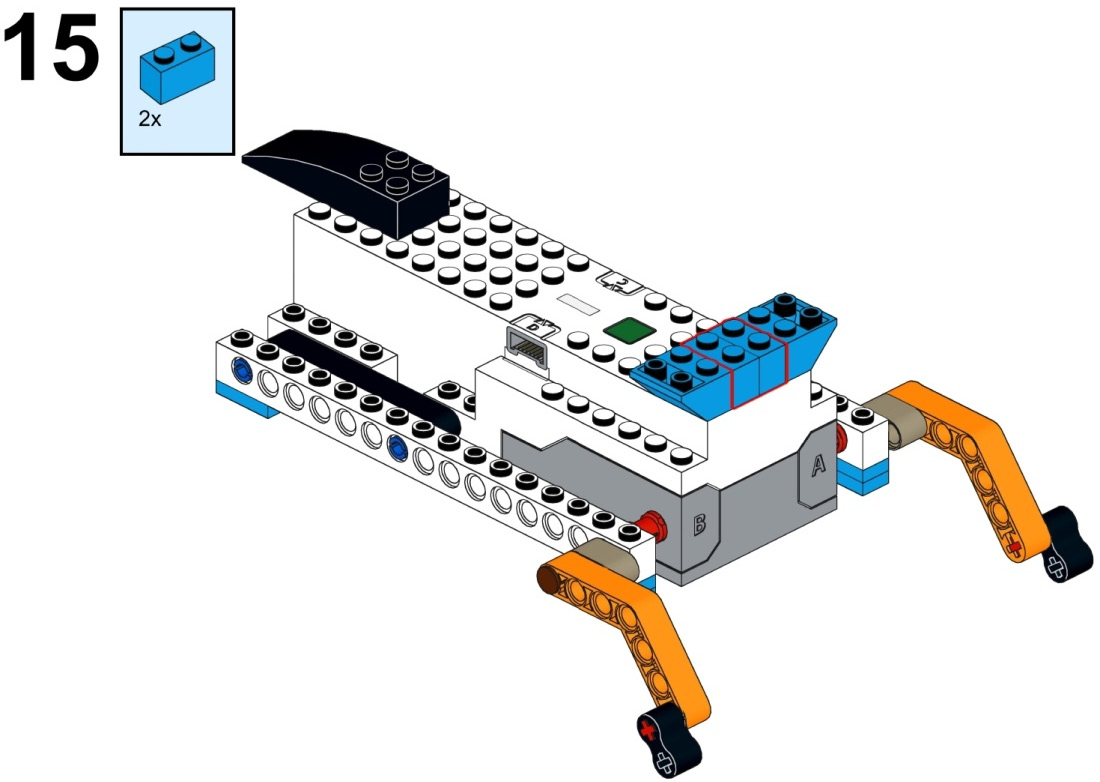
Figure 3.16
- Take a 2x6 plate and connect it to the 1x2 bricks and roof tile bricks as shown:
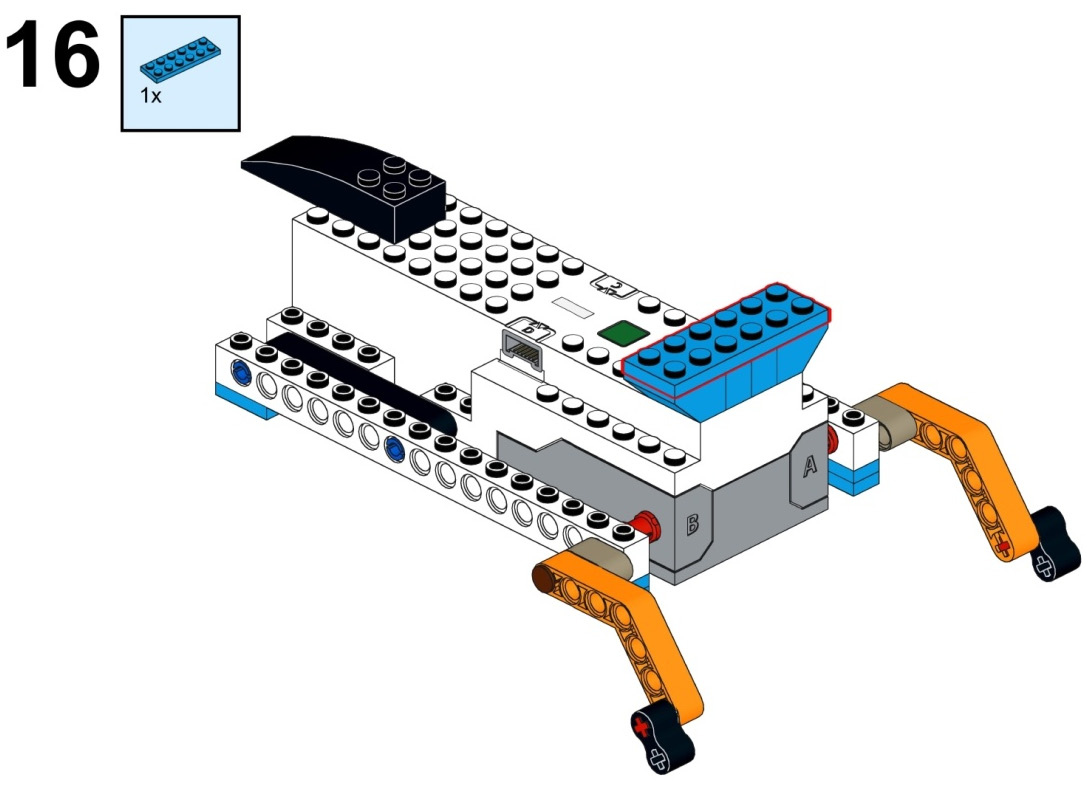
Figure 3.17
- Take two 2x2 roof tiles and connect them to the 2x6 plate that you just attached:
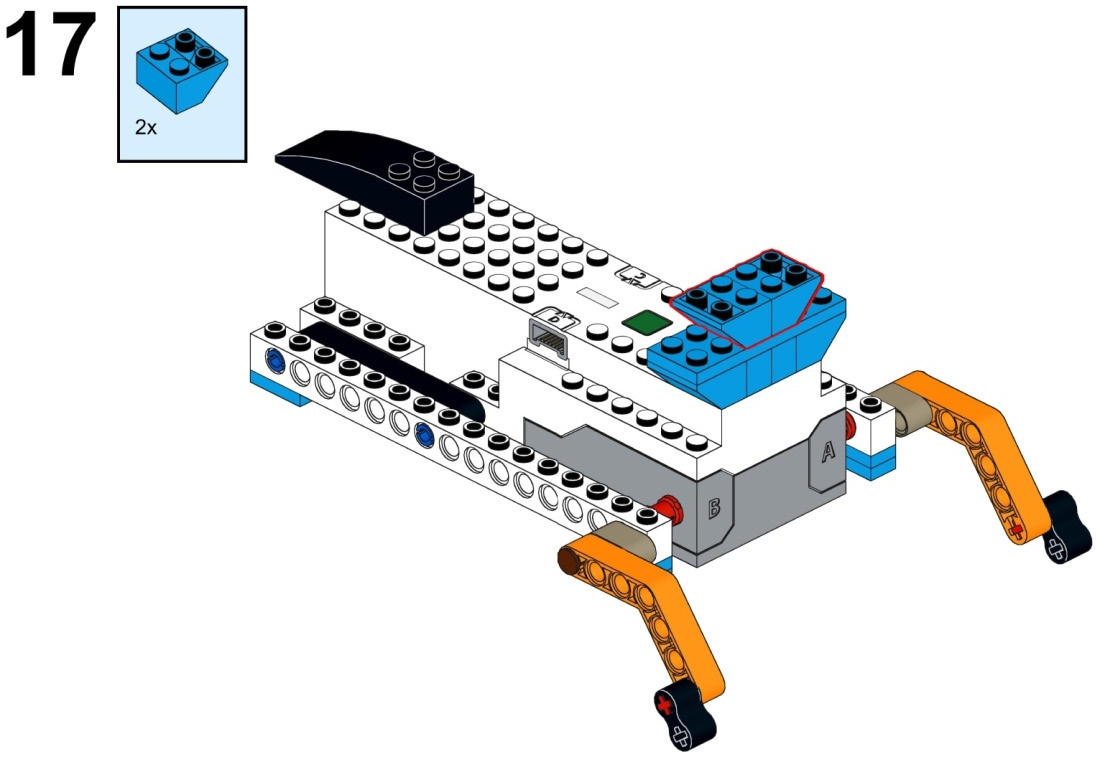
Figure 3.18
- Now take a 2x4 white brick with an eye design and connect it to the 2x2 roof tiles:
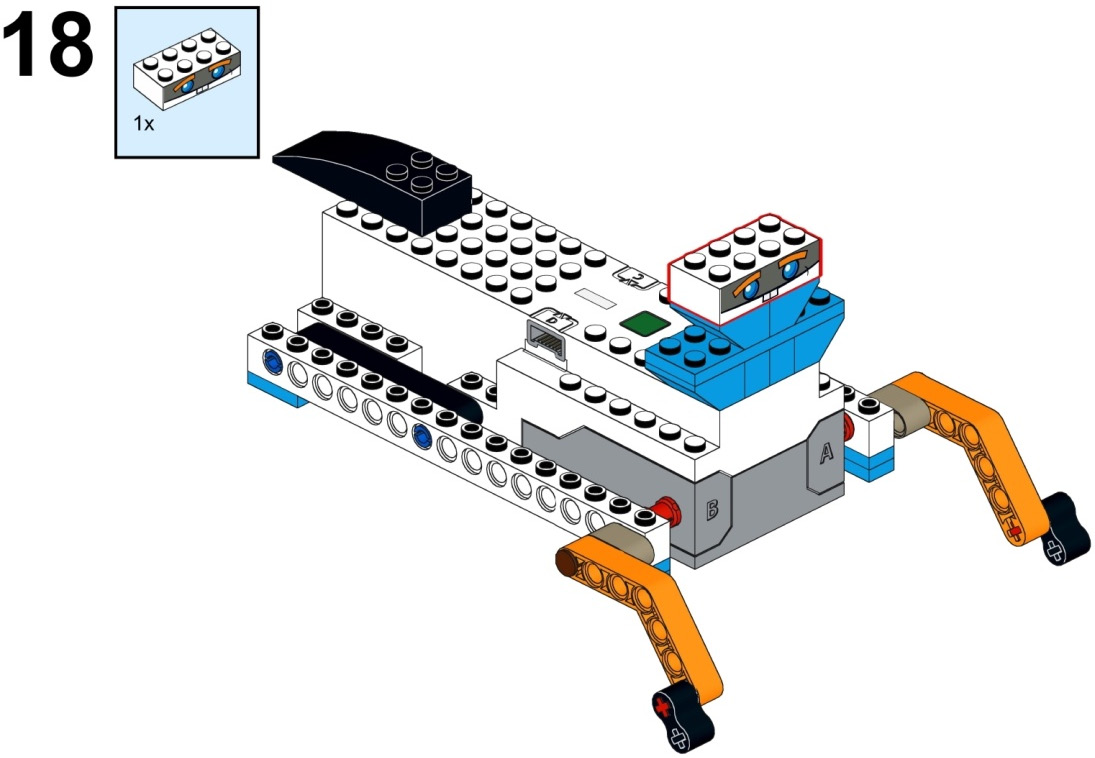
Figure 3.19
The robot that you have built moves in a similar way to a frog: hopping. It will be fun to write a program for this hopper bot.
Let's code the robot without wheels
Open Scratch 3.0 and connect your BOOST Hub to your laptop as per the instructions given in Chapter 2, Building Your First BOOST Robot – Tabletop Fan. While performing some activities today, we shall understand the difference between seconds-based and rotation-based programming.
Before we move on to the task, let's learn about two new programming blocks:
- set light color to: This block changes the light color of your BOOST Hub:
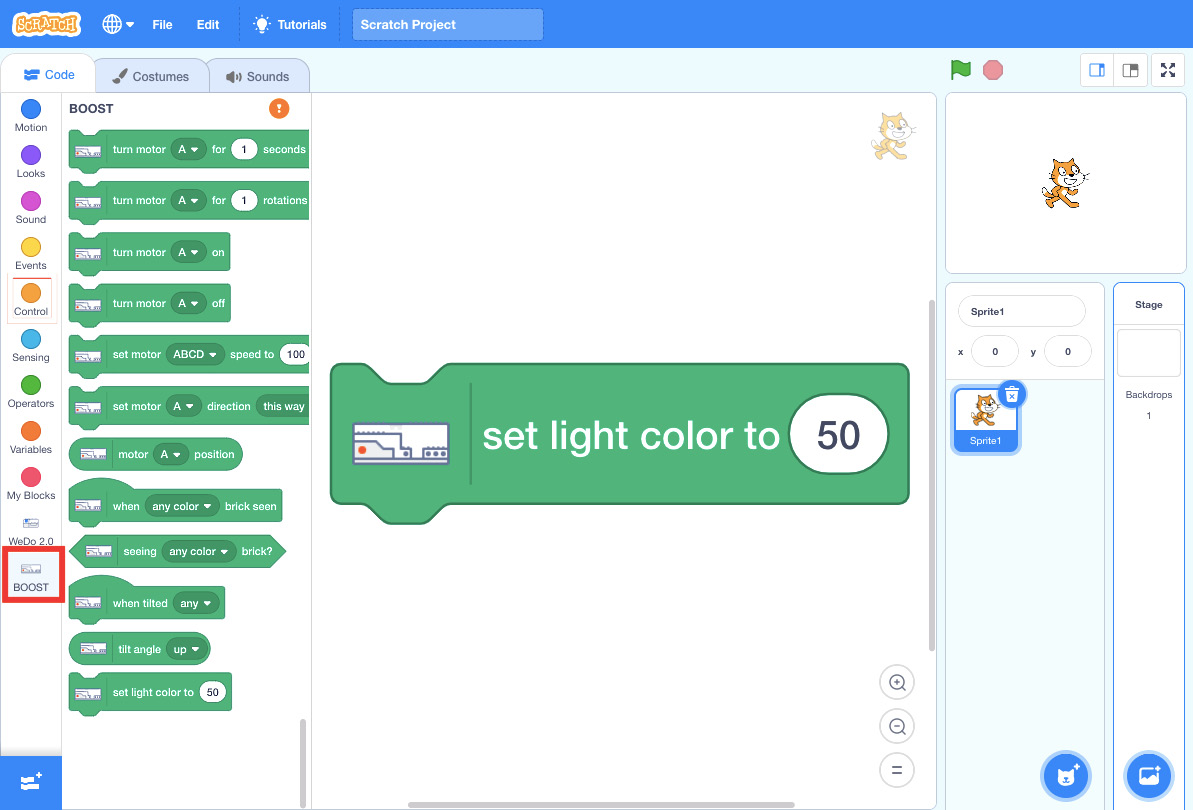
Figure 3.20 – New block to learn
- wait: This block waits for the number of seconds that the user inputs and lets the previous block execute for that time. We will learn how to use it while writing some code in the tasks. This block is found in the Control pallet:

Figure 3.21 – Wait block in the Control pallet
Set light color:
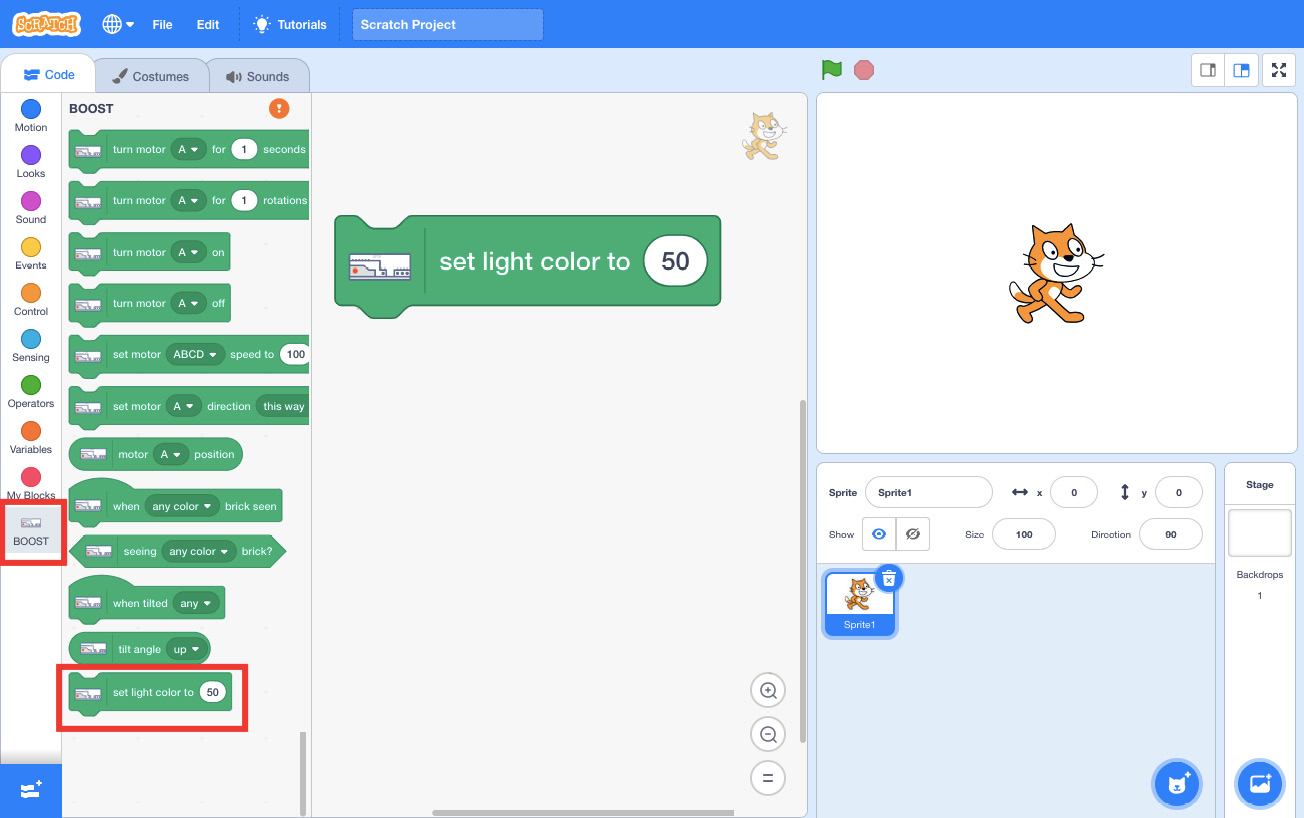
Figure 3.22 - Changing the hub light colors
This is how the light color changes based on the value that you input:

Table 3.1 – Hub light colors
I hope you remember the following tip – break down your problem statement into smaller problems.
Activity #1
Program your robot to move forward at 40% speed for 5 seconds. Mark the start (green sticky note) and stop (red sticky note) positions of your robot. Change the hub light color to blue for 2 seconds when the robot stops.
Let's break our problem statement into smaller steps:
- Set the event to when green flag is clicked.
- Set the motor AB speed to 40%.
- Set the motor AB direction to this way.
- Turn on motor AB for 5 seconds.
- Set light color to 60.
- Wait for 2 seconds:
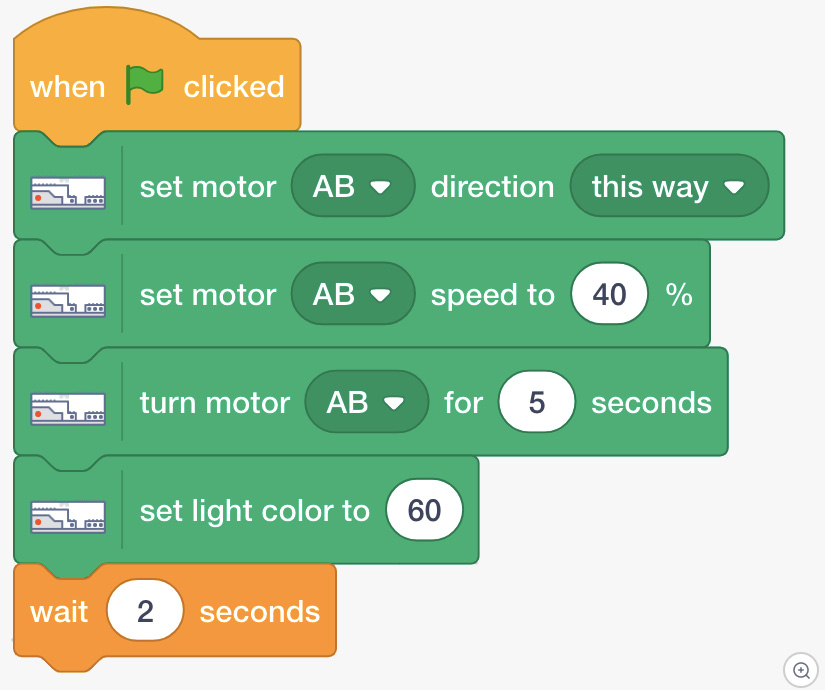
Figure 3.23 – Sample program
Great! Your program is now ready to be downloaded to your BOOST Hub and run. See how your robot hops with this code.
Activity #2
Program your robot to move forward at 40% speed for 5 rotations. Make sure that your starting position is the same as in Activity #1. Mark the stopping position with an orange or any other color sticky note. Change the hub light color to green for 2 seconds when the robot stops.
Write down your problem fragmentation here:
- Step 1 - ____________________________________________________________
- Step 2 - ____________________________________________________________
- Step 3 - ____________________________________________________________
- Step 4 - ____________________________________________________________
- Step 5 - ____________________________________________________________
- Step 6 - ____________________________________________________________
- Step 7 - ____________________________________________________________
Once you've done this, write your code in Scratch and run the robot.
Did you observe the difference between the two activities? Although your starting position and motor power are the same, your stopping position is different in each activity. It means that move for __ seconds and move for __ rotations are completely different.
Rotation-based movement gives precision to our robot's movement. Regardless of the battery level, your robot will always travel the same distance in rotation-based programming.
But in seconds-based programming, the distance traveled by your robot will be dependent on the battery level of your BOOST Hub. If the battery level is low, the distance traveled for the same time and at the same motor power will be less than if the battery was at full power. This reduces the consistency of your robot's performance. There are some advantages associated with seconds-based programming, which you will explore in the chapters coming up next.
Activity #3
Since you have marked the starting and stopping position of the robot in Activity #1 and Activity #2, let's use the ruler and measure the distance covered by your robot in each case:
Distance covered in activity #1 = ____________ cm
Distance covered in activity #2 = ____________ cm
As you can see by your answers, it is not true that the robot moves the same distance when it goes forward for either 5 seconds or 5 rotations. They are different.
Time for a challenge
Time to test your learning! Read the problem statement twice.
Challenge #1
Do you know that you can measure the speed of your robot if you have its distance traveled as well as the time taken? The formula to calculate speed is total distance traveled / total time taken. Try to calculate the speed of your robot in each case. You can use the empty spaces in the following sections to do the math work.
Distance traveled in Activity #1 = _________ cm
Time taken = 5 seconds
Speed = ______ cm/second

Distance traveled in Activity #2 = _________ cm
Time taken = _________ seconds (run your robot again and measure the time taken)
Speed = ______ cm/second

Challenge #2
Program your robot to move forward at 80% speed for 5 seconds. Mark the start and end positions and calculate the speed of your robot.
Distance traveled = _________ cm
Time taken = 5 seconds
Speed = ______ cm/second

Did you observe that your robot has traveled more distance in the same time of 5 seconds than in Challenge #1? In seconds-based programming, the distance traveled by the robot is purely based on the motor power and the amount of time the motor runs for. So, for the same period, the robot travels further if motor power is high, and it travels a shorter distance if the motor power is low.
Challenge #3
Program your robot to move forward at 80% speed for 4 rotations. Mark the start and end positions and calculate the speed of your robot.
Distance traveled = _________ cm
Time taken = ________ seconds
Speed = ______ cm/second
Did you observe that your robot has covered the same distance as in Challenge #2 but in less time because you increased the motor speed level? Rotation-based programming always adds consistency to your robot's performance.
Summary
In this chapter, you learned how to build a robot that can move forward and backward without wheels. You also learned about various ways in which things can move even without wheels, such as by hopping or slithering. A new programming block called brick light was introduced, which can change the light color of the BOOST Hub brick. You also learned the difference between rotation-based and seconds-based programming, with their respective advantages and disadvantages. In the next chapter, you will learn how to build a basic robot with wheels and learn more about programming, making your robot turn, and making shapes such as squares, circles, and triangles.
Further reading
Do you know that satellites are objects launched by humans into orbit for various purposes? They revolve around the Earth, collect data as they are programmed to, and send the data back to Earth. This data is then used for various purposes. Google Maps and Apple Maps are dependent on data sent by satellites. You can read more about satellites at https://www.esa.int/kids/en/learn/Technology/Useful_space/Satellites.