
Chapter 5: Getting into Gear – My First Geared Robot
A wheel with teeth on it is called a gear. A gear is used for various applications, including the following:
- Changing the speed of an object
- Changing the direction of the force that's being applied
- Changing the torque of an object
Whether it is your parents' car or their bike, vehicles use gears to move. Gears are used in almost all machines, mechanisms, and robots. You can find at least one application of gears in your printer, machine tools such as drills, industrial robots, packaging machines, and so on. The most common example of where you can find gears is in the wall clock in your home! The hours, minutes, and seconds hands are all interconnected with the help of complex gear mechanisms.
In this chapter, you will learn about various concepts surrounding gears, such as gear ratios and torque, by performing some useful hands-on experiments. We will be covering the following topics:
- Using different types of gears based on your requirements
- Understanding some important terminologies
- Building the geared robot
- Let's code the robot in gear up and gear down mechanism
- Time for a challenge
First, let's build the geared robot.
Technical requirements
In this chapter, you will need the following:
- A LEGO BOOST kit with six AAA batteries, fully charged
- A laptop/desktop with Scratch 3.0 installed on it and an active internet connection
- A diary/notebook with a pencil and eraser
Using different types of gears based on your requirements
Gears can be made from different materials such as plastic and metal, depending on their use. Different types of gears have different applications. Let's understand each of them by referring to the following table:
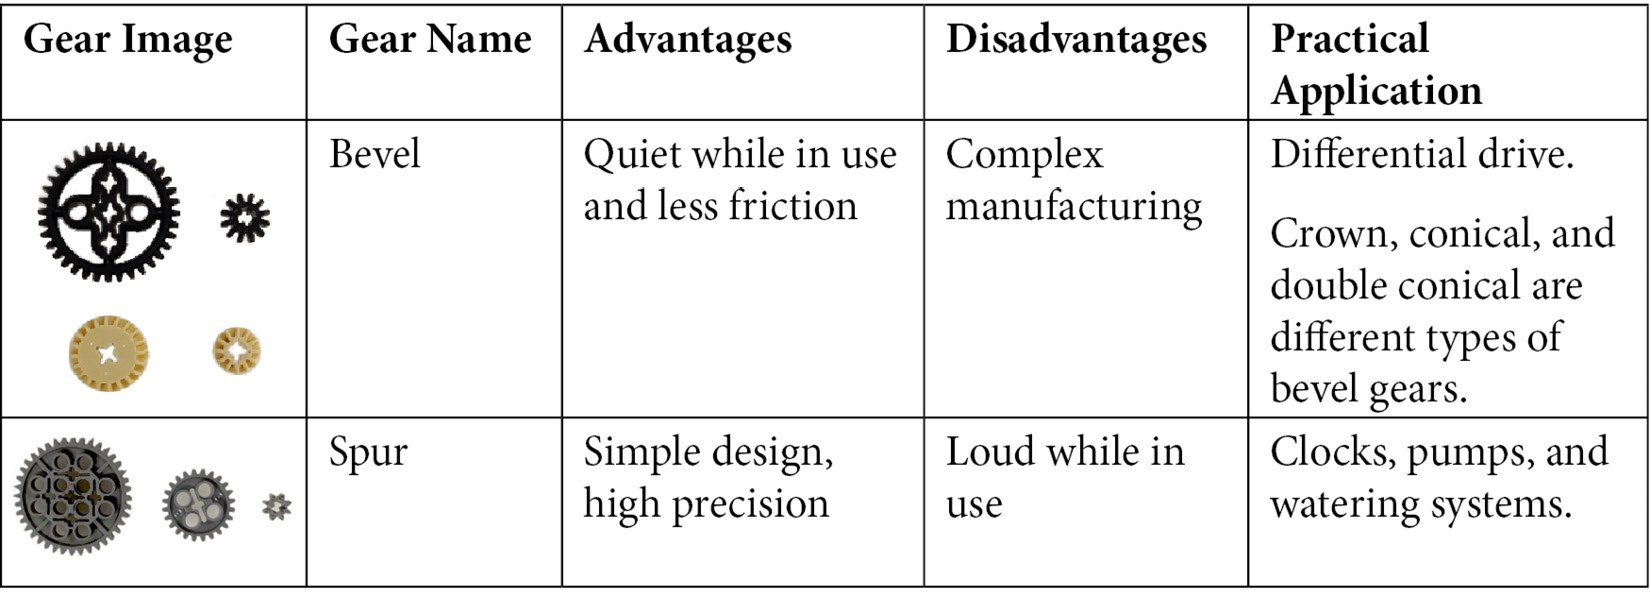

Table 5.1 - Different types of gears
In your LEGO BOOST kit, gears such as bevel, crown, conical, double conical, and spur gears are provided. We used spur gears to construct our robot.
Understanding some important terminologies
Before we learn more about gears and perform this chapter's activities, let's learn about some important terminologies:
- Drive gear: A gear that is connected to the motor.
- Driven gear: A gear that is connected to the drive gear.
- Mesh: This is when the drive and driven gears are connected to each other.
- Gear ratio: The ratio of number of teeth of driving gear / number of teeth of driven gear.
- Torque: The amount of force needed to bring your wheel into motion.
- Gear up: When your gear ratio is greater than 1, this is known as the gear up mechanism. With gear up, your driven gear moves at a faster speed than the drive gear and offers less torque.
- Gear down: When your gear ratio is less than 1, this is known as the gear down mechanism. With gear down, your driven gear moves at a slower speed than the drive gear and offers more torque.
Basically, whenever you need more power – for example, to lift a heavy load, go up a slope, and so on – you need high torque and less speed, which is what the gear down mechanism provides. When you are cruising on a highway at a high speed, you do not need a lot of power but a lot of speed. This is when the gear up mechanism should be used.
Let's calculate the gear ratio for the following gear combinations. The gear on the left-hand side in the first figure is the drive gear, while the one on the right-hand side is the driven gear:
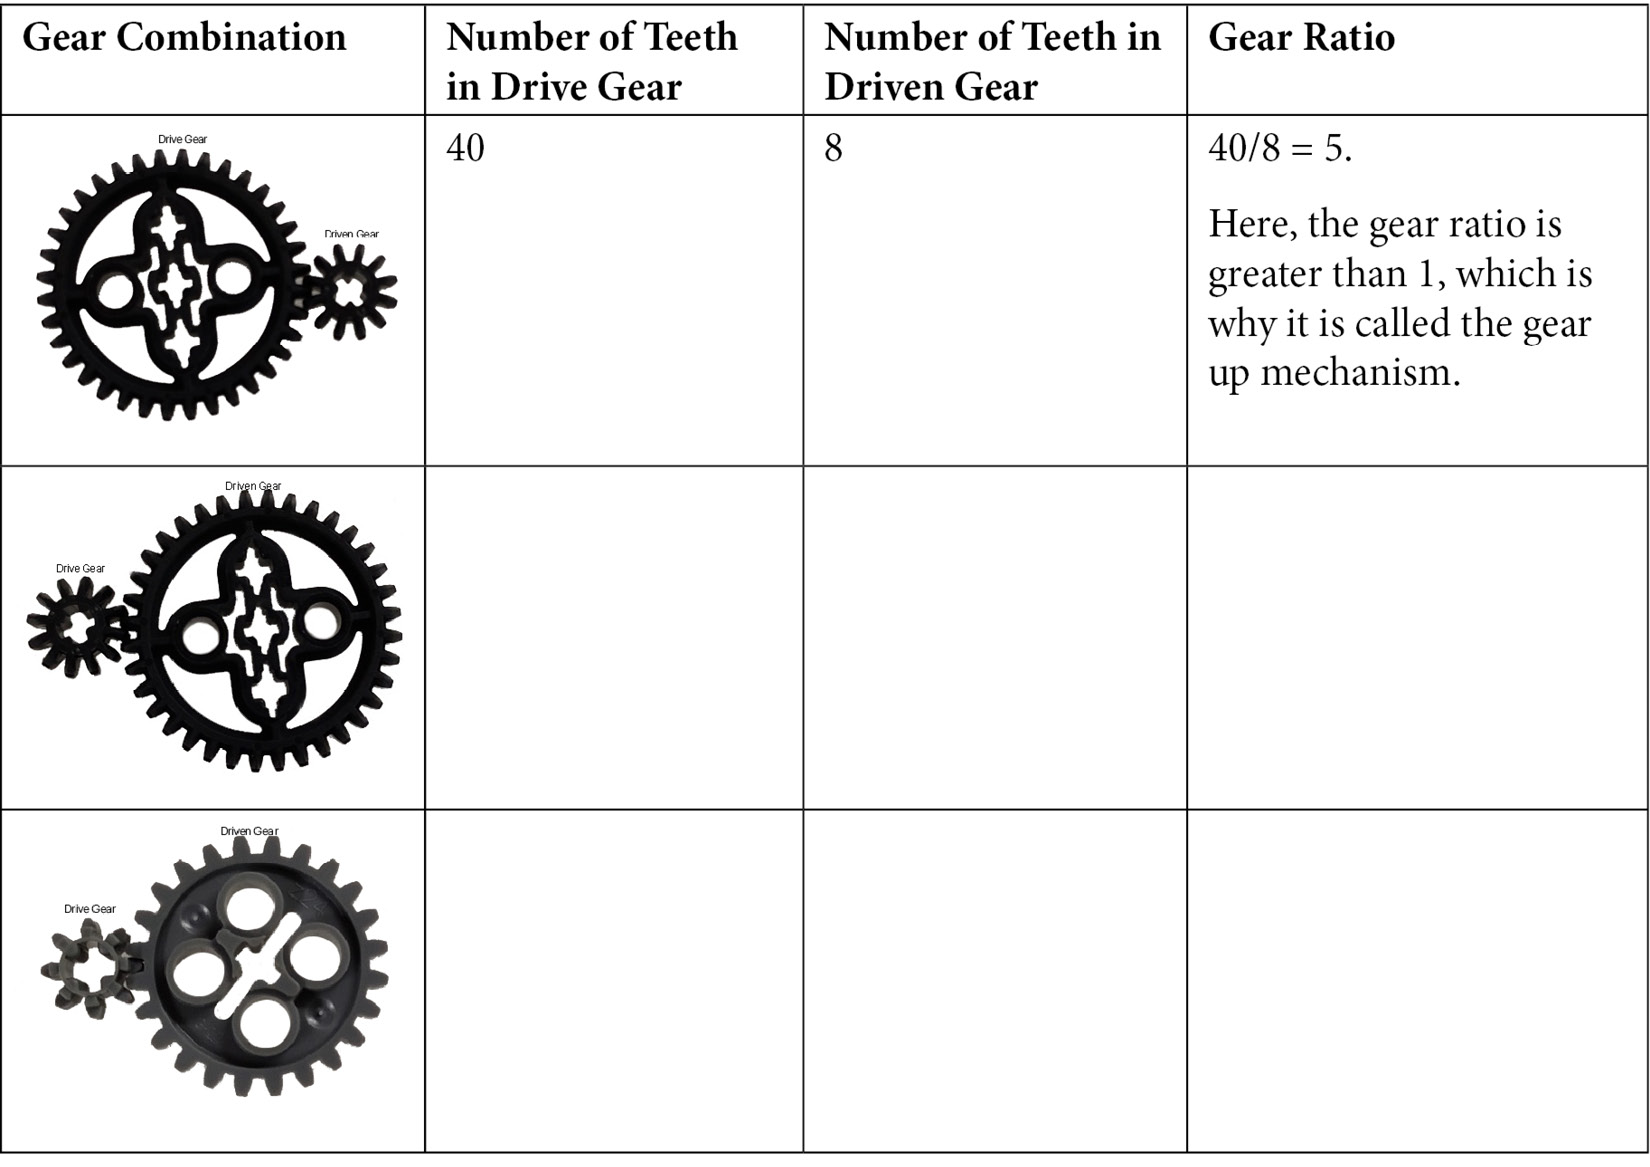
Table 5.2 - Calculating gear ratio
Now, let's start building a geared robot.
Building the geared robot
In this section, we will be building the following robot:
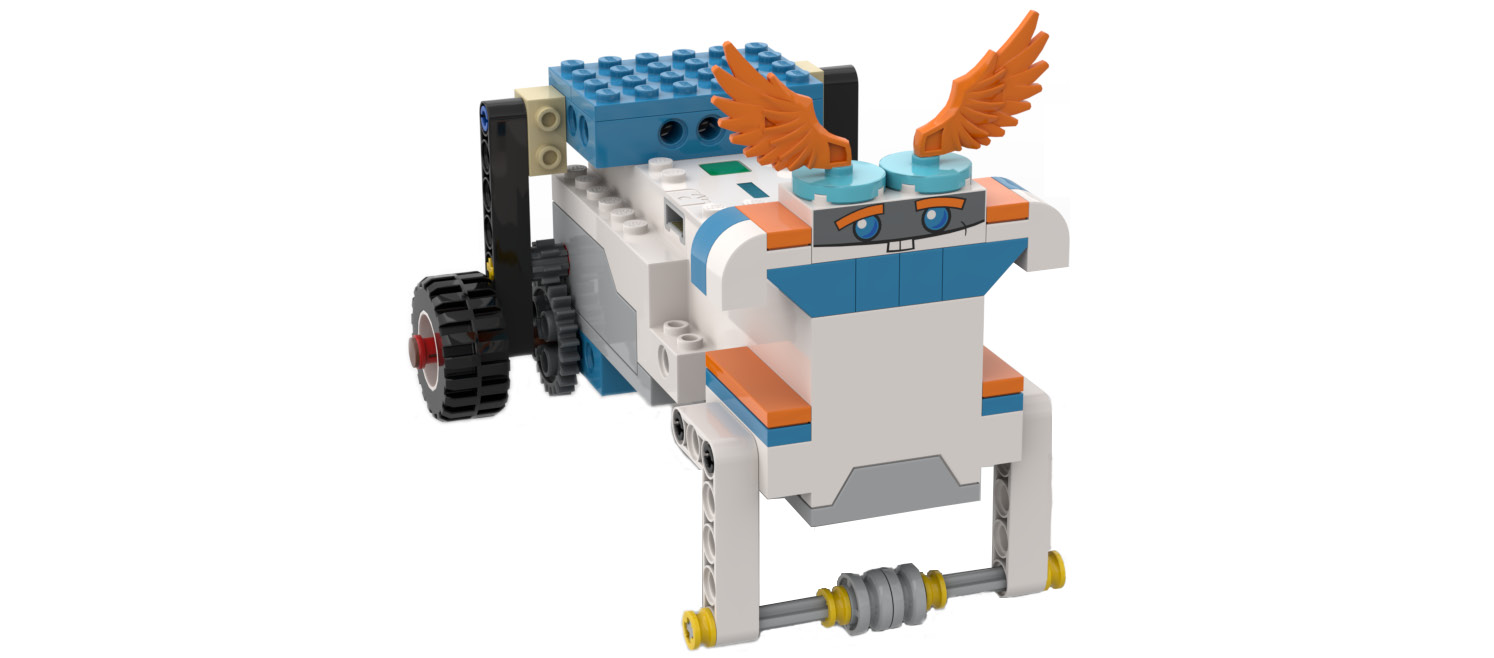
Figure 5.1
To do this, perform the following steps:
- Take your LEGO BOOST Hub and insert six working AAA batteries into it before you start constructing your robot.

Figure 5.2
- Take two 4x6 bricks and connect them to the top and bottom of the BOOST Hub:

Figure 5.3
- Take two 2x5 plates and two 1x4 plates with knobs. Connect the 2x5 plates to the 4x6 brick. Then, connect the 1x4 plates with knobs to the back of the Hub, on both sides:
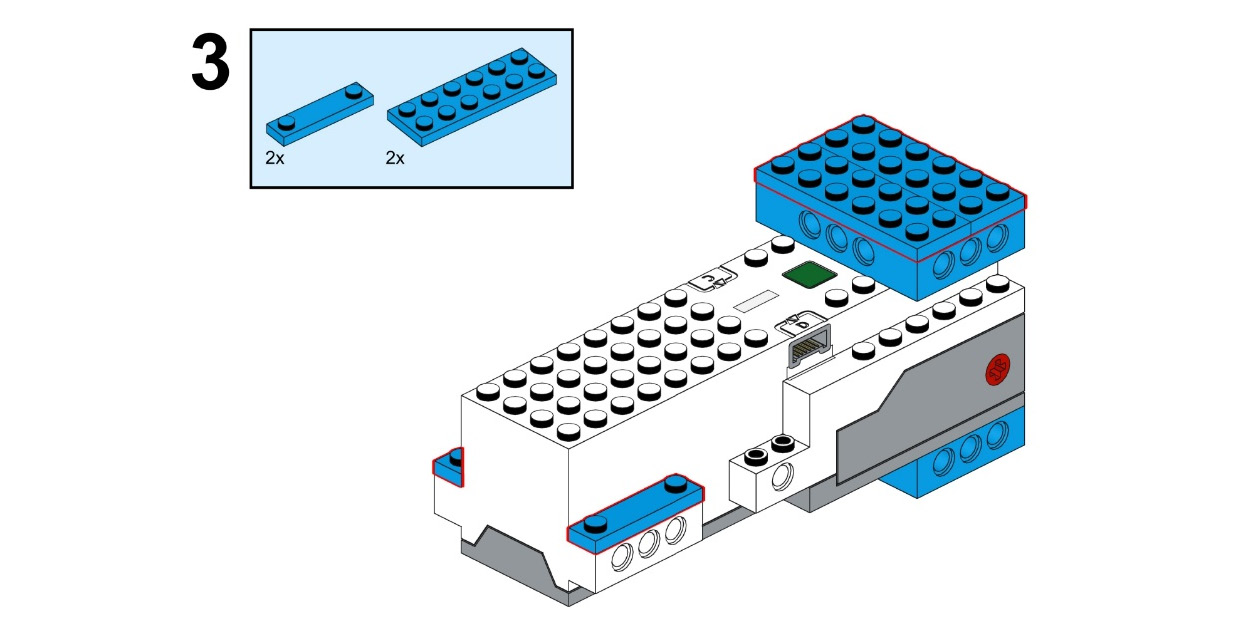
Figure 5.4
- Take two 1x4 flat tiles and connect them to the 1x4 plates with knobs:
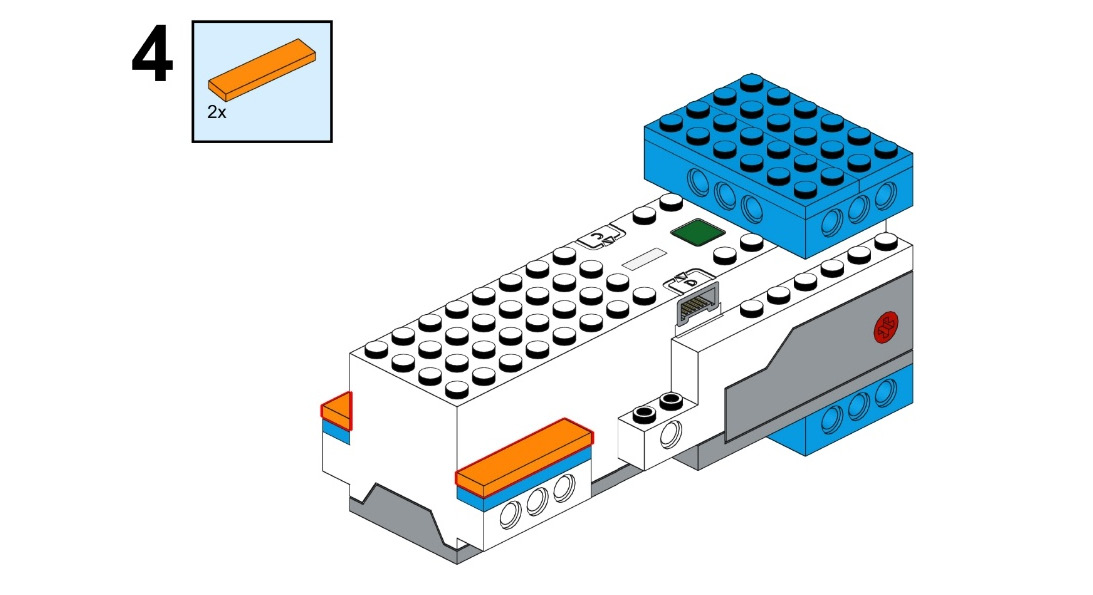
Figure 5.5
- Take two 3M pegs and connect them to the last hole of the 4x6 brick, as shown here:
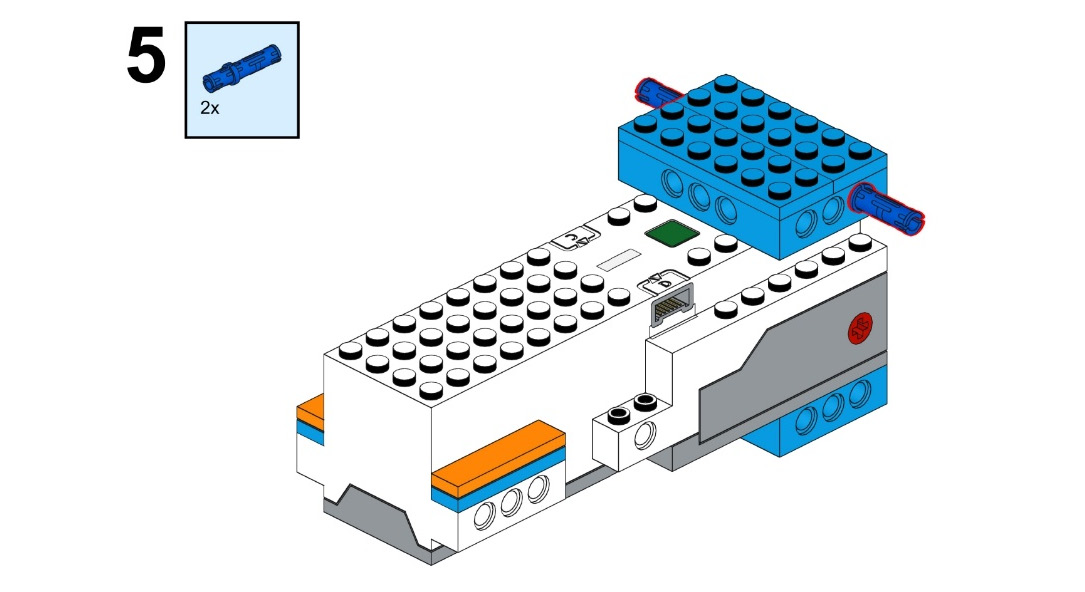
Figure 5.6
- Take two 1x2 bricks with holes. Connect them to the recently connected 3M pegs:
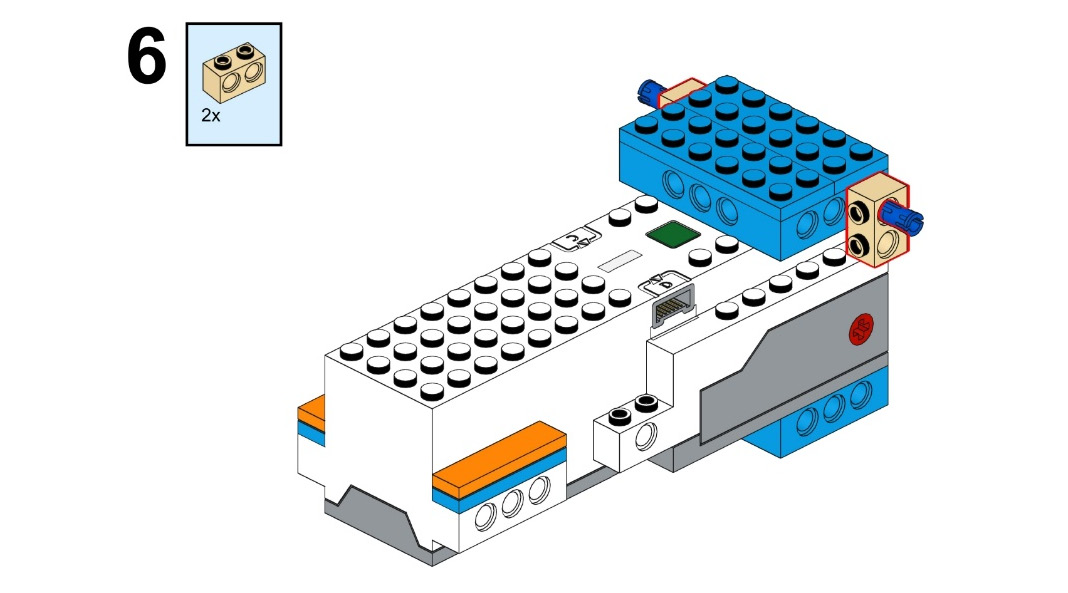
Figure 5.7
- Take two 4M cross axles and connect them to motor A and motor B.
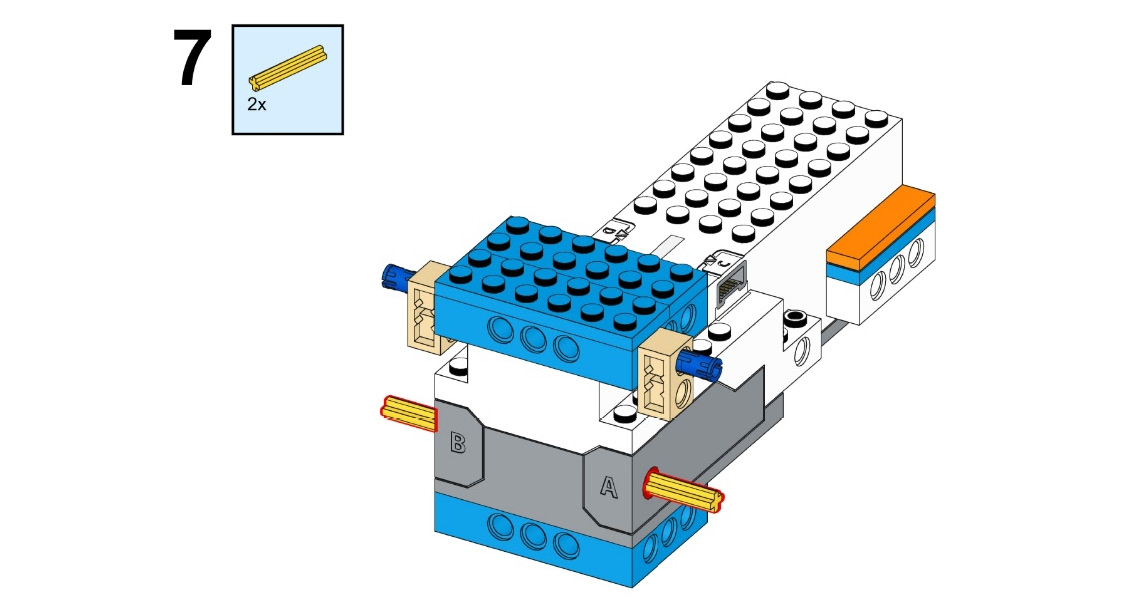
Figure 5.8
- Take two eight-teeth spur gears and connect them to the 4M cross axles on motor A and motor B.

Figure 5.9
- Take two 7M beams. Connect them to the 1x2 brick with holes and the 4M cross axles by their first and fifth holes, respectively:

Figure 5.10
- Take two 24-teeth spur gears and place them beneath the eight-teeth spur gears:
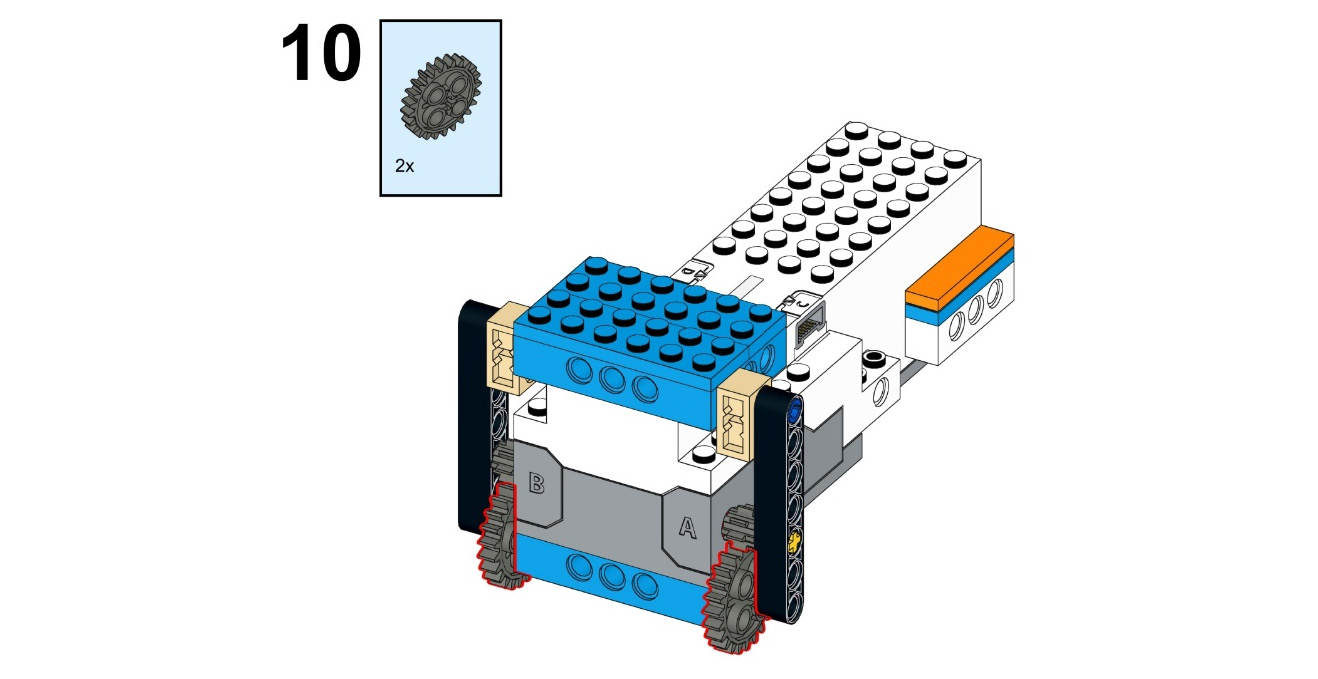
Figure 5.11
- Take two full bushings, two 5M cross axles with end stops, two wide rims with crosses, and two normal wide tyres. Connect the rims to the tyres. Now, insert the stop axles through the full bushing as well as the wheels, and eventually pass it through the last hole of the 7M beam, the 24 teeth gears and the last hole of 4x6 plates as shown in the following figure:

Figure 5.12
- Take four black pegs and connect them to the BOOST Hub, beneath the orange flat tiles, as shown here:

Figure 5.13
- Now, take two 3x5 angular beams and connect them to these pegs on both sides:
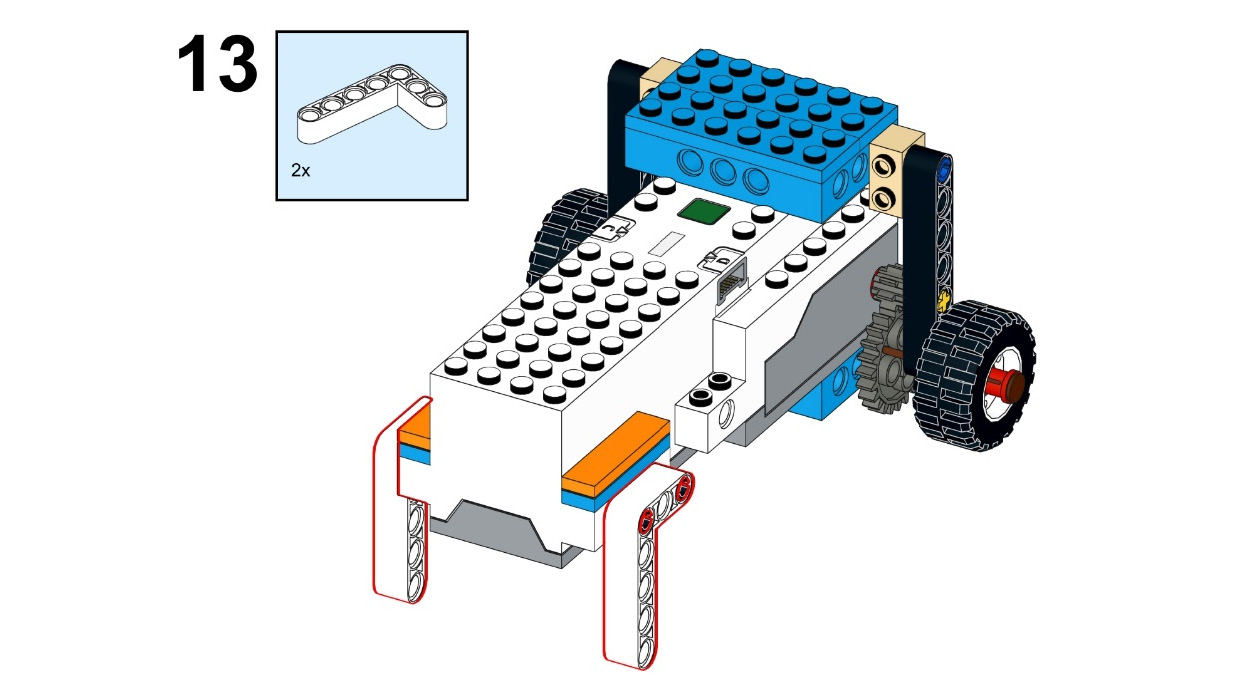
Figure 5.14
- Now, take a 9M cross axle, two hub wheels, and four half bushings. Connect them so that they go through the angular beams, as shown in the following figure. This is your driven wheel:

Figure 5.15
- Now, take two 1x2 bricks and two 2x2 roof tiles. Connect them to the BOOST Hub, as shown in the following figure:
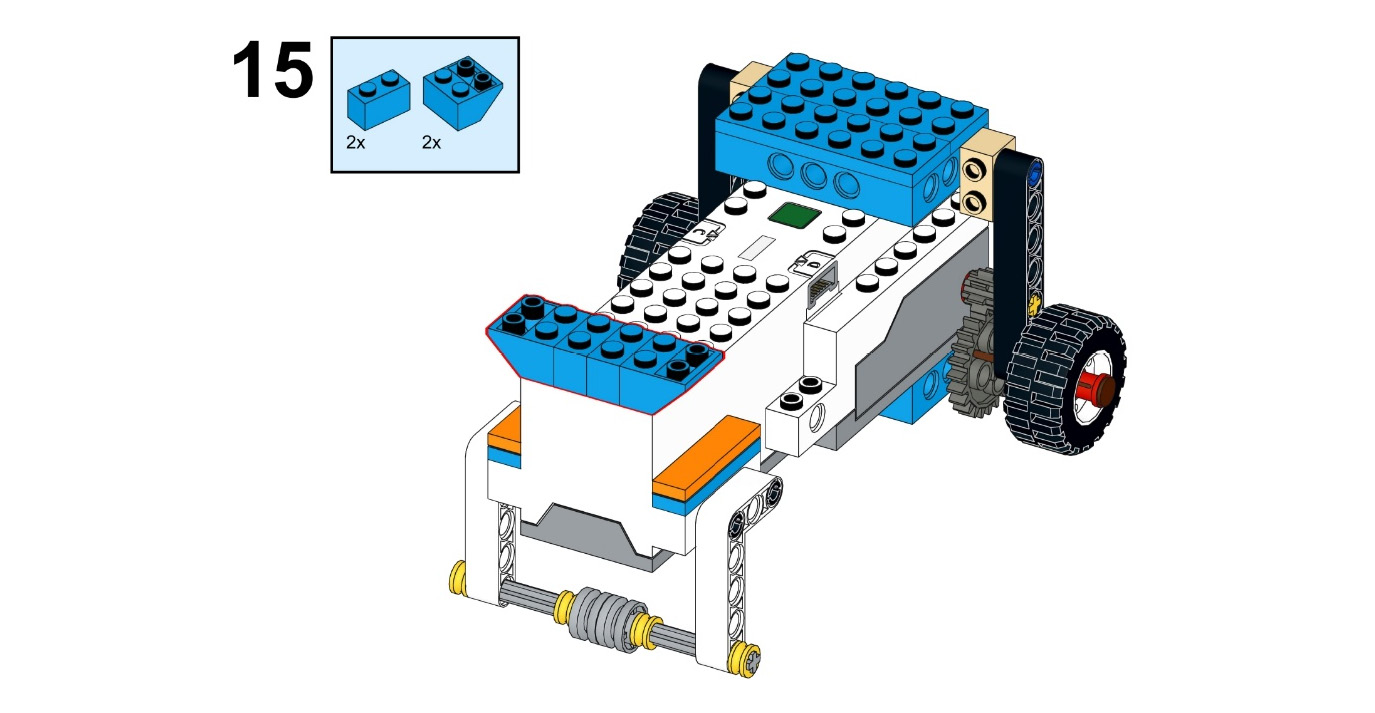
Figure 5.16
- Take two 1x1x1 1/3rd white and blue bricks with arcs and the same blue bricks. Connect them to both sides of the roof tiles, as shown in the following figure:

Figure 5.17
- Take two 1x flat tiles and connect them to the bricks with arcs:
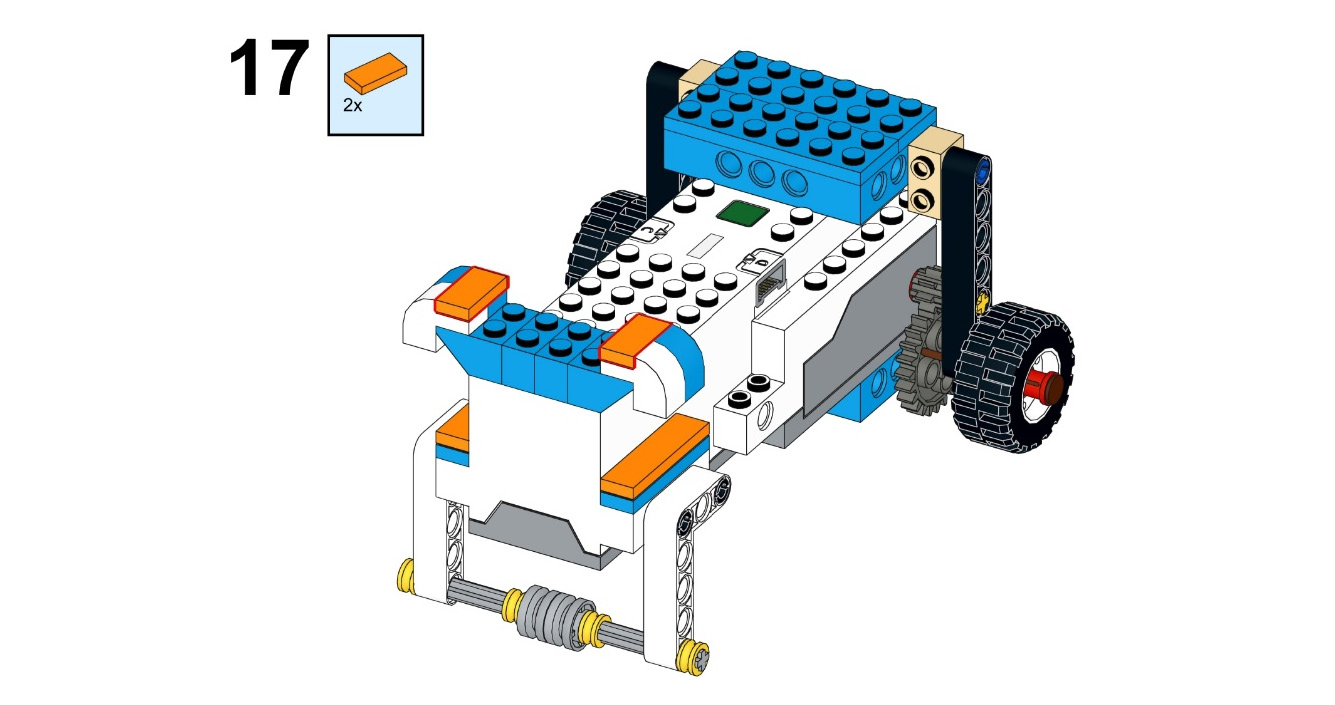
Figure 5.18
- Take a 2x4 white brick with a face design and connect it to the LEGO bricks, as shown in the following figure. Now, take two round plates with knobs and place them on top of this white brick:
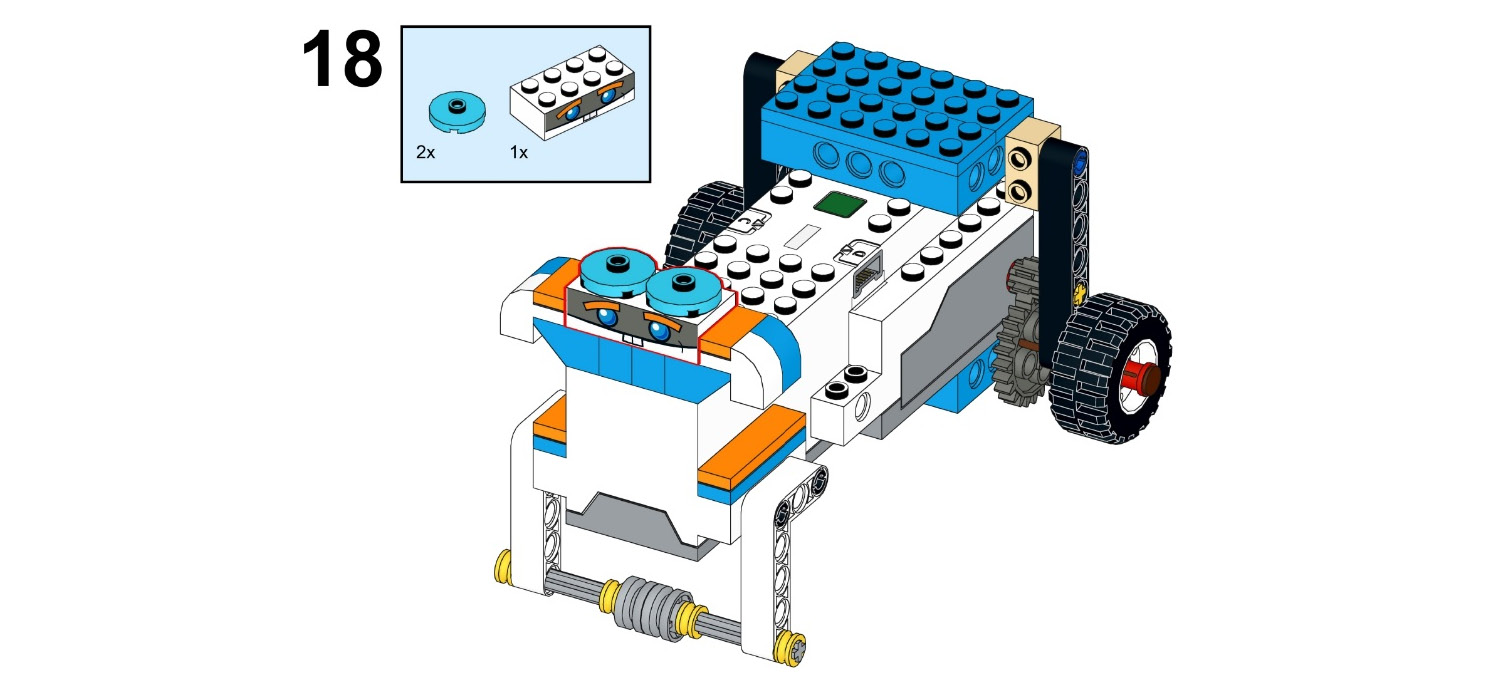
Figure 5.19
- Take two wings with 4 mm shafts and connect them to the circular plates with knobs. This will add an aesthetic element to your gear robot:
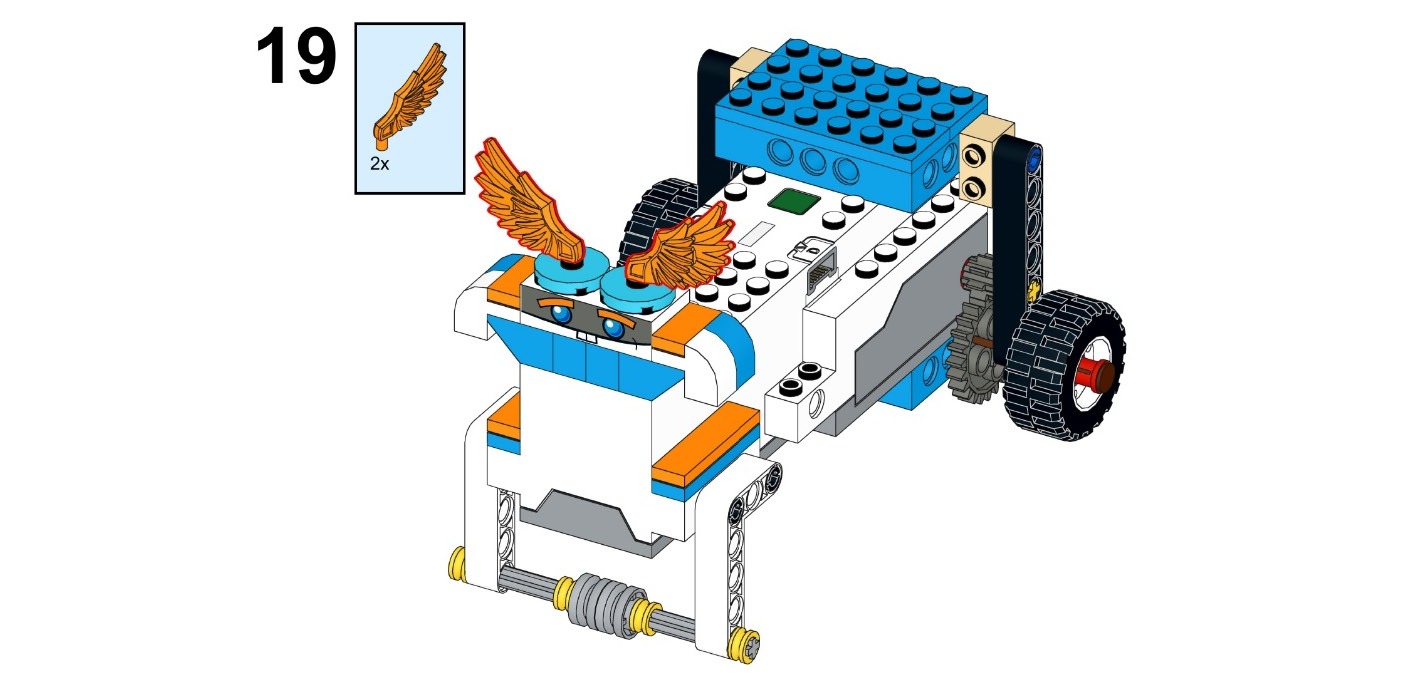
Figure 5.20
Great! Now that we've finished constructing the robot, we can start programming it so that it can perform tasks.
Let's code the robot in gear up and gear down mechanism
In this chapter, you will not be learning about any new programming blocks. Instead, you will be using the programming blocks you learned about previously in this book and carrying out some fun activities with your BOOST robot. Before you get started with these activities, you will need to set up the following:
- A clear path for your robot to move around – at least 3 feet long.
- Fix the starting point of the robot. Mark it with a clear demarcation. You will be starting your robot from this position in every activity.
- A measuring tape.
Now let's perform a few activities.
Activity 1
Program your robot to move forward for five rotations at 70% speed. You can change the brick's light if you wish. Measure the time taken, and distance traveled, and then fill in the following table:

Table 5.3 - Measuring the time taken and distance traveled by the robot
The sample code for the activity is given here:

Figure 5.21 - Sample code
Now, swap your drive gear and driven gear.
When you need to swap the drive and driven gears, please refer to the following figure, as this will make things much easier for you:
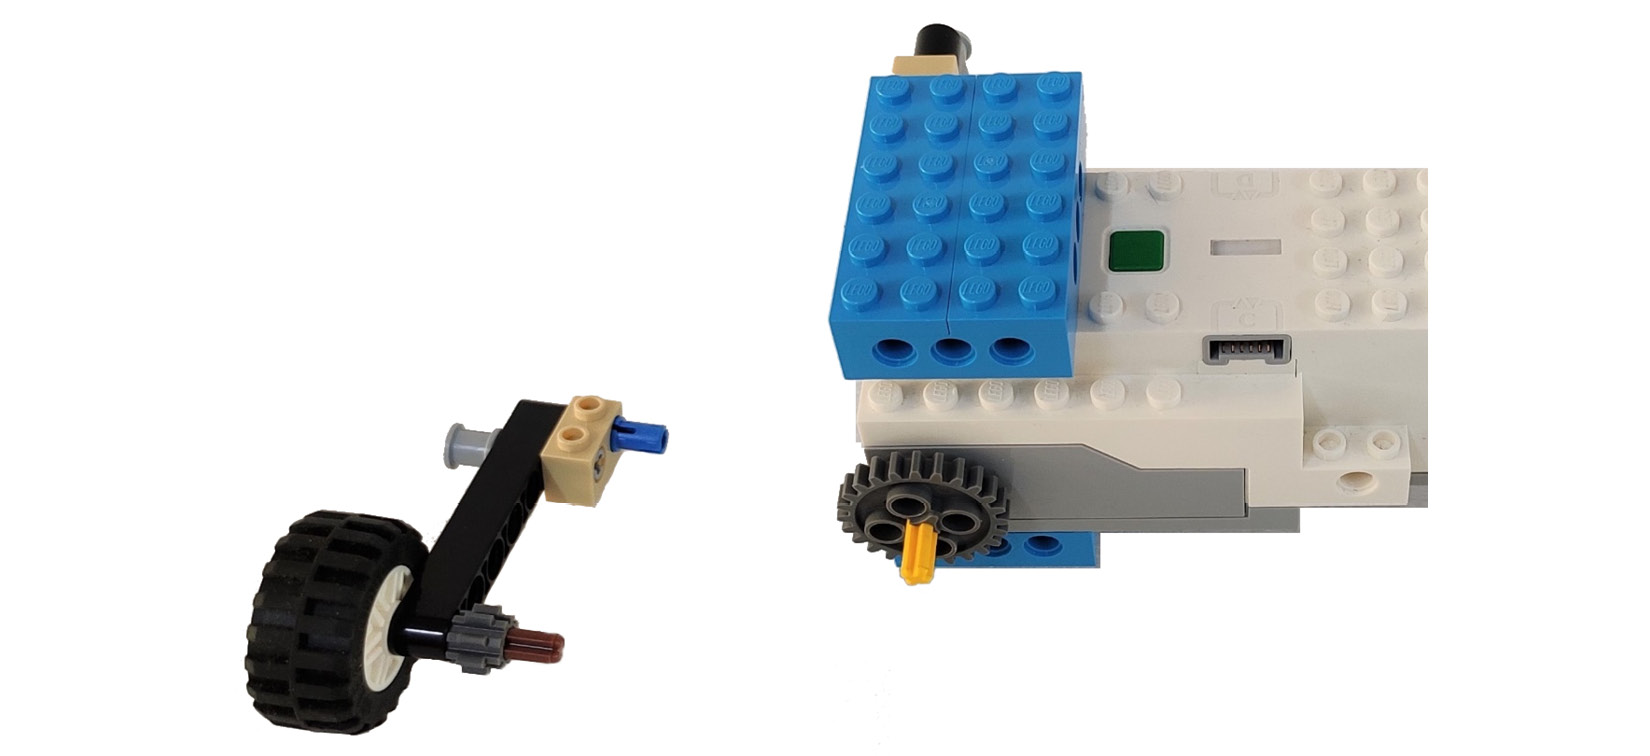
Figure 5.21 – Process of swapping the drive and driven gears
When you do this, your robot drive wheels will look like this:
–
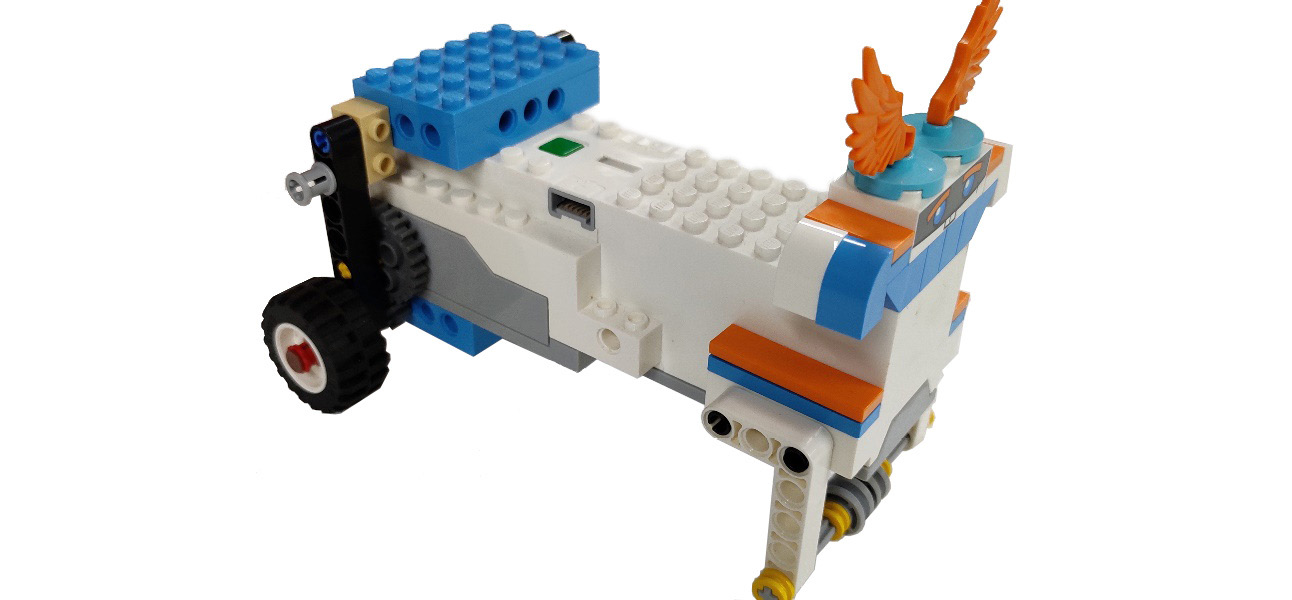
Figure 5.22 – Gearing up the robot
Now, let's perform another activity.
Activity 2
Program your robot to move forward for five rotations at 70% speed. You can change the brick's light if you wish. Measure the time taken and distance traveled, and then fill in the following table:

Table 5.4 - Measuring the time taken and distance traveled by the robot
Select the right options from the following statements:
The time it takes to finish the given number of motor rotations in gear up is (the same as/more than/less than) in the gear down mechanism. The distance traveled for the same motor rotations in gear up is (more than/less than) the gear down mechanism.
Do you know that you can calculate the speed of your robot with a simple formula?
Speed = (Distance Traveled) / (Time Taken)
Can you use your math skills and calculate the speed of your robot in Activity 1 and Activity 2? Use the spaces provided to do the calculations.
The speed of the robot in Activity 1 = _________ cm/second.
The speed of the robot in Activity 2 = _________ cm/second.
Time for a challenge
Challenge #1
Get your robot back in the gear up combination. Now, create a ramp using the resources available in your home. Try implementing a different height for this ramp and reach a point where your robot is no longer capable of going up that ramp in this gear up combination!

Figure 5.23 – Representation of the setup
The height of this ramp = ________ cm.
Now, change your gear combination, so that it's in the gear down combination and see whether it can cross this ramp. I am sure it will. This is because the robot is slower, but its torque is quite high! Can you find a height for this ramp where this robot can't climb, even when using the gear down combination?
The height of this ramp = _______ cm.
One major conclusion we can draw from this chapter is that when you try to gain one thing, you lose the other. For example, when you gain speed, you lose power and vice versa! It takes a lot of engineering prowess to achieve high-speed, high-torque mechanisms. Later in this book you will learn more about changing the axis of force using gears.
Challenge #2
Do you remember building and coding a tabletop fan? Can you make use of gears and rebuild this fan so that it moves much quicker to spread cool air around the room?
Summary
In this chapter, you learned about how to use gears. You also learned about the different types of gears that are available in the market, along with their advantages, disadvantages, and practical applications. To understand the difference between the gear up and gear down mechanisms, you performed two activities and compared some critical parameters such as time taken and distance traveled for a specific number of motor rotations. To understand the importance of high torque in certain conditions, such as going up a ramp, you tried to crack the challenges provided and understood the impact of the gear down mechanism in achieving high torque.
In the next chapter, you will be building an amazing forklift that will be able to lift the load from one place to another, all by itself. A forklift is widely used in warehouses and industries to make human work easy. The forklift will be made with the application of simple machines and a gear mechanism.
Further reading
You can learn more about gears at https://www.thomasnet.com/articles/machinery-tools-supplies/understanding-gears/.
Gears can have a lot of wear and tear issues, but if maintenance is done at the right time, these gear mechanisms can add a lot of power and speed to your machinery, while also helping change the direction of the force you're applying.