© Adam Bertram 2020
A. BertramBuilding Better PowerShell Codehttps://doi.org/10.1007/978-1-4842-6388-4_12

12. Don’t Skimp on Security

Adam Bertram1  
(1)
Evansville, IN, USA
 

As developers and system administrators come together to form DevOps, it’s important to not exclude security. Security is an extremely important topic especially in today’s day and age and is one that we can begin to include in our everyday PowerShell code.

Injecting security in PowerShell code is a deep topic and one that could not be completed in a single chapter let alone a single book. But, in this chapter, you’ll learn some tips to take care of some of the low-hanging fruit easily obtained by using some best practices.

Sign Scripts

PowerShell has a built-in method to cryptographically sign all scripts to ensure they are not tampered with. Signing a script adds a cryptographic hash at the bottom of the script. When an execution policy is set to RemoteSigned or AllSigned , PowerShell will not allow the script to run if it detects the code has been modified since it was last signed.

Let’s quickly cover how you would sign a PowerShell script. To do so, you must first have a certificate capable of code signing. You can either use a public certificate or a self-signed one. Let’s create a self-signed certificate for simplicity using the New-SelfSignedCertificate cmdlet.

Using the New-SelfSignedCertificate cmdlet, you can only create the certificate in the My store, so go ahead and do that. Be sure to note the thumbprint. You’ll need that in the next step.
New-SelfSignedCertificate -DnsName <your email> -CertStoreLocation Cert:CurrentUserMy -Type Codesigning
Next, export the created certificate and import it into the Trusted Root Certification Authorities and Trusted Publishers certificate stores.
Export-Certificate -FilePath codesigning.cer -Cert Cert:CurrentUserMy<thumbprint of certificate>
Import-Certificate -CertStoreLocation Cert:LocalMachineRoot -FilePath .codesigning.cer
Import-Certificate -CertStoreLocation Cert:LocalMachineTrustedPublisher -FilePath .codesigning.cer
Now you can sign a script. Take any ol’ PowerShell script and sign it with the Set-AuthenticodeSignature cmdlet .
## This assumes there is only one code signing cert in the store
$cert = Get-ChildItem -Path Cert:CurrentUserMy -CodeSigningCert
Set-AuthenticodeSignature -FilePath C:Tempscript1.ps1 -Certificate $cert

If you open up the script you just signed, you’ll see the large signature at the bottom. Now if you run this script on a computer that has an execution policy requiring signed certificates and that computer has your generated certificates, PowerShell will execute the script.

Tip Source: https://twitter.com/brentblawat

Further Learning

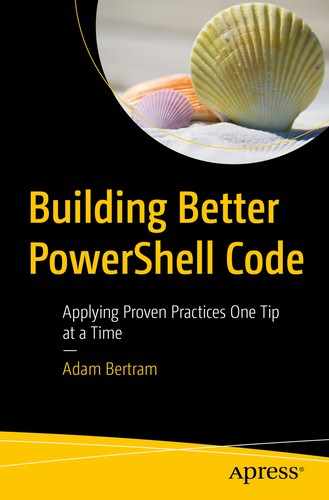
Use Scriptblock Logging

It’s critical to know what code is being executed in your environment. Unfortunately, if you download a script from the Internet, click a malicious link or a user gets a phishing email, that code may be malicious.

By enabling scriptblock logging in your environment, you can see, down to the scriptblock level, exactly what that code is doing and developing a proper audit trail.

To enable scriptblock logging, you must first enable it at the local policy or group policy level by going to the Computer ConfigurationAdministrative TemplatesWindows ComponentsWindows PowerShell. Once there, double-click Turn on PowerShell Script Block Logging. You can see what the menu item looks like in Figure 12-1.
../images/501963_1_En_12_Chapter/501963_1_En_12_Fig1_HTML.jpg
Figure 12-1

Navigating a local policy

Once you have the Turn on PowerShell Script Block Logging box open, click Enabled and OK to confirm as shown in Figure 12-2.
../images/501963_1_En_12_Chapter/501963_1_En_12_Fig2_HTML.jpg
Figure 12-2

Enabling scriptblock logging

Now when PowerShell executes code, you’ll begin to see events written to the Microsoft/Windows/PowerShell event log as shown in Figure 12-3.
../images/501963_1_En_12_Chapter/501963_1_En_12_Fig3_HTML.jpg
Figure 12-3

Windows PowerShell events

Further Learning

Never Store Sensitive Information in Clear Text in Code

This should go without saying but saving passwords, private keys, API keys, or any other sensitive information in code is a bad idea. PowerShell allows you many different ways to encrypt this information and decrypt it, when necessary.

Use the Export and Import-CliXml commands to encrypt and decrypt objects with sensitive information like credentials. Use secure strings rather than plaintext strings, generate your own cryptographic keys, and more with PowerShell. There are lots of ways to encrypt and decrypt sensitive information with PowerShell.

Perhaps you need to pass a PSCredential object to a service to authenticate. Typically, you’ve been using the Get-Credential cmdlet to create this object by prompting you for a username and password. You’d now like to automate this process and authenticate without any user interaction.

Browsing the Web trying to find a way to prevent that username/password prompt, you come across the following code. This code allows you to statically assign a username and password in the code and create a PSCredential object.
$password = ConvertTo-SecureString 'MySecretPassword' -AsPlainText -Force
$credential = New-Object System.Management.Automation.PSCredential ('root', $password)

You now have MySecretPassword stored in plaintext inside of the script. Don’t do this. Instead, save PSCredential object to disk encrypted using Export-CliXml.

Instead of creating the PSCredential object on the fly, instead, save the entire object in an XML file that automatically encrypts the password. To do that, first, create the PSCredential object using whatever means you’d like.
$credential = Get-Credential
Next, export that object to an XML file on disk with Export-CliXml.
$credential | Export-CliXml -Path .credential.xml
Take a look at the credential.xml file in Figure 12-4 that you just created and you’ll see the password is encrypted.
../images/501963_1_En_12_Chapter/501963_1_En_12_Fig4_HTML.jpg
Figure 12-4

Encrypted password in credential.xml

You’ll then need to “convert” that credential.xml file to a PSCredential object your script can use. To do that, use Import-CliXml.
$credential = Import-CliXml -Path .credential.xml

You now have a PSCredential object stored in $credential that’s exactly the same as if you obtained it via other means. And, as an added bonus, it requires no interaction and is encrypted.

Further Learning

Don’t Use Invoke-Expression

Using the Invoke-Expression command can open up your code to code injection attacks. The Invoke-Expression command allows you to treat any type of string as executable code. This means that whatever expression you pass to Invoke-Expression, PowerShell will gladly execute it under whatever context it’s running in. Although executing the expression you intend works great, what happens when you open up the code to others?

Perhaps you’re accepting input to a script from some external source. Maybe you have a script that takes input from a web form and does some processing that looks like the following:
[CmdletBinding()]
param(
    [Parameter()]
    [string]$FormInput
)
## Do something with $FormInput
You expect the value of FormInput to be some specific string that you can just execute. You consider yourself clever because you’re saving lines of code validating the value of FormInput but at the risk of malicious code.
[CmdletBinding()]
param(
    [Parameter()]
    [string]$FormInput
)
Invoke-Expression -Command $FormInput
Perhaps that web page is accidentally exposed to the Internet and someone puts this in the form that gets sent to your script:
Remove-Item -Path 'C:' -Recurse -Force

You’ve got a bad day on your hands. By invoking expressions blindly and allowing PowerShell to invoke any code passed to it, you’re allowing any kind of code to run which is a terrible practice!

Further Learning

Use PowerShell Constrained Language Mode

If you need to allow junior users, employees in your company, or service applications the ability to run PowerShell commands, you need to ensure that access is least privilege. There’s no need to allow running commands others do not need and may accidentally or purposefully introduce security issues.

PowerShell has a mode called constrained language mode that allows you to provide access to a PowerShell environment but not allow access to all commands and modules. Constrained language mode allows you to granularly define activities as allowed and disallowed giving you tight control over what can be done.

Maybe you’d like a junior admin to run some scripts or execute some commands on a server. But you don’t want them executing any ol’ command. You can enable constrained language mode just by setting a property value.
$ExecutionContext.SessionState.LanguageMode = "ConstrainedLanguage"
Once a PowerShell session is in constrained language mode, PowerShell does not allow you to execute certain commands or perform certain functions. You can see in Figure 12-5 an error message PowerShell will display when you hit one of these restrictions.
../images/501963_1_En_12_Chapter/501963_1_En_12_Fig5_HTML.jpg
Figure 12-5

PowerShell constrained language mode preventing command execution

Further Learning

..................Content has been hidden....................

You can't read the all page of ebook, please click here login for view all page.
Reset
3.133.131.168