If you’re writing PowerShell for personal, random reasons to save yourself some time, writing tests for your scripts probably isn’t worth it. But, if you’re writing PowerShell for a business in a production environment, this is a requirement.
Tests, especially automated tests, are quality control for your code. Tests not only ensure you publish code that won’t nuke your production environment, but they also help you trust your code. They open up an entirely new, more professional way of PowerShell development.
Learn the Pester Basics
The only dominant testing framework for PowerShell is Pester. If you’re developing PowerShell scripts for an organization and don’t have the first clue about Pester, stop right now and check out The Pester Book.
Pester is a PowerShell module that allows you to build unit and integration tests for your code. You can also create infrastructure tests from it to run after your code runs to ensure it made the appropriate changes.
At its most basic level, Pester is just a specially designed PowerShell script. Pester tests are built using a domain-specific language (DSL). A DSL is a specific way of writing code in a particular area, testing in this case.
Pester is all about comparing what you expect something to be vs. what it actually is.
Further Learning
Leverage Infrastructure Tests
Confirming the environment is how you’d expect
Ensuring the scripts you write made the changes you expect
By writing infrastructure tests with Pester, you can get a bird’s-eye view of your entire environment boiled down to simple red/green checks. Once the tests are written, they can be executed at any time.
Pester infrastructure tests also allow you to verify the changes your scripts are supposed to make to your environment actually do. When’s the last time you ran a script, it didn’t return any errors, but it didn’t change what you wanted it to? It happens all the time.
If you have a set of tests to run before and after your script runs, you can easily see if the changes you expected to happen did.
You can either build your own infrastructure tests or use existing projects. Two open source projects I can recommend are PoshSpec and Operational Validation Framework.
Further Learning
Automate Pester Tests
Once you’ve learned about Pester, created some tests, and can now run them on demand, it’s time to automate them. Automating Pester tests consists of building some way to automatically run tests once a change is made to code. This step is most commonly used in a continuous integration/continuous delivery (CI/CD) pipeline.
To automate tests upon code change, you’ll, at a minimum, need some version control like Git. You’ll then need an automation engine to detect when a change has been detected in version control and kick off a test. There are many automated build/release pipelines like this. Some popular ones include Jenkins, AppVeyor, and Azure DevOps.
Further Learning
Use PSScriptAnalyzer
PSScriptAnalyzer is a free tool by Microsoft that performs code linting. Code linting runs checks against your code to ensure you’re meeting best practices and building efficient code.
Download the PSScriptAnalyzer module from the PowerShell Gallery and run it against your scripts and modules to see what errors it finds.
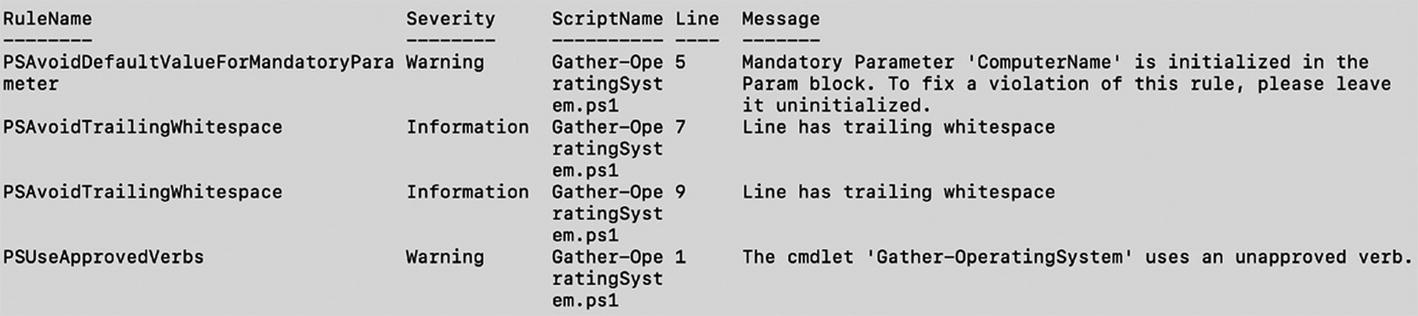
PSScriptAnalyzer has caught various issues
You can see in the figure that PSScriptAnalyzer found multiple issues with this script. This is a handy tool to run against all of your scripts to ensure they are constantly meeting best practices.
Tip Source: https://twitter.com/DavePinkawa