As you begin to write more PowerShell, you’ll probably find that you keep reinventing the wheel. This is natural. You keep repeating yourself over and over again because you’re not building upon the code you had previously created. You’re not building script libraries, modules, and tools. You’re essentially creating disposable code. Stop that!
Instead of wasting time writing a brand new script from scratch, write code in a way you can reuse it. Build tools you can then put to use to build larger automation frameworks.
Think Ahead and Build Abstraction “Layers”
This tip isn’t necessarily PowerShell specific, but it’s one of the most important tips of this entire book. When you build reusable tools in PowerShell, always think and build with abstraction in mind.
What’s abstraction? Abstraction is a term software developers are familiar with but you may not be. Abstraction means writing code that interacts with something just not directly. Abstraction means writing code in “layers” that then refer back to one another eventually building an entire framework around a concept.
Building in abstraction layers means you’re coding not for the now but for the future. You’re writing code that can be reused across many different use cases in various situations without actually changing the code; you just call it differently.
Think about the code you write now. The code may work in the current context, but will it work if you run it from another computer, another environment, or even move it to the cloud? Does it need to have that kind of resiliency? If so and your code breaks when it’s moved out of its pristine, current environment, you’re probably not building in enough abstraction.
I know the term abstraction is a bit vague, so let’s put some context and examples behind it when you’re building tools in PowerShell. Let’s say you’ve built some scripts that start, stop, and manage Hyper-V virtual machines (VMs). Your team manages one of the company’s hypervisors which, in this case, is Hyper-V.
This script works just fine. You’ve already created a parameter which is a great first start. This parameter allows you to run this script against many different VMs without changing any code inside of the script. Good job!
With this script, you’ve already created one layer of abstraction. Instead of running Start-Vm and Stop-VM directly on the PowerShell console, you decided you needed a script to those things and run some other code in between. You created it and now, instead of typing Start-VM and Stop-VM at the console, you’re simply running .-MyVM.ps1 or something like that. You’re not calling the Start-VM and Stop-VM cmdlets directly. You’ve abstracted away the need to do that and instead just interface with the script and not the cmdlets themselves.
One day, your boss comes along and tells you your team has now inherited management of the company’s VmWare cluster. Uh oh! Now you think you need to create an entirely new set of scripts or module to manage VmWare VMs. You might have to but you could decide to integrate VmWare functionality into your current solution.
A VM is a VM, right? VmWare VMs and Hyper-V VMs are similar; they just run on different hypervisors. What are the commonalities between them? You can start and stop both kinds of VMs. Instead of creating another script, why not integrate them into your current generic Set-MyVM.ps1 script. One way to do that would be to add a parameter called Hypervisor and build the logic needed to determine if your script should run some VmWare code of HyperV code.
You’ve now discovered the commonalities between Hyper-V and VmWare VMs and have built a solution to manage them both! You’ve now created a layer of abstraction that allows you to manage two different VM types with a single script.
Further Learning
Wrap Command-Line Utilities in Functions
If you have to use a command-line utility, wrap it in a PowerShell function. If it returns output, parse the output and make it return a pscustomobject. This allows a CLI utility to act like any other PowerShell command. Once you’ve abstracted away all of the “CLIness”, the command can be easily integrated with other PowerShell tools.
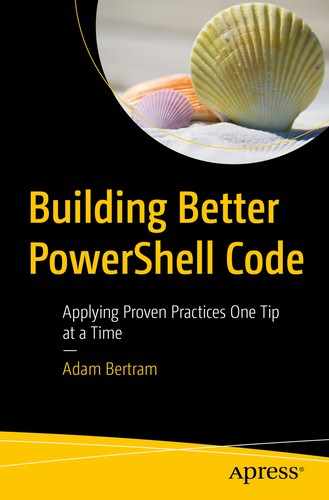
No object structure to netstat

The netstat command-line output in objects
Once you have a script or function returning a PowerShell object, you can treat that command’s output just like you would any other object.
Further Learning
Make Module Functions Return Common Object Types
If you have different PowerShell functions that work together, be sure they always return the same type of object. This object type is usually a pscustomobject because it’s generic and easy to create. If functions are all returning a pscustomobject type, you’ll know what to expect when it returns information. It also makes troubleshooting easier.
When you or someone else now runs Get-Thing, they’ll then expect Get-OtherThing to return the same type of object. The properties may be different because they are, after all, different functions that perform different tasks, but you should always strive to return objects of the same type and as similar as possible.
Further Learning
Ensure Module Functions Cover All the Verbs
If you have an immediate need to accomplish a task like creating a user account, removing a file, or modifying a database record, don’t just create a single function. Instead, create four functions that cover the complete life cycle of that object – New, Set, Get, and Remove.
For example, perhaps you’re creating a module for a monitoring appliance that has an API. You decide on an “object” noun of Monitor. If you need to create a new monitor in an automation script, don’t just create the New-Monitor function. Instead, create Get-Monitor, Set-Monitor, and Remove-Monitor to ensure you have support for the monitor’s full life cycle.
Even if you just have the need to create a new monitor at this point, always, at least create a Get-Monitor function. You’re going to inevitably need to confirm if the monitor you think you just created was actually created or ensure the monitor does not exist before attempting to create it.
If you’re tight on time, create the function you immediately need to perform some change on an object like New, Set, or Remove. Then, once you have built that function, build the Get function alongside of it. Eventually, you should go back and build out the entire set of functions which ensures you have a tool that can manage whatever thing you’re working with through its entire life cycle.
Tip Source: https://twitter.com/JimMoyle