
The Bukkit plugins that we will program will be written in the Java programming language. We will use an IDE (short for Integrated Development Environment) to write the plugins. An IDE is software that will aid us in writing the Java code. It has many tools and features that make programming much easier. For example, it automatically detects errors in code, it often tells us how to fix these errors and sometimes even does it for us, and it provides us with many shortcuts, such as a keystroke to compile code and build a JAR file so that the code can be executed. In this chapter, we will download and install an IDE and prepare it to create a new Bukkit plugin. We will cover the following topics and by the end of this chapter, we will have written our first plugin, which will be ready to be tested on our server:
- Installing an IDE
- Creating a new project
- Adding Bukkit as a library
- The
plugin.ymlfile - The plugin's
mainclass - Creating and calling new methods
- Expanding the code
In this book, we will use NetBeans as our IDE. There are other popular IDEs too, such as Eclipse and IntelliJ IDEA. You can use a different IDE if you wish. However, in this chapter, it will be assumed that you are using NetBeans. No matter which IDE you choose, the Java code will be the same. Therefore, as long as you set up the code properly, you can use any IDE for the remaining chapters. If you are fairly new to programming, then I suggest that you use NetBeans for now, and after you are more comfortable with programming, try other IDEs and choose the one that you prefer.
The NetBeans IDE can be downloaded from http://www.oracle.com/technetwork/java/javase/downloads/. Downloading the program from Oracle will also allow us to download the required Java Development Kit (JDK) at the same time. You will see several download links. Click on the NetBeans link to visit the JDK 8 with NetBeans download page. Once you select Accept License Agreement, you will be allowed to download the software. The download link is located in a table that is similar to the one shown in the following screenshot:
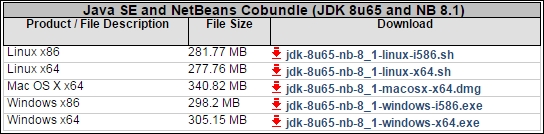
If your PC has a 64-bit Windows operating system, then you will want to use the link corresponding to Windows x64. If your PC has a 32-bit Windows operating system or you are unsure about whether it's a 64-bit or 32-bit Windows operating system, then download the Windows x86 version.
Once it has finished downloading, install the software. During the installation process, you may be asked about whether you'd like to install JUnit. We will not be using JUnit. Therefore, you should select Do not install JUnit. In the next few screens of the installer, you will be asked about where you would like to install the two types of software. The default settings are fine. You can simply click on Next.