
Once you have added the command to the plugin.yml file, you can begin working on the code that the command will trigger. Create a new class in the NetBeans project. This new class will be called EnchantCommand. You can name the class something else if you wish, but keep in mind that the name of a class should give you an idea of how the class is used without you having to open it. Place this class in the same package as that of Enchanter, the main plugin class, as shown in the following screenshot:

This new class will execute the enchant command. Thus, it must implement the CommandExecutor interface. We will append code to the class header to do this. This is similar to adding extends JavaPlugin to the Enchanter class. JavaPlugin is a class. Therefore, we extended it with our class. CommandExecutor is an interface, which means that we must implement it. Once we add implements CommandExecutor to the class header of EnchantCommand, a light bulb will appear to notify us of the need to import the CommandExecutor class. Import the class, and the light bulb will still be there. It is now informing us that because we implemented an interface, we must implement all of its abstract methods. Click on the light bulb to do so, and the method that we need appears. This new method will be called when a player executes the enchant command. The method provides us with the following four parameters:
CommandSender sender- This command can be named
csby default, but we will name itsenderbecause it is easy to forget whatcsstands for - This is who sent the command
- It may be a player, the console, a command block, or even a custom
CommandSenderinterface that was created by another plugin
- This command can be named
Command cmnd- This is the
Commandobject that the sender executes - We will not need this as this class will be used for only a single command
- This is the
String alias- This is which alias the sender typed
- For example, it might be
enchant,e,addenchant, orpowerup
String[] args- This is an array of strings
- Each string is an argument that the sender type
- Arguments follow the alias and are separated by a space
- The command itself is not considered as an argument
- For example, if they type
/enchant knockback 5, thenknockbackwill be the first argument (args[0]) and5will be the second and final argument (args[1]) - We do not need to worry about the arguments at this point, because the
enchantcommand will not need any
As mentioned before, there are different kinds of CommandSenders. The following image is an inheritance diagram for CommandSender:
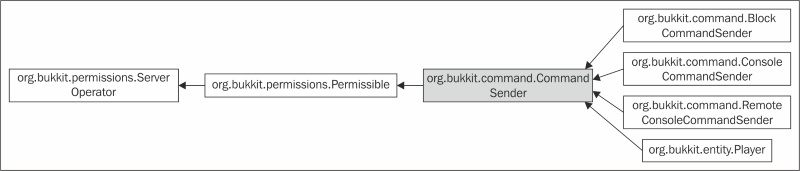
In this diagram, you can see that Player, ConsoleCommandSender, and a couple of other classes are all subtypes of CommandSender. The purpose of the enchant command is to allow a player to enchant the item that they are holding. Therefore, a CommandSender object that isn't a player will have no use for this command. In the onCommand method, the first code that we write will be to check whether a player has executed the command. If we do not perform this check, then the plugin will crash when a nonplayer attempts to issue the enchant command. We will check this by using an if statement and the instanceof keyword. The code for this is as follows:
if (sender instanceof Player)
This code can be translated to this:
if the command sender is a Player
This if statement will let us know if it was a player who sent the command. If the command sender is not a player, then we want to stop executing the code. We will do this by using the return keyword. However, the return type for this method is boolean. We must return a boolean value, which will tell Bukkit whether the usage message needs to be shown to the command sender. Typically, for the onCommand method, you want to return false if the command is not executed successfully. In this case, it was not. Therefore, we will use the return false; code. So far, inside the method, we have constructed the following code:
if (sender instanceof Player) {
  return false;
}
However, this is not quite right. This asks Bukkit to return false if the command sender is a player, but we want to return false when the opposite is the case. We can accomplish this by adding an exclamation point. If you don't already know, in Java, an exclamation point is a NOT operator and can be used to invert a boolean value. We will correct the previous code by inverting the resulting value, as shown in the following code:
if (!(sender instanceof Player)) {
  return false;
}
Note the extra set of parentheses. This is very important. Parentheses allow expressions to be grouped together. We want to invert the boolean value that results from the sender instanceof Player code. Without the parentheses, we would be attempting to invert the sender object, which does not make sense. As a result of this, the code would not be compiled.
Up to this point, the EnchantComand class code is as follows:
package com.codisimus.enchanter;

import org.bukkit.command.Command;
import org.bukkit.command.CommandExecutor;
import org.bukkit.command.CommandSender;
import org.bukkit.entity.Player;

/**
 * Enchants the item that the command sender is holding
 */
public class EnchantCommand implements CommandExecutor {

  @Override
  public boolean onCommand(CommandSender sender, Command cmnd,String alias, String[] args) {
    //This command can only be executed by Players
    if (!(sender instanceof Player)) {
      return false;
    }
  }

}
Now that we have taken care of the nonplayers, we are certain that the CommandSender object is a player. We will want to work with the Player object rather than the CommandSender object because the Player object will have a specific item in its hand. We can get the Player object by casting the CommandSender object to Player. By casting, we are telling Java that we know that the command sender is actually a Player object rather than a ConsoleCommandSender object or one of the other subtypes. Casting is done by using the following syntax:
Player player = (Player) sender;
Tip
If you are not already familiar with casting, I again suggest that you learn some of these programming concepts at codisimus.com/learnjava.
Now that we have the Player object, we need the item that they are holding. Looking at the Bukkit API documentation for the Player class, which is available at https://hub.spigotmc.org/javadocs/bukkit/org/bukkit/entity/Player.html, you can see that there exists a getItemInHand method, which is inherited from HumanEntity. It will return an ItemStack class, which is exactly what we want. This is demonstrated in the following piece of code:
ItemStack hand = player.getItemInHand();
Before doing anything with this item, we have to ensure that there actually is an item to enchant. If the player runs the command when they have no item in their hand, we do not want the plugin to crash. We will check whether the value of ItemStack class is null and the type of the item is AIR. In either case, we will return false, as follows, because the command wasn't executed:
if (hand == null || hand.getType() == Material.AIR) {
  return false;
}Now, we have a reference to the player and the item that they are holding. Our end goal is to enchant this item. Again, looking at the API documentation, we can find several methods to add enchantments to an ItemStack class at https://hub.spigotmc.org/javadocs/bukkit/org/bukkit/inventory/ItemStack.html. Read through the descriptions to find out which one is right for us.
Two of the methods are used to add multiple enchantments at once. We may want to add more than one enchantment, but to simplify the code, we will only add one at a time. The two remaining methods are addEnchantment(Enchantment ench, int level) and addUnsafeEnchantment(Enchantment ench, int level).
Tip
The description for the unsafe method states that: This method is unsafe and will ignore level restrictions or item type. Use at your own discretion. This warning is provided because these unsafe enchantments have not been tested and could produce undesirable results. You shouldn't let this deter you from using the method but you will want to test the enchantment before using it with friends to ensure that it doesn't crash the server.
Therefore, if we choose to go with unsafe, we can create powerful enchantments, such as a sharpness level of 10. Without a plugin, a sword is limited to a sharpness of level 5. With unsafe enchantments, we can also enchant items that were previously unenchantable, such as a fish with KNOCKBACK or FIRE_ASPECT. Now, you will start to discover all the fun and cool things that you can do with plugins and which could not be done with a vanilla game.
From a personal experience, I found out that the KNOCKBACK enchantment is quite entertaining. In my example, I will apply KNOCKBACK to the item, but you should of course choose whichever enchantment you prefer. For a full list of enchantments and what they do, visit the API docs at https://hub.spigotmc.org/javadocs/bukkit/org/bukkit/enchantments/Enchantment.html or the Minecraft Wiki at http://minecraft.gamepedia.com/Enchanting#Enchantments. Bukkit does warn us that using an unsafe method can cause problems. To avoid conflicts, try to keep the enchantment levels at 10 or below. With most enchantments, you will not even notice a difference after level 10. We have decided that we will use addUnsafeEnchantment(Enchantment ench, int level). This method takes an Enchantment and an int value as parameters. This int value is of course the enchantment's level, as stated in the API documentation. We have decided what we want each of these parameters to be. We can complete the line of code, as shown in the following piece of code:
hand.addUnsafeEnchantment(Enchantment.KNOCKBACK, 10);
For added fun, we will add the FIRE_ASPECT enchantment as well, as shown in the following piece of code:
hand.addUnsafeEnchantment(Enchantment.FIRE_ASPECT, 1);
At this point, everything will be executed successfully. Before we return true, we should send a message to the player to let them know that everything worked as planned. We will use the sendMessage method to send the message to only this player by using the following line of code. No one else on the server, including the console, will see the message:
player.sendMessage("Your item has been enchanted!");The completed class is shown in the following lines of code. Remember to comment your code as you type it. Some of the comments in the following code may seem unnecessary, as the code is easy enough to read. We will refer to this code by the term self-documentation. You only need to leave comments for the code that may be difficult to understand in the future or which may need clarification. While you are still learning, I encourage you to overuse comments. They won't hurt anything by being present, and they will clearly explain the code for you in case you need it:
package com.codisimus.enchanter;

import org.bukkit.Material;
import org.bukkit.command.Command;
import org.bukkit.command.CommandExecutor;
import org.bukkit.command.CommandSender;
import org.bukkit.enchantments.Enchantment;
import org.bukkit.entity.Player;
import org.bukkit.inventory.ItemStack;

/**
 * Enchants the item that the command sender is holding
 */
public class EnchantCommand implements CommandExecutor {

  @Override
  public boolean onCommand(CommandSender sender, Command cmnd,String alias, String[] args) {
  //This command can only be executed by Players
    if (!(sender instanceof Player)) {
    return false;
  }

  //Cast the command sender to a Player
  Player player = (Player) sender;

  //Retrieve the ItemStack that the Player is holding
  ItemStack hand = player.getItemInHand();

  //Return if the Player is not holding an Item
  if (hand == null || hand.getType() == Material.AIR) {
    return false;
  }

  //Add a level 10 Knockback enchantment
  hand.addUnsafeEnchantment(Enchantment.KNOCKBACK, 10);

  //Add a level 1 Fire Aspect enchantment
  hand.addUnsafeEnchantment(Enchantment.FIRE_ASPECT, 1);

  player.sendMessage("Your item has been enchanted!");
  return true;
  }

}
The preceding code implements the enchant command. It verifies that the command sender is a player and that the player is holding an item. It then adds defined enchantments to the item. This concludes the work that needed to be done in the EnchantCommand class.