After we finish the security architecture and design, we need to bring security into the development phase. On the one hand, firmware is still a type of software that is written in a software programming language, such as the C language. Most software secure coding practices are also applicable for firmware development. On the other hand, firmware is a special class of software. Its work is to initialize the silicon to boot the operating system, such as a system firmware, or to provide special runtime services in a hidden execution environment, such as device firmware. Firmware has unique security requirements based upon those usages. Today, there are lots of books introducing software secure coding. Two classic books, Code Complete by Steve McConnell and Writing Solid Code by Steve Maguire, are highly recommended for C programmers. Newer books, such as Writing Secure Code by Michael Howard and David Le Blanc and Building Secure Software by John Viega and Gary McGraw, are excellent resources for the secure programming practices in Windows and Linux. We will not duplicate the details of those parts but instead will give examples on how that guidance impacts the firmware. After that, we will introduce the firmware-specific secure coding practices.
Basic Security Practice
First, let’s look at the basic secure coding practice and secure design practice.
Secure Coding Practice
The general secure coding practice in the firmware is similar to the one in the software.
Prevent Buffer Overrun
Listing 14-1.
Listing 14-2.
Listing 14-3.
To mitigate this, the code should check BiosData->Size to ensure it points to the correct TxtHeap and also check the AcpiTable->Header.Length to ensure that there is no buffer overrun in the memory copy.
.
Prevent Arbitrary Buffer Access and Execution
Listing 14-5.
Listing 14-6.
Listing 14-7.
As a mitigation, the SMC handler should perform the similar check for the TrustZone communication buffer.
Listing 14-8.
As a mitigation, the SMI handler should never refer to a function pointer from an untrusted source. A design change is required to let the SMI handler retrieve the function pointer from inside of SMRAM.
Avoid Arithmetic Error
The cause of buffer overruns varies. One of the most important is an integer overflow. A typical integer overflow might be caused by multiplication or addition.
Listing 14-9.
Listing 14-10
Listing 14-11.
Listing 14-12.
Listing 14-13.
Listing 14-14.
Eliminate Banned Functions
Listing 14-15.
As a mitigation, the safe version of sscanf_s() should be used with the size of https_connection->connection as the last parameter.
Microsoft listed the banned functions in MSDN. The new C standard provides the safe version of the C standard library, such as strcpy_s, strcat_s, strncpy_s, strncat_s, and so on. Please be aware that the strncpy() and strlcpy() services are not recommended for use. There are many debates on if they are secure or not. It might be secure if they are used properly, but the biggest concern for strncpy() is that it is not NULL terminated. strlcpy() is better since it is NULL terminated, but it is not in any standard. As such, using strlcpy() is not portable.
- 1)
The safe version of a function shall include a size of the destination buffer so that the callee can check the buffer size to ensure there is not a buffer overrun.
- 2)
The safe version of a function shall return a NULL-terminated destination buffer for a string so that the caller can use the buffer for the string operation directly.
- 3)
The safe version of a function shall return the error status in case of a runtime verification failure so that the caller can check the return status to know if it has succeeded or not.
- 4)
The safe version of a function should include the source size.
- 5)
The safe version of a function may return the filled destination size.
Listing 14-16.
Listing 14-17.
Listing 14-24.
.
Be Aware of Race Conditions
Race conditions may occur in the firmware as well, including race conditions for a data buffer and a race condition in a register unlock function.
The classic race condition for a data buffer is the time-of-check/time-of-use (TOC/TOU) issue. We have discussed this in Chapter 3. Figure 3-29 shows the classic TOC/TOU attack on the SMM communication buffer. The mitigation is to copy the untrusted input buffer to the trusted execution environment and perform the check and usage. Figure 3-30 shows that concept.
Because the firmware may use an isolated trusted execution environment to unlock the flash region and perform a runtime update, there is another race condition on flash region unlock. We have also discussed that in Chapter 3. Figure 3-33 shows the race condition attack on an SMM-based flash protection implementation. The mitigation is to rendezvous all processors in the trusted execution environment before performing the unlock action.
Take Care of Information Leaks
The firmware may need to handle secret information, such as BIOS password. The secret cannot be stored in plain text anywhere, including stack, heap, global variable, and any communication buffer in the code path. After the password is used, the program should clear the temporary buffer used to store the password by using a non-optimized zero memory function.
One common mistake is that the password is not cleared in the key buffer. The legacy BIOS saved the keystroke in the fixed BIOS data area (BDA), which is at 0x400 physical memory. If that region is not cleared before boot, then the attacker in the operating system may steal the password by dumping the BDA region.
The flash region may be used as a temporary buffer as well. Similar to the file system, the delete action for the flash region might not erase the content, but only set a flag to indicate the content is invalid. In that case, the real content is still in the flash region. As such, we cannot use the flash region as the temporary buffer to store any secret data.
If the password needs to be stored in the flash region, then we should follow the best practices for the password to add a salt value and use a time-consuming hash-based algorithm to generate the digest.
Sometimes the device access requires a special passcode. We have seen examples that used a hardcoded passcode comparison in the code. That is not a good idea because the hardcoded passcode can easily be discovered by reverse engineering.
Besides the secrets, such as password or passcode, the firmware should define the secret information in the execution context, such as the important data structure locations in the kernel, hypervisor, or trusted execution environment (TEE). If the address space layout randomization (ALSR) technique is used to prevent the control flow attack, then the content information shall also be treated as secret and not exposed.
A random number may be required in the firmware. The implementation should try to use the hardware-generated random seed, if supported, such as the X86 RDSEED and RDRNG instruction or ARM RNDR and RNDRRS instruction. The RTC is not a good random seed.
Know Bad Compiler Optimizations
For firmware, it is good to enable the compiler optimizations to build a small-sized firmware image. At the same time, we should be aware of the possible side effects.
One common concern in the compiler optimization process is about zero memory for the local variable. Usually, this is used before the function return, and the purpose is to clear the secret in the local buffer. However, the compiler may believe it is useless to zero the local buffer because it is not accessed afterward. Then the compiler just skips the zeroing memory operation and returns directly. That behavior leaves the secret in the local stack. The typical mitigation is to create a non-optimizable version of a zeroing memory function to clear the secret in order to ensure that the secret clear operation always happens, such as memset_s() in C11 extension, SecureZeroMemory() in Windows, and explicit_bzero() in Linux.
Listing 14-19.
Listing 14-20.
Listing 14-21.
Please do not confuse these actions with the hardware memory barrier actions which need the CPU-specific instructions, such as X86 LFENCE, SFENCE, MFENCE or ARM DMB, DSB, ISB.
Use ASSERT the Right Way
ASSERT is very helpful to catch program mistakes. However, the ASSERT macro only exists in the debug build, and it is removed in the release build. As such, the ASSERT is not a replacement for the error checking and error handling.
- 1)
Use error handling code for conditions you expect to occur; use assertions for conditions that should never occur.
- 2)
Avoid putting executable code into assertions.
- 3)
Use assertions to document and verify preconditions and postconditions.
- 4)
For highly robust code, assert and then handle the error anyway.
These rules can be used in a UEFI BIOS as well. For the condition that is “expected to occur,” the BIOS must use error handling; for the condition that should “never occur,” the BIOS can use ASSERT to ensure that condition is satisfied.
In the early boot phase, such as the Security (SEC) phase or Pre-EFI Initialization (PEI) phase, an error might mean a system configuration error or a hardware error. It might be unrecoverable and should never occur. For example, the memory initialization module may fail to find any valid dual in-line memory module (DIMM). In that case, the best way to handle the scenario is to use the ReportStatusCode to inform the end user of the situation via an LED activation or audible BEEP code. ASSERT() can be used here to let the developer check if the memory initialization module is using the wrong parameters. In another condition, the memory initialization module may find two valid DIMMs wherein one of them passed self-test, while the other did not. Then we should not use ASSERT(). Instead, we should disable the bad DIMM in the error handling logic and boot the system with the good DIMM and then report the DIMM error to the end user via some console message or error log entry.
The UEFI shell environment receives external input from the end user, such as to list a nonexistent file or to copy a file to a read-only location. These actions should be handled by the error handler instead of ASSERT(). The network driver receives network packets from the Internet. It cannot assume the packet is always the correct one. The network driver should not use ASSERT to handle the errant packets. Instead, the proper way is to check the packets and drop malformed ones.
- 1)For UEFI Variable API
- 1.1)
GetVariable() with non-volatile (NV) and runtime (RT) attributes without the authentication (AU) or read-only (RO) attribute: We should not use ASSERT() but use error handling because the attacker may delete it.
- 1.2)
GetVariable() with the AU or RO attribute: We may use ASSERT() if the driver assumes the variable must exist because the attacker may not modify it.
- 1.3)
SetVariable() with the NV attribute: We should not use ASSERT() but use error handling because the attacker may write the full variable region and trigger an out of resource condition.
- 1.4)
SetVariable() without the NV attribute: We may use ASSERT() before exiting the manufacture auth phase because the attacker cannot control the environment at that time.
- 1.1)
- 2)For resource allocation
- 2.1)
Memory allocation should not use ASSERT() after exiting the manufacture auth phase because the attacker may allocate all memory.
- 2.2)
Memory allocation may use ASSERT() before exiting the manufacture auth phase if the allocation failure is critical and prevents the system from booting or processing the next step.
- 2.3)
Memory mapped I/O (MMIO)/IO allocation for external devices should not use ASSERT() because we never know how many external devices the attacker may choose to plug in.
- 2.4)
MMIO/IO allocation for the onboard devices may use ASSERT() before exiting the manufacture auth phase because the resources can be precalculated for a given platform. It might be a critical error, and the system may not be able to boot without this critical resource.
- 2.1)
- 3)For the trusted execution environment (TEE), such as SMM or TrustZone
- 3.1)
The TEE handler should not use ASSERT() for the external input check after exiting the manufacture auth phase because the attacker may inject malicious data in the external input.
- 3.2)
The TEE driver may use ASSERT() in the entry point to construct the TEE. A failure may be a critical issue and block the system from booting.
- 3.1)
ASSERT may be used in the library functions, such as BaseLib, BaseMemoryLib, IoLib, PciLib, and HobLib in EDK II UEFI firmware. If a library accepts the external input, ASSERT must not be used, such as a signature verification function in a CryptoLib. Writing Solid Code mentioned a good way for self-test: Once you’ve written a function, review it and ask yourself, “What am I assuming?” If you find an assumption, either assert that your assumption is always valid, or rewrite the code to remove the assumption. For the former, the caller needs to guarantee the input data is correct; for the latter, the callee needs to guarantee the input data is correct.
Secure Design Practice
Besides the secure coding practice, there are secure design practices in the firmware which are also similar to the ones in software.
Check Input Cross Trust Boundary
In Chapter 2, we discussed the trust boundary definition in firmware. If there is a data flow across the trust boundary, then this data must be validated before use, including data type, length, range, format, and so on. Remember the secure coding practices, such as preventing buffer overrun, preventing arbitrary buffer access and execution, avoiding arithmetic error, eliminating banned functions, being aware of race conditions, and using ASSERT in the correct manner.
Fail Intelligently
Listing 14-22.
The right way is to send any unexpected error to the failure case.
Listing 14-23.
The boothole issue in GRUB2 OS loader is also an example that a vulnerability in error handling causes buffer overflow and the arbitrary code execution. Because Grub2 need parse the input configuration file grub.conf, it uses flex and bison to generate a parsing engine. The parser engine generated by flex includes this define as part of the token processing code. See Listing 14-24. If the code detects that a token is too large to fit into the internal buffer, it calls YY_FATAL_ERROR(). However, the YY_FATAL_ERROR() implementation provided in the GRUB2 just prints an error to the console and returns, instead of aborting the function or halting the system. As the consequence, the flex starts to copy the large buffer to internal and overflow the internal buffer.
Reduce Attack Surfaces
The firmware may have attack surfaces. Take the trusted execution environment (TEE) as an example. This example includes the system management interrupt (SMI) handler in an X86 system or the secure monitor call (SMC) handler in an ARM system. Usually, the attacker may use fuzz testing to trigger all possible software SMI handlers or SMC handlers in the TEE to see if there is any vulnerability. If a handler in the TEE is not required, it might not be validated. As such, we should remove these unused and unvalidated TEE handlers. It is highly recommended that a firmware implementation should implement a profile feature to list all possible TEE handlers for evaluation purposes.
Use Least Privilege
The firmware may implement features within different privilege levels. For example, normal data processing, such as a Bitmap (BMP) file parser, requires the user mode – ring 3. Modifying the system status, such as a page table or a PCI device configuration state, requires the supervisor privilege – ring 0. Unlocking the flash region and performing a UEFI variable update or BIOS update may require TEE privilege, such as X86 system management mode (SMM) because the flash is protected in the TEE. The best design is to put different functions in different privilege levels. In case there is a vulnerability, the damage is limited to that privilege level only. For example, we can use the TEE handler profiling feature to list all TEE handlers to see if each is really needed to be implemented inside of the TEE. Or if we can have some other way to implement it in a non-TEE. If the TEE privilege is not required, then we should move the feature out of the TEE.
Defense in Depth
Defense in depth is a general way to protect the most critical assets. Take Intel BIOS Guard as the example. In a general X86 system, the flash is protected by the system management mode (SMM) environment. However, if there is an SMM vulnerability, then the attacker may break SMM and thus break the flash protection, such as the ThinkPwn attack. Intel BIOS Guard brings one more layer of protection. In order to update the BIOS, the SMM code must launch a special BIOS Guard module to perform the BIOS flash update. The new BIOS image signature check and flash unlock are performed inside of the BIOS Guard module. Even if the SMM environment is broken, the malicious code cannot update the flash region freely. As such, the platforms which adopt Intel BIOS Guard can resist the flash update attack from the ThinkPwn-style attack.
Another example is the PCI option ROM loading. Because the PCI option ROM is third-party code, it must be signed to meet the UEFI secure boot requirements. However, signing can only guarantee the code is from a trusted source but cannot guarantee there are no bugs. As such, the PCI option ROM is loaded after the platform exits the manufacture auth phase. At that time, the BIOS flash is locked. Even if there is bug in an option ROM code, the attacker cannot take advantage of this flaw to attack the system BIOS flash before it is locked.
Open Design
Open design is based upon the basic cryptography principle – Kerckhoffs’s principle: The security of a system should be based upon the key instead of the algorithm. The algorithm should be public. The key should be the only secret. Today, this is referred to as “Obscurity != Security.” The security architecture and implementation should be open to the public. We should not rely on hidden design and implementation details to provide the security, such as hiding private keys or passcodes in the firmware image. Results show that the attackers have used reverse engineering to uncover security issues introduced more than ten years ago.
Remove Backdoors
A backdoor refers to an undocumented interface which may be used for special purposes, such as maintenance. The existence of a backdoor violates the secure design practices of reducing attack surfaces and open design. One example is that in Black Hat 2018, Domas demonstrated how to find a hidden instruction to gain supervisor privileges in user mode. He used fuzzing to scan the system and found a special “God Mode Bit” (MSR 1107, BIT 0). Toggling this bit activated a launch instruction (0F03). By using a co-located core with unrestricted access to the core register file, software can send content via Ring 3 to modify a Ring 0 register and obtain hardware privilege escalation.
Keep Code Simple
Simple code makes it easy for testing and code review. The general guideline is that a file should have less than 1000 lines of code and a function should have less than 100 lines of code. One bad example is that in the EDK II UEFI variable driver – MdeModulePkg/Universal/Variable/RuntimeDxe/Variable.c. The UpdateVariable() routine has more than 600 lines of code and 65 “if” branches. One of the “if” branches misses the “else” branch handling and causes the timestamp field to be filled with a wrong value. This issue had been there for several years. We performed several rounds of code reviews and testing, but no one found this problem. Sixty-five“if” branches in one function is overly complicated.
Boot Firmware Secure Design Practice
Besides general design practices, we list some boot firmware-specific secure design practices.
Firmware Resiliency: Protection, Detection, and Recovery
The firmware should take firmware resiliency into account, such as integrity protection, secure update, secure boot, and secure recovery. We have discussed the firmware resiliency solutions in Chapters 3, 4, and 5.
Firmware Measurement and Attestation
The firmware should report firmware integrity measurements and support attestation. It can use the Trusted Platform Module (TPM)–style measurement and attestation or the Device Identifier Composition Engine (DICE) –style measurement and attestation. We have discussed the firmware trusted boot in Chapter 7.
Device Security
Devices have become a threat these days. On the one hand, the system firmware should authenticate and measure the device firmware, such as using the Secure Protocol and Data Model (SPDM) protocol. On the other hand, the system firmware should not trust the input from the device. For example, it should set up protection for DMA attack and validate the input from the device. We have discussed device security in Chapter 8.
S3 Script
- 1)
Enable a LockBox for S3 data storage.
- 2)
Save the S3 script itself into the LockBox.
- 3)
Save the S3 script executor into the LockBox.
- 4)
If the S3 script includes a function pointer, save the full function into the LockBox.
- 5)
If the S3 script includes a function parameter, save the full parameter into the LockBox.
- 6)
If a LockBox is not available, use a read-only variable as an alternative.
- 7)
If there is a confidentiality requirement, use the TEE directly, such as X86 SMM RAM (SMRAM).
More details of the S3 resume are discussed in Chapter 9.
Secure Configuration
- 1)
Do not provide an option to control the protection managed by the manufacturer owner, such as flash protection. It should always be enabled.
- 2)
Require user physical presence to control the protections managed by the machine owner, such as UEFI secure boot or TPM.
More details of system access control are discussed in Chapter 10.
UEFI Variable Use and Misuse
UEFI variables are used to store the non-volatile configuration for the boot firmware. Most UEFI secure variables are read/write. As such, the UEFI variable should also be treated as untrusted input. We should verify the variable data before accessing it. For example, an expected string in the UEFI variable might not be NULL terminated. An expected 8-byte data might only have 1 byte stored, and the remaining 7 bytes contain a random value. The system configuration in the variable might be garbage.
- 1)
If the variable data is not required to be persistent across a reboot, then we should remove the non-volatile (NV) attribute.
- 2)
If the variable data is not required to be accessed at OS runtime, then we should remove the runtime (RT) attribute.
- 3)
If the variable data is critical and we do not expect anyone to modify the data at OS runtime, then we should lock this variable at boot time.
More details of the system configuration are discussed in Chapter 11.
Trusted Execution Environment
- 1)
The TEE should protect itself from access by the code and I/O out of the TEE.
- 2)
The TEE should not trust any data from outside of the TEE and perform input validation.
- 3)
The TEE should not call any code outside of the TEE.
- 4)
The TEE should not act as a confused deputy to assist the low-privilege nonsecure world to attack the high-privilege secure world.
We will introduce more on the TEE subject in Chapter 17.
Silicon Register Lock
The role of the system firmware is to initialize the silicon and boot to the OS. After the silicon is initialized, the system firmware should lock the configuration to resist any further attack, such as corruption or modification of assets like flash storage, the TEE, and memory mapped I/O (MMIO) configuration base address registers (BARs). This lock action is silicon specific. Chapter 18 provides some examples for the X86 system.
Advanced Secure Coding Topic
Now let’s take a look at the advanced secure coding topic. We will discuss the side channel attack and fault injection, followed by the software mitigation.
Side Channel Attack
There is an interesting puzzle named 3 Bulbs and 3 Switches. The puzzle proceeds as follows: “There is a room with a door (closed) and three light bulbs. Outside the room, there are three switches, connected to the bulbs. You may manipulate the switches as you wish, but once you open the door, you can’t change them. Please identify each switch with its bulb.”
The solution of this puzzle cannot be reduced to a mathematical model. Logically, it seems impossible to identify which switch controls which bulb by entering the room only once because each bulb can only have one of two states – ON or OFF. There is not enough mathematical information to distinguish the different states of three bulbs. In practice, the bulb can have more than two states because of the heat. If we turn on a switch for a while, the bulb becomes hot. Even after we turn off the switch, the bulb is still hot for a while.
- 1
If the light is on, it is Y.
- 2
If the light is off and hot, it is X.
- 3
If the light is off and cold, it is Z.”
The heat of the bulb is a typical example of side channel information which is used to distinguish X and Z.

Worn-Out Numeric Keypad
Traditional Side Channel Attack
The traditional side channel attack can be pure software or hardware assisted. The software side channel attack includes a timing attack and a cache attack. The hardware side channel attack includes simple power analysis (SPA), simple electromagnetic analysis (SEMA), differential power analysis (DPA), differential electromagnetic analysis (DEMA), and so on. Some of these are used to attack the cryptographic library implementation.
Marc Witteman’s whitepaper “Secure Application Programming in the Presence of Side Channel Attacks” provides good information on this topic.
Timing Attack
Listing 14-25.

Timing Attack
Listing 14-26.
Cache Attack
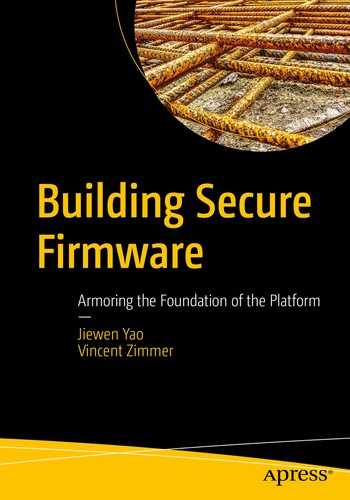
A Single Level of Set-Associated Cache
Prime+Probe
- 1)
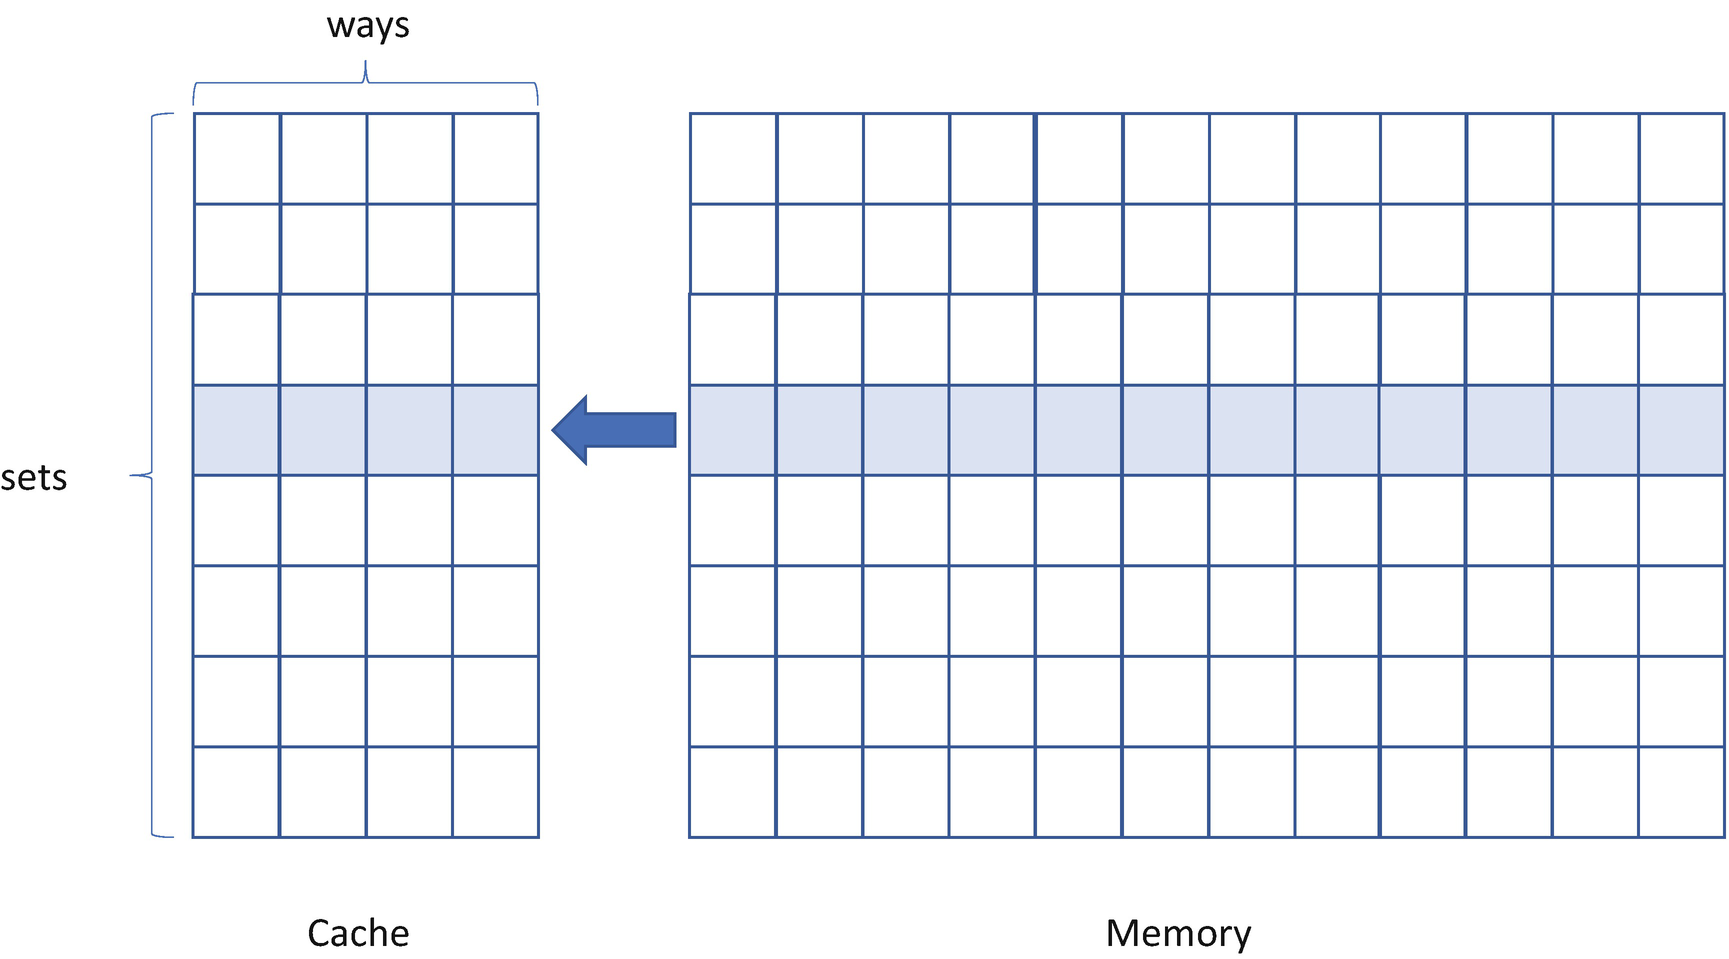
For phase PRIME, the attacker primes the targeted cache set by accessing the cache lines in its eviction buffer. The monitored cache set is filled with the attacker’s data. See Figure 14-4.
- 2)
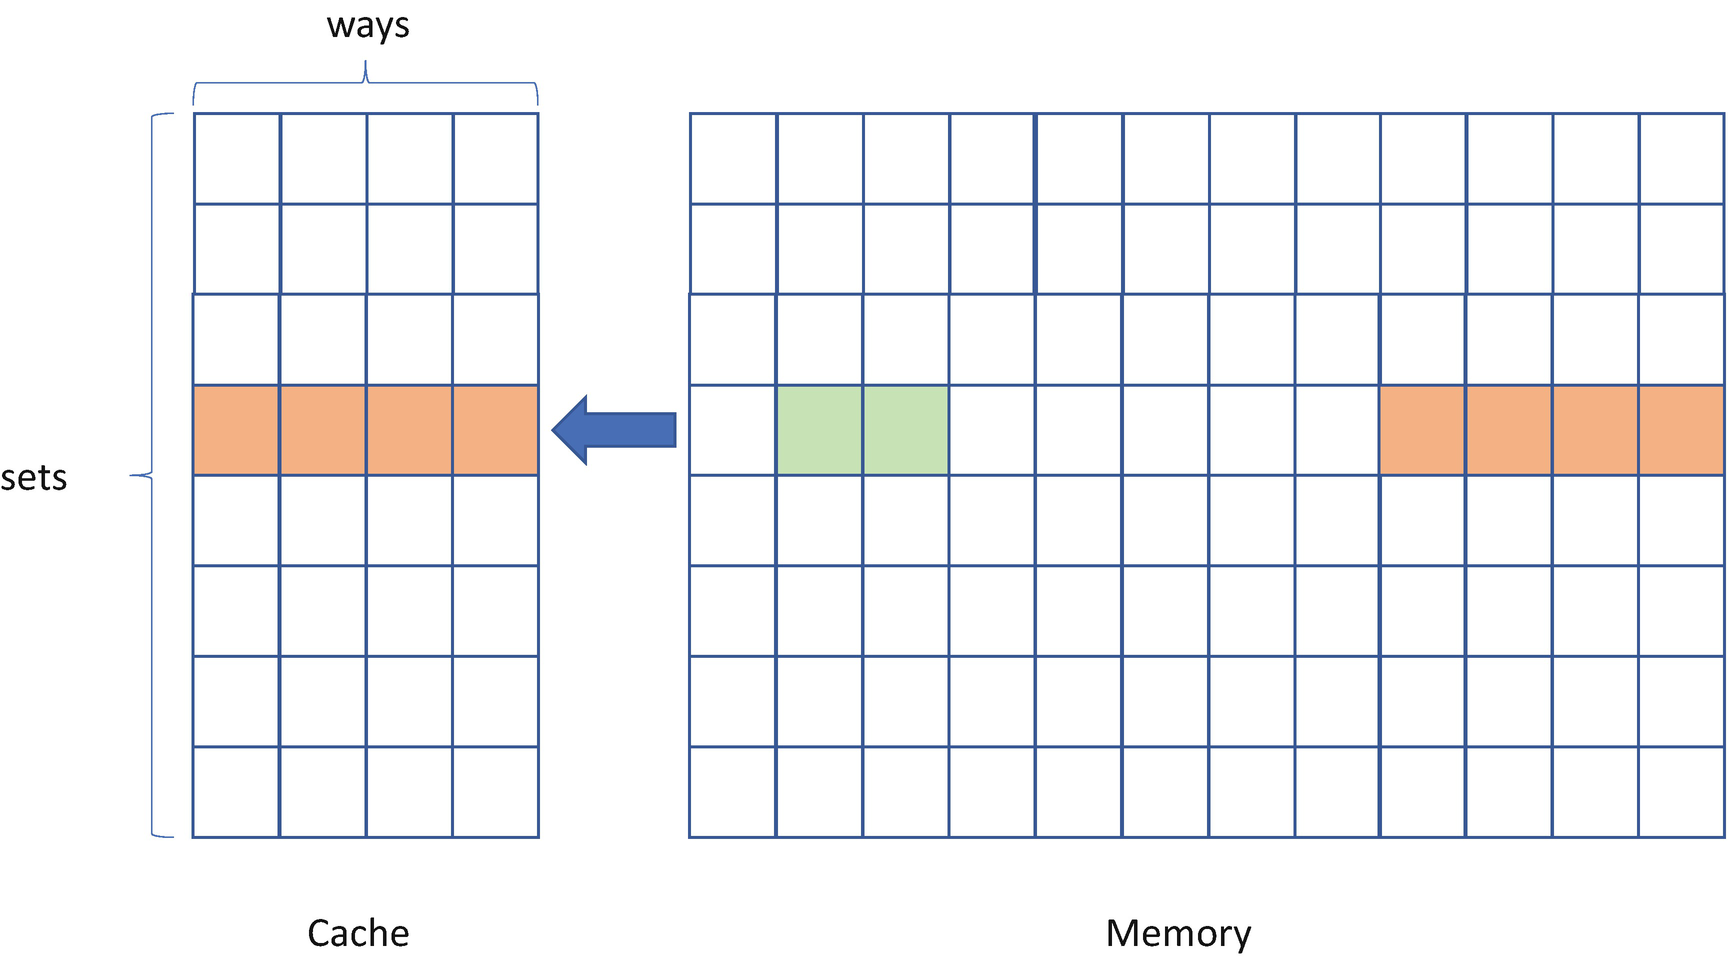
For phase IDLE, the attacker waits for a while to allow the victim to access the target cache line.
- 3)
For phase PROBE, the attacker probes the cache set by measuring the time to access the cache lines in the eviction buffer. If the victim accesses the target cache line in phase 2, the target cache line will evict an attacker line from the cache; then the PROBE operation will take a longer time. See Figure 14-5.
Prime+Probe Attack – PRIME Phase

Prime+Probe Attack – PROBE Phase
One example of the Prime+Probe attack is to monitor the lookup table usage in a bad AES crypto implementation and then derive the key value based upon the side channel information.
The mitigation includes removing the lookup table, using a dynamic lookup table, disabling the cache, hiding timing, and using hardware-assisted cryptographic algorithms.
Flush+Reload
- 1)
For phase FLUSH, the attacker flushes the target cache line from the cache hierarchy. For example, this flush can be accomplished by using the clflush instruction. See Figure 14-6.
- 2)
For phase IDLE, the attacker waits for a while to allow the victim to access the target cache line.
- 3)
For phase RELOAD, the attacker reloads the target cache line and measures the time to load. If the victim accesses the target cache line in phase 2, then the RELOAD operation will take a short time. Otherwise, the RELOAD operation takes a longer time. See Figure 14-7.
Flush+Reload Attack – FLUSH Phase

Flush+Reload Attack – RELOAD Phase
There are some other cache attacks, such as Evict+Time and Evict+Reload. With a cache attack, the attacker can know if the content in a specific memory location is accessed by measuring the time difference between a cache hit and a cache miss.
One example of the Flush+Reload attack is to recognize the Square-Reduce-Multiply-Reduce pattern in the bad GnuPG crypto implementation . With the side channel information, the attacker may recover the bits of the exponent.
The mitigations include but are not limited to preventing page sharing, not using special data-dependent algorithm, disabling the cache, hiding timing, and using hardware-assisted cryptographic algorithms.
Simple Analysis
Simple analysis includes simple power analysis (SPA) and simple electromagnetic analysis (SEMA) . The attacker can observe the power consumption difference or the electromagnetic signal difference to distinguish different instruction executions. Special measurement equipment is required to collect such information. ChipWhisperer is one of the open-source toolchains for side-channel power analysis and glitching attacks.
Differential Analysis
Differential analysis includes differential power analysis (DPA) and differential electromagnetic analysis (DEMA) . The attacker needs to collect a large number of trace data sets and use statistical analysis to figure out their relationships and then to derive secrets. Similar to the simple analysis, special measurement equipment is required to collect such information.
Principle of Traditional Side Channel–Resistant Coding
- 1)
Secret-independent runtime (SIR)
- 2)
Secret-independent code access (SIC)
- 3)
Secret-independent data access (SID)
Secret values should not cause a change to the order of accessed addresses or the data size of loads/stores. For example, don’t use a secret value to load a specific location from a table representing an S-box without taking appropriate precautions. Care must be taken for any lookup table usage in the crypto library.
Speculative Execution Attack
Modern CPUs have introduced some advanced techniques to achieve maximum performance, such as branch prediction, speculative execution, out-of-order execution, and so on. The basic idea is to execute the next instruction in the instruction pipeline whenever it is possible and prepare the result. If this instruction needs to be executed finally, the result can be committed directly. If this instruction is not needed, then the result is discarded.
Ideally, once the result is discarded, there will be no impact to the security of the system. Unfortunately, this intermediate result may impact the cache state. Then the cache state can be exposed via the cache side channel attack we discussed in the preceding text, such as the Flush+Reload attack. Spectre and Meltdown are two famous side channel attacks. Let’s discuss them one by one.
Spectre Variant 1: Bounds Check Bypass
Spectre breaks the isolation between different applications. It allows an attacker to trick error-free programs, which follow best practices, into leaking their secrets.
Listing 14-27.
If the attacker gives x = &secret[0] - &array1, then k = array1[x] = secret[0] is the first byte of secret. With speculative execution, the CPU will read the k from the secret, calculate the y, and save the value k and array2[k * 256] to the cache before the if statement is evaluated. Later after the CPU notices that the value x is out of bound, then it will discard the value y. However, the secret k and the value array2[k * 256] are still in the cache.
Now, the attacker can use the Flush+Reload attack to get the k if the array2 is readable from the attacker’s process. In phase FLUSH, the attacker flushes the cache line for the array2. Then they trigger the data process. In phase RELOAD, the attacker can try to load each byte at array2[n* 256], where n is from 0 to 255. When n == k, the reload time is very short because the data is from the cache. Otherwise, the reload time is significantly longer because the data is from memory.
Listing 14-28.
For the host firmware, the system management mode (SMM) code might be impacted by the bounds check bypass. As such, the speculation barrier instruction is required for the SMM handler if it accepts any untrusted external input as array index.
Spectre Variant 2: Branch Target Injection
Listing 14-29.
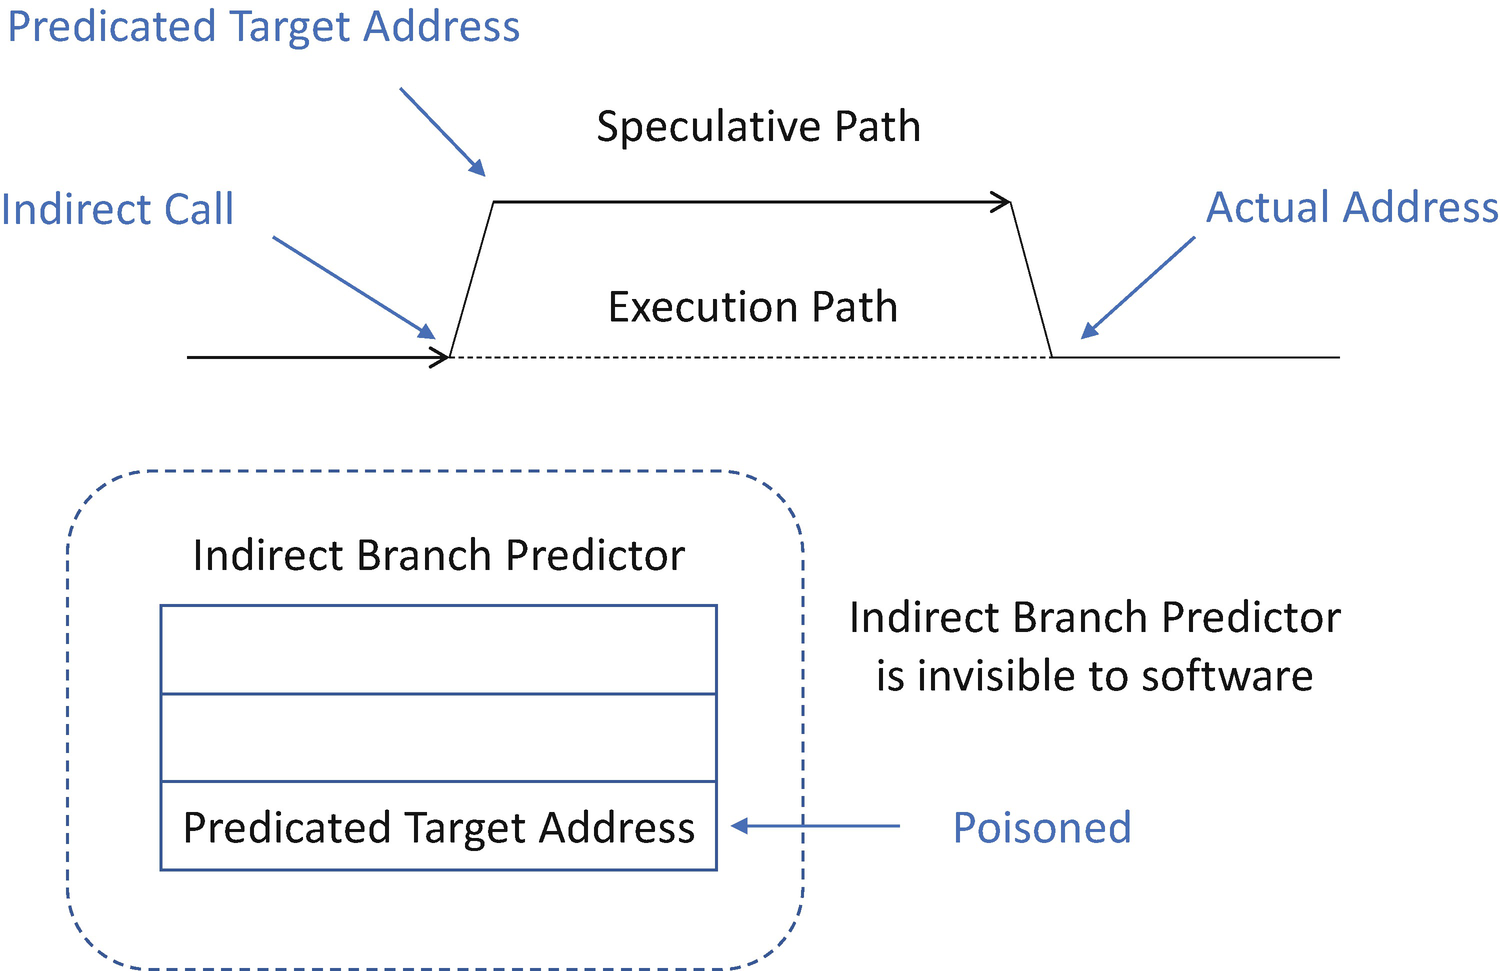
The branch target injection takes advantage of the indirect branch predictors that are used to direct what operations are speculatively executed. By influencing how the indirect branch predictors operate, a malicious attacker can cause malicious code to be speculatively executed and then measure the effects such code has on the processor cache/system memory to infer data values.
- 1)
The target of the exploit (the victim) must have some secret data that an exploit wants to obtain. In the case of an OS kernel, this includes any data outside of the user’s permissions, such as memory in the kernel memory map.
- 2)
The exploit needs to have some method of referring to the secret. Typically, this is a pointer within the victim’s address space that can be made to reference the memory location of the secret data. Passing a pointer of an overt communication channel between the exploit and the victim is a straightforward way to satisfy this condition.
- 3)
The exploit’s reference must be usable during execution of a portion of the victim’s code which contains an indirect branch that is vulnerable to exploitation. For example, if the exploit pointer value is stored in a register, the attacker’s goal is for speculation to jump to a code sequence where that register is used as a source address for a move operation.
- 4)
The exploit must successfully influence this indirect branch to speculatively mis-predict and execute a gadget. This gadget, chosen by the exploit, leaks the secret data via a side channel, typically by cache timing.
- 5)
The gadget must execute during the “speculation window” which closes when the processor determines that the gadget execution was mis-predicted.
- 1)
The first mitigation entails directly manipulating the speculation hardware. This requires a CPU microcode update and manipulation of hardware registers.
- 2)
The second mitigation involves indirectly controlling speculation behavior. Retpoline is a software construct for preventing branch target injection. It only impacts element 4 in the preceding five elements, but it is sufficient to stop the branch target injection exploit.
Speculative Execution Without Retpoline
Speculative Execution with Retpoline
Usually the retpoline is generated by the compiler. In some rare case, we may need to write assembly code directly. As such, we need to know how to write retpoline code.
Listing 14-30.
Listing 14-31.
Listing 14-32.
Listing 14-33.
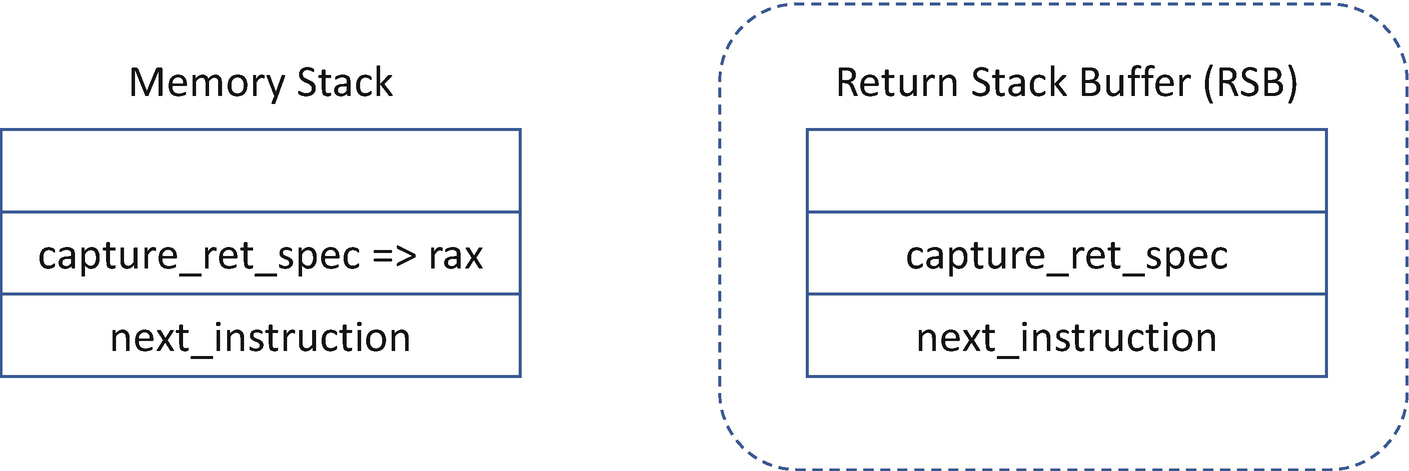
Memory Stack and RSB
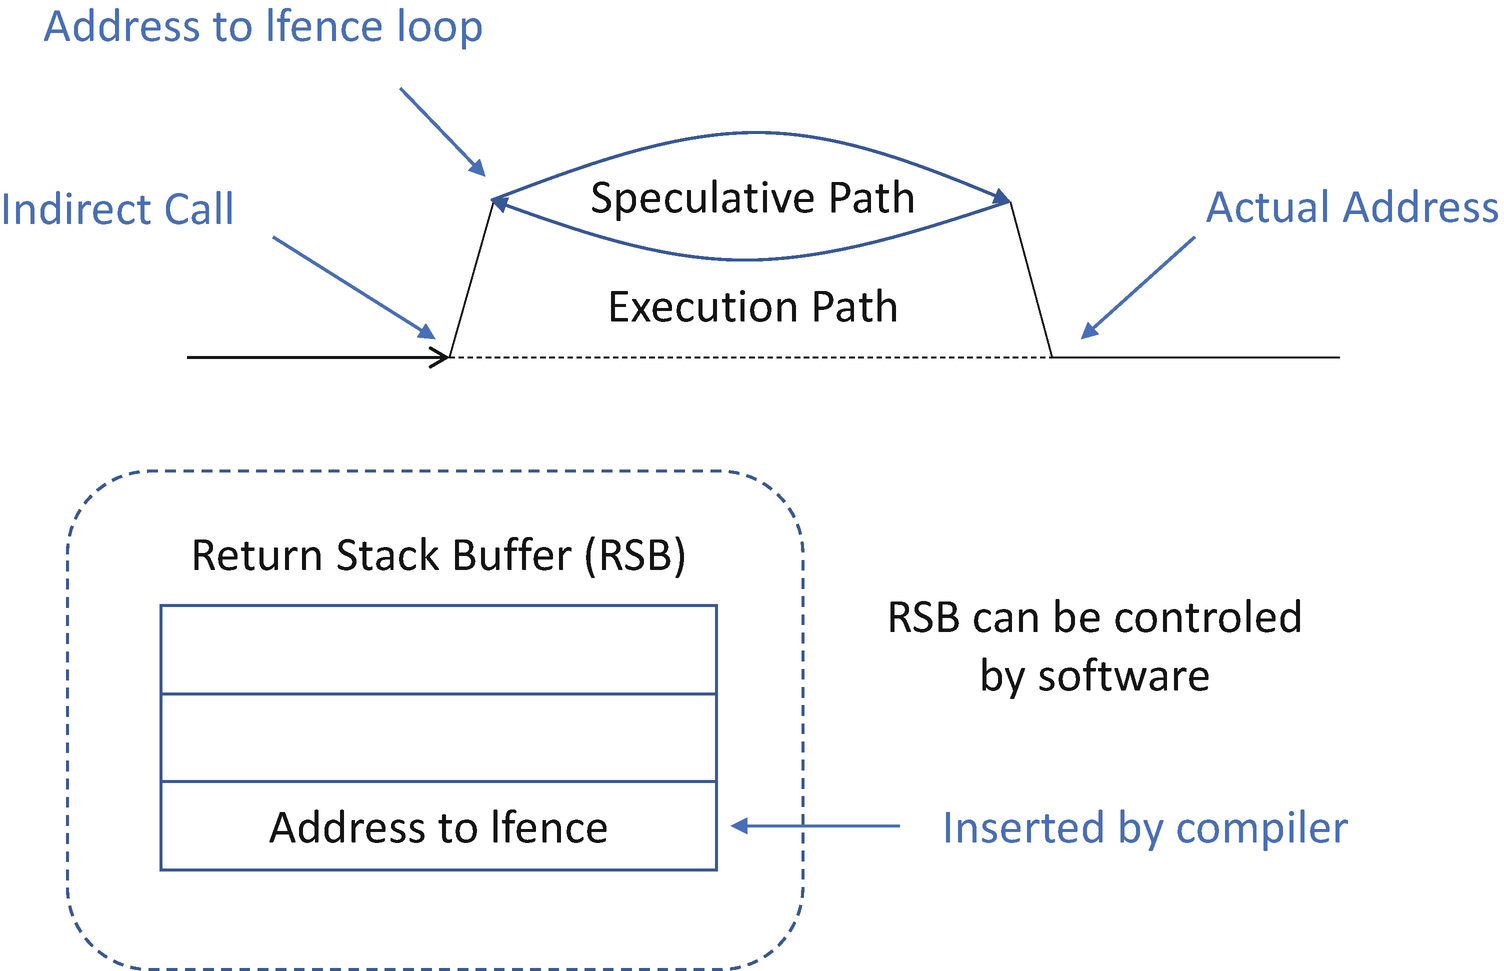
The RSB is a fixed-size stack implemented in hardware. It can underflow in certain conditions, thus causing undesirable behavior. When the RSB stack is empty on some processors, a RET instruction may speculate based upon the contents of the indirect branch predictor. This latter case is the situation that retpoline is designed to avoid.
- 1)
Interrupts/NMIs/traps/aborts/exceptions which increase call depth
- 2)
System management interrupts (SMIs)
- 3)
Host VMEXIT/VMRESUME/VMENTER
- 4)
Microcode update load (WRMSR 0x79) on another logical processor of the same core
Listing 14-34.
The host firmware might not be impacted by the branch target injection if all codes run at the same privilege. On processors with different empty RSB behaviors, SMM code should stuff the RSB with CALL instructions before returning from SMM to avoid interfering with non-SMM usage of the retpoline technique.
Meltdown Variant 3
Meltdown breaks the most fundamental isolation between user applications and the operating system. This attack allows a program to access the memory, and thus also the secrets, of other programs and the operating system.
- 1)
Secret read: The attacker accesses a kernel address and loads the content into a register, such as using a MOV instruction. This address is inaccessible because of the privilege. Most modern operating systems use a single page table to map the application space and the kernel space. As such, the kernel space address is present in the page table. Because of out-of-order execution, the CPU loads the kernel data internally at first regardless of the privilege. Later when the MOV instruction retires, the exception is triggered. However, there is a race condition between the raising of the exception and the secret transmit step.
- 2)
Secret transmit: The attacker uses a transient instruction sequence to access a cache line based on the secret content of the register. If this transient instruction sequence is executed before the MOV instruction is retired in the race condition and the transient instruction sequence performed computations based on the secret, it can be utilized to transmit the secret to the attacker.
- 3)
Secret receive: The attacker uses the Flush+Reload attack to determine the accessed cache line and then gets the secret content.
Listing 14-35.
The mitigation of Meltdown is to set up dual page tables, also known as kernel page table isolation (KPTI). One page table is designated for the user-level application, with a minimal kernel page for the context switch only. The other page table is only for the OS kernel usage. With the dual page tables, the Meltdown attack will fail in the secret read because the user mode paging does not have a valid address for the OS kernel. There is no way to read the OS kernel content. We will introduce more details in Chapter 16.
If the firmware enables the kernel mode and user mode isolation, the dual page tables should be used to resist the Meltdown attack.
Others
Besides the original Spectre variant 1 and variant 2 and Meltdown variant 3, there are more and more side channel attacks appearing, such as variant 3a, Rogue System Register Read; variant 4, Speculative Store Bypass; SpectreRSB; BranchScope; and so on.
Intel, “Host Firmware Speculative Execution Side Channel Mitigation”
Intel, “Deep Dive: Analyzing Potential Bounds Check Bypass Vulnerabilities”
Intel, “Deep Dive: Retpoline – A Branch Target Injection Mitigation”
Intel, “Security Best Practices for Side Channel Resistance”
ARM, “Cache Speculation Side-channels”
Google, “Retpoline: a software construct for preventing branch-target-injection”
Linux, “KAISER: hiding the kernel from user space”
Microsoft, “Spectre mitigations in MSVC”
Microsoft, “Mitigating Spectre variant 2 with Retpoline on Windows”
Besides the cache, other micro-architecture may also be vulnerable to the speculative attack, such as Intel Microarchitecture Data Sampling (MDS). Intel MDS involves Microarchitecture Store Buffer Data Sampling (MSBDS), Microarchitecture Fill Buffer Data Sampling (MFBDS), Microarchitecture Load Port Data Sampling (MLPDS), and Microarchitecture Data Sampling Uncacheable Memory (MDSUM). The key concept of MDS is that the CPU microarchitecture includes one or more special data buffer in the memory pipeline besides the CPU cache. These special data buffers are vulnerable to cache speculative attack, such as FLASH+RELOAD. The Rogue In-Flight Data Load (RIDL) showed the attack to leak in-flight data from the line-fill buffer. The fallout demonstrated the attack the data leakage from the store buffer. Those attacks can bypass the existing cache speculative mitigation. Intel whitepaper “Deep Dive: Intel Analysis of Microarchitectural Data Sampling” provides more detailed information on MDS.
Please always refer to the latest side channel mitigation guidelines.
Fault Injection
Fault injection entails the generation of unexpected conditions and triggering of a fault. In general, it includes software fault injection and hardware fault injection. The software fault injection can be compiler time or runtime. The compiler-time fault injection is to add some stub functions to trigger the error path. Usually, it is used to test the robustness and error handling code. The runtime software fault injection is similar to the untrusted external input. It can be used in both the penetration test and real attack. It is already covered in the previous section – “Check Input Cross Trust Boundary.”
Hardware fault injection involves the modification of the physical environment by placing the hardware chip in an unusual situation. It could be overvoltage, under-voltage, voltage glitch, electromagnetic pulse, high-energy radiation, high temperature, low temperature, and so on. A typical hardware fault injection brings a transient effect, such as flipping a single bit or a few bits, to skip an instruction or control a branch path. It is very effective to bypass the security check. In the real world, we have seen row hammer attacks or glitch attacks to bypass the security checking and gain privilege. The real open source example includes ChipWhisperer and SySS iCEstick Glitcher, etc. Our focus in this section is to discuss the mitigation for the hardware fault injection.
Listing 14-36.
This function is vulnerable to the glitch attack if the attack can flip 1 bit between “Test (&Action)” and “switch (Action).” In cases wherein the test function finds some errors and sets Action to be an abnormal one, such as EfiDriverConfigurationActionStopController (1), the attacker can flip the Action bit0 to 0 in order to let this code just continue running. If the test function sets the Action to be EfiDriverConfigurationActionRestartController (2), the attacker can flip the Action bit1 to 0. If the Action is set to EfiDriverConfigurationActionRestartPlatform (3), then the attacker cannot flip the Action to 0. However, the attacker can flip the Action bit31 to 1 to make it invalid. Because the default path in the switch is continued, this code just continues running with the invalid action.
Listing 14-37.
First, the enum definition should use a non-trivial value with a large Hamming distance. The Hamming distance between two numbers is defined as the number of bits that differ for those numbers. For example, the pair (0, 1) has a Hamming distance 1. (0x5A=0101_1010b, 0x3C=0011_1100b) has a Hamming distance 4. (0x5A=0101_1010b, 0xA5=1010_0101b) has a Hamming distance 8. A large Hamming distance makes it hard for the attacker to change from one value to the other value. Second, we handle the undefined state in the default path and treat it as a failure condition. This makes it difficult for the attacker to take advantage of success by default.
Listing 14-38.
Listing 14-39.
Listing 14-39 shows the improvement. First, it uses the non-trivial definition for the final result instead of a BOOLEAN. As such, it is hard for the attacker to flip the result. Second, it adds a redundancy check. For example, the authentication function is called twice as a double check. The attacker must flip bits in two different places. Third, it uses a random delay before any check function, which makes it hard for the time-based fault injection.
Mitigation Summary
- 1)
Use non-trivial code with a large Hamming distance.
- 2)
Fail the default path in a switch case explicitly.
- 3)
Add redundancy checks.
- 4)
Add random delay in the code.
High-Risk Area in Firmware
In Chapter 2, we mentioned eight high-risk areas in firmware. Now let’s revisit to see how to apply the secure coding practice to those areas.
External Input
Checking the untrusted external input across the trust boundary is rule number 1.
What entails untrusted external input should be defined clearly based upon the threat model. You may ask yourself, can the attacker control and modify the data? If yes, then it is untrusted external input. If no, then it is probably trusted data. Some external input data are very clear, such as a BIOS logo Bitmap (BMP) file or Joint Photographic Experts Group JPEG file, a BIOS update image, content in the file system, the trusted execution environment (TEE) communication buffer, network packet, and so on. Some external input data may be trusted or untrusted, such as a recovery image. If the system designer puts the recovery image into an immutable location and only allows manufacturing mode update, then this image could be treated as trusted. If the system designer allows the end user to put a recovery image in any allowed recovery media, such as the hard disk or USB disk, then the input is untrusted. Another example is the flash content. If the threat model includes the simple hardware adversary and assumes the attacker may use a flash programmer to update the flash content directly, then it is untrusted and should be validated by a platform Root-of-Trust. If the threat model does not include simple hardware adversary but only includes a system software adversary, then we can just apply flash write protection in the TEE. The flash content can be treated as trusted in the boot.
The concept of trusted internal input and untrusted external input may change in the production. For example, in old days, the BMP logo file was treated as the internal input. The end user cannot modify the BMP BIOS boot logo file. Later, some BIOS treated it as a feature to allow an end user to customize the BIOS boot logo. Then the BMP logo file becomes an untrusted external input. The universal plug and play (UPnP) protocol is designed to be used in a trusted local area network (LAN) and the protocol does not implement any form of authentication or verification. However, many common Internet-connected devices support UPnP. The attacker found the vulnerabilities, such as CallStranger. Then the Open Connectivity Foundation (OCF) has updated the UPnP specification to address this issue. If the previous assumption is changed, the external input for the production must be reevaluated.
When we perform the input check, the secure coding practices should be followed. Per our observation, buffer overflow, arbitrary buffer access, and arithmetic error such as integer overflow are the top three issues. Care must be taken for them. If the input check is missing or incomplete, there is a high risk of privilege escalation. This usually happens during the firmware update process or in a trusted execution environment (TEE) handler, such as X86 system management interrupt (SMI) handler or ARM secure monitor call (SMC) handler. The input validation is critical for the TEE to resist the confused deputy attack because of the high privilege of the TEE.
Correct error handling is also important. For example, if the check function fails to find the policy, it should return a verification failure instead of a verification pass. Especially in cases where the check function fails to find the revocation policy or denied image policy due to expected system error or hardware error, it should still also return verification fail. Only if the check function fails to find the revocation policy or denied image policy because the policy is valid but empty should it return a verification pass. Missing error handling is not a good choice. ASSERT may be used to define the contract clearly. Before using ASSERT, please always ask yourself: Might this occur when the attacker tries to attack the system and modify the software or hardware state? Or is this a case that never occurs because it is guaranteed by the other code logic or hardware restriction? ASSERT should only be used in the latter case. Error handling should be used for the former case.
The compatibility support might be a burden because the old image format or signature format might be different from the latest one. It is highly recommended to use a different function and different code path to cover the compatibility support instead of mixing the logic with the latest format. We have seen bad examples where the code combines both logic flows together and thus makes it very complicated. With such complexity, a small mistake in the compatibility support logic brings a security hole in the checking function.
The deprecated or banned API should not be used because it may miss a length parameter. Even if you use a safe version of API, you still need to pay much attention to the input parameter, especially the length of the buffer. We have seen bad examples when the project tried to clean up the banned API usage. The developer filled a wrong length parameter to a safe string function, which makes the boundary check in the safe string function useless.
Race Condition
In general, there are two typical race conditions in firmware.
The first one is the race condition for the external data buffer for the check function. This brings a typical time-of-check/time-of-use (TOC/TOU) issue. The right way to handle this type of race condition is as follows: 1) copy the data from an untrusted environment to a trusted environment, 2) verify the data in the trusted environment, and 3) use the data in the trusted environment. The data in the untrusted environment should never be used in steps 2 and 3. One example is the trusted execution environment (TEE) communication buffer. The TEE handler should copy the communication buffer into TEE and then verify and use the data inside of the TEE. Another example is the boot flash content, where a root-of-trust should copy the boot flash to a trusted memory, such as cache, and then verify and use the content in the trusted memory. If the external flash cannot be trusted, then it should not be accessed anymore after verification.
The second one is the race condition for the critical register unlock in the TEE. This is a typical TEE-based protection. The X86 system management mode (SMM)–based flash protection is one example. The flash region is locked, and no flash write is allowed after boot. The flash region can only be unlocked inside of SMM. The normal process is as follows: 1) enter SMM, 2) unlock the flash region, 3) write flash content, 4) lock the flash region again, and 5) exit SMM. These five steps must be in one system management interrupt (SMI). Before the CPU performs the unlock action, this CPU must check the state of other CPUs to see if they are also in SMM running trusted code. If there is one CPU not inside of SMM, then this malicious CPU can perform the flash content write after the flash region is unlocked by the CPU in SMM. As such, if we need to unlock the critical register in the TEE, we must check that all CPUs are in the TEE and running trusted code.
Hardware Input
Hardware input is an extension for the external input class of concern. We list it here independently because it is a new threat and it is easily ignored when we design a solution.
The device-specific data is the hardware input, such as the USB descriptor or Bluetooth Low Energy (BLE) advertisement data. The attacker can easily create malicious data and send the malformed data, such as the USB FaceDancer tool. At the same time, we have seen some implementations just follow the specification and assume that the device sends the data according to the specification. Eventually, the malformed data caused a buffer overflow. The same attack can be on the Serial Peripheral Interface (SPI) bus, Inter-Integrated Circuit (I2C) bus, System Management Bus (SMBus), and so on.
The silicon register is another hardware input because the attacker may program it to a malicious state and attack the TEE. The remap register reprogramming and the memory mapped I/O (MMIO) base address register (BAR) overlapping are two common techniques in the address alias attack. As such, if possible, we should lock the configured silicon register. For the unlockable MMIO BAR register, an overlap check is always required before accessing any data in the MMIO region. The overlap check should cover the TEE, such as SMM, the high-privilege environment such as the hypervisor, or any other high-privilege assets to potentially overlap the MMIO region.
DMA attacks have become more and more popular. The PCI Leech is a tool to generate DMA from a PCI device to attack the system. It could run in both the OS phase and the pre-OS firmware phase. If a DMA attack is included in the threat model, then DMA protection should be included. The time to enable DMA protection should also depend upon the threat model. If only external DMA threats need to be considered, the DMA protection can be enabled before we connect the external device. If the internal DMA threat needs to also be considered, the DMA protection should be enabled before the DRAM initialization. If the internal DMA can access the SRAM, then the DMA protection should be enabled by default when the system powers on.
Secret Handling
If the firmware needs to deal with a secret, such as a password, then the best practices for secret handling must be followed. A common mistake is that the secret is left in the memory, such as the key buffer, temporary local variable to convert the format of the secret from ASCII to Unicode or vice versa, or communication buffer to pass the secret from one environment to the other environment. The secret should be cleared after use in all those places.
When clearing the secret, please pay attention to the compiler optimization. The zeroing memory function might be optimized by the compiler. Please always double-check the final generated binary to confirm the zeroing action is still there.
If the secret needs to be stored in the non-volatile memory, then we should not use plain text. The best practice is to use a slow hash function with salt data. Please pay attention to the special data management attribute of the non-volatile memory because the removal operation might simply be a flag setting on the volatile memory storage to achieve the best performance. One example is the file system. Even after a file is deleted, the content of the file is still on the disk. Saving the secret in such a file system is not a good idea, even as temporary storage.
Register Lock
After the system boots, the firmware should lock down the configuration as much as possible. The most important ones include the flash region lock, the TEE lock such as SMM, and system configuration lock, such as MMIO BAR. A simple check you can do is to read the datasheet to see if there is a lock register. If there is, then probably you need to lock it, unless you are told not to lock with a good justification.
Care must be taken that the lock action might not be a register setting. It might be a command, such as the End Of Post (EOP) command transmitted as an Intel Management Engine (ME) EOP message; a freeze command, such as the ATA SECURITY_FREEZE_LOCK command; or a block command, such as the TCG OPAL BLOCK_SID command.
Secure Configuration
In firmware, some security features are configurable, for example, the secure boot and TPM capability. The configuration can be static or dynamic. For the static configuration, it should be locked by the firmware to prevent any malicious reconfiguration, such as the flash lock, TEE lock, or MMIO BAR lock. For the dynamic configuration, the platform should use an access control mechanism to prevent the malicious configuration, such as the secure boot policy change requiring the authenticated variable update and the TPM configuration change requiring physical user presence.
An attacker may enable the recovery mode or manufacturing mode to bypass some security checks. We should design the solution carefully to apply the same security policy in the special boot modes. For example, skipping the secure boot verification in manufacturing mode is probably not a good idea.
A production implementation should not include any debug-related code or data. A debug message may cause an information leak in the TEE. A debug service handler may expose an unnecessary attack surface. A debug key or test key in the production platform may lead to a bypass of the authentication via a debug tool. All of those should be removed in final production.
An attacker may attach a debugger to the product in order to steal information in order to tamper with the system. The telemetry information is allowed for sending to the debugger, but the private key should never be exposed. Also, a root-of-trust module should detect this behavior and report a different firmware measurement to distinguish a debugger-attached boot from a normal boot. As such, the verifier can know the system is under debug and assert a different trust level.
In the TCG trusted boot solution, the completeness is the most important thing. The firmware must measure all required data into the right Trusted Platform Module (TPM) Platform Configuration Register (PCR). If a firmware forgets to measure one component, the tampering of this component will not be discovered. People have demonstrated how to use this missing measurement in tboot to attack the Intel Trusted Execution Technology (TXT) in S3 resume phase.
S3 resume is another perfect attack point because the system needs to be reconfigured in the S3 phase. All the secure configuration policy in the normal boot should be applied to S3 resume as well.
Replay/Rollback
The firmware usually needs to be updated. One threat in the firmware update is that the attacker may roll back the current firmware to an old known vulnerable version. As such, the version check in the firmware update is as important as the firmware integrity check, such as digital signature. The firmware version must be signed as part of the firmware image. The new firmware image version must not be smaller than the lowest supported version number (LSN) of the current firmware image.
If the firmware supports a data communication protocol, then the old vulnerable communication protocol must be excluded in the implementation. Otherwise, the attacker may try to negotiate with the firmware and downgrade the communication protocol to the older vulnerable one. The SSL Padding Oracle on Downgraded Legacy Encryption (POODLE) attack is such an example. It downgrades the TLS to SSL3.0.
Another example is the Qualcomm Achilles vulnerability. When a Digital Signal Processor (DSP) chip loads a library, the signature of the library is verified. However, there is no version check in the loader of the DSP and there is no device limitation. The attacker may find an old known vulnerable signed library from an old device and load it on a new DSP device. This is a typical downgrade vulnerability.
Cryptography
- 1)
Do not invent any cryptographic algorithm or protocol but instead follow the industry standards and guidelines. For example, don’t invent a new algorithm to support encryption and MAC. Please use the standard Authenticated Encryption with Associated Data (AEAD) instead.
- 2)
Do not write your own cryptographic library and instead use the existing one, such as openSSL and mbed TLS. The reason is that there were lots of implementation flaws observed in previous implementations and fixed, especially the side channel vulnerability. A new implementation may have the same mistake unless all existing vulnerabilities are well known by the developer.
- 3)
Always ask a cryptography expert to review the crypto-related architecture and implementation.
- 1)
Insufficient entropy in the random number seed
- 2)
Weak pseudo random number generation function
As such, if the hardware provides the random seed or random number, we should use the hardware-generated one.
The developer should also be aware of the randomness requirement in different algorithms and protocols, such as initialization vector, nonce, counter, sequence number, and so on. The initialization vector must be uniformly random. Using a fixed value for the initialization vector is a bad idea. A sequence number might not need to be random, but an incremental value needs to be synchronized between the sender and the receiver.
Similar to secret handling, the symmetric key and the private key must be cleared after use.
Summary
In this chapter, we introduced the secure coding practice in firmware. It covers the basic secure coding practice and secure design practice. We also introduced the advanced secure coding topic, including the traditional side channel attacks, such as timing side channel and cache side channel, the speculative execution attack, and the fault injection attack, as well as the mitigations. Finally, we summarized the recommendations for firmware development in the high-risk areas. In the next chapter, we will introduce the compiler defensive technologies to see how we can use those in the firmware development.
References
Book
[B-1] Steve McConnell, Code Complete: A Practical Handbook of Software Construction, 2nd Edition, Microsoft, 2004
[B-2] Steve Maguire, Writing Solid Code: Microsoft’s Techniques for Developing Bug-Free C Programs, Microsoft, 1993
[B-3] Michael Howard, David LeBlanc, Writing Secure Code: Practical Strategies and Proven Techniques for Building Secure Applications in a Networked World, 2nd Edition, Microsoft, 2004
[B-4] Michael Howard, David LeBlanc, John Viega, 24 Deadly Sins of Software Security: Programming Flaws and How to Fix Them, McGraw-Hill, 2009
[B-5] M.G. Graff and K.R. van Wyk, Secure Coding: Principles and Practices, O’Reilly, 2002
[B-6] John Viega, Matt Messier, Secure Programming Cookbook for C and C++: Recipes for Cryptography, Authentication, Input Validation and More, O’Reilly Media, 2003
[B-7] John Viega, Gary McGraw, Building Secure Software: How to Avoid Security Problems the Right Way, Addison-Wesley Professional, 2001
[B-8] Greg Hoglund, Gary McGraw, Exploiting Software: How to Break Code, Addison-Wesley Professional, 2004
[B-9] Jon Erickson, Hacking: The Art of Exploitation, 2nd Edition, No Starch Press, 2008
[B-10] Christian Collberg, Jasvir Nagra, Surreptitious Software: Obfuscation, Watermarking, and Tamperproofing for Software Protection, Addison-Wesley Professional, 2009
[B-11] Wenliang Du, Computer and Internet Security: A Hands-on Approach, CreateSpace Independent Publishing Platform, 2019
[B-12] Brian W. Kernighan, Rob Pike, The Practice of Programming, Addison-Wesley, 1999
[B-13] Gary Stringham, Hardware/Firmware Interface Design: Best Practices for Improving Embedded Systems Development, Newnes, 2009
[B-14] Jacob Beningo, Reusable Firmware Development: A Practical Approach to APIs, HALs and Drivers, Apress, 2017
[B-15] Jason Cohen, Best Kept Secrets of Peer Code Review, Smart Bear Inc., 2006
[B-16] Daniel P. Freedman and Gerald M. Weinberg, Handbook of Walkthroughs, Inspections, and Technical Reviews: Evaluating Programs, Projects, and Products, Dorset House, 1990
[B-17] Tom Gilb and Dorothy Graham, Software Inspection, Addison-Wesley Professional, 1994
[B-18] Karl Wiegers, Peer Reviews in Software: A Practical Guide, Addison-Wesley Professional, 2001
Conference, Journal, and Paper
[P-1] Rafal Wojtczuk, Alexander Tereshkin, “Attack Intel BIOS,” in BlackHat 2009, available at www.blackhat.com/presentations/bh-usa-09/WOJTCZUK/BHUSA09-Wojtczuk-AtkIntelBios-SLIDES.pdf
[P-2] Rafal Wojtczuk, Joanna Rutkowska, “Attacking Intel TXT via SINIT Hijacking,” in invisiblethingslab whitepaper 2011, available at https://invisiblethingslab.com/resources/2011/Attacking_Intel_TXT_via_SINIT_hijacking.pdf
[P-3] Di Shen, “Attacking your Trusted Core – Exploiting Trustzone on Android,” in BlackHat US 2015, www.blackhat.com/docs/us-15/materials/us-15-Shen-Attacking-Your-Trusted-Core-Exploiting-Trustzone-On-Android.pdf
[P-4] Oleksandr Bazhaniuk, Yuriy Bulygin, “Blue Pill for Your Phone,” in BlackHat 2017, available at www.blackhat.com/docs/us-17/wednesday/us-17-Bazhaniuk-BluePill-For-Your-Phone.pdf
[P-5] Dmitriy Evdokimov, Alexander Ermolov, Maksim Malyutin, “Intel AMT Stealth Breakthrough,” in BlackHat 2017, available at www.blackhat.com/docs/us-17/thursday/us-17-Evdokimov-Intel-AMT-Stealth-Breakthrough.pdf
[P-6] Fabien Perigaud, Alexandre Gazet, Joffrey Czarny, “Backdooring your server through its BMC,” in SSTIC 2018, available at www.sstic.org/media/SSTIC2018/SSTIC-actes/subverting_your_server_through_its_bmc_the_hpe_ilo/SSTIC2018-Slides-subverting_your_server_through_its_bmc_the_hpe_ilo4_case-gazet_perigaud_czarny.pdf
[P-7] Nico Waisman, Matias Sebastian Soler, “The Unbearable Lightness of BMCs,” in BlackHat 2018, available at http://i.blackhat.com/us-18/Wed-August-8/us-18-Waisman-Soler-The-Unbearable-Lightness-of-BMC.pdf
[P-8] Fabien Perigaud, Alexandre Gazet, Joffrey Czarny, “Turning your BMC into a revolving door,” in ZeroNight 2018, https://airbus-seclab.github.io/ilo/ZERONIGHTS2018-Slides-EN-Turning_your_BMC_into_a_revolving_door-perigaud-gazet-czarny.pdf
[P-9] Vincent Lee, “Hardware Reversing with the BELKIN SURF N300 Router,” 2019, available at www.thezdi.com/blog/2019/6/6/mindshare-hardware-reversing-with-the-belkin-surf-n300-router
[P-10] Vincent Lee, “Wipe Out! Hanging (More Than) Ten On Your Old Belkin Surf Router,” 2019, available at www.thezdi.com/blog/2019/8/1/wipe-out-hanging-more-than-ten-on-your-old-belkin-surf-router
[P-11] Vincent Lee, “Hardware Reversing with the TP-LINK TL-WR841N Router,” 2019, available at www.thezdi.com/blog/2019/9/2/mindshare-hardware-reversing-with-the-tp-link-tl-wr841n-router
[P-12] Vincent Lee, “Hardware Reversing with the TP-LINK TL-WR841N Router – Part 2,” 2019, available at www.zerodayinitiative.com/blog/2019/12/2/mindshare-hardware-reversing-with-the-tp-link-tl-wr841n-router-part-2
[P-13] Gal Beniamini, “Over The Air: Exploiting Broadcom’s Wi-Fi Stack,” in 2017, available at https://googleprojectzero.blogspot.com/2017/04/over-air-exploiting-broadcoms-wi-fi_4.html, https://googleprojectzero.blogspot.com/2017/04/over-air-exploiting-broadcoms-wi-fi_11.html
[P-14] Nitay Artenstein, “Broadpwn: Remotely Compromising Android and IOS via a Bug in Broadcom’s Wi-Fi Chipsets,” in BlackHat US 2017, available at https://www.blackhat.com/docs/us-17/thursday/us-17-Artenstein-Broadpwn-Remotely-Compromising-Android-And-iOS-Via-A-Bug-In-Broadcoms-Wifi-Chipsets.pdf
[P-15] Denis Selyanin, “Researching Marvell Avastar Wi-Fi: From zero knowledge to over-the-air zero-touch RCE,” in Zero Nights 2018, available at https://www.youtube.com/watch?v=Him_Lf5ZJ38
[P-16] Xiling Gong, Peter Pi, “QualPwn – Exploiting Qualcomm WLAN and Modem Over the Air,” in Blackhat US 2019, available at http://i.blackhat.com/USA-19/Thursday/us-19-Pi-Exploiting-Qualcomm-WLAN-And-Modem-Over-The-Air.pdf
[P-17] Hugues Anguelkov, “Reverse-engineering Broadcom wireless chipsets,” 2019, available at https://blog.quarkslab.com/reverse-engineering-broadcom-wireless-chipsets.html
[P-18] Charlie Miller, Collin Mulliner, “Fuzzing the Phone in Your Phone,” in Blackhat US 2009, available at https://www.blackhat.com/presentations/bh-usa-09/MILLER/BHUSA09-Miller-FuzzingPhone-SLIDES.pdf
[P-19] Ralf-Philipp Weinmann, “Baseband Attacks: Remote Exploitation of Memory Corruptions in Cellular Protocol Stacks,” in USENIX WOOT 2012, available at https://www.usenix.org/system/files/conference/woot12/woot12-final24.pdf
[P-20] Nico Golde, Daniel Komaromy, “Breaking Band: Reverse engineering and exploiting the shannon baseband,” in recon 2016, available at https://comsecuris.com/slides/recon2016-breaking_band.pdf
[P-21] Gyorgy Miru, “Path of Least Resistance: Cellular Baseband to Application Processor Escalation on Mediatek Devices,” in 2017, available at https://comsecuris.com/blog/posts/path_of_least_resistance/
[P-22] Amat Cama, “A walk with Shannon Walkthrough of a pwn2own baseband exploit,” in 2018, available at https://downloads.immunityinc.com/infiltrate2018-slidepacks/amat-cama-a-walk-with-shannon/presentation.pdf
[P-23] Marco Grassi, Muqing Liu, Tianyi Xie, “Exploitation of a Modern Smartphone Baseband,” in BlackHat US 2018, available at http://i.blackhat.com/us-18/Thu-August-9/us-18-Grassi-Exploitation-of-a-Modern-Smartphone-Baseband.pdf
[P-24] Jonathan Brossard, “Bypassing Pre-boot Authentication Passwords,” in DEFCON162008, available at www.defcon.org/images/defcon-16/dc16-presentations/brossard/defcon-16-brossard-wp.pdf
[P-25] Charlie Miller, “Battery Firmware Hacking,” in BlackHat US 2011, available at https://media.blackhat.com/bh-us-11/Miller/BH_US_11_Miller_Battery_Firmware_Public_Slides.pdf
[P-26] Alex Matrosov, Alexandre Gazet, “Breaking Through Another Side,” in Blackhat US 2019, available at http://i.blackhat.com/USA-19/Thursday/us-19-Matrosov-Breaking-Through-Another-Side-Bypassing-Firmware-Security-Boundaries-From-Embedded-Controller.pdf
[P-27] Marc Witteman, “Secure Application Programming in the presence of Side Channel Attack,” Riscure Whitepaper 2017, available at www.riscure.com/uploads/2018/11/201708_Riscure_Whitepaper_Side_Channel_Patterns.pdf
[P-28] Dag Arne Osvik, Adi Shamir, Eran Tromer, “Cache attacks and countermeasures: the case of AES,” 2005, available at www.cs.tau.ac.il/~tromer/papers/cache.pdf.
[P-29] Eran Tromer, Dag Arne Osvik, Adi Shamir, “Efficient cache attacks in AES, and countermeasures,” In Journal of Cryptology 23, 2010, available at www.cs.tau.ac.il/~tromer/papers/cache-joc-official.pdf
[P-30] Colin Pecival, “Cache missing for fun and profit,” in Proceedings of BSDCan 2005, available at www.daemonology.net/papers/htt.pdf
[P-31] Yuval Yarom, Katrina Falkner, “FLUSH+RELOAD: a High Resolution, Low Noise, L3 Cache Side-Channel Attack,” in USENIX Security Symposium 2014, available at https://eprint.iacr.org/2013/448.pdf
[P-32] Fangfei Liu, Yuval Yarom, Qian Ge, Gernot Heiser, Ruby B. Lee, “Last-level cache side-channel attacks are practical,” in IEEE Symposium on Security and Privacy 2015, available at http://palms.ee.princeton.edu/system/files/SP_vfinal.pdf
[P-33] Fangfei Liu, Qian Ge, Yuval Yarom, Frank Mckeen, Carlos Rozas, Gernot Heiser, Ruby B. Lee, “CATalyst: Defeating Last-LevelCache Side Channel Attacks in Cloud Computing,” 22nd IEEE Symposium onHigh Performance Computer Architecture, 2016, available at http://palms.ee.princeton.edu/system/files/CATalyst_vfinal_correct.pdf
[P-34] Zirak Allaf, Mo Adda, Alexander Gegov, “A Comparison Study on Flush+Reload and Prime+Probe Attacks on AES Using Machine Learning Approaches,” in UKCI 2017, available at https://link.springer.com/content/pdf/10.1007%2F978-3-319-66939-7_17.pdf
[P-35] Paul Kocher, Jann Horn, Anders Fogh, Daniel Genkin, Daniel Gruss, Werner Haas, Mike Hamburg, Moritz Lipp, Stefan Mangard, Thomas Prescher, Michael Schwarz, Yuval Yarom, “Spectre Attacks: Exploiting Speculative Execution,” 2018, available at https://spectreattack.com/spectre.pdf
[P-36] Moritz Lipp, Michael Schwarz, Daniel Gruss, Thomas Prescher, Werner Haas, Anders Fogh, Jann Horn, Stefan Mangard, Paul Kocher, Daniel Genkin, Yuval Yarom, Mike Hamburg, “Meltdown: Reading Kernel Memory from User Space,” 2018, available at https://meltdownattack.com/meltdown.pdf
[P-37] Caroline Trippel, Daniel Lustig, Margaret Martonosi, “MeltdownPrime and SpectrePrime: Automatically-Synthesized Attacks Exploiting Invalidation-Based Coherence Protocols,” 2018, available at https://arxiv.org/pdf/1802.03802
[P-38] Esmaeil Mohammadian Koruyeh, Khaled N. Khasawneh, Chengyu Song and Nael Abu-Ghazaleh, “Spectre Returns! Speculation Attacks using the Return Stack Buffer,” in USENIX 2018, available at www.usenix.org/system/files/conference/woot18/woot18-paper-koruyeh.pdf
[P-39] Dmitry Evtyushkin, Ryan Riley, Nael Abu-Ghazaleh, Dmitry Ponomarev, “BranchScope : A New Side-Channel Attack on Directional Branch Predictor,” in ASPLOS 2018, available at www.cs.ucr.edu/~nael/pubs/asplos18.pdf
[P-40] Jann Horn, “Reading Privileged Memory With Side-Channel,” in Project Zero 2018, available at https://googleprojectzero.blogspot.com/2018/01/reading-privileged-memory-with-side.html
[P-41] Michael Schwarz, Moritz Lipp, Daniel Moghimi, Jo Van Bulck, Julian Stecklina, Thomas Prescher, Daniel Gruss, “ZombieLoad: Cross-Privilege-Boundary Data Sampling,” in ACM Conference on Computer and Communications Security 2019, available at https://zombieloadattack.com/zombieload.pdf
[P-42] Jo Van Bulck, Marina Minkin, Ofir Weisse, Daniel Genkin, Baris Kasikci, Frank Piessens, Mark Silberstein, Thomas F. Wenisch, Yuval Yarom, Raoul Strackx, “FORESHADOW: Extracting the Keys to the Intel SGX Kingdom with Transient Out-of-Order Execution,” in USENIX, available at https://foreshadowattack.eu/foreshadow.pdf
[P-43] Ofir Weisse, Jo Van Bulck, Marina Minkin, Daniel Genkin, Baris Kasikci, Frank Piessens, Mark Silberstein, Raoul Strackx, Thomas F. Wenisch, Yuval Yarom, “Foreshadow-NG: Breaking the Virtual Memory Abstraction with Transient Out-of-Order Execution,” available at https://foreshadowattack.eu/foreshadow-NG.pdf
[P-44] Stephan van Schaik, Alyssa Milburn, Sebastian Osterlund, Pietro Frigo, Giorgi Maisuradze, Kaveh Razavi, Herbert Bos, Cristiano Giuffrida, “RIDL: Rogue In-Flight Data Load,” in IEEE Symposium on Security and Privacy 2019, available at https://mdsattacks.com/files/ridl.pdf
[P-45] Claudio Canella, Daniel Genkin, Lukas Giner, Daniel Gruss, Moritz Lipp, Marina Minkin, Daniel Moghimi, Frank Piessens, Michael Schwarz, Berk Sunar, Jo Van Bulck, Yuval Yarom, “Fallout: Leaking Data on Meltdown-resistant CPUs,” in ACM Conference on Computer and Communications Security 2019, available at https://mdsattacks.com/files/fallout.pdf
[P-46] Brett Giller, “Implementing Practical Electrical Glitching Attacks,” in Blackhat 2015, available at www.blackhat.com/docs/eu-15/materials/eu-15-Giller-Implementing-Electrical-Glitching-Attacks.pdf
[P-47] Alyssa Milburn, Niek Timmers, “There will be Glitches,” in Blackat 2018, available at http://i.blackhat.com/us-18/Wed-August-8/us-18-Milburn-There-Will-Be-Glitches-Extracting-And-Analyzing-Automotive-Firmware-Efficiently.pdf
[P-48] Claudio Bozzato, Riccardo Focardi and Francesco Palmarini, “Shaping the Glitch: Optimizing Voltage Fault Injection Attacks,” in IACR Transactions on Cryptographic Hardware and Embedded Systems, 2019(2), 199-224, available at https://tches.iacr.org/index.php/TCHES/article/download/7390/6562/
[P-49] Sergei Skorobogatov, “Fault attacks on secure chips: from glitch to flash,” in ECRYPT 2011, available at www.cl.cam.ac.uk/~sps32/ECRYPT2011_1.pdf
[P-50] Yoongu Kim, Ross Daly, Jeremie Kim, Chris Fallin, Ji Hye Lee, Donghyuk Lee, Chris Wilkerson, Konrad Lai, Onur Mutlu, “Flipping Bits in Memory Without Accessing Them: An Experimental Study of DRAM Disturbance Errors,” in IEEE 2014, available at http://users.ece.cmu.edu/~yoonguk/papers/kim-isca14.pdf
[P-51] Yoongu Kim, Ross Daly, Jeremie Kim, Chris Fallin, Ji Hye Lee, Donghyuk Lee, Chris Wilkerson, Konrad Lai, Onur Mutlu, “RowHammer: Reliability Analysis and Security Implications,” 2015, available at http://users.ece.cmu.edu/~omutlu/pub/rowhammer-summary.pdf
[P-52] Adrian Tang, Simha Sethumadhavan, and Salvatore Stolfo, “CLKSCREW: Exposing the Perils of Security Oblivious Energy Management,” in USENIX 2017, available at www.usenix.org/system/files/conference/usenixsecurity17/sec17-tang.pdf
[P-53] Tony Chen, “Guarding Against Physical Attacks: The Xbox One Story,” in Bluehat Seattle 2019, www.slideshare.net/MSbluehat/bluehat-seattle-2019-guarding-against-physical-attacks-the-xbox-one-story
[P-54] Ang Cui, Rick Housley. “BADFET: Defeating modern secure boot using second-order pulsed electromagnetic fault injection,” In USENIX, WOOT 2017, available at www.usenix.org/system/files/conference/woot17/woot17-paper-cui.pdf
[P-55] Daniel Genkin, Lev Pachmanov, Itamar Pipman, “ECDSA Key Extraction from Mobile Devices via Nonintrusive Physical Side Channels,” 2016, available at https://eprint.iacr.org/2016/230.pdf
[P-56] Ryad Benadjila, Mathieu Renard, “Security offense and defense strategies: Video-game consoles architecture under microscope,” in Hack in Paris 2016, available at www.researchgate.net/publication/305154898_Security_offense_and_defense_strategies_Video-game_consoles_architecture_under_microscope
[P-57] Daniel Gruss, “software based microarchitectural attacks,” 2018, available at https://gruss.cc/files/oecg_2018.pdf
[P-58] Christopher Domas, “God Mode Unlocked Hardware Backdoors in X86 CPUs,” in BlackHat 2018, available at http://i.blackhat.com/us-18/Thu-August-9/us-18-Domas-God-Mode-Unlocked-Hardware-Backdoors-In-x86-CPUs.pdf
[P-59] Thomas Wollinger, Jorge Guajardo, Christof Paar, “Security on FPGAs: State-of-the-Art Implementations and Attacks,” in ACM transactions on embedded computing system 2003, https://perso.univ-st-etienne.fr/bl16388h/salware/Bibliography_Salware/FPGA%20Bistream%20Security/Article/Wollinger2003.pdf
[P-60] Jonathan Shimonovich, Glen Deskin, “Achilles: Small Chip, Big Peril,” in Check Point 2020, https://blog.checkpoint.com/2020/08/06/achilles-small-chip-big-peril/, https://www.brighttalk.com/webcast/16731/431234
Specification and Guideline
[S-1] CMU SEI, “SEI CERT C Coding Standard,” 2018 available at https://wiki.sei.cmu.edu/confluence/display/c/SEI+CERT+C+Coding+Standard
[S-2] MITRE, “The MITRE System Engineering Guide,” 2014, available at www.mitre.org/publications/technical-papers/the-mitre-systems-engineering-guide
[S-3] OWASP org, “OWASP Secure Coding Practices – Quick Reference Guide,” 2010, available at www.owasp.org/index.php/OWASP_Secure_Coding_Practices_-_Quick_Reference_Guide
Web
[W-1] OWASP, “How to write insecure code,” www.owasp.org/index.php/How_to_write_insecure_code
[W-2] Microsoft, “What are the Microsoft SDL practices?,” www.microsoft.com/en-us/securityengineering/sdl/practices
[W-3] Microsoft, “Security Development Lifecycle (SDL) Banned Function Calls,” 2012, https://msdn.microsoft.com/en-us/library/bb288454.aspx
[W-4] David Wheeler, “Secure Programming for Linux and Unix HOWTO – Creating Secure Software,” 2015, www.dwheeler.com/secure-programs/
[W-5] RedHat Secure Coding, https://developers.redhat.com/topics/secure-coding/
[W-6] Apple, “Secure Coding Guide,” https://developer.apple.com/library/mac/documentation/Security/Conceptual/SecureCodingGuide/Introduction.html
[W-7] Mozilla, “Secure Development Guidelines,” https://developer.mozilla.org/en-US/docs/Mozilla/Security/Secure_Development_Guidelines
[W-8] “Spectre and Meltdown,” https://meltdownattack.com/
[W-9] “ZombieLoad,” https://zombieloadattack.com/
[W-10] “Foreshadow,” https://foreshadowattack.eu/
[W-11] “MDS: Microarchitectural Data Sampling,” https://mdsattacks.com/
[W-12] Intel, “Host Firmware Speculative Execution Side Channel Mitigation,” https://software.intel.com/security-software-guidance/insights/host-firmware-speculative-execution-side-channel-mitigation
[W-13] Intel, “Deep Dive: Intel Analysis of Microarchitectural Data Sampling,” https://software.intel.com/security-software-guidance/insights/deep-dive-intel-analysis-microarchitectural-data-sampling
[W-14] Intel, “Deep Dive: Analyzing Potential Bounds Check Bypass Vulnerabilities,” https://software.intel.com/security-software-guidance/insights/deep-dive-analyzing-potential-bounds-check-bypass-vulnerabilities
[W-15] Intel, “Deep Dive: Retpoline: A Branch Target Injection Mitigation,” https://software.intel.com/security-software-guidance/insights/deep-dive-retpoline-branch-target-injection-mitigation
[W-16] Intel, “Security Best Practices for Side Channel Resistance,” https://software.intel.com/security-software-guidance/insights/security-best-practices-side-channel-resistance
[W-17] Intel, “Guidelines for Mitigating Timing Side Channels Against Cryptographic Implementations,” https://software.intel.com/security-software-guidance/insights/guidelines-mitigating-timing-side-channels-against-cryptographic-implementations
[W-18] AMD, “AMD Product Security,” www.amd.com/en/corporate/product-security
[W-19] “AMD PSP: fTPM Remote Code Execution via crafted EK certificate,” 2018, https://seclists.org/fulldisclosure/2018/Jan/12
[W-20] ARM, “ARM Security Updates,” https://developer.arm.com/support/arm-security-updates
[W-21] ARM, “Cache Speculation Side-channels Whitepaper,” https://developer.arm.com/support/arm-security-updates/speculative-processor-vulnerability/download-the-whitepaper
[W-22] Paul Turner, “Retpoline: a software construct for preventing branch-target-injection,” available at https://support.google.com/faqs/answer/7625886
[W-23] Jonathan Corbet, “KAISER: hiding the kernel from user space,” https://lwn.net/Articles/738975/
[W-24] Microsoft, “Protect your Windows devices against speculative execution side-channel attacks,” https://support.microsoft.com/en-us/help/4073757/protect-windows-devices-from-speculative-execution-side-channel-attack
[W-25] Microsoft, “Windows Server guidance to protect against speculative execution side-channel vulnerabilities,” https://support.microsoft.com/en-us/help/4072698/windows-server-speculative-execution-side-channel-vulnerabilities-prot
[W-26] Andrew Pardoe, “Spectre Mitigations in MSVC,” https://devblogs.microsoft.com/cppblog/spectre-mitigations-in-msvc/
[W-27] Mehmet Iyigun, “Mitigating Spectre variant 2 with Retpoline on Windows,” https://techcommunity.microsoft.com/t5/windows-kernel-internals/mitigating-spectre-variant-2-with-retpoline-on-windows/ba-p/295618#
[W-28] Terry Myerson, “Understanding the performance impact of Spectre and Meltdown mitigations on Windows Systems,” www.microsoft.com/security/blog/2018/01/09/understanding-the-performance-impact-of-spectre-and-meltdown-mitigations-on-windows-systems/
[W-29] Dan Farmer, “IPMI: freight train to hell,” at http://fish2.com/ipmi/
[W-30] OpenSSL heartbleed, https://heartbleed.com/
[W-31] LoRaDawn – Multiple LoRaWAN Security Vulnerabilities, https://blade.tencent.com/en/advisories/loradawn/
[W-32] UPnP CallStranger, http://callstranger.com/, https://kb.cert.org/vuls/id/339275
[W-33] ThinkPwn, http://blog.cr4.sh/2016/06/exploring-and-exploiting-lenovo.html
[W-34] 3 bulbs and 3 switches, www.geeksforgeeks.org/puzzle-7-3-bulbs-and-3-switches/
[W-35] USB FaceDancer, https://int3.cc/products/facedancer21
[W-36] PCI Leech, www.kitploit.com/2016/10/pcileech-direct-memory-access-dma.html
[W-37] Microblaze, https://github.com/Cr4sh/s6_pcie_microblaze
[W-38] Openssl POODLE, www.openssl.org/~bodo/ssl-poodle.pdf
[W-39] GRUB2 boothole, https://eclypsium.com/wp-content/uploads/2020/07/Theres-a-Hole-in-the-Boot.pdf
[W-40] ChipWhisperer, https://wiki.newae.com/CW1173_ChipWhisperer-Lite, https://github.com/newaetech/chipwhisperer
[W-41] SySS iCEstick Glitcher, https://github.com/SySS-Research/icestick-glitcher