This chapter covers the following Cisco-specified objectives for the “Implement a small routed network” section of the 640-822 ICND1 exam:
<objective>Manage Cisco IOS
</objective> <objective>Describe the operation of Cisco routers (including: router bootup process, POST, router components)
</objective> </feature><feature><title>Outline</title>210 | |||
210 | |||
210 | |||
212 | |||
212 | |||
212 | |||
213 | |||
214 | |||
214 | |||
215 | |||
215 | |||
215 | |||
217 | |||
217 | |||
218 | |||
220 | |||
220 | |||
221 | |||
222 | |||
223 | |||
224 | |||
224 | |||
226 | |||
226 | |||
227 | |||
230 | |||
231 | |||
231 | |||
231 | |||
233 | |||
233 | |||
235 | |||
236 | |||
237 | |||
Read the information presented in the chapter, paying special attention to tables, Notes, and Exam Alerts.
This chapter serves as a foundation for all configurations that are to come. It is not enough to just grasp these concepts. You should feel completely comfortable with the navigation of the IOS before tackling advanced configurations in future chapters.
If possible, practice the syntax of every command discussed throughout this chapter (and book) with real or simulated Cisco equipment.
Complete the Challenge Exercises and the Exercises at the end of the chapter. These exercises are designed to give you practical experience using the utilities discussed.
Complete the Exam Questions at the end of the chapter. They are designed to simulate the type of questions you will be asked in the ICND1 exam.
Unfortunately, Cisco devices are not yet at the point where they can automatically configure themselves. With that being said, each Cisco device that contains an IOS (internetwork operating system) must have some interface in which you, the expert Cisco administrator, can interact with the operating system to perform any administration, configuration, and troubleshooting services.
This chapter explores the options available for interacting with Cisco IOS using the command-line interface (CLI). In Chapter 9, “Understanding the Cisco SDM,” you will see that Cisco has simplified some Cisco device administration by creating a graphical user interface (GUI) in which many configuration and verification command can be performed using a web browser. Granted this is a great tool for many tasks; however, you will inevitably need to access the CLI of Cisco IOS to perform tasks outside of the GUI’s capabilities. As a consequence, you will need to understand the command hierarchy of the IOS CLI to accurately navigate your way around to achieve your administrative goal.
This chapter also looks into the multiple boot-up steps that occur when a Cisco router or switch is powered on, and how you can manipulate that startup sequence.
After starting a router configuration using the Console Port or Auxiliary Port, you can choose from among several options to gain access to Cisco IOS Software. These access methodologies are commonly referred to as EXEC sessions. Assuming that the device model and IOS supports them, certain Cisco devices can support up to five means of gaining an EXEC session to the IOS, which are discussed in the following subsections.
Several Cisco devices do not have a default IP address that can be utilized to gain access to the IOS. Therefore, administrators gain initial out-of-band terminal access to Cisco devices via the console port. After an EXEC access is gained, you can configure the device via the CLI of IOS.
Note
The term out-of-band simply refers to the fact that the console is a management port that is separate from interfaces that are used for networking data transmissions. Conversely, in-band management signals traverse over the same networking paths and interfaces as the data stream. This implies that you have IP connectivity to the devices that you are managing.
To connect to a console port, Cisco supplies you with a flat rollover cable. As illustrated in Figure 7.1, the pins in a rollover cable are reverse images of each other when the cable is viewed with both sides of the tabs in the same orientation. Cisco console cables either come with two RJ-45 connectors in which a DB-9 adapter is required for connection to the PC, or come with the DB-9 connector attached to one end of the cable. The 9-pin connector of the console cable connects to your terminal PC’s COM port. Keep in mind that this management connection is for initial terminal access only and should not be confused with an actual networking Ethernet cable of any sort.

Exam Alert
It is imperative to be able to recognize and differentiate between the pin configurations and the usage of a straight-through ethernet cable versus a cross-over ethernet cable versus a rollover console cable.
An ASCII terminal emulation software program must be running on your management PC if it is to interact with the Cisco IOS. There are several different terminal programs available, such as HyperTerminal, TeraTerm, SecureCRT, and others. The terminal setup of the COM port connected to the rollover console cable must be set to the following default console parameters: 9600 baud, 8 data bits, no parity bits, 1 stop bit, and no flow control. After the terminal is set up correctly and you have powered on the Cisco device, you should see the output from your console EXEC session in the terminal window.
Certain Cisco models may contain another out-of-band management port called an auxiliary (AUX) port. This port is very similar to the console port in that it uses a rollover cable and has an RJ-45 connection to the Cisco device. The difference between the auxiliary and the console port is that the auxiliary port has flow control capability, which is useful for analog modem connectivity. By connecting an external modem to this management port, you can dial into the modem remotely and gain an EXEC session without being physically next to the Cisco device.
As discussed in Chapter 1, “Standard Internetworking Models,” Telnet is an Application layer protocol of the TCP/IP protocol suite that uses TCP port 23 to gain virtual terminal emulation to a device. Telnet is considered in-band management because it is required to have IP connectivity to the Cisco device into which you are trying to Telnet. Most Cisco devices allow at least five Telnet EXEC sessions to be connected for remote terminal access. For the sake of security, there is some configuration involved to allow Telnet access into the Cisco devices. Telnet is discussed in further detail in Chapter 8, “Foundation Cisco Configurations.”
Similar to Telnet, HTTP and HTTPS are also Application layer protocols of the TCP/IP protocol suite. HTTP uses TCP port 80 to establish a management connection to the Cisco device. HTTPS is a secure version of HTTP over Secure Socket Layer (SSL) and uses TCP port 443. HTTP and HTTPS terminal sessions require IP connectivity to the Cisco device, making it an in-band management communication methodology. The key difference between HTTP/HTTPS and Telnet is that when you use HTTP or HTTPS, you can have a graphical interface to the configuration and administration features of the Cisco IOS.
The HTTP EXEC session is made possible by a HTTP server service that can run if configured on the Cisco device. For security purposes, some Cisco routers do not have this functionality enabled by default. If this functionality is not going to be utilized, it is recommended that you disable this service to avoid any security vulnerabilities.
Note
HTTP and HTTPS are utilized in the Security Device Manager (SDM) configuration utility, which will be discussed in greater detail in Chapter 9, “Understanding the Cisco SDM.”
Imagine you have Telntetted into a Cisco device and it is prompting you for a password. If an attacker has the capability to eavesdrop on that Telnet terminal session, he could very well detect the password because the Telnet communications are in clear text.
With SSH (Secure Shell), you are provided a secure terminal EXEC connection through the use of encrypted communications between your terminal client and the Cisco device. Your terminal application must support SSH to connect securely to your Cisco device. Some terminal programs that support SSH are SecureCRT and Putty. In addition, the version and feature set of the Cisco IOS must support SSH. Similar to its brother in-band protocols, SSH also requires initial configurations before gaining access to an EXEC session. Granted, this additional configuration may seem tedious; however, the benefit of having secure remote terminal connections to the Cisco device outweighs the work involved.
Describe the operation of Cisco routers (including: router bootup process, POST, router components)
Now that you have an understanding of how to connect to the Cisco IOS, you can now look at the startup procedures for a Cisco router or switch to determine how the IOS is loaded and running in the first place when you power on those devices. Additionally, these devices would be doing us a huge administrative injustice if they did not load the configurations that you have toiled over in previous EXEC sessions (despite the obvious level of job security). Thus, you also need to look into how a saved configuration is applied after the IOS is loaded. As you will see, each of the memory components that were discussed in Chapter 6, “Introduction to Cisco Routers and Switches,” performs a pivotal part in the storing, loading, and running of the IOS and the configuration.
Router and switch startup procedures are extremely similar to a computer’s boot-up process. For instance, when you turn on a computer, the computer utilizes ROM (read-only memory) chips to perform a POST (power-on self-test) to check the critical hardware initially for startup. Then it consults the BIOS (basic input/output system) settings to determine the order in which to search the hard drives, floppy drives, or CD drives to locate the operating system. After the operating system is loaded, it applies any custom configurations you have made in the past and utilizes those settings toward its normal operation.
Similarly, when you turn on a Cisco router and a switch, ROM chips perform a POST and then load the IOS process. You can manipulate the location sources of the IOS similar to specifying the boot drive in the BIOS settings on a computer. After the IOS is loaded, your saved configuration is loaded and applied to the device’s operating functions. The next sections delve further into the specific processes that are occurring at each stage.
When you first apply power to a Cisco router or switch, a specialized ROM performs a series of tests of the critical hardware components that are pertinent for startup and basic operation such as Flash memory, CPU, and interfaces. It makes sense to utilize ROM chips for this service because they are already hard-coded with their programs and they do not require constant power to keep those programs stored in the memory. If a failure occurs during this stage of the startup process, you may encounter one of several outcomes, ranging from a non-functioning interface all the way to complete device failure. In any case, your equipment should be under warranty or you have an active support contract in place to fix the failing hardware.
After the hardware passes all its tests (if only the ICND1 was that easy), another ROM seeks out the operating system in accordance to its programming routines. The code that is run in the ROM is commonly referred to as the bootstrap code. If a failure occurs at this stage of the boot-up process, your Cisco device could very likely enter what is known as ROM Monitor or commonly called ROMmon.
In your travels, if you or someone else has ever coined the phrase “hit rock bottom,” you have a general idea of what purpose ROMmon serves. The ROM Monitor is a very limited codeset that enables you to perform elementary functions to manually get the router or switch back to a functioning state. You can perform low-level diagnostics and even copy a new IOS file to the Cisco device over the console port or configure TFTP information so the device can download the IOS image off of a TFTP server.
Tip
Keep in mind that your default console speed is 9600bps, and a typical IOS file exceeds 16 megabytes. If you need to re-copy a working IOS to the Cisco device in ROMmon mode over the console, I recommend changing the default console speed in ROMmon to a higher speed or taking a long lunch or dinner break.
ROMmon is also utilized during password recovery on a Cisco router to make it possible to tell the device manually to ignore any saved configurations (including the passwords). It is possible to force your Cisco device to go directly to ROMmon on boot by sending a break sequence in your terminal session in the first 60 seconds of bootup. You can tell you are in ROMmon mode if you are presented with a command prompt that looks like rommon 1 >. Any time you type a command in ROMmon, the number at the prompt increments by one (rommon 2 >, rommon 3 >, and so on).
Up to this point, the Cisco router or switch has performed only initial diagnostics. With that being said, the IOS itself still has not been located or loaded. The bootstrap’s programming has a specific search order in which it typically follows to locate and load the IOS. I say “typically” because you can alter the natural order of things with the router or switch’s startup process if you manipulate something called the configuration register.
Located in NVRAM, the configuration register is a 16-bit (4 hexadecimal characters) value that specifies how the router or switch should operate during initialization. For instance, 0x2102 (0x signifies all characters that follow are hexadecimal) is a common configuration register that specifies that the router or switch should boot in its typical fashion. However, if you manipulate certain characters in the configuration register, you can manually modify the startup process to load the IOS from locations other than the default. Specifically, the last hexadecimal character in the configuration register, known as the boot field, is the value that dictates where the bootstrap code can find the IOS. The possible boot field values are as follows:
0×2100—. When the boot field is a zero, the configuration register instructs the bootstrap to boot directly into ROM and load ROMmon.
0x2101-0x210F—. When the last field in the configuration register is 1-F, the router or switch boots normally.
Tip
In older router and switch models, a configuration register of 0x2101 (if the boot field has a value of one), the router or switch would boot a mini IOS located in ROM and commonly referred to as RxBoot. RxBoot looks very similar to the normal IOS; however, it does not provide the majority of the IOS’s services. This mini IOS provides just enough functionality to reach a TFTP server and download a working IOS to the Cisco device. You can easily determine you are in RxBoot if the prompt looks like Router(boot)> in a router or Switch(boot)> in a switch.
Assuming the configuration register is 0x2102 (the default configuration register), the next step for initialization is to have the bootstrap search the configuration located in NVRAM to see whether the Cisco administrator has placed a command telling the router or switch specifically where to boot. The tools to do this are known as boot system commands. For example, if you have previously configured your device and put in the boot system tftp c2600-do3s-mz.123-5.T1 172.16.1.1 command, you have instructed the bootstrap to load the IOS file c2600-do3s-mz.123-5.T1 from a TFTP server located at 172.16.1.1.
Note
Do not confuse this step with loading the configuration. This is just a step in the IOS loading process that enables the bootstrap code to implement any configuration specifications you previously saved that told the device where to boot. The configuration itself is not loaded until after the IOS is located and running.
If the default configuration register is utilized and you have not configured the device with any boot system commands, the default action of the bootstrap is to load the first IOS file in Flash memory. After the file is found, it is decompressed and loaded into RAM. At this point, the IOS is successfully loaded and running on your Cisco device.
What would happen if the IOS image were corrupted or missing? As with many functions of Cisco devices, a couple of failsafes are put in place to keep the device in an operating state or a mode in which you can get it back to an operating state. Specifically, if the Cisco router or switch cannot locate a working IOS file, it broadcasts out all interfaces in the hopes that a backup IOS file is stored on a TFTP server on its connected segments. If there isn’t a TFTP server or the TFTP server does not contain a valid IOS file, the next failsafe for the IOS is to boot to ROMmon where you can copy the IOS over via the console or TFTP.
With the IOS loaded, the router or switch is now able to apply any saved configuration parameters. NVRAM is the first location where the device searches for the configuration. Here, a file called startup-config contains all the previous configurations that were present the last time an administrator saved the configuration. As the name states, this is the configuration that is loaded each time the Cisco device starts up. Similar to the IOS, after this configuration file is found, it is loaded into RAM as well. After the configuration is loaded and running at this point, it is conveniently referred to as running-config.
Cisco devices do not ship with a complete startup configuration, which is why you might have to initially configure your Cisco device through some means of out-of-band management such as the console or auxiliary port. So the question begs, what happens when you initially turn on a new Cisco router or switch, or if someone erases the startup configuration?
Many Cisco devices attempt to do an autoinstall by downloading a configuration file from an active TFTP server (similarly to the IOS) when they detect that the startup-config is not located in NVRAM. Typically, these files contain enough configuration parameters (such as IP addresses for interfaces) for you to Telnet into the device and configure the remaining parameters. If the Cisco device finds an autoinstall configuration file from a TFTP server, the device loads the file and makes that the running-config. On the chance that you were not proactive enough to have an autoinstall configuration on your TFTP server, the router or switch prompts you for something called Setup Mode.
Exam Alert
It is imperative that you can identify the steps that a switch or router follows during initialization, the memory or device architectures where these steps occur, and the fallback sequences when a failure has occurred in the boot-up sequence.
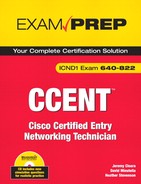
With non-CCNA technicians in mind, Cisco created Setup Mode so you can build a working configuration on a device without having to memorize the nuances of the CLI of the IOS. Setup Mode is a friendly interactive dialog in which the IOS asks the administrator questions about common configuration parameters that enable the Cisco device to have basic operations. Illustrated in Figure 7.2, the Setup Mode dialog initially asks you whether you wish to continue with Setup Mode. If you answer “no” to this question, you exit out of Setup Mode and are brought immediately to a CLI EXEC session. In addition, if you want to cancel at any point in the Setup Mode and get to the command prompt, you can use Ctrl+C to terminate the setup dialog. After you complete all questions, Setup Mode displays the parameters that you specified and asks you whether you want to use this configuration. If you answer “yes,” the Cisco device saves your configuration and applies the settings to the device’s operations.
Tip
Throughout the configuration with the IOS, you may encounter several different types of interactive dialogs similar to Setup Mode. To save yourself from unnecessary typing, you can use the default value that is located in the brackets to answer any single-answer question by simply hitting the Enter key. For example, notice in Figure 7.2, the Enter host name prompt contains the word Router in brackets. If you were to press the Enter key at that prompt, this Cisco router would have a host name of Router.
As the next chapter explains, you can secure access to your Cisco devices in several ways. In times where you inherit a pre-configured device or accidentally forgot or mis-configured a password, you need some loophole in the boot-up process that enables you to regain access to the device. Once again, the configuration register plays a pivotal part in the quest to manipulate the natural order of Cisco device initialization.
The third character in the configuration register enables you to tell the device to ignore any configurations that might be saved in NVRAM. If this field is changed from a 0 to a 4, the device inevitably boots into Setup Mode because the router or switch is fooled that there is no startup configuration. Now, with the configuration register changed to 0x2142, you can reconfigure the Cisco device creating your own unique passwords and save that configuration for future device startups.
Manage Cisco IOS
By now, you have a new-found love and respect for your Cisco equipment after knowing all the work that occurs when you turn on your router or switch. What better way to prove that love and respect but by mastering the IOS that the Cisco devices have so painstakingly found and loaded for your administration and configuration pleasure? This section looks at the hierarchical levels of the IOS and what type of interactivity you can encounter at each level.
Exam Alert
You will be able to eliminate several distracting incorrect answers in the exam by recognizing the level of the IOS hierarchy the commands will be found.
At your organization, you may have Level 1 technicians who are not strong in Cisco fundamentals; thus, you want to ensure only that they have access to basic troubleshooting and statistics without worrying that they might change the configuration or cause some other network catastrophe. Because a multitude of administrators might need to gain access to these Cisco devices, it makes sense to ensure that the first level of IOS hierarchy they encounter is somewhat limited in the extent of what can be done. This is the nature of User EXEC.
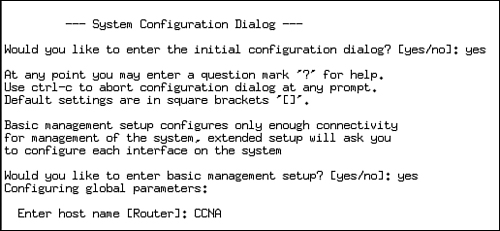
In User EXEC, you are limited in the number and type of commands that are available to you. For instance, the majority of show commands are available at this level of the IOS hierarchy because they do not detrimentally affect the router or the switch to perform these commands. In addition, you can test IP connectivity to other devices with ping as well as remotely administer other devices or troubleshoot all the way up to Layer 7 with Telnet. The Cisco IOS prompt for User EXEC is signified by the greater than sign (>) following the hostname of the Cisco device. For example, a Cisco router and switch with their default hostnames would look like Router> and Switch>, respectively. Figure 7.3 displays the commands that you have available at User EXEC.
Assuming you need to acquire more functionality from your Cisco devices beyond basic troubleshooting and statistical displays, you have to have another layer of the Cisco IOS hierarchy in which you have access to all commands. Happily named, Privileged EXEC is the next level of the IOS, in which you have the same commands as you do in User EXEC, as well as some commands that can alter the Cisco device’s functionality.
For example, in Privileged EXEC, you can perform debug commands that can show you hundreds of real-time routing and switching functions and report them to the console. Because this can cause quite a processing strain on the device, these commands are reserved for only those who can access Privileged EXEC. Additionally, some show commands such as show startup-config and show running-config can be seen only by those who should be able (privileged) to see the configuration of the devices (including passwords). Some other new and dangerous commands available in Privileged EXEC include delete, clear, erase, configure, copy, and reload (reboots the device), to name a few.
To gain access to Privileged EXEC, type the command enable from User EXEC. After you press Enter, the prompt changes from > to #, signifying that you are now in Privileged EXEC mode. Because anybody can read this section and learn how to get to these commands, it makes sense to have some way for the IOS to prompt for a password to authorize those who truly should be granted access. The next chapter discusses how to apply these passwords to restrict who gains access from User EXEC to Privileged EXEC. To return back to User EXEC, the reverse command is disable.
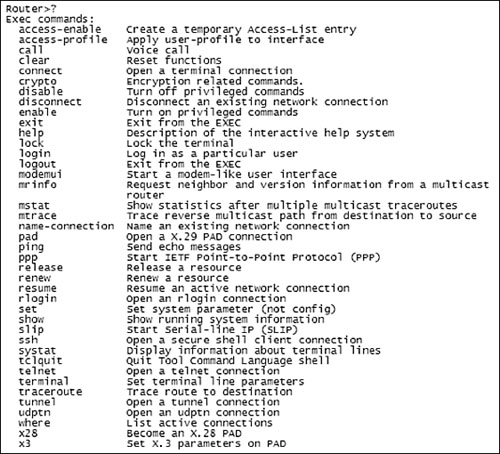
One of the commands that you can access through Privileged EXEC is configure. This means that we have to enter yet another level of the Cisco IOS to make any configuration changes to the Cisco device. By typing the configure terminal command, you are telling the Cisco IOS that you are going to configure the Cisco device via your terminal window. The new level you enter after you complete this command is called Global Configuration. You can recognize it by looking at the command prompt, which will reflect Router(config)# for routers and Switch(config)# for switches.
Figure 7.4 displays a partial output of just some of the commands that are available in Global Configuration. Note that the commands delete, debug, clear, configure, and copy do not show up in the list of commands. You have a different set of commands available to you at this level of the IOS versus Privileged and User EXEC. This means that you must exit Global Configuration to use these commands as well as show, reload, and other Privileged EXEC-specific commands.
Of equal note, after you enter a command in the IOS, it is immediately applied to running-config and applied to the device’s operation. The configurations are not listed and then applied later like batch files or executed compiled programs. Configuration help is shown in Figure 7.4.
Exam Alert
Newer releases of Cisco IOS are making it possible to utilize some of these commands across the levels of the Cisco IOS hierarchies. However, for exam purposes, put on a pair of Cisco horse blinders to this new functionality and focus on the original levels and syntaxes described throughout this book.
As the name states, any configuration that is applied in this level applies globally to the Cisco router or switch. Here we can perform configuration tasks such as changing the hostname of the router or switch, creating a login banner, creating a password to prompt users trying to gain access to Privileged EXEC, and many others. It is also at this level of the Cisco IOS hierarchy that you can enter several different sub-configuration modes to apply specific configurations for things such as interfaces, routing protocols, and EXEC lines (which are discussed throughout this book).
Directly from Global Configuration, you can configure interface-specific commands that apply only to interfaces specified in the configuration. Now you can enable the interfaces, assign IP addresses, set speeds, and configure other interface commands. Once again, the commands that are available at this sub-configuration level of the IOS are not applicable at Global Configuration or Privileged EXEC and User EXEC.
To configure an interface, you must specify the interface you want to configure. If the device has fixed (non-modular) interfaces, you simply specify the type of interface followed by the interface number (and remember Cisco routers start their numbering schema with 0). For example, the 1600 series router has a fixed ethernet interface that cannot be removed from the router. To configure that interface, you type interface Ethernet 0 from Global Configuration. Most devices today utilize the modular configuration in which you have to specify the module number as well as the interface number because these devices can change functionality depending on the type of module inserted into them. For example, to configure the second WAN serial interface on the first module on a 2800 series router, you would input interface serial 0/1 where 0 is the module number (first module starts with 0) and 1 is the interface. The prompt in Interface Configuration Mode is displayed as Router(config-if)#, regardless of the interface type. This means you must keep track of what interface you are configuring because the prompt does not specify the type.
Also accessed from Global Configuration, line configurations are specific to those EXEC lines through which a user can gain access to the Cisco device. Specifically, you can configure options such as logins and passwords for a user trying to gain User EXEC access to the console and auxiliary ports, as well as the 5 vty (virtual teletype) Telnet lines into a router or switch. From Global Configuration, you must utilize the keyword, line, followed by the EXEC line you want to configure. For example, to configure console-specific commands, you would type line console 0 from Global Configuration. The prompt changes to Router(config-line)#, regardless of the line you are configuring.
Even though the Cisco IOS is a command-line interface, it is not without its help features to help you through your navigation of the IOS. Specifically, to see what commands are available at any level of the IOS, you can use the help feature of the IOS, the question mark. By typing ? (no Enter keystroke necessary) at any level of the IOS, you get a listing of all the commands available and a brief description of the command, such as you saw in Figures 7.3 and 7.4.
Quite often, the list of available commands may extend beyond one terminal screen. This is apparent because the string —More— is displayed at the bottom of the list on the screen. To see the next page of listed commands, you can press the space bar and the command list scrolls another terminal screen’s length. If you prefer to see the commands line by line, you can keep hitting the Enter key and it displays only the next command each time you press it. On the chance that you have found the command you were looking for in the list, you can hit any key (pause for inevitable “where’s the any key?” joke) to get back to the command prompt.
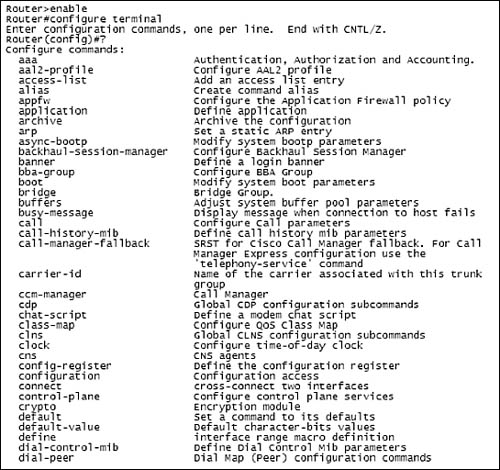
In some instances, you may not recall the command that you are looking for, but you do remember the first letter of the command. Let’s say, for example, the command is in Global Configuration and starts with the letter l. You could use the question mark and scroll through all the commands; however, the IOS enables you to see the commands starting with l if you type the letter, followed immediately by the question mark (no space in between), as demonstrated below. Similarly, if you remembered that the command started with log, you can type those characters, followed immediately by the question mark, to see the commands logging and login-string.
Router>enable
Router#configure terminal
Enter configuration commands, one per line.  End with CNTL/Z.
Router(config)#l?
l2tp-class  lane   li-view       line
logging     login  login-string
Router(config)#l
Keep in mind that many commands in the IOS require a string of keywords to comprehend what you are trying to achieve with the command. For instance, if I was searching for the command logging and hit the Enter key, the IOS would report back an error to the terminal screen that the command was incomplete because it does not understand where I want to send my logging information. If you are unsure of the commands available, once again, you use the question mark for command help. In this case, you must put a space after the first keyword followed by the question mark. The IOS then displays a list of commands that are valid after the keyword logging, as displayed here:
Router(config)#logging ?
  Hostname or A.B.C.D  IP address of the logging host
  buffered             Set buffered logging parameters
  buginf               Enable buginf logging for debugging
  cns-events           Set CNS Event logging level
  console              Set console logging parameters
  count                Count every log message and timestamp last occurrence
  exception            Limit size of exception flush output
  facility             Facility parameter for syslog messages
  filter               Specify logging filter
  history              Configure syslog history table
  host                 Set syslog server IP address and parameters
  monitor              Set terminal line (monitor) logging parameters
  on                   Enable logging to all enabled destinations
  origin-id            Add origin ID to syslog messages
  queue-limit          Set logger message queue size
  rate-limit           Set messages per second limit
  reload               Set reload logging level
  server-arp           Enable sending ARP requests for syslog servers when
                       first configured
  source-interface     Specify interface for source address in logging
                       transactions
  trap                 Set syslog server logging level
  userinfo             Enable logging of user info on privileged mode enabling

Router(config)#logging
To make things easy for administration, the Cisco IOS enables you to abbreviate commands as long as you type enough characters for the IOS to interpret the command that you want to input. For instance, the previous example involved trying to locate the command that started with 1 in Global Configuration. Because there were several commands that started with 1, you would need to type in more characters to find the logging command. Specifically, you would need to type logg, which is just enough characters for the IOS to understand that you want to use the logging command. If you want the IOS to complete typing the command for you, you can hit the Tab key and it autocompletes the command when you provide enough characters.
Exam Alert
The simulations on the exam support some of the abbreviations; however, not all of them are supported. With that being said, it is a good idea to be able to type the entire command in case it is not supported for abbreviation. The Tab autocomplete, however, is not supported on the exam simulations.
To make terminal editing simpler and faster, Cisco has created several shortcut keystrokes that can speed up IOS navigation. The most useful of these shortcuts enables you to cycle through your command history to re-use or edit previously typed commands. You can use both the up and down arrow keys or Ctrl+N and Ctrl+P (if arrow keys are not supported at your terminal) to cycle through the last 10 commands in the history buffer relative to the level of the IOS you are currently located. Table 7.2 lists some other useful terminal editing keystrokes that will help you navigate within a command line.
The terminal editing keys discussed so far are very useful for moving within a particular level of the IOS. However, you need to know how to navigate back from those different levels of the Cisco IOS. Namely, if you need to go back one level of the IOS, simply type the command exit. For instance, if you are in the Interface Configuration mode of the IOS and you need to go back to Global Configuration, just type exit, and your prompt display should change from Router(config-if)# to Router(config)#.
Suppose you are back in the interface configuration and you need to ping or traceroute to your neighbor or do a show command to verify that the interface is working. Recall that this variety of commands can be performed only in Privileged EXEC or User EXEC. To return to these levels of the IOS hierarchy, you can type exit until you are all the way back. You can also use the keystroke Ctrl+Z or the keyword end, which will automatically take you back to Privileged EXEC, regardless of how deep in the configuration levels you happen to be.
As mentioned before, the IOS reports back error messages if you have not provided the correct syntax for a command. The three syntax error messages that you may encounter are as follows:
Ambiguous Command—. This error is displayed when you have not typed enough characters for the IOS to distinguish which command you want to use. In other words, several commands start with those same characters, so you must type more letters of the command for the IOS to recognize your particular command.
Incomplete Command—. The IOS has recognized your keyword syntax with this error message; however, you need to add more keywords to tell the IOS what you want to do with this command.
Invalid Input—. Also known as the “fat finger” error, this console error message is displayed when you mistype a command. The IOS displays a caret mark (^) at the point up to which the IOS could understand your command.
Below is an example for each of these three error console messages. Also notice that this configuration snapshot now includes abbreviations to get into Privileged EXEC and Global Configuration.
Router>
Router>en
Router#conf t
Enter configuration commands, one per line.  End with CNTL/Z.
Router(config)#r
% Ambiguous command: "r"
Router(config)#router
% Incomplete command.
Router(config)#routre rip
                  ^
% Invalid input detected at '^' marker.
Navigating the IOS
Go into Privileged EXEC by typing
enableoren(or any abbreviation you feel comfortable with).Enter Global Configuration by typing
configure terminalorconfig t.Enter the Line Configuration mode for the console by typing
line console 0orline con 0.Look at the list of commands available by using
?.Press the space bar to cycle page by page or Enter to cycle line by line.
Return back to Global Configuration by typing
exit.Enter the interface configuration for serial 0/0 by typing
interface serial 0/0orint ser 0/0.Exit back to Privileged EXEC by typing
Ctrl+Zorend.
Use the output below as a loose reference of what the output might look like:
! Step 1 Router> Router>en ! Step 2 Router#conf t Enter configuration commands, one per line. End with CNTL/Z.o ! Step 3 Router(config)#line con 0 ! Step 4 Router(config-line)#? Line configuration commands: absolute-timeout Set absolute timeout for linedisconnection access-class Filter connections based on an IP
This chapter delved into the many intricacies surrounding the Cisco internetwork operating system. Specifically, you learned at least five ways to gain access to IOS. The two out-of-band methods are through the console and auxiliary interface. In-band methods such as Telnet, HTTP, HTTPS, and SSH require some level on configuration of the Cisco devices before you can remotely manage them.
To load the IOS, Cisco routers and switches have to complete a series of systematic stages. Initially, the device tests the hardware and loads the bootstrap code, both located in ROM. If the configuration register boot field has not been manipulated (values 0x1-0xF), then the bootstrap queries the startup-config in NVRAM for any boot system commands. If no commands are present, the first file in Flash memory is loaded into RAM. If the file in Flash is missing or corrupt, the Cisco router or switch broadcasts for help to any local TFTP servers. If that fallback fails, the router or switch returns back to ROM and loads ROMmon. After the IOS is loaded, the Cisco device can load the startup configuration in NVRAM (assuming you didn’t change the configuration register to 0x2142 for password recovery). If the startup configuration is not present, the router or switch tries to autoinstall from a TFTP server. If that fails, the device enters the configuration dialog, Setup Mode.
If you were to cancel out of Setup Mode by answering “no” or typing Ctrl+C, you would give yourself the opportunity to conquer the mighty mountain of the Cisco IOS navigation hierarchy because you would immediately enter into User EXEC mode. In User EXEC, you have limited functionality (the majority of show commands, ping, traceroute, Telnet, and so on) and would need to use the command enable to enter Privileged EXEC to gain access to all the commands at that particular level. From here, you can enter Global Configuration by typing configure terminal to configure parameters that apply to the entire device. Global Configuration can then be utilized as a jumping-off point to enter sub-configuration modes, such as for interfaces, EXEC lines, routing protocols, and many other sub-configuration modes.
At any point in IOS, you can see the commands available by using ? at the command prompt. If you were to get an ambiguous command error, Cisco IOS requires that you enter more characters to a keyword because multiple commands might share those beginning characters. You can easily discover the commands that start with certain character by immediately typing ? after those letters. Incomplete Command errors signify that the command string required more keywords to know what to do with the command keyword. To see the commands available after a specific keyword, you can also use the ? preceded by a space to see what commands are valid. Invalid input errors indicate that the command was mistyped somewhere. In these situations, you can cycle through the previous commands by using the up and down arrows or Ctrl+P and Ctrl+N. After you find the mistyped command, you can use other terminal editing keys to navigate the cursor to the point where the mistake was made. To exit configuration modes, you can type exit to go back a level at a time. To go directly to Privileged EXEC, type Ctrl+Z or end.
You have just received a new router that you will have to install at a customer’s location in two days. To ensure you appear confident in your installation, you decide to take the router out for a test drive so you can be comfortable with the IOS navigation before arriving onsite.
This exercise assumes you have a router to utilize that is not in production.
Note
If you do not have an actual router, you can always follow along by using simulated software such as SemSim (www.semsim.com) or Boson’s NetSim (www.boson.com). If your budget is tight, open up Notepad and type the commands as you would if you were in the router itself. Practicing these commands and understanding the level of IOS at which they should be typed are critical to your success in the ICND1 exam and as a CCENT technician.
Estimated Time: 15 minutes
Plug the router into the power outlet and connect your console cable between your PC’s COM port and the console port on the router.
Open your terminal program and set the settings for 9600 baud, 8 data bits, no parity bits, 1 stop bit, and no flow control.
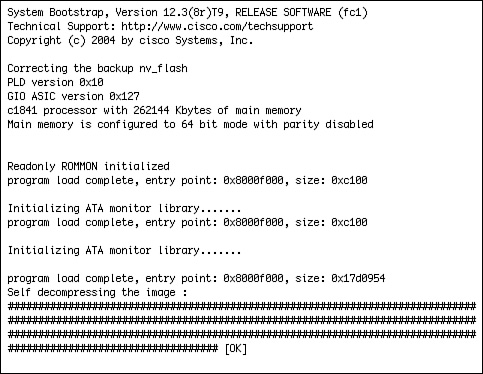
Power on the router and notice bootstrap and IOS decompression from Flash output similar to Figure 7.5.
Because this is the first time the router has been turned on, a startup-config is not present in NVRAM, so you will inevitably go to Setup Mode. Exit Setup Mode by answering “no” to the question,
Would you like to enter the initial configuration dialog? [yes/no].In User EXEC, type
enableto enter into Privileged EXEC.Enter Global Configuration by typing
configure terminal.See what commands are available in this mode by using the question mark for help.
Type
land press Enter to see the ambiguous command error.Type
lito see the incomplete command error.Type
line consoul 0, purposely misspelling the word console to see the invalid command error.Press the up arrow or Ctrl+P to cycle to the previous command.
Enter Ctrl+A to go to the beginning of the command.
Enter Esc+F to move the cursor forward one word.
Move the cursor forward, using Ctrl+F, until you are at a point where you can correct the spelling to console.
Exit back to Privileged EXEC by entering Ctrl+Z or type the command
end.Exit out of Privileged EXEC by typing
disableor the keywordexit.
By changing any of the values in the configuration register from its default value of 0x2102, you are altering how the router or switch operates during initialization. The last hexadecimal field in the configuration register is the boot field. This value determines whether the device boots to ROM and loads ROMmon (0x0). Values of 0x1-0xF indicate that the device parses the startup configuration in NVRAM for any | |
The | |
ROM contains the POST program and the bootstrap code for the initial stages of the booting process. Flash memory stores the IOS files. The configuration register is stored in NVRAM along with the startup configuration that contains any | |
The console and AUX ports both use the rollover cable. The terminal settings should reflect the following parameters: 9600 baud, 8 data bits, no parity bits, 1 stop bit, and no flow control. | |
User EXEC is useful if you have to give access to technicians who need rights to basic verification commands. Privileged EXEC enables access to the remaining command modes, including those commands that can affect the router or switch’s operations. |
D. The cable to connect your terminal to the Cisco device’s console or auxiliary port is a rollover cable. Answers A, B, and C are cables that are used for ethernet networking. | |
A, C. To exit out of Setup Mode, you must answer “no” to the | |
D. When the third hexadecimal character in the configuration register is a 4, the | |
A. The | |
B. When no | |
D. A normal configuration register is 0x2102. A forces the router or switch into ROMmon. B ignores the | |
A, D. The three in-band management session methods are SSH, Telnet, and HTTP. Answers C and E are out-of-band; B is not a management session method. | |
B. Without even discussing the actual configuration of the command, the question stated that it must be in Interface Configuration mode, which means the command prompt will look like | |
C. Without a TFTP for autoinstall and with the startup-config missing, the router or switch enters Setup mode, which prompts you with | |
A, B. Ctrl+Z and End returns you to Privileged EXEC, no matter in which level of the configuration hierarchy you are. C returns you to User EXEC from Privileged EXEC mode. D is used to exit out of Setup Mode. | |
A, B, E. POST, bootstrap code, and ROMmon all reside in ROM. Startup-config is located in NVRAM, and running-config is located in RAM. The IOS file is typically located in Flash memory. |
Boney, James. Cisco IOS in a Nutshell. O’Reilly Publishing, 2001.
“Using the Command-Line Interface,” www.cisco.com.
“Rebooting” for an explanation of the booting process, www.cisco.com.