
Chapter 7. Managing Users and Groups
This chapter covers the following topics:
1.0 Cloud Infrastructure Administration and Reporting
1.1 Configure users/groups and role-based access control in the portal, including basic troubleshooting
1.1.a Describe default roles
1.1.b Configure new user with single role
1.1.c Describe multirole user profiles
1.1.d Configure a user profile
In all systems, it is important to ensure that users as well as administrators within the organization have proper access to the private cloud. Ensuring that your organization’s end users are able to perform the necessary functions when interacting with Cisco ONE Enterprise Cloud and that various administrators have the proper rights to perform their duties is paramount to a successful private cloud project.
“Do I Know This Already?” Quiz
The “Do I Know This Already?” quiz allows you to assess whether you should read this entire chapter thoroughly or jump to the “Exam Preparation Tasks” section. If you are in doubt about your answers to these questions or your own assessment of your knowledge of the topics, read the entire chapter. Table 7-1 lists the major headings in this chapter and their corresponding “Do I Know This Already?” quiz questions. You can find the answers in Appendix A, “Answers to the ‘Do I Know This Already?’ Quizzes.”

Caution
The goal of self-assessment is to gauge your mastery of the topics in this chapter. If you do not know the answer to a question or are only partially sure of the answer, you should mark that question as wrong for purposes of the self-assessment. Giving yourself credit for an answer you correctly guess skews your self-assessment results and might provide you with a false sense of security.
1. To set up directory services integration in Prime Service Catalog, you should:
a. From the main portal, click Browse Categories and select User Administration.
b. From the main portal, click the Search icon and search for directory integration.
c. From the main portal, click your username and choose Switch To > Service Manager.
d. From the main portal, click your username and choose Switch To > Administration.
2. Prime Service Catalog integrates with which of the following directory services? (Choose all that apply.)
a. OpenLDAP Server
b. NetIQ eDirectory
c. Sun ONE Directory
d. Microsoft Active Directory
e. IBM Tivoli Directory Server
f. Only a and d above
g. Only c and e above
3. Prime Service Catalog can connect to various directory services using which of the following protocols or methods? (Choose all that apply.)
a. Netbind
b. MS-RPC
c. LDAP
d. NetBEUI
e. None of the above
4. Configuring UCS Director with local users and local groups can be considered a best practice. Select the best answer regarding this statement.
a. True.
b. False; only configuring UCS Director with local users is a best practice.
c. False; only configuring UCS Director with local groups is a best practice.
d. False; neither configuring UCS Director with local users nor configuring UCS Director with local groups is a best practice.
5. UCS Director integrates with which of the following directory services? (Choose all that apply.)
a. OpenLDAP Server
b. NetIQ eDirectory
c. Sun ONE Directory
e. IBM Tivoli Directory Server
f. Only a and d above
g. Only c and e above
6. UCS Director ships with ______ default roles.
a. 10
b. 11
c. 12
d. 15
e. 20
7. Which role in UCS Director has the highest-level permissions?
a. IS Admin
b. MSP Admin
c. All Policy Admin
d. Group Admin
e. System Admin
8. Custom roles created within UCS Director can be which of the following types? (Choose two.)
a. Operator
b. Policy Administrator
c. End User
d. Admin
e. Supervisor
9. True or False. Users can belong to more than one role.
a. True
b. False
10. Which of the following statements is correct?
a. Custom roles can be embedded within default system roles.
b. Custom roles cannot be embedded within default system roles.
c. Custom roles can be embedded within default system roles only if the custom role has less restrictive permissions than the default system role.
d. Custom roles can be embedded within default system roles only if the custom role has more restrictive permissions than the default system role.
Foundation Topics
Overview of Users and Groups
With the ability to integrate into directory services such as Microsoft Active Directory for user and group authentication and authorization, both Prime Service Catalog and UCS Director give you a flexible framework for ensuring both end users and administrators of your private cloud have proper access. This section looks at the process for each in turn.
Prime Service Catalog
Prime Service Catalog offers rich integration with a variety of directory services such as Microsoft Active Directory, Sun ONE Directory, and IBM Tivoli Directory Server. This allows you to tie into existing enterprise directories for the purpose of user and group mapping.
To do this, you first have to switch from the default portal view of Prime Service Catalog to the Administrator’s view. Perform the following:
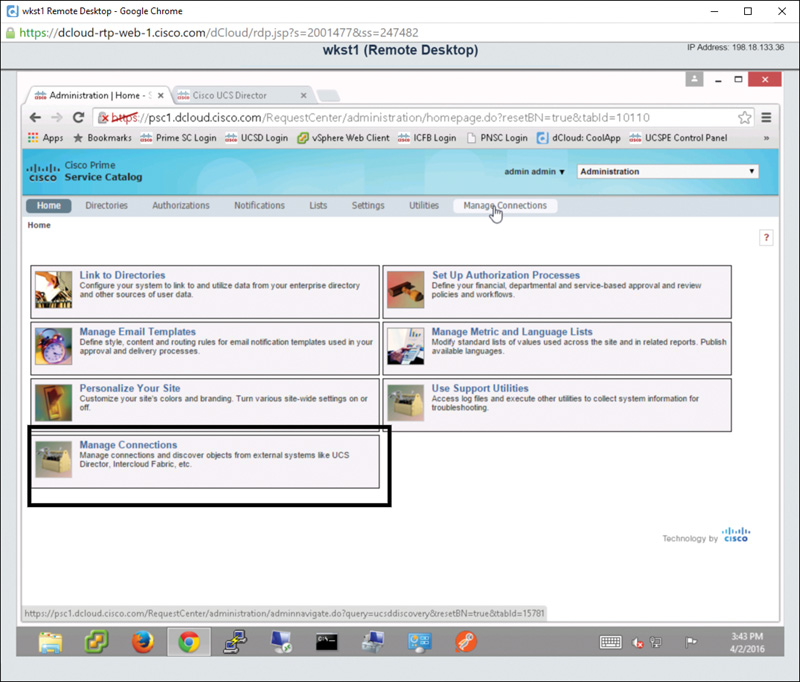
Step 1. Log in as an administrator and, in the upper-right corner of the Prime Service Catalog screen, choose username > Switch To > Administration as shown in Figure 7-1.

Step 2. On the Home screen of the Administration view, click the first box in the upper left titled Link to Directories (see Figure 7-2).

Step 3. On the Directories screen for creating a new directory connection from Prime Service Catalog, click the Add button on the Datasources page, as shown in Figure 7-3.

Step 4. The screen expands to display the Datasource Configuration form, which includes the following sections (see Figure 7-4):
![]() Add or Edit a Datasource
Add or Edit a Datasource
![]() Select protocol and server product
Select protocol and server product
![]() Connection Information
Connection Information
![]() Security Certificate Information
Security Certificate Information
![]() Referral Datasource
Referral Datasource

In the Add or Edit a Datasource section, enter a name in the Data Source Name field.
Step 5. Expand the Select Protocol and Server Product section. Notice that the only protocol available is LDAP, but for Server Product, you have the following choices (see Figure 7-5):
![]() Sun One Directory
Sun One Directory
![]() MS Active Directory
MS Active Directory
![]() IBM Tivoli Directory Server
IBM Tivoli Directory Server

Step 6. Choose the server product you intend to use.
Step 7. Expand the Connection Information section, as shown in Figure 7-6.

Step 8. Open the Authentication Method drop-down list and choose one of the following options (see Figure 7-7):
![]() Simple
Simple
![]() Anonymous
Anonymous
![]() SASL Authentication
SASL Authentication
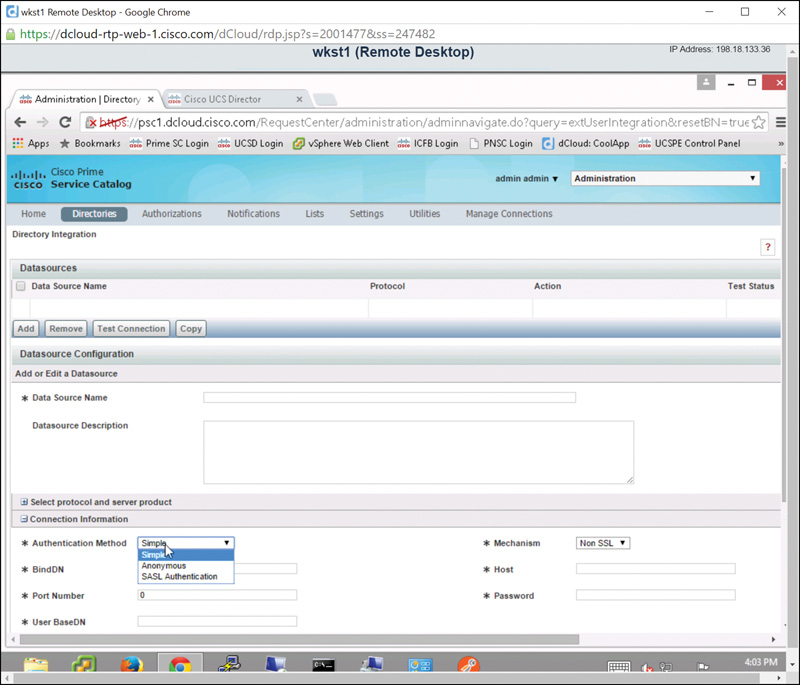
Step 9. For the Mechanism field, choose SSL or Non SSL.
Step 10. For the directory service you chose in Step 6, enter the bind DN in the BindDN field, the directory service hostname in the Host field, the port number in the Port Number field, a password, and the user base DN in the User BaseDN field.
Note
Bind DN refers to the user in the LDAP server who is permitted to search the LDAP directory within the defined search base. Base DN refers to the location in LDAP where a server will start its search for users.
Step 11. Expand the Security Certificate Information section and click Add Certificate, as shown in Figure 7-8. Input the requested information for the certificate.

Step 12. Expand the Referral Datasource section and click the Add Referral button (see Figure 7-9.) Enter names in the Data Source Name and Mapping Name fields.

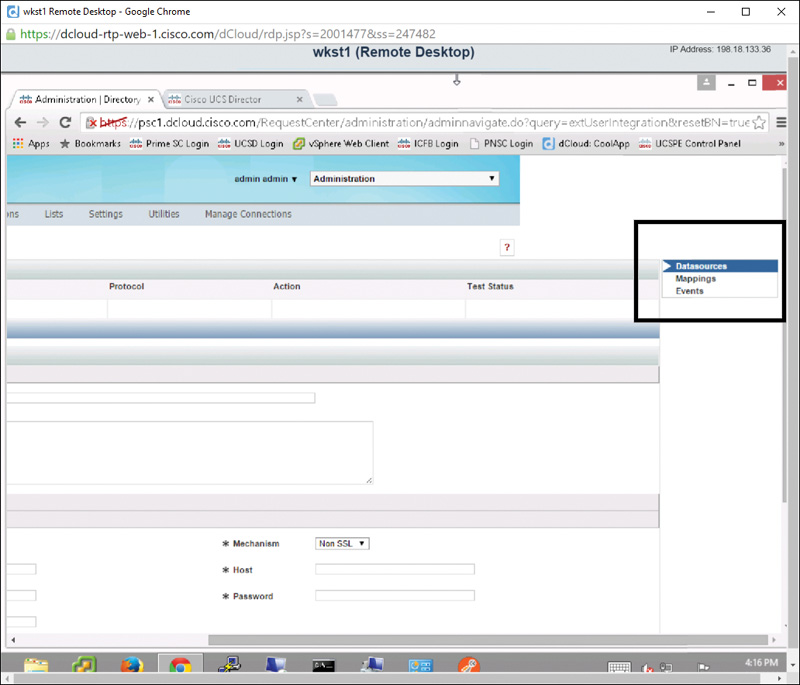
Step 13. Click the Update button at the bottom of this form. At the top of the Directories screen, you will now see an option to test the directory connection you just created. Select the data source name you just created, and click the Test Connection button shown in Figure 7-10.

Step 14. Click the Mappings tab to the far right of the Directories screen, as shown in Figure 7-11, to open the Mapping Configuration page.
Step 15. In the Add or Edit a Mapping Name section, shown in Figure 7-12, enter a name in the Mapping Name field.
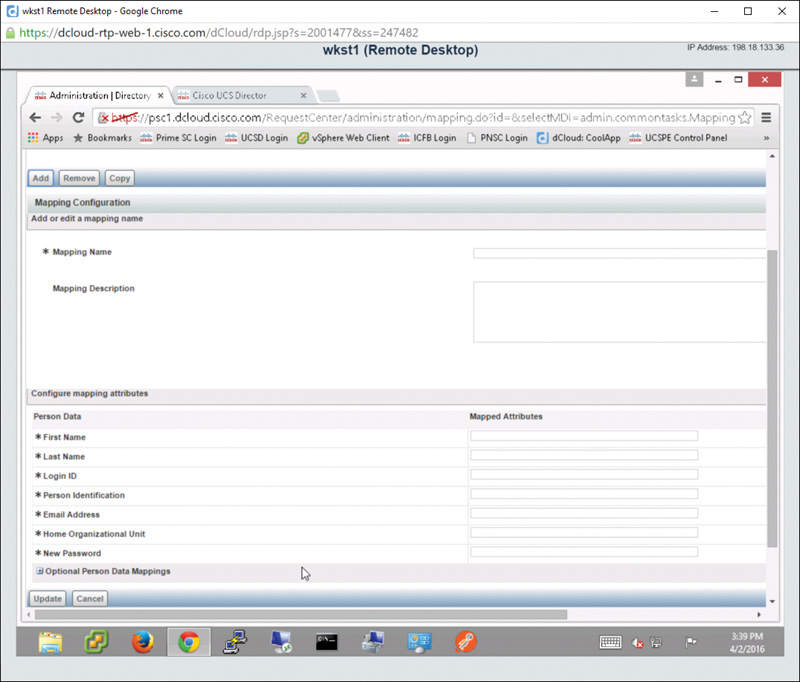
Step 16. Expand the Configure Mapping Attributes section and fill out all of the required fields, also shown in Figure 7-12, and then click on the Update button. This will create an LDAP mapping for a particular user.
Step 17. Repeat this process as necessary to create additional mapping names in Prime Service Catalog.
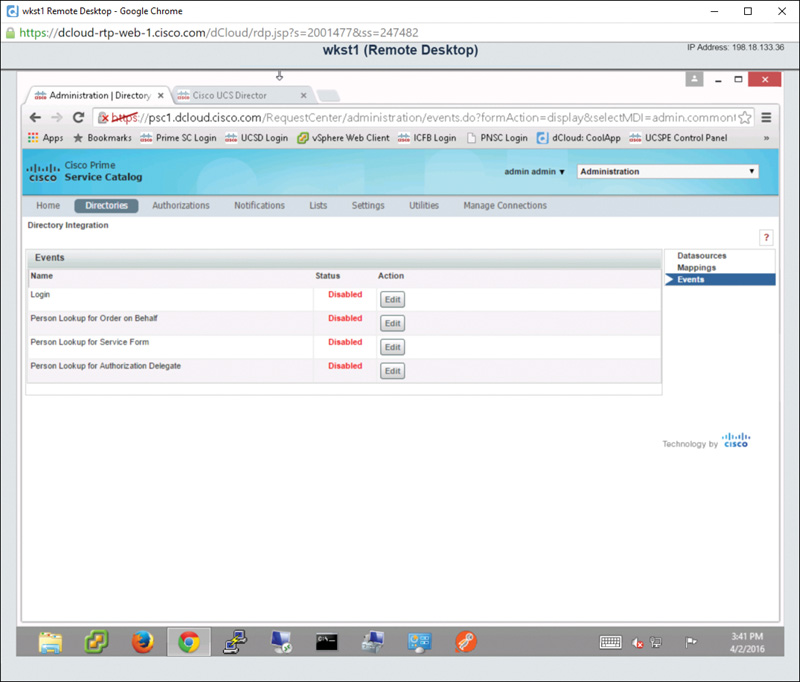
Step 18. Back to the far right of the Directories screen, as referenced previously in Figure 7-11, click the Events tab. On the Events page, you can enable or disable the directory connection for the following actions, as shown in Figure 7-13:
![]() Login
Login
![]() Person Lookup for Order on Behalf
Person Lookup for Order on Behalf
![]() Person Lookup for Service Form
Person Lookup for Service Form
![]() Person Lookup for Authorization Delegate
Person Lookup for Authorization Delegate
As you have seen, it is very easy to tie Prime Service Catalog into existing directory sources within your organization to create custom authentication and authorizations for your organization’s users.
Managing Connections Between Prime Service Catalog
Now that you have completed the Link to Directories activity, you are ready to look at how to link Prime Service Catalog to other products such as UCS Director. On the Home screen of the Administration view, notice the Manage Connections option as shown in Figure 7-14. Choosing this option will allow you to connect Prime Service Catalog to UCS Director. Details on how to manage this connection can be found in Chapter 7, “Managing Users and Groups.”
Now let’s look at how we can create users and groups and connect to external directories in UCS Director.
UCS Director
Similar to Prime Service Catalog, UCS Director offers rich integration with directory services. This allows you to leverage an existing enterprise directory, such as Microsoft Active Directory, when tying your organization’s user population into UCS Director. Local users and groups are also supported in the case where you do not wish to leverage an enterprise directory service with UCS Director.
We’ll first look at how to create local users and groups within UCS Director, and then explore how to tie UCS Director into directory services. For purposes of demonstration, the configuration examples assume Microsoft Active Directory is the directory service being utilized for directory integration.
Local Users in UCS Director
If your organization doesn’t require external directory services, users can be created directly within the UCS Director virtual appliance and will reside locally within the virtual appliance. This is less than ideal because passwords for cloud users have to be maintained separately from their enterprise directory credentials. It is highly recommended that when you integrate UCS Director into your organization you take advantage of LDAP integration. For those of you who wish to forge ahead with UCS Director for one reason or another, this section covers local user creation.
After logging in to UCS Director as an administrator, perform the following steps:
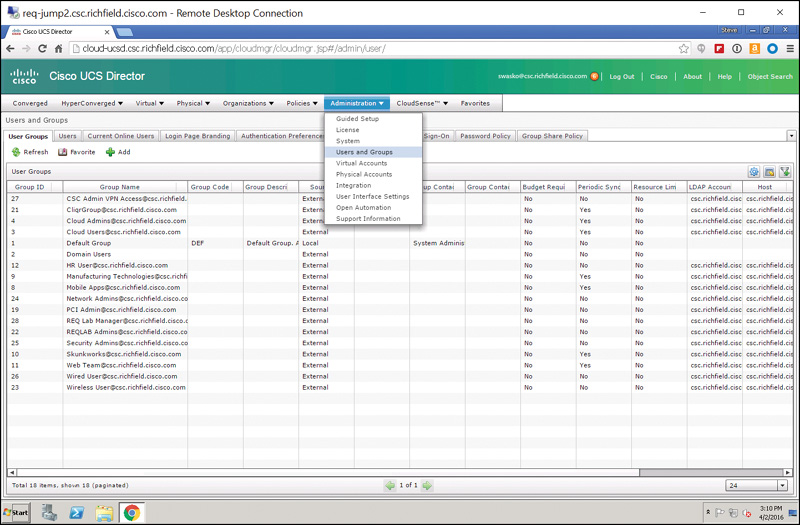
Step 1. Choose Administration > Users and Groups, as shown in Figure 7-15.
Step 2. On the Users and Groups screen, click the Users tab; then click Add as shown in Figure 7-16.

Step 3. In the Add User dialog box, click the User Role drop-down list box and choose a user role, as shown in Figure 7-17. (User roles are covered in more detail later in the chapter in the section “Default Roles in UCS Director.”) Next, do the following:
![]() Select a login name (follow the recommendations for special characters).
Select a login name (follow the recommendations for special characters).
![]() Select and confirm the user’s password.
Select and confirm the user’s password.
![]() Enter the user’s email address in the User Contact Email field.
Enter the user’s email address in the User Contact Email field.
![]() Optionally, fill out the remaining fields on the form shown in Figure 7-17.
Optionally, fill out the remaining fields on the form shown in Figure 7-17.

Step 4. Click Add to add the user and return to the main Users tab. Notice in the example shown in Figure 7-18 that the local user CCNA has been created and that the Source column identifies CCNA as Local (created locally within UCS Director as opposed to being imported from Active Directory or another directory service).

Local Groups in UCS Director
Just as local users can be created within UCS Director, local groups can also be created. Again, the same caution applies to using local groups as applies to using local users. Best practices are to leverage your enterprise Active Directory (or other directory service) infrastructure within UCS Director. If that is impractical or not needed, though, follow the steps presented next to create local groups.
Step 1. From within UCS Director, log in as an administrator and choose Administration > Users and Groups (refer to Figure 7-15).
Step 2. On the User Groups tab, click the Add button as shown in Figure 7-19.
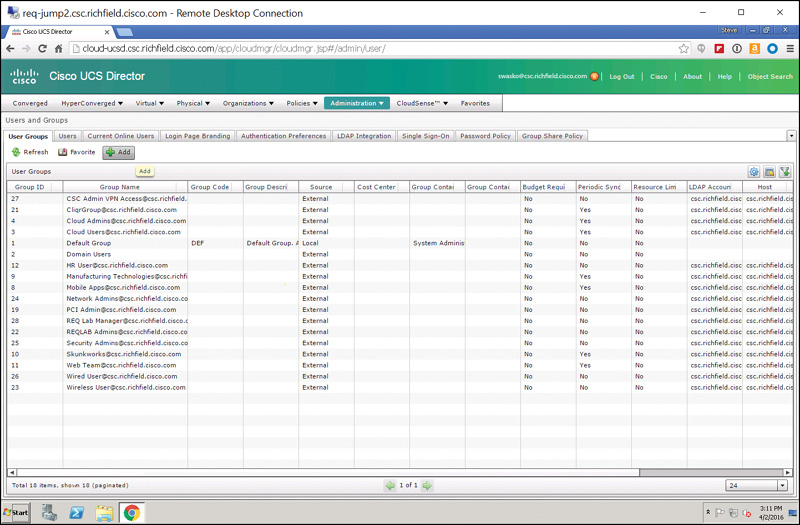
Step 3. In the Edit Group dialog box, shown in Figure 7-20, choose a name for the group and enter a contact email. All other fields are optional. The contact email is used for system-generated messages that result as actions are taken by members of the group, such as an approval email going to a particular group.

Step 4. Click Save; then notice that the group has been created as a local group as opposed to an external group (being imported from Active Directory or another directory service). See Figure 7-21. Click Save.

LDAP Integration for UCS Director
As mentioned previously, LDAP directory integration with UCS Director is the preferred deployment mechanism in that it simplifies the administrative steps required to manage user and admin access to UCS Director by quickly and easily allowing you to add existing Active Directory (or other directory service) user accounts into groups. This streamlines the management and administrative functions required for you, the private cloud owner. To set up LDAP integration, follow these steps:
Step 1. From within UCS Director, log in as an administrator and choose Administration > Users and Groups (refer to Figure 7-15).
Step 2. Navigate to the LDAP Integration tab and click the Add button, as shown in Figure 7-22.

Step 3. Fill out the following fields on the LDAP Configuration page of the LDAP Server Configuration wizard (see Figure 7-23):
![]() Account Name: The name you want to call this particular connection.
Account Name: The name you want to call this particular connection.
![]() Server Type: Choose Microsoft Active Directory or OpenLDAP, as appropriate to your environment.
Server Type: Choose Microsoft Active Directory or OpenLDAP, as appropriate to your environment.
![]() Server: Enter the fully qualified domain name (FQDN) or IP address of the directory server you want to create a connection to. Check the Enable SSL check box if a secure connection is required.
Server: Enter the fully qualified domain name (FQDN) or IP address of the directory server you want to create a connection to. Check the Enable SSL check box if a secure connection is required.
![]() Port: Enter the port used for the connection. The default port number for a non-SSL-enabled LDAP connection is 389.
Port: Enter the port used for the connection. The default port number for a non-SSL-enabled LDAP connection is 389.
![]() Domain Name: Enter the domain name of your organization.
Domain Name: Enter the domain name of your organization.
![]() Username and Password: Enter the combination for the connection that will be used to connect to the directory server.
Username and Password: Enter the combination for the connection that will be used to connect to the directory server.
![]() Synchronization Frequency: Set the interval at which the UCS Director virtual appliance will poll the directory server for changed/updated user/group information. Setting this to 1 hour will ensure that changes made (user or group adds) will synchronize quickly with UCS Director. Note that users or groups in UCS Director are imported if they do not exist. If they do exist, UCS Director will ignore them and the “changes” will never take place.
Synchronization Frequency: Set the interval at which the UCS Director virtual appliance will poll the directory server for changed/updated user/group information. Setting this to 1 hour will ensure that changes made (user or group adds) will synchronize quickly with UCS Director. Note that users or groups in UCS Director are imported if they do not exist. If they do exist, UCS Director will ignore them and the “changes” will never take place.

Step 4. Click Next. On the LDAP Search Base page, shown in Figure 7-24, click the Select button to select the LDAP search base to the OU (organizational unit) where you want to look for UCS Director users and groups. Note the message stating that “The page may take a while to load depending on the number of OUs in the Domain.” It isn’t uncommon for this operation to take many seconds to a few minutes in very large directory services implementations.

Step 5. After you click the Select button, you can filter or query for keyboards in the upper right of the Select dialog box. In the example shown in Figure 7-25, the search is for the keyword Demo to limit the number of objects shown in the Search Base selection screen to only those containing the word “Demo.” Click Select to return to the LDAP Search Base page, and then click Next.

Step 6. On the Configure User and Group Filters page, shown in Figure 7-26, the default, setting cn (container name) with an Operator value of equals, will suffice in mapping users and groups in the previous OU to UCS Director. Note that at least one of the Group/User filters must be configured. The purpose of these filters differs. The User filter will limit users imported from the base OU selected in Step 5 and show only those that match the User filter. The same rules apply for the Group filter. The Group filter will limit groups imported from the base OU selected in Step 5 to only those that match the Group filter.

Step 7. Click Next. On the LDAP User Role Filter page, set user role filters for any groups you want to map from within your directory service to UCS Director. In the example shown in Figure 7-27, Cloud Admins in the directory service maps to the Admin (User) user role in UCS Director, while Cloud Users in the directory service maps to the Regular (User) user role in UCS Director. Note that by default, imported users are created as Service End Users. However, by specifying a user role filter, users matching that filter will be created with the specified user role, such as System Admin, Compute Admin, and so on.

Step 8. Finally, back on the LDAP Integration screen, click the Test Connection button to ensure that everything is working properly (see Figure 7-28). Assuming all is configured properly, you’ll be presented with a dialog box stating “LDAP Connection test successful.” See Figure 7-29.


Next, we’ll discuss the purpose of roles in UCS Director. All users of UCS Director, whether created locally or being imported externally from a properly configured directory service, will be assigned a role.
Default Roles in UCS Director
Roles in UCS Director provide a very flexible framework for assigning rights and permissions to end users and administrators within the private cloud infrastructure. This flexibility allows you as the administrator to ensure that users have the permissions they need but are kept away from areas to which they shouldn’t have access. Note that a user can only be part of one role.
By default, UCS Director comes preconfigured with one system default role (system admin) and ten custom roles. The roles are listed here, along with a brief description of the permissions enabled for each role:
![]() System Admin: Role has admin/superuser permissions to do all tasks within UCS Director
System Admin: Role has admin/superuser permissions to do all tasks within UCS Director
![]() All Policy Admin: Role is able to administer most policies within UCS Director
All Policy Admin: Role is able to administer most policies within UCS Director
![]() Billing Admin: Role designed for doing chargeback, budgeting, accounting, and resource limit reporting
Billing Admin: Role designed for doing chargeback, budgeting, accounting, and resource limit reporting
![]() Computing Admin: Role designed for working with physical and virtual servers and compute policy
Computing Admin: Role designed for working with physical and virtual servers and compute policy
![]() Group Admin: An end user with the privilege of adding users to a group or groups
Group Admin: An end user with the privilege of adding users to a group or groups
![]() IS Admin: Role is able to assign VMs to vDCs, create new vDCs, create new catalogs, create/modify Deployment Policy and SLA Policy, and perform orchestration
IS Admin: Role is able to assign VMs to vDCs, create new vDCs, create new catalogs, create/modify Deployment Policy and SLA Policy, and perform orchestration
![]() MSP Admin: Role is able to create virtual computing, VM labels, and service group service requests
MSP Admin: Role is able to create virtual computing, VM labels, and service group service requests
![]() Network Admin: Role is able to handle most aspects of networking within the private cloud as well as add physical and virtual network resources, apply budgets and resource accounting to networks, and see chargeback for network resources
Network Admin: Role is able to handle most aspects of networking within the private cloud as well as add physical and virtual network resources, apply budgets and resource accounting to networks, and see chargeback for network resources
![]() Operator: Role can create VM labels and assign VMs to vDCs
Operator: Role can create VM labels and assign VMs to vDCs
![]() Service End User: Role can only view and use the self-service portal
Service End User: Role can only view and use the self-service portal
![]() Storage Admin: Role is able to handle most aspects of storage within the private cloud as well as add physical and virtual storage resources, apply budgets and resource accounting to networks, and see chargeback for storage resources
Storage Admin: Role is able to handle most aspects of storage within the private cloud as well as add physical and virtual storage resources, apply budgets and resource accounting to networks, and see chargeback for storage resources
The permissions by role are listed in their entirety in Figure 7-30. Note that the table in Figure 7-30 shows only ten roles, because the system admin role is a system default role that cannot be disabled and that has read/write access to all permissions and roles within UCS Director.

In addition to the system-generated roles within UCS Director, there exists support for a maximum of 48 total system roles (including default roles). This will allow you as the administrator of the private cloud solution to create custom roles with custom Read/Write permissions for scenarios that aren’t addressed by the 10 default roles included.
To create a custom role, use the following steps:
Step 1. Log in with administrator credentials, choose Administration > System; then navigate to the User Roles tab, as shown in Figure 7-31.

Step 2. The User Roles tab lists the default system roles that have been created within UCS Director. Notice that the fourth column is labeled Default Role and, because this is a new installation, all of the roles show Yes, indicating that they’re system default roles.
Step 3. To add a custom role, click the Add button.
Step 4. On the User Role page of the Add User Role wizard, shown in Figure 7-32, give the role a name. In the example shown, we are creating a user role named Custom-CCNA-Role.
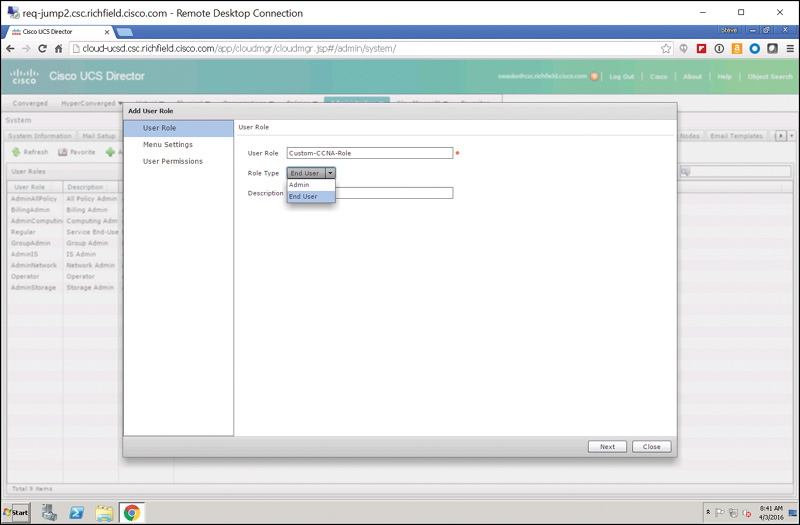
Step 5. For Role Type, select either Admin or End User.
Step 6. Optionally give the role a description. Click Next.
Step 7. On the Menu Settings page, shown in Figure 7-33, select one or more menus that will be exposed to users that will be assigned to the new Custom-CCNA-Role. In the example shown, Catalog and Accounting are selected. Click Next.

Step 8. On the User Permissions page, shown in Figure 7-34, select the following permissions that will be exposed to users that will be assigned to the new Custom-CCNA-Role:
![]() Read – Virtual Computing
Read – Virtual Computing
![]() Read – Resource Accounting
Read – Resource Accounting
![]() Read – Catalogs
Read – Catalogs

Step 9. Click Submit. After you acknowledge the role creation and are returned to the User Roles tab of the Administration System screen, shown in Figure 7-35, note that the new role created appears at the bottom of the User Role column and that the Default Role column shows a value of No (indicating that this is a custom role and not one of the system default roles).

This section introduced you to the UCS Director system default roles and showed you how to create custom roles. This gives you great flexibility in designing roles and permissions for your private cloud infrastructure that can match nearly any use case and ensure that the proper users have the proper permissions required to browse service catalogs, order resources, create resources, report on resources utilized, consume resources, etc.
The next section describes the process of creating a new user and assigning that user to the custom role that was created in this section.
Configuring a New User with a Single Role
Roles cannot be embedded within other roles. For example, you aren’t allowed to create a custom role and embed that role within a default system role. That shouldn’t pose a problem, however, because you can create multiple custom roles, up to 48 total (as mentioned previously in this chapter), which gives you tremendous flexibility to design roles with just the right level of access for users and administrators within your organization. Additionally, within the default system roles, you can modify both the menu settings presented and the user permissions granted. Please note however that a best practice is to clone a default system role and then make changes to the copy, as opposed to modifying the default system roles.
The previous section showed how to create a new custom role called Custom-CCNA-Role. Now, let’s create a new user, CCNA User, and assign it to this role. You will then log in to that role and see how the permissions applied in the previous section affect the end user’s visibility and actions they can perform in the service catalog.
Step 1. Starting out from the main login screen while signed in as an administrator within UCS Director, choose Administration > Users and Groups (see Figure 7-36).

Step 2. Navigate to the Users tab and click the Add button, as shown in Figure 7-37.

Step 3. Complete the Add User dialog box as listed here and shown in Figure 7-38:
![]() User Role: Custom-CCNA-Role
User Role: Custom-CCNA-Role
![]() User Group: Default Group
User Group: Default Group
![]() Login Name: CCNA
Login Name: CCNA
![]() Password: C1sc0123
Password: C1sc0123
![]() Confirm Password: C1sc0123
Confirm Password: C1sc0123
![]() User Contact Email: [email protected]
User Contact Email: [email protected]
![]() First Name: CCNA
First Name: CCNA
![]() Last Name: User
Last Name: User
![]() Phone: Optional
Phone: Optional
![]() Address: Optional
Address: Optional
![]() Set user disable date: Check the box and set a date 24 hours from now
Set user disable date: Check the box and set a date 24 hours from now

Step 4. Click Add. As shown in Figure 7-39, the user now appears at the top of the Users list, the Access Level column shows Custom-CCNA-Role (the role created in the previous section), and the Source column shows Local.

Step 5. Log out of UCS Director by clicking Log Out at the top of the window, as shown in Figure 7-40.

Step 6. Log in as user CCNA with a password of C1sc0123 (see Figure 7-41).

Step 7. As shown in Figure 7-42, your newly created CCNA user with the custom role of Custom-CCNA-Role can see two top-level menu options: Catalog and Accounting. Recall from the previous section that we created a very restricted user role with just the ability to see virtual machine resources and with read-only permissions to Catalogs and Accounting information.

Step 8. Explore what rights (very few!) your newly created user with this custom role has; then click Log Out to log out of user CCNA.
Custom roles are a great tool to use when the default system roles provided with UCS Director don’t quite grant the proper level of access desired to achieve a particular end result. As many organizations have different approval, reporting, and consumption levels internally, custom roles give you as the private cloud administrator a very powerful set of capabilities to ensure proper access under a wide variety of organizational scenarios.
Exam Preparation Tasks
As mentioned in the section “How to Use This Book” in the Introduction, you have a couple of choices for exam preparation: the exercises here, Chapter 15, “Final Preparation,” and the exam simulation questions on the Pearson IT Certification Practice Test.
Review All Key Topics
Review the most important topics in this chapter, noted with the Key Topics icon in the outer margin of the page. Table 7-2 lists a reference of these key topics and the page number on which each is found.

Table 7-2 Key Topics for Chapter 7
Define Key Terms
Define the following key terms from this chapter and check your answers in the glossary:
Lightweight Directory Access Protocol (LDAP)