
Chapter 11. Deploying Virtual Application Containers
This chapter covers the following exam topics:
1.0 Cloud Infrastructure Administration and Reporting
1.3 Deploy virtual app containers
1.3.a Provide basic support and troubleshoot app container with firewall, networking, and load balancer
The term container has become very popular in IT and application development in recent years. In most cases today, container refers to an alternative method of constructing and running software in a lightweight, highly portable, and fast-to-instantiate virtualization technology as an alternative to virtual machines. Linux has had LXC, a method for creating and managing containers, for years. However, it wasn’t until Docker containers became available that the term and its use became so widespread.
Within UCS Director, an application container is something very different from these containers. Application containers have been available within UCS Director for many years, long before the term became so strongly associated with the containers from Docker and other companies. A UCS Director application container is an object designed to offer end users the ability to rapidly deploy and manage a group of virtual machines organized into one or more network segments, or tiers, as a single entity.
At a network layer, the application container is inherently a secure and isolated environment where the policies designed and offered in the template determine how virtual machines within the container communicate with each other, what traffic is allowed to leave the container, and what services from the container virtual machines are exposed to external users and systems. Some application container types offer network services such as load balancing, stateful firewall, and application inspection capabilities to the container virtual machines.
“Do I Know This Already?” Quiz
The “Do I Know This Already?” quiz allows you to assess whether you should read this entire chapter thoroughly or jump to the “Exam Preparation Tasks” section. If you are in doubt about your answers to these questions or your own assessment of your knowledge of the topics, read the entire chapter. Table 11-1 lists the major headings in this chapter and their corresponding “Do I Know This Already?” quiz questions. You can find the answers in Appendix A, “Answers to the ‘Do I Know This Already?’ Quizzes.”
The goal of self-assessment is to gauge your mastery of the topics in this chapter. If you do not know the answer to a question or are only partially sure of the answer, you should mark that question as wrong for purposes of the self-assessment. Giving yourself credit for an answer you correctly guess skews your self-assessment results and might provide you with a false sense of security.
1. An application container within UCS Director refers to which of the following?
a. An alternative method for deploying software within a lighter-weight virtualization technology than traditional virtual machines
b. A logical construct composed of one or more network tiers containing virtual or physical compute resources in a private and secured network environment that can be ordered, managed, and deleted as a single entity
c. A snapshot of a configured virtual machine enabling end users to roll back to previous application states
d. A logical construct representing a software application that can be deployed onto a selected virtual machine
2. Select all of the options that represent application container types supported in UCS Director.
a. Docker container
b. Fenced virtual container
c. Virtual Security Gateway (VSG)
d. APIC container
e. Fabric container
f. LXC container
g. VACS container
3. Which technologies can provide firewall services into and within the different application containers available in UCS Director? (Choose all that apply.)
a. Linux Gateway
b. Virtual Security Gateway (VSG)
c. ASA
d. ASAv
4. Virtual Application Cloud Segmentation (VACS) containers make use of which of the following Cisco technologies? (Choose three.)
a. Cloud Services Router (CSR)
b. ASAv
c. Virtual Security Gateway (VSG)
d. Nexus 1000v
e. Application Policy Infrastructure Controller
5. Before creating application containers, which of the following Virtual/Hypervisor Policies must be configured? (Choose three.)
a. Computing Policy
b. Storage Policy
c. End User Self-Service Policy
d. System Policy
6. True or False. Virtual machines can be added after an application container is deployed.
a. True
b. False
7. What will happen when you power off an application container?
a. You will be presented an interface where you will indicate which container virtual machines to power off.
b. All deployed virtual machines will be powered off and deleted. Network service appliances will remain powered on.
c. All deployed virtual machines and network service appliances will be powered off but maintain all configuration and be able to be powered on again.
d. You cannot power off an application container.
8. Which Gateway Types are options in a fenced virtual container Tiered Application Gateway Policy? (Choose two.)
a. CSR
b. ASA/ASAv
c. Nexus Switch
d. Linux
9. What are the three available container types within VACS?
a. VACS – Custom Container
b. VACS – Flexible Container
c. VACS – 3 Tier (Internal)
d. VACS – 3 Tier (Private)
e. VACS – 3 Tier (External)
f. VACS – 3 Tier (Public)
10. What catalog type is used when publishing a VACS container template to the service catalog?
a. VACS container
b. Application container
c. Service container
d. Advanced
Foundation Topics
Understanding UCS Director Application Containers
Before we explore the different types of application containers within UCS Director, let us look at their general structure and common aspects.
Every application container is instantiated from a template, and the template is simply an infrastructure model that describes the network, security, services, and compute resources that will be delivered through automation when a new application container is ordered.
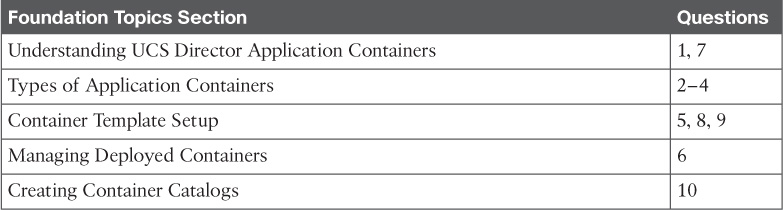
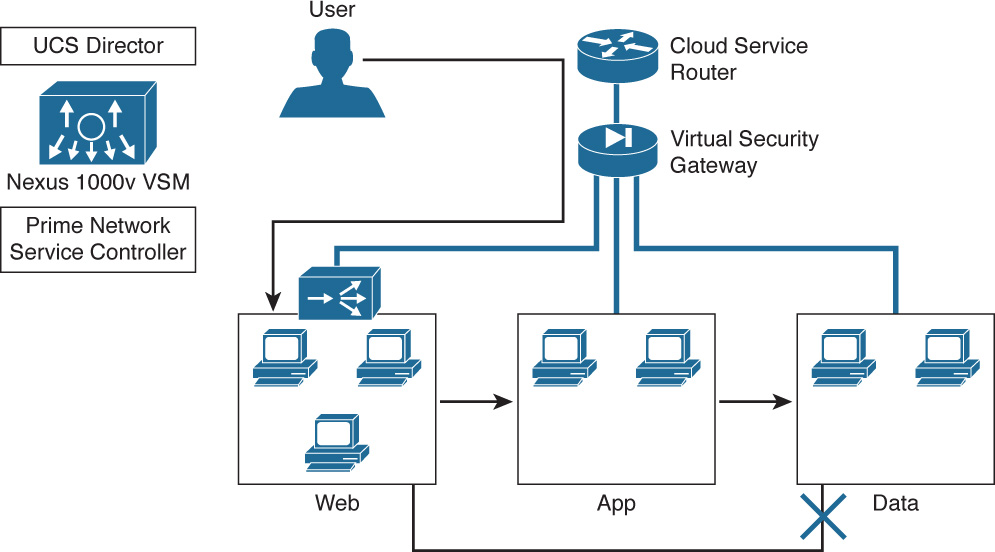
The example three-tier application container represented in Figure 11-1 shows one of the most common and basic types of containers you might find offered through UCS Director. This container is composed of separate network segments for web, application, and data servers. Most containers also include a network device to provide routing and security enforcement for traffic to and from the servers in the individual tiers. This container is designed to offer a fairly typical security policy where servers in the web tier can communicate with the app tier, but not with the data tier. Only app tier servers can communicate with the data tier servers. External users are allowed to access only the web servers. Though this example leverages the ubiquitous three-tier model of an application, UCS Director application containers can be built to support one or more tier models.
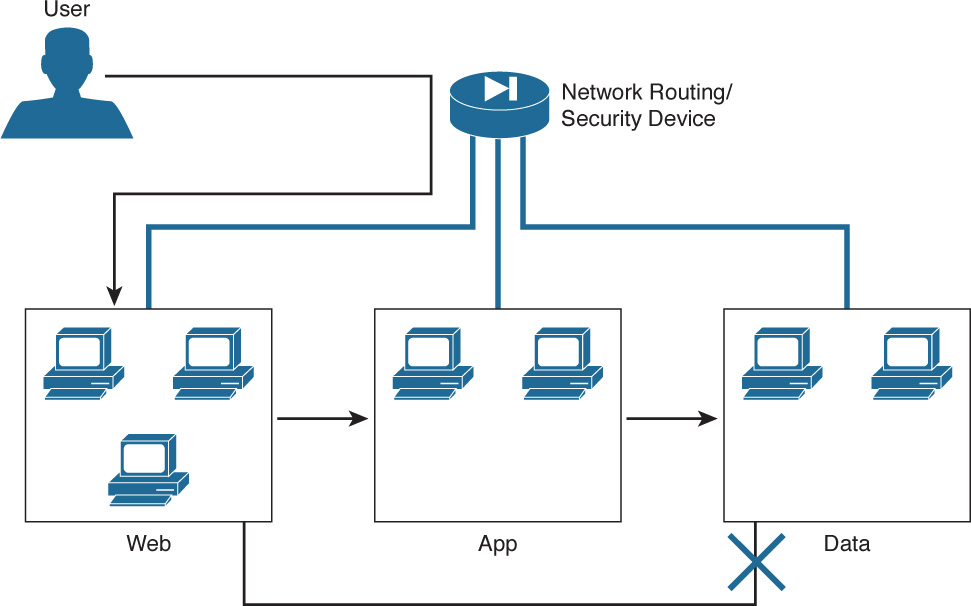
In the example load-balanced application container shown in Figure 11-2, you will find a simple one-tier container where a load-balancing service is offered for the virtual machines deployed to the web tier. This makes it easy for users who are building or managing a web application to scale out the service with included management of the load-balancing configuration.
After a new application container is ordered, users manage the container as a single object within UCS Director. Actions such as Power On or Off, Clone, or Delete can be executed on a deployed container. When one of these actions is executed, UCS Director will act on all virtual machines and resources within the container. For example, when you power off a container with three web servers, two application servers, a data server, and a virtual router, all seven of the virtual machines will be shut down. If the template for the container allows for it, you can also add or remove virtual machines from a deployed container. Double-clicking a deployed application container enables you to see and interact with individual elements within the container based on the User Action Policies configured within the template.
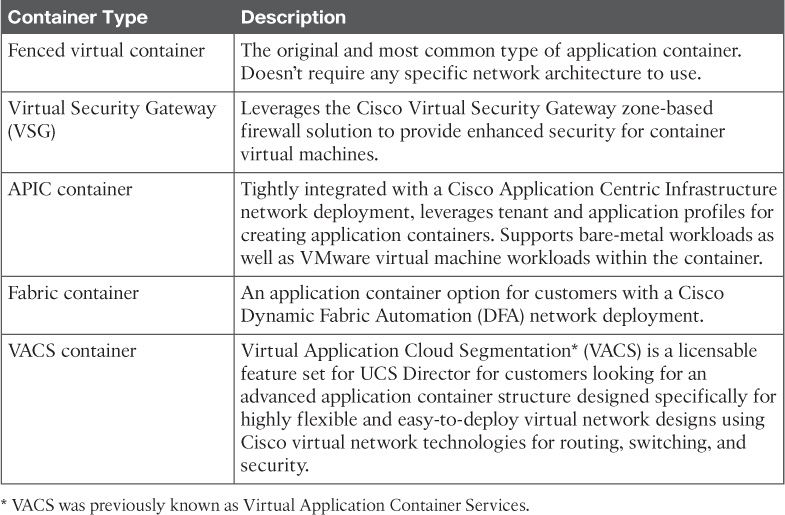
Types of Application Containers
Several types of application containers are supported within UCS Director. The main differentiation between the types relates to how the container networking is created, and the virtual and/or physical infrastructure used to create it. Table 11-2 lists the different application container types and the key characteristics of each. Following the table, the two most common types of containers will be explored in more depth.
Fenced Virtual Container
Fenced virtual containers can be used in any VMware-based deployment with UCS Director. The biggest advantage of this container type is that it does not require any particular network hardware, software, or topology. The virtual network for a fenced virtual container can be provided by a standard VMware vSwitch, a VMware Distributed vSwitch, or a Cisco Nexus 1000v.
An application container requires a gateway to allow the deployed virtual machines to communicate with each other and outside of the container. The gateway provides inter-VLAN routing, security enforcement, and IP network address translation (NAT) capabilities. Fenced virtual containers support two different types of gateway devices, a Linux VM or a Cisco ASA. UCS Director can leverage any available Linux VM template as the gateway by taking advantage of the IP forwarding and embedded firewall feature (IPTables) within all Linux distributions. And for deployments, where an enterprise-class stateful firewall with application inspection option is required, the Cisco ASA or ASAv can be used (requires licensing of the ASAv).
Templates for a fenced virtual container without a gateway can be built. In these templates, you will need to address the networking design and deployment to enable communication to and from the container virtual machines outside of the template and default workflows used to build the application container. One way to accomplish this would be to build a custom workflow based on the out-of-the-box example that provides the networking needs of your environment.
Fenced virtual containers can optionally be deployed with a load-balancing policy to leverage an F5 BIG-IP application delivery controller as part of the container template. When included in a template, UCS Director will create and manage virtual server and server pool objects within the BIG-IP device automatically, but as of UCS Director 5.4, the VLAN and NAT settings within the gateway and BIG-IP device itself must be configured manually or through more customized infrastructure automation workflows. Providing automated configuration of these features as part of the fenced virtual container automation will be addressed in a future release of UCS Director.
In a fenced virtual container, the gateway device provides the security enforcement based on the policies configured in the template. This means that enforcement is done at network boundaries between container tiers, or between the container and devices outside the container. Communication within each tier is completely open and allowed. The VSG and VACS container options provide capabilities for more enhanced security by leveraging the Virtual Security Gateway and Nexus 1000v from Cisco to further segment the east-west communication within and between tiers. The security term microsegmentation has been coined to refer to a security style leveraging security between and within traditional security zones.
VACS Container
Virtual Application Cloud Segmentation (VACS) is an optional feature license for UCS Director available for customers looking to simplify the consumption of the robust virtual networking capabilities provided by Cisco to VMware and Hyper-V environments (VACS support for HyperV is roadmapped for CY2016). The VACS solution within UCS Director provides the following benefits to customers:
![]() Offers single per-hypervisor host license for required virtual network components
Offers single per-hypervisor host license for required virtual network components
![]() Simplifies the installation and upgrade of the Nexus 1000v Virtual Switch, Virtual Security Gateway (VSG), Cloud Services Router (CSR), and Prime Network Services Controller
Simplifies the installation and upgrade of the Nexus 1000v Virtual Switch, Virtual Security Gateway (VSG), Cloud Services Router (CSR), and Prime Network Services Controller
![]() Enables end users to deploy application containers backed by Cisco switching, routing, and security services
Enables end users to deploy application containers backed by Cisco switching, routing, and security services
![]() Ensures consistent cloud tenant segmentation
Ensures consistent cloud tenant segmentation
VACS containers are built using proven and best-of-breed technologies. Figure 11-3 illustrates a VACS deployment and a sample application container. UCS Director provides the underlying infrastructure management and automation solution for the application container deployment. The installation of VACS into UCS Director adds the content (workflows and tasks) needed to install, upgrade, and manage the virtual network components as well as deploy and manage the application containers themselves. A first step of the installation involves deploying the Nexus 1000v Virtual Supervisor Module (VSM) into the virtualization platform in use. This installation is fully automated and doesn’t require any manual configuration on the part of the cloud administrator. Prime Network Services Controller will also be automatically deployed, and it will be used to construct and deploy the network policies each time a new container is ordered. Depending on the template configuration, each application container will include a CSR, VSG, and server load balancer as required. These instances are dedicated to the container, and their life cycle will be managed as part of the container itself.
When comparing and evaluating using VACS over the fenced virtual container option within UCS Director, you should consider the following:
![]() With VACS deployed, you will be able to leverage the Nexus 1000v for managing application container virtual networks as well as noncontainer-related virtual networks. This will provide you with the full Cisco switching feature set available with the Nexus 1000v Advanced License.
With VACS deployed, you will be able to leverage the Nexus 1000v for managing application container virtual networks as well as noncontainer-related virtual networks. This will provide you with the full Cisco switching feature set available with the Nexus 1000v Advanced License.
![]() Each VACS container leverages a CSR to provide a stateful external firewall including Layer 7 application inspection of common applications including HTTP, HTTPS, FTP, DNS, ICMP, SQLnet, MSSQL, and LDAP.
Each VACS container leverages a CSR to provide a stateful external firewall including Layer 7 application inspection of common applications including HTTP, HTTPS, FTP, DNS, ICMP, SQLnet, MSSQL, and LDAP.
![]() The VSG provides east-west traffic protection, enabling you to build security policies much more granular than the network boundary–based security available with Fenced Virtual Containers.
The VSG provides east-west traffic protection, enabling you to build security policies much more granular than the network boundary–based security available with Fenced Virtual Containers.
![]() By leveraging the CSR as the container gateway, your containers have available the full enterprise routing capabilities available, including dynamic routing, quality of service (QoS), VPN, and monitoring services such as NetFlow.
By leveraging the CSR as the container gateway, your containers have available the full enterprise routing capabilities available, including dynamic routing, quality of service (QoS), VPN, and monitoring services such as NetFlow.
![]() For deployments where you are looking to avoid leveraging private container networks and NATing at the gateway, VACS offers more flexible options for IP subnet, routing, and NAT.
For deployments where you are looking to avoid leveraging private container networks and NATing at the gateway, VACS offers more flexible options for IP subnet, routing, and NAT.
![]() Server Load Balancing (SLB) is also offered as an optional feature for each VACS container and requires no external hardware or software licenses. SLB within VACS is built on the open source HAProxy load balancer widely available and used in many enterprises and cloud applications. With VACS, you can offer this service to a container tier without any manual configuration of HAProxy itself.
Server Load Balancing (SLB) is also offered as an optional feature for each VACS container and requires no external hardware or software licenses. SLB within VACS is built on the open source HAProxy load balancer widely available and used in many enterprises and cloud applications. With VACS, you can offer this service to a container tier without any manual configuration of HAProxy itself.
Container Template Setup
Having explored the details of fenced virtual and VACS application container types, we will now walk through how to build templates and deploy each type of container. Before creating your first application container template, you need to address the prerequisites for each container type, which are covered first.
Fenced Virtual Containers
UCS Director deploys fenced virtual containers into a VMware vCenter–based cloud or virtual account, so be sure to add this account before beginning the container template process. Your container templates will also need to have access to virtual machine images (that is, VM templates) for the different VMs that will be provisioned into the new containers. This includes an image for a Linux Gateway VM if your containers will be leveraging one for the network boundary of the container. If you will be using an ASAv as the gateway, you will need to upload the ASAv OVA file to UCS Director before beginning to create the Container Policies. You can upload the OVA file by navigating to Administration > Integration > User OVF Management. The remaining portion of this walkthrough will leverage a Linux VM as the gateway, as this is the most common deployment method.
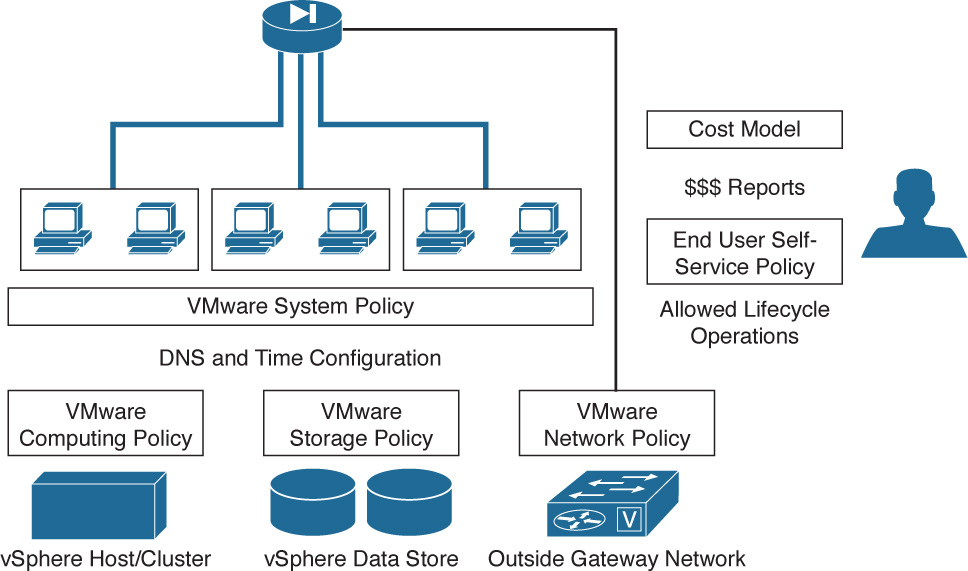
Once you have the VMware Cloud connected and ready, you can create the needed Virtual/Hypervisor Policies that will be used during application container provisioning to properly place and configure new virtual machines deployed. Fenced virtual containers use these policies in a very similar way as virtual data centers (vDCs), covered in Chapter 9, “Automating Cloud Infrastructure with UCS Director.” Figure 11-4 provides a summary of the policies you will need to configure as well as their purpose. You will need to create VMware Computing and VMware Storage Policies to indicate on which vSphere hosts or clusters, and which data stores or data store clusters, to deploy the new virtual machines. A VMware Network Policy is used for the configuration of the gateway’s outside interface. The inside interfaces and all virtual machine interfaces will be configured based on the container tiers described within the template. A VMware System Policy is used to configure DNS and time zone information on virtual machines. The container virtual machine naming convention will reflect the container name itself rather than what is configured in the System Policy. A Cost Model is optional in a fenced virtual container template configuration, but can be helpful when an enterprise is looking to implement a showback/chargeback policy as part of the private cloud deployment. Also, the End User Self-Service Policy is optional, but in most cases you will want to enable your users to have some level of administration over the container and its virtual machines.
When a new fenced virtual container is ordered based on one of the configured templates, UCS Director executes a workflow to do the automation to build the container network and deploy the needed virtual machines. UCS Director ships with sample workflows for deploying the container, and in most cases only very minor modifications are needed. It is recommended that you clone the provided out-of-the-box workflows, make the needed changes for your environment, and use the cloned workflow in your container templates.
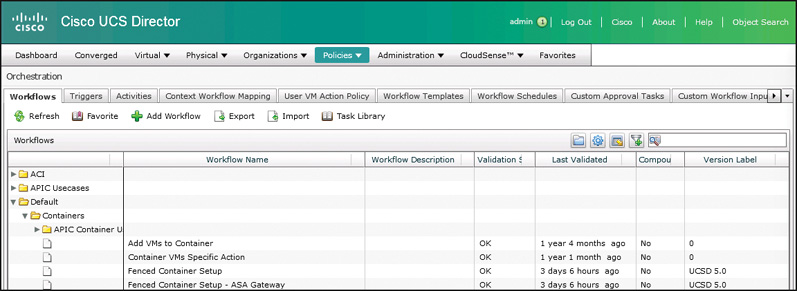
Navigate to Policies > Orchestration > Workflows just as you would when building or managing any other automation workflow. As shown in Figure 11-5, you will find two sample workflows for Fenced Containers in the folder Default > Containers. The workflow “Fenced Container Setup” is used for Linux Gateway–based templates, and “Fenced Container Setup – ASA Gateway” is used for Cisco ASA–based templates. Clone the workflow based on your needs (the screenshots and remaining walkthrough are for a Linux Gateway container) and give it a descriptive name.
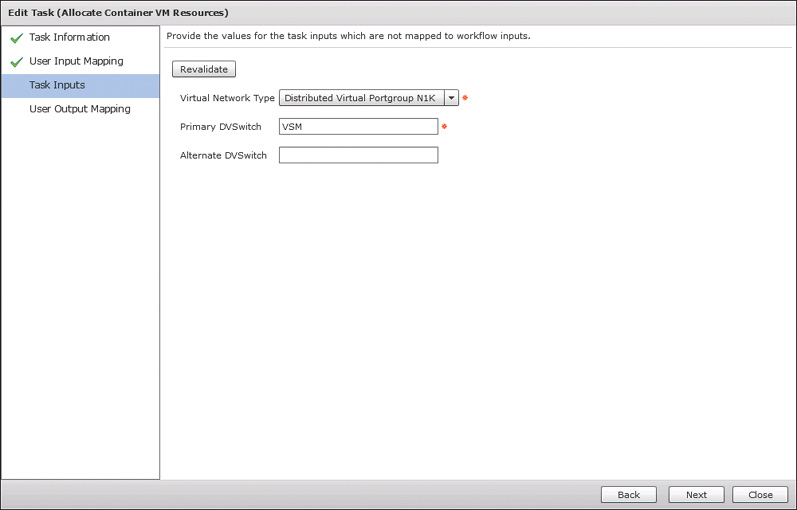
Open the Workflow Designer for your newly cloned workflow to make the needed changes. The first task in the workflow should be Allocate Container VM Resources; double-click it to open and edit its task inputs, as shown in Figure 11-6. Choose the appropriate Virtual Network Type for your VMware deployment and enter the name of the vSwitch or DVSwitch. In our example we are using a Nexus 1000v DVSwitch named VSM. You must submit the changes to the task by clicking Next and Submit, not simply close it after making the change. With the changes to the task submitted, close the workflow designer.
You have now completed all the preparation steps needed, and can begin creating the fenced virtual container policies and templates. Navigate to Policies > Application Containers for the remaining setup steps. Your goal is to create an application container template from which you can provision new application containers; however, the template requires available policies to properly provision the network elements. First navigate to the Tiered Application Gateway Policies tab and click Add Policy. On the first page, Policy Specification, shown in Figure 11-7, provide a Policy Name, optional Policy Description, Gateway Type (Linux, ASA, or ASAv), and Select Virtual Account for your VMware Cloud. Figure 11-7, and some later figures, shows the edit view of a policy rather than the creation view, the only difference between them being that you can’t edit a policy name. Click Next to move forward.
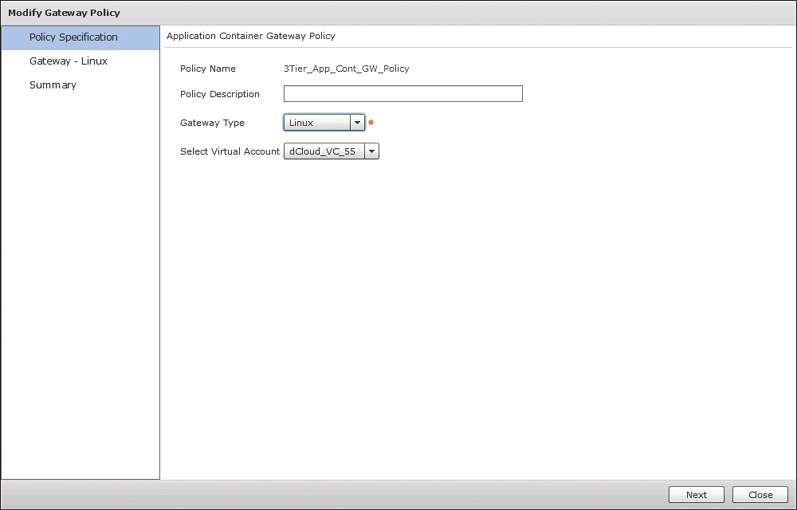
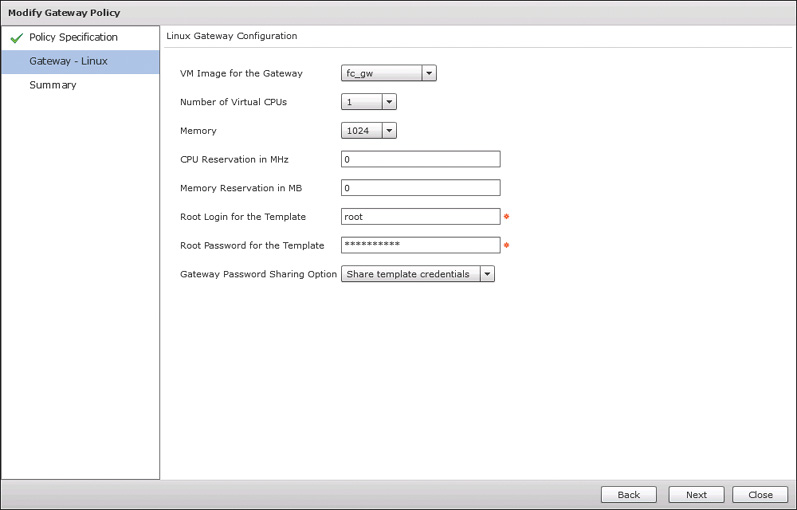
On the second page, shown in Figure 11-8 for Gateway – Linux, you provide the details for the Linux Gateway that will be created for each new container. Select the VM image that will be used as the basis for each gateway and provide virtual hardware specifications. Provide the root credentials for the template and indicate if you want the credentials shared with end users. Click Next and move to the final page where you can click Submit after reviewing a summary of the policy you’ve configured.
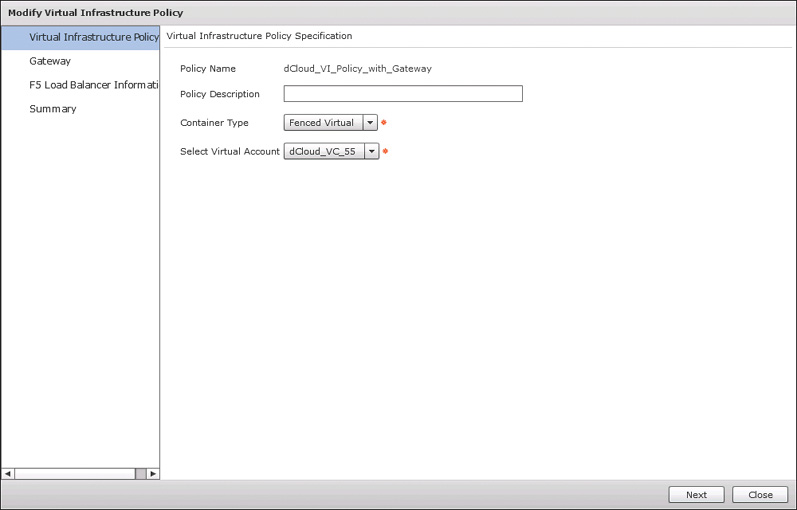
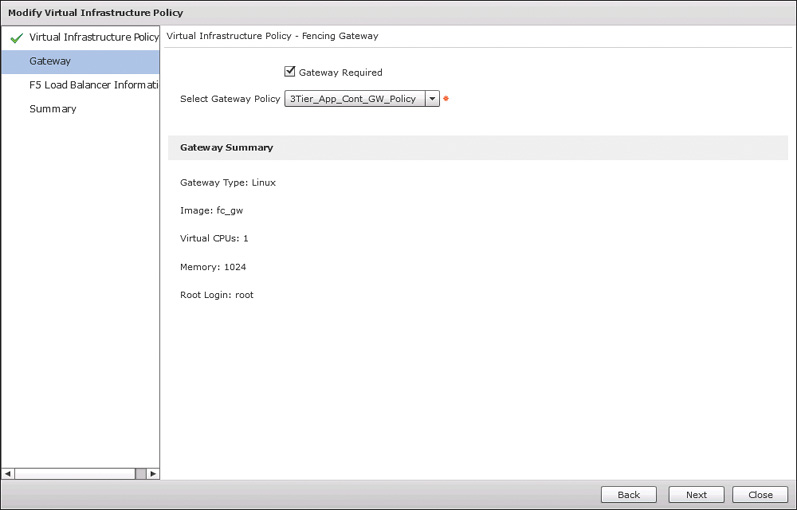
Now navigate to the Virtual Infrastructure Policies tab and click Add Policy. The Virtual Infrastructure Policy will be used in the fenced virtual container template creation in the next step, and it refers to the gateway and, if being used, F5 Load Balancer policy. On the first page of the policy wizard, shown in Figure 11-9, you determine the container type being configured and the virtual account that will be used. Click Next and on the second page, shown in Figure 11-10, check the Gateway Required box (if it isn’t already checked) and select the policy you configured in the previous step. Click Next twice to skip the F5 Load Balancer Information page, and then Submit the new Virtual Infrastructure Policy.
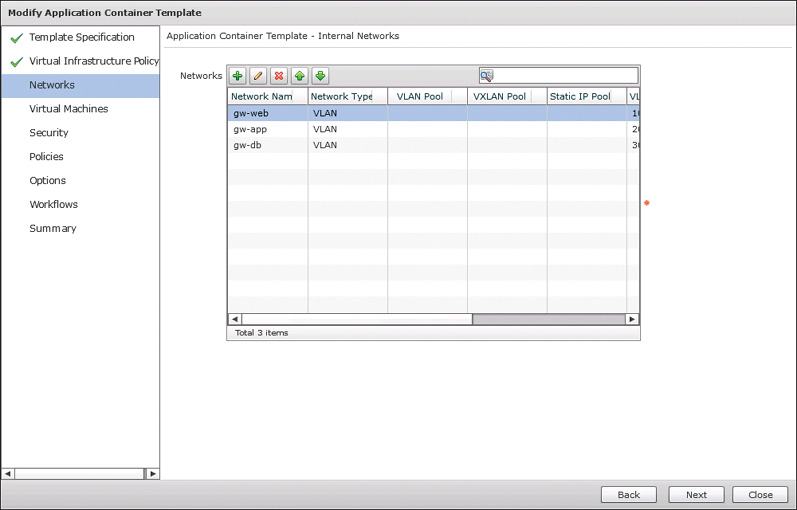
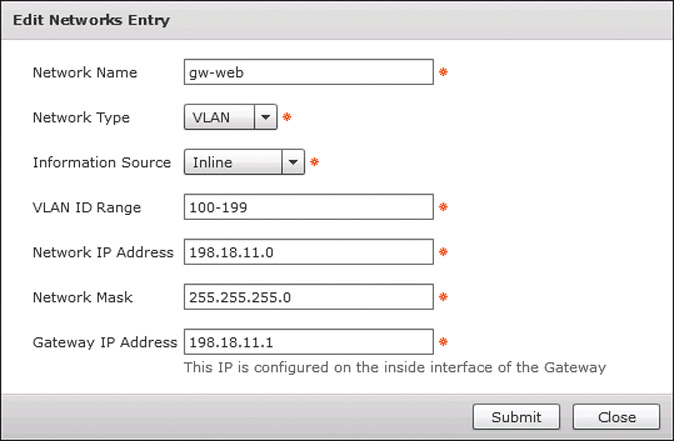
You are now ready to move to the Application Container Templates tab and create a fenced virtual template. Click the Add Template button to open the wizard. On the first page, provide a template name and optional description and click Next. On the second page, select the Virtual Infrastructure Policy you created in the previous step and click Next. You will now be on the third page of the wizard, shown in Figure 11-11, where networks are configured. Use the table displayed to add the number of tiers you desire your fenced virtual container to have. Keep in mind that in a fenced virtual container, the internal networks are private to the container and not exposed to the rest of the data center network. All traffic in and out of the container will run through IP NAT translation by the gateway. This means that all application containers deployed from a given template will leverage the same private IP network space. Figure 11-12 shows an example configuration for a web tier of a container that is accessed by the add or edit buttons (plus and pencil, respectively) in Figure 11-11. Click Next when finished configuring the networks.
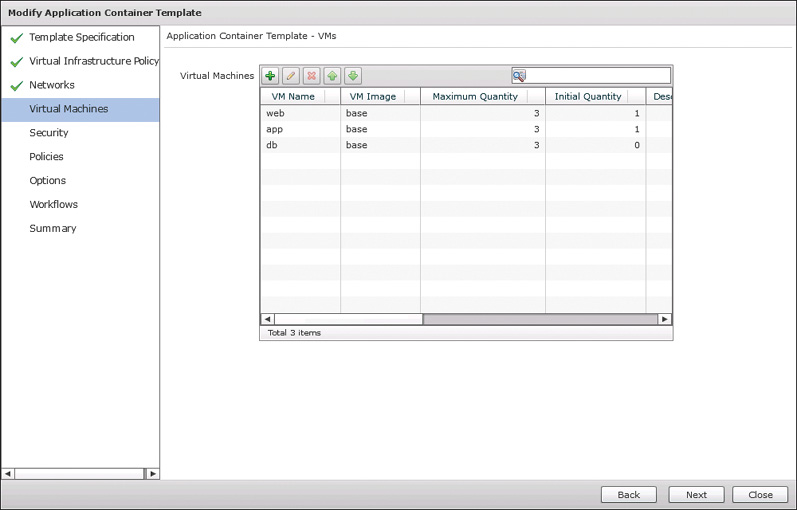
Moving on to the fourth page of the wizard, Virtual Machines, shown in Figure 11-13, you determine the number and type of virtual machines that will be available in each tier of the container. Even if you do not wish to initially deploy virtual machines as a container is built—that is, you’ll allow users to add virtual machines after deploying the container—you must still add virtual machine entries for each tier of the container. As can be seen in Figure 11-13, you indicate both the maximum and initial quantities of VMs to be deployed. Simply indicate 0 as the initial quantity if you do not want to preprovision virtual machines in new containers, and then choose the template. Click Next to continue.
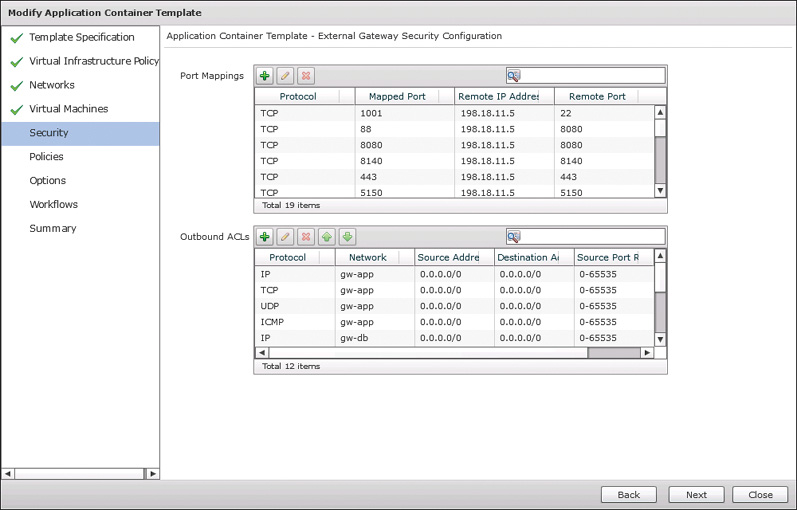
On the Security page, displayed in Figure 11-14, you configure the port mappings and outbound ACLs that will govern the traffic allowed in and out of the container. Because a fenced virtual container is designed to have a completely private internal network, you need to explicitly map any ports for services you wish container virtual machines to provide externally. The Remote IP Address fields are determined by the configurations you selected when configuring the networks and VMs for the container template. Also, by default no traffic will be allowed from the virtual machines out of the container. This includes standard services like DNS, LDAP, HTTP, etc. If you want container VMs to be able to access these types of services, be sure to provide the needed ACLs in the Security configuration. The configurations made here will be enforced on the gateway using platform capabilities. In our example, the Linux Gateway will leverage IPTables to apply these policies. Click Next to continue.
On the next two pages, Policies and Options, select the Virtual/Hypervisor Policies that you configured in preparation. On the Options page you can also indicate whether to allow end users to delete their own containers, as well as leverage VNC-based console access to container VMs. On the second-to-last page of the wizard, Workflows, search for and select the customized workflow that you created where your virtual switching network was indicated. And then finally submit the template creation after reviewing the Summary.
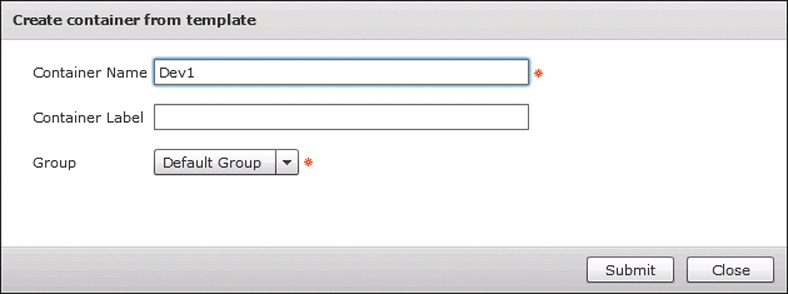
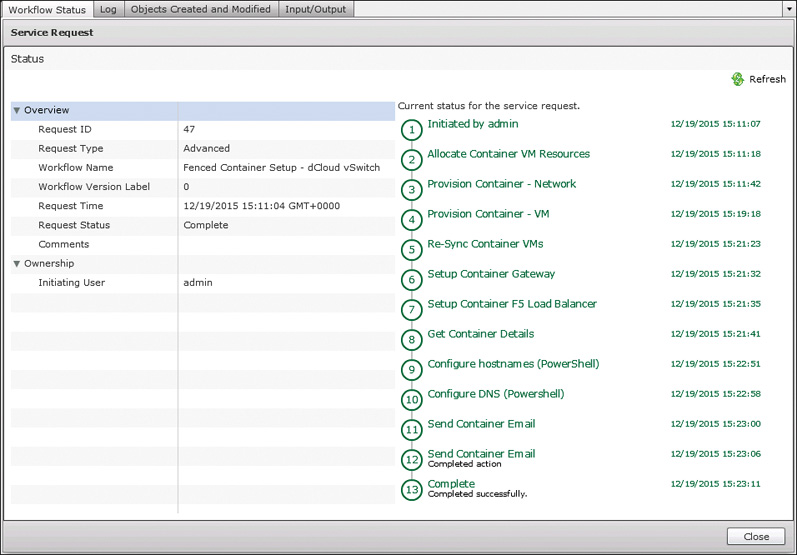
Having completed the template creation wizard, you can now select your template and click Create Container to build your first fenced virtual container. As shown in Figure 11-15, you simply need to provide a container name, optional label, and group to own the new container. The container name must be less than 8 characters long to be valid because the container name is used as part of the virtual machine name, and Microsoft Windows restricts hostnames to 15 characters. Container names longer than 8 characters would have the potential to create invalid Windows hostnames. The creation of a container creates a service request for the workflow execution. Figure 11-16 shows a sample service request Status for a completed container creation.
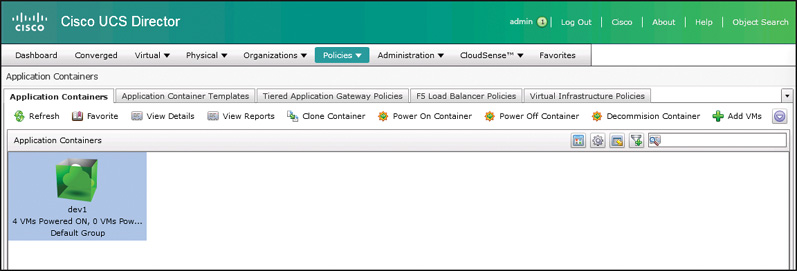
Details on managing and working with a container will be covered in a later part of this chapter, but in Figure 11-17 you can see the newly deployed fenced virtual container in the Application Containers tab.
VACS Containers
Before you can begin building VACS containers with UCS Director, you must install and license the VACS feature. The initial installation of VACS is out of scope for the CLDADM exam and this book, but you can find a detailed walkthrough of the installation and setup on Cisco.com. At the time of this writing, the latest guide is Cisco Virtual Application Cloud Segmentation Services Installation and Upgrade Guide, Release 5.4STV3.0, which you can easily find through an Internet search of the title. You can also find video walkthroughs of the installation and configuration by going to Cisco.com and conducting a search for Virtual Application Cloud Segmentation Install and Upgrade Guides.
Once you have VACS installed, you are ready to address the prerequisites for creating templates. At the time of writing, VACS only supports VMware-based hypervisor environments, so you will need to have the virtual account for the vCenter Cloud successfully added to UCS Director as well as virtual machine images available for deploying workloads into the new containers.
You can create templates that will use either VLANs or Virtual Extensible LANs (VXLAN) for network segmentation. Using VXLANs is recommended because it doesn’t require the underlying physical network to have VLANs added to support the containers as they are built and changed. UCS Director could be used to automate the addition of the VLANs to physical switches and UCS Fabric Interconnects as a custom extension to the VACS workflows. However, by using VXLANs for the segmentation, this need is avoided completely. You will need to ensure a minimum Jumbo MTU size of 1600 bytes is available throughout the physical network to support the overhead of the VXLAN header.
As with fenced virtual container preparation, you need to create Virtual/Hypervisor Policies for VMware Computing, Storage, and System before creating VACS templates. These policies are used to properly place and configure the container virtual machines at deployment. No Network Policies are required for VACS templates.
You will need to create IP subnet pools, static IP pools, and VXLAN or VLAN pools before creating templates. Refer to the section “Network Resource Pools” in Chapter 9 for details on how to configure each of them. Each VACS container will deploy virtual network appliances for routing, security, and services, and these appliances will need management IP addresses. These addresses will be pulled from a static IP pool that you will identify when building a template. A second static IP pool is needed for the virtual router uplink interface. Both of these IP pools need to have the Gateway and VLAN fields completed as part of the configuration. Next, create an IP subnet pool from which the inside subnets for each container will be provisioned. And lastly, create either a VLAN or VXLAN pool to be used to identify each network segment for deployed containers. Be sure to provide large enough pools to meet the potential needs of your VACS usage. Having multiple network resource pools configured and used is supported, but any one template can reference only one of each type at any given time.
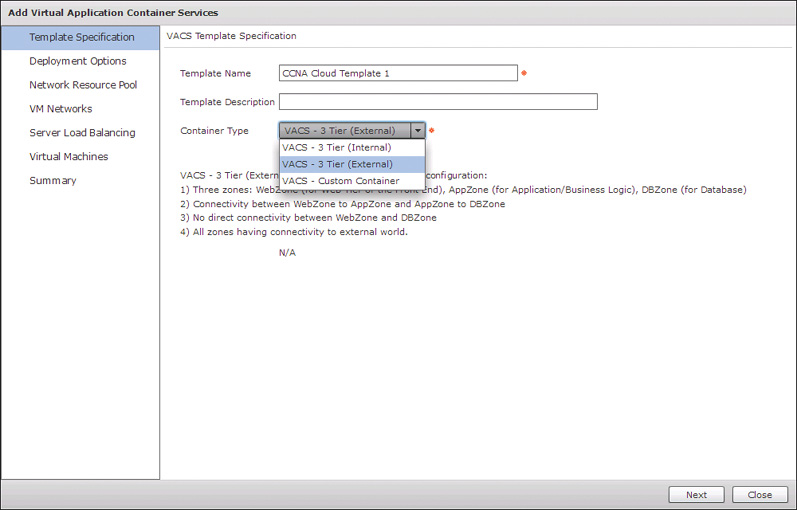
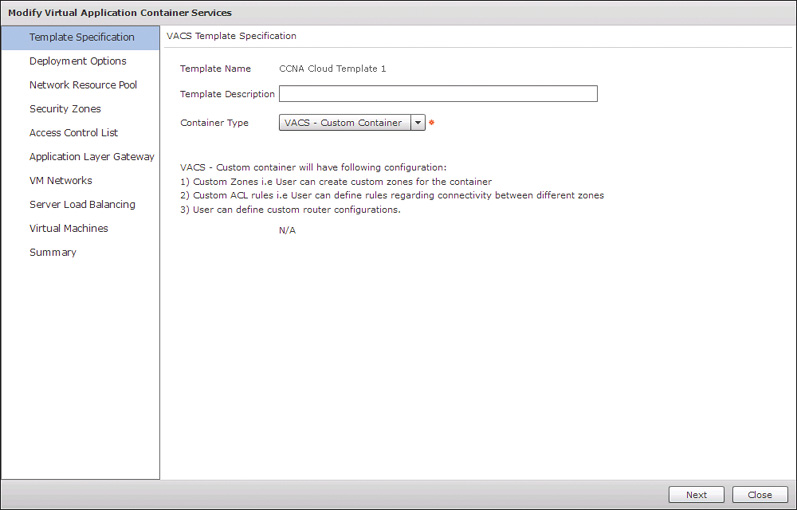
After you complete all these prerequisite steps, navigate to Solution > VACS Container to create the templates. Click Add Template to open the template wizard shown in Figure 11-18. On the first page, Template Specification, provide a name and optional description for the template, as well as identify the type of container you will be deploying. VACS provides three types from which to choose. The first two, VACS – 3 Tier (Internal) and VACS – 3 Tier (External), are very similar with only one difference. Each builds the typical three-tier network structure with a web, app, and data zone. Each also preconfigures security rules to enable the web tier (or zone) to communication with the app tier, enable the app tier to communicate with the data tier, and prevent the web tier from communicating with the data tier, as was represented in Figure 11-1. The difference between the two types is that the Internal version of the template allows communication from outside the container to reach only resources in the web tier, while the External version allows external communication to all three tiers. The last type of container is the VACS – Custom Container. This type enables the designer to control all aspects of the container template. This includes the number and names of the tiers and full control over the security policy applied.
A very useful feature of VACS is that a container can be initially created as one of the 3 Tier models, and then converted to a Custom Container for fine tuning and modification. This can make it easy to quickly get started offering VACS containers to your users, and then adjust as your end-user requirements become more understood. We will initially walk through the creation of a 3 Tier External template and then use this technique to investigate the other options available.
On the second page, Deployment Options, shown in Figure 11-19, you configure the details of the size and configuration of the basic container features. First indicate whether you will deploy a Small, Medium, or Large template. Clicking the Select button will bring up an interface where you can see the RAM and CPU sizing for the different options that will affect the effective network throughput available to your container virtual machines. Select the proper virtual account, Nexus 1000v, and policies to be used. You can also check or uncheck the Server Load Balancing check box to indicate whether you want to provide SLB to one of the three tiers of the container. We will look at this feature more when we convert to a Custom Container.
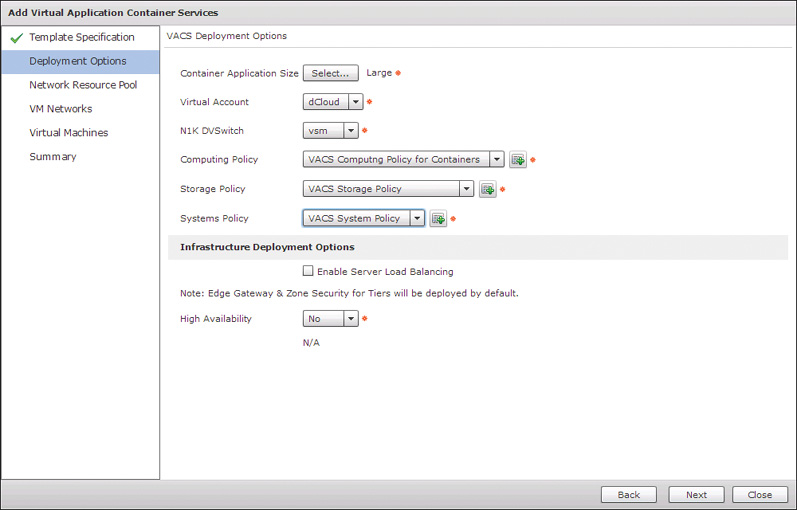
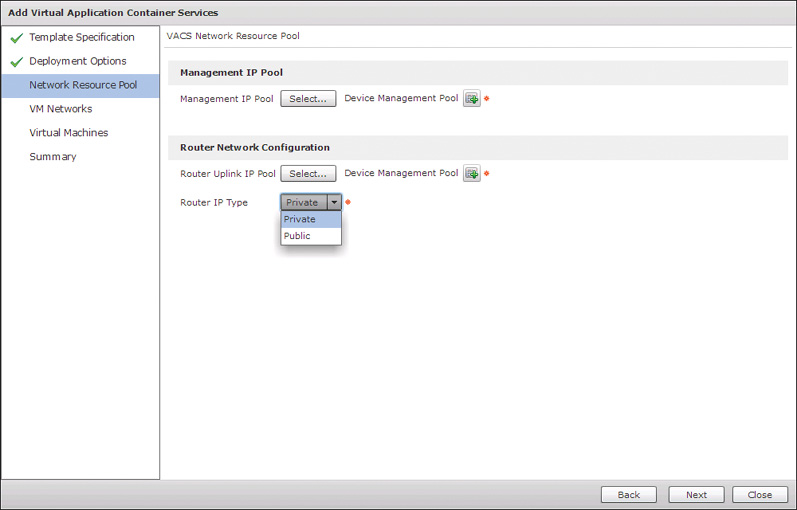
Network resource pool configuration is done on the third page, shown in Figure 11-20. Here you reference the management and uplink pools you set up previously. The option for Router IP Type indicates whether the container will leverage NAT from inside to outside (the Private type) or use EIGRP or Static routing to advertise the inside networks outside the container (the Public type).
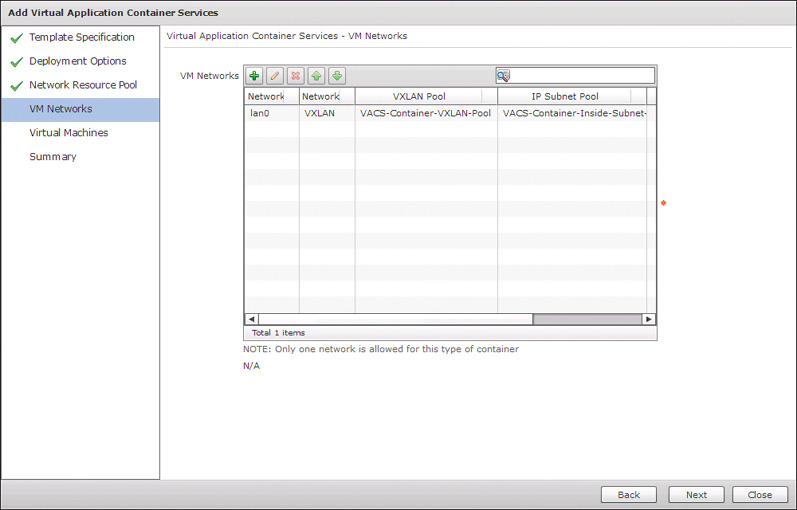
On the next page, VM Networks, you provide the details for the inside VM networks to be configured in the container. Because tier segmentation is provided by the Virtual Security Gateway based on VM attributes, the 3 Tier Container types only leverage a single virtual machine network. This is very helpful to conserve IP subnets and addresses. In Figure 11-21 you can see how a single lan0 network is configured using the VXLAN and subnet pools configured earlier.
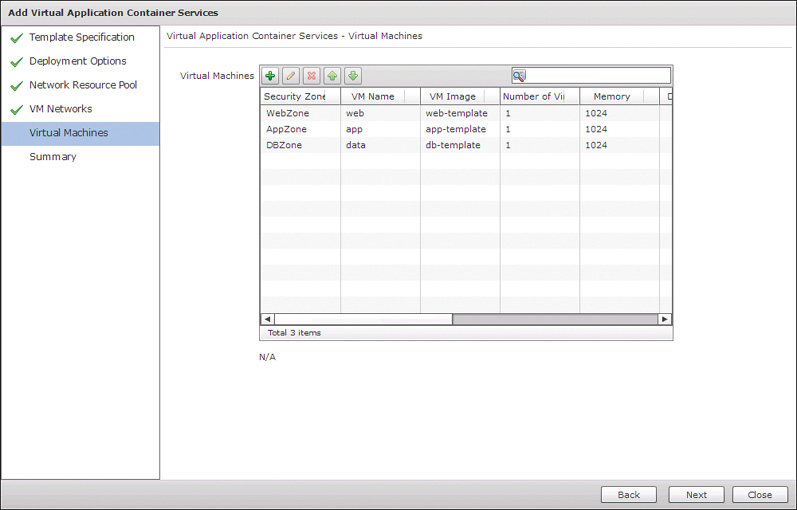
The final configuration page, Virtual Machines, enables you to configure the details for virtual machines to be added to the container. In Figure 11-22 you can see that a VM entry for each tier has been configured. Add your virtual machines, review the summary on the final page, and click Submit to save your new template.
Now that your new template is created, let’s convert it to a Custom Template and take a look at the details of the network and security configuration that VACS abstracts and builds based on the default settings for a 3 Tier Container. Select your template and click Edit Template to reopen it. As shown in Figure 11-23, when you convert the type to a Custom Container, several new pages in the wizard become available.
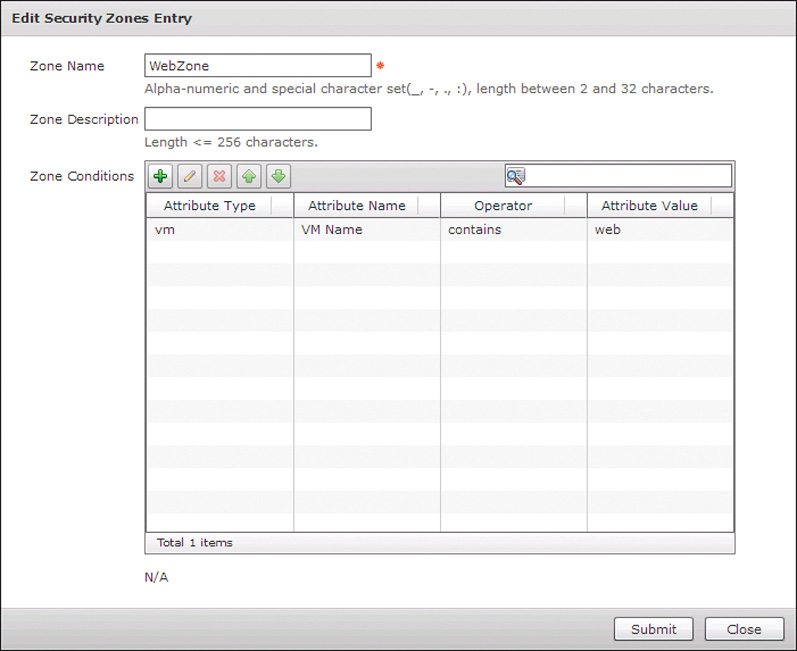
Click Next several times to advance the wizard to the Security Zones page. You could add, edit, or delete zones using buttons in the table, and here in Figure 11-24 we are looking at the Edit Zone Entry interface of the WebZone. You can see by default virtual machines will be placed into proper security zones based on whether web, app, or data appears in the VM Name.
Click Next to move to the Access Control List page, where, as shown in Figure 11-25, you can see the default security rules based on the 3 Tier External container type. From this interface you can add, delete, or adjust the rules to meet your security policy requirements.

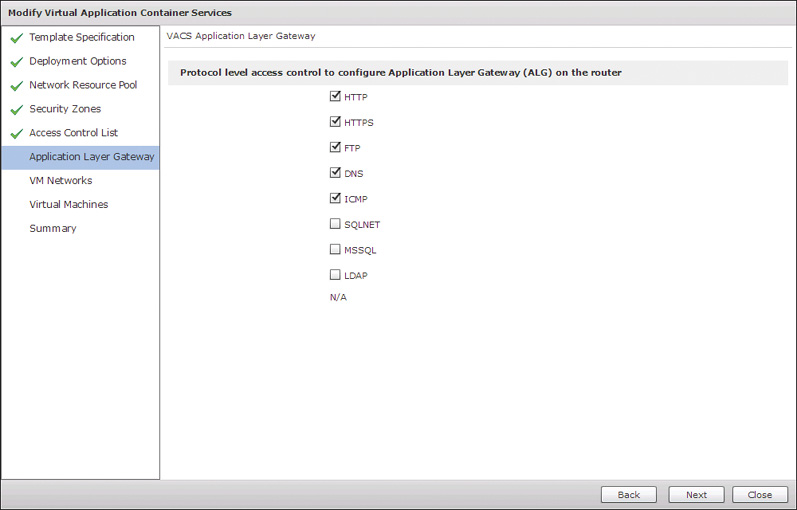
Click Next to move to the last of the new pages available, Application Layer Gateway, shown in Figure 11-26. The page allows you to customize which application layer gateway (ALG) inspections are enabled on the CSR for traffic entering and leaving the container. These inspections look at traffic matching the typical protocols and ports for the enabled applications and make sure that the traffic aligns to the RFC specifications for the protocol. The goal of the inspections is to prevent unauthorized traffic from entering or leaving a container on an open port. In Figure 11-26 you can see the default inspections that are turned on with the 3 Tier Container models, as well as the additional optional protocols you can choose to enable.
Up to this point we have simply looked at the configuration that was applied based on our initial choice of a 3 Tier External Container. Go back to the Deployment Options page and check the box to enable Server Load Balancing. This adds an additional page to the wizard for Server Load Balancing, shown in Figure 11-27. By enabling the feature, VACS will deploy an additional service virtual machine to the container running HAProxy to load balance the virtual machines in the chosen tier. In the current release of VACS, only a single tier can be load balanced in a given container; however, enabling other options is being considered for future releases. Keep the defaults for the SLB feature and click Submit to submit your changes to save the container.

Now that your template is finished, select your container and click the Create Container button located on the VACS Container interface. Provide a container name and an optional label, and indicate the group that will own the container, just like you did with the fenced virtual container. The container creation creates a service request like the one shown in Figure 11-28. Once deployed, you will find and manage the VACS containers in the same Policies > Application Containers menu where fenced virtual containers are located.

Creating Container Catalogs
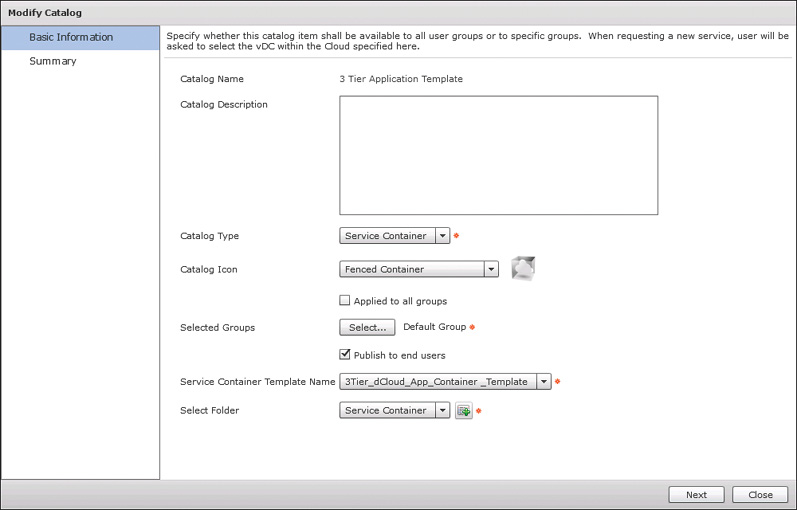
No matter the type of application container, you create the catalog offers the same way. Recall from Chapter 9 that you must create catalog offers for any service that end users will be enabled to order and manage. As an administrator, you have the ability to create a new container simply by clicking the template. End users, on the other hand, do not have access to the templates; they have access only to the service catalog available. Navigate to Policies > Catalogs and click Add to create a new catalog. Choose the Service Container type from the drop-down list. Figure 11-29 shows the completed form for the new catalog that will allow end users to order and deploy a new container based on our template.
Managing Deployed Containers
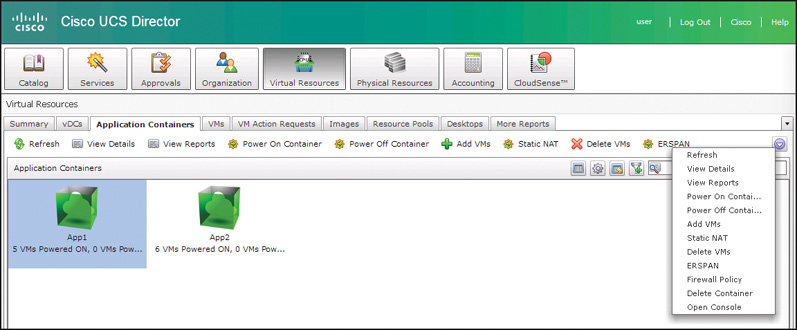
Deploying a container is a great first step, but you will also want to manage the life cycle of the container and work with the VMs contained within it. Several actions are available to end users, depending on the type of container. Figure 11-30 shows the actions available for a fenced virtual container and Figure 11-31 for a VACS container. Some of the key differences and things to note about the available actions are listed here:
![]() Fenced virtual containers can be cloned to create a new container based on a copy of the running container.
Fenced virtual containers can be cloned to create a new container based on a copy of the running container.
![]() VACS containers support configuring ERSPAN sessions to capture traffic from the container networks and send it to a network analysis system.
VACS containers support configuring ERSPAN sessions to capture traffic from the container networks and send it to a network analysis system.
![]() VACS containers support changing the Firewall Policy on a deployed container through the portal.
VACS containers support changing the Firewall Policy on a deployed container through the portal.
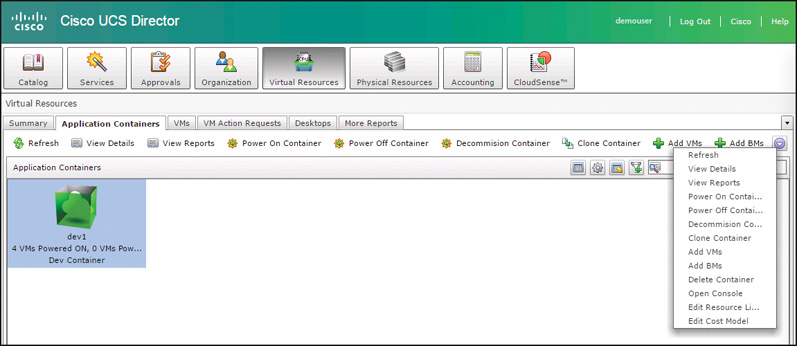
Although there is an option in the Fenced Container menu to Add BMs (bare-metal servers), enabling this feature for a fenced virtual container is complex and rarely used. For containers supporting bare-metal servers, the best option will be the newest container type, APIC containers, briefly discussed in the next section.
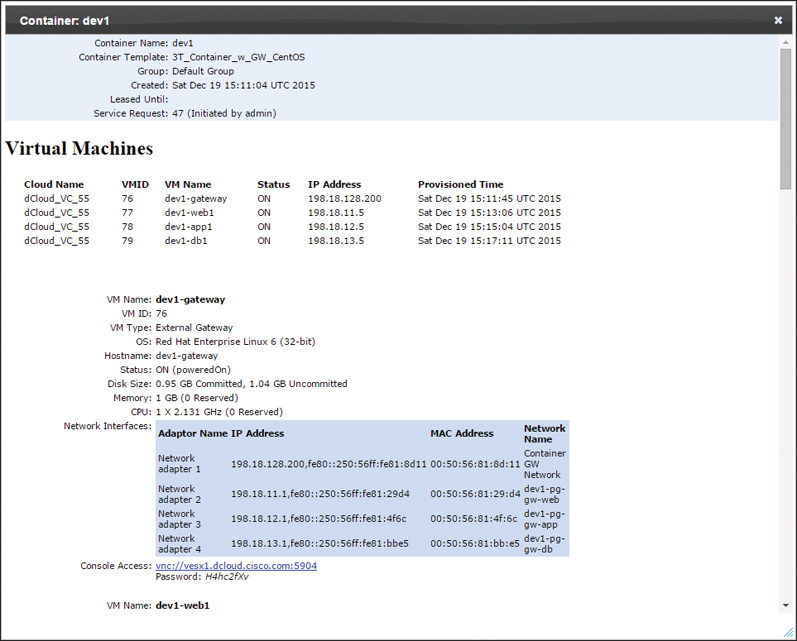
All container types also provide end users with several report options from which they can obtain details about the container and the resources in the container. These details include the IP address, usernames and passwords, and hardware details for each virtual machine. Figure 11-32 shows an example report for a fenced virtual container. Users can find these reports by clicking the application container and selecting View Reports. The Detailed Report with Credentials is shown in the figure.
APIC Containers
The newest types of application container supported in UCS Director are APIC containers. These containers are tightly integrated with Cisco Application Centric Infrastructure (ACI) and the policy-defined networking approach configured through the Application Policy Infrastructure Controller (APIC). APIC containers are built to extend the tenancy model from ACI into UCS Director and allow users to create container networks spanning virtual and physical resources, manage storage configurations for tenants, and provide robust security and services with firewall and load balancers.
The configuration and deployment of APIC containers are beyond the scope for the CLDADM exam and this book. For details, refer to the “Implementing Cisco Application Policy Infrastructure Controller Support” chapter of the Cisco UCS Director Application Container Guide available on Cisco.com.
Exam Preparation Tasks
As mentioned in the section “How to Use This Book” in the Introduction, you have a couple of choices for exam preparation: the exercises here, Chapter 15, “Final Preparation,” and the exam simulation questions on the Pearson IT Certification Practice Test.
Review All Key Topics
Review the most important topics in this chapter, noted with the Key Topics icon in the outer margin of the page. Table 11-3 lists a reference of these key topics and the page number on which each is found.
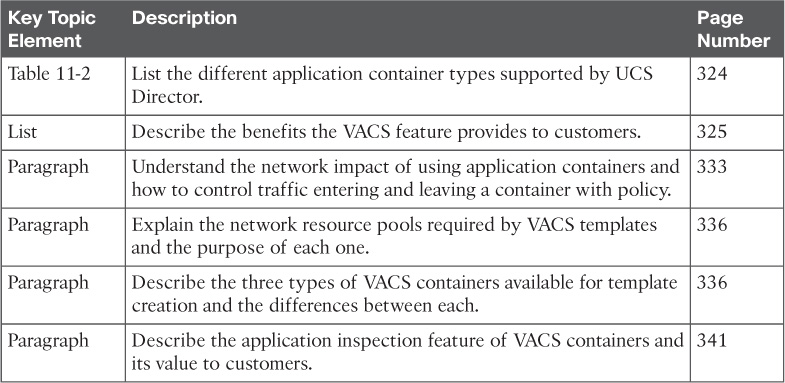
Table 11-3 Key Topics for Chapter 11
Complete Tables and Lists from Memory
Print a copy of Appendix B, “Memory Tables” (found online), or at least the section for this chapter, and complete the tables and lists from memory. Appendix C, “Memory Tables Answer Key,” also online, includes completed tables and lists to check your work.
Define Key Terms
Define the following key terms from this chapter and check your answers in the glossary: