
6.1 The main screen of the Custom Functions menu has three groups, each with its own set of menus.
Chapter 6: Customizing the Canon EOS 6D
The Canon EOS 6D is a great camera to use straight out of the box, but you can increase both your shooting pleasure and efficiency by customizing the camera to suit your style and preferences. The Custom Functions ( ![]() ) enable you to change camera controls and behavior, as well as set up the camera for both general and venue-specific shooting situations. The Custom shooting modes enable you to set up virtually everything on the camera, and then save all of the settings to use later as Custom shooting mode 1 (
) enable you to change camera controls and behavior, as well as set up the camera for both general and venue-specific shooting situations. The Custom shooting modes enable you to set up virtually everything on the camera, and then save all of the settings to use later as Custom shooting mode 1 ( ![]() ) and Custom shooting mode 2 (
) and Custom shooting mode 2 ( ![]() ). My Menu (
). My Menu ( ![]() ) enables you to choose the six camera options you use most frequently and register them for quick access.
) enables you to choose the six camera options you use most frequently and register them for quick access.
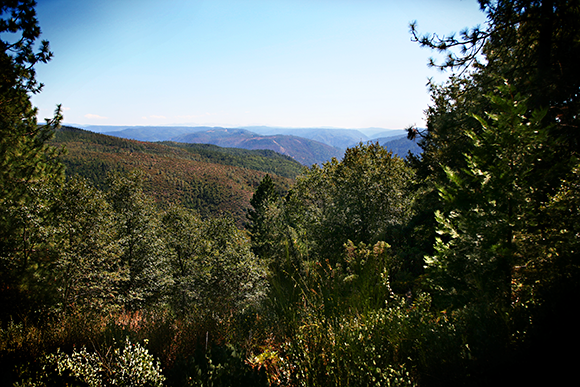
One of the first things I do with a new camera is set the Custom Functions to suit my personal preferences. Exposure: ISO 100, f/4.5, 1/800 second with a Canon 28-70mm, f/2.8 L USM.
Custom Function Groups
The 6D has 20 Custom Functions that enable you to tailor the camera to your shooting preferences. Some Custom Functions have a broad range of uses, and others are useful for specific shooting situations or scenes.
If you’ve used previous 5D or EOS dSLR models, you may wonder why some of the most common Custom Functions are not in their usual place. On the 6D, the camera menus have been redesigned. Some functions are now full-fledged menu options, which makes them easier to find. Two notable examples are the noise-reduction options for long exposures and the high ISO settings. However, there are still Custom Functions that you should explore and set based on your shooting needs and preferences.
Canon organized the 20 Custom Functions, abbreviated as C.Fn, into three groups within the Custom Functions menu tab ( ![]() ). Each group has menu screens, and each is assigned a number for individual custom functions. Use the Quick Control dial (
). Each group has menu screens, and each is assigned a number for individual custom functions. Use the Quick Control dial ( ![]() ) to navigate the menu screen within each group. A fourth option on the main Custom Functions menu (
) to navigate the menu screen within each group. A fourth option on the main Custom Functions menu ( ![]() ) contains a single option to clear Custom Functions.
) contains a single option to clear Custom Functions.
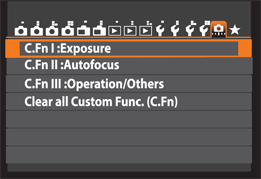
6.1 The main screen of the Custom Functions menu has three groups, each with its own set of menus.
The three groups that comprise the Custom Functions menu ( ![]() ) and their menu options break down as shown in Tables 6.1, 6.2, and 6.3.
) and their menu options break down as shown in Tables 6.1, 6.2, and 6.3.
Table 6.1 C.Fn I: Exposure
|
Option number |
Function name |
|
1 |
Exposure level increments |
|
2 |
ISO speed setting increments |
|
3 |
Bracketing auto cancel* |
|
4 |
Bracketing sequence* |
|
5 |
Number of bracketed shots* |
|
6 |
Safety shift* |
Functions marked with an asterisk (*) are not available in the Live View (![]() ) or Movie shooting (
) or Movie shooting (![]() ) modes.
) modes.
Table 6.2 C.Fn II: Autofocus
|
Option number |
Function name |
|
1 |
Tracking sensitivity* |
|
2 |
Accel./decel. Tracking* |
|
3 |
AI Servo 1st image priority* |
|
4 |
AI Servo 2nd image priority* |
|
5 |
AF-assist beam firing |
|
6 |
Lens drive when AF impossible |
|
7 |
Orientation AF point |
|
8 |
Superimposed display |
|
9 |
AF Microadjustment |
Functions marked with an asterisk (*) are not available in the Live View (![]() ) or Movie shooting (
) or Movie shooting (![]() ) modes.
) modes.
Table 6.3 C.Fn III: Operation/Others
|
Option number |
Function name |
|
1 |
Dial direction during Tv/Av |
|
2 |
Focusing screen |
|
3 |
Multi-function lock |
|
4 |
Warnings ! in viewfinder |
|
5 |
Custom Controls |
At the bottom of the Custom Function main screen, you find the Clear all Custom Func. (C.Fn) option. Use it to clear all Custom Functions except the Focusing screen options you selected in C.Fn III-2, and Custom Control settings in C.Fn III-5. These settings are retained.
Custom Function Menus
This section describes each Custom Function and the options that you can set. As I describe each one, consider how you can use them in specific shooting situations. If you choose Custom Functions as they pertain to your shooting, you will be surprised by how much of a difference they make in everyday shooting.
C.Fn I: Exposure
The Exposure Custom Functions are described here, followed by the options that you can choose for each function.
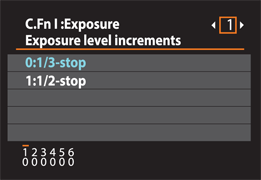
6.2 The first screen of six in C.Fn I: Exposure. This menu governs Exposure level increment settings.
Exposure level increments
With this function, you can set the exposure increment that is used for shutter speed, aperture, exposure compensation, and Auto Exposure Bracketing (AEB) changes. The increment you choose is displayed in the viewfinder and on the LCD panel as either one tick mark or a double set of them at the bottom of the Exposure Level Indicator.
The Exposure level increment options are as follows:
• 1/3 stop. By default, the 6D uses 1/3 stop as the exposure level increment for changes in shutter speed, aperture, exposure compensation, and AEB for very fine exposure changes. For day-to-day shooting, this is a good option to use. If you choose this option, a single tick mark is displayed under the Exposure Level Indicator in the viewfinder and on the LCD panel to show the exposure change.
• 1/2 stop. This option sets 1/2 stop as the exposure level increment changes. This option provides a larger exposure change, and would be useful if you bracket images to composite later in an image-editing program. If you choose this option, double tick marks are displayed under the Exposure Level Indicator in the viewfinder and on the LCD panel.
ISO speed setting increments
With this function, you can set the level of change that is used when you change the ISO sensitivity setting. For most shooting, selecting the 1/3-stop option is a good choice. If you are increasing the ISO incrementally to get to a fast-enough camera handholding speed, the 1/3-stop option gets you there and keeps the ISO as low as possible. With the 1-stop option, you get there faster, but you may end up with an ISO setting that is higher than it needs to be.
ISO speed setting increment options are as follows:
• 1/3 stop. This is the default increment. With this option set, the ISO speeds are Auto, 100, 125, 160, 200, 250, 320, 400, 500, and so on.
• 1 stop. This option sets 1 f-stop as the ISO adjustment-level increment. With this option set, the ISO speeds are Auto, 100, 200, 400, 800, 1600, and so on.
Bracketing auto cancel
With this function, you can choose to have the camera cancel AEB and White Balance Bracketing (WB-BKT) settings completely or temporarily when you turn off the camera, use the flash, or switch to Movie mode ( ![]() ). Very often, AEB and WB-BKT are specific to a scene. Therefore, these are not settings that you want to retain. It is also easy to forget that you have set one of the bracketing options, and you end up shooting with bracketing inadvertently. Unless you shoot often with AEB and WB-BKT, I recommend using the default Enable (ON) option.
). Very often, AEB and WB-BKT are specific to a scene. Therefore, these are not settings that you want to retain. It is also easy to forget that you have set one of the bracketing options, and you end up shooting with bracketing inadvertently. Unless you shoot often with AEB and WB-BKT, I recommend using the default Enable (ON) option.
Bracketing auto cancel options are as follows:
• Enable (ON). Both AEB and WB-BKT are permanently cancelled when you turn the power switch to Off, use a flash, or switch to Movie mode ( ![]() ).
).
• Disable (OFF). Both AEB and WB-BKT settings are retained even after you turn off the camera. If you use a flash or switch to Movie mode ( ![]() ), bracketing is temporarily cancelled, but the camera remembers the AEB and WB-BKT ranges.
), bracketing is temporarily cancelled, but the camera remembers the AEB and WB-BKT ranges.
Bracketing sequence
With this function, you can change the sequence of both exposure-bracketed and white-balance bracketed images. White Balance Bracketing depends on how you set the Blue/Amber or Magenta/Green direction. For example, with a Magenta/Green direction, the under (–) is the Magenta bias and the over (+) is the Green bias.
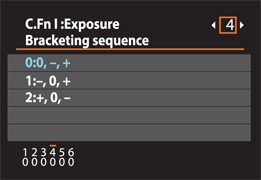
6.3 The Bracketing sequence screen.
White Balance Bracketing is detailed in Chapter 5.
Bracketing sequence options are as follows:
• 0 – +: 0, –, +. Zero is standard exposure/standard white balance. A minus sign (–) is decreased exposure/less blue or less magenta white-balance bias. A plus sign (+) is increased exposure/more amber and more green white-balance bias.
• – 0 +: –, 0, +. The minus symbol (–) means decreased exposure/less blue or less magenta white-balance bias. Zero is standard exposure/standard white balance. A plus sign (+) is increased exposure/more amber and more green white-balance bias.
• + 0 –: +, 0, –. A plus sign (+) means increased exposure/more amber and more green white-balance bias. Zero is standard exposure/standard white balance. A minus sign (–) is decreased exposure/less blue or less magenta white-balance bias.
Number of bracketed shots
With this function, you can change the number of bracketed shots that the camera makes. The traditional number is three shots: a standard exposure or white balance, and then an underexposure and overexposure or color bias. However, now you can make three, two, five, or seven shots. If you use High Dynamic Range (HDR) shooting often, the five- and seven-shot options are handy for getting a good range of shadow, standard, and highlight exposures. Each of the options produces the number of images indicated by the option number: 3, 2, 5, or 7.
If you set the bracketing sequence Custom Function to 0, –, + option and choose to make three shots, then the shot sequence is standard, under, and over. However, if you choose to bracket three, two, five, or seven images, then the exposures or color-biased images are made in 1-stop increments, as shown in Table 6.4.

Safety shift
With this Custom Function the 6D automatically adjusts the exposure settings if there is a sudden shift in lighting that would cause an improper exposure at the current exposure settings. With the first option, Safety shift adjusts the aperture in Shutter-priority AE ( ![]() ) and the shutter speed in Aperture-priority AE (
) and the shutter speed in Aperture-priority AE ( ![]() ) shooting modes to get a proper exposure. With the second option, Safety shift adjusts the ISO in Program AE (
) shooting modes to get a proper exposure. With the second option, Safety shift adjusts the ISO in Program AE ( ![]() ), Shutter-priority AE (
), Shutter-priority AE ( ![]() ), and Aperture-priority AE (
), and Aperture-priority AE ( ![]() ) modes. Safety shift isn’t used in Manual (
) modes. Safety shift isn’t used in Manual ( ![]() ) mode.
) mode.
Safety shift can be helpful in scenes with sudden changes in lighting, such as stage and theater venues where performers move from bright spotlit areas to shadows. This function is equally helpful outdoors. Say that you’re photographing a deer at 1/1000 second with the aperture set to f/22, which is the minimum aperture for the lens. Then, the deer moves into bright sunlight. The change in light calls for closing down another f-stop, but you’ve run out of apertures. This is where Safety shift steps in to set a faster shutter speed to get a correct exposure. Alternatively, say that you’ve set a fast shutter speed, and the light dims so that even the lens’s maximum aperture won’t provide an accurate exposure. Safety shift sets a slower shutter speed instead of producing an underexposed image.
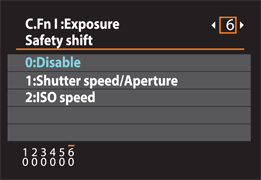
6.4 The Safety shift screen.
Safety shift options are as follows:
• 0: Disable. The exposure you set is maintained regardless of light changes.
• 1: Shutter speed/Aperture. In Shutter-priority AE ( ![]() ) and Aperture-priority AE (
) and Aperture-priority AE ( ![]() ) shooting modes, the shutter speed or aperture automatically shifts if the subject brightness suddenly changes.
) shooting modes, the shutter speed or aperture automatically shifts if the subject brightness suddenly changes.
• 2: ISO speed. This option adds Program AE ( ![]() ) shooting mode to Shutter-priority AE (
) shooting mode to Shutter-priority AE ( ![]() ) and Aperture-priority AE (
) and Aperture-priority AE ( ![]() ) shooting modes, and it changes the ISO setting to get a correct exposure if the scene brightness changes. If you change the ISO speed range manually or set the minimum shutter speed on the Shooting menu 2 tab (
) shooting modes, and it changes the ISO setting to get a correct exposure if the scene brightness changes. If you change the ISO speed range manually or set the minimum shutter speed on the Shooting menu 2 tab ( ![]() ), Safety shift overrides your settings if necessary. The minimum and maximum ISO settings used are the Auto ISO Range you set on the Shooting menu 2 tab (
), Safety shift overrides your settings if necessary. The minimum and maximum ISO settings used are the Auto ISO Range you set on the Shooting menu 2 tab ( ![]() ). If the shutter speed, aperture, or ISO is set, Safety shift is used even if you use a flash.
). If the shutter speed, aperture, or ISO is set, Safety shift is used even if you use a flash.
C.Fn II: Autofocus/Drive
This group of functions enables you to control various lens and camera autofocusing tasks. This is also where you can set mirror lockup.
AI Servo Tracking sensitivity
This setting determines how the system responds to either maintain focus on the original subject or switch focus to something or someone that suddenly enters the frame. This also affects the response if the original subject leaves the AF points. The adjustment either responds quickly and focuses on the new subject, or it delays slightly so you can find the subject again.
The scale ranges from Locked on to Responsive. With a –1 (Locked on) setting, there is a noticeable delay before the camera focuses on the new object. A –2 setting extends the delay. The responsive +1 and +2 settings determine the speed with which the camera focuses on a new subject, with +2 being faster than +1. A +2 setting can cause the camera to focus on the wrong subject.
The setting you choose depends on the subject you’re shooting. If you are following a star soccer player across the field, a –1 setting is a good choice. Conversely, if you’re shooting the finish line of a track meet, a +1 setting makes the camera focus on each athlete individually; it switches subjects as the runners enter the frame, one after another.
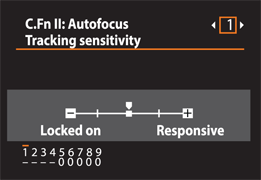
6.5 The Autofocus Tracking sensitivity screen.
Accel./desel. Tracking
With the acceleration/deceleration tracking parameter, you can adjust how the autofocus system responds to subjects that start, stop, and change direction erratically and unpredictably. AI Servo AF mode is designed to predict the subject’s movement based on the subject’s speed and direction.
This option lets you fine-tune the camera’s response based on the subject’s motion. A plus setting tells the system to expect erratic direction shifts and sudden starts and stops; for example, the motion of a soccer player. A +1 or +2 setting can help prevent back and front focusing for subjects coming toward the camera at varying speeds. A +2 setting does a better job of tracking subjects with significant changes in speed. Set this parameter to zero to track subjects that begin moving and are likely to continue moving in the same direction and at a predictable speed; for example, cyclists or long-distance runners on a straightaway. A zero setting has the least response to subject speed changes.
AI Servo 1st image priority
For the first image in a series, you can choose from the following:
• Release priority. This means the shutter fires regardless of whether the subject is in focus.
• Equal priority. This means both focus and shutter firing have the same weight or priority. The camera delays a bit so focus can be established before the shutter fires. This seems like an ambiguous setting that gains nothing except a slight delay for the camera to find focus with no guarantee that you’ll get sharp focus.
• Focus priority. This means that the shutter won’t fire unless focus is established. The delay in shutter firing is just enough to verify that the shot will be in sharp focus. This has been the default on EOS cameras to this point, and is the setting I choose most often when shooting portraits. When I’m shooting weddings, I switch the 6D into Release priority ( ![]() ).
).
The option you choose depends entirely on the situation and your preference. If you’re shooting breaking news, and must get the shot no matter what, then choose the Release priority setting ( ![]() ). If you’re the kind of photographer who trashes a shot that doesn’t have sharp focus on the subject, then definitely use the Focus priority setting (
). If you’re the kind of photographer who trashes a shot that doesn’t have sharp focus on the subject, then definitely use the Focus priority setting ( ![]() ).
).
AI Servo 2nd image priority
For the second and ongoing images in a burst, you can choose from the following:
• Shooting speed priority. This means the shutter fires regardless of whether the subject is in focus for every frame in the series.
• Equal priority. This provides a compromise that maintains the shooting speed while still providing a bit of time to focus.
• Focus priority. This ensures that all frames in the series are sharply focused, even if doing so slows down the overall frame rate of shooting.
These options mirror the ones for AI Servo 1st image priority. Again, you have to weigh your or your client’s priorities for in-focus shots versus getting a shot of some kind, regardless of whether it’s in focus.
Make your choices for these two options in tandem. For example, if you choose Focus priority for both options, you’re telling the camera to focus for the first shot and track the subject maintaining focus for subsequent shots, even at the cost of a shooting speed slower than 4.5 fps (frames per second).
Before I chose Release priority and Speed priority, I tested the camera at the default settings while shooting action to see what percentage of images were in focus. If the percentage is low for you, I would not combine the Release priority and Speed priority settings, but I would opt for Focus priority for one or both of the options. Of course, if you’re shooting with a narrow aperture or you’ve prefocused on action that is contained within a specific area, you have latitude to bias the settings toward shooting speed.
AF-assist beam firing
With this option, you can control whether the autofocus (AF)-assist light on an accessory EX Speedlite fires to help the camera establish focus in low-light scenes. The AF-assist light fires a quick series of small flashes that are very helpful in speeding up focus and ensuring sharp focus. The Speedlite’s Custom Function for AF-assist beam firing takes priority over the setting you choose here so keep the two in sync.
Here are the options:
• On: Enable. The Speedlite’s AF-assist light is used to establish focus. This is useful in low-light scenes and when the subject contrast, texture, and detail are low. The flash also fires unless you have the External Speedlite control on the Shooting menu 2 tab ( ![]() ) set to Disable.
) set to Disable.
• Off: Disable. The AF-assist beam isn’t used.
• IR: IR AF-assist beam only. If your Speedlite has an infrared AF-assist beam, then only that beam is used if you choose this option. The advantage is that the IR beam is used instead of the Speedlite firing a series of small flashes.
Lens drive when AF impossible
This is a handy function to explore if you often shoot in scenes where the lens simply cannot focus. You have likely been in situations where the lens seems to be seeking focus for an incredibly long time, and it goes far out of focus range during this attempt, particularly with telephoto and super-telephoto lenses. Setting this function to Option 1 stops the lens from trying to find focus and going far out of focus range.
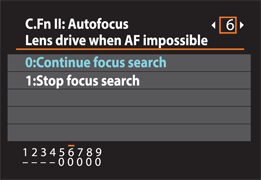
6.6 The Lens drive when AF impossible screen.
The Lens drive when AF impossible options are as follows:
• Option 0: Continue focus search. The lens drive continues to function as the camera seeks focus.
• Option 1: Stop focus search. The lens drive stops going into extreme defocus range.
Orientation linked AF point
This is one of the coolest and most useful new Custom Functions related to focusing. You can set a specific AF point for the camera to use when it is in horizontal orientation and another when the camera is in vertical orientation, or set the same AF point for both orientations.
Therefore, if you’re shooting a wedding ceremony in landscape orientation, and then turn the camera to portrait orientation to shoot a close-in portrait of the bride and groom, the AF point is automatically selected when you turn the camera vertically. Also, when you return to a horizontal orientation, the AF point that you preset is automatically selected. Orientation linked AF point options are as follows:
• Option 0: Same for both vertical/horizontal. In this default setting, the camera maintains the same AF point regardless of camera orientation.
• Option 1: Select different AF points. With this option, you can set up different AF selection modes and AF points for horizontal and vertical camera orientation. The camera recognizes these orientations:
• Horizontal
• Vertical with the camera grip at the top
• Vertical with the camera grip at the bottom
To use Option 1, you have to set up the AF point for each of the three orientations in the order listed previously and then choose Option 1.
Superimposed display
By default, the AF point(s) in the viewfinder turn red to indicate focus has been achieved. This setting allows you to disable this function if it’s not your preference. When set to disable, AF points still turn red when selected.
Superimposed display options are as follows:
• Option 0: On. AF point(s) turn red to indicate focus has been achieved.
• Option 1: OFF. AF point(s) don’t turn red when focus has been achieved.
AF Microadjustment
Autofocus lens adjustment is a relatively new feature for EOS cameras. In years past, you had to send in your camera and lens to Canon, where technicians would make the adjustments to ensure the lens and camera combination focused precisely with no front or back focusing. Now, you can make the adjustments yourself. Certainly, the do-it-yourself approach saves time and money, but it’s not necessarily easy or foolproof.
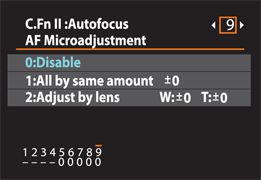
6.7 The AF Microadjustement screen.
Making microadjustments entails taking a picture, preferably of a calibration target that is specifically designed for lens alignment. Next, you evaluate the picture on the computer to identify focus misalignment such as back and front focusing. If there is a focusing misalignment, you can adjust the lens on the camera. Then you repeat the process until the focus is precisely where it should be. Typically, you adjust individual lenses. However, Canon also gives you the option of making a single global adjustment that is applied to all the lenses used on the camera.
Front focusing and back focusing are terms used to describe instances when a lens mistakenly focuses in front or back of the intended area of focus.
I recommend you buy a calibration target designed specifically for lens adjustment. I use LensAlign from Michael Tapes Design (http://michaeltapesdesign.com) and have had good success with it. The Michael Tapes Design website also provides step-by-step instructions for making microadjustments to the focus.
Not all lenses need to be adjusted. Do the adjustment only if you see consistent back or front focusing on one or more lenses, or on all your lenses when shooting with the 6D.
Here are some things to know about microadjustment with the 6D:
• You can adjust and register adjustments for up to 40 lenses. This gives studios latitude to register all the company’s lenses on each 6D camera body. If you reach the 40-lens mark, you have to delete an existing lens before you can add another lens.
• If you have more than one copy of a lens, you can now adjust all the copies. The copies are identified by the registration number that’s entered during the alignment process. There is an exception if the lens’s 10-digit registration number is displayed with an asterisk during the adjustment process, in those cases multiple copies of the same lens cannot be registered.
• Canon recommends making microadjustments at both the wide and telephoto ends of zoom lenses. If you adjust individual lenses, then once you adjust the wide and telephoto ends of a zoom lens, the intermediate focal length is adjusted automatically. However, if you choose to adjust all lenses by the same amount, then you cannot adjust for the short and long ends of zoom lenses.
• Canon recommends making the adjustment on location because subject and scene conditions, and the zoom position of the lens, can influence the adjustment. Practically speaking, it’s unlikely you will have time built into the schedule for an average shoot to adjust each lens in the camera bag. So be aware that even if you’ve adjusted the lenses you’re using, the scene and subject conditions can cause previous focus adjustments to be less than perfect.
• You can make adjustments for a lens and lens extender combination.
• Don’t attempt to make microadjustments in FlexiZone – Single (![]() ) and Face Detection Live (
) and Face Detection Live (![]() ) focusing modes when you’re using Live View (
) focusing modes when you’re using Live View (![]() ). In addition, the adjustments you make are used only in Quick (
). In addition, the adjustments you make are used only in Quick ( ![]() ) focusing mode.
) focusing mode.
• Use Large JPEG image quality rather than lower-quality JPEGs or RAW.
• Use a tripod to ensure the camera is stabilized when photographing the calibration target.
• If you lose your nerve while making adjustments, or find that focus is worse after an adjustment than before, just press the Erase button (![]() ) when you see a Clear all option at the bottom of the screen. This clears both global and individual lens adjustments.
) when you see a Clear all option at the bottom of the screen. This clears both global and individual lens adjustments.
• The lens adjustments are not cleared if you choose to clear all the camera settings on the Setup menu 4 tab (![]() ). The setting will be set to Disable.
). The setting will be set to Disable.
On the adjustments screens, you can make adjustments 20 steps in two directions, by either shifting the point of sharp focus in front of the standard (0) mark by moving it to the negative side of the scale, or shifting it to the rear of the standard focus by moving it to the positive side of the scale.
Here’s how to set the same AF Microadjustment for all lenses. Be sure the Mode dial is set to one of the Creative Zone shooting modes rather than one of the Basic Zone shooting modes when you begin making the camera adjustments.
Follow these steps to make AF Microadjustments for lenses:
1. On the Custom Functions menu tab (![]() ), highlight C.Fn II, and then press the Set button (
), highlight C.Fn II, and then press the Set button (![]() ). Use the Quick Control dial (
). Use the Quick Control dial ( ![]() ) to scroll to C.Fn II-9: AF Microadjustment. The AF Microadjustment screen appears.
) to scroll to C.Fn II-9: AF Microadjustment. The AF Microadjustment screen appears.
2. Select All by same amount, and then press the Quick Control button (![]() ). The AF Microadjustment/All by same amount screen appears.
). The AF Microadjustment/All by same amount screen appears.
3. Turn the Quick Control dial (![]() ) to the left to move the point of focus in front of the standard (0) focus, or to the right to shift the focus behind the standard setting, and then press the Set button (
) to the left to move the point of focus in front of the standard (0) focus, or to the right to shift the focus behind the standard setting, and then press the Set button (![]() ).
).
Different photographers use different steps to adjust a single individual lens. Before you begin, have the registration number for the lens handy — you can find it on the side of the lens box. I follow these steps to calibrate a lens:
1. In Aperture-priority AE (![]() ) or Manual (
) or Manual (![]() ) shooting mode, set up the calibration target so that the target and image plane are parallel. Use a tripod to ensure that the camera is stabilized when photographing the target. I try to keep the camera-to-target distance at approximately 4 feet.
) shooting mode, set up the calibration target so that the target and image plane are parallel. Use a tripod to ensure that the camera is stabilized when photographing the target. I try to keep the camera-to-target distance at approximately 4 feet.
2. Set the white balance for the light, or set a custom white balance.
3. Set the AF to Single-point AF and manually select the center AF point. Focus on the calibration target.
4. If you’re using a zoom lens that will focus at a distance of 4 feet, zoom to the telephoto end of the lens and take a picture of the calibration target. Then, zoom to the wide focal length and take another picture. If you’re not using a zoom lens, switch lenses or move back to a distance where focus is possible.
5. Download the image(s) and evaluate the point of sharp focus. You are looking to see if the focus is in front of or behind where you set the focus. If there is a focus misalignment, continue to the next steps.
6. On the Custom Functions menu tab (![]() ), highlight C.Fn II, and then press the Set button (
), highlight C.Fn II, and then press the Set button (![]() ). Use the Quick Control dial (
). Use the Quick Control dial ( ![]() ) to scroll to C.Fn II-9: AF Microadjustment. The AF Microadjustment screen appears.
) to scroll to C.Fn II-9: AF Microadjustment. The AF Microadjustment screen appears.
7. Select Adjust by lens, and then press the Quick Control button (![]() ). The AF Microadjustment screen appears with the lens name.
). The AF Microadjustment screen appears with the lens name.
8. Press the Info button (![]() ). The Review/edit lens information screen appears.
). The Review/edit lens information screen appears.
9. Press the Set button (![]() ) to activate the first digit control, and then turn the Quick Control dial (
) to activate the first digit control, and then turn the Quick Control dial (![]() ) to enter the first digit in the 10-digit lens number.
) to enter the first digit in the 10-digit lens number.
10. Press the Set button (![]() ). Repeat Step 9 until you’ve entered all ten digits.
). Repeat Step 9 until you’ve entered all ten digits.
11. Choose OK, and then press the Set button (![]() ). The AF Microadjustment screen for this lens appears.
). The AF Microadjustment screen for this lens appears.
12. Turn the Quick Control dial (![]() ) to the left to move the point of focus in front of the standard (0) focus, or to the right to shift the focus behind the standard setting, and then press the Set button (
) to the left to move the point of focus in front of the standard (0) focus, or to the right to shift the focus behind the standard setting, and then press the Set button (![]() ).
).
13. Choose OK, and then press the Set button (![]() ).
).
14. Take another picture of the calibration target with the adjusted settings, and then evaluate the accuracy of the point of focus. If necessary, repeat the process until the focus is accurate.
See Chapter 4 for additional information about autofocus accuracy and performance.
C.Fn III: Operation/Others
This group of Custom Functions gives you control over many of the camera’s dials and controls, as well as some of its display settings. The Custom Controls option gives you the most options when you’re reassigning functions to ten of the camera controls.
Dial direction during Tv/Av
If the direction of the camera dials for changing the aperture and shutter speed seem backward to you, use this Custom Function to change the direction in the Shutter-priority AE ( ![]() ) and Aperture-priority AE (
) and Aperture-priority AE ( ![]() ) modes.
) modes.
Dial direction during Tv/Av options are as follows:
• Normal (![]() ). The default dial directions are used. Turning the Main dial (
). The default dial directions are used. Turning the Main dial ( ![]() ) to the right in Aperture-priority AE shooting mode (
) to the right in Aperture-priority AE shooting mode ( ![]() ) results in a smaller aperture.
) results in a smaller aperture.
• Reverse direction (![]() ). Turning the Main dial (
). Turning the Main dial ( ![]() ) to the right in Aperture-priority AE shooting mode (
) to the right in Aperture-priority AE shooting mode ( ![]() ) makes the aperture larger. In Shutter-priority AE shooting mode (
) makes the aperture larger. In Shutter-priority AE shooting mode ( ![]() ), turning the Main dial (
), turning the Main dial ( ![]() ) to the right makes the shutter speed slower instead of faster. In Manual shooting mode (
) to the right makes the shutter speed slower instead of faster. In Manual shooting mode ( ![]() ), both the Main dial (
), both the Main dial ( ![]() ) and the Quick Control dial (
) and the Quick Control dial ( ![]() ) are reversed. In the remaining exposure modes, only the direction of the Main dial (
) are reversed. In the remaining exposure modes, only the direction of the Main dial ( ![]() ) is reversed, but in Manual shooting mode (
) is reversed, but in Manual shooting mode ( ![]() ), the Quick Control dial (
), the Quick Control dial ( ![]() ) direction is not reversed.
) direction is not reversed.
Focusing Screen
Use this Custom Function to select the corresponding focusing screen option when using one of the optional focusing screens available for the 6D. Choose from the following:
• 0:Eg-A II: Standard Precision Matte. Viewfinder brightness and ease of focusing manually are provided with this standard focusing screen.
• 1:Eg-D: Precision Matte with Grid. The addition of grid lines on this optional focusing screen helps when composing images where horizontal and/or vertical lines are important, such as Architectural and product photography.
• 2:Eg-S: Super Precision Matte. This focusing screen provides a higher degree of accuracy for photographers who focus manually often.
Multi function lock
With this Custom Function, you can prevent changes to the exposure and other camera settings by choosing to lock the Main dial ( ![]() ), the Quick Control dial (
), the Quick Control dial ( ![]() ), and/or the Multi-controller (
), and/or the Multi-controller ( ![]() ) when the Multi-function lock switch (
) when the Multi-function lock switch ( ![]() ) is set to the far-right position. This helps prevent changes from occurring when other people handle the camera and when you move the camera in and out of the gear bag.
) is set to the far-right position. This helps prevent changes from occurring when other people handle the camera and when you move the camera in and out of the gear bag.
As a reminder, the camera displays an L in the viewfinder, on the LCD panel, and on the camera settings screen when you try to use a locked control. If you’ve locked the Quick Control dial ( ![]() ), you can use the touch pad to make selections while recording a movie.
), you can use the touch pad to make selections while recording a movie.
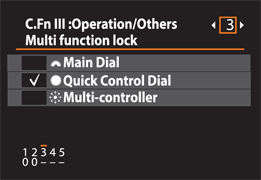
6.8 The Multi function lock screen, where you can choose to lock one or all of the controls shown.
On this screen, just turn the Quick Control dial ( ![]() ) to select a dial or control, and then press the Set button (
) to select a dial or control, and then press the Set button ( ![]() ) to add a check mark, indicating that the control will be locked when the Multi-function lock switch (
) to add a check mark, indicating that the control will be locked when the Multi-function lock switch ( ![]() ) is set. Even when the Multi-function lock switch (
) is set. Even when the Multi-function lock switch ( ![]() ) is in the locked position, you can use the controls you chose to lock to navigate the camera menus and the Quick Control screen. The Multi-function lock switch options include Main dial (
) is in the locked position, you can use the controls you chose to lock to navigate the camera menus and the Quick Control screen. The Multi-function lock switch options include Main dial ( ![]() ), Quick Control dial (
), Quick Control dial ( ![]() ), and Multi-controller (
), and Multi-controller ( ![]() ).
).
Even if you don’t modify this Custom Function, setting the Multi-function lock switch ( ![]() ) to the far right prevents anyone from using the Quick Control dial (
) to the far right prevents anyone from using the Quick Control dial ( ![]() ) to make exposure changes.
) to make exposure changes.
Warnings in viewfinder
You will set some settings on the camera only for scene- or subject-specific circumstances. Because it is easy to forget that you chose those settings, you can have the camera remind you that they are in effect by displaying a Warning icon ( ![]() ) at the bottom-right of the viewfinder. Canon chose the most common settings, and you can have a Warning icon (
) at the bottom-right of the viewfinder. Canon chose the most common settings, and you can have a Warning icon ( ![]() ) displayed for one or all of the items.
) displayed for one or all of the items.
To choose an item, turn the Quick Control dial ( ![]() ) to highlight an item, and then press the Set button (
) to highlight an item, and then press the Set button ( ![]() ) to add a check mark or remove an existing check mark. Then select OK and press the Set button (
) to add a check mark or remove an existing check mark. Then select OK and press the Set button ( ![]() ). Items with a check mark will display the Warning icon (
). Items with a check mark will display the Warning icon ( ![]() ) in the viewfinder.
) in the viewfinder.
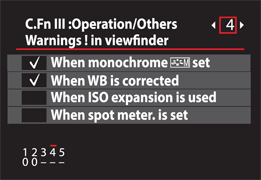
6.9 When the Warnings in viewfinder options are set this way, the viewfinder displays a warning when you use either of the selected features.
Warnings in Viewfinder options are as follows:
• When Monochrome (![]() ) is set. As mentioned in Chapter 5, you cannot convert a monochrome image back to color. Therefore, with that safety net gone, it’s advisable to select this setting.
) is set. As mentioned in Chapter 5, you cannot convert a monochrome image back to color. Therefore, with that safety net gone, it’s advisable to select this setting.
• When (![]() ) is corrected. This reminds you that White Balance Correction is set or that a combination of White Balance Correction and bracketing is set. No warning is displayed for White Balance Bracketing alone.
) is corrected. This reminds you that White Balance Correction is set or that a combination of White Balance Correction and bracketing is set. No warning is displayed for White Balance Bracketing alone.
• When ISO expansion is used. This reminds you if you’re using ISO 50 (L), ISO 51200 (H1), or ISO 102400 (H2). You can set these ISO sensitivity settings manually.
• When spot meter is set. If you’ve switched to Spot metering mode for select images, this reminds you to switch back to Evaluative or another metering mode as necessary.
Custom Controls
If you’ve ever wanted to customize virtually everything on the camera to your liking, this Custom Function is a wish come true. The Custom Controls screen gives you a diagram of the camera where you can change the function of many buttons on the camera.
If you are a dedicated back-button focus photographer, use this Custom Function to set up back-button focus. Back-button focus decouples the autofocus activation from the shutter release. To set up back-button focus, set the shutter button or the AE Lock button ( ![]() ) to Metering start. Then set the AF start button (
) to Metering start. Then set the AF start button ( ![]() ) or AE Lock button (
) or AE Lock button ( ![]() ) to function as Metering and AF start. Also, the Multi-controller (
) to function as Metering and AF start. Also, the Multi-controller ( ![]() ) has no function during shooting, but you can put it to work during shooting by programming it to switch to the registered AF point or the center AF point when you press it.
) has no function during shooting, but you can put it to work during shooting by programming it to switch to the registered AF point or the center AF point when you press it.
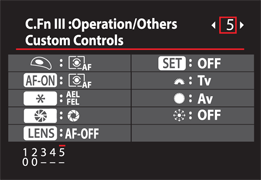
6.10 The Custom Controls screen.
For all step-by-step tasks in this chapter, be sure that the Mode dial is set to any Creative Zone shooting mode.
Because this screen is different from the majority of the other Custom Function screens, I’ve provided the steps for using the Custom Controls screen:
1. On the Custom Functions menu tab (![]() ), highlight C.Fn III: Operations/Others, and then press the Set button (
), highlight C.Fn III: Operations/Others, and then press the Set button (![]() ). The Operation/Others screen is displayed. Use the Quick Control dial (
). The Operation/Others screen is displayed. Use the Quick Control dial ( ![]() ) to select option number 5, Custom Controls.
) to select option number 5, Custom Controls.
2. Press the Set button (![]() ) to enter the Custom Controls menu, use the Quick Control dial (
) to enter the Custom Controls menu, use the Quick Control dial (![]() ) to highlight the name of the button or dial you want to customize, and then press the Set button (
) to highlight the name of the button or dial you want to customize, and then press the Set button (![]() ). A screen appears with the functions that you can assign to the button or dial.
). A screen appears with the functions that you can assign to the button or dial.
3. Turn the Quick Control dial (![]() ) to select the function you want to assign to the button or dial, and then press the Set button (
) to select the function you want to assign to the button or dial, and then press the Set button (![]() ).
).
In some cases, a submenu of additional options is available. This is indicated by the appearance of the Info button ( ![]() ) on the settings menu. If the Info button (
) on the settings menu. If the Info button ( ![]() ) appears, follow these steps:
) appears, follow these steps:
1. Press the Info button (![]() ) to display a second screen with options that you can set.
) to display a second screen with options that you can set.
2. On the second screen, select the options you want, and then press the Set button (![]() ).
).
3. Press the Set button (![]() ) to exit the screen and continue setting additional Custom Controls.
) to exit the screen and continue setting additional Custom Controls.
If you get confused and want a do-over, press the Menu button ( ![]() ) to get back to the main Custom Controls screen, and then press the Erase button (
) to get back to the main Custom Controls screen, and then press the Erase button ( ![]() ) to clear the Custom Controls you’ve set.
) to clear the Custom Controls you’ve set.
Following are the changes you can make to buttons and dials on the camera. The 6D instruction manual provides more details and a chart that is useful for reassigning button functions.
In the following list, the first item is the camera control (and action, if applicable), and the second item after the colon is the default setting of that control, which is the setting that you can change:
• Shutter button half-press: Metering and AF start (![]() ). Instead of metering and focusing when you half-press the shutter button, you can assign a half-press of the shutter button to meter (
). Instead of metering and focusing when you half-press the shutter button, you can assign a half-press of the shutter button to meter ( ![]() ) only, or to set AE Lock (
) only, or to set AE Lock ( ![]() ).
).
• AF-On button (![]() ): Metering and AF start (
): Metering and AF start (![]() ). Instead of metering and focusing when you press the AF-On button (
). Instead of metering and focusing when you press the AF-On button ( ![]() ), you assign the AF-On button (
), you assign the AF-On button ( ![]() ) functionality to AE (
) functionality to AE ( ![]() )/FE Lock (
)/FE Lock ( ![]() ), AF-Off (
), AF-Off ( ![]() ) (stops focus when the button is held down), AE Lock (hold) (
) (stops focus when the button is held down), AE Lock (hold) ( ![]() ), AE Lock (
), AE Lock ( ![]() ), Flash Exposure Lock (FEL) (
), Flash Exposure Lock (FEL) ( ![]() ), or Off (no function is assigned to the button). If you choose Metering and AF start (
), or Off (no function is assigned to the button). If you choose Metering and AF start ( ![]() ), press the Info button (
), press the Info button ( ![]() ) to set the AF start point to either a manually selected AF point or the registered AF point.
) to set the AF start point to either a manually selected AF point or the registered AF point.
• AE Lock button: AE Lock (![]() ). Instead of setting AE Lock (
). Instead of setting AE Lock ( ![]() ) when you press the AE Lock button (
) when you press the AE Lock button ( ![]() ), you can assign the AE Lock button (
), you can assign the AE Lock button ( ![]() ) functionality to Metering and AF start (
) functionality to Metering and AF start ( ![]() ), AF Stop (
), AF Stop ( ![]() ), AE Lock (hold) (
), AE Lock (hold) ( ![]() ), AE Lock (
), AE Lock ( ![]() ), FEL (
), FEL ( ![]() ), or choose Off to assign no function to the button.
), or choose Off to assign no function to the button.
With AE Lock (hold) ( ![]() ), the locked exposure is maintained until you press the assigned button to cancel it. This way you can use the metered exposure for multiple shots without worrying about it timing out. Just remember to cancel it when you finish.
), the locked exposure is maintained until you press the assigned button to cancel it. This way you can use the metered exposure for multiple shots without worrying about it timing out. Just remember to cancel it when you finish.
• Depth-of-field preview button: Depth-of-field preview (![]() ). Instead of previewing the depth of field (DOF) when pressing the Depth-of-field preview button (
). Instead of previewing the depth of field (DOF) when pressing the Depth-of-field preview button ( ![]() ), you can assign this button to AF-Off (
), you can assign this button to AF-Off ( ![]() ), AE Lock (
), AE Lock ( ![]() ), One Shot/AI Servo (
), One Shot/AI Servo ( ![]() ) switching, IS (Image Stabilization) start (
) switching, IS (Image Stabilization) start ( ![]() ), VF (viewfinder) electronic level (
), VF (viewfinder) electronic level ( ![]() ), AE Lock (hold) (
), AE Lock (hold) ( ![]() ), FEL (
), FEL ( ![]() ), or Off. If you choose to switch to a registered autofocus function, press the Info button (
), or Off. If you choose to switch to a registered autofocus function, press the Info button ( ![]() ) to register one of the following AF functions: Tracking sensitivity, Accel./decel. tracking, AF point auto switching, Al Servo 1st image priority (you can set the timing priority for shutter release or focus for the first image in AI Servo AF mode), or Al Servo 2nd image priority.
) to register one of the following AF functions: Tracking sensitivity, Accel./decel. tracking, AF point auto switching, Al Servo 1st image priority (you can set the timing priority for shutter release or focus for the first image in AI Servo AF mode), or Al Servo 2nd image priority.
If you assign One-shot/AI Servo ( ![]() ) functionality to a button, you can hold down the button to switch temporarily from the current autofocus mode to the other mode. The camera switches to the other autofocus mode only while the button is depressed.
) functionality to a button, you can hold down the button to switch temporarily from the current autofocus mode to the other mode. The camera switches to the other autofocus mode only while the button is depressed.
Each of the suboptions can be set separately. Just turn the Quick Control dial ( ![]() ) to select an item, turn the Main dial (
) to select an item, turn the Main dial ( ![]() ) to activate it, press the Set button (
) to activate it, press the Set button ( ![]() ), and then select the option or setting you want from the screen. Then press the Set button (
), and then select the option or setting you want from the screen. Then press the Set button ( ![]() ) to return to the previous screen.
) to return to the previous screen.
• Lens: AF-Off. The AF Stop button ( ![]() ) is found only on super-telephoto IS lenses. You can change the default AF-Off button (
) is found only on super-telephoto IS lenses. You can change the default AF-Off button ( ![]() ) functionality to Metering and AF Start (
) functionality to Metering and AF Start ( ![]() ), to AE lock (
), to AE lock ( ![]() )/FE lock (
)/FE lock ( ![]() ), to switch between One Shot/AI Servo (
), to switch between One Shot/AI Servo ( ![]() ), to start IS (
), to start IS ( ![]() ) (Image Stabilization on the lens), to AE Lock (hold) (
) (Image Stabilization on the lens), to AE Lock (hold) ( ![]() ), to AE Lock (
), to AE Lock ( ![]() ), and to FE Lock (FEL) (
), and to FE Lock (FEL) ( ![]() ).
).
• Set button (![]() ): Off. You can change the default Off setting so that pressing the Set button (
): Off. You can change the default Off setting so that pressing the Set button ( ![]() ) displays the Image quality (
) displays the Image quality ( ![]() ), Picture Style (
), Picture Style ( ![]() ), or the camera menu (
), or the camera menu ( ![]() ). Choose Set ISO speed (
). Choose Set ISO speed ( ![]() ) to configure the Set button (
) to configure the Set button ( ![]() ) so that pressing it and turning the Main dial (
) so that pressing it and turning the Main dial ( ![]() ) controls ISO speed. Select Flash exposure compensation (
) controls ISO speed. Select Flash exposure compensation ( ![]() ) to configure the Set button (
) to configure the Set button ( ![]() ) so that pressing it and turning the Main dial (
) so that pressing it and turning the Main dial ( ![]() ) controls flash exposure compensation.
) controls flash exposure compensation.
• Main dial (![]() ): Shutter speed setting in Manual mode (
): Shutter speed setting in Manual mode (![]() ). You can change the function of the Main dial (
). You can change the function of the Main dial ( ![]() ) in Manual mode (
) in Manual mode ( ![]() ) from setting the Shutter speed (
) from setting the Shutter speed ( ![]() ) to setting the Aperture (
) to setting the Aperture ( ![]() ).
).
• Quick Control dial (![]() ): Aperture setting in Manual mode (
): Aperture setting in Manual mode (![]() ). You can change the function of the Quick Control dial (
). You can change the function of the Quick Control dial ( ![]() ) in Manual mode (
) in Manual mode ( ![]() ) from setting the Aperture (
) from setting the Aperture ( ![]() ) to setting the Shutter speed (
) to setting the Shutter speed ( ![]() ).
).
• Multi-controller (![]() ): OFF. You can set the Multi-controller (
): OFF. You can set the Multi-controller ( ![]() ) so that it selects an AF point automatically; you don’t need to first press the AF-point selection button (
) so that it selects an AF point automatically; you don’t need to first press the AF-point selection button ( ![]() ). If you choose AF-point selection (
). If you choose AF-point selection ( ![]() ), press the Info button (
), press the Info button ( ![]() ) to switch either to the center or registered AF point.
) to switch either to the center or registered AF point.
Setting Custom Functions
After you review the functions and options, you might be able to immediately identify specific functions that are helpful during your daily shooting. Other functions may be suited for scene-specific shooting.
Whether you use them separately or together, Custom Functions can significantly enhance your experience with the 6D. To set a Custom Function, follow these steps:
1. Press the Menu button (![]() ) and use the Main dial (
) and use the Main dial (![]() ) to navigate to the Custom functions menu (
) to navigate to the Custom functions menu (![]() ). Use the Quick Control dial (
). Use the Quick Control dial ( ![]() ) to highlight one of the following Custom Function menu (
) to highlight one of the following Custom Function menu ( ![]() ) groups, C.Fn.I: Exposure, C.Fn.II: Autofocus, C.Fn.III: Operations/Others, or select the last option on the Custom Functions menu (
) groups, C.Fn.I: Exposure, C.Fn.II: Autofocus, C.Fn.III: Operations/Others, or select the last option on the Custom Functions menu ( ![]() ), Clear all Custom Func. (C.Fn) to clear any previously set custom functions.
), Clear all Custom Func. (C.Fn) to clear any previously set custom functions.
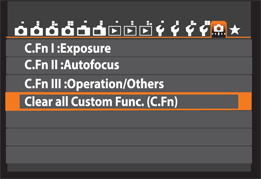
6.11 The Clear all Custom Func. option highlighted on the main C.Fn menu.
2. When the Custom Function group you want is highlighted, press the Set button (![]() ) to access the menu screens containing the options for that group.
) to access the menu screens containing the options for that group.
3. Turn the Quick Control dial (![]() ) to select the option name and number for the Custom Function you want to change, and then press the Set button (
) to select the option name and number for the Custom Function you want to change, and then press the Set button (![]() ) to enter the options screen for that custom function.
) to enter the options screen for that custom function.
4. Press the Set button (![]() ) to activate the options screen you just entered. Use the Quick Control dial (
) to activate the options screen you just entered. Use the Quick Control dial ( ![]() ) to select the option you want, and then press the Set button (
) to select the option you want, and then press the Set button ( ![]() ) to confirm your selection. If there are additional settings contained in submenus, press the Set button (
) to confirm your selection. If there are additional settings contained in submenus, press the Set button ( ![]() ) to display the submenu screen. If there are no submenus, you can press the Info button (
) to display the submenu screen. If there are no submenus, you can press the Info button ( ![]() ) to display a description of the options. Refer to the descriptions earlier in this chapter to select the function and the option number that you want.
) to display a description of the options. Refer to the descriptions earlier in this chapter to select the function and the option number that you want.
If you want to reset one of the Custom Functions, repeat these steps to change it to another setting or the default. If you want to restore all the Custom Functions to the default settings, navigate to the Custom Function main menu ( ![]() ), and use the Quick Control dial (
), and use the Quick Control dial ( ![]() ) to highlight the Clear all Custom Func. (C.Fn) option at the bottom of the menu. Press the Set button (
) to highlight the Clear all Custom Func. (C.Fn) option at the bottom of the menu. Press the Set button ( ![]() ), and then choose OK. All Custom Functions are restored to their defaults.
), and then choose OK. All Custom Functions are restored to their defaults.
Registering Custom Modes
With Custom modes, denoted as Custom shooting mode 1 ( ![]() ) and Custom shooting mode 2 (
) and Custom shooting mode 2 ( ![]() ) on the Mode dial, you can preset the 6D with your favorite shooting mode, exposure settings, drive and autofocus modes, and Custom Functions. Then when you’re ready to shoot, you simply switch to the Custom shooting 1 (
) on the Mode dial, you can preset the 6D with your favorite shooting mode, exposure settings, drive and autofocus modes, and Custom Functions. Then when you’re ready to shoot, you simply switch to the Custom shooting 1 ( ![]() ) or 2 (
) or 2 ( ![]() ) mode on the Mode dial. You can also change the settings as you shoot.
) mode on the Mode dial. You can also change the settings as you shoot.
It does not take long to think of a plethora of ways to use Custom shooting modes. For example, you can set up the Custom shooting mode 1 ( ![]() ) for shooting nature and landscapes with the camera preset to the exposure mode you prefer, with exposure bracketing, and with Mirror lockup, as well as to your favorite drive, autofocus, and Picture Style. You can set up Custom shooting mode 2 (
) for shooting nature and landscapes with the camera preset to the exposure mode you prefer, with exposure bracketing, and with Mirror lockup, as well as to your favorite drive, autofocus, and Picture Style. You can set up Custom shooting mode 2 ( ![]() ) with presets for studio portraits, weddings, concerts, or whatever works for you. Without question, Custom modes enable you to spend less time adjusting camera settings and more time shooting.
) with presets for studio portraits, weddings, concerts, or whatever works for you. Without question, Custom modes enable you to spend less time adjusting camera settings and more time shooting.
If you have forgotten which settings you registered for Custom shooting mode 1 ( ![]() ) or Custom shooting mode 2 (
) or Custom shooting mode 2 ( ![]() ), press the Info button (
), press the Info button ( ![]() ) to display them.
) to display them.
Registered camera settings are saved and recalled when you set the Mode dial to the Custom shooting mode, 1 ( ![]() ) or 2 (
) or 2 ( ![]() ), where you registered them:
), where you registered them:
• Shooting settings. These shooting settings are saved in Custom shooting modes: the exposure mode, ISO, aperture, shutter speed, autofocus mode, AF point, autofocus area selection mode; the setting, metering and drive modes; and the settings for exposure compensation and flash exposure compensation.
• Menu settings. In Custom shooting modes 1 ( ![]() ) and 2 (
) and 2 ( ![]() ), the following settings are either registered or not:
), the following settings are either registered or not:
• Shooting menus. On the four Shooting menus, all menu settings are registered except the Dust Delete Data setting on the Shooting menu 4 tab ( ![]() ).
).
• AF menu. All settings are registered except AF Microadjustment on C.Fn II-9 ( ![]() ).
).
• Playback menus. On the three Playback menus, none of the settings on the Playback menu 1 tab ( ![]() ) are registered. On the Playback menu 2 tab (
) are registered. On the Playback menu 2 tab ( ![]() ), only Slide show and Image jump with the Main dial (
), only Slide show and Image jump with the Main dial ( ![]() ) are registered. On the Playback menu 3 tab (
) are registered. On the Playback menu 3 tab ( ![]() ), all settings except Ctrl over HDMI are registered.
), all settings except Ctrl over HDMI are registered.
• Setup menus. On the Setup menu 1 tab ( ![]() ), only the Select folder settings are not registered. On the Setup menu 2 tab (
), only the Select folder settings are not registered. On the Setup menu 2 tab ( ![]() ), Auto power off, and LCD panel brightness are registered. On the Setup menu 3 tab (
), Auto power off, and LCD panel brightness are registered. On the Setup menu 3 tab ( ![]() ), the Info button (
), the Info button ( ![]() ) display options are registered. On the Setup menu 4 tab (
) display options are registered. On the Setup menu 4 tab ( ![]() ), Sensor cleaning (Auto cleaning) is registered.
), Sensor cleaning (Auto cleaning) is registered.
• Custom Function menu. On the Custom Function menu, all menu items except Warnings in the viewfinder on the C.Fn II-4 menu ( ![]() ) are registered.
) are registered.
• My Menu. The My Menu settings are not registered.
• Live View shooting menus. These menu settings are saved in Custom shooting modes 1 ( ![]() ) and 2 (
) and 2 ( ![]() ): Live View shooting, AF method, Grid display, Aspect ratio, Exposure simulation, Silent LV shooting, and Metering timer.
): Live View shooting, AF method, Grid display, Aspect ratio, Exposure simulation, Silent LV shooting, and Metering timer.
• Movie mode menus. These settings are registered in Custom shooting modes 1 ( ![]() ) and 2 (
) and 2 ( ![]() ): AF method, Silent LV shooting, Metering timer, Grid display, Movie recording size, and Sound recording.
): AF method, Silent LV shooting, Metering timer, Grid display, Movie recording size, and Sound recording.
Here is how to register camera settings to Custom shooting mode 1 ( ![]() ) and 2 (
) and 2 ( ![]() ):
):
1. In either Custom shooting mode 1 (![]() ) or 2 (
) or 2 (![]() ), choose all the settings you want to register. In addition to the exposure, metering, focus, drive, and menu settings, you can set Custom Functions that you want to register.
), choose all the settings you want to register. In addition to the exposure, metering, focus, drive, and menu settings, you can set Custom Functions that you want to register.
2. On the Setup menu 4 tab (![]() ), highlight Custom Shooting mode (C1-C2), and then press the Set button (
), highlight Custom Shooting mode (C1-C2), and then press the Set button (![]() ). The Custom Shooting mode (C1-C2) screen appears.
). The Custom Shooting mode (C1-C2) screen appears.
3. Select Register settings, and then press the Set button (![]() ). The Register settings screen appears. The options are Custom shooting mode 1 (
). The Register settings screen appears. The options are Custom shooting mode 1 ( ![]() ) or Custom shooting mode 2 (
) or Custom shooting mode 2 ( ![]() ).
).
4. Highlight the Custom shooting mode you want, and then press the Set button (![]() ). A Register settings confirmation screen appears.
). A Register settings confirmation screen appears.
5. Choose OK, and then press the Set button (![]() ). The Custom shooting mode (C1-C2) screen appears.
). The Custom shooting mode (C1-C2) screen appears.
6. If you want any of the changes you make while shooting in the Custom mode to be saved, highlight Auto update, and then press the Set button (![]() ). The Disable and Enable options appear.
). The Disable and Enable options appear.
7. Highlight Enable, and then press the Set button (![]() ). You can set the Mode dial to the C mode you set up and begin shooting.
). You can set the Mode dial to the C mode you set up and begin shooting.
In a C mode, neither the Clear all Camera settings on the Setup menu 4 tab ( ![]() ) nor the Clear all Custom Func. (C.Fn) option on the Custom Functions menu (
) nor the Clear all Custom Func. (C.Fn) option on the Custom Functions menu ( ![]() ) can be used. If you want to clear the registered user settings, choose Clear settings on the Custom shooting mode (C1-C2) screen in Step 3 in the previous steps.
) can be used. If you want to clear the registered user settings, choose Clear settings on the Custom shooting mode (C1-C2) screen in Step 3 in the previous steps.
Customizing My Menu
The My Menu option on the 6D can save you a lot of time. You can add your six most frequently used menu items and options. In addition to frequently used menu items, you can also add your most-often used Custom Functions to My Menu ( ![]() ).
).
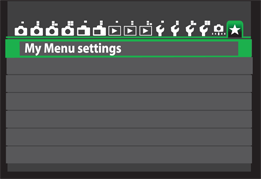
6.12 The My Menu settings screen.
You can arrange the menu items, and you can easily add or delete items from the menu. You can also set the 6D to display My Menu first when you press the Menu button ( ![]() ). The only drawback to My Menu (
). The only drawback to My Menu ( ![]() ) is that you can only register six items. So before you begin registering, evaluate the menu items and Custom Functions and carefully choose six of your favorite.
) is that you can only register six items. So before you begin registering, evaluate the menu items and Custom Functions and carefully choose six of your favorite.
As an example, here is what I have registered on My Menu: Custom WB, Multiple exposure, HDR mode, External Speedlite control, Mirror lockup, and High ISO speed NR (noise reduction). I have also set up My Menu ( ![]() ) as the first menu that is displayed when I press the Menu (
) as the first menu that is displayed when I press the Menu ( ![]() ).
).
Here is how to add items to My Menu ( ![]() ):
):
1. Navigate to the My Menu camera menu (![]() ).
).
2. Highlight My Menu settings, and then press the Set button (![]() ). The My Menu settings screen appears.
). The My Menu settings screen appears.
3. Highlight Register to My Menu, and then press the Set button (![]() ). The Select item to register screen appears with a scrollable list of all menu items and Custom Functions available on the camera. To scroll through the list, turn the Quick Control dial (
). The Select item to register screen appears with a scrollable list of all menu items and Custom Functions available on the camera. To scroll through the list, turn the Quick Control dial ( ![]() ).
).

6.13 The Register to My Menu option highlighted.
4. Highlight the menu item you want to register, and then press the Set button (![]() ). The Select item to register confirmation screen appears.
). The Select item to register confirmation screen appears.
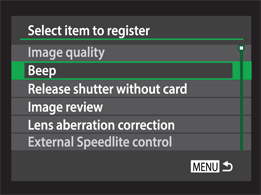
6.14 The Select item to register screen. Grayed out items have already been registered.
5. Choose OK, and then press the Set button (![]() ). The Select item to register screen reappears so that you can select the next item.
). The Select item to register screen reappears so that you can select the next item.
6. Repeat Steps 4 and 5 until all the menu items you want are registered, and then press the My Menu button (![]() ). The My Menu settings screen appears. If you want to sort your newly added items, jump to Step 2 in the following set of steps.
). The My Menu settings screen appears. If you want to sort your newly added items, jump to Step 2 in the following set of steps.
To sort your registered item, follow these steps:
1. Repeat Steps 1 and 2 in the previous list if necessary.
2. On the My Menu settings screen, highlight Sort, and then press the Set button (![]() ). The Sort My Menu screen appears.
). The Sort My Menu screen appears.
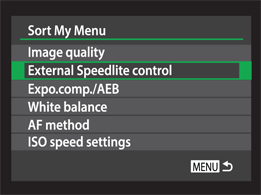
6.15 The Sort My Menu screen.
3. Highlight the item you want to move, and then press the Set button (![]() ). The camera activates the sort control to the right side of the menu item.
). The camera activates the sort control to the right side of the menu item.
4. Turn the Quick Control dial (![]() ) to move the item up or down in the list, and then press the Set button (
) to move the item up or down in the list, and then press the Set button (![]() ).
).
5. Repeat Steps 3 and 4 to move other menu items in the order that you want.
6. Press the My Menu button (![]() ) twice to display your customized menu, or lightly press the shutter button to dismiss the menu.
) twice to display your customized menu, or lightly press the shutter button to dismiss the menu.
You can follow these general steps to access My Menu settings, where you can delete one or all items from the menu and have My Menu displayed each time you press the My Menu button ( ![]() ).
).
Now you have a good idea of how to set up the 6D to make it more comfortable and efficient for your preferences, as well as ready in advance for different shooting scenes and subjects.