
Quick Tour
Whether you just got your Canon EOS 6D or you’ve been using it for a while, it’s important to set up the camera for the image quality and program settings that suit your preferences and skill level. This Quick Tour gives you a brief look at the 6D’s key controls and provides the basics for quickly setting up and using the camera.
The 6D is versatile and fun to use. You can begin by using one of the automated modes or leverage a full range of creative options using the semi-automatic and manual modes — the choice is yours. As you gain experience, you gain the power and skills you need to take image creation with the 6D to the next level.
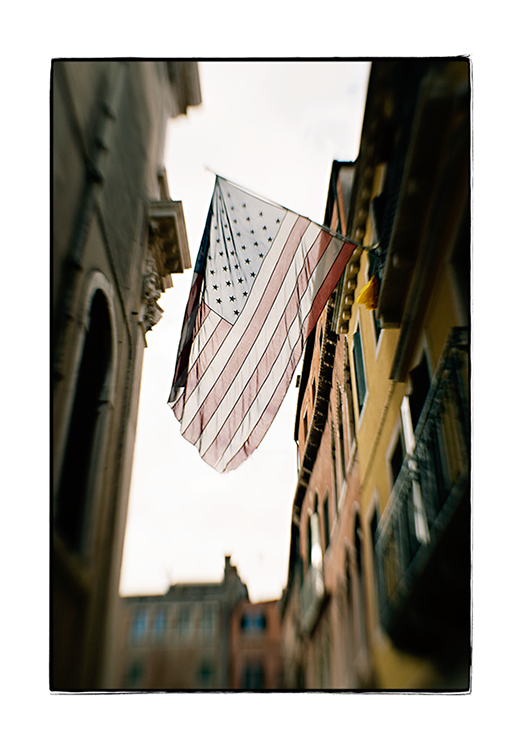
The sophisticated, yet simple-to-use capabilities of the Canon EOS 6D don’t disappoint. Exposure: ISO 400, f/5.6, 1/1600 second with the Lensbaby Composer.
Key Canon EOS 6D Controls
The camera controls you’ll use most often are easily within reach. The following main controls can be used together or separately to control key functions on the 6D:
• Mode dial. This dial enables you to choose an exposure mode and is grouped into two Zones: Basic and Creative. The Basic Zone is great for beginners who don’t yet have a solid grasp of how to set exposure properly on their own. It’s comprised of the following automatic modes: Scene Intelligent Auto ( ![]() ), Creative Auto (
), Creative Auto ( ![]() ), and Special Scene (
), and Special Scene ( ![]() ). The second section on the Mode dial includes the Creative Zone exposure modes, which consist of Program Auto Exposure (AE for short) (
). The second section on the Mode dial includes the Creative Zone exposure modes, which consist of Program Auto Exposure (AE for short) ( ![]() ), Shutter-priority AE (
), Shutter-priority AE ( ![]() ), Aperture-priority AE (
), Aperture-priority AE ( ![]() ), Manual (
), Manual ( ![]() ), and Bulb (
), and Bulb ( ![]() ), as well as two Custom modes, (
), as well as two Custom modes, ( ![]() ) and (
) and ( ![]() ), which users can use to program their favorite settings. Creative Zone exposure modes give you significantly more control over exposure settings; therefore, they are appropriate for more experienced or adventurous users. For the purpose of this Quick Tour, select Program AE (
), which users can use to program their favorite settings. Creative Zone exposure modes give you significantly more control over exposure settings; therefore, they are appropriate for more experienced or adventurous users. For the purpose of this Quick Tour, select Program AE ( ![]() ) to get up and running quickly. Program AE mode (
) to get up and running quickly. Program AE mode ( ![]() ) is fully automatic, but unlike the Basic Zone modes, it allows you to override the settings the camera determines to be optimum, and gives you access to all menu items and most camera features.
) is fully automatic, but unlike the Basic Zone modes, it allows you to override the settings the camera determines to be optimum, and gives you access to all menu items and most camera features.
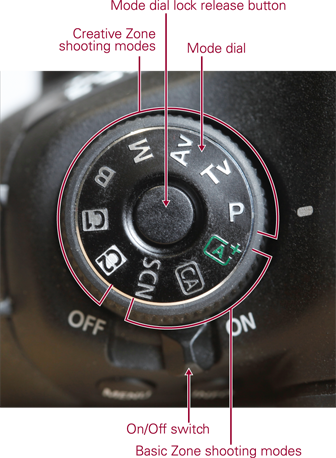
QT.1 The Mode dial.
• Quick Control dial ( ![]() ), Multi-controller (
), Multi-controller ( ![]() ), and Set button (
), and Set button ( ![]() ). When shooting in any one of the Creative Zone exposure modes — Program AE (
). When shooting in any one of the Creative Zone exposure modes — Program AE ( ![]() ), Shutter-priority AE (
), Shutter-priority AE ( ![]() ), Aperture-priority AE (
), Aperture-priority AE ( ![]() ), Manual (
), Manual ( ![]() ), Bulb (
), Bulb ( ![]() ), and the two custom modes (
), and the two custom modes ( ![]() ) and (
) and (![]() ) — you use the Quick Control dial (
) — you use the Quick Control dial ( ![]() ) to make adjustments to the ISO, and autofocus (AF), drive, and metering modes. Each setting is represented by a corresponding icon displayed on camera’s top LCD panel. When you use the camera’s menus, you’ll use the Quick Control dial (
) to make adjustments to the ISO, and autofocus (AF), drive, and metering modes. Each setting is represented by a corresponding icon displayed on camera’s top LCD panel. When you use the camera’s menus, you’ll use the Quick Control dial ( ![]() ) as well as the Multi-controller (
) as well as the Multi-controller ( ![]() ) to navigate through the menu system, view options, and make selections. The Quick Control dial (
) to navigate through the menu system, view options, and make selections. The Quick Control dial ( ![]() ) enables you to rotate through options and the Multi-controller (
) enables you to rotate through options and the Multi-controller ( ![]() ) allows you to move up, down, left, and right. With the Quick Control dial (
) allows you to move up, down, left, and right. With the Quick Control dial ( ![]() ), you can navigate the shooting controls and set almost all the relevant ones without having to access the menu system. Pressing the Set button (
), you can navigate the shooting controls and set almost all the relevant ones without having to access the menu system. Pressing the Set button ( ![]() ) confirms your choices.
) confirms your choices.

QT.2 The Quick Control dial, Set button, and Multi-controller.
• Main dial (![]() ) and shutter button. Use the Main dial (
) and shutter button. Use the Main dial ( ![]() ) to move among camera menu tabs, make selections on the Quick Control screen, change the aperture in Aperture-priority AE shooting mode (
) to move among camera menu tabs, make selections on the Quick Control screen, change the aperture in Aperture-priority AE shooting mode ( ![]() ), and change the shutter speed in Manual shooting mode (
), and change the shutter speed in Manual shooting mode ( ![]() ). Half-press the shutter release button to set the focus and exposure. Continue holding the shutter button down halfway to lock both the exposure and focus, allowing you to recompose without losing these readings. Press the shutter button fully to capture the image.
). Half-press the shutter release button to set the focus and exposure. Continue holding the shutter button down halfway to lock both the exposure and focus, allowing you to recompose without losing these readings. Press the shutter button fully to capture the image.
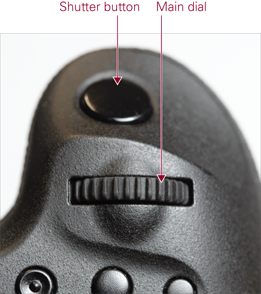
QT.3 The shutter button and Main dial.
• Live View shooting (![]() )/Movie shooting switch (
)/Movie shooting switch (![]() ). Use this switch to change from shooting still images to movies. In Movie shooting mode use the Start/Stop button (
). Use this switch to change from shooting still images to movies. In Movie shooting mode use the Start/Stop button ( ![]() ) in the center to start and stop movie recording.
) in the center to start and stop movie recording.
• Quick Control button (![]() ). This button is on the back of the camera, and is handy for quick access to the camera settings you change most often as you shoot. Press the Quick Control button (
). This button is on the back of the camera, and is handy for quick access to the camera settings you change most often as you shoot. Press the Quick Control button ( ![]() ), and then use the Multi-controller (
), and then use the Multi-controller ( ![]() ) to select the setting you want to change. Turn the Main dial (
) to select the setting you want to change. Turn the Main dial ( ![]() ) or Quick Control dial (
) or Quick Control dial ( ![]() ) to adjust the setting. The number of settings you can adjust depends entirely on the shooting mode you choose. In the Creative Zone exposure modes — Program AE (
) to adjust the setting. The number of settings you can adjust depends entirely on the shooting mode you choose. In the Creative Zone exposure modes — Program AE ( ![]() ), Shutter-priority AE (
), Shutter-priority AE ( ![]() ), Aperture-priority AE (
), Aperture-priority AE ( ![]() ), Manual (
), Manual ( ![]() ), Bulb (
), Bulb ( ![]() ), and the two Custom modes (
), and the two Custom modes ( ![]() ) and (
) and ( ![]() ) — you can adjust more camera settings than you can in the Basic Zone modes. When shooting in one of the Creative Zone modes, you can adjust White balance, Metering modes, Flash exposure compensation, and Picture Styles, just to name a few.
) — you can adjust more camera settings than you can in the Basic Zone modes. When shooting in one of the Creative Zone modes, you can adjust White balance, Metering modes, Flash exposure compensation, and Picture Styles, just to name a few.
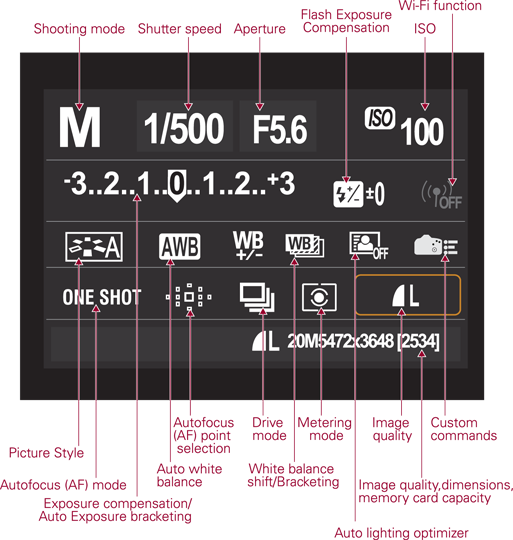
QT.4 The Quick Control screen.
The Canon EOS 6D Menu System
You set up much of the camera using the camera’s menus. To help you navigate through the menus, similar settings are grouped and color-coded. Settings that affect shooting are located on the four Shooting menu tabs, which are highlighted in red when they’re selected. The two Live View shooting menu tabs are next, and they’re highlighted in red when selected. Following are three Playback menus, which are highlighted in blue when they’re selected; three Setup menus, which are highlighted in yellow when they’re selected; one Custom Functions menu, which is highlighted in orange when it’s selected; and, last, one user settings menu tab (My Menu settings), which is highlighted in green when it’s selected.

QT.5 The Canon EOS 6D menus.
It’s important to note that available camera menus and their options change according to the shooting mode being used. In the automatic, or Basic Zone exposure modes, there are fewer options on camera menus than there are in the semiautomatic and manual modes in the Creative Zone exposure modes. Also, the menus change when you’re in the Movie shooting ( ![]() ) and Live View shooting (
) and Live View shooting ( ![]() ) modes. So if you can’t find one of the options mentioned in this book, first check to see what shooting mode the camera is in, and then switch to one of the Creative Zone exposure modes — Program AE (
) modes. So if you can’t find one of the options mentioned in this book, first check to see what shooting mode the camera is in, and then switch to one of the Creative Zone exposure modes — Program AE ( ![]() ), Shutter-priority AE (
), Shutter-priority AE ( ![]() ), Aperture-priority AE (
), Aperture-priority AE ( ![]() ), Manual (
), Manual ( ![]() ), Bulb (
), Bulb ( ![]() ), or one of the two Custom modes (
), or one of the two Custom modes ( ![]() ) and (
) and ( ![]() ) — and check the menus again.
) — and check the menus again.
To use the camera menus, follow these steps:
1. Press the Menu button (![]() ) on the back of the camera.
) on the back of the camera.
2. Turn the Main dial (![]() ) to move to the camera menu tab that you want. You can also press the left or right parts of the Multi-controller (
) to move to the camera menu tab that you want. You can also press the left or right parts of the Multi-controller ( ![]() ) to move among the camera’s menu tabs.
) to move among the camera’s menu tabs.
3. Turn the Quick Control dial (![]() ), or press the top and bottom parts of the Multi-controller (
), or press the top and bottom parts of the Multi-controller (![]() ) to move up and down through available menu options.
) to move up and down through available menu options.
4. Press the Set button (![]() ) to display the sub-options or open additional screens.
) to display the sub-options or open additional screens.
5. Turn the Quick Control dial (![]() ) again, or press the top and bottom parts of the Multi-controller (
) again, or press the top and bottom parts of the Multi-controller (![]() ) to move up and down through the available menu options.
) to move up and down through the available menu options.
6. Press the Set button (![]() ) to confirm your choices.
) to confirm your choices.
Setting the date and time
The camera asks you to set up the date and time the first time you turn it on. Once set, the date and time are included in the EXIF (Exchangeable Image File Format) data for every image you make. The EXIF data contains all the information about a picture, including the exposure information, camera settings, and the date and time you shot the picture. You can see this information when you view your images in ImageBrowser, a program on the EOS Solution Disk that comes with the camera. The date and time provides a handy record that you can use to recall when you took pictures, and it can help you organize images on your computer. You may need to reset the date and time if the battery runs out of power.
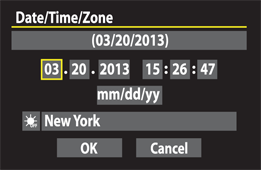
QT.6 The Date/Time/Zone menu screen.
To set the date and time, follow these steps:
1. On the Setup menu 2 tab (![]() ), select Date/Time, and then press the Set button (
), select Date/Time, and then press the Set button (![]() ). The Date/Time screen appears with the month control selected.
). The Date/Time screen appears with the month control selected.
2. Press the Set button (![]() ) to activate the month control. The camera adds up and down arrows to the month control.
) to activate the month control. The camera adds up and down arrows to the month control.
3. Press the up or down parts of the Multi-controller (![]() ) until the number of the current month appears, and then press the Set button (
) until the number of the current month appears, and then press the Set button (![]() ).
).
4. Press the right part of the Multi-controller (![]() ) to move to the next control, and then repeat Steps 2 and 3 to set the day, year, hour, minute, and second.
) to move to the next control, and then repeat Steps 2 and 3 to set the day, year, hour, minute, and second.
5. Select your Time zone by using the Multi-controller (![]() ) to highlight the Time zone selection option. Highlighted option names appear at the top of the menu screen. Press the Set button (
) to highlight the Time zone selection option. Highlighted option names appear at the top of the menu screen. Press the Set button ( ![]() ) to activate the Time zone options submenu, displaying an arrow above and below the highlighted field. Press the top or bottom of the Multi-controller (
) to activate the Time zone options submenu, displaying an arrow above and below the highlighted field. Press the top or bottom of the Multi-controller ( ![]() ) to scroll through the available Time zones. Once the desired Time zone is displayed, press the Set button (
) to scroll through the available Time zones. Once the desired Time zone is displayed, press the Set button ( ![]() ) to confirm the Time zone selection.
) to confirm the Time zone selection.
6. To account for daylight saving time, use the Multi-controller (![]() ) to highlight the Daylight Savings Time enable/disable option, which appears to the left of the Time zone setting, and then press the Set button (
) to highlight the Daylight Savings Time enable/disable option, which appears to the left of the Time zone setting, and then press the Set button (![]() ) to activate the Daylight Savings Time submenu. An arrow appears above and below the highlighted field. Press the top or bottom of the Multi-controller (
) to activate the Daylight Savings Time submenu. An arrow appears above and below the highlighted field. Press the top or bottom of the Multi-controller ( ![]() ) to choose Daylight Savings Time enable (
) to choose Daylight Savings Time enable ( ![]() ) or Daylight Savings Time disable (
) or Daylight Savings Time disable ( ![]() ). Press the Set button (
). Press the Set button ( ![]() ) to confirm your selection.
) to confirm your selection.
7. Press the left or right part of the Multi-controller (![]() ) to navigate to the OK button, and then press the Set button (
) to navigate to the OK button, and then press the Set button (![]() ) to confirm your selections.
) to confirm your selections.
Setting the image quality
Choosing the image-recording quality is an important decision because it affects the following:
• The maximum size at which you can print your images. The higher the image quality, the larger the print you can make.
• The number of images that you can store on the memory card. The higher the image quality, the fewer images you can store on the card. Given that memory card prices have become much more affordable in recent years and their size has increased, it’s worth getting a large memory card and taking advantage of the highest quality images the 6D can deliver.
• The burst rate. This is the maximum number of images captured when you shoot a series of images in rapid succession.
The higher the image quality, the lower the burst rate. However, even at the Large/Fine quality, the burst rate using an 8GB memory card is 73 images. I recommend choosing the Large/Fine recording quality to get the highest quality JPEG images. Also, if you’re an experienced photographer, I recommend you shoot RAW to get the best image quality possible.
Here’s how to set the image quality using the Quick Control button ( ![]() ) (you also access and set image quality settings under the Shooting menu 1 tab):
) (you also access and set image quality settings under the Shooting menu 1 tab):
1. Press the Quick Control button (![]() ) on the back of the camera. The Quick Control screen appears.
) on the back of the camera. The Quick Control screen appears.
2. Press the Multi-controller (![]() ) to select the Image-recording quality control located at the lower right of the screen, and then press the Set button (
) to select the Image-recording quality control located at the lower right of the screen, and then press the Set button (![]() ). This control displays the currently selected image-recording quality as an icon; for example, a quarter-circle icon with the letter L appears if the camera is set to Large/Fine JPEG recording. The Quality screen appears after you press the Set button (
). This control displays the currently selected image-recording quality as an icon; for example, a quarter-circle icon with the letter L appears if the camera is set to Large/Fine JPEG recording. The Quality screen appears after you press the Set button ( ![]() ).
).
3. Press the left or right parts of the Multi-controller (![]() ) to select the recording quality you want for JPEG capture or select the None symbol (
) to select the recording quality you want for JPEG capture or select the None symbol (![]() ) if you don’t want JPEGs captured, and then press the Set button (
) if you don’t want JPEGs captured, and then press the Set button (![]() ). Use the Main dial (
). Use the Main dial ( ![]() ) to select the recording quality you want for RAW capture, or the None symbol (
) to select the recording quality you want for RAW capture, or the None symbol ( ![]() ) if you don’t want any RAW files captured. RAW and JPG files can be captured together simultaneously, which is sometimes a good option. As you move through the settings, the image dimensions in pixels and the number of images that you can store on the memory card installed are displayed at the top of the screen. The icons next to the letters on the Quality screen indicate the amount of compression. A quarter circle with a smooth edge, Large Fine (
) if you don’t want any RAW files captured. RAW and JPG files can be captured together simultaneously, which is sometimes a good option. As you move through the settings, the image dimensions in pixels and the number of images that you can store on the memory card installed are displayed at the top of the screen. The icons next to the letters on the Quality screen indicate the amount of compression. A quarter circle with a smooth edge, Large Fine ( ![]() ), indicates low compression for high image quality while a jagged icon edge, Large Normal (
), indicates low compression for high image quality while a jagged icon edge, Large Normal ( ![]() ), indicates high compression for low image quality.
), indicates high compression for low image quality.
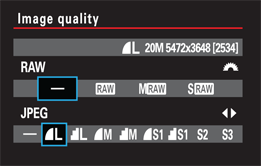
QT.7 The Image quality menu screen.
Choosing a Shooting Mode
While Chapter 3 is the best place to learn about the 6D’s shooting modes in depth, here is a high-level summary to help you choose one:
• When you want to set it and forget it, choose a shooting mode from the Basic Zone section of the Mode dial. These include the Scene Intelligent Auto ( ![]() ), Creative Auto (
), Creative Auto ( ![]() ), and Special Scene (
), and Special Scene ( ![]() ) modes. You can choose the image-quality settings and a few other options. Just press the Quick Control button (
) modes. You can choose the image-quality settings and a few other options. Just press the Quick Control button ( ![]() ) to display the Quick Control screen that shows the adjustments you can make when using automated modes.
) to display the Quick Control screen that shows the adjustments you can make when using automated modes.
• When you want more control with minimal adjustments, set the Mode dial to Creative Auto mode (![]() ). Then press the Quick Control button (
). Then press the Quick Control button ( ![]() ) on the back of the camera to display the Quick Control screen. On this screen, you can choose an Ambience setting that changes the overall contrast and color saturation of your images. You can set the level of the background blur, which is the same as changing the f-stop, only it’s more intuitive. Just follow the onscreen instructions and press the left or right parts of the Multi-Controller (
) on the back of the camera to display the Quick Control screen. On this screen, you can choose an Ambience setting that changes the overall contrast and color saturation of your images. You can set the level of the background blur, which is the same as changing the f-stop, only it’s more intuitive. Just follow the onscreen instructions and press the left or right parts of the Multi-Controller ( ![]() ) to increase or decrease the level of blur. Then press the bottom part of the Multi-Controller (
) to increase or decrease the level of blur. Then press the bottom part of the Multi-Controller ( ![]() ) to highlight the Drive mode options. There are six Drive mode options to choose from: Single shooting (
) to highlight the Drive mode options. There are six Drive mode options to choose from: Single shooting ( ![]() ), Continuous shooting (
), Continuous shooting ( ![]() ), Silent single shooting (
), Silent single shooting ( ![]() ), Silent continuous (
), Silent continuous ( ![]() ), Self-timer mode 10 seconds remote (
), Self-timer mode 10 seconds remote ( ![]() ), or Self-timer mode 2 seconds remote (
), or Self-timer mode 2 seconds remote ( ![]() ). Press the right or left sides of the Multi-Controller (
). Press the right or left sides of the Multi-Controller ( ![]() ) to select the desired Drive mode and press the Set button (
) to select the desired Drive mode and press the Set button ( ![]() ) to confirm your selection.
) to confirm your selection.
• When you want a lot of (or complete) control over the exposure and camera settings, select a shooting mode from the Creative Zone section of the Mode dial. These include the Program ( ![]() ), Shutter-priority AE (
), Shutter-priority AE ( ![]() ), Aperture-priority AE (
), Aperture-priority AE ( ![]() ), Manual (
), Manual ( ![]() ), and Bulb (
), and Bulb ( ![]() ) modes, as well as the two Custom modes (
) modes, as well as the two Custom modes ( ![]() ) and (
) and ( ![]() ). In Program AE mode (
). In Program AE mode ( ![]() ), you can use the camera’s suggested settings, or you can temporarily change the f-stop and shutter speed for one picture simply by turning the Main dial. In Aperture-priority AE mode (
), you can use the camera’s suggested settings, or you can temporarily change the f-stop and shutter speed for one picture simply by turning the Main dial. In Aperture-priority AE mode ( ![]() ) and Shutter-priority AE mode (
) and Shutter-priority AE mode ( ![]() ), you can control the f-stop and the shutter speed, respectively. In Manual mode (
), you can control the f-stop and the shutter speed, respectively. In Manual mode ( ![]() ), you can set the f-stop and shutter speed yourself. Bulb mode (
), you can set the f-stop and shutter speed yourself. Bulb mode ( ![]() ) comes in handy when night shooting things like fireworks, star trails, and so on. However, this mode is best used on a tripod with a remote shutter-release cable. In these shooting modes, you can control all the features of the camera, including the white balance, drive mode, focus and autofocus modes, as well as other settings.
) comes in handy when night shooting things like fireworks, star trails, and so on. However, this mode is best used on a tripod with a remote shutter-release cable. In these shooting modes, you can control all the features of the camera, including the white balance, drive mode, focus and autofocus modes, as well as other settings.
With the shooting mode set on the Mode dial, you can begin shooting. If you set the camera to one of the Creative Zone shooting modes — Program AE ( ![]() ), Shutter-priority AE (
), Shutter-priority AE ( ![]() ), Aperture-priority AE (
), Aperture-priority AE ( ![]() ), Manual (
), Manual ( ![]() ), Bulb (
), Bulb ( ![]() ), or the Custom user settings (
), or the Custom user settings ( ![]() ) and (
) and ( ![]() ) — be sure to read the next section on focusing.
) — be sure to read the next section on focusing.
Getting Sharp Focus
When you’re shooting in the Creative Zone shooting modes — Program AE ( ![]() ), Shutter-priority AE (
), Shutter-priority AE ( ![]() ), Aperture-priority AE (
), Aperture-priority AE ( ![]() ), Manual (
), Manual ( ![]() ), or Bulb (
), or Bulb ( ![]() ), or the Custom user settings (
), or the Custom user settings ( ![]() ) and (
) and ( ![]() ) — you can control where the sharp focus is set in the image, or let the camera work automatically to determine the best place for focus.
) — you can control where the sharp focus is set in the image, or let the camera work automatically to determine the best place for focus.
In the Basic Zone shooting modes — Scene Intelligent Auto ( ![]() ), Creative Auto (
), Creative Auto ( ![]() ), and Special Scene (
), and Special Scene ( ![]() ) — the camera automatically decides what and where the subject is, and it decides which autofocus (AF) point or points to use. This is called Automatic AF-point Selection. Sometimes the camera correctly identifies the subject, and other times, it does not. Because one major aspect of capturing a successful image is achieving sharp focus, it’s important to know how to control the way the camera focuses.
) — the camera automatically decides what and where the subject is, and it decides which autofocus (AF) point or points to use. This is called Automatic AF-point Selection. Sometimes the camera correctly identifies the subject, and other times, it does not. Because one major aspect of capturing a successful image is achieving sharp focus, it’s important to know how to control the way the camera focuses.
To ensure that the sharp focus in the image is where you want it, your best option is to use one of the Creative Zone shooting modes — Program AE ( ![]() ), Shutter-priority AE (
), Shutter-priority AE ( ![]() ), Aperture-priority AE (
), Aperture-priority AE ( ![]() ), Manual (
), Manual ( ![]() ), Bulb (
), Bulb ( ![]() ), or the Custom user settings (
), or the Custom user settings ( ![]() ) and (
) and ( ![]() ) — and manually select the AF point yourself.
) — and manually select the AF point yourself.
Here’s how to select an AF point manually:
1. In the Program AE (![]() ), Shutter-priority AE (
), Shutter-priority AE (![]() ), Aperture-priority AE (
), Aperture-priority AE (![]() ), Manual (
), Manual (![]() ), Bulb (
), Bulb (![]() ) shooting modes, and the Custom Shooting modes (
) shooting modes, and the Custom Shooting modes (![]() ) and (
) and (![]() ), press the AF-point Selection button on the top right back of the camera. This button has an icon of a dotted cross inside a rectangle representing the AF points in the viewfinder.
), press the AF-point Selection button on the top right back of the camera. This button has an icon of a dotted cross inside a rectangle representing the AF points in the viewfinder.
2. Turn the Main dial (![]() ) until the AF point you want is highlighted in the viewfinder. Use the Main dial (
) until the AF point you want is highlighted in the viewfinder. Use the Main dial ( ![]() ) to move the focus point horizontally and the Multi-controller (
) to move the focus point horizontally and the Multi-controller ( ![]() ) for vertical movements. Choose an AF point that is on top of the place in the scene that should have sharp focus. For example, in a portrait, choose the AF point that is on top of the person’s eye. As you move through the AF points, each AF point is highlighted until eventually all of them are highlighted. This is the option where the camera automatically chooses the AF point or points to use. Do not choose this option if you want to control the focus yourself. Instead, select an option where only the one AF point you want to use is highlighted.
) for vertical movements. Choose an AF point that is on top of the place in the scene that should have sharp focus. For example, in a portrait, choose the AF point that is on top of the person’s eye. As you move through the AF points, each AF point is highlighted until eventually all of them are highlighted. This is the option where the camera automatically chooses the AF point or points to use. Do not choose this option if you want to control the focus yourself. Instead, select an option where only the one AF point you want to use is highlighted.

QT.8 The viewfinder AF points.
3. Press the shutter button halfway to focus, and then press it completely to take the picture. When you press the shutter button halfway, the AF point you selected is highlighted, and a beep sounds when focus is achieved.
Putting it All Together
Now that I’ve covered the basics, it’s time to put it all together and get you shooting. Here are ten simple steps you can follow to make your first exposure:
1. Make sure the battery and media card are installed. Turn the camera on using the On/Off switch next to the Mode dial.
2. Set the Live View (![]() )/Movie shooting (
)/Movie shooting (![]() ) mode switch to the Still images position.
) mode switch to the Still images position.
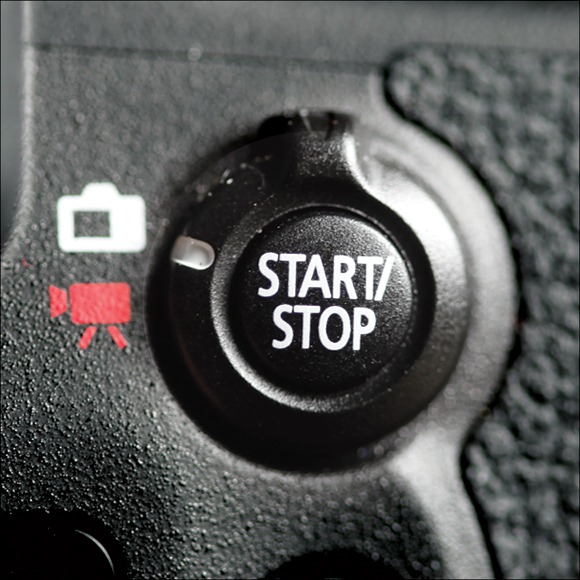
QT.9 The Live View/Movie shooting mode switch.
3. Select a shooting mode using the Mode dial. For this Quick Tour, you’ll use the Program AE mode ( ![]() ). This mode is fully automatic but still allows you to make modifications on a single-shot basis, change the camera’s exposure choices, and access all menu items and almost every camera feature.
). This mode is fully automatic but still allows you to make modifications on a single-shot basis, change the camera’s exposure choices, and access all menu items and almost every camera feature.
4. To select the Program AE exposure mode (![]() ), push the round button in the center of the Mode dial to unlock it. Continue to hold the button down, and turn the Mode dial until Program AE (
), push the round button in the center of the Mode dial to unlock it. Continue to hold the button down, and turn the Mode dial until Program AE ( ![]() ) and the white tick mark next to the Mode dial are aligned.
) and the white tick mark next to the Mode dial are aligned.
5. Choose your preferred image quality setting. This time you’ll use the menus to get there. Press the Menu button ( ![]() ) and highlight the Shooting menu 1 tab; then use the Quick Control dial (
) and highlight the Shooting menu 1 tab; then use the Quick Control dial ( ![]() ) to select Image quality and press the Set button (
) to select Image quality and press the Set button ( ![]() ) to access the Image Quality options screen. Press the left or right parts of the Multi-controller (
) to access the Image Quality options screen. Press the left or right parts of the Multi-controller ( ![]() ) to select the recording quality you want for JPEG capture or select the None symbol (
) to select the recording quality you want for JPEG capture or select the None symbol ( ![]() ) if you don’t want JPEGs captured. Use the Main dial (
) if you don’t want JPEGs captured. Use the Main dial ( ![]() ) to select the recording quality you want for RAW capture or select the None symbol (
) to select the recording quality you want for RAW capture or select the None symbol ( ![]() ) if you don’t want any RAW files captured. RAW and JPG files can be captured together simultaneously if desired. Select the first JPEG option on the left of the menu — Large/Fine JPG (
) if you don’t want any RAW files captured. RAW and JPG files can be captured together simultaneously if desired. Select the first JPEG option on the left of the menu — Large/Fine JPG ( ![]() ). Press the Set button (
). Press the Set button ( ![]() ) to confirm your choice and press the Menu button (
) to confirm your choice and press the Menu button ( ![]() ) again to exit the menu system.
) again to exit the menu system.
6. Choose a Drive mode to control how many images are captured when you press the shutter button. You use the Quick control menu for this. Press the Quick control button ( ![]() ) to activate this menu. Take a minute to look at all the other controls you can access without ever having to dig into the menus.
) to activate this menu. Take a minute to look at all the other controls you can access without ever having to dig into the menus.
7. Use the Multi-controller (![]() ) to navigate to the Drive mode icon. Select it, and then press the Set button (
) to navigate to the Drive mode icon. Select it, and then press the Set button ( ![]() ) to enter the Drive mode options screen. Use the Quick Control dial (
) to enter the Drive mode options screen. Use the Quick Control dial ( ![]() ) or the Main dial (
) or the Main dial ( ![]() ) to choose Single shooting mode (
) to choose Single shooting mode ( ![]() ). This way the camera will only make a single exposure when you press the shutter button. When you’re ready for rapid-fire shooting, you can switch it back to Continuous shooting mode (
). This way the camera will only make a single exposure when you press the shutter button. When you’re ready for rapid-fire shooting, you can switch it back to Continuous shooting mode ( ![]() ). Press the Set button (
). Press the Set button ( ![]() ) to confirm your setting.
) to confirm your setting.
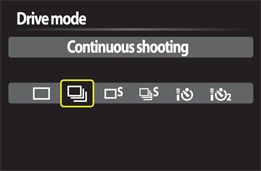
QT.10 The Drive mode options screen in the Quick Control menu.
8. Press the shutter button halfway; make sure the active AF point covers the main part of the scene or subject you’re photographing. You can see which AF point is active by pressing the AF-point selection button ( ![]() ) once; the active point will turn red. Press the shutter button halfway to take an exposure reading and focus. Continuing to press the shutter button halfway locks both exposure and focus, and allows you to recompose without losing those readings.
) once; the active point will turn red. Press the shutter button halfway to take an exposure reading and focus. Continuing to press the shutter button halfway locks both exposure and focus, and allows you to recompose without losing those readings.
Improving Autofocus Accuracy and Performance
Autofocus speed depends on factors including the size and design of the lens, the speed of the lens-focusing motor and autofocus sensor, the amount of light in the scene, and the level of subject contrast. Here are some things to consider to get the best autofocus results:
• Light. In low-light scenes, the autofocus performance depends in part on the lens speed and design. The faster the lens is, the faster the autofocus performance will be. If there is enough light for the lens to focus without an AF-assist beam, lenses with a rear-focus optical design, such as the EF 85mm f/1.8 USM, focus faster than lenses that move their entire optical system, such as the EF 85mm f/1.2L II USM. Regardless, the lower the light, the longer it takes to focus.
• Contrast. Low-contrast subjects and subjects in low light slow down focusing speed and can cause autofocus failure. With a passive autofocus system, autofocusing depends on the sensitivity of the autofocus sensor. Autofocus is always faster in bright light, and this is true in both the One-shot autofocus ( ![]() ) and AI Servo focusing (
) and AI Servo focusing ( ![]() ) modes. In low light, consider using an accessory EX Speedlite’s AF-assist beam as a focusing aid.
) modes. In low light, consider using an accessory EX Speedlite’s AF-assist beam as a focusing aid.
• Focal length. The longer the lens, the longer the time required to focus because the range of defocus is greater on telephoto lenses than on normal or wide-angle lenses. Simply put, the amount of movement required to get from the minimum focusing distance to infinity is greater with telephoto lenses than with normal or wide angle lenses. To improve the focus speed, manually set the lens in the general focusing range, and then use autofocus.
• AF-point selection. Manually selecting one AF point provides faster autofocus performance than using Automatic AF-point selection mode because the camera does not have to determine and select the AF point(s) to use first.
• Subject contrast. The camera takes longer to focus on low-contrast subjects than higher-contrast subjects. If the camera cannot focus, shift the camera position to an area of the subject that has higher contrast.
• EF Extenders. EF Extenders reduce the effective aperture of the lens being extended by anywhere from one to two stops depending on the extender being used. This will in turn reduce the speed of the lens-focusing drive.
• Wide-angle lenses and small apertures. Sharpness can be degraded by diffraction when you use small apertures with wide-angle or wide-angle zoom lenses. Diffraction happens when light waves pass around the edges of an object and enter the shadow area of the subject, softening fine detail. To avoid diffraction, avoid using apertures smaller than f/16 with wide-angle prime (single-focal-length) and zoom lenses.
To select an AF point manually, first make sure you’re in one of the Creative Zone shooting modes. Then press the AF-point selection button ( ![]() ) and turn the Main dial (
) and turn the Main dial ( ![]() ) to move to and select one of the horizontally oriented AF points or the Multi-controller (
) to move to and select one of the horizontally oriented AF points or the Multi-controller ( ![]() ) to move to and select vertically located AF points. Choose an AF point on top of the place in the scene that you’d like to have sharp focus.
) to move to and select vertically located AF points. Choose an AF point on top of the place in the scene that you’d like to have sharp focus.
9. Press the Shutter button fully to capture the image. You’ve just made your first image!
10. Press the Playback button (![]() ) to review your image. Use the Magnify button (
) to review your image. Use the Magnify button ( ![]() ) to zoom in, the Main dial (
) to zoom in, the Main dial ( ![]() ) to control magnification from 1.5X to 10X, and the Multi-controller (
) to control magnification from 1.5X to 10X, and the Multi-controller ( ![]() ) to navigate to the hidden parts of a magnified image.
) to navigate to the hidden parts of a magnified image.
Pressing the Magnify button ( ![]() ) once zooms in on the image. The magnification range on the LCD monitor is 2x, 4x, 8x, and 10x. Use the Main dial (
) once zooms in on the image. The magnification range on the LCD monitor is 2x, 4x, 8x, and 10x. Use the Main dial ( ![]() ) to zoom back out through the magnification levels. Once the entire image is back in full screen view, rotating the Main dial (
) to zoom back out through the magnification levels. Once the entire image is back in full screen view, rotating the Main dial ( ![]() ) counterclockwise displays a grid of image thumbnails, first four up and then nine up. This makes finding an image you’d like to review at a larger magnification quick and easy. Use the Multi-controller (
) counterclockwise displays a grid of image thumbnails, first four up and then nine up. This makes finding an image you’d like to review at a larger magnification quick and easy. Use the Multi-controller ( ![]() ) or Quick Control dial (
) or Quick Control dial ( ![]() ) to navigate through the thumbnails and to move between thumbnail screens. Press the Set button (
) to navigate through the thumbnails and to move between thumbnail screens. Press the Set button ( ![]() ) once the desired thumbnail is highlighted to view it at 100 percent.
) once the desired thumbnail is highlighted to view it at 100 percent.