
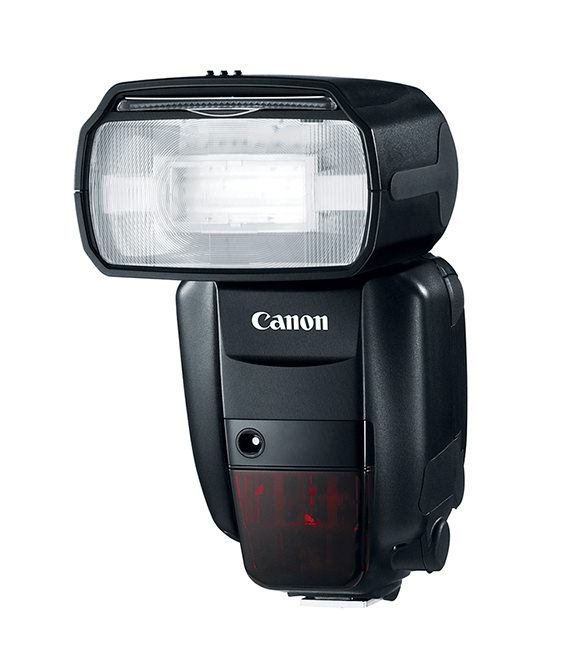
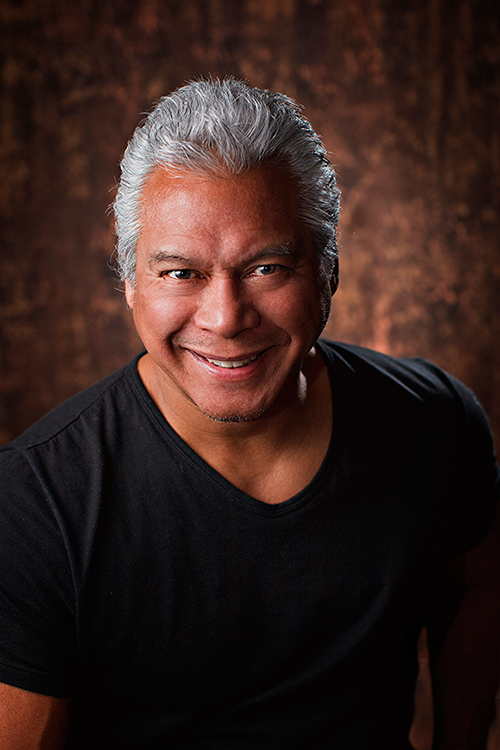
9.1 The 600EX-RT is the most powerful Speedlite in Canon’s flash lineup. It has the guide number 60.
Chapter 9: Working with Flash
The Canon EOS 6D paired with the new Canon 600EX-RT Speedlite, or earlier model Speedlites, offers you a new world of lighting possibilities and creative control. You have the option of using wireless E-TTL (Evaluative Through-the-Lens) flash, communicating via radio transmission, for single as well as multiple flash setups. Using radio waves to communicate exposure data between the camera and the Speedlite eliminates many of the previous limitations of wireless systems relying on optical flash sensors. Of course, if you have earlier Speedlites, then you can use existing optical transmission to control multiple flashes wirelessly with or without the Speedlite 600EX-RT.
The 6D enables you to control functions of the flash directly from the camera’s menu system. You can set the metering, flash sync speed in Aperture-priority AE shooting mode ( ![]() ), flash exposure compensation, bracketing, shutter synchronization, flash ratio, and Custom Functions for compatible EX-series Speedlites.
), flash exposure compensation, bracketing, shutter synchronization, flash ratio, and Custom Functions for compatible EX-series Speedlites.
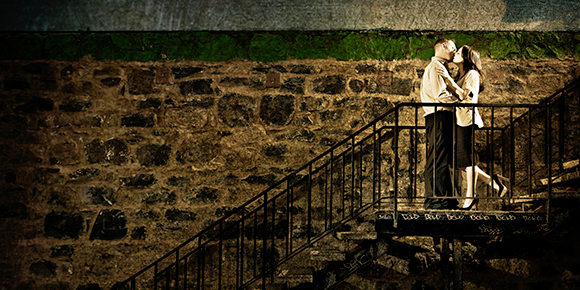
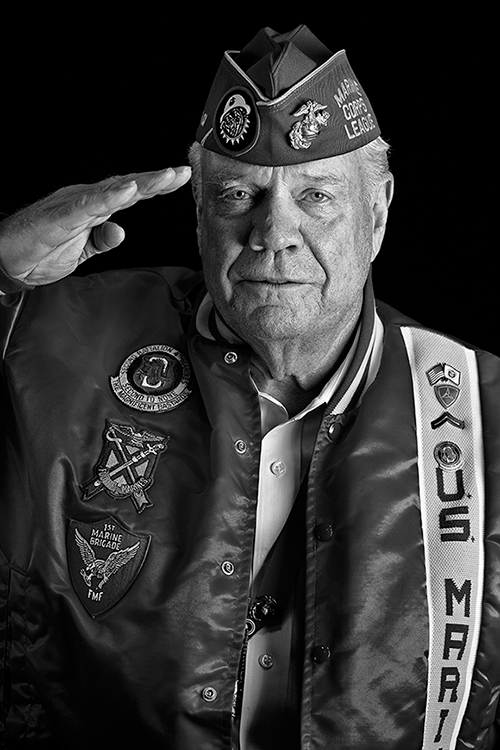
Speedlites make creating images like this one quick and easy. Exposure: ISO 160, f/4.0, 1/100 second.
Deciding Whether to Use Flash
Photographers tend to fall into two camps: Available light shooters and those who use flash. For many years, I was in the first camp. Flash was not only difficult and intimidating to use, but to my eye, and especially because of my lack of expertise, it also created a sterile, unappealing light that was difficult to control and didn’t add to the story of the image or complement the subject. The use of flash is not right for all situations, but it’s a great option to have and feel comfortable with.
Well, that was then, and this is now: Flash photography and my understanding of it have come a long way in a short time. Now I am among the many photographers who consider flash an indispensable tool for much of their photography. My definition of “available light” now goes beyond what’s naturally available, and handheld flash is right at the top of that list. With the large range of light-shaping tools available, in-camera flash controls, and easy-to-use wireless triggers, you have all the control you need to easily create beautiful images with flash.
Therefore, if you are intimidated like I was by using flash in your photography, I hope you’ll consider at least experimenting with one or more off-camera Speedlites. They aren’t as complicated as they can seem when starting out. This chapter covers the basics of using one or multiple Speedlites to help you get started.
Calculating Flash Exposure
With E-TTL, the camera automatically calculates the flash exposure. However, knowing the elements that factor into flash exposures enables you to move beyond what the camera thinks is best and bring your own creative vision to bear. Having a solid understanding of flash exposures will allow you to troubleshoot when things don’t look the way you expected. Whether you use an accessory Speedlite or a third-party flash unit, the same factors go into calculating flash exposure.
Flash exposure begins with the flash unit’s guide number. The guide number for the Canon Speedlite 600EX-RT is 60 meters/197 feet at 200mm flash coverage and at ISO 100. The guide number indicates the relative power of the flash used at full power and in Manual mode. You can use the guide number to compare the power outputs of different flash units. The higher the guide number, the more powerful the flash.
9.1 The 600EX-RT is the most powerful Speedlite in Canon’s flash lineup. It has the guide number 60.
Understanding Light Falloff
It is important to understand the dynamics of light falloff and how to compensate for it. The inverse square law — a law that applies to flash as well as to studio lights — describes the characteristics of light falloff.
The inverse square law states that the quantity or intensity of light is inversely proportional to the square of the distance from the light source. If this is as clear as mud, it can be restated much more simply: An object that is twice as far from a point light source as another object receives a quarter as much light as the closer object.
Move the subject three times as far away, and the subject receives only a ninth the amount of light. This is true because a point light source — a flash unit or studio light — spreads out like a cone as the subject’s distance from the light source increases, diminishing the light reaching the subject. You have likely seen the effect of the inverse square law in flash images where subjects close to the camera received sufficient light for a good exposure while subjects a few feet away received noticeably less light, as the following illustration shows.

The inverse square law applies primarily when talking about a point source, like flash or a tungsten bulb. If you double the distance of the subject from the light source, you need four times the amount of light. You can achieve this by either opening up 2 f-stops or by using a flash that has four times more power. As you move into more advanced uses that incorporate accessories and lighting modifiers, there are exceptions, such as when you use Fresnel lenses, optical spotlights, and light sources modified by a grid. Also, light from softboxes and scrims at close working distances falls off less than the inverse square law predicts.
A guide number is typically measured at ISO 100 for a 105mm focal length. From the guide number, you can determine what aperture to set given the subject distance and the ISO. As stated earlier, the guide number for the Canon Speedlite 600EX-RT is 60 meters/197 feet at 200mm flash coverage and at ISO 100. Once you know the guide number, you can divide the guide number by the flash-to-subject distance to determine the appropriate aperture to set.
The relationship between the aperture and the flash-to-subject distance is Guide Number ÷ Aperture = Distance and Guide Number ÷ Distance = Aperture for optimal exposure. Therefore, if the subject is 15 feet from the camera, you divide 197 (the guide number in feet) by 15 feet (camera-to-subject distance) to get f/13 at ISO 100.
If you want a different aperture, you can change the camera-to-subject distance, or you can increase the ISO sensitivity setting on the camera. When you increase the ISO, the camera needs less light to make the exposure, and it simultaneously increases the range of the flash. When you increase the ISO from 100 to 200, the guide number increases by a factor of 1.4; increasing from 100 to 400 doubles the guide number.
The last factor to consider is the focal length. The flash covers a fixed area, or a fixed angle of view. Thus, when you use a wide-angle lens, the flash may not cover the entire image area, causing dark areas on the periphery. In addition, with a telephoto focal length, some of the light may spill outside the lens’s angle of view. For example, the Canon 580EX II Speedlite has default coverage from 24mm to 105mm while the 600EX-RT has coverage from 20mm to 200mm. Both flash units include a pull-out panel for shooting with wider focal lengths that extends flash coverage to 14mm.
Using E-TTL II Technology
Canon flash units use E-TTL II technology. To make a flash exposure using Evaluative metering ( ![]() ), the camera takes a reading of the light in the scene when you half-press the shutter button. When you fully press the shutter button, a preflash is fired and read by the camera. The camera compares the existing and preflash readings to determine the best flash output, and then it stores that information in its internal memory. The camera also detects when there is a difference between the existing ambient light and flash light readings, and it assumes the difference is the background. If the camera detects areas where there are large differences in readings, it attributes them to a highly reflective surface, such as glass or a mirror, and ignores them when calculating the exposure.
), the camera takes a reading of the light in the scene when you half-press the shutter button. When you fully press the shutter button, a preflash is fired and read by the camera. The camera compares the existing and preflash readings to determine the best flash output, and then it stores that information in its internal memory. The camera also detects when there is a difference between the existing ambient light and flash light readings, and it assumes the difference is the background. If the camera detects areas where there are large differences in readings, it attributes them to a highly reflective surface, such as glass or a mirror, and ignores them when calculating the exposure.
During this lightning fast process, the flash unit also receives information from the camera, including the focal length of the lens, distance from the subject, and exposure settings, and this information confirms if the subject distance from the flash reading is correct. The flash also automatically figures in the angle of view. Thus, the EX-series Speedlites automatically adjust the flash zoom mechanism to get the best flash angle and to illuminate key areas of the scene, which also helps conserve power.
To control exposure in mixed-light situations, or those that require a combination of ambient light and flash, remember that shutter speed controls the amount of ambient light contributed to an exposure and aperture controls the amount of light contributed by the flash.
E-TTL II technology also enables high-speed sync flash with Speedlites. High-speed sync flash allows flash synchronization at a shutter speed faster than the camera’s maximum flash sync speed of 1/180 second. There are several advantages of this. First, when shooting at shutter speeds faster than 1/180 of a second you can open up the lens to a wide aperture even working in very bright ambient conditions. This creates a shallow depth of field and blurs the background, often desirable in portraits. Second, by using a faster shutter speed than possible without High-speed Sync mode, you can remove more of the ambient light in an exposure. This is useful when you want an image to have a dramatic sky or appear as though it were captured at night.
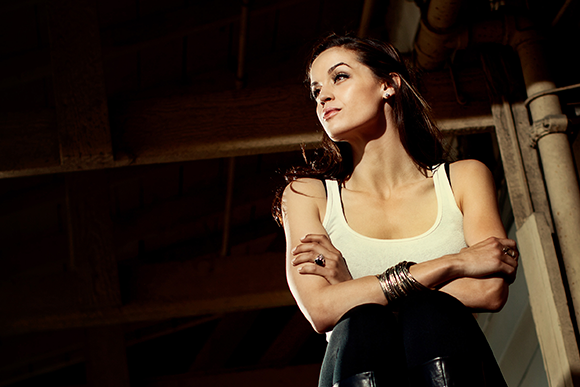
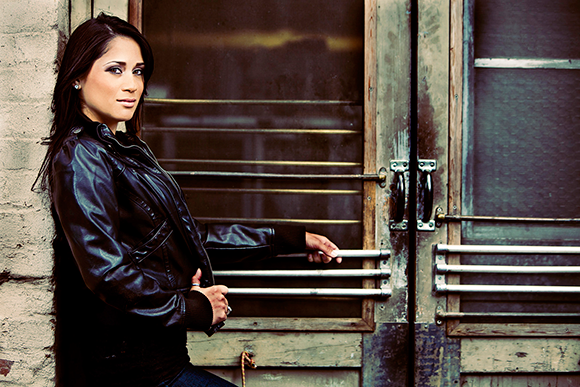
9.2 A high-speed sync flash allowed me to shoot this image with a very high shutter speed. This removed the majority of ambient light and made the image appear as though it was captured at night. Exposure: ISO 100, f/2.8, 1/800 second with a Canon 50mm, f/1.2L USM.
Why Flash Sync Speed Matters
Flash sync speed is the fastest shutter speed at which the camera can expose the full image. If flash sync speed isn’t set correctly, only part of the image sensor has enough time to receive light while the shutter curtain is open. The result is that the image is unevenly exposed or part of the scene isn’t captured. The 6D doesn’t allow you to set a shutter speed faster than 1/180 second (unless you’re using high-speed flash sync), but you can set a slower flash sync speed.
When you’re shooting in Aperture-priority AE mode ( ![]() ), you can use the External Speedlite control option on the Shooting 2 menu tab (
), you can use the External Speedlite control option on the Shooting 2 menu tab ( ![]() ), to control the flash sync speed. The options are AUTO, 1/180-1/60 sec. auto, or 1/180 sec. (fixed).
), to control the flash sync speed. The options are AUTO, 1/180-1/60 sec. auto, or 1/180 sec. (fixed).
Using Off-camera Flashes
It’s safe to say that most, if not all, professional images are produced with off-camera flash. When asked by people about the steps they should take to improve their flash photography, the one piece of advice I give without fail is to get the flash off their camera as soon as possible. This doesn’t mean not using the flash, quite the opposite. It means using the flash off-camera so you can produce the stunning images you’ve always wanted. Flashes located off-camera can produce light with a more polished, deliberate, and pleasing look for your subjects.
The ingenious thing about of the Canon Speedlite System is that Speedlites don’t have to be physically connected to the camera to be triggered or to utilize the myriad benefits of E-TTL II communication between the camera and flash. The Speedlite’s E-TTL II preflash, working together with the camera, does all the work for you; all you have to do is make some minor tweaks when necessary, and you’re ready to shoot. You can make all of your adjustments using either the External Speedlite control menu on some of Canon’s newer cameras, the 580EX II’s LCD monitor, or the back panel of the ST-E2 Speedlite transmitter.
Radio versus optical Speedlite systems
In the past, photographers using multiple flashes have contended with the limitations of optical signals to wirelessly trigger slave flash units from the master flash or from a wireless transmitter such as the ST-E2. Alternatively, there was the option of buying third-party radio-control accessories. However, with Canon’s Speedlite 600EX-RT, wireless flash became a lot easier. With built-in radio transmission, third-party radio transmitters are no longer necessary, and many of the restrictions imposed by optically based systems are eliminated, including the need for slave units to have clear line of sight to the master unit.
For more detailed information on Canon Speedlites, see my book, Canon Speedlite System Digital Field Guide, Third Edition (also available from Wiley).
While having built-in radio control is exciting, Canon’s RT flash system is pricey. The new Speedlite 600EX-RT costs an additional $100 more than its non-RT Speedlite predecessors do. The following sections provide an overview of both radio- and optical-based systems.
With the introduction of the Speedlite 600EX-RT, most of the limitations imposed by optical-based wireless multiple flash systems are gone. Whether you are converting to RT (radio transmission) flash right away or over time, there are some important things to know about the new RT system compared to the optical Speedlite system.
First, anyone who wants to use current Speedlites and move gradually to an RT system will be happy to know that the new 600EX-RT is compatible with the existing optical-based Speedlites. This way, you can add the 600EX-RT to your existing wireless system and use it just as you use your current Speedlites in multiflash setups. The 600EX-RT plays nicely with the 580EX II, 580EX, 550EX, 430EX II, 430EX, 320EX, or 270EX II. Backward compatibility means that you can incorporate one or two 600EX-RTs into your existing Speedlite system and keep shooting.
Compatibility works only one way, though. While the 600EX-RT is compatible with wireless optical Speedlites, optical Speedlites are not compatible with the 600EX-RT or the Speedlite Transmitter ST-E3-RT. As of this writing, if you have a Speedlite system with a third-party radio-based accessory, such as Radio Poppers, it cannot be mixed with a 600EX-RT wireless E-TTL system.
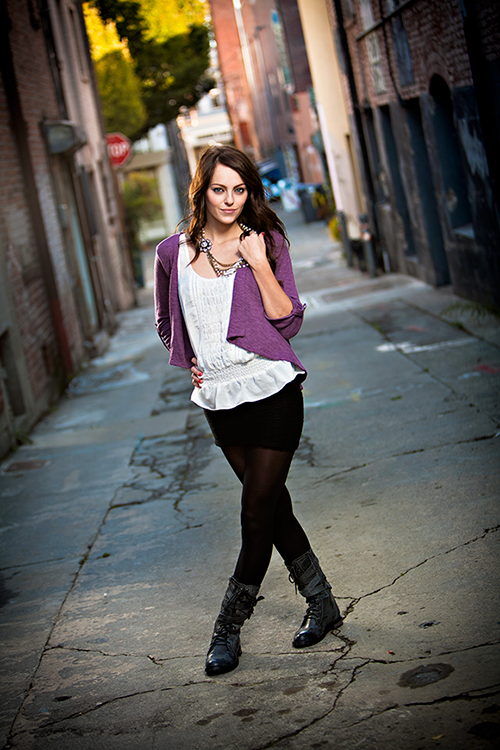
9.3 For this image, I used two 580EX II Speedlites communicating wirelessly with RadioPopper triggers. Exposure: ISO 100, f/2.8, 1/125 second with a Canon 70-200mm, f/2.8L IS USM.
Those are the mix-and-match basics. Table 9.1 provides a quick look at some of the other differences between optical- and radio-based wireless Speedlite systems.
Table 9.1 Differences Between Radio and Optical Wireless Flash
|
Optical-based wireless flash |
Radio-based wireless flash |
|
|
Distance |
Slave units limited to a distance of approximately 49 feet from the master unit indoors. |
Slave units can be positioned 100 feet from the master unit. |
|
Slave position |
The master unit preflash has an angle equivalent to a 24mm wide-angle lens. Thus, placing flash units too far to the sides of the master can create relatively weak preflash signals. |
Radio waves are transmitted in a 360-degree arc so that slave units can be placed to the side and even behind the photographer. |
|
Placement relative to master flash |
Slave units must have a clean and clear line of sight to the master flash or ST-E2 unit. |
Radio waves move through and around obstructions, including walls, people, and objects such as product displays, so slaves can be placed virtually anywhere, including behind the photographer. |
|
Number of groups |
Up to three, A–C |
Up to five, A–E |
|
Number of slave units |
No restriction |
Up to 15 slave units |
|
Number of channel choices |
1 to 4 |
1-15 |
|
Existing light challenges |
The relatively weak preflashes from the master flash may be overpowered by existing light conditions, such as bright sunlight, causing the slave units to not fire. |
Radio transmission is unaffected by existing light conditions. |
In addition, RT system flash groups can have 1 to 15 units per group, and groups do not need to have the same number of units. The firing status of each group is communicated to the master unit automatically. If one group doesn’t recycle as quickly as other groups, then the master unit knows, and lets you know, if a group isn’t ready to fire. If you’re using fully automatic flash, the master unit settings are automatically communicated to the slave unit so that you do not have to set the slave unit(s) separately.
When you choose the Gr (Group) mode, new to the 600-EX-RT, you have the option to set up to five flash groups with each group using a different flash mode. For example, you can have one group in Manual mode, another group in E-TTL II, and another set to Auto external flash metering. This type of setup is restricted, as of this writing, to the most recent (2012 or later) Canon EOS cameras, including the 6D, 5D Mark III, and the 1DX.
Multicamera remote shooting
One interesting option that the RT technology offers is the ability to use a 600EX-RT unit or the ST-E3-RT to fire a camera from up to 100 feet away. With remote release from a slave unit, you can position a camera with an attached 600EX-RT or ST-E3-RT in a place where you may not be able to stand during a concert, wedding, or other event. Then you can trip the camera shutter wirelessly from a 600EX-RT or an ST-E3-RT from 100 feet away. Of course, you have to work out a way to ensure that the focus is established; otherwise, the slave camera will not fire. Canon recommends using manual focus.
To carry this idea further, use Linked Shooting and Remote Release to fire up to 15 slave cameras, each outfitted with either a 600EX-RT flash or an ST-E3-RT up to 100 feet from a designated master camera. As of this writing, Linked Shooting and Remote Release work only with the 6D, 5D Mark III, and the 1DX. For other EOS cameras with an N3-style remote control socket, you need an accessory SR-N3 cord.
Working with Canon Speedlites
Regardless of whether you use only the new 600EX-RT or a mix of EX Speedlites, the 6D offers a high level of control over the Speedlite directly from the camera. For example, you can set the metering mode, Av-mode sync speed, wireless functions, zoom (on-camera flash only), shutter sync, and flash exposure modifications. In addition, you can set the Custom Functions for the Speedlite. If you’re shooting in automatic mode, the settings from the master are automatically replicated on the slave flash units, making setup easy to control directly from the camera.
Setting flash options
Many of the Speedlite flash settings can be accessed from the Shooting menu 2 tab ( ![]() ). This menu offers an array of adjustments ranging from enabling flash firing to determining the flash-sync mode for Aperture-priority AE mode (
). This menu offers an array of adjustments ranging from enabling flash firing to determining the flash-sync mode for Aperture-priority AE mode ( ![]() ) shooting. From this menu, you can also set Custom Functions for the Speedlite.
) shooting. From this menu, you can also set Custom Functions for the Speedlite.
For all step-by-step tasks, set the Mode dial to any mode except Scene Intelligent Auto shooting mode ( ![]() ).
).
To change the basic settings for EX-series Speedlites, attach the Speedlite to the hot shoe, turn it on, and then press the Menu button ( ![]() ) to activate the camera’s menu system. Use the Main dial (
) to activate the camera’s menu system. Use the Main dial ( ![]() ) to navigate to the Shooting menu 2 tab (
) to navigate to the Shooting menu 2 tab ( ![]() ). Turn the Quick Control dial (
). Turn the Quick Control dial ( ![]() ) to highlight External Speedlite control, and then press the Set button (
) to highlight External Speedlite control, and then press the Set button ( ![]() ). The External Speedlite control screen appears. Turn the Quick Control dial (
). The External Speedlite control screen appears. Turn the Quick Control dial ( ![]() ) to highlight the setting that you want, and then press the Set button (
) to highlight the setting that you want, and then press the Set button ( ![]() ).
).
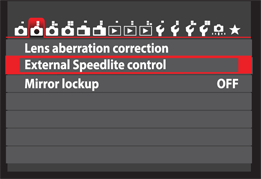
9.4 The Shooting menu 1 tab with the External Speedlite control option selected.
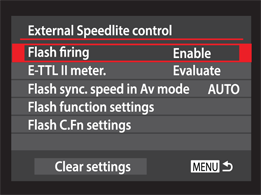
9.5 The External Speedlite control screen.
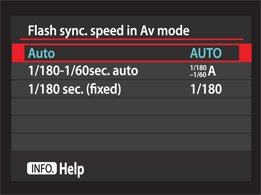
9.6 The Flash sync. speed in Av mode screen.
Table 9.2 details the options from which you can choose. The Flash function settings are covered later in this chapter.
Table 9.2 External Speedlite Control Menu Options
|
Setting |
Option(s) |
Suboptions/Notes |
|
Flash firing |
Enable, Disable |
Turns the flash firing on and off for shooting in Program AE ( |
|
E-TTL II meter |
Evaluative, Average |
Evaluative metering samples the entire scene and biases the exposure for the subject area. As the name implies, Average metering averages the exposure for the entire scene. You may need to set flash exposure compensation to get a pleasing exposure. |
|
Flash sync. speed in Av mode |
Auto, 1/180–1/60 sec. auto, or 1/180 sec. (fixed) |
This determines the flash sync speed when you’re shooting in Aperture-priority AE mode ( |
|
Clear flash settings |
Cancel, OK |
Press the Set button ( |
|
Flash C.Fn settings |
Access to all Custom Function screens for the attached Speedlite |
Press the Set button ( |
|
Clear all Speedlite C.Fn’s |
Cancel, OK |
Press the Set button ( |
Flash function settings
You likely already know how handy the Quick Control screen is for changing settings on the 6D. The equivalent to that screen for the flash is the Flash function settings screen — a handy screen with the most commonly used flash settings.
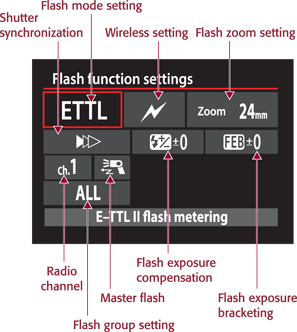
9.7 The Flash function settings screen for a Speedlite 600EX-RT.
To make the Flash function settings screen more accessible, add the External Speedlite control to your My Menu ( ![]() ) options. Then just turn the Quick Control dial (
) options. Then just turn the Quick Control dial ( ![]() ) to select Flash function settings and press the Set button (
) to select Flash function settings and press the Set button ( ![]() ) to access the screen.
) to access the screen.
You can set the following functions on the Flash function settings screen. The options that are displayed vary depending on the Speedlite you’re using. The following options are for the Speedlite 600EX-RT (not all of these will be available on earlier Speedlites):
• Flash mode. You can choose the following options:
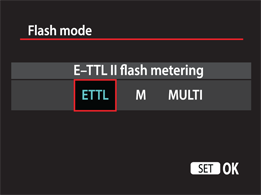
9.8 The Flash mode settings screen.
• ETTL. This is the choice for automatic flash exposure with EX-series Speedlites.
• M. Manual is the option to choose if you’re using a handheld flash meter or using the guide number and distance measurement to determine the flash exposure. You can set the flash output from 1/128 power to full output or 1/1 in 1/3-stop increments.
• MULTI. This option (Stroboscopic Flash) enables you to capture successive movements of the subject when shooting with a slow shutter speed using stroboscopic flash. You can set wireless for radio or optical transmission, or no wireless, and you can set the number of flashes, the flash frequency (Hz), and the flash output level from 1/128 to 1/2 power.
• Ext.A or Ext.M. These modes use the Speedlite’s built-in external metering sensor to measure the light that is reflected from the subject back to the Speedlite. Then it adjusts the flash output for achieving a standard exposure. The A and M designations stand for Auto and Manual. With Auto, the Speedlite automatically adjusts the flash output; with Manual, you set the flash output with the ISO and aperture settings on the camera.
• Gr. The Group option gives you control over individual flash units designated in groups from A to E. For each group, you can set the Flash mode with options for E-TTL, Manual flash, and AutoExtFlash, or you can choose Disable. Then, you can also set flash exposure compensation for each group.
• Wireless options. The choices are Off, Wireless: Radio transmission, or Wireless: Optical transmission. You can use radio transmission only with the 600EX-RT Speedlite and Speedlite Transmitter ST-E3-RT. Wireless optical transmission is compatible with Speedlites before the 600EX-RT. You can use the 600EX-RT as part of an optical wireless multiple-flash setup.
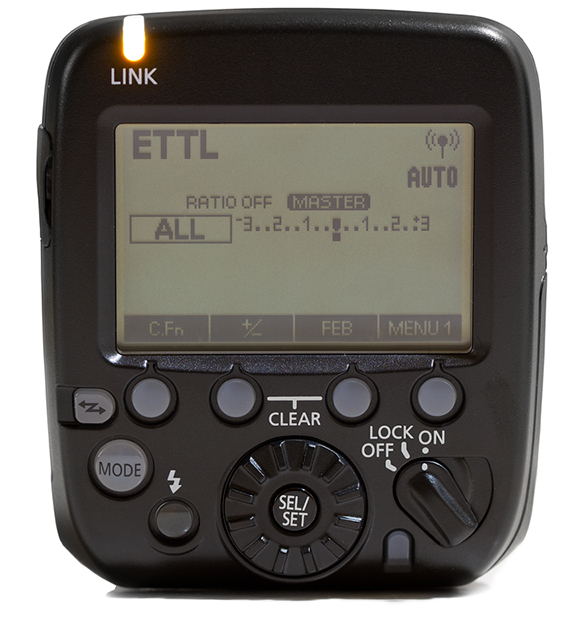
9.9 The Speedlite Transmitter ST-E3-RT control panel.
• Flash zoom. This function enables you to either have the Speedlite automatically detect the focal length of the lens or have you manually set the focal length on the Flash zoom screen.
When working with off-camera flash, manually zooming the Speedlite’s focal length value is great way to focus its beam of light and create a natural in-camera vignette, and it allows you to place your light farther away from your subject.
• Shutter synchronization. The options here are:
• First-curtain synchronization. This is the most commonly used setting and causes the flash to fire immediately after the exposure starts.
• Second-curtain synchronization. With this option, the first flash is a preflash, which takes place before the shutter is opened when ETTL mode is being used. This preflash is used to determine flash output and is not recorded as part of the image. Normally, there is only one flash at the end of the exposure sequence just before the second curtain closes.
• High-speed synchronization. This enables you to use the flash at shutter speeds faster than 1/180 second. With High-speed sync, the faster the shutter speed, the shorter the flash range. The effective flash range is displayed on the LCD monitor.
• Flash exposure compensation. Similar to the way exposure compensation is set on the camera, this function allows you to adjust the light output up or down in 1/3-stop increments over a +/– 3-stop range while still enjoying all the benefits of E-TTL II flash metering.
• Flash exposure bracketing (FEB). This is a similar concept to Auto-Exposure Bracketing (AEB), only instead of changing ambient exposure settings you shoot a series of three photographs with normal, positive flash compensation and negative flash compensation. You can apply the bracketing value in half, third, or full stop values. FEB auto-cancels once you’ve taken the three-photograph sequence and uses whatever drive mode your camera is set to. FEB can be used in conjunction with both Flash Exposure Lock (FEL) and Flash Exposure Compensation (FEC).
• Master flash. The flash unit that is mounted on the camera when using multiple Speedlites in a wireless flash configuration. The master flash unit controls the flash output of all remote units. The built-in Speedlites of some camera models can also act as a master flash. The master flash unit is also sometimes called a commander.
• Flash group. A collection of Speedlites, in which each flash can either share the same or different output and mode settings and is controlled by the master flash unit or controller.
• Radio Channel. To avoid interfering with other wireless flash users in the same location, the master and slave units can communicate wirelessly using 1 to 15 channels. Communications in the Speedlite System are partially based on setting the master and all additional Speedlites to the same channel. If by chance another photographer is using the same channel as you are, your Speedlite System units may fire from the other photographer’s controls. To avoid this, you can set the master and the other Speedlites to a different channel.
To set any of these options, follow these steps:
1. Press the Menu button (![]() ) to activate the camera’s menu system. Use the Main dial (
) to activate the camera’s menu system. Use the Main dial ( ![]() ) to navigate to the Shooting menu 2 tab (
) to navigate to the Shooting menu 2 tab ( ![]() ). Turn the Quick Control dial (
). Turn the Quick Control dial ( ![]() ) to highlight External Speedlite control, and then press the Set button (
) to highlight External Speedlite control, and then press the Set button ( ![]() ).The External Speedlite control screen appears.
).The External Speedlite control screen appears.
2. Turn the Quick Control dial (![]() dial) to highlight Flash function settings, and then press the Set button (
dial) to highlight Flash function settings, and then press the Set button (![]() ). The Flash function settings screen appears.
). The Flash function settings screen appears.
3. Turn the Quick Control dial (![]() ) to select the option that you want to change, and then press the Set button (
) to select the option that you want to change, and then press the Set button (![]() ). The settings screen appears for the option you chose.
). The settings screen appears for the option you chose.
4. Turn the Quick Control dial (![]() ) to change the setting, and then press the Set button (
) to change the setting, and then press the Set button (![]() ). It’s important to note that the options on the screen change as you make various adjustments, so be sure to continue exploring the options. Just turn the Quick Control dial (
). It’s important to note that the options on the screen change as you make various adjustments, so be sure to continue exploring the options. Just turn the Quick Control dial ( ![]() ) to select additional options as they appear, and then press the Set button (
) to select additional options as they appear, and then press the Set button ( ![]() ) to view more settings.
) to view more settings.
Flash exposure compensation
Like a dimmer switch on household lights, flash exposure compensation (FEC) enables you to adjust the flash output without changing the aperture or the shutter speed. This is a good modification to use when your subject is lighter or darker than middle (18 percent) gray and when the background is very bright or very dark. FEC is also useful for balancing lighting in unevenly lit scenes and reducing the dark background shadows that flash creates.
Using FEC, you can increase or decrease the flash output up to +/–3 stops in 1/3-stop increments. As a result, you can maintain the camera’s original E-TTL readings while manually increasing or decreasing the flash output.
To create a more natural looking image, set the FEC to –0.5 to –2 Exposure Values (EV).
FEC can also be combined with exposure compensation. If you shoot a scene where one part of the scene is brightly lit and another part of the scene is much darker — for example, an interior room with a view to the outdoors — then you can set exposure compensation to –1 and set the FEC to –1 to make the transition between the two differently lit areas more natural.
Auto Lighting Optimizer can mask the effect of FEC. If you want to see the effect of the compensation, turn off Auto Lighting Optimizer by setting it to Disable on the Shooting 3 menu tab ( ![]() ).
).
FEC can be set in one of two ways. First, be sure the Speedlite is mounted on the camera and turned on. To set FEC via the Quick Control screen, follow these steps:
1. Press the Quick Control button (![]() ) to activate the Quick Control screen, use the multi-controller (
) to activate the Quick Control screen, use the multi-controller (![]() ) to navigate to FEC (
) to navigate to FEC (![]() ). Once FEC is highlighted, a pop-up tip describing FEC’s function temporarily appears on the camera’s LCD monitor.
). Once FEC is highlighted, a pop-up tip describing FEC’s function temporarily appears on the camera’s LCD monitor.
2. Use the Main dial (![]() ) or Quick Control dial (
) or Quick Control dial (![]() ) to dial in a plus (+) or minus (–) FEC value in 1/3-stop increments.
) to dial in a plus (+) or minus (–) FEC value in 1/3-stop increments.
3. Alternatively, press the Set button (![]() ) to activate the FEC submenu, which displays the exposure level indicator with darker (–) values on the left and brighter (+) values on the right. Press the Set button to confirm value changes.
) to activate the FEC submenu, which displays the exposure level indicator with darker (–) values on the left and brighter (+) values on the right. Press the Set button to confirm value changes.
To remove FEC, repeat these steps, but in Step 2 or 3, set the value to zero or move the tick mark on the Exposure Level Indicator back to the center. To set FEC via the External Speedlite control menu, follow these steps:
1. Press the Menu button (![]() ) to activate the camera’s menu system. Use the Main dial (
) to activate the camera’s menu system. Use the Main dial ( ![]() ) to navigate to the Shooting menu 2 tab (
) to navigate to the Shooting menu 2 tab ( ![]() ).
).
2. Use the Quick Control dial (![]() ) or multi-controller (
) or multi-controller (![]() ) to highlight the External Speedlite control menu. Press the Set button (
) to highlight the External Speedlite control menu. Press the Set button ( ![]() ) to activate it.
) to activate it.
3. Use the Quick Control dial (![]() ) to highlight the Flash function settings option, and then press the Set button (
) to highlight the Flash function settings option, and then press the Set button (![]() ) to activate the Flash function option menu.
) to activate the Flash function option menu.
4. Use the Quick Control dial (![]() ) or multi-controller (
) or multi-controller (![]() ) to highlight FEC (
) to highlight FEC (![]() ), and then press the Set button (
), and then press the Set button (![]() ) to activate the FEC (
) to activate the FEC (![]() ) menu.
) menu.
5. Use the Quick Control dial (![]() ) to dial in a plus (+) or minus (–) FEC value in 1/3-stop increments.
) to dial in a plus (+) or minus (–) FEC value in 1/3-stop increments.
Flash exposure bracketing
As with Auto Exposure Bracketing (AEB) on the camera, flash exposure bracketing (FEB) takes three images at a standard, reduced, and increased flash output. The range is +/–3 stops in 1/3-stop increments. To set FEB, follow these steps:
1. Press the Menu button (![]() ) to activate the camera’s menu system. Use the Main dial (
) to activate the camera’s menu system. Use the Main dial ( ![]() ) to navigate to the Shooting menu 2 tab (
) to navigate to the Shooting menu 2 tab ( ![]() ).
).
2. Use the Quick Control dial (![]() ) or multi-controller (
) or multi-controller (![]() ) to highlight the External Speedlite control menu. Press the Set button (
) to highlight the External Speedlite control menu. Press the Set button ( ![]() ) to activate it.
) to activate it.
3. Use the Quick Control dial (![]() ) to highlight the Flash function option, and then press the Set button (
) to highlight the Flash function option, and then press the Set button (![]() ) to activate the Flash function option menu.
) to activate the Flash function option menu.
4. Use the Quick Control dial (![]() ) or multi-controller (
) or multi-controller (![]() ) to highlight FEB (
) to highlight FEB (![]() ), and then press the Set button (
), and then press the Set button (![]() ) to activate the FEB (
) to activate the FEB (![]() ) menu.
) menu.
5. Turn the Quick Control dial (![]() ) clockwise or use the multi-controller (
) clockwise or use the multi-controller (![]() ) to set the bracketing amount in 1/3-stop increments. If you want to cancel FEB, turn the Quick Control dial (
) to set the bracketing amount in 1/3-stop increments. If you want to cancel FEB, turn the Quick Control dial ( ![]() ) counterclockwise until the tick mark is at 0.
) counterclockwise until the tick mark is at 0.
Flash Exposure Lock
Flash Exposure Lock (FE Lock) is a great way to set flash output for any part of the scene or subject — typically an area in the scene that has 18 percent reflectance or when using a photographic gray card. You can also use FE Lock to help compensate for the exposure error that can be caused by surfaces such as mirrors or windows or other highly reflective subjects. Just take a preflash reading off an 18 percent reflectance area of the subject or scene using the Spot meter ( ![]() ); the 6D locks the reading long enough for you to recompose the shot and make the image.
); the 6D locks the reading long enough for you to recompose the shot and make the image.
If you’re accustomed to using gray cards, you can use the card provided in the back of this book or identify a middle-gray tonal value in the scene and lock the flash exposure on it. If the area from which you take the meter reading is brighter or darker than middle gray, you can use flash exposure compensation (FEC) to compensate for the difference.
If you are shooting a series of images under unchanging light, FEC is more efficient and practical than FE Lock.
To set FE Lock, follow these steps:
1. Focus on the subject, and then point the center of the viewfinder on the subject or an area that is middle gray (18 percent). Keep in mind if the subject has a fair complexion, this may not be accurate. Lighter skin can be a full stop brighter than a grey card.
2. Press the AE Lock button (![]() ). The camera fires a preflash. FEL is displayed momentarily in the viewfinder. If the flash icon in the viewfinder blinks, you’re beyond the flash range, so move closer and repeat the process. If pressing the AE Lock button (
). The camera fires a preflash. FEL is displayed momentarily in the viewfinder. If the flash icon in the viewfinder blinks, you’re beyond the flash range, so move closer and repeat the process. If pressing the AE Lock button ( ![]() ) does not fire a preflash, go to the Custom Functions menu (
) does not fire a preflash, go to the Custom Functions menu ( ![]() ), highlight C.Fn III: Operations/Others, press the Set button (
), highlight C.Fn III: Operations/Others, press the Set button ( ![]() ) to enter C.Fn III menu and use the Quick Control dial (
) to enter C.Fn III menu and use the Quick Control dial ( ![]() ) to select option 5: Custom Controls. Press the Set button (
) to select option 5: Custom Controls. Press the Set button ( ![]() ) to enter the Custom Controls options menu. Next use the Quick Control dial (
) to enter the Custom Controls options menu. Next use the Quick Control dial ( ![]() ) to highlight the AE Lock button, AE Lock/FE Lock, press the Set button (
) to highlight the AE Lock button, AE Lock/FE Lock, press the Set button ( ![]() ) to enter the AE Lock button, AE Lock/FE Lock options menu, use the Quick Control dial (
) to enter the AE Lock button, AE Lock/FE Lock options menu, use the Quick Control dial ( ![]() ) to highlight FEL for the function and press the Set button (
) to highlight FEL for the function and press the Set button ( ![]() ) to confirm your selection.
) to confirm your selection.
3. Move the camera to compose the image, and then focus and make the image. Ensure that the asterisk is still displayed to the right of the flash icon in the viewfinder before you make the picture. As long as the asterisk is displayed, you can take other images at the same compensation amount.
For non-Canon flash units, the sync speed is 1/180 second. For studio strobes, Canon recommends a 1/60 or 1/30 second sync speed.
In lower light indoor or night outdoor scenes, the flash often illuminates the subject properly, but the background is too dark. In these scenes, switch to Aperture-Priority AE mode ( ![]() ) or Shutter-priority AE mode (
) or Shutter-priority AE mode ( ![]() ) and use a wide aperture or slow shutter speed, respectively, to allow more of the existing light to contribute to the exposure. Just be sure that the subject remains very still if the shutter speed is slow.
) and use a wide aperture or slow shutter speed, respectively, to allow more of the existing light to contribute to the exposure. Just be sure that the subject remains very still if the shutter speed is slow.
Setting Up Wireless Flashes
While it’s beyond the scope of this book to provide detailed instructions for wireless flash techniques, the following sections help get you started with flash setups ranging from one to multiple Speedlites.
When I shoot portraits on location, I take three Speedlites with stands, silver umbrellas, portable softboxes, often a beauty dish, and multiple reflectors. This setup is a lightweight mobile studio that can either provide the primary lighting for subjects or supplement existing light. Along with the 6D, I also bring the Speedlite Transmitter ST-E3-RT if I’m using 600EX-RT Speedlites.
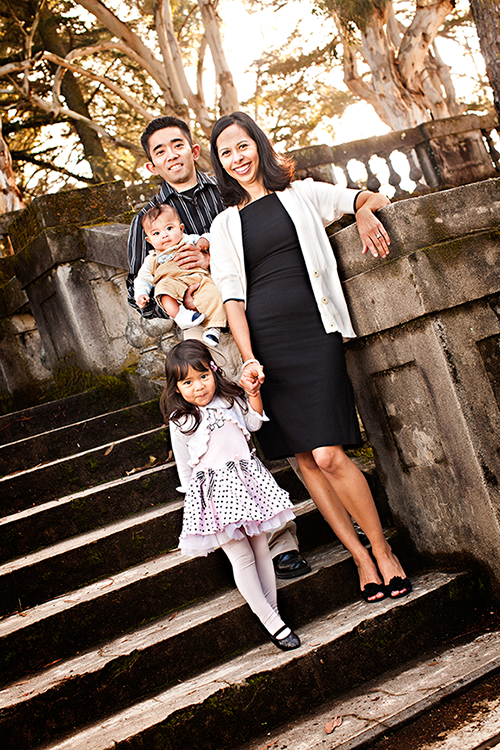
9.10 Using two Speedlites as one light source allowed me to overpower the sun behind this family. Using E-TTL, I fine-tuned the power output with FEC to create a more natural look. Exposure: ISO 160, f/5.0, 1/80 second with a Canon 50.0 mm, f/1.2L USM.
Using a one-light setup
Any lighting system begins with a single light. With some creativity, you can use one Speedlite effectively for portraits, still-life subjects, and some food and product shots. Be sure to have reflectors on hand to increase your options for directing the light. They essentially function like an additional light source.
9.11 Here, I used the sun as a backlight and illuminated the subject’s face with a single wireless Speedlite fired through a diffusion panel. Exposure: ISO 100, f/2.8, 1/100 second with a Canon 70-200mm, f/2.8L IS USM.
To get the best images, always start with the Speedlite off the camera. You can do that by using the Speedlite Transmitter ST-E3-RT, the ST-E2 with Speedlites older than the 600EX-RT, or an inexpensive and extra long E-TTL cable. This way the Speedlite can be mounted on a light stand or flash bracket.
9.12 For this image, I used an off-camera wireless Speedlite in a softbox on the right of the subject and a reflector on the left. Exposure: ISO 200, f/5.0, 1/100 second with a Canon 85mm, f/1.2L USM.
Using multiple Speedlites
It follows that if one light or flash is good, two or more flash units are better. While that logic doesn’t hold true for everything, in the case of flash units it does. Multiple Speedlites enable you to set up lighting patterns and ratios just as you can with a studio lighting setup. In addition, you can use flash units to resculpt existing light while still providing natural-looking illumination.
Ganging up multiple Speedlites so that together they create a stronger light source is a useful technique when you need to overpower the sun. Additionally, working this way demands less power from each individual Speedlite, thereby increasing battery life and decreasing recycle times.
Keep in mind that if you have more than one 600-EX-RT Speedlite, you can also use one as a master commander and the others as slave flash units. In this situation, I usually disable the light output of the master flash, which is in camera’s hot shoe, and rely on the master only to communicate exposure data between the camera and slave flash units.
With multiple Speedlites, you can use lighting ratios to create classic lighting patterns for portraits and for other still-life subjects. If you are new to using lighting ratios, the accompanying sidebar details how ratios relate to exposure. The basic concept with ratios is using a set of numbers to describe the difference in power output from one light source to another. For example, in a two light setup using a 1:2 ratio, one light would output twice as much light as the other.
In any lighting setup, the key light provides the primary light. Then you add another light, and it determines the depth of the shadows. From there, you can add a background light or two, and a hair or accent light. Once you’ve done this, you simply set the lighting ratio to get the effect you want. It also helps to have a compliment of reflectors, softboxes, stands, and umbrellas on hand to soften, shape, and direct the light. Even a simple Sto-Fen cap (www.stofen.com) on the flash heads provides softening to the light.
You can also have all the Speedlites fire as a single group when you need to fill an area with light. To do this, set the Firing group to ALL.
The following steps describe using an ST-E3-RT as the master unit and a 600EX-RT as a slave unit. You can use essentially the same settings for an optical Speedlite and the ST-E2 or use a second Speedlite mounted on the camera hot shoe as the master unit that doesn’t fire.
Here is how I set up the master ST-E3-RT for the shot shown in Figure 9.13:
• Metering: ETTL.
• Transmission: Radio transmission.
• Sync: First-curtain.
• FEC and FEB: 0.
• Channel: Auto. Channels enable you to work in the same area as other photographers who are also using flash units. When you set a channel, your flashes do not trigger theirs. Just set the master and the slave to the same channel.
• Flash group: ALL.
• Wireless radio ID: 0000.
The setup on the slave 600EX-RT was the same as the master for metering, transmission, sync, FEB, channel, flash group, and radio ID. I set the FEC to –1 stop.
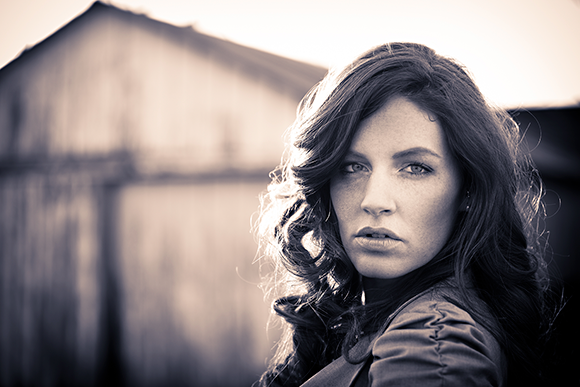
9.13 Two Speedlites communicating wirelessly in a left-to-right wedge pattern in front of the subject produces an even, complimentary lighting pattern often seen in beauty photography. Exposure: ISO 100, f/3.2, 1/500 second with a Canon 70-200mm, f/2.8L IS USM.
While there are some differences between the radio-based setups of the RT and the optical setups of earlier model Speedlites, the differences are minor for the most part, and you should be able to make the necessary adjustments easily. As an example, for the following settings, I used a 600EX-RT as the master unit, and I set a 580EX II and 580EX as slaves:
• Metering: ETTL.
• Transmission: Optical.
• Zoom: Manual (although Auto zoom works fine if it is accurate for the lens you’re using).
• Sync: First-curtain.
• FEC: 0.
• FEB: 0.
• Channel: 1.
• Master flash firing: Enabled.
• A:B Ratio control: 3:1.
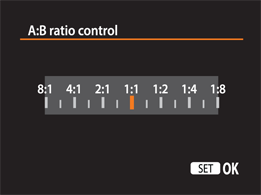
9.14 The A:B ratio control screen.
• Flash group: A:B C. If you are using two groups, choose the A:B option.
• Group C exposure compensation: –1.
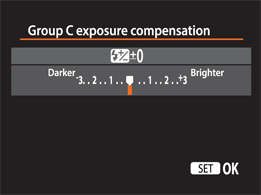
9.15 The Group C exposure compensation screen.
I used an optical setup because, at the time, I had only one 600EX-RT unit, but several optically based Speedlites. The slave Speedlites had the same metering, transmission, zoom, sync, and channel settings. I set the second Speedlite to Group B, and I set the third Speedlite to Group C. The steps for adjusting settings differ depending on the Speedlite. For the 580EX Speedlite, for example, press and hold the Zoom button until the Group setting blinks, and then turn the Select dial to change the setting.
9.16 For this shot with a 3:1 ratio, I used three Speedlites: One lit the background, one served as a side accent light, and another lit the face. The main light was camera left and positioned approximately 45 degrees to the subject to create a Rembrandt lighting pattern. Exposure: ISO 100, f/3.5, 1/200 second with a Canon 50.0 mm, f/1.2L USM.