
10.5 The Wi-Fi function option is highlighted.
Chapter 10: Using the Canon EOS 6D Wireless Features
The Canon EOS 6D introduces the first-ever built-in Wi-Fi and GPS features included on an EOS camera. These features open up a world of sharing and provide remote control options never before possible with a Canon dSLR. Wi-Fi makes it easy to use a smartphone or tablet to control the camera and capture images remotely, connect to and print from wirelessly enabled printers, transfer images between Wi-Fi enabled cameras, and share your images and movies on popular social media sites, such as Facebook, Twitter, and YouTube. The robust built-in GPS system provides features like geotagging and mapping image locations.
In this chapter, I discuss setting up the camera’s Wi-Fi settings, connecting to a wireless network, sharing images and video on the web, remotely controlling the camera with a smartphone or tablet, geotagging images with GPS information, and using the map utility.
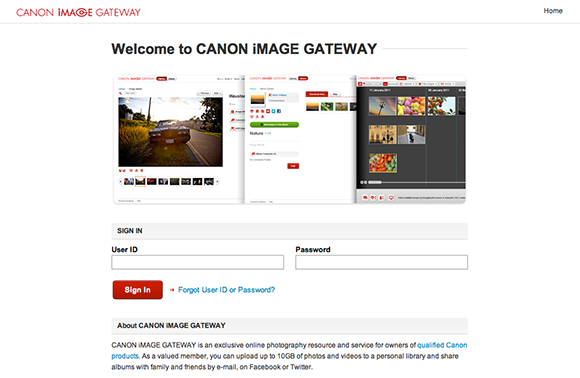
The Canon iMAGE Gateway sign-in page.
Wi-Fi Capabilities
The 6D’s new built-in Wi-Fi capabilities make it possible to do the following wirelessly:
• Remotely control the camera
• Transfer images
• Print images
• Share images and movies on social media sites
In this section, I detail the 6D Wi-Fi settings, and show you how to configure the camera settings, connect to a network, and share images on the web. In the next section, I’ll explain how to set up your camera and smartphone or tablet for remote control.
Wi-Fi settings
The first step toward utilizing the many new Wi-Fi enabled features built into the 6D is configuring the camera for wireless use. The following steps are necessary to enable Wi-Fi on the 6D.
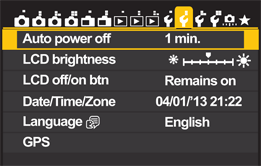
By default, the camera is set to Auto power off after 1 minute of inactivity to save power. If the camera powers down, the Wi-Fi connection will be lost. To prevent this, disable the Auto power off function by doing the following:
1. Use the Main dial (![]() ) to select Setup menu 2 tab (
) to select Setup menu 2 tab (![]() ). Use the Quick Control dial (
). Use the Quick Control dial ( ![]() ) to highlight Auto power off and press the Set button (
) to highlight Auto power off and press the Set button ( ![]() ) to enter the Auto power off settings menu. Use the Quick Control dial (
) to enter the Auto power off settings menu. Use the Quick Control dial ( ![]() ) to highlight Disable, and then press the Set button (
) to highlight Disable, and then press the Set button ( ![]() ) to confirm your selection. This maintains your Wi-Fi connection when the camera wakes from standby mode.
) to confirm your selection. This maintains your Wi-Fi connection when the camera wakes from standby mode.
10.1 The Setup menu 2 tab with the Auto power off option highlighted.
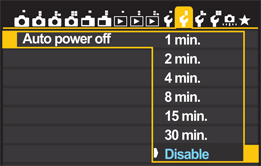
10.2 The Auto power off options screen with Disable highlighted.
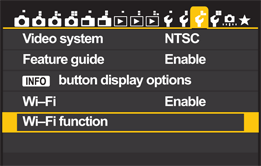
2. Press the Menu button (![]() ), use the Main dial (
), use the Main dial (![]() ) to select the Setup menu 3 tab (
) to select the Setup menu 3 tab (![]() ), and then use the Quick Control dial (
), and then use the Quick Control dial (![]() ) to highlight Wi-Fi.
) to highlight Wi-Fi.
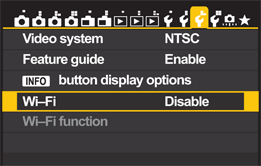
10.3 The Setup menu 3 tab with Wi-Fi highlighted.
3. Press the Set button (![]() ) and use the Quick Control dial (
) and use the Quick Control dial (![]() ) to highlight the Enable option. Pressing the Set button (
) to highlight the Enable option. Pressing the Set button ( ![]() ) confirms your selection and returns you to the main menu screen for the Setup menu 3 tab (
) confirms your selection and returns you to the main menu screen for the Setup menu 3 tab ( ![]() ).
).
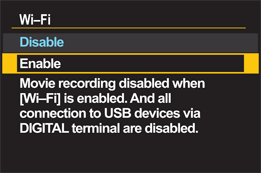
10.4 The Wi-Fi Disable/Enable option screen.
When Enable is selected from the Wi-Fi Enable/Disable menu options, a warning will appear stating that movie recording and the camera’s USB terminal is disabled during Wi-Fi operation.
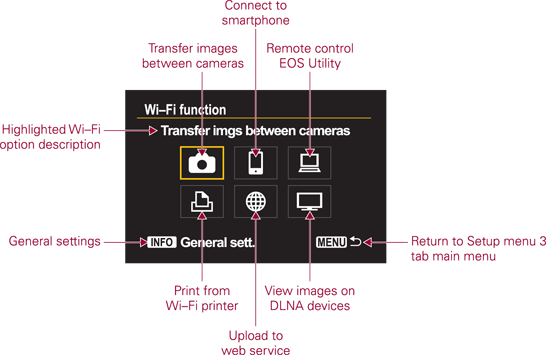
4. Use the Main dial (![]() ) to highlight the Wi-Fi function option, and then press the Set button (
) to highlight the Wi-Fi function option, and then press the Set button (![]() ).
).
10.5 The Wi-Fi function option is highlighted.
5. On the next Wi-Fi function screen that appears, you are prompted to register a nickname for your 6D. Press the Set button ( ![]() ) to access the Register nickname screen.
) to access the Register nickname screen.
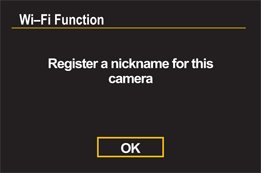
10.6 The Wi-Fi function/Register a nickname for this camera screen.
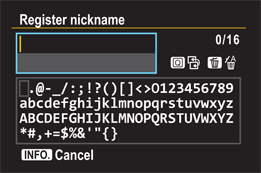
10.7 The Register nickname screen.
6. Press the Quick Control button (![]() ) to access the character menu. Use the Multi-controller (
) to access the character menu. Use the Multi-controller ( ![]() ) to navigate up, down, left, and right within the character menu while creating your camera’s nickname. Pressing and holding the left or right side of the Multi-controller (
) to navigate up, down, left, and right within the character menu while creating your camera’s nickname. Pressing and holding the left or right side of the Multi-controller ( ![]() ) moves you rapidly through the characters. Highlight the letter you want and press the Set button (
) moves you rapidly through the characters. Highlight the letter you want and press the Set button ( ![]() ) to add it to the nickname field at the top of the screen. Repeat this step until your nickname is complete.
) to add it to the nickname field at the top of the screen. Repeat this step until your nickname is complete.
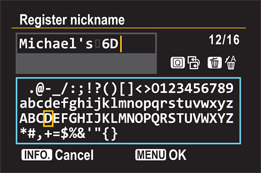
10.8 The Register nickname character entry screen.
7. To correct any mistakes during character entry, press the Erase button (![]() ) to delete a character. Press the Menu button (
) to delete a character. Press the Menu button ( ![]() ) to confirm the nickname you just entered for your camera. On the confirmation screen that follows, highlight OK using the Quick Control dial (
) to confirm the nickname you just entered for your camera. On the confirmation screen that follows, highlight OK using the Quick Control dial ( ![]() ), and then press the Set button (
), and then press the Set button ( ![]() ) to invoke the OK command. Pressing OK confirms your camera’s nickname and brings up the Wi-Fi function menu.
) to invoke the OK command. Pressing OK confirms your camera’s nickname and brings up the Wi-Fi function menu.
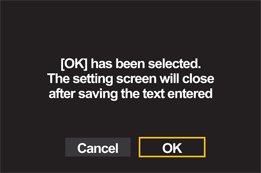
10.9 The Register nickname confirmation screen.
Wi-Fi is now enabled on the 6D, you have registered a nickname for your camera, and you have disabled the Auto power off feature to ensure an uninterrupted Wi-Fi connection.
10.10 The Wi-Fi function options screen.
The next step as you set things up to share images and movies on the web is to register your 6D with the Canon iMAGE Gateway web service (www.canon.com). To do this, you need to create an account with Canon using the EOS Utility software that came with camera on the EOS Solution Disk. Double-check to make sure that this software is installed on your computer before you proceed to the next steps. If need be, install the EOS Utility software. The steps are as follows:
1. Launch the EOS Utility software and click the Register button under the Canon iMAGE Gateway title. This launches the Canon iMAGE Gateway website, where you are prompted to choose your preferred language.
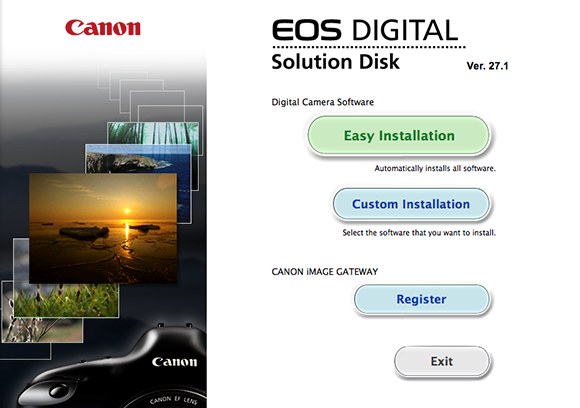
10.11 The EOS Digital Solution Disk with the Canon iMAGE Gateway Register button.
2. Click the Register Now link at the bottom of the Sign In screen that appears. The Canon Account login page appears.
3. Choose Create a Canon Account from the New User options, enter a user ID and password for your new Canon account, and then click Continue.
4. Fill in your account information, and then click Submit.
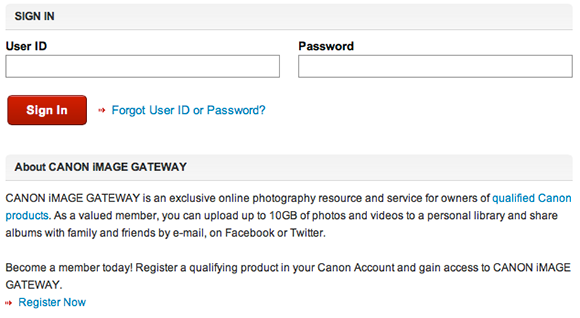
10.12 Click the Register Now link at the bottom of the Canon iMAGE Gateway Sign In screen.
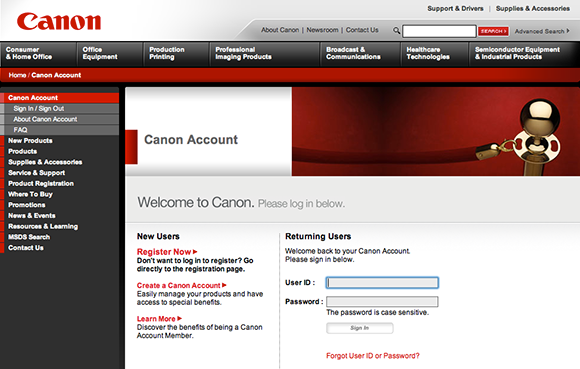
10.13 The Canon Account New Users and Sign In screen.
5. Use the Click here for the log in page link on the Canon Account confirmation and welcome screen to log in to your new account.
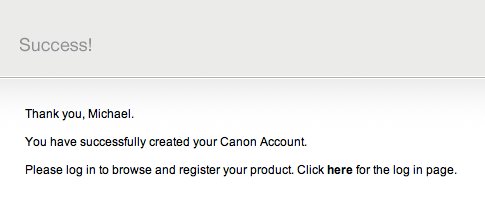
10.14 The Canon Account confirmation and welcome screen.
Now that you’ve created a user account online with Canon, you must register your 6D to your account. Following these steps to do so:
1. Log in to your Canon account using the user ID and password you created in the previous steps.
2. Register your 6D to your Canon account by clicking the Product Registration link on the screen that appears.
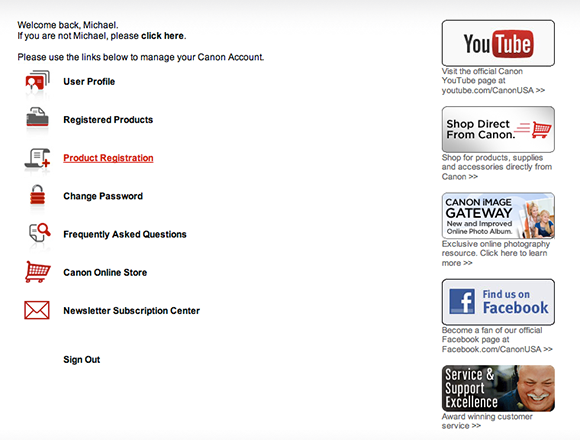
10.15 The Product Registration link.
3. On the next series of screens, choose Professional Imaging Products under Product Category; Cameras & Camcorders under Product Type; Digital SLR Cameras under Product Family; and EOS 6D under Models.
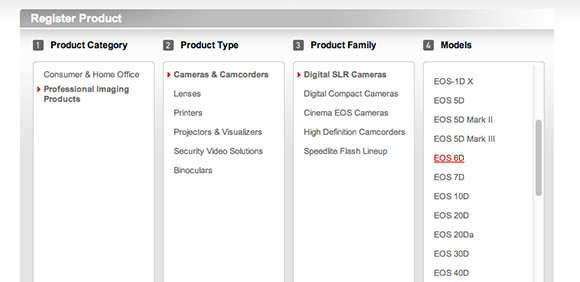
10.16 Canon Product Registration options.
4. Fill in the camera serial number and date of purchase information requested on the web form, and then click Continue.
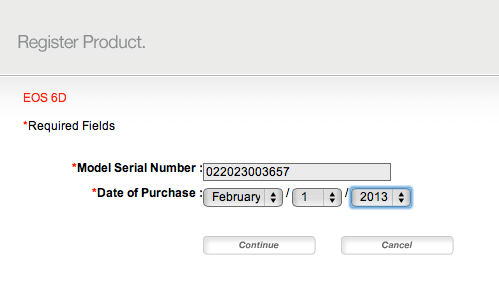
10.17 The Enter the model serial number and date of purchase screen.
The serial number for your 6D is on the bottom of the camera.
5. Review the account information presented. If the information is correct, click Submit and proceed. Next fill out the survey that appears and click Submit. You’ve successfully registered your 6D to your Canon account.
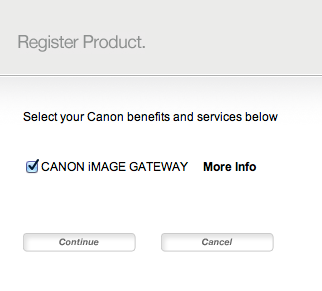
10.18 The Product Registration Confirmation screen. Note that the Canon iMAGE Gateway is selected as your available Canon benefits and services.
6. The next screen you see has a series of promotional offers. Click the Canon Account Home button at the bottom of the page to go to your Canon Account home page.

10.19 Click the Canon Account Home button to get to your Canon home page.
7. Click Canon iMAGE Gateway, and sign in using the user ID and password you created earlier.
Now that you have successfully created a Canon account, named and registered your camera, and signed into the Canon iMAGE Gateway, you will need to configure the 6D’s web and network settings by connecting the camera to your computer and using the EOS Utility software you previously installed. Configure your 6D with the following steps:
1. After disabling the Wi-Fi options, press the Menu button (![]() ) and use the Main dial (
) and use the Main dial (![]() ) to navigate to the Setup menu 3 tab (
) to navigate to the Setup menu 3 tab (![]() ).
).
2. Use the Quick Control dial (![]() ) to highlight the Wi-Fi option, press the Set button (
) to highlight the Wi-Fi option, press the Set button (![]() ) to enter the Wi-Fi options screen, use the Quick Control dial (
) to enter the Wi-Fi options screen, use the Quick Control dial (![]() ) to highlight Disable, and then press the Set button (
) to highlight Disable, and then press the Set button (![]() ) to confirm the selection.
) to confirm the selection.
3. Connect the 6D to your computer using the included USB cable.
As discussed earlier, if Wi-Fi is enabled on the camera’s Setup menu 3 tab ( ![]() ), the USB connection will be disabled. So first, temporarily disable the Wi-Fi options by choosing Disable from the Wi-Fi options on the Setup menu 3 tab (
), the USB connection will be disabled. So first, temporarily disable the Wi-Fi options by choosing Disable from the Wi-Fi options on the Setup menu 3 tab ( ![]() ), and then proceed.
), and then proceed.
4. Once the camera is connected to the computer, turn on the camera’s power switch. Depending on the other software you have installed on your computer and how it’s configured to respond when media is detected, either the EOS Utility CameraWindow dialog box automatically appears on your computer screen prompting you to select either a camera or memory card, or the EOS Utility software launches directly.
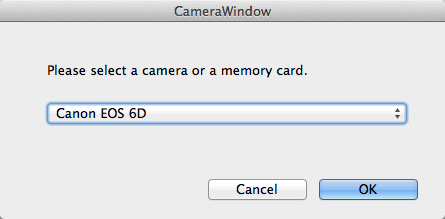
10.20 The EOS Utility CameraWindow dialog box.
5. If prompted, choose the 6D from the drop-down list, and then click OK. The EOS Utility automatically launches.
6. Click Web Service Settings at the bottom of the dialog window. You may get an alert message, requesting that you download the latest SSL certificate for the camera. If you do, click OK.
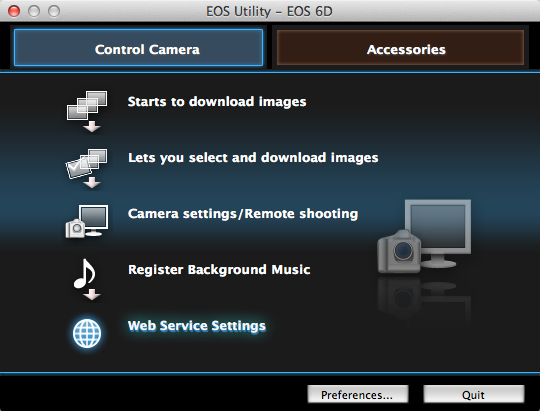
10.21 The EOS Utility main dialog window with Web Service Settings highlighted.
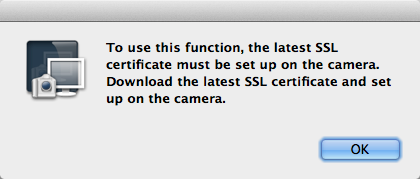
10.22 The SSL certificate download alert.
7. Log in to the Canon iMage Gateway using your Canon account user ID and password. The Setup Web Services first alert appears; click OK, and the Edit Web Service Settings screen appears. Click the Edit button next to Web Service you want to set up for use. You have the following choices:
• YouTube
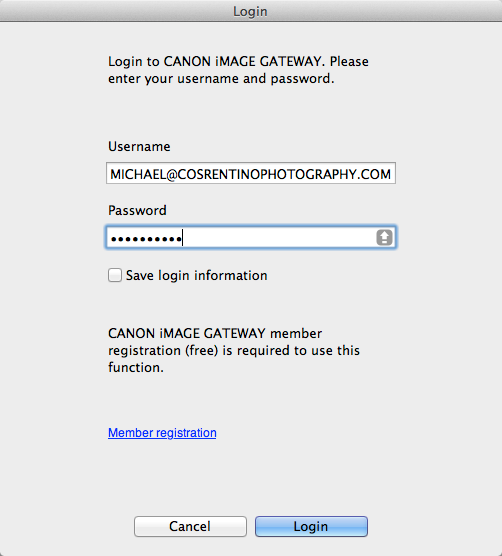
10.23 The Canon iMAGE Gateway login screen.
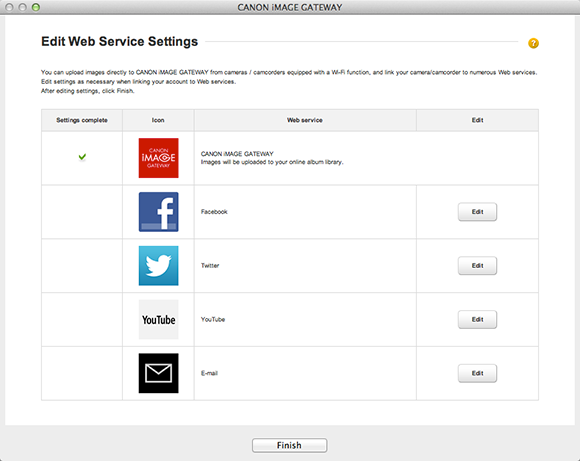
10.24 The Edit Web Service Settings screen.
8. Follow the instructions onscreen to set up the web services you’ve chosen. You will need to log into your account for each of those web services to set up access and permissions. Make sure everything is set up the way you want it for the web service you’re setting up and click the Set button.
9. Set up each additional web service by clicking the Edit button to the right of it and repeating the previous steps. When your web services are set up as desired, click Finish.
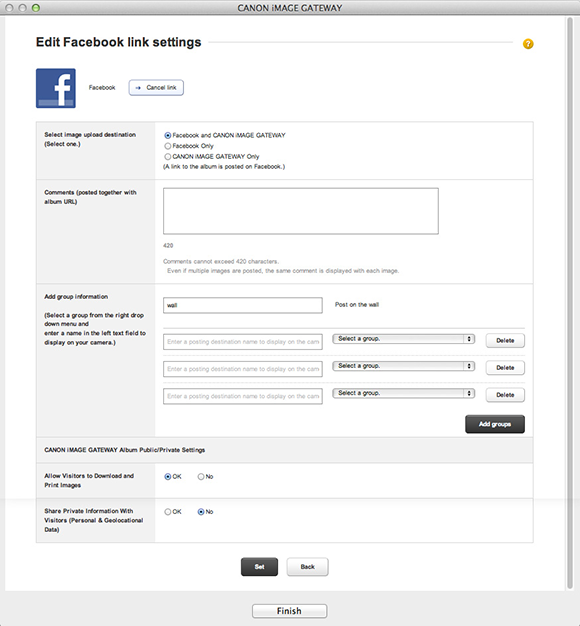
10.25 The first Edit Facebook link settings screen.
10. When you see the list of web services you configured for the 6D in the right column and those available in the left, highlight (one at a time) those in the right column that you want to add to the 6D. Click the blue add arrow between the columns to add them to the left column and your 6D. You can add up to three web services. Click OK when you are finished, power off, and disconnect the camera from the computer. The EOS Utility Software automatically closes.
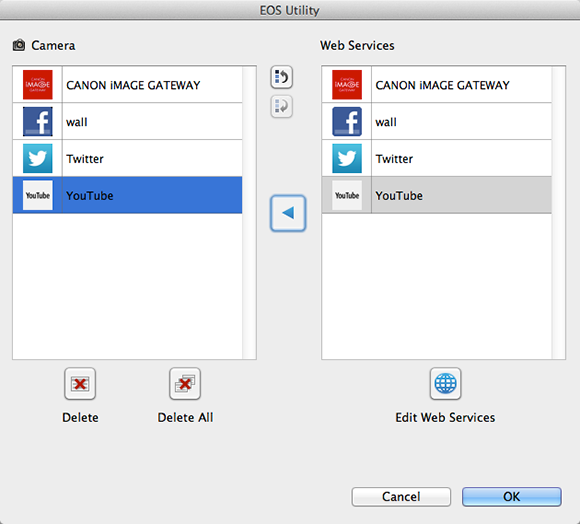
10.26 Configured Web Services added to the left column are now available for use on the 6D.
You are now ready to connect to one of the web services you’ve configured and added to the 6D.
Sharing images and video on the web
Now that the 6D has been registered to your Canon account, and you have configured and added web services to your 6D, you’re ready to connect the camera to a wireless network. Once you do this, you can start sharing images on popular social media sites, such as Facebook, Twitter, and YouTube.
To connect the 6D to an existing wireless network and utilize the web services you configured earlier, follow these steps:
1. Use the Main dial (![]() ) to highlight Setup menu 3 tab (
) to highlight Setup menu 3 tab (![]() ), highlight Wi-Fi, press the Set button (
), highlight Wi-Fi, press the Set button (![]() ) to enter the Wi-Fi Enable/Disable options screen, select Enable, and press the Set button (
) to enter the Wi-Fi Enable/Disable options screen, select Enable, and press the Set button (![]() ) to confirm your selection and return to the main menu.
) to confirm your selection and return to the main menu.
2. Highlight Wi-Fi function, and press the Set button (![]() ) to access the Wi-Fi function screen. Use the Multi-controller (
) to access the Wi-Fi function screen. Use the Multi-controller ( ![]() ) to highlight the Web Services icon (
) to highlight the Web Services icon ( ![]() ).
).
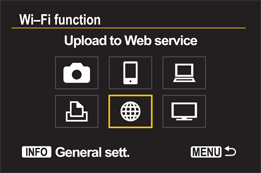
10.27 The Wi-Fi function/Upload to Web service screen.
3. Use the Multi-controller (![]() ) to select the web service you want to upload to, and then press the Set button (
) to select the web service you want to upload to, and then press the Set button (![]() ) to enter the settings for that service.
) to enter the settings for that service.
10.28 The Upload to Web service screen with the Canon iMAGE Gateway selected.

4. Use the Multi-controller (![]() ) to select Find network on the Wireless LAN setup method screen, press the Set button (
) to select Find network on the Wireless LAN setup method screen, press the Set button (![]() ) twice to select this option, and then press OK. On the next screen, select a wireless network from the list of available networks, press the Set button (
) twice to select this option, and then press OK. On the next screen, select a wireless network from the list of available networks, press the Set button ( ![]() ) twice to select this network, and then press OK.
) twice to select this network, and then press OK.
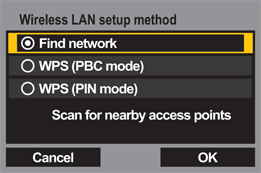
10.29 The Wireless LAN setup method screen.

10.30 The Select wireless network screen.
5. On the next screen, choose a keyboard format option and press OK. Enter your network password using the Multi-controller ( ![]() ) to select characters. Press the Set button (
) to select characters. Press the Set button ( ![]() ) to select the keyboard option and then press the Set button (
) to select the keyboard option and then press the Set button ( ![]() ) again to confirm your selection.
) again to confirm your selection.
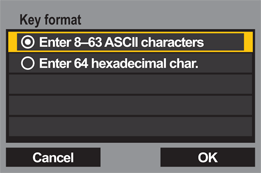
10.31 The Key format screen.
6. When you are prompted, select Auto setting from the IP address set screen, press the Set button (![]() ) to select it, and then press the Set button (
) to select it, and then press the Set button (![]() ) again to confirm your selection. The Selected Web Service connection screen appears.
) again to confirm your selection. The Selected Web Service connection screen appears.
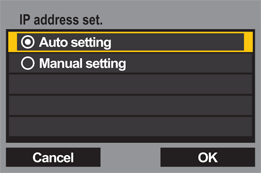
10.32 The IP address set screen.
7. When the Web Services settings configuration confirmation screen appears, press the Set button (![]() ) once, and then select OK to confirm all the settings. You now have a functioning Wi-Fi connection and can begin sharing images and movies online.
) once, and then select OK to confirm all the settings. You now have a functioning Wi-Fi connection and can begin sharing images and movies online.
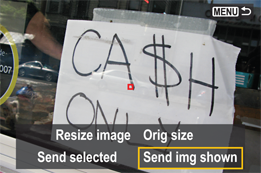
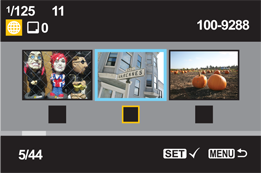
8. Send an individual image by selecting Send img shown, or send a group of images by selecting Send selected and pressing the Set button (![]() ). The Image review and upload selection screen appears allowing you to navigate and select multiple images to send. Use the Multi-controller (
). The Image review and upload selection screen appears allowing you to navigate and select multiple images to send. Use the Multi-controller ( ![]() ) to highlight images and press the Set button (
) to highlight images and press the Set button ( ![]() ) to select a highlighted image. Selected images will have a check mark in the box below them. At the top left of the screen, note the selected web service icon and the number of images you selected to be sent.
) to select a highlighted image. Selected images will have a check mark in the box below them. At the top left of the screen, note the selected web service icon and the number of images you selected to be sent.
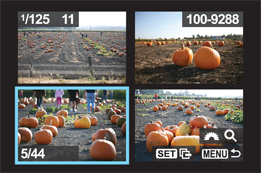
10.33 The Image review and upload selection screen.
10.34 Select single or multiple images and resize them prior to uploading them.
10.35 The Multiple image selection screen.
9. Use the Quick Control button (![]() ) to move to the next screen in the sending process. This brings up the image transfer screen where you confirm if you want to send the selected images in their original size or have them resized as they’re sent. Use the Multi-controller (
) to move to the next screen in the sending process. This brings up the image transfer screen where you confirm if you want to send the selected images in their original size or have them resized as they’re sent. Use the Multi-controller ( ![]() ) to highlight the desired size option. These options are JPEG only. Use the Quick Control dial (
) to highlight the desired size option. These options are JPEG only. Use the Quick Control dial ( ![]() ) to select Send and press the Set button (
) to select Send and press the Set button ( ![]() ) to confirm you want to send the images.
) to confirm you want to send the images.
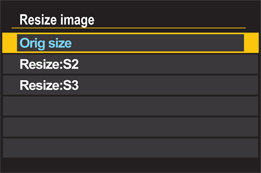
10.36 The Resize image screen.
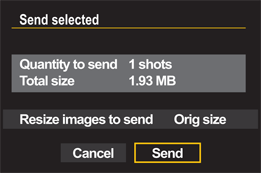
10.37 The Send selected screen.
10. Image transfer begins and a transfer progress screen appears so you can monitor the transfer. Once all the images have been uploaded to the selected web service, a confirmation appears with an Image(s) sent message. Select OK and press the Set button ( ![]() ) to confirm the transfer.
) to confirm the transfer.
The camera automatically disconnects after images are sent.
The Canon EOS Remote App
You can remotely control the 6D easily from a smartphone or tablet using the Canon EOS Remote app. With this app, you can connect wirelessly to the 6D without a computer and control the camera’s settings, select where focus is placed in a scene, trigger the camera’s shutter button, and review images, all from a smartphone or tablet.
To set up and use the Canon EOS Remote app to control your 6D remotely with a smartphone or tablet, follow these steps:
1. First download and install the Canon EOS Remote app onto your smartphone or tablet.

10.38 The Canon EOS Remote app.
2. Power on your 6D and press the Menu button (![]() ). Use the Main dial (
). Use the Main dial ( ![]() ) to select the Setup menu 3 tab (
) to select the Setup menu 3 tab ( ![]() ) and make sure Wi-Fi is set to Enable on the Wi-Fi Enable/Disable options screen. Use the Quick Control dial (
) and make sure Wi-Fi is set to Enable on the Wi-Fi Enable/Disable options screen. Use the Quick Control dial ( ![]() ) to highlight Wi-Fi function and press the Set button (
) to highlight Wi-Fi function and press the Set button ( ![]() ) to enter the Wi-Fi function selection screen. Use the Multi-controller (
) to enter the Wi-Fi function selection screen. Use the Multi-controller ( ![]() ) to navigate to the Connect to smartphone icon and then press the Set button (
) to navigate to the Connect to smartphone icon and then press the Set button ( ![]() ) to confirm your selection.
) to confirm your selection.
3. Select Camera access point mode when the Connection method options screen appears. Press the Set button ( ![]() ) once to select the Camera access point mode option, and then press it again to confirm the selection. This advances you to the Network settings screen.
) once to select the Camera access point mode option, and then press it again to confirm the selection. This advances you to the Network settings screen.
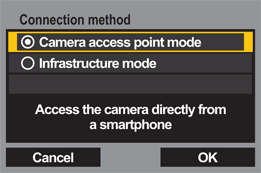
10.39 The Connection method screen.
4. Press the Set button (![]() ) once to select the Easy connection option, and then press the Set button (
) once to select the Easy connection option, and then press the Set button (![]() ) again to confirm the selection.
) again to confirm the selection.
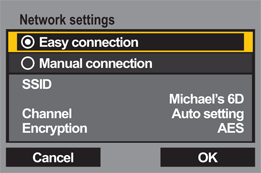
10.40 The Wi-Fi Network settings screen with Easy connection selected.
5. Access the Wi-Fi settings on your smartphone or tablet and select the wireless network name displayed on the camera’s LCD monitor.
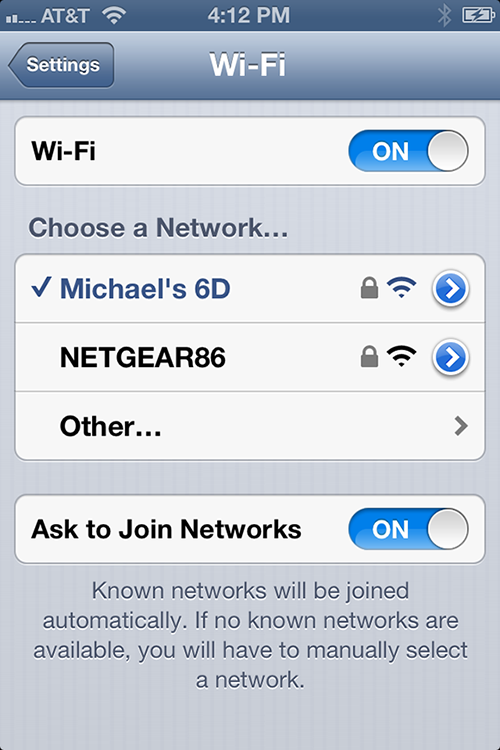
10.41 The Smartphone network settings screen with the camera’s name listed.
6. When prompted by your smartphone or tablet for the Wi-Fi password, enter the Encryption key found on the next screen displayed on the camera’s LCD monitor. Once the camera is ready to connect, a screen appears on the camera’s LCD monitor prompting you to Start the EOS app on the smartphone.
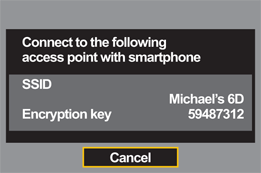
10.42 The Connection screen displaying the camera’s name and encryption code.
7. Start the Canon EOS Remote app on your smartphone or tablet, and then press the Camera Connection button on the main menu screen of the Canon EOS Remote app and press the Pairing button on the next screen. When the paring connection between the smartphone/tablet and 6D is established, a message displaying the name of your smartphone/tablet appears on the camera’s LCD monitor asking you to confirm the connection.
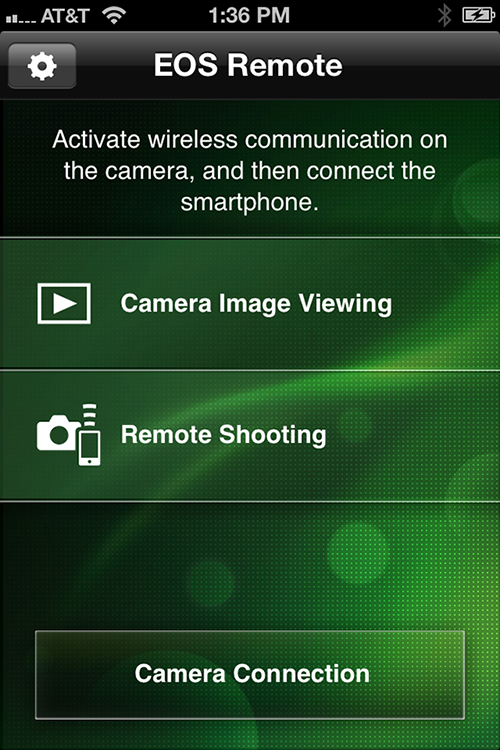
10.43 The main screen of the Canon EOS Remote app as it appears on a smartphone or tablet.
8. Highlight the OK button, press the Set button (![]() ) to confirm the connection, and then press the Set button (
) to confirm the connection, and then press the Set button (![]() ) to select OK from the setting configured screen on the camera’s LCD monitor. This confirms the connection settings and begins communication between the camera and smartphone or tablet. The Connection screen appears next on the camera’s LCD monitor.
) to select OK from the setting configured screen on the camera’s LCD monitor. This confirms the connection settings and begins communication between the camera and smartphone or tablet. The Connection screen appears next on the camera’s LCD monitor.
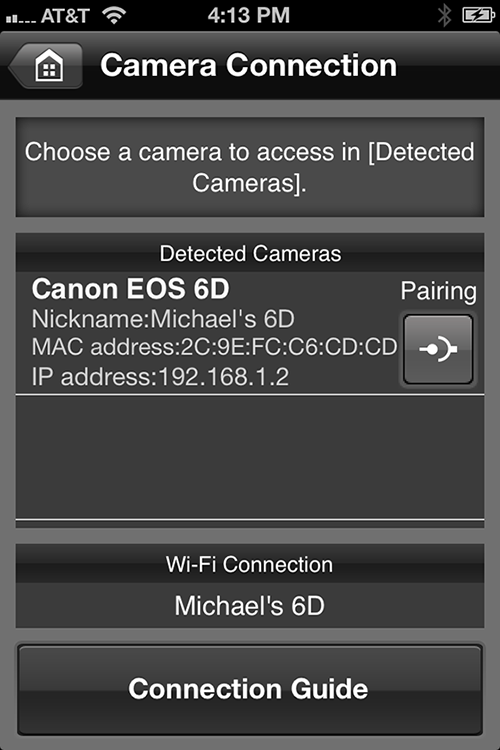
10.44 The Camera Connection screen of the Canon EOS Remote app as it appears on a smartphone or tablet. Note the Pairing button next to the camera’s name in the Detected Cameras section.
9. Press the Remote Shooting button at the bottom of the Canon EOS Remote app’s main screen to start the camera control screen on your smartphone or tablet. The camera control screen displays what the camera sees through the viewfinder, the controls for the camera’s settings, and the shutter release button. You can view, but not modify, the following camera settings along the left side of the screen: Exposure mode, White balance, Metering method, AF-point selection, Drive mode, and Image recording quality.
10. You can adjust Shutter Speed, Aperture, Exposure Compensation, and ISO speed, located along the bottom the window, by pressing the Remote app settings button (![]() ). Next, touch the setting you want to adjust with your finger and then slide your finger left or right along the value scale at the bottom of the window. Dial in the desired value for that setting. Press the Remote app arrow button (
). Next, touch the setting you want to adjust with your finger and then slide your finger left or right along the value scale at the bottom of the window. Dial in the desired value for that setting. Press the Remote app arrow button ( ![]() ), located in the same position as the settings button (
), located in the same position as the settings button ( ![]() ), to confirm the new values.
), to confirm the new values.
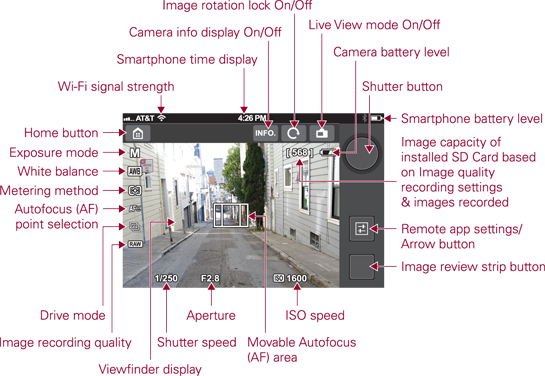
10.45 The Canon EOS Remote app camera control screen.
For the best viewing experience and control, orient your smartphone or tablet horizontally. Available camera settings will vary depending on the selected shooting mode.
11. Touch the viewfinder area on the smartphone or tablet screen to move the camera’s focus area to the part of the scene desired.
12. Press the large, round shutter button at the top right of the smartphone or tablet window to trigger the camera’s shutter and capture an image. Captured images are then available for review on the smartphone or tablet.
13. Press the image thumbnail button at the bottom right of the window to introduce a strip along the bottom of the window displaying images captured. Pressing one of the image thumbnails enlarges it to a single image view. Zoom in and out using pinch gestures on the smartphone or tablet screen. Press the X icon on the lower right of the image to exit the single image view.
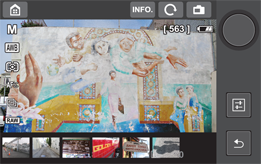
10.46 The Canon EOS Remote app with the image review strip along the bottom.
14. Press the arrow button (![]() ) to return the Remote app to its shooting state.
) to return the Remote app to its shooting state.
15. Once you’re done shooting, you can easily terminate the Wi-Fi connection on the camera by selecting Exit from the Connection screen and pressing the Set button (![]() ). On the Connect/Exit wireless LAN function screen that appears, select OK, and then press the Set button (
). On the Connect/Exit wireless LAN function screen that appears, select OK, and then press the Set button ( ![]() ) to confirm your selection.
) to confirm your selection.
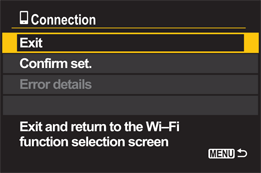
10.47 The Exit Wi-Fi Connection confirmation screen with the Exit option highlighted.
GPS Features and Functions
The Canon 6D is the first EOS camera with built-in GPS. When the internal GPS is enabled, it can automatically record Latitude, Longitude, Elevation, and Time Data without need for a separate accessory. This information is added to the EXIF metadata for each image. Images with GPS information are geotagged and you can view them on the Canon Map Utility software included with your camera.
Images with embedded GPS information, such as Latitude, Longitude, Elevation, and Time Data, are referred to as geotagged.
GPS settings
Before using the built-in GPS, you need to enable the GPS settings feature and configure its settings. To do so, follow these steps:
1. Use the Main dial (![]() ) to navigate to the Setup menu 2 tab (
) to navigate to the Setup menu 2 tab (![]() ), use the Quick Control dial (
), use the Quick Control dial (![]() ) to highlight the GPS option, and then press the Set button (
) to highlight the GPS option, and then press the Set button (![]() ) to enter the GPS options screen.
) to enter the GPS options screen.
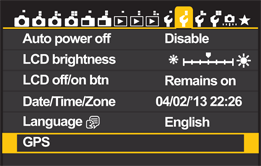
10.48 The GPS option highlighted.
2. Highlight Select GPS device, and then press the Set button (![]() ) to enter the Select GPS options screen. On this screen, you have three choices: Internal GPS, External GPS, and Disable. Use the Quick Control dial (
) to enter the Select GPS options screen. On this screen, you have three choices: Internal GPS, External GPS, and Disable. Use the Quick Control dial ( ![]() ) to highlight Internal GPS and enable the 6D’s built-in GPS, and then press the Set button (
) to highlight Internal GPS and enable the 6D’s built-in GPS, and then press the Set button ( ![]() ) to confirm this choice.
) to confirm this choice.
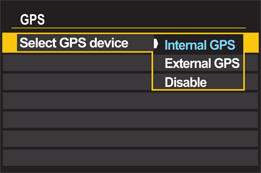
10.49 The Select GPS device options screen with Internal GPS selected.
To preserve battery power, disable GPS by selecting Disable from the Select GPS device options.
3. Allow 30 to 60 seconds for a GPS connection to be established and be reflected on the camera’s top LCD panel.
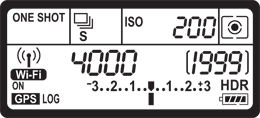
10.50 The 6D’s LCD panel display indicating a GPS connection in the lower-left corner.
4. Use the the Quick Control dial (![]() ) to highlight the Set up option on the GPS menu screen, and then press the Set button (
) to highlight the Set up option on the GPS menu screen, and then press the Set button (![]() ) to enter the GPS Set up options screen.
) to enter the GPS Set up options screen.
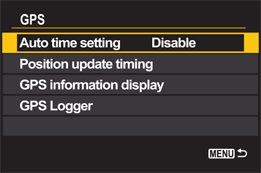
10.51 The GPS setup options.
5. Highlight the Auto time setting option, and then press the Set button (![]() ) to enter the Auto time setting options screen. When this setting is enabled, the camera’s internal clock is updated using GPS data and is accurate to approximately +/–1 second. Use the Quick Control dial (
) to enter the Auto time setting options screen. When this setting is enabled, the camera’s internal clock is updated using GPS data and is accurate to approximately +/–1 second. Use the Quick Control dial ( ![]() ) to highlight Auto update and press the Set button (
) to highlight Auto update and press the Set button ( ![]() ) to confirm the selection.
) to confirm the selection.
Once the Auto time setting is enabled, the camera connects with a GPS satellite and automatically updates its internal clock using GPS Universal Time Code Data. This occurs whenever GPS is enabled via the camera menu or when the camera is powered on with GPS already enabled.
For photographers working with multiple cameras who need their clock times in sync (such as wedding and event photographers), setting the time using the Set now GPS Auto time setting is a great solution. With this setting, you can quickly activate all GPS enabled cameras and manually sync their times via satellite anywhere you happen to be and without the necessity of a computer.
6. On the GPS main menu, use the Quick Control dial (![]() ) to highlight the Position update timing option, and then press the Set button (
) to highlight the Position update timing option, and then press the Set button (![]() ) to enter the Position update timing options screen. You use this screen to choose how often new GPS readings are taken; the camera default is a new reading every 15 seconds. Choose the new update timing that meets your needs and press the Set button (
) to enter the Position update timing options screen. You use this screen to choose how often new GPS readings are taken; the camera default is a new reading every 15 seconds. Choose the new update timing that meets your needs and press the Set button ( ![]() ) to confirm your selection.
) to confirm your selection.
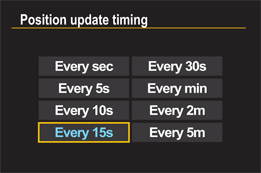
10.52 The GPS Position update timing options screen with Every 15s selected.
7. Press the Set button (![]() ) to enter the GPS information display screen and view the current GPS information being read.
) to enter the GPS information display screen and view the current GPS information being read.
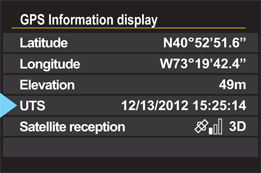
10.53 The GPS information display screen.
8. Press the Set button (![]() ) to enter the GPS Logger options screen. This option allows the camera to take repeated GPS location readings, store this information in its memory, and then allow users to download a daily GPS location log that they can use with the included Canon Map Utility software. This software allows you to view the location of each image taken.
) to enter the GPS Logger options screen. This option allows the camera to take repeated GPS location readings, store this information in its memory, and then allow users to download a daily GPS location log that they can use with the included Canon Map Utility software. This software allows you to view the location of each image taken.
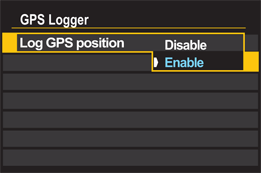
10.54 The Log GPS position Disable/Enable screen.
You can also use the map to view the route you traveled as the images where taken. This can be useful when you’re trying to remember exactly where an image was taken. I love this feature for scouting and logging new shooting locations to be used later.
Image geotagging
Image geotagging refers to automatically recording location data, along with captured images for use later with Canon Map Utility Software, Adobe Photoshop Lightroom, and online services, such as Flickr and others.
To start Geotagging images follow the steps earlier in this chapter to enable and configure GPS functions. GPS information is included in the image metadata.
The Canon Map Utility
The Canon Map Utility uses logged GPS information to plot points on a map showing image thumbnails and the exact location of where images were taken. Daily GPS logs also track the route traveled during the 24-hour period those images where made. This enables you to plot a visual display of your daily photography travels with the Canon Map Utility.
To use the Canon Map Utility software, follow these steps:
1. Begin by following Steps 1 through 7 to enable the GPS Settings feature covered earlier in this chapter.
2. On the GPS main menu, select the GPS Logger option, and then press the Set button (![]() ) to enter the GPS Logger options screen. This option allows the camera to take repeated GPS location readings, store this information in the its memory, and then allow users to download a daily GPS location log that they can use with the included Canon Map Utility Software. The software allows you to view the location of each image taken.
) to enter the GPS Logger options screen. This option allows the camera to take repeated GPS location readings, store this information in the its memory, and then allow users to download a daily GPS location log that they can use with the included Canon Map Utility Software. The software allows you to view the location of each image taken.
3. Select Transfer log data to card from the GPS Logger options menu when you are ready to create a map with the Canon Map Utility Software on your computer. This log contains the GPS information recorded during this 24-hour period along with each image captured. Selecting this option copies the GPS data log to your camera’s media card.
4. Insert the media card into a card reader connected to your computer. Launch the Canon Map Utility Software and follow the Canon Map Utility Software instructions contained in your manual.