
3. Ultra-Wides and Wides
ISO 200 • 1/50 sec. • f/22 • 17mm
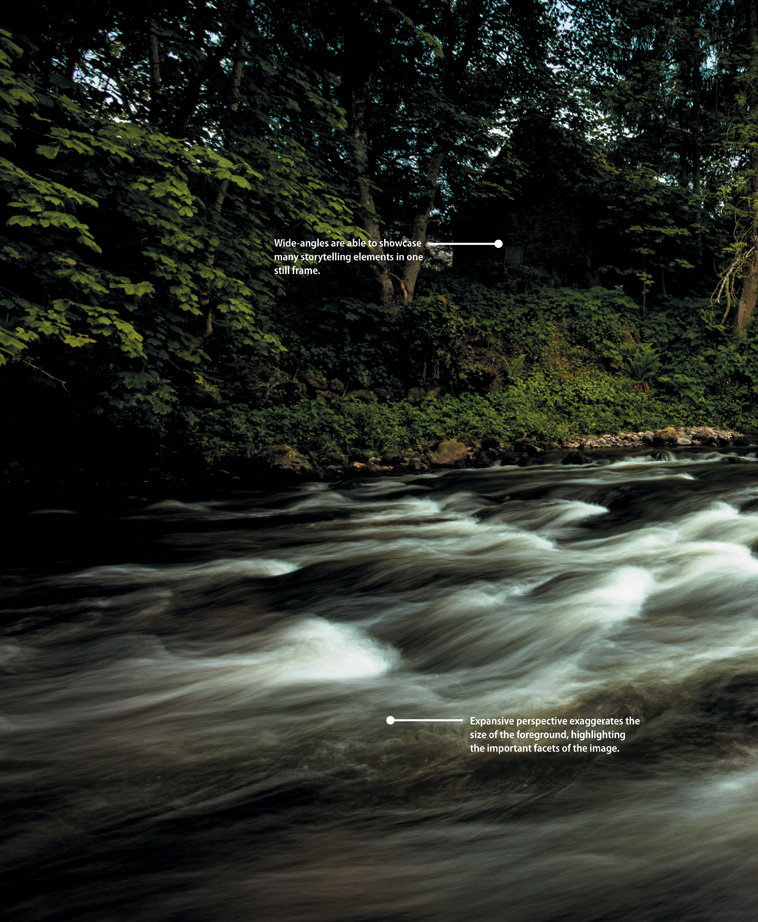
Expansive opportunities
I have to be honest: I love wide-angle lenses. I love the extremely wide perspective, the bulbous glass at the end of the lenses, that they are not the size of telephotos, and that I can handhold wide-angle lenses using relatively slower shutter speeds. I am constantly drawn to images that showcase great use of wide-angle focal lengths, and I’m apt to see images in terms of wider focal lengths before considering longer lenses. Ultra-wide and wide-angle lenses have value in the photographer’s camera bag, offering us really cool perspectives. I don’t know anyone who has not had an “oh, wow!” moment after looking through a 14mm or 10mm focal length for the first time. Afterward, it’s all about converting that moment to outstanding images!

How Wide Can You Go?
Really wide! As a matter of fact, 8mm is the widest focal length Canon lenses can reach. This is the widest end of the widest Canon zoom lens, the EF 8–15mm f/4L Fisheye (Figure 3.1). Wide-angle focal lengths typically comprise focal lengths of 24mm to around 35mm (these are full-frame focal lengths), and those wider are designated as “ultra-wide.”

ISO 100 • 1/4 sec. • f/22 • 8mm
Figure 3.1 Canon’s widest focal length is 8mm, as shown through this fisheye zoom (the EF 8–15mm f/4L).
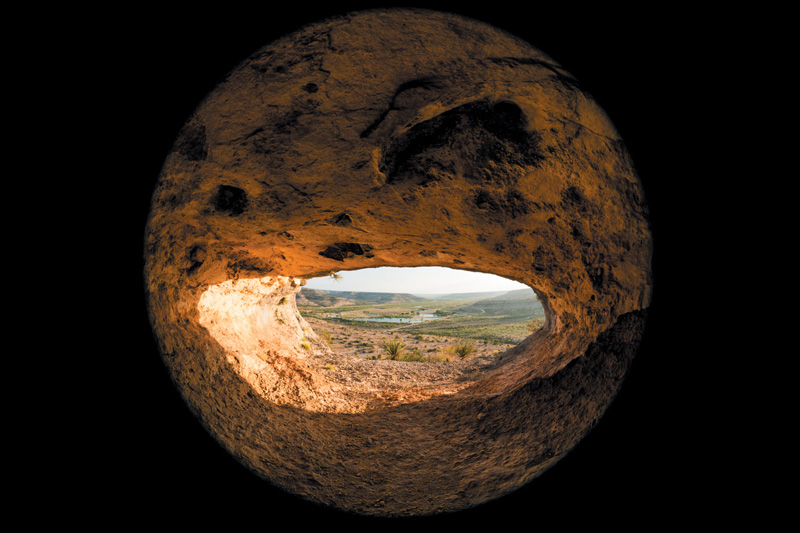
The EF 8–15mm f/4L Fisheye is ultra-wide, one of two fisheye lenses Canon manufactures at the time of writing, the other being the EF 15mm f/2.8 Fisheye. A fisheye lens exhibits the visual qualities of its moniker, offering a 180-degree angle of view. What does this mean? It means if you point the lens straight at the horizon, you’ll more than likely capture your shoes in the shot, as well as the sky straight above you! As a result, everything within the frame of a fisheye lens is distorted, seemingly stretching outward toward the image’s viewer. When you see a fisheye perspective, you immediately know it for the extreme distortion and curvature of straight lines, such as the horizon, building corners, and the like.
Circular and Full-Frame Fisheyes
Although fisheye lenses have been around for more than a century, they gained wide appeal about 50 years ago and are still considered a popular niche lens. The EF 8–15mm f/4L Fisheye exhibits the two different types of fisheyes generally discussed: circular and full-frame (not to be confused with full-frame sensors).
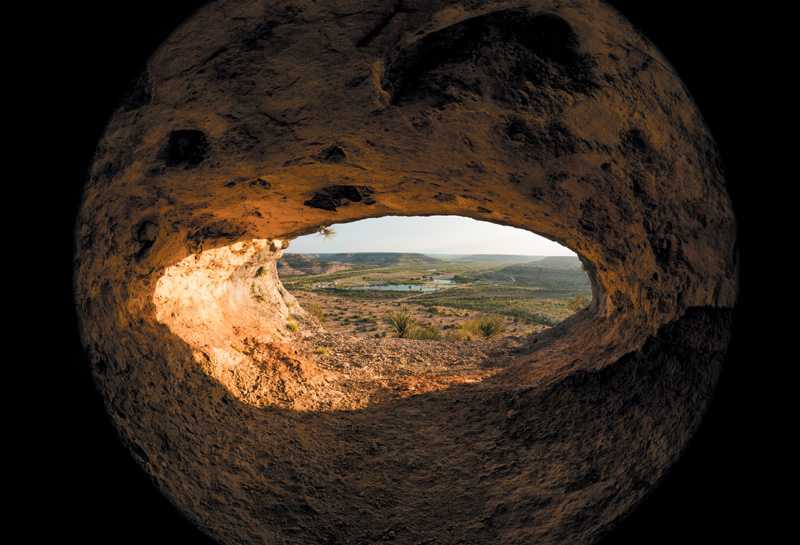
Circular fisheyes produce a classic fisheye look in that the angle of view—all 180 degrees—is contained in a circular image in the middle of the frame (Figures 3.2 and 3.3). This is a result of the focal length being so wide that real estate on the camera’s sensor (or film) has to be sacrificed. As you zoom out from 15mm to 8mm, you start to notice a circular visual manifest through the viewfinder. (Tip: make sure you take the lens hood off to ensure a circular image as opposed to another shape.)
ISO 100 • 1/40 sec. • f/11 • 8mm
Figure 3.2 At 8mm, the EF 8–15mm f/4L is a circular fisheye, capturing a 180-degree angle of view, forcing one to be aware of where his or her feet rest.
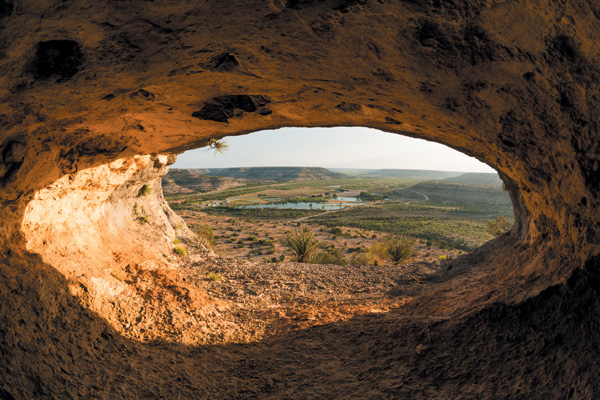
ISO 100 • 1/40 sec. • f/11 • 10mm
Figure 3.3 Zooming a bit tighter in the cave takes up more real estate on the camera’s sensor without giving up too much detail in the shot.
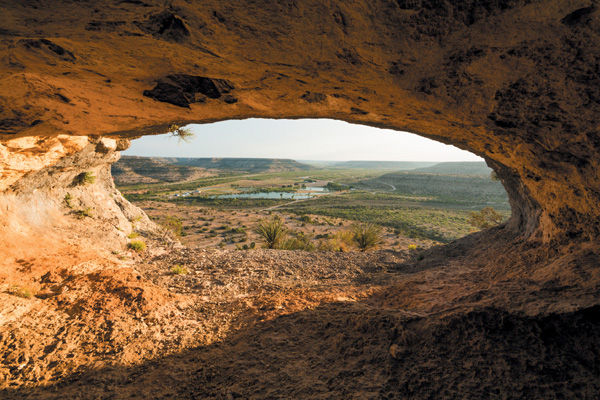
Full-frame fisheyes, such as the EF 15mm f/2.8 and the longer end of the EF 8–15mm f/4L, project an image onto all of the camera’s sensor, albeit still extremely distorted (Figure 3.4). Lest your hands move the zoom ring easily, the EF 8–15mm f/4L Fisheye includes a “Limit” switch, which locks the focal length at 15mm and avoids the circular vignetting that would occur at shorter focal lengths.
ISO 100 • 1/40 sec. • f/11 • 15mm
Figure 3.4 A full-frame fisheye perspective, where the bulbous aesthetic of the lens takes up the entire sensor and image area. Note the curved nature of the horizon in the far background.
As I stated earlier, fisheye lenses fulfill a fairly niche function. The extreme curvilinear distortion and warping of the image is a unique visual, and although these lenses are downright fun to play with, they are not for everyone. I don’t own one—they just don’t fit my style. Others have a ball with them, seeing everything from landscapes to cityscapes in new, bulbous ways!
Rectilinear Lenses
For those who want to avoid the fisheye look, Canon’s EF 14mm f/2.8L offers an extremely wide perspective without the distortion that reveals the curvature of the lens elements (Figure 3.5).
ISO 100 • 1/40 sec. • f/11 • 14mm
Figure 3.5 Fisheye lenses exhibit a curvilinear look, but the EF 14mm f/2.8L and all other wide-angle lenses showcase a rectilinear perspective, reducing the extreme bulge seen in previous images.
The 14mm is a rectilinear lens, which means it maintains straight lines as visually straight, despite the accompanying wide-angle distortion that occurs when focal lengths get more and more expansive (Figure 3.6). This feature paired with this focal length makes for an incredible landscape lens (Figure 3.7), as well as one that can be used to really push up on high-action activities and show off the environment at the same time (Figure 3.8).
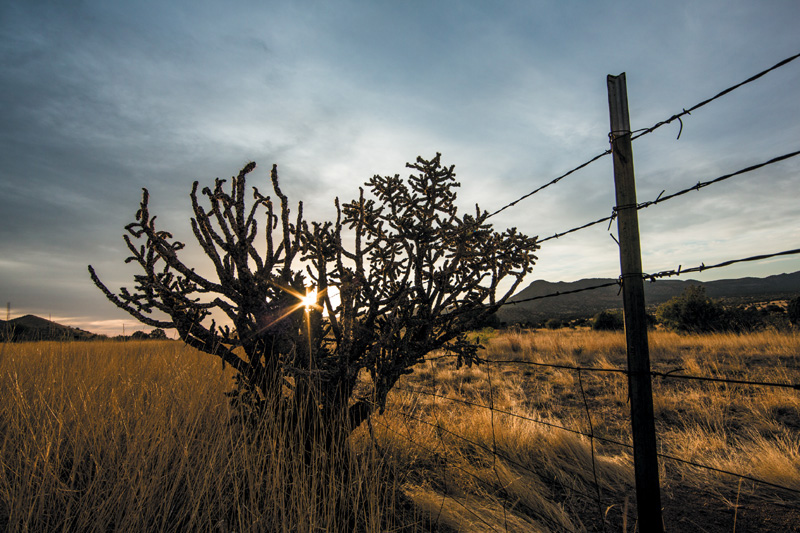
ISO 200 • 1/200 sec. • f/11 • 14mm
Figure 3.6 Even though it is extremely wide, the rectilinear EF 14mm f/2.8 still keeps linear subject matter straight, such as the fence post and the barbed wire.
ISO 100 • 1/40 sec. • f/16 • 14mm
Figure 3.7 Extremely wide-angle lenses typically have short minimal focusing distances, allowing the shooter to compose tightly on significant subject matter.
ISO 200 • 1/1000 sec. • f/5.6 • 14mm
Figure 3.8 Want to make your viewers feel like they are part of the action? Take a wide-angle like the EF 14mm f/2.8L into the thick of it.
Although it is difficult to use in all instances, given that subject matter diminishes in size greatly if just a few feet away, the EF 14mm f/2.8L is an extremely well made and highly functional lens for those wanting the widest rectilinear focal length possible. Unfortunately for some, this lens also comes with a premium price tag, so it might be worth renting before purchasing. If you’re anything like me, though, you’ll find an affinity for this chunk of glass.
Keep an Eye on the Glass
One thing to keep in mind with all lenses, but especially the widest of the wide, is the importance of taking care of the outer lens element. I’ll touch on lens care in Chapter 9, but since we’re on the subject of lenses that feature bulbous front elements, it is worth reiterating here: It is just too easy to put a greasy thumb- or fingerprint on that glass, or bump it into a hard corner. Consider always placing the lens cap on the lens when it is not in use, carry a lens cloth (always) with you, and, as my buddy Alan Hess taught me a few years ago, sling your camera over your shoulder with the lens pointing toward you instead of away from you. This way, the lens element is less likely to come into contact with grubby hands, brick walls, and the like.
Ultra-Wides for Every Day
Wide-angle lenses for Canon typically range in focal length from 8mm to 35mm. Technically, anything wider (or shorter) than 50mm can be considered wide-angle, but the closer the lens is to normal perspective, the more it loses that visual essence. For me and many others, the perfect wide-angle lens—which is part of the trinity written about earlier in the book—is a lens that covers the ultra-wide and wide alike. Wide-angle zoom lenses such as the EF 16–35mm f/2.8L, the EF 17–40mm f/4L, and the EF-S 10–22mm f/3.5–4.5 (for crop-sensor cameras) provide such an offering. They move from extremely wide-angle perspectives perfect for landscapes (Figure 3.9) to a longer focal length loved by many photojournalists and street photographers (Figure 3.10).
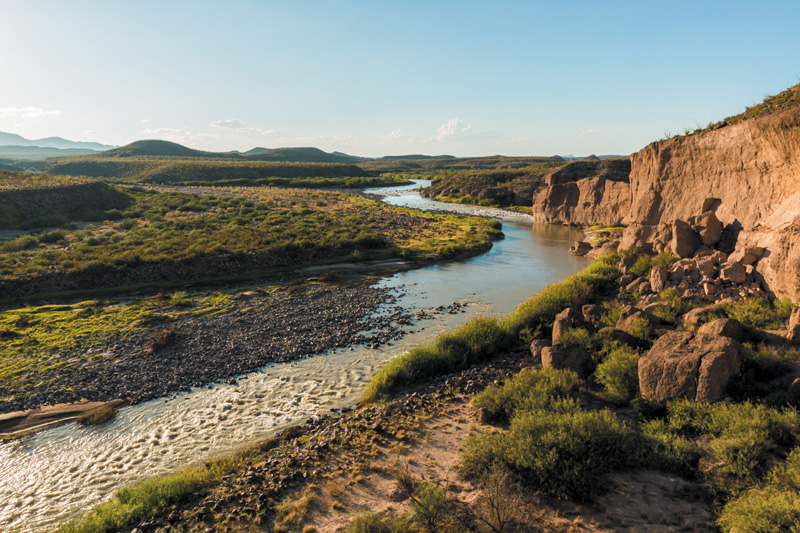
ISO 100 • 1/40 sec. • f/16 • 24mm
Figure 3.9 My first thought when I see a river like the Rio Grande in the Texas Big Bend is to go wide!
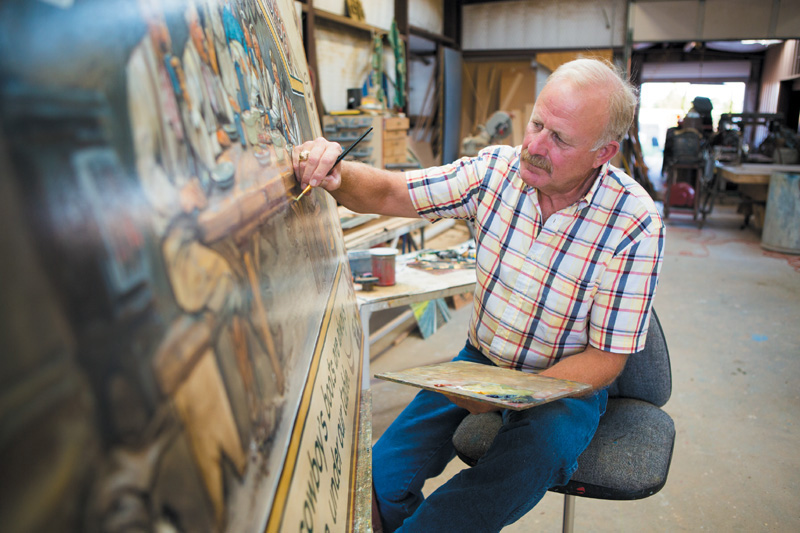
ISO 400 • 1/100 sec. • f/2.8 • 30mm
Figure 3.10 On the longer end of wide-angle focal lengths, 30mm was perfect for showcasing the artist, his work, and his studio without sacrificing the context to distortion.
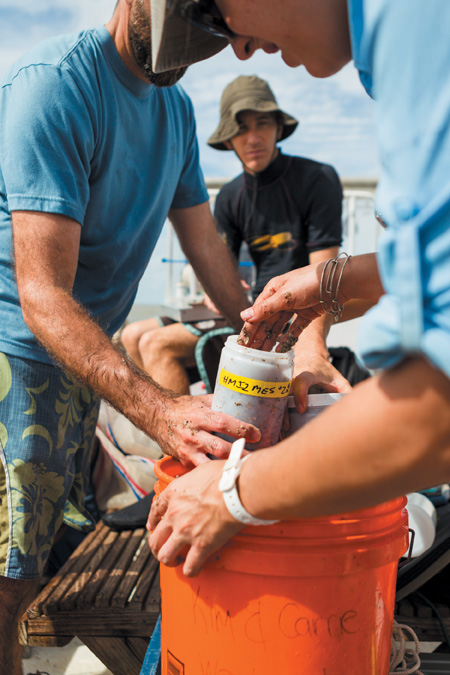
A lens that covers landmark focal lengths, such as 16mm, 24mm, and 35mm, is ideal for an all-around wide-angle zoom. I prefer a wide-angle zoom that covers this range. Like many shooters, I tend to move from one extreme of the lens to the other and not hit much in between. I might use 17mm to tighten up on a feature-heavy portion of a desert landscape, and then move somewhere close to 35mm to make an environmental portrait. Somewhere near the middle is 24mm, a popular focal length for wide-angle prime lenses, as well as the starting point for the higher-end standard zoom lenses (Figure 3.11). It is also a very flexible focal length that doesn’t quite distort like 16mm or 17mm but can still be used effectively to establish a visual context in the shot (Figure 3.12).
ISO 100 • 1/2000 sec. • f/2.8 • 24mm
Figure 3.11 I used a 24mm focal length to move in tight on research activities of several marine biologists while also keeping the team’s diver relevant to the story.
ISO 100 • 1/1600 sec. • f/5.6 • 24mm
Figure 3.12 Since 24mm does not distort as much as wider focal lengths, I tend to see environmental portraits at their widest starting at this focal length.
If I Had to Choose: My Favorite Wide-Angle
ISO 50 • 5 sec. • f/22 • 17mm
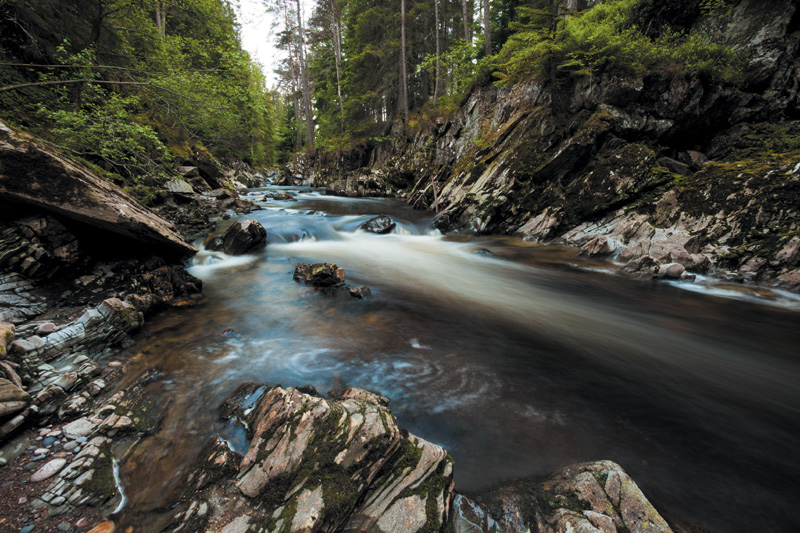
Figure 3.13 I often shoot at the extremes of lenses, hence my tendency to shoot at 17mm on my favorite wide-angle, the EF 17–35mm f/2.8L. Rugged, structure-heavy Scottish streams invite this perspective.
Composing With Wide-Angles
Most folks new to ultra-wide-angle photography point the camera up and watch the sky (or high rises, depending on where they live) stretch on forever. Wide-angle lenses can be extremely fun to play with, but taking that play to the next level means being attentive to composition and noticing how everything that is arranged in the shot is affected by the focal lengths used. This is where wide-angle images go from being neat pictures to being compelling and engaging photographs.
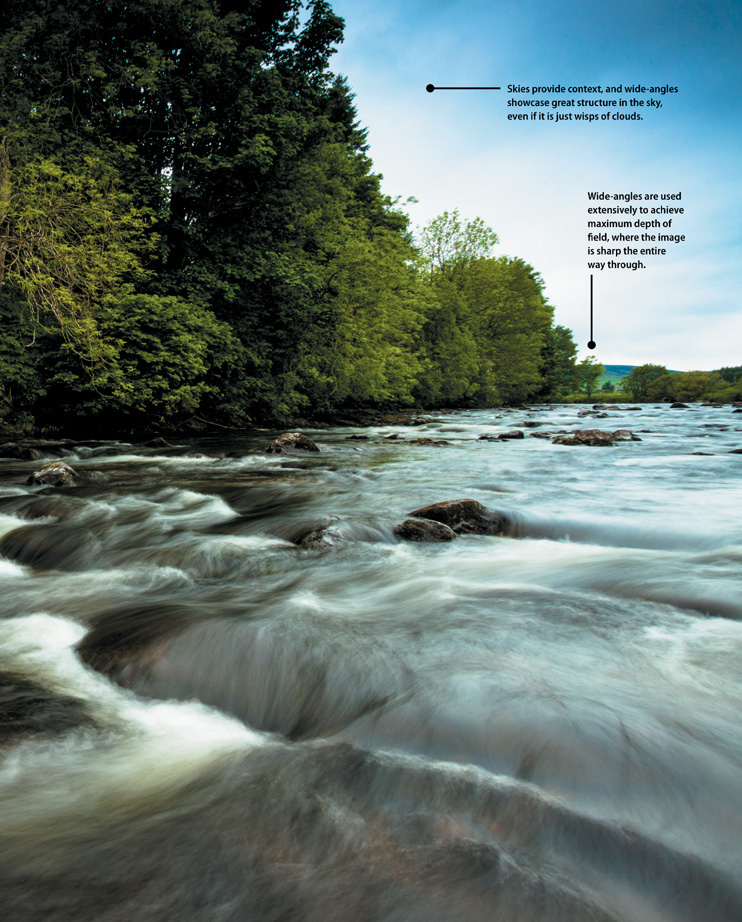
Work the Sky
Where I live in West Texas, the sky is one of our strongest visual assets. This region is extremely flat, and the sky is the biggest thing around. It is also a playground for photographers, offering up some of the best color, clouds, and storms to shoot in the world. As a result, local photographers are very conscientious and almost snobbish about the skies we use as both the main subject and background for our images. And it is all about the structure.
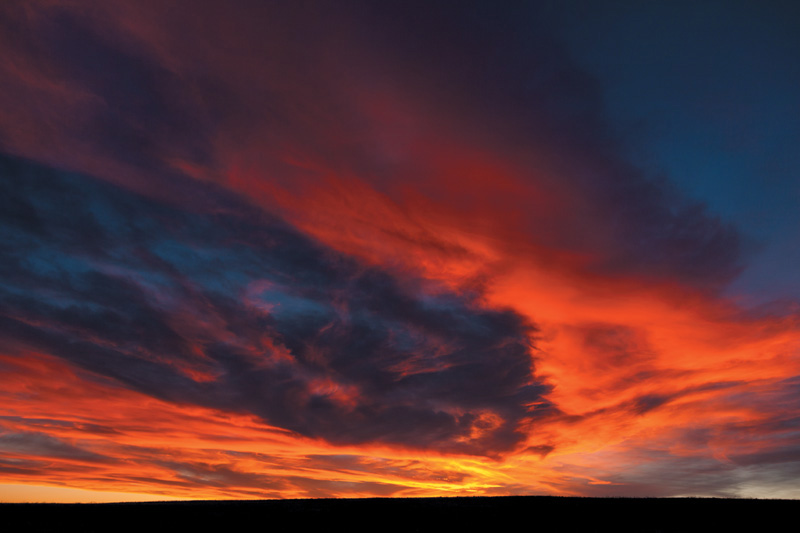
Simply put, skies with unique cloud structures are more interesting than if they were empty. The sky is not something we can control, and bald (cloudless) skies are simply a part of shooting outside. However, we can take advantage of the shapes and forms the sky presents some days (Figure 3.14).
ISO 50 • 1 sec. • f/22 • 17mm
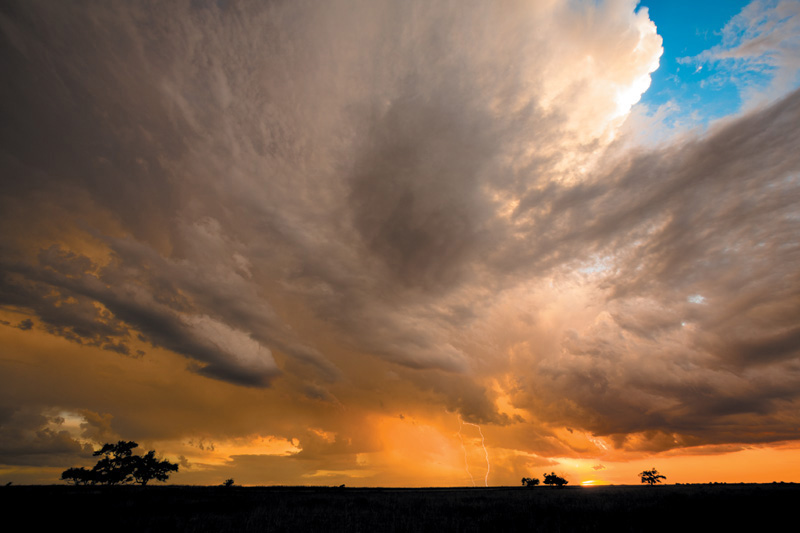
Figure 3.14 I’m a sucker for great thunderstorms, and I favor shooting them with extremely wide focal lengths for the expanse that often parallels a ferocious one.
Outstanding sunsets and layered color at sunrise or sunset, striated clouds cutting diagonally across the sky, and intense overhead thunderstorms are good reasons to compose a wide-angle shot with little more than the sky itself. When presented with these types of skies, move to a position so the structure fills the frame (Figure 3.15). Sometimes this means moving closer to the storm (while being safe) or farther under the clouds.

ISO 100 • 1/6 sec. • f/5.6 • 24mm
Figure 3.15 With a wide-angle, one can move into a unique and sometimes extreme cloud structure to produce the feeling of being under it.
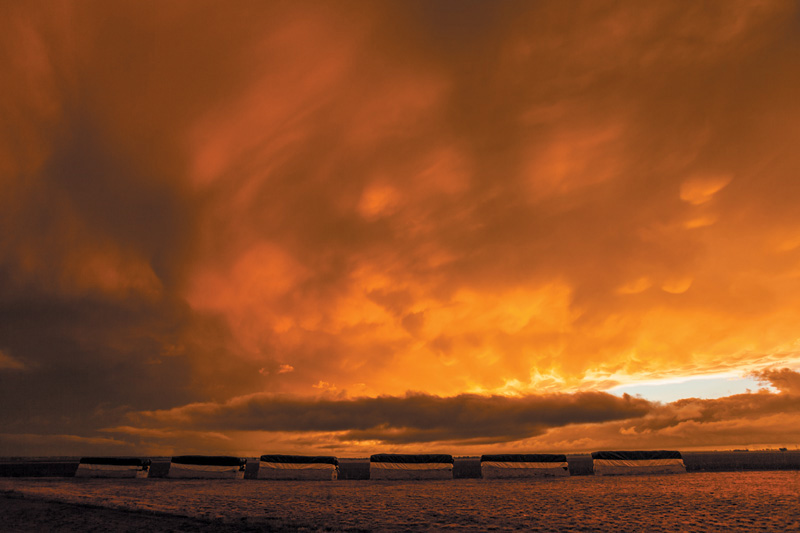
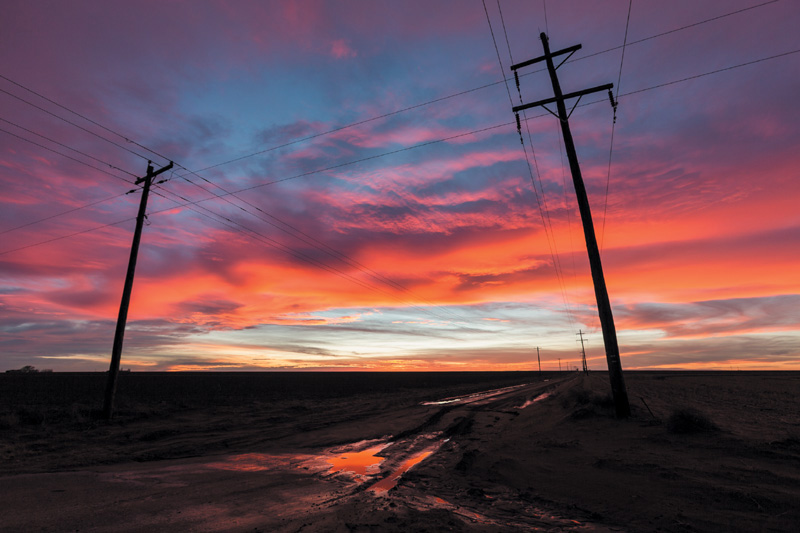
Even though the sky is the champion in shots like this, remember to place at least a sliver of the earth’s horizon in the shot (Figure 3.16). Showing a bit of land does two things: It provides both perspective and scale, and it showcases context and a sense of place. A very colorful sky full of performance can seem massive when tied to a minute structure on the ground, and that structure on the ground gives the viewer an idea of the environment in which it was shot (Figure 3.17). Power lines (which I desperately try to avoid at a small visual scale) and city buildings suggest an urban backdrop; mountaintops silhouetted against the sky indicate something more natural.
ISO 100 • 1/30 sec. • f/5.6 • 24mm
Figure 3.16 Placing a sliver of the flat West Texas horizon at the bottom of the frame gives a sense of scale to this impressive, colorful sky.
ISO 200 • 1/100 sec. • f/5.6 • 17mm
Figure 3.17 Just the tiniest bit of structure composed well in a shot can give storytelling clues, like these large cotton modules waiting out a massive thunderstorm.
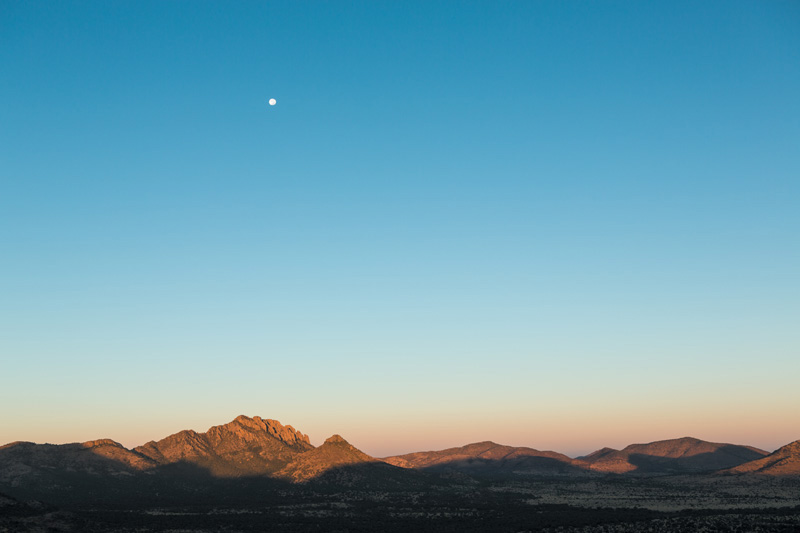
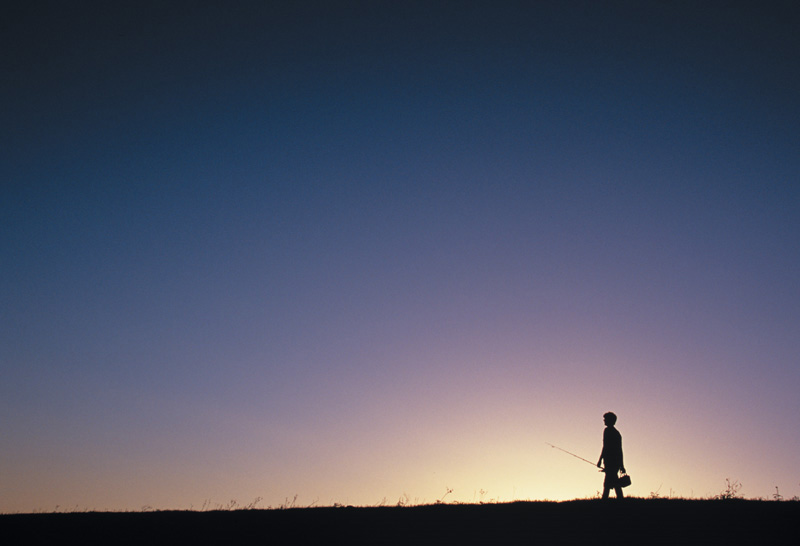
Working the structure in a sky and filling a wide-angle frame up with great clouds and color help a shooter avoid capturing a lot of unwanted and unnecessary void space. For the most part, you want to avoid shooting an empty sky (Figure 3.18). Sometimes the void is what you want, perhaps for unique color or interpretive value (Figure 3.19). The void can be very powerful as a way to show emptiness and critical depth. When I am confronted with bald skies or clouds lacking character, I look for other natural or artificial structures, such as the overhanging branches of a large tree or a creative feature of a building downtown (Figure 3.20).
ISO 100 • 1/125 sec. • f/5.6 • 34mm
Figure 3.18 I wanted the full moon to work for this shot of Sawtooth Mountain, but it was simply too small and too far above the mountain, poised in an otherwise uninteresting, featureless sky.
ISO 100 • 1/250 sec. • f/5.6 • 17mm
Figure 3.19 The large, open sky, combined with a unique color gradation and the silhouette of the primary subject, conveys feelings of nostalgia, youth, or just smallness.
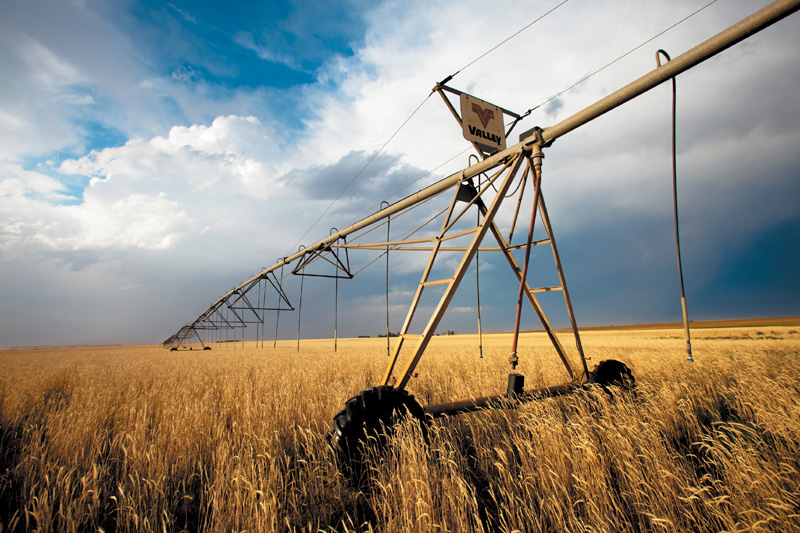
ISO 100 • 1/160 sec. • f/8 • 17mm
Figure 3.20 For skies lacking strong structure, lines or leading composition, I will add artificial components like this irrigation system to increase interest and a sense of place to the shot.
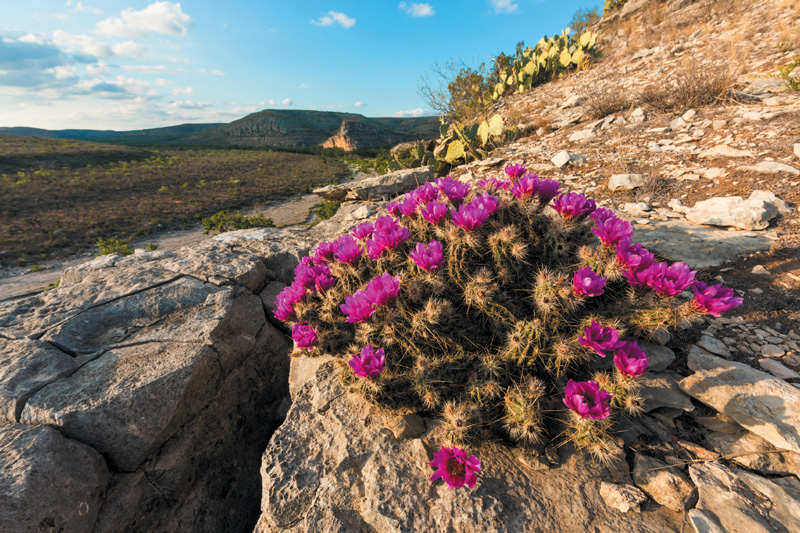
Push In on the Foreground
One of my favorite things to do with a wide-angle lens is find something of importance to the environment in which I’m shooting and make it the foreground (Figure 3.21). The nice thing about wide-angle lenses is that the minimum focusing distance is fairly short, allowing you to maintain focus on the subject while being just inches from it (Figure 3.22). Another asset of wide-angle lenses—their expansive perspective—keeps you from losing the environment. Concentrate the lens on a visually appealing part of a story but keep the story world as part of the picture (Figure 3.23).
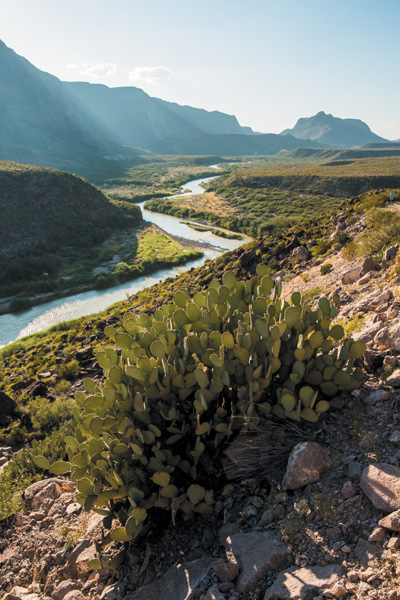
ISO 100 • 1/40 sec. • f/16 • 32mm
Figure 3.21 A large prickly pear serves as a strong foreground subject against an expansive river valley.
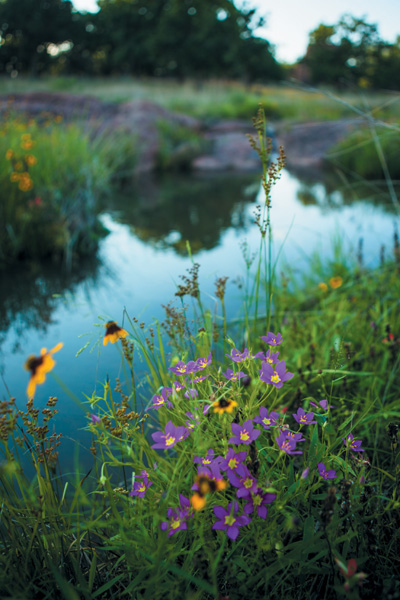
ISO 200 • 1/500 sec. • f/2.8 • 24mm
Figure 3.22 Being able to focus inches away from the small purple flowers at a wide focal length offered me a way to also expose the riparian habitat that gives life to the vegetation.
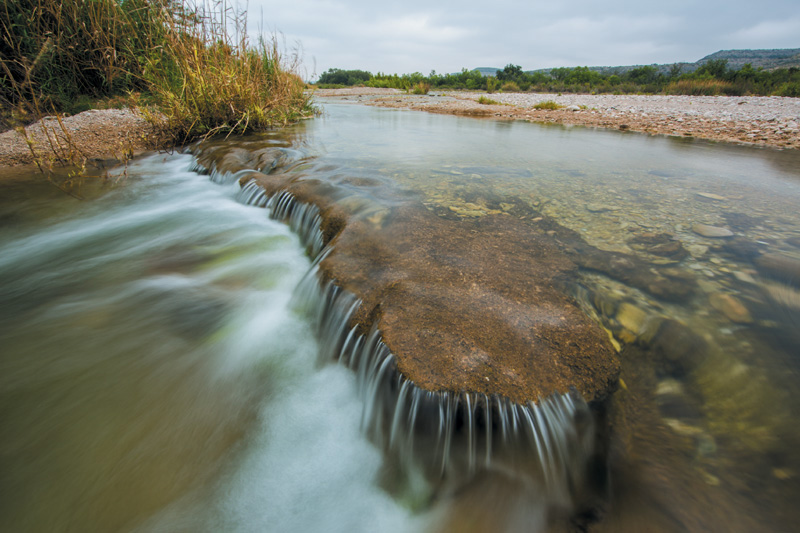
ISO 50 • 1 sec. • f/22 • 14mm
Figure 3.23 The curved feature of this small waterfall on a desert creek is an accent worth pushing in on it tightly.
The rule of thirds—one of the Holy Grail composition guides, suggesting placement of significant subject matter on invisible lines that trisect the frame into vertical and horizontal thirds—comes in especially handy while using strong foregrounds and wide focal lengths. Keeping the primary subject matter near the left or right vertical third and on or in the bottom third of the shot leaves plenty of real estate for the mid-ground expanse, as well as the horizon line on or in the upper third of the frame (Figure 3.24). Design-wise, this type of composition also leaves room for placement of text or other graphics that complement the editorial use of an image.
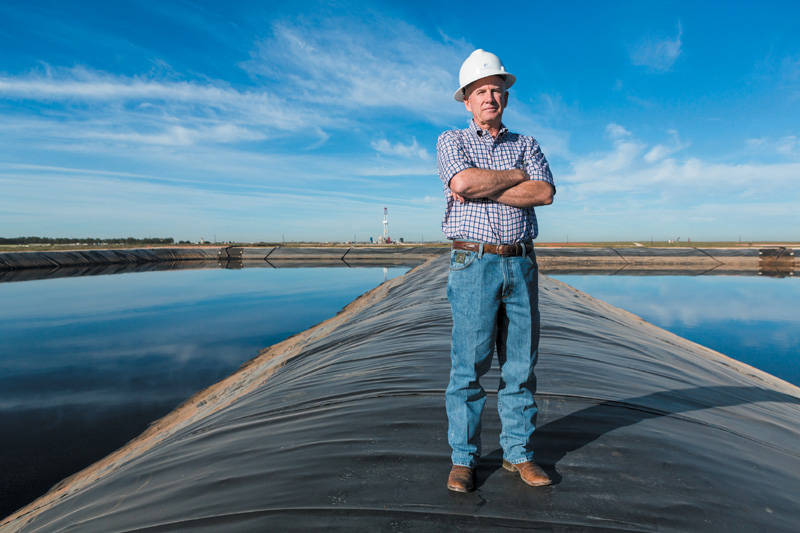
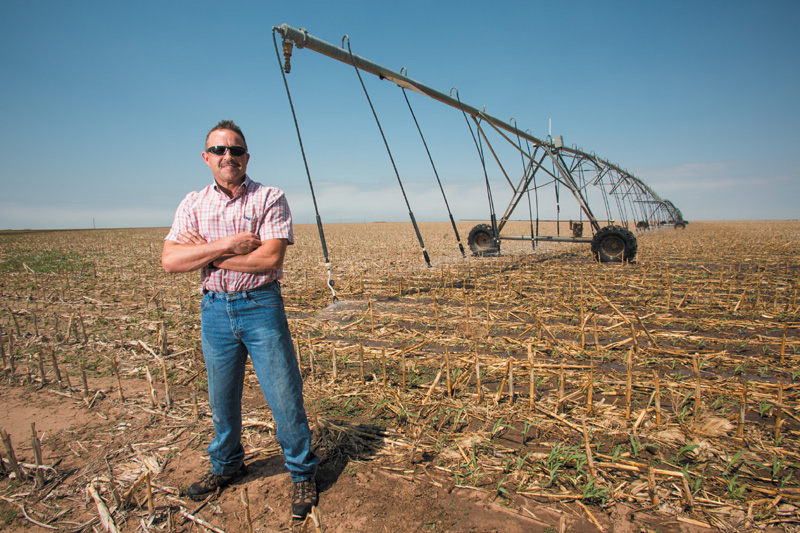
ISO 100 • 1/125 sec. • f/14 • 24mm
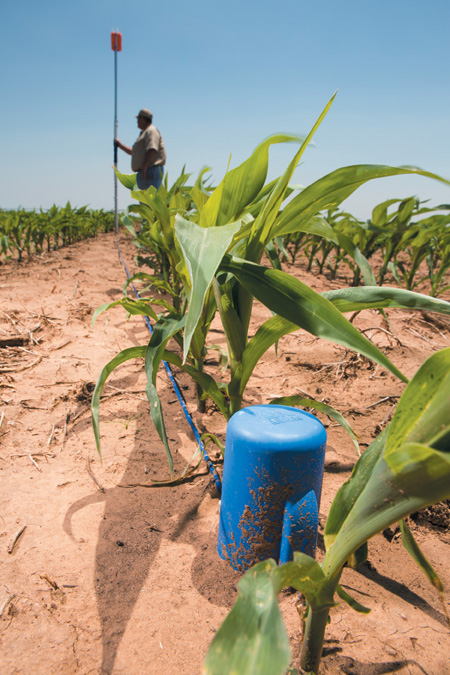
Figure 3.24 A wide-angle pushed close to the primary subject was essential in this shot covering new water conservation technologies that farmers are using.
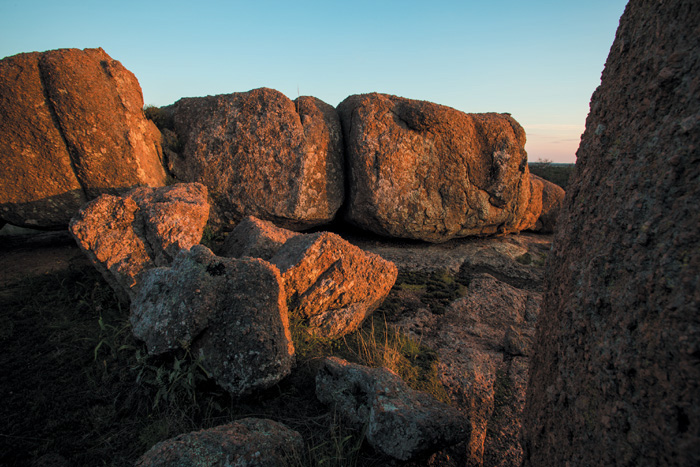
Strong foreground subjects can also be used as guiding lines themselves. Explore the linear structure of subjects, considering it as a way to direct the eye through the frame. Wide-angle focal lengths allow us to exaggerate this direction, resulting in both aesthetic and strategic composition. One of my favorite places to discover new lines in unsuspecting subject matter is a large pink granite mountain in the Texas Hill Country (Figure 3.25). From high and low, I can find great wide-angle composition by simply pushing in tighter on nearby boulders and arranging myself so that other boulders fall in dynamic lines through much of the frame. I also use fragments of subject matter to help frame a shot (Figure 3.26).

ISO 200 • 1/15 sec. • f/11 • 17mm
Figure 3.25 Looking through an extremely wide-angle lens and varying your position may uncover strong lines in subject matter you would normally not consider because of its form, such as these short granite boulders.
ISO 200 • 1/25 sec. • f/11 • 17mm
Figure 3.26 Wide-angle focal lengths such as 17mm make using a piece of an extremely close foreground subject (like the boulder at the right) useful for framing other subject matter while the foreground remains in focus.
Break the Rules
Speaking of the rule of thirds, there are times when it should be ignored. This is the “rules are meant to be broken” part of the book.
Center the subject
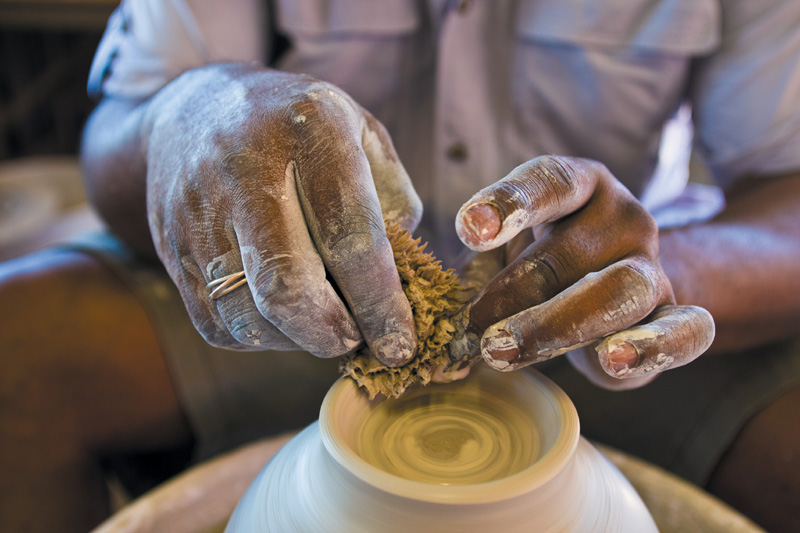
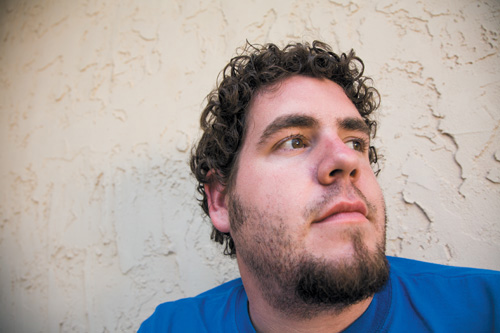
When a subject is so valuable that you want to direct immediate attention to it, placing the subject in the middle of the frame will do it for you (Figure 3.27). Of course, haphazardly doing so might cause confusion, especially if the subject is very small compared to its surroundings. Instead, push in tight on the primary content. The curvature of wide-angle lenses—rectilinear or curvilinear—will force the subject to pop out toward the viewer (Figure 3.28). As the subject enlarges, you are being very deliberate about where your viewers’ eyes go. Since wide-angles still let you keep the environment in the picture, consider using strong lines on either side of the subject to frame it and form an invisible vanishing point beyond it.

ISO 400 • 1/80 sec. • f/3.2 • 17mm
Figure 3.27 When centering subject matter in the shot, such as James Watkins’s pot, consider filling the entire frame with the general form of the subject. The large circle of the potter’s wheel is the foreground.
ISO 400 • 1/60 sec. • f/3.2 • 31mm
Figure 3.28 Placing Watkins’s hands—a vital part of his artistic process—in the middle of the frame seems appropriate composition for this frame only because I shot tight on them and made them leap from the background with expansive perspective.
Warped perspective
Breaking compositional rules with a wide-angle lens, particularly the extremely wide ones, such as the fisheyes and the shorter extremes of the zoom lenses, is often kept in check by the focal lengths. While expansive perspective exaggerates the distance between foreground and background—something we are mostly in favor of when using these lenses—we also experience severe distortion (Figure 3.29).
ISO 250 • 1/30 sec. • f/5.6 • 17mm
Figure 3.29 As windblown as West Texas is, the leaning of the electricity poles is a result of keystoning, a type of optical distortion common with wide-angle lenses.
Pointing a wide-angle lens up and down, and pushing it in on a subject and then backing it out all come with fairly drastic changes in perspective. It is the nature of the focal lengths to alter everything in the lens with the exception of the smallest part of the center of the frame (Figures 3.30 and 3.31). This area is like the eye of a hurricane, in which all is “normal.” Outside this very small zone, lines are extended, subject matter grows or shrinks (depending on its distance from the lens), and contents near the edges of the frame begin to stretch so much it looks like they’re trying to get out of the shot.
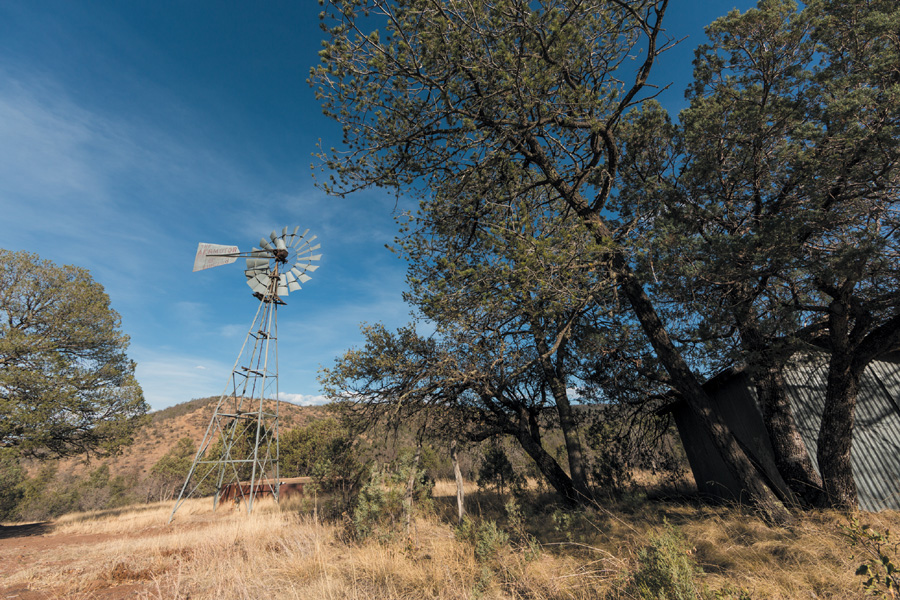
ISO 100 • 1/200 sec. • f/11 • 14mm
Figure 3.30 Keystoning is exaggerated when subject matter with vertical lines, like the windmill, are closer to the edges of the frame, where the curvature of the wide lens is most severe.
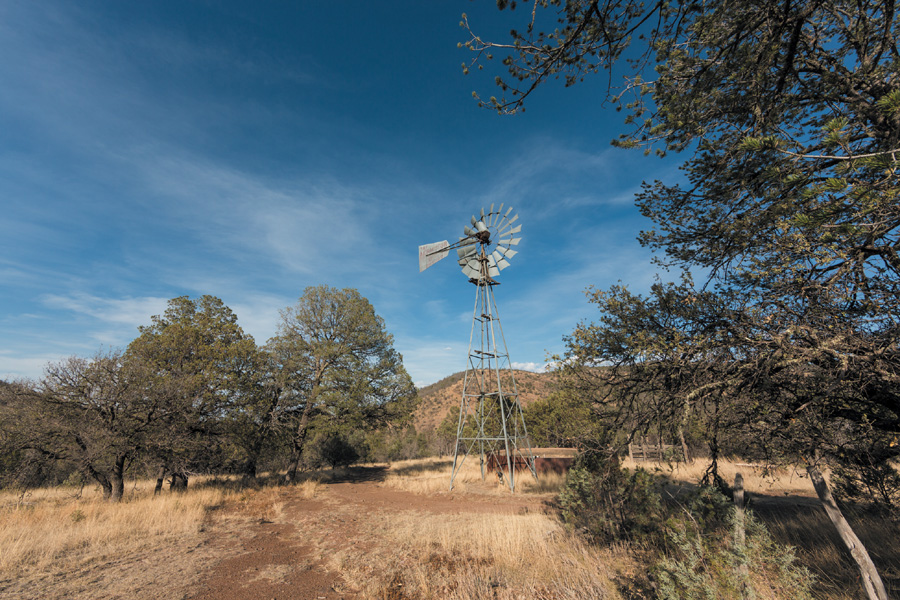
ISO 100 • 1/200 sec. • f/11 • 14mm
Figure 3.31 One way to mitigate distortion is by moving important subject matter closer to the center of the frame. The windmill is still keystoning but not as drastically.
Distorting perspective is the nature of these lenses and wider focal lengths. It is handy, though, to know where this distortion can get us in trouble. I’m all for breaking the rules when it counts, but when something round (like the petals on flower plants) becomes extremely oblong, I re-adjust my composition, my physical position, or even the lens I’m using to negate this unwelcome warpage. I encourage shooting at wide focal lengths every chance you get just to see how subject matter reacts in the frame.
The Wide-Angle Portrait
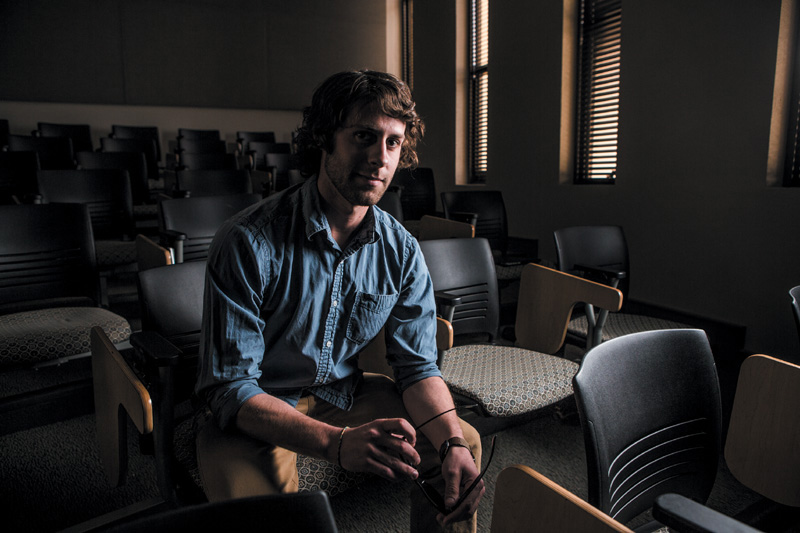
If you are new to photography, you may have heard that it is inappropriate to shoot portraits with wide-angle lenses. If you are not so new to photography, you may be telling this to newbies. There is validity in adhering to and offering up this piece of advice, but it is far from a rule to follow strictly. Some of my favorite portraits were made at 17mm, many others at 24mm. There are ways to make great portraits with wide-angles (Figure 3.32).
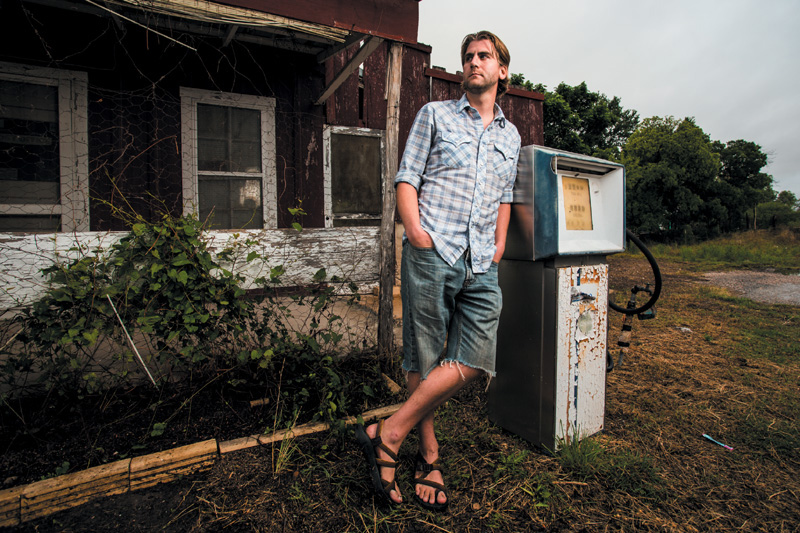
ISO 200 • 1/30 sec. • f/8 • 17mm
Figure 3.32 A wide perspective provides this portrait with context to go along with the character at the pump.
It all depends on the type of portrait you are wanting to make. More formal portraits may not benefit from the expansive perspective that wide-angles exhibit (Figures 3.33, 3.34 and 3.35). For example, corporate headshots require the least amount of distortion possible to a face and body. Wide-angles don’t surface much in bridal and traditional engagement and family portraits. Aesthetically, these types of portraits benefit more from longer focal lengths that compress distance between foreground and background, and more easily throw the background out of focus.
ISO 100 • 1/100 sec. • f/5.6 • 24mm
Figure 3.33 Push a wide-angle close to someone’s face and features start to become more round and protruding.
ISO 100 • 1/100 sec. • f/5.6 • 24mm
Figure 3.34 Photograph a face at the same distance from below and the chin starts to elongate, as does the nose.
ISO 100 • 1/100 sec. • f/5.6 • 190mm
Figure 3.35 Headshots are best made at longer focal lengths that approach telephoto in order to keep facial and body features proportionate.
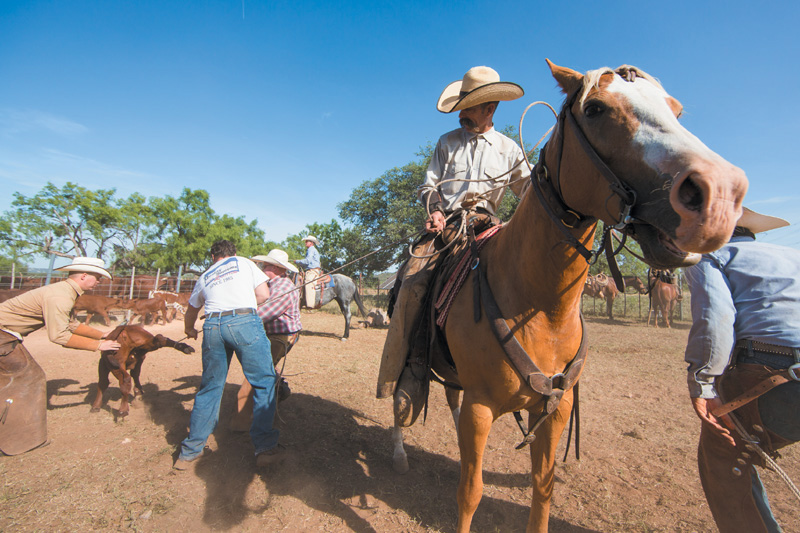
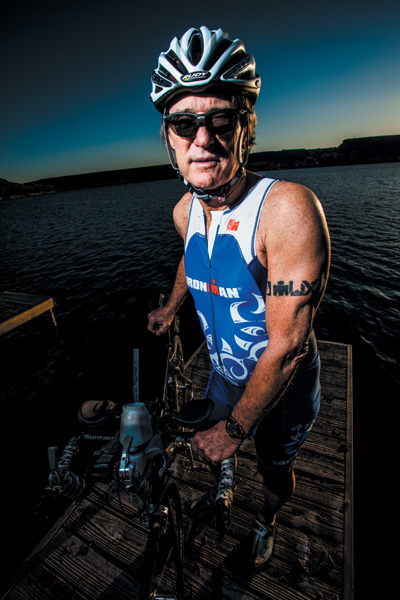
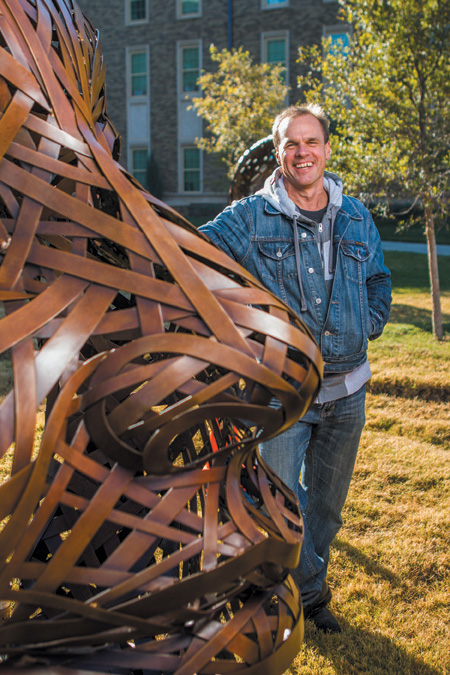
However, wider lenses are great for environmental portraiture and less traditional forms of portraits. As an editorial photographer, I’m constantly in environmental portrait mode, where showcasing the primary subject’s context is important (Figure 3.36). Wider focal lengths allow the shooter to include a great deal of this environment while also powerfully composing the subject (Figure 3.37).
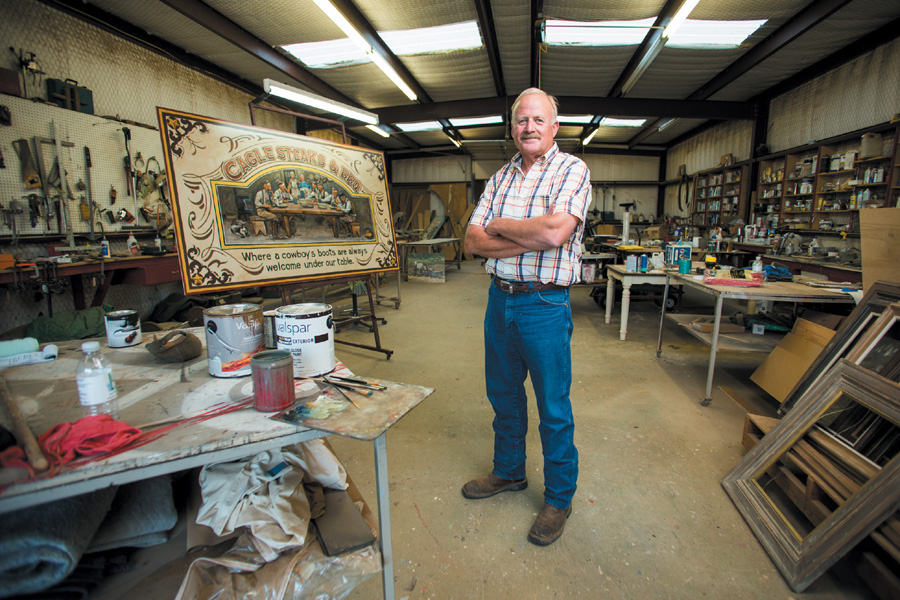
ISO 200 • 1/60 sec. • f/2.8 • 17mm
Figure 3.36 Wides are excellent lenses for environmental portraits, where showcasing the subject, like this western artist, in his space is important to telling a story.
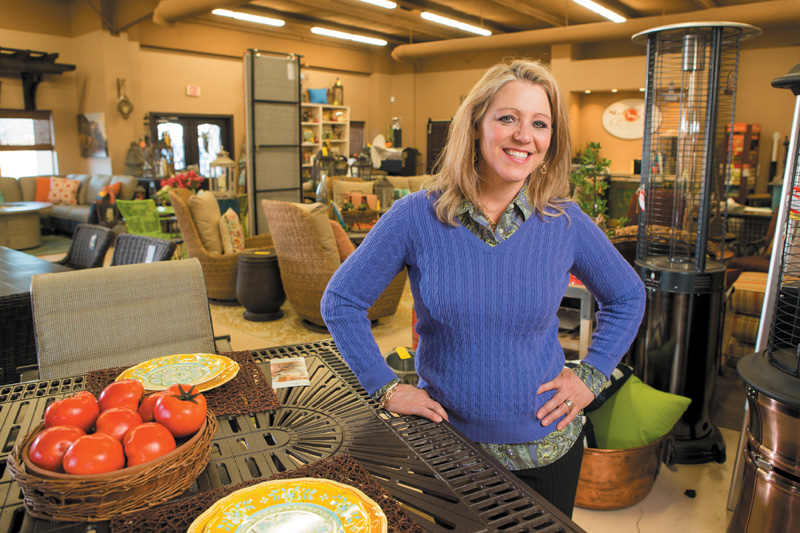
ISO 800 • 1/60 sec. • f/4 • 24mm
Figure 3.37 A boutique owner and her place of work. Wide-angle lenses are still good for pushing in to waist-high portraits, as long as the subject’s body is not too close to the edge.
Full-body environmental portraits work well if the subject is kept from the edges of the frame, where her form may stretch too much because of the glass. Pushing in tight on a waist-up version of the same subject engages the viewer with the subject in a more stylized fashion. Family portraiture that resembles a photojournalistic look more than a traditional one can employ wide focal lengths to place the viewer in the “middle” of the action. Portraits that also exhibit interpretive drama and intensity are often wide-angle shots (Figure 3.38).
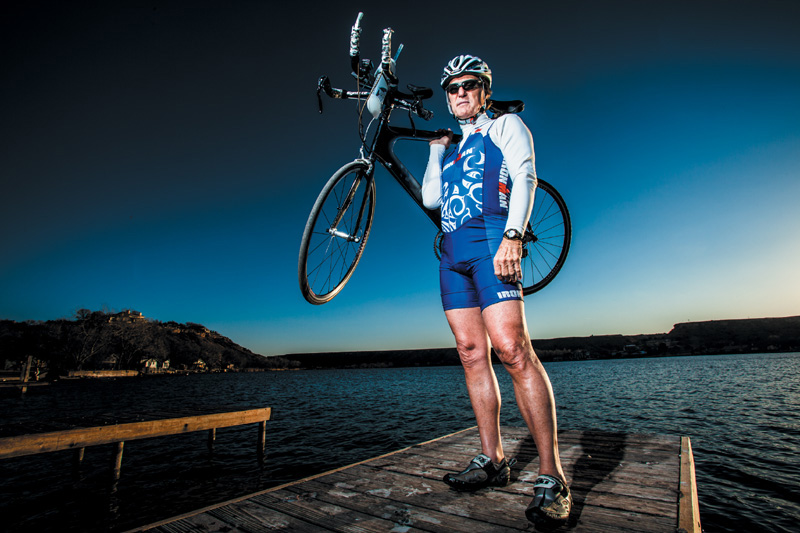
ISO 100 • 1/200 sec. • f/13 • 17mm
Figure 3.38 From below, wide-angles elongate the body, making the subject seem taller. For athletes, this perspective conveys power.
This look is not for everyone. Heavier people tend to gain more weight visually when wide-angles are pushed in on them, and while shooting subjects from below eye level may convey power for some, others may not like how it elongates their body. When shooting down on a subject with a wide-angle, you may turn the subject into a bobble-head doll (Figure 3.39) or make them top-heavy, seemingly leaning toward the outer edge of the frame along a slanted line (Figure 3.40).
ISO 100 • 1/200 sec. • f/16 • 17mm
Figure 3.39 Mike’s no bobble-head doll, but shooting down on him at 17mm makes his head seem much larger than the rest of his body.
ISO 100 • 1/200 sec. • f/11 • 17mm
Figure 3.40 A farmer looks like he is leaning toward the edge of the frame due to the lens distortion, as it is pointed more downward than upward. Looking closely will also reveal that the lit side of his face stretches just a bit toward the edge as well.
The wide-angle portrait is a balance act of context and perspective. Although lenses have no bias toward gender, people viewing portraits often do. Wide-angles are less prevalent in making portraits of women—especially in commercial settings—than of men, due to the level of distortion that comes with these lenses (Figure 3.41). Again, it all depends on the type of portraiture you are looking to create (Figure 3.42). Practice and knowledge of how the lens will affect the portrait’s look are key to successfully using it (Figure 3.43).
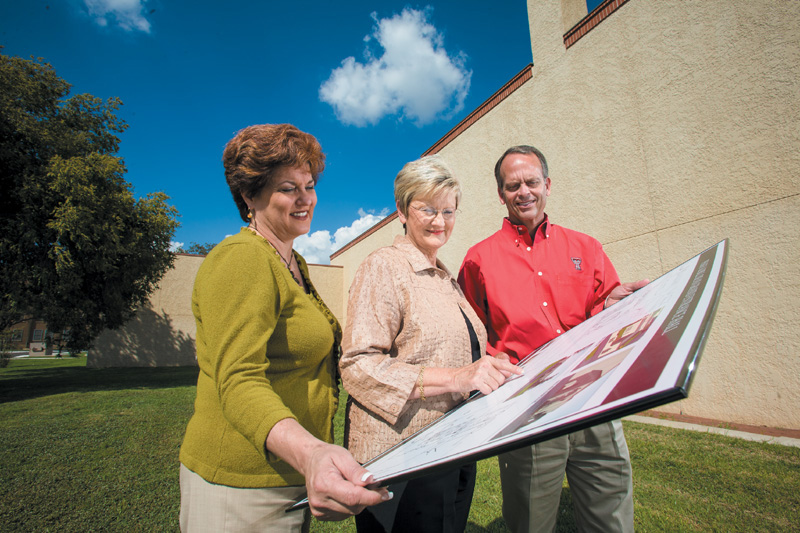
ISO 100 • 1/160 sec. • f/13 • 17mm
Figure 3.41 An interesting portrait of a building-planning committee, but I don’t believe the woman in green appreciates the enlarged size of her hand. Since it is closer to the wide-angle lens, it falls victim to expansive perspective.
ISO 500 • 1/125 sec. • f/4 • 24mm
Figure 3.42 Wide-angle lenses are great for portraits that are highly stylized or dramatic, where the distortion that occurs is insignificant, such as in this short-lit portrait of a literature student.
ISO 50 • 1/250 sec. • f/2.8 • 32mm
Figure 3.43 Knowing that a wide-angle lens would severely distort Michael Stutz’s artwork, I decided to go with the longer end of the wide spectrum and use just a part of the art for this full-length portrait.
All this being said, extremely wide focal lengths are generally not used for portraiture. The next chapter will cover a vast range of lenses and focal lengths that are more popular for this type of work, as well as a great many other forms of photography.
Chapter 3 Assignments
When I got my first wide-angle lens, it didn’t come off my camera for six months. I worked with it tirelessly to get acquainted with it and learn how to compose different types of shots without getting too out of hand, perspectively speaking.
Lock it to the left
Walk outside with your wide-angle lens and zoom it out to the widest focal length (if you have a prime lens, just walk outside). Whether it is 24mm, 18mm, 10mm, or 8mm, stay at one focal length and work on composing with an extremely expansive perspective. Look around for strong subject matter to place in the foreground of some landscape shots, such as a knee-high plant or small rock formation. If you are downtown, look for street signs to compose with iconic buildings or roads to showcase strong lines. Working with the widest focal length you can will allow you to get comfortable with it, and as a result, develop some very interesting images.
Study the structure of the sky
Point your camera up to the sky and look for great composition up there. The next time a thunderstorm rolls your way, or the sky looks like it will offer up a nice sunrise or sunset, position yourself under it and look for structure. Strong lines created by striations or stretches of clouds, identifiable forms like circles and triangles, and layers of color make for not only interesting skies but often intriguing shots.
Portraits with a purpose
Choose a person—friend or family member—and photograph her in her environment. Create several portraits of your subject at varying wide-angle focal lengths and camera-to-subject distances. Seek out compositional elements and prime spots in which to place your subject. When moving in and away from your subject, recomposing the person in the frame, pay special attention to the distortion the focal length creates for the environment and your subject. Shoot full-length shots as well as waist-up portraits, and see what works best with the environment and the subject.
Share your results with the book’s Flickr group!
Join the group here: www.flickr.com/groups/canonlenses_fromsnapshotstogreatshots