
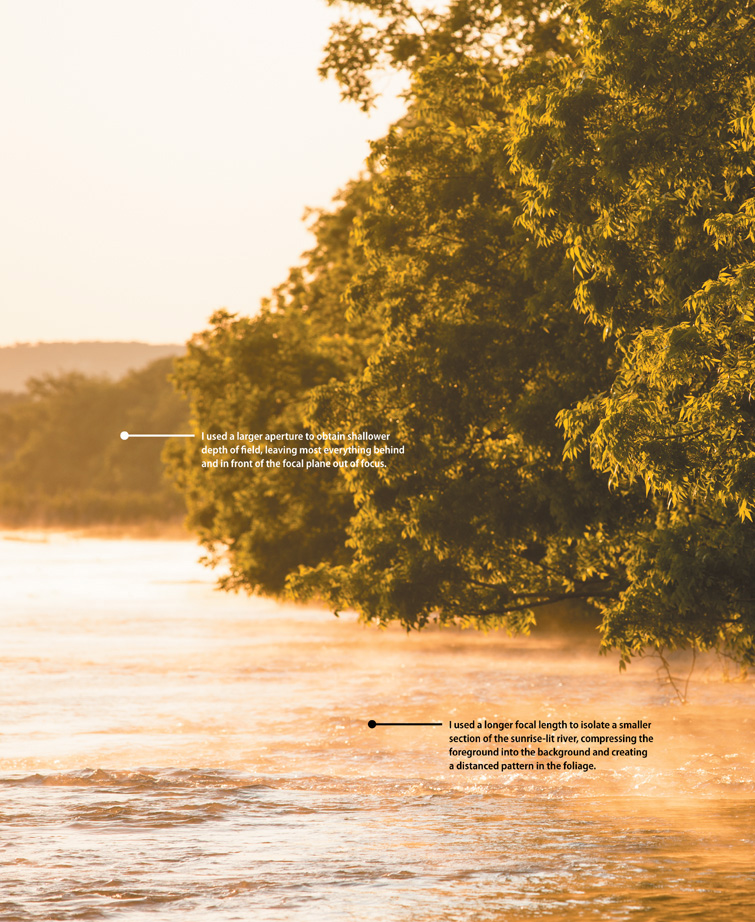
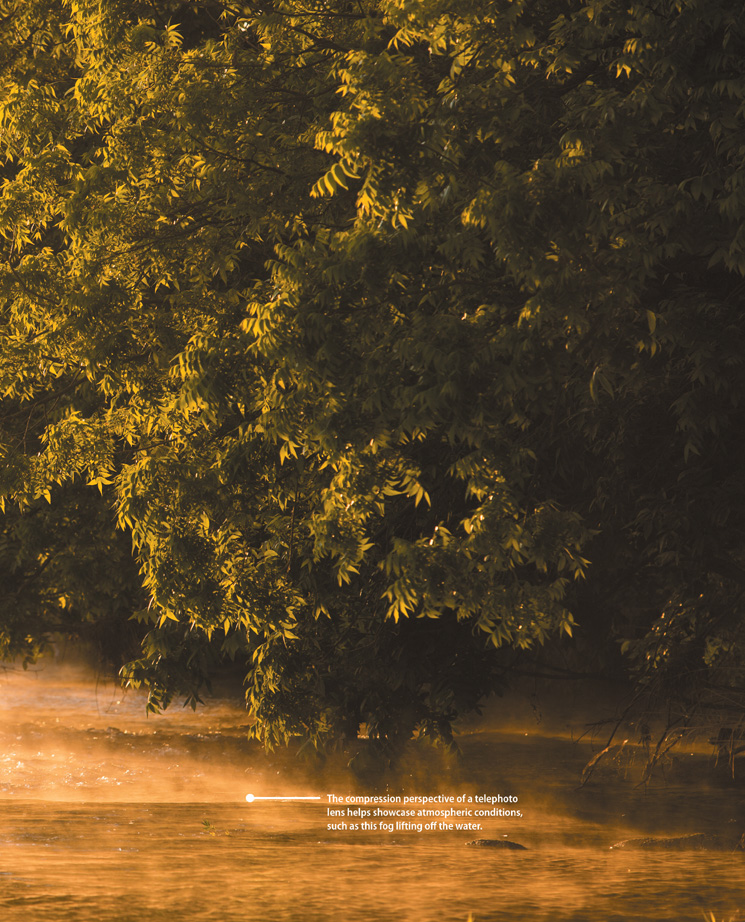
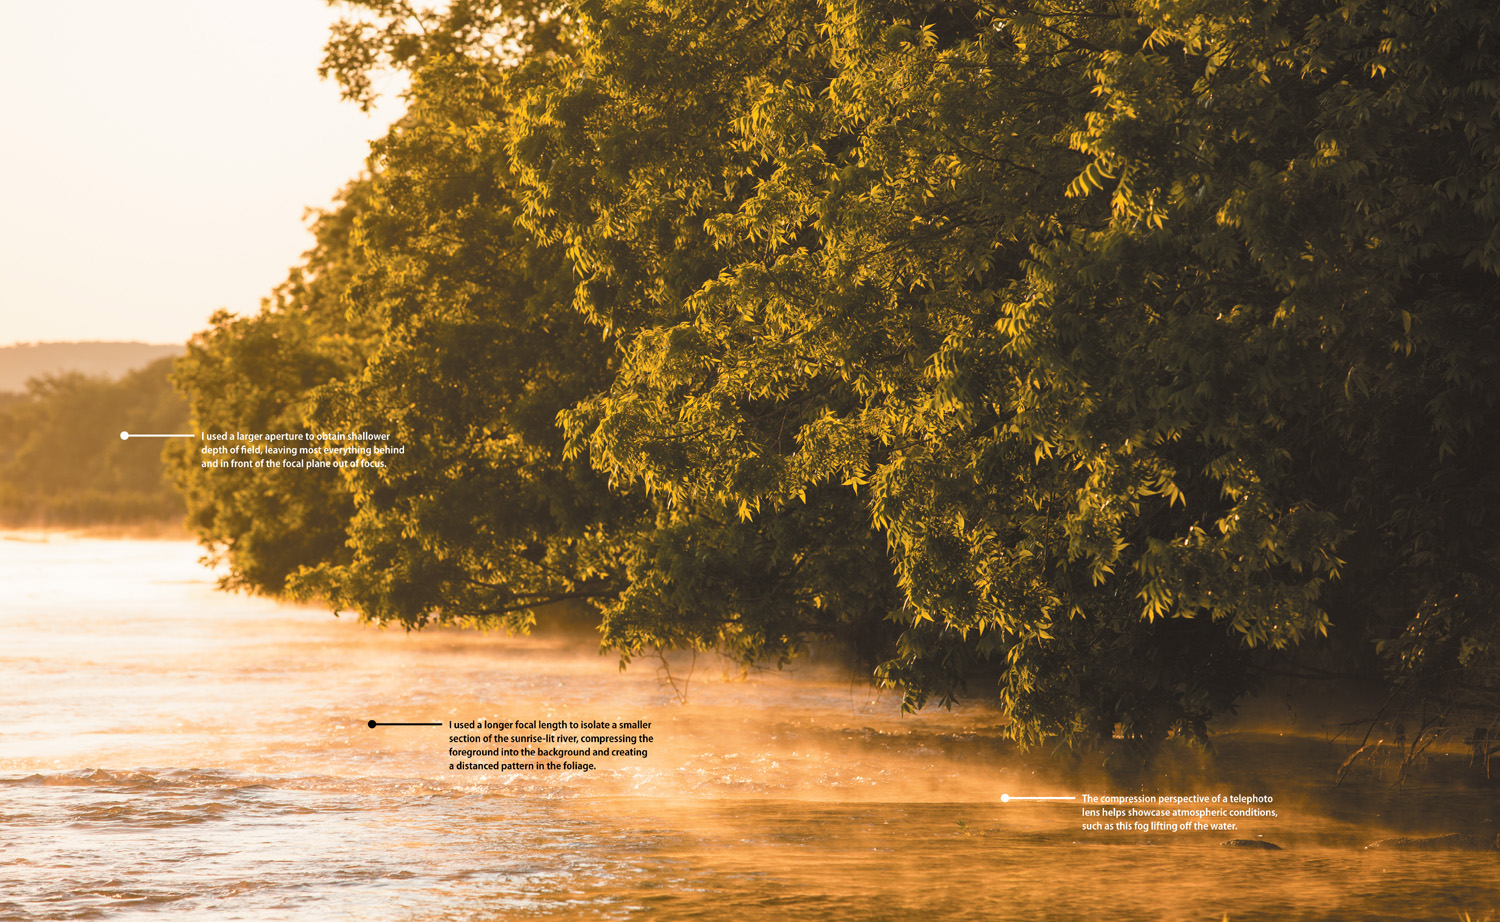
2. Depth of Field and Perspective

ISO 400 • 1/200 sec. • f/2.8 • 125mm
Using the visual controls of the lens
My favorite exposure mode is Aperture Priority (AV). I’m in this mode 80 percent of the time, moving to Manual (M) when I’m shooting in the studio and at times when exposure is a bit tricky for the camera’s metering. However, I’m not in Aperture Priority because it’s an automatic mode that does most of the heavy lifting with metering. Instead, I like Aperture Priority because I think and see in terms of the aperture and depth of field when sizing up potential shots. The ability to affect an image’s depth of field with the flick of a switch and take advantage of one of photography’s most important aesthetic controls is exciting—you’ll benefit from becoming more comfortable working the aperture. This chapter covers the relationship between aperture and depth of field, hyperfocal distance, and how to make your photos more interesting using different perspectives.
Plane of Critical Focus and Aperture
The aperture, aside from the optical-grade glass and the barrel containing a lens’s internals, is probably the most important mechanism of any lens. To be specific, the aperture is a set of overlapping metal leaves forming a ring within the lens, closing or opening depending on the user’s or camera’s determined settings. We colloquially call this opening and closing of the aperture “stopping” up or down. The aperture controls two things: depth of field and how much light is allowed through the lens to expose on the camera’s sensor (or film). The aperture is just one of a few items that make up the formula for exposure; many folks use the aperture and shutter speed together for a desirable exposure. For the purposes of this chapter, we will look at aperture as it relates to depth of field (Figure 2.1).

ISO 100 • 1/60 sec. • f/2.8 • 60mm
Figure 2.1 The aperture is the direct control of depth of field, which allowed me to place the frog in tack-sharp focus and everything else out of focus.
Aperture and Depth of Field
Before we delve into depth of field, we need to cover the plane of critical focus. Remember planes? Not the flying variety but rather the theoretical mathematic concepts you learned about in geometry? They are invisible, yet infinite, having no thickness but encompassing theoretical real estate that sprawls forever in space. The plane of critical focus is no different, and it is highly relevant when talking about focus and depth of field. Often referred to as the focal plane, the plane of critical focus is simply where focus is placed into an image. When you focus—manually or by using auto-focus—on a subject, this invisible plane exists at the very point at which you focused.
The plane exists parallel to the optics in the lens, and therefore the sensor in the camera, and it is positioned exactly perpendicular to the direction in which the lens is pointed. Anything existing on the plane of critical focus in an image (and theoretically everything on it outside the frame) is in focus (Figure 2.2). If you move exactly sideways in either direction, the plane stays at the same position, and everything that exists on the plane remains in focus. Not so if you move forward or backward. The plane then shifts accordingly, and what was once in focus—that which existed on the plane previously—is now out of it.
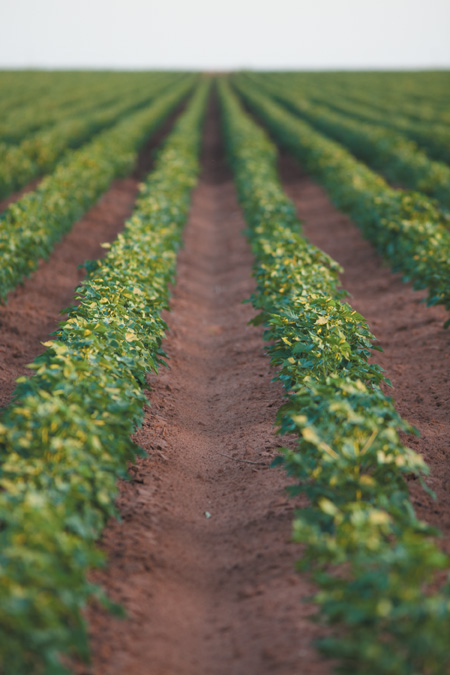
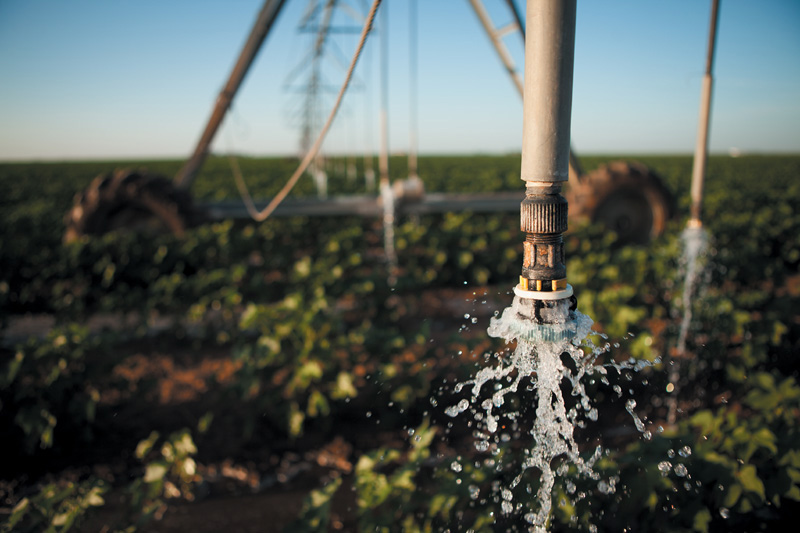
ISO 200 • 1/80 sec. • f/4 • 300mm
Figure 2.2 At f/4 and at 300mm, only a few feet of these two rows of cotton are in focus, the area that surrounds where I placed the plane of critical focus.
Unlike theoretical planes in geometry, though, we can manipulate the “thickness” of the plane of critical focus to adjust how much is actually in focus. This is where depth of field comes into play, as well as the aperture.
Depth of field is the amount of a shot that is noticeably in focus. It is called depth of field because it exists around the plane of critical focus. Technically, you do not adjust the thickness of the focal plane, but when depth of field is increased, areas in front of and behind the plane itself come more into focus. When depth of field is decreased, less of these areas is in focus. We commonly describe large amounts of depth of field as wide and small amounts as shallow (note: you probably hear “shallow” used more often than “wide”).
Landscape photography (Figure 2.3), where it is typical to have everything in sharp focus, regularly employs large amounts of depth of field. Conversely, shallow depth of field is used extensively in portrait photography (Figure 2.4), where the person or animal in the shot is in focus, but the background—and foreground, if you can see it—is thrown out of focus to help isolate and draw attention to the subject.

ISO 100 • 1/4 sec. • f/22 • 14mm
Figure 2.3 Landscape shots like this one regularly employ a closed-down aperture, resulting in maximum depth of field, where everything from the foreground to the background is sharp.

ISO 400 • 1/100 sec. • f/2.8 • 185mm
Figure 2.4 With an aperture value of f/2.8 at 185mm, there isn’t very much in focus except the subject’s left eye, where the focal plane is placed.
The mechanism used to adjust depth of field is the aperture. To increase—or widen—the depth of field in a shot, a photographer can decrease the physical size of the aperture. To produce shallower depth of field, a photographer can open up the aperture. What does this look like to the operator? Aperture values are represented by the number in the viewfinder or on the LCD screen containing a decimal. Aperture values are technically denoted as f-stops, which are ratios between the lens’s focal length and the physical size of the aperture opening within the lens. Meaning that even though the same aperture values exist for other lenses, the numbers are specific to each lens. Typical aperture values range from f/3.5 (or f/2.8 or f/1.2, depending on the lens) to f/22 or f/32.
Practically speaking, the lower the aperture value is, the shallower the depth of field (Figure 2.5). Inversely, the more closed, or stopped down, the aperture, the more depth of field one gets in a shot (Figure 2.6). Here’s the counter-intuitive part: Shallower depth of field (meaning a larger aperture opening) is achieved with lower aperture values, and wider depth of field (a smaller aperture opening) is achieved with higher aperture values.
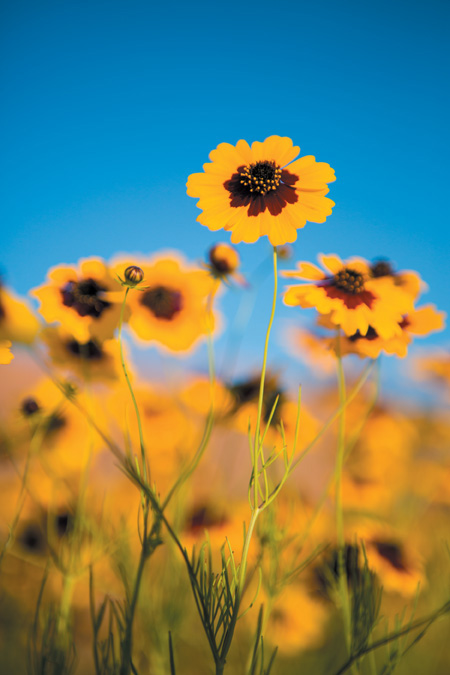
ISO 100 • 1/1600 sec. • f/2.8 • 64mm
Figure 2.5 Shallow depth of field (aperture value of f/2.8) throws everything beyond the tallest flower in the shot pleasingly out of focus.
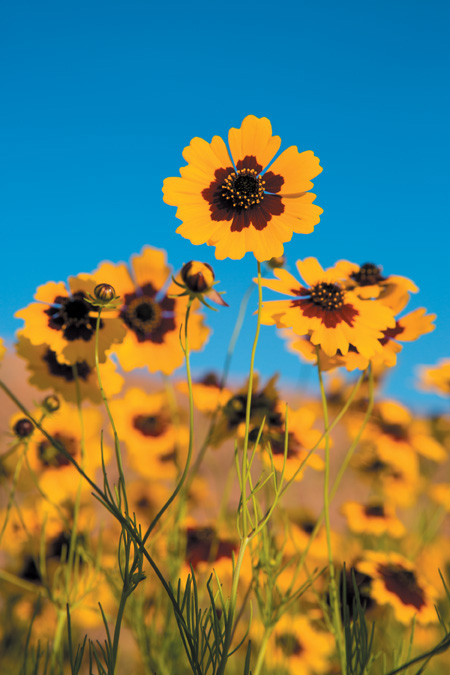
ISO 200 • 1/400 sec. • f/8 • 64mm
Figure 2.6 At f/8, the flowers in the background come more into focus as a result of greater depth of field.
For the landscape example above, an aperture value of f/22 closes the physical aperture down so much that the depth of field is nearly infinite. A typical portrait, however, might employ an aperture value of f/5.6, f/4, or f/2.8 to create very shallow depth of field. Many lenses—and cameras—allow you to adjust aperture values by 1/3-stop increments, offering you finer controls for both exposure and depth of field than did older all-manual film cameras. It is worth running through the range of aperture values your lens has and getting a sense of how each affects the shot (Figures 2.7 through 2.10).
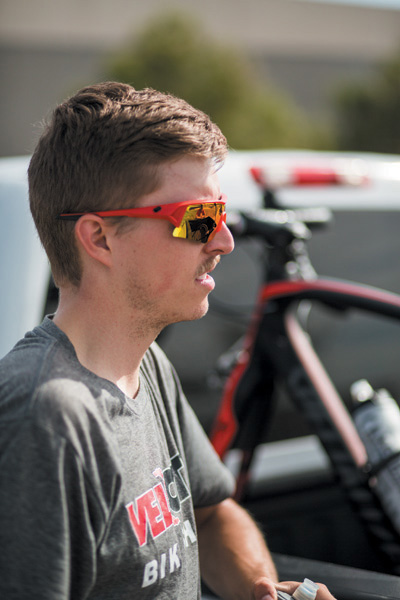
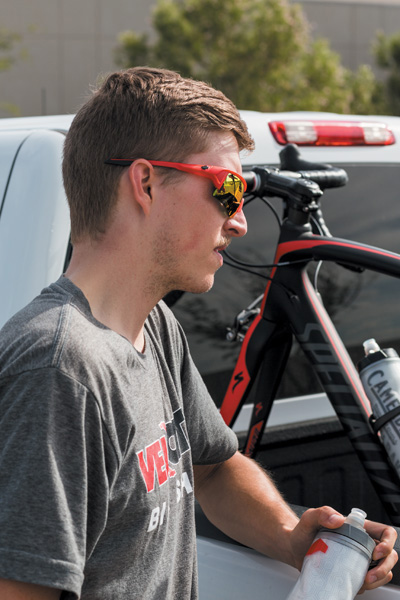
ISO 100 • 1/6400 sec. • f/1.8 • 85mm
Figure 2.7 Compare aperture values for Figures 2.7 through 2.10, and notice how the bicycle and pickup truck come more into focus behind cyclist Cody Hale as they close down.
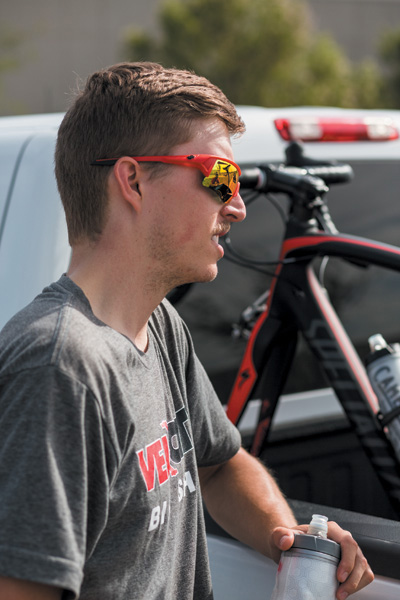
ISO 100 • 1/1250 sec. • f/4 • 85mm
Figure 2.8 At f/4, the depth of field grows beyond just the camera side of Cody’s face, and the background is more discernible.
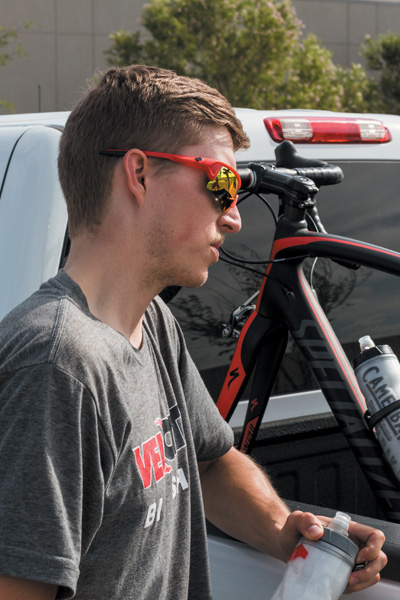
ISO 100 • 1/320 sec. • f/8 • 85mm
Figure 2.9 The depth of field is wide enough now to see that the background is the back of a pickup truck and the front of a bicycle.
ISO 100 • 1/80 sec. • f/16 • 85mm
Figure 2.10 At f/16, the depth of field has grown so much it has become a distraction in the shot.
To run this experiment, simply frame up a shot for which you can focus on a stationary subject and make several exposures, adjusting your aperture value higher each time you shoot a new frame (you might benefit from placing your camera on a tripod and switching the focus over to Manual). Look at the change in the background for each shot, noticing that it comes more into focus the more closed, or stopped down, the aperture becomes. Keep in mind that for every adjustment you make to the aperture, you will likely have to adjust your shutter speed (if shooting in Manual exposure mode).
Distance and Depth of Field
The aperture is not the only thing that can visually affect depth of field. Although aperture is the only mechanism we can manipulate in-camera to control depth of field, physical distance between the subject and shooter also impacts how much of a shot is in focus.
At any given aperture and focal length, the closer you are to the primary subject (for example, a portrait subject), the more the depth of field drops off as long as you maintain your plane of critical focus on the subject (Figures 2.11 and 2.12). The opposite is true the more you move away from the subject, when you gain depth of field. Technically, it has nothing to do with the distance of the subject from the shooter but rather the distance of the focal plane from the lens. When the focal plane is closer to the lens, there is less depth of field, even if the lens is stopped down all the way to f/22 or f/32. However, the farther away the focal plane is from the lens, the more relative depth of field is gained, or at least visually apparent, even when the aperture is wide open. This has much to do with the relative size of the subject in the frame as well, which will be discussed later.
ISO 100 • 1/80 sec. • f/2 • 50mm
Figure 2.11 Compare the backgrounds of Figures 2.11 and 2.12. The closer the lens is to the subject at 50mm and a constant aperture, the more out of focus the background becomes.

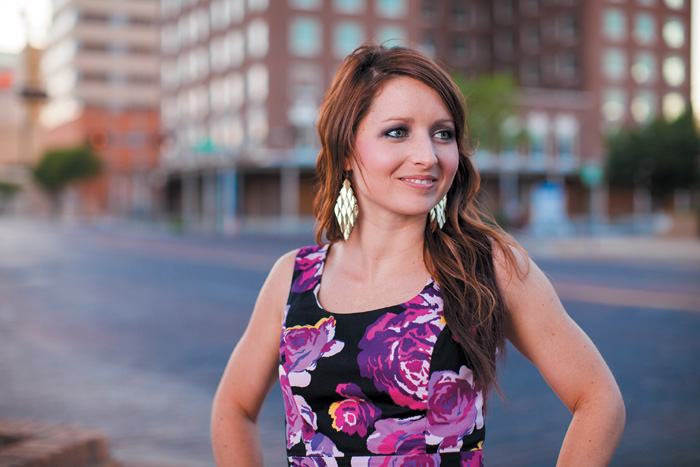
ISO 100 • 1/80 sec. • f/2 • 50mm
Figure 2.12 When the lens is farther away from the subject, the background comes more into focus, even at f/2. Compare the windows of the building.
An additional factor that affects the appearance of depth of field is the subject’s distance from a background. Portrait photographers like to place their subjects against interesting backgrounds, like colorful walls or cascading plants in a garden (Figure 2.13). The closer the background is to the subject, the more it will appear in focus, even if the photographer is using an aperture of f/2.8 or lower. Even at large apertures such as f/2.8, f/2, f/1.4, and f/1.2, depth of field does not fall off immediately, albeit more drastically than at more closed-down apertures. In some cases, that nice background you wanted for ambience can instead be a distraction, unless you pull your subject off of the background more. Increase the distance between the subject and the background, and then see what you get (Figure 2.14).
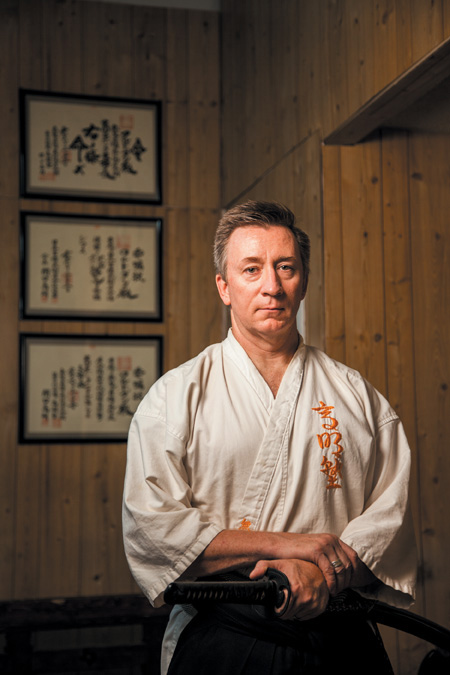
ISO 400 • 1/160 sec. • f/4 • 65mm
Figure 2.13 A martial arts instructor poses approximately 7 feet away from a wall containing his certifications, which appear slightly out of focus due to a large aperture setting.

ISO 400 • 1/50 sec. • f/4 • 67mm
Figure 2.14 When I moved him forward 3 feet, the wall and certifications appeared more out of focus, with the shift of the focal plane—on the subject’s eyes—closer to the lens and away from the wall.
Hyperfocal Distance
At times, achieving maximum depth of field is appealing (Figure 2.15 on the following page). Many of the world’s famous landscape, architecture, and street photographs were made with all of their content in focus, from the closest foreground content to the farthest background subject matter. Achieving maximum depth of field like this is often referred to as hyperfocal distance, and it is another one of those “tricks of the trade” to add to your bag of techniques.

ISO 50 • 4 secs. f/22 • 31mm
Figure 2.15 Everything from the closest waterfall to the mountaintop in the background is in focus, illustrating maximum depth of field, or hyperfocal distance.
Hyperfocal distance actually refers to the distance at which you can place your focal plane and render everything in the frame sharply. Although there is a great deal of optical science defining hyperfocal distance, that distance is basically one-third of the distance into the scene in which you’re shooting. For example, if you were shooting into a room that measured 100 feet long, you would focus at about 33 feet. Easy enough, right? Well, you’re probably not photographing in 100-foot-long rooms very often. You are looking off into canyons, photographing people walking down a street that has no end, and shooting macro images of flowers in a field. All instances offer up varied distances in which to shoot, leaving you to take a visual stab at where a third of the distance into the scene may be (Figure 2.16 on the following page).
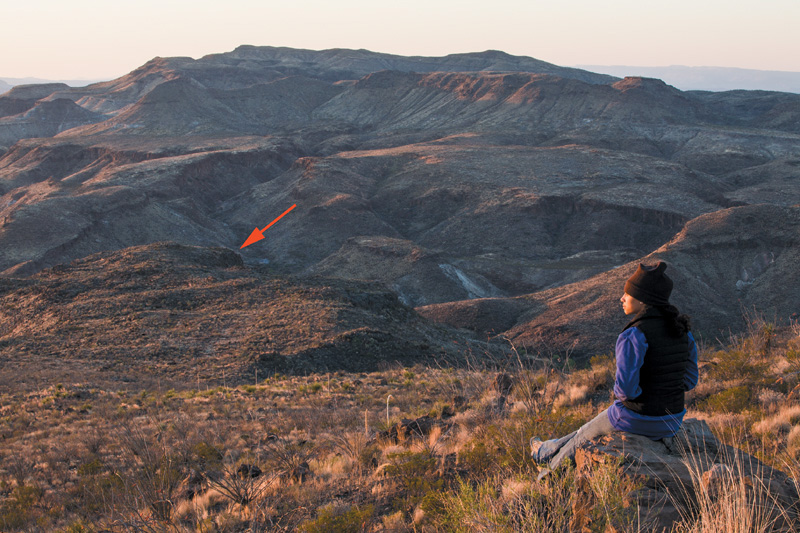
ISO 100 • .6 sec. • f/32 • 70mm
Figure 2.16 With the aperture stopped down all the way on a telephoto zoom lens, I tried to focus one-third of the distance into the entire scene (indicated by the red arrow) to ensure maximum depth of field.
On top of focusing a third of the distance into a scene for maximum depth of field, you need to make sure the lens’s aperture is stopped down all the way. For most wide and standard lenses, this means stopping down to f/22. For telephoto lenses and lenses capable of zooming to telephoto focal lengths, it might mean stopping down to f/32. Combining appropriate hyperfocal distance focusing and stopping the aperture down all the way will result in a sharp image throughout.
I’ve learned over the years that achieving hyperfocal distance is a bit easier (and more common) with wider focal lengths. They are less sensitive to minute adjustments of the focus ring—adjusting the ring on a telephoto lens may mean shifting focus dozens of feet, versus inches with a wide-angle lens. Wider focal lengths are often used in situations where maximum depth of field is desired, such as landscape photography.
Keep in mind that although you can use autofocus to focus one-third of the distance into a scene, it might be less frustrating to use manual focus. Additionally, shots like Figure 2.16 often require the use of a tripod, particularly when stopping the aperture down all the way means shooting with shutter speeds slower than the minimum sustaining shutter speed (see Chapter 1).
Perspective
In addition to considering the aperture—more specifically, depth of field—when I size up a shot, I envision its perspective before composing within the frame. Perspective refers to the size of and spatial relationships between objects in a two-dimensional image. Photographers use different perspectives to accomplish many things, one being to provide the viewer with a more three-dimensional perception of their work. When it comes down to it, photographs are dimensionally flat, but lenses, in conjunction with good composition, allow us to augment this feeling. Just as compositional technique emphasizes use of foreground, midground, and background to guide the eye through a shot, perspective deals with the size of the foreground to the midground and background, as well as the perceived distance between the three. Although it changes as focal lengths change, there are three categories we typically use to discuss perspective: expansive, compressed, and normal.
Expansive Perspective
The quintessential landscape shot is created with an ultra-wide-angle lens (think of the Canon 14mm f/2.8L or the EF-S 10–22mm f/3.5–4.5) pushed in close to a strong foreground subject, like an iconic plant or repetitious linear elements (Figure 2.17), with a sprawling mountain scene comprising the midground and background, topped off with an impressive sky that seems to stretch on forever. In this shot, the foreground looks to be miles away from the background structure, as well it might be, and it is so wide that you might as well be in the shot as opposed to looking at it. This feeling is closely associated with the type of perspective wider focal lengths offer: expansive.
ISO 100 • 1/60 sec. • f/14 • 14mm
Figure 2.17 This extremely wide desert-landscape shot emphasizes and exaggerates the size of the foreground, expanding it toward the camera.
Typically, focal lengths ranging from 8mm to 35mm provide an avenue to achieving expansive perspective. Several visual characteristics help highlight this common look. The first is that foreground subject matter—objects that are within several feet of the photographer—will appear much larger than subject matter of much larger size in the background (Figure 2.18).
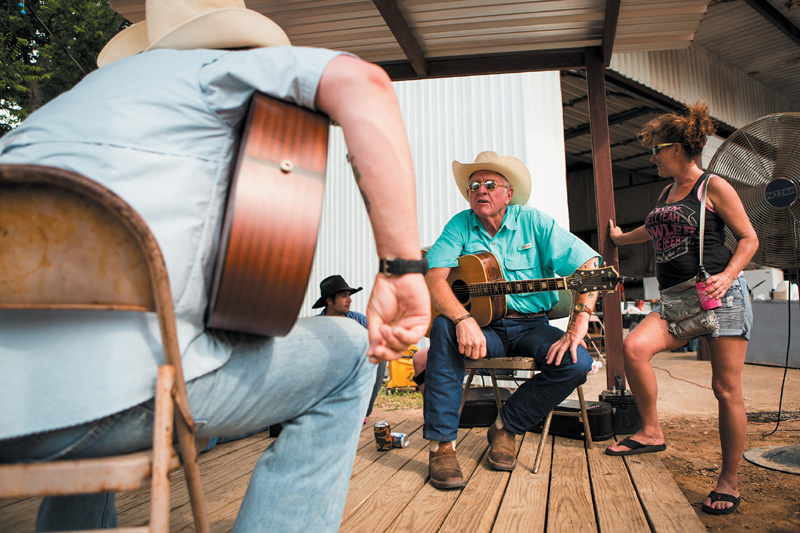
ISO 100 • 1/640 sec. • f/2.8 • 24mm
Figure 2.18 A wide-angle lens pushed in tight on the foreground makes it look like the man facing the camera is playing with a giant!
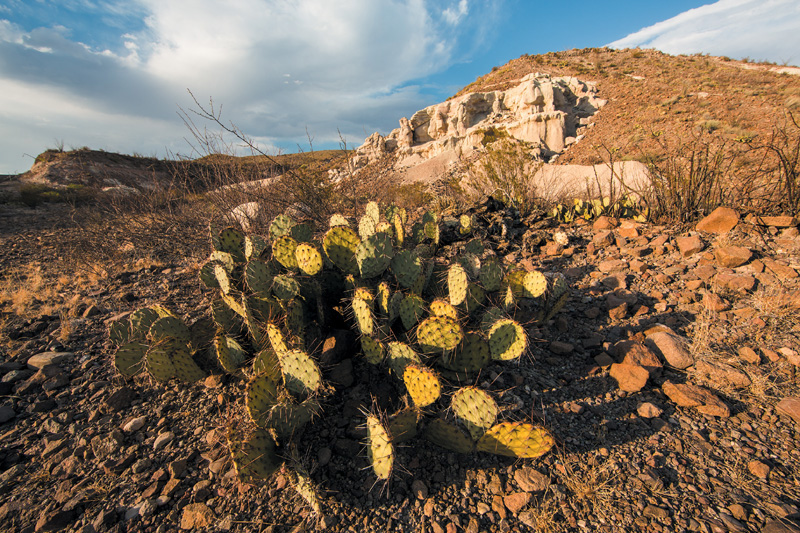
Want to drive visual significance toward a relatively small object while still showing off its environment? Throw on a wide-angle lens (Figure 2.19). The second image is an example of the signature expansive distance created between said foreground subject matter and midground and background material (Figure 2.20). The wider the lens, the larger the distance between points in the frame.
ISO 100 • 1/640 sec. • f/2.8 • 24mm
Figure 2.19 The value in a wide-angle, expansive perspective is its ability to showcase an important subject, like this irrigation head, and its relative environment.
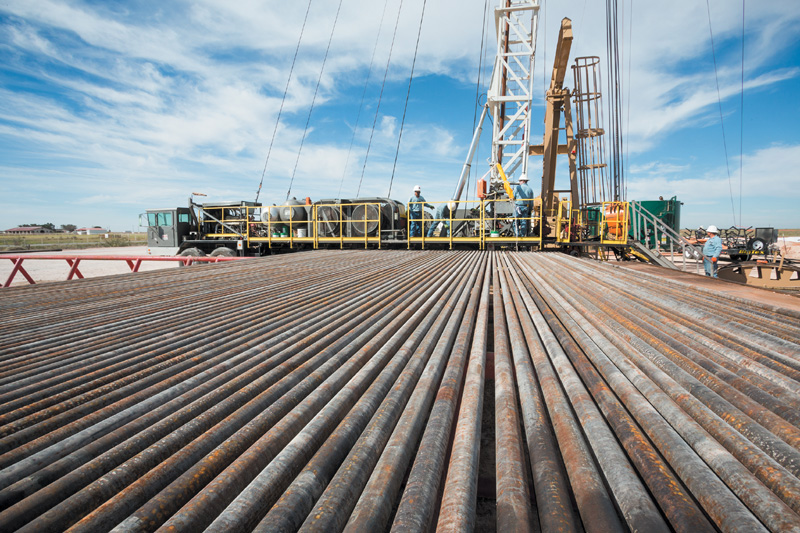
ISO 200 • 1/60 sec. • f/22 • 17mm
Figure 2.20 Expansive perspective exaggerates distance between foreground and background, making these oilfield pipes seem longer than the rig in the midground is tall. Truth be told, they are shorter than the vehicle.
I often use wider focal lengths, which result in expansive shots. I enjoy how you can drive so much attention to a particular part of the frame while also including the world around it for context and storytelling purposes (Figure 2.21). However, expansive perspective is not without its drawbacks.
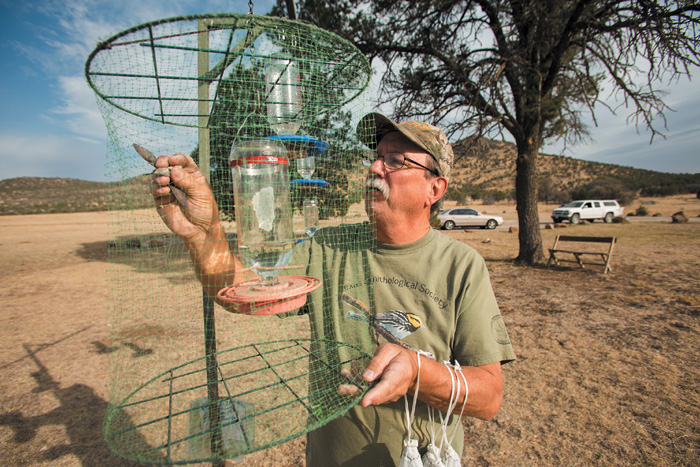
ISO 100 • 1/640 sec. • f/5 • 17mm
Figure 2.21 Pushing a wide-angle lens close to an active subject, such as this hummingbird researcher netting birds, engages viewers with the setting as if they were standing right there.
Distortion
All of the perspective goodness highlighted above can be considered serious optical distortion in some instances. In creating an expansive perspective, one is exaggerating the actual size and distances of subject matter in the frame. There are certain areas of photography where this is less acceptable or appropriate, such as in architectural and commercial photography (Figure 2.22), or even in areas of photojournalism.

ISO 100 • 1/250 sec. • f/7.1 • 18mm
Figure 2.22 As interesting as the expansive exaggeration is, it distorts the length and, subsequently, the shape of the photography drone, as well as the length of photographer Kris Barton’s legs.
Expansive perspective is also considered taboo in many portraiture circles. Consider for a moment the plight of a bride’s nose if you pushed a 17mm lens close up on her face. The bride might not appreciate how her nose stretches and curves toward the outside of the frame as it follows the convex form of the lens elements, or perhaps the way her nose seems to bulge toward the viewer if she is facing into the frame. The distortion is caused by the actual curvature of the glass elements in the lens (Figure 2.23). They are responsible for this great perspective in many landscape shots—and some portraits if composed appropriately (Figure 2.24)—but they just might wreak havoc for a commercial portrait session.

ISO 100 • 1/30 sec. • f/2.8 • 32mm
Figure 2.23 Even at 32mm, wide-angle-lens distortion stretches the female model’s legs since they exist near the left and bottom edges of the frame, areas where the curvature of the lens is extreme.
ISO 200 • 1/60 sec. • f/8 • 17mm
Figure 2.24 Although this composition is stylistically appropriate, in my opinion, the model’s head is not proportionately correct as a result of a wide-angle lens pushed in tightly for the portrait.
Keystoning
Another issue wider focal lengths present is keystoning. Although technically not related to expansive perspective, it bears mentioning here since it is most evident when using lenses that achieve expansive perspective. Just as expansive perspective increases as you go wider with your focal length, so does this optical distortion. Keystoning refers to the convergence of vertical lines in a frame when a lens is pointed either up or down from being level with the horizon (Figure 2.25). A result of the shape of the lens elements, this converging of lines can express dominance or emphasize the importance of some subject matter in editorial contexts. However, it also severely distorts structures that we know to be level or square—not ideal for architects and others who value realistic depictions.

ISO 100 • 1/250 sec. • f/8 • 24mm
Figure 2.25 Normally, flag poles don’t lean, and walls are usually built vertically straight. Keystoning forces vertical lines like these to lean in toward the middle of the frame when a wide-angle lens is pointed up (they lean the opposite way when the lens is pointed down).
Tolerance of keystoning varies in different fields, and it is good to be aware of when keystoning happens. The nice thing about both keystoning and any other form of optical distortion or exaggeration is that you can see it through the viewfinder. If you are new to working with wider-angle lenses, test it out by zooming out to the widest focal length, focusing on a building, and moving your lens vertically up and down. Watch all of the lines in the frame that tend to be vertical start to lean in or out depending on the direction in which you are moving the camera. It is an interesting effect, but it bears repeating that keystoning doesn’t go over well in some realms of image making. Note that keystoning occurs with all lenses; it is just more exaggerated with wider-angle lenses. Past 200mm, you might be hard-pressed to even notice it.
Compressed Perspective
On the other end of the focal-length spectrum, a completely opposite look and feel emerges. Instead of expanding the distance between foreground and background, compressed perspective, wait for it, compresses that distance (Figure 2.26). Longer focal lengths—typically 105mm and beyond—smash foreground, midground, and background together, and the longer the lens, the more compression you get as a result (Figure 2.27). Portrait photographers like using a longer lens combined with a large aperture to place an out-of-focus, abstract background right behind the subject (Figure 2.28).

ISO 200 • 1/1600 sec. • f/8 • 400mm
Figure 2.26 In order to emphasize the amount of rain, I used a long 400mm focal length to compress all of the mountains together.
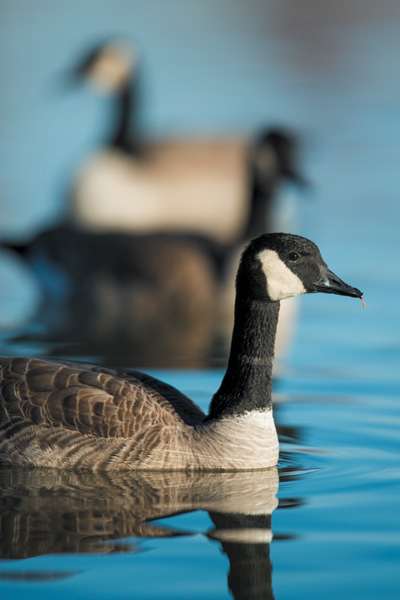
ISO 100 • 1/2000 sec. • f/2.8 • 400mm
Figure 2.27 Even though the other two geese are quite some distance behind the one in focus, a long lens will draw them together as a result of optical compression.

ISO 100 • 1/100 sec. • f/4 • 105mm
Figure 2.28 Compression perspective is useful for creating beautiful, abstract backgrounds for portraits.
Landscape photographers use compressed perspective to draw out layers and patterns in vistas. Pulling backgrounds toward subject matter can be quite interpretive, and it is a great way to de-clutter an overly complex image. I enjoy using compressed perspective to create a sense of largeness in my landscape and outdoor work (Figure 2.29), and to highlight textural or pattern-like occurrences in environments that would otherwise go unnoticed without a longer lens’s look (Figure 2.30).
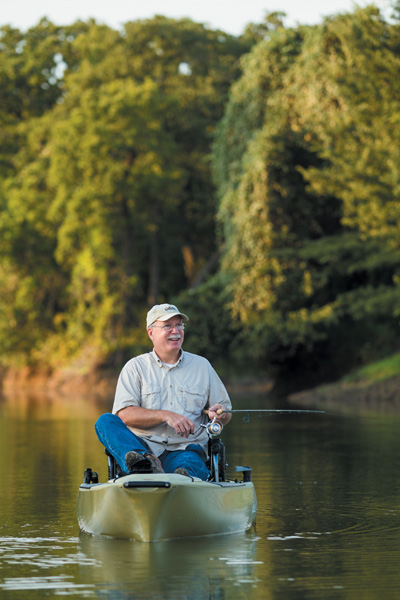
ISO 100 • 1/320 sec. • f/2.8 • 145mm
Figure 2.29 With the wooded background pulled closer to the subject, the setting seems larger than the small creek on which the angler is paddling.

ISO 50 • 1/5 sec. • f/32 • 155mm
Figure 2.30 Compression also allows for a nice way to isolate pattern and rhythm in small areas of a photo-worthy context, such as this one rapid in a larger set of them.
Compressed perspective is certainly another form of optical distortion, but it is treated less as such compared to expansive perspective. Although it does manipulate size—especially the relative size of the background compared to the foreground—it does not necessarily share the negative connotation. One thing to keep in mind is that compressed perspective threatens to make an already flat medium look even more flat. When working with longer lenses, pay close attention to photographic attributes such as color and light (and shadow) to increase or maintain the image’s depth and dimension.
Normal Perspective
For a moment, lift your eyes from the book and look around you. Try to avoid using your peripheral vision and simply take in what is in front of you. Notice the size of the book compared to something of a similar size five feet away, then ten feet away. Gauge the distance from where you are sitting or standing to a wall or tree or another static object. In completing this simple visual exercise, you have experienced (as you have your entire life) normal perspective. This so-aptly named perspective highlights a lens’s ability to replicate the way our eyes actually see everything in our environment.
So, what is the focal length that most closely matches the way our eyes take in relative size and spatial relationships? On a full-frame camera, the tried and true 50mm is considered a normal lens. On an APS-C crop-sensor camera, a 35mm (more like 31mm) lens would do the job. The normal perspective is extremely popular. Standard zoom lenses, such as the EF 24–70mm f/2.8L or EF-S 18–55mm f/3.5–5.6 are designed around the normal perspective. At the university, the only lens I require students in introductory courses to have is a zoom lens with a focal length that exhibits normal perspective.
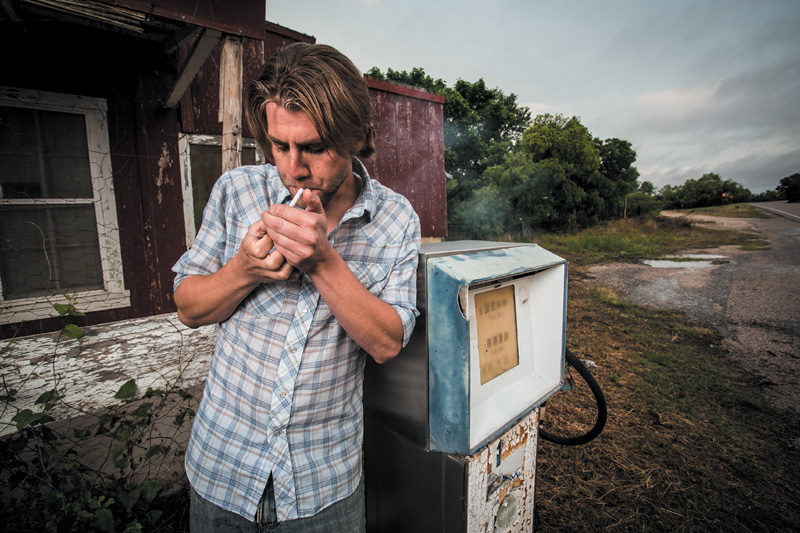
Many photographers enjoy shooting with normal perspective because of their ability to capture what they actually see—or at least get pretty close (Figure 2.31). I know photographers who for extended periods of time would only shoot with a normal-perspective lens. It is the perspective in which many of the world’s most famous, historical shots were recorded. Although a prime EF 50mm f/1.4 might not offer as much versatility as the Swiss Army knife of a lens, EF 28–135mm f/3.5–5.6 IS, it is still valued for its straight-ahead approach to making realistic images—not to mention its ultra-fast maximum aperture (Figure 2.32).

ISO 50 • 1/40 sec. • f/2 • 50mm
Figure 2.31 When on assignment photographing folks such as this ice sculptor, I like to make some images tight on the subject at 50mm to counter the expansive and sometimes distorted look of a wide-angle lens.
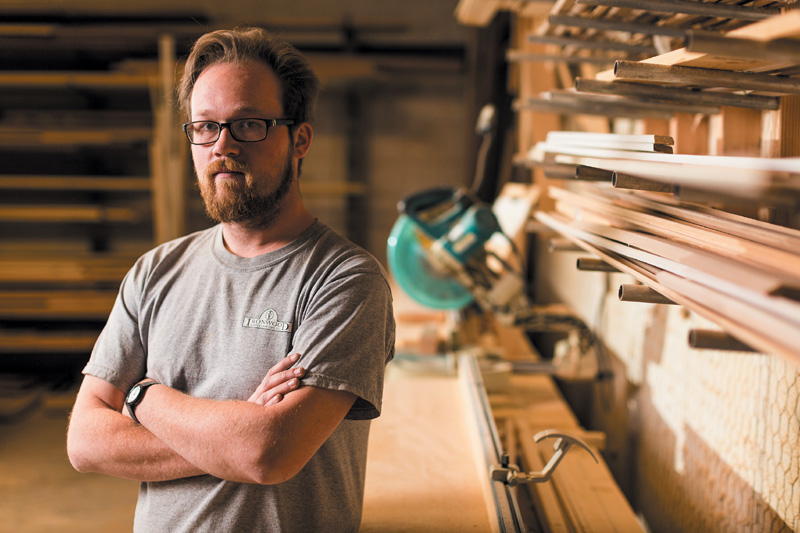
ISO 200 • 1/200 sec. • f/2 • 50mm
Figure 2.32 Because it captures subjects proportionately, a normal lens is great for environmental portraits.
It is worth mentioning that in highlighting expansive, normal, and compressed perspective, I left out some ranges of focal lengths. As mentioned previously, perspective changes on a sliding scale from extremely expansive to extremely compressed as focal lengths change. The valuable thing to keep in mind is that as one moves to wider focal lengths, one will achieve more expansive perspective, and the longer the focal length, the more compressed. Going into a shoot knowing this helps you to both see and compose great shots and avoid being surprised later by unexpected perspective-influenced issues in your images. You will see in the following four chapters how perspective plays a large role in considering different types of lenses for making the most of different subject matter and their environment.
Chapter 2 Assignments
Depth of field is so important to photographers! If there is one control that is a go-to technical and aesthetic consideration for folks new to photography, this is it. Below are a few assignments that will help you become more cognizant and confident in seeing and adjusting the depth of field your lens offers you.
It’s all about the aperture
Thanks to relatively modern technology, there are multiple aperture values from which to choose, allowing you to make the finest adjustment to the amount of depth of field in the frame. Place your camera on a tripod and photograph a single subject (it could be a person or something inanimate, like a stuffed animal) positioned 5 feet from you. Start with your aperture wide open (the lowest value), and for each shot, stop your aperture down (up in value) by one stop until you cannot stop it down anymore. I recommend doing this in Aperture Priority (AV) mode, but if you are in Manual exposure mode, be sure to make equivalent adjustments to your shutter speed.
As you make these shots, check your LCD and notice how much depth of field you gain as you stop the aperture down each time. For more nuanced adjustments, stop your aperture down by a third of a stop each shot. Use this as a way to become more familiar with how the aperture’s effect on depth of field will appear in your images. There are several variables that play into the appearance of depth of field, but this is the most fundamental of them all.
Move!
With the same subject, leave your lens at one focal length (50mm, for example) and the aperture at a fixed value (let’s say f/5.6, but any will do). For this series of images, move closer by one foot every time you make an image, always maintaining focus on your subject. Move in closer until you pass your minimum focusing distance (the closest point you can focus on with that particular lens).
Now, start backing up a foot for each shot. Assess the level of perceived depth of field based on simply moving back and forth from your subject. You’ll notice that the closer you move toward your subject, the shallower your depth of field becomes, and vice versa when you back out. This exercise will give you an idea of how to handle situations in which you’ve maxed out your aperture setting but may need more or less depth of field (especially handy when shooting portraits).
Practice hyperfocal distance focusing by positioning yourself and your camera in front of a subject-heavy scene. It could be a landscape or cityscape with a strong foreground subject and a noticeable background subject. Place your camera on a tripod, compose your shot, and make your best guess at how far one-third of the distance between your background subject and the camera is. Focus on that point.
Stop your aperture down all the way, and make a few exposures. Check your focus. Is everything from the foreground subject to the background sharp? If it isn’t, you might have to adjust where you placed the focal plane. If that doesn’t work, you are more than likely too close to the foreground subject (remember minimal focusing distance). If it helps to do so before tackling a land or cityscape, set up four cones on a 100-foot stretch of pavement, two to indicate foreground and background, the other two to mark the points that split the distance into thirds. Focus on the second cone from the camera, and check your focus. Hyperfocal distance can be hard to judge when shooting in the field. Like anything, the more you work with it, the better you get at doing it.
Share your results with the book’s Flickr group!
Join the group here: www.flickr.com/groups/canonlenses_fromsnapshotstogreatshots