
Chapter 4: Cisco Security Best Practices
In This Chapter
![]() Looking into the areas of management
Looking into the areas of management
![]() Delving into Authentication, Authorization, and Accounting
Delving into Authentication, Authorization, and Accounting
![]() Collecting and monitoring logs
Collecting and monitoring logs
![]() Securing protocols
Securing protocols
![]() Managing the network’s configuration
Managing the network’s configuration
![]() Implementing physical security
Implementing physical security
Security is often the elephant in the room. Security is there, and obvious, but nobody wants to be the one who brings it up or acknowledges it. I know a company that is absolutely paranoid about security and has hoops upon hoops for people to jump through to get new equipment added to the network, but it also has remote computers that have almost no security on them that have access to the entire network with no network Access Control Lists (ACLs). Why? Because a common misconception is that if you manage ACLs on remote devices, you can get yourself in a bind by doing things wrong.
Security should never be skipped because it is too difficult or too scary. There is always some uncertainty by implementing new systems, but there is also uncertainty about the safety of your data by not implementing security systems. Given a choice, I would rather explain difficulties with a new, safer system, or even data loss by implementing a new system, rather than explain why everything was lost due to inaction.
Now, I am not saying to implement new and difficult systems for the sake of having the newest systems. This whole process of data and network security should start with an audit, followed by an evaluation of business goals and risks, and finally a review and alignment of the two. This should give you a list of deficiencies that the business determines to be actionable risks, which can then be rolled into a deployment plan. Security and data safety may involve implementing new systems that require a capital outlay for the organization, or the safety may simply be a change in business process or software and configuration changes, which has a cost in staff time or possibly consultant compensation. <Shameless plug> Remember, it is often well worth hiring a consultant, like Ed Tetz, to come to your network and implement a solution in a fraction of the time that it may take you to implement it yourself. </Shameless plug>
In this chapter, I introduce you to many of the security tools that you need to be familiar with and use to protect your network, including Authentication, Authorization, and Accounting (AAA), log collection and monitoring, secure protocols, configuration management, monitoring traffic, securing traffic with ACLs, and physical security.
Management Areas
According to Cisco, three main areas of network management play a role in your device and data security. The following are the areas of the devices that need protection through your security measures; these all relate to soft security features (as opposed to hard security features like locked doors and alarm systems) and are the
• Management plane: This is the area that is responsible for communication with the management interfaces of your devices. The management interfaces include applications and protocols, such as Secure Shell (SSH), Simple Network Management Protocol (SNMP), and Telnet.
• Control plane: This is the area that is responsible for infrastructure. The infrastructure includes applications and protocols that deal with maintaining network infrastructure between devices. Control applications and protocols include routing protocols like Enhanced Interior Gateway Routing Protocol (EIRGP), Open Shortest Path First (OSPF), and Routing Information Protocol (RIP).
• Data plane: This is the area that is directly responsible for the movement of data through the network and networking devices.
This chapter gives you guidance in how to implement security on your network, but I do not provide all the details related to implementing all these features.
Finding Out About Known Issues with Cisco Devices
The best way to find out about issues with your Cisco devices and their Internetwork Operating System (IOS) is to stay updated on Cisco advisories, which are posted to Cisco’s support website by the Product Security Incident Response Team (PSIRT). To read more about the latest advisories, visit www.cisco.com/go/psirt.
If you do not know that you have issues with your devices, it makes it hard to keep them secured. When the advisories are posted, they detail what the issues are and the steps that need to be taken to mitigate or eliminate the risks from the issue.
Leveraging Authentication, Authorization, and Accounting
Authentication, Authorization, and Accounting (AAA) services play a critical role in securing your network resources because they offer a secure method of maintaining a central database of users and passwords. Depending on the server that you use (Remote Authentication Dial In User Service [RADIUS] or Terminal Access Controller Access-Control System [TACACS]) and the AAA servers your devices support, you cannot only authenticate users and devices, but you can also push out configuration settings to those users or devices. An example of pushing out configuration information is the association of virtual local area networks (VLANs) with users; when a user authenticates at a switch, the port they are connected to dynamically joins the VLAN that the user is supposed to be a member of. Within the Cisco ISO, AAA authentication can be used to limit the commands that are available to a user and to log the commands that a user issues.
Authentication fallback
One issue that can befall you when you implement AAA is what happens when AAA is unavailable. Your Cisco devices support a secondary authentication method for just that case arising. As secondary authentication methods, you can use the enable password, local user accounts on the device, or line authentication. In Book III, Chapter 3 and Book IV, Chapter 3, you see how to configure line passwords on the console port, AUX port, and Virtual Terminal (vty) sessions.
The preferred secondary authentication method is actually the enable password because the other types of passwords use Type 7 passwords (which I complain about shortly). The enable password can use the secret option that implements a one-way hashing algorithm, which is a more secure option. Because you need to configure the enable password, you need to protect your systems by overriding it with enable secret. Although doing so is required only as a backdoor security option when AAA authentication is unavailable, if you are using it, you have the extra work required to support local passwords or user account on your devices.
![]() Some versions of the Cisco IOS support using the same password hashing algorithm for user passwords as you use with the secret password. If this option is available to you for your local user accounts, your local user accounts are preferred over the enable/secret password.
Some versions of the Cisco IOS support using the same password hashing algorithm for user passwords as you use with the secret password. If this option is available to you for your local user accounts, your local user accounts are preferred over the enable/secret password.
Avoiding Type 7 passwords
Type 7 passwords were created to obscure the passwords found in the configuration files, but they were designed to support fast decryption during authentication. To support this speed, they implemented the Vigenère cipher. Unfortunately, the process for decrypting passwords are well-known; as such many tools, such as Cain & Abel, can quickly decrypt Type 7 passwords by using the toolbar tool button identified in Figure 4-1.
Figure 4-1: Using Cain & Abel to read a Type 7 password.

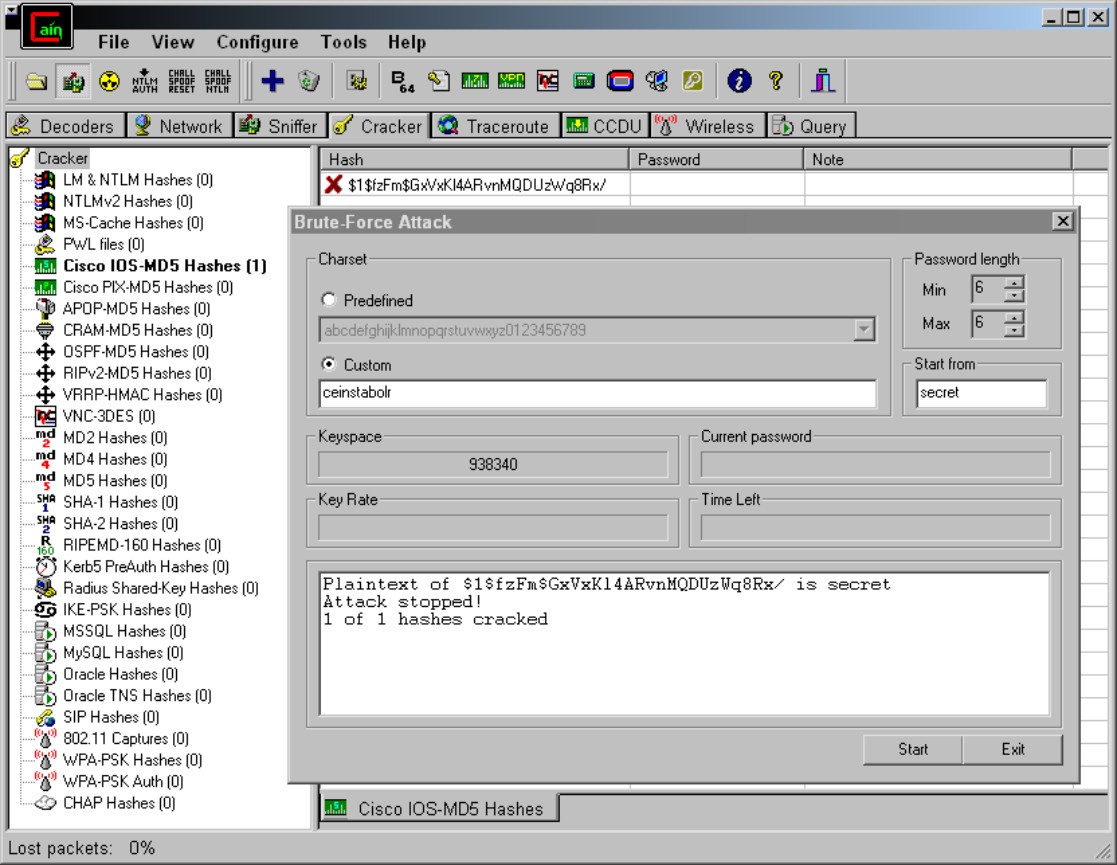
Even Message-Digest version 5 (MD5) and Advanced Encryption Standard (AES) hashed passwords can be cracked, but they take substantially more time because every possible password needs to be hashed and compared to the version that is hashed in the configuration files. Figure 4-2 shows Cain & Abel completing a crack on my secret password. (Keep in mind though that the password was between only five and six characters, and I gave Cain & Abel a list of the necessary letters.) If the password was between 1 and 16 characters and made up of standard letters and numbers, the brute force guessing would take upward of 9x10¹³ years — processing 3,000 passwords a second — on the computer that I used. Using a more powerful computer would have resulted in faster times; but really, what difference would a few thousand years make in cracking the password?
![]() Use AAA for authentication, avoid local usernames and passwords, and if you are using locally stored passwords, make sure that passwords you care about are not stored as Type 7 passwords.
Use AAA for authentication, avoid local usernames and passwords, and if you are using locally stored passwords, make sure that passwords you care about are not stored as Type 7 passwords.
![]() The secret password is a more secure option because of encryption than most of the other password options. If you do not set your secret password but you do configure a cleartext (unencrypted) password on your console port, you grant anyone who gains console or vty access privileged access to your system. After a user can enter Privileged EXEC mode, he can do whatever he wants in the device IOS, including taking a copy of all the device’s usernames and password.
The secret password is a more secure option because of encryption than most of the other password options. If you do not set your secret password but you do configure a cleartext (unencrypted) password on your console port, you grant anyone who gains console or vty access privileged access to your system. After a user can enter Privileged EXEC mode, he can do whatever he wants in the device IOS, including taking a copy of all the device’s usernames and password.
Figure 4-2: Using Cain & Abel to eventually crack an MD5 password.
To grant you a higher level of security, you can specify service password-encryption, which encrypts future passwords in your configuration file. The service password-encryption command is how you configure your system to use the low security Type 7 passwords. To work with the service password-encryption command, you simply enable password encryption, and any passwords in your configuration file are encrypted (or encoded) automatically with Type 7 hashing. The service password-encryption process is not reversed with the no service password-encryption command because the passwords remain encrypted until you reset them. The following code shows how to set up service password-encryption:
Router1#enable
Password:
Router1#configure terminal
Enter configuration commands, one per line. End with CNTL/Z.
Router1#show running-config | include enable password
enable password enablepass
Router1#configure terminal
Enter configuration commands, one per line. End with CNTL/Z.
Router1(config)#service password-encryption
Router1(config)#enable password enablepass
Router1(config)#exit
Router1#
Router1#show running-config | include enable password
enable password 7 121C0B16100709142B3837
Router1#show running-config
<content delete for brevity>
!
line con 0
exec-timeout 0 0
password 7 070C2E425E080A16
login
line aux 0
password 7 104F1C0115160118
login
line vty 0 4
privilege level 15
password 7 1311121E0509106A
login local
transport input telnet ssh
!
<content delete for brevity>
![]() Type 7 passwords can be read easily with any number of tools on the Internet, so they must be treated almost the same as cleartext passwords.
Type 7 passwords can be read easily with any number of tools on the Internet, so they must be treated almost the same as cleartext passwords. service password-encryption is different from the secret password: The secret password is a one-way MD5 hash, whereas service password-encryption uses the Type 7 or Vigenère hash.
When dealing with usernames in your configuration file, the username secret command may be issued in Global Configuration mode to configure your local users to have their passwords encrypted with MD5 hashing. In the following example, I created two user accounts — one with Type 7 hashing and one with MD5 hashing. Look at how they appear in the configuration file with service password-encryption disabled initially.
Router1#enable
Password:
Router1#configure terminal
Enter configuration commands, one per line. End with CNTL/Z.
Router1(config)#username etetz password 0 type7pass
Router1(config)#username etetzs secret 0 md5pass
Router1(config)#exit
Router1#show running-config | include etetz
username etetz password 0 type7pass
username etetzs secret 5 $1$hbNJ$QbM1G5AjnbiKVYgNFL4DN/
Router1#configure terminal
Enter configuration commands, one per line. End with CNTL/Z.
Router1(config)#service password-encryption
Router1(config)#exit
Router1#show running-config | include etetz
*Apr 22 14:38:30.867: %SYS-5-CONFIG_I: Configured from console by console
username etetz password 7 02121D4B0E511F205F5D
username etetzs secret 5 $1$hbNJ$QbM1G5AjnbiKVYgNFL4DN/
Notice the difference in the preceding code example as to the appearance of the three types of passwords and how they are identified in the file, password 0 (no encrytion), password 7 (Vigenère hash), and secret 5 (MD5 hash). The encrypted passwords for the user accounts identify the hashing algorithm that was used (by the 5 or 7 preceding the password), and the passwords are displayed in encrypted text.
Centralizing Log Collection and Monitoring
George Santayana once wrote, “Those who cannot remember the past are condemned to repeat it.” This is as true today as it was over 100 years ago when he wrote it. How can you know the history of your network? By logging.
Logging allows you to see what happened to your network in the past. Regular reviewing of your logs can also identify issues before they become problems. Cisco devices, however, have limited buffer space to store logs, and when you reboot the device, you lose them.
Collecting logs in one location
The solve Cisco devices’ limited buffer space, use a Syslog server. You can find a Syslog server for Windows from Kiwi Software (now part of SolarWinds) at www.kiwisyslog.com. You can choose from many other Syslog servers, all at different price points, ranging from free to thousands of dollars. The purpose of a Syslog server, regardless of the cost, is to collect log data from a variety of devices and consolidate it in one place where it can easily be monitored, searched, and analyzed. If you use Linux or Unix, you have a huge selection of free Syslog servers.
The Syslog server acts as a collection point for your logging activities, allowing all your network logs to be stored in one place so that you can search it easily. The Syslog server is a must for network security because without a Syslog server, your logs will remain on scattered devices and will never be reviewed or archived.
The downside is that Syslog can send a lot of small pieces of data very fast, so it uses User Datagram Protocol (UDP) and cleartext to prevent overloading the network. To prevent unauthorized users from reading those cleartext packets and to isolate your Syslog traffic, you need to use a separate management VLAN. This management VLAN should be in place already because that is where you isolate all your switch and router management traffic. Another option, in place of the management network, is to enable network layer security for all this traffic through IPSec or another type of encryption mechanism.
You can easily enable logging from the Cisco side of the equation. (The more difficult part is the configuration of the Syslog server.) Use code similar to the following example, which needs only to specify the IP address of the log server:
Router1#enable
Password:
Router1#configure terminal
Enter configuration commands, one per line. End with CNTL/Z.
Router1(config)#logging host 192.168.8.20
Router1(config)#exit
Choosing a logging level
With almost all Cisco’s Enterprise-level devices are eight default logging levels that range from zero to seven. Each of these logging levels is tied to a detail in the data logging, as I specify in Table 4-1. These levels allow you to easily choose a block of data that you wish to have logged into the system logs, and then actually sends the log info via SNMP or to Syslog destinations. Take care as you increase the levels because you increase the load on your device CPU. This is especially true of level 7.

As with most things with the Cisco IOS, this is not very difficult to set up or configure. In Global Configuration mode, use two commands. logging trap specifies which logging level should be sent to your Syslog server; logging buffered configures the logging level that displays in the temporary buffer.
Router1#enable
Password:
Router1#configure terminal
Enter configuration commands, one per line. End with CNTL/Z.
Router1(config)#logging trap 6
Router1(config)#logging buffered 6
Router1(config)#end
Dealing with logging in the console, monitor, and buffer
Cisco makes it possible to send logging data to the console session or to the remote vty terminals that have specified that they want to see logging data by issuing the EXEC command terminal monitor. However, if logging is also sent to the console, this command places a high load on the CPU. To control whether logging displays in the console session or the monitor sessions, use the commands no logging console or no logging monitor, respectively. If you want to see the log buffer, you can use the show log command at any time while in User EXEC mode or Privileged EXEC mode.
When logging to any display, such as the console or monitor sessions, you have overhead on your Cisco device. Console logging causes overhead even if you view the console at the time but disconnect with the console left open. The recommendation is to log data only to the buffer. You can configure the buffer with the size of the buffer with the logging buffered command. The buffer size varies with your device, but in the following example, the size is set to 32KB and with logging at level 6, or the information level:
Router1#enable
Password:
Router1#configure terminal
Enter configuration commands, one per line. End with CNTL/Z.
Router1(config)#logging buffered 32768 6
Router1(config)#end
When collecting logging data in a Syslog server, the device’s interface IP address is used — and included in the data — to send logging data to the server. When the IP address changes, it can cause a lot of confusion when reviewing the logs. To keep consistency in your logs, you can configure the loopback interface with an address and then configure that interface address to be used as the logging source interface. Here is the command to configure logging to use the loopback interface address:
Router1#enable
Password:
Router1#configure terminal
Enter configuration commands, one per line. End with CNTL/Z.
Router1(config)#logging source-interface Loopback 0
Router1(config)#end
When reviewing your logs and piecing together a timeline for a major network issue, your times and time reference need to all make sense. Network Time Protocol (NTP) servers for centralized time management helps keep times synchronized, and placing a time level attached to your log entries helps as well. The following command configures your logging to include date and time, down to milliseconds, and includes the time zone:
service timestamps log datetime msec show-timezone
By default, the system clock is configured for Coordinated Universal Time (UTC). However, if you prefer to use a local time zone for your devices (say, to avoid the question, “Why was that going on at that time of night?”), try using this set of commands:
Router1#enable
Password:
Router1#configure terminal
Enter configuration commands, one per line. End with CNTL/Z.
Router1(config)#clock timezone AST -4
Router1(config)#service timestamps log datetime msec localtime show-timezone
Router1(config)#end
Implementing Secure Protocols
Use secured protocols wherever they make enough sense to implement. By default and historically, many unsecured protocols have been implemented to support your Cisco devices. This is not Cisco’s fault — when Cisco implemented the protocols, no secured options were available. Over the years, as newer secured options became available, many people did not adopt them because they were comfortable with what they knew. I still have to work hard to convince some clients that SSH is not really any more complicated or difficult to implement than Telnet is.
The following table gives common unsecured protocols and the better, more secure protocol choices.

Managing Configurations
How do you manage configuration of your devices? Do you just read about the change, connect to the device, type in the change, use the write memory command, and exit? If so, I have bad news for you; this is not the way you should do manage configuration.
The concept of change management needs to be followed rigorously for very important devices. Cisco IOS devices allow you to store configurations in text files and then apply them a section at a time. Ideally, you have a duplicate of important equipment in a networking lab, but that is a luxury few people can afford. Lacking a lab, pre-record the configuration changes you will make, including a back-out plan, such as scheduling a reboot to roll back configuration changes. If possible, have some sort of review and approval process to better track configuration changes. If your organization is large enough to have different groups within the IT department, that review and approval process needs to include people from the other IT groups, such as desktop support, because the changes you make on the network may impact user connectivity to network devices. Having the other groups aware of what is going on allows them to respond better to issues that arise as a result of the networking changes.
Simple change management processes are easy to set up. The key components of any change management system revolve around documentation, recovery processes, and communication. These key elements can typically be implemented with a few small changes in your processes.
![]() Storage of your configuration files is important because they contain passwords that could give unauthorized access to your network devices. These should be stored with an appropriate level of security because poor storage can undermine your security goals.
Storage of your configuration files is important because they contain passwords that could give unauthorized access to your network devices. These should be stored with an appropriate level of security because poor storage can undermine your security goals.
Password management
I discuss two key features when dealing with passwords and users within your Cisco devices. If you are using local accounts, you can enable two features for password management:
• Password Retry Lockout
• Service Password Recovery
Password Retry Lockout
When users attempt to authenticate, there is no limit to how long they can try incorrectly. If you want to put a limit on the system, you need to enable a failed login lockout system. This system is built into the current Cisco IOS.
A failed login lockout is important because any users that have been granted privilege level 15 (the highest set of security rights) are not typically locked out. After enabling this feature, even these privileged user accounts are locked out if they exceed their login attempts. The number of privileged users you have should always be kept to a minimum. After locked out, these accounts are locked until you manually unlock them. To enable this, you simply need to change the AAA authentication process to use the new version AAA authentication (which supports account lockout) that Cisco cleverly calls new-model. Do not worry, even though you change AAA authentication process, you can still specify that users will be authenticated locally and not via the AAA server, as I have in the following set of commands:
Router1#enable
Password:
Router1#configure terminal
Enter configuration commands, one per line. End with CNTL/Z.
Router1(config)#aaa new-model
Router1(config)#aaa local authentication attempts max-fail 5
Router1(config)#aaa authentication login default local
Router1(config)#end
If an account is locked out, you can use the following command in Privileged EXEC mode to unlock an account, as in the following example. This command can apply a specific user or all.
clear aaa local user lockout username etetz
The counter is never reset, so if you have several failed logins over a few days, reset the counter with a command specifying all accounts, or just yours. Here is the command to issue in Privileged EXEC mode:
clear aaa local user fail-attempts username etetz
Service Password Recovery
The current Cisco IOS supports a fairly new command: service password-recovery, or perhaps more specifically, no service password-recovery. This is a Global Configuration mode command that modifies the behavior of your password recovery process.
Anyone with console access and the ability to reboot the Cisco device can set her own enable or secret password on the device. (I cover this process in Book I, Chapter 5.) Recovery is more about being able to recover a device that has a password you have forgotten or lost by setting a new password, rather than actually recovering the password. This poses a bit of a security risk, especially because you may not notice the password has been changed. You may notice the reboots of the device, but that is all.
By adding the no service password-recovery to your configuration, the password recovery process does not allow you to recover the password without erasing the entire configuration. If your device configuration is erased, someone has likely been messing around with your equipment. The other advantage of no service password-recovery is that it offers you the advantage of not having your configuration fall into the wrong hands for devices you have removed from the network and prevents the password from being reset for devices that are still on the network. When the device is recovered, with the configuration lost, you know something is up with the device.
![]() If you plan to enable this feature for security, make sure that you maintain configuration backups of your device.
If you plan to enable this feature for security, make sure that you maintain configuration backups of your device.
Here is the code example to enable this feature on your Cisco device:
Router1#enable
Password:
Router1#configure terminal
Enter configuration commands, one per line. End with CNTL/Z.
Router1(config)#no service password-recovery
Router1(config)#end
Managing services
Many services run in the background on Cisco devices. These services are often unused for your network, but unfortunately leave holes in your system that allow attackers to gain access to it. If you are not using these services, consider disabling them on your devices.
The following small services can easily be disabled with a pair of commands, no service tcp-small-servers and no service udp-small-servers:
• echo (port number 7)
• discard (port number 9)
• daytime (port number 13)
• chargen (port number 19)
In addition, the following list of commands disables other common services that you likely do not need to have running on your system. Most of these commands are issued in Global Configuration mode:
• no ip finger
• no ip bootp server
• no ip dhcp boot ignore
• no service dhcp
• no mop enabled
• no ip domain-lookup
• no service pad
• no ip http server
• no ip http secure-server
• no service config
• no cdp enable
• no cdp run
• no lldp transmit
• no lldp receive
• no lldp run global
Setting up timeouts
Without setting up timeout settings for Privileged EXEC Mode, your sessions stay open indefinitely. This is especially true of the console port. I have plugged in to console ports of clients’ devices, only to find out that I am in Privileged EXEC mode or Global Configuration mode from their last session, which may have been months ago. Because they did not log out and I had access to the console port, I had no problem getting elevated permissions.
To avoid this potentially dangerous situation, you need only type a command in each of your configuration line interfaces. The command’s format is exec-timeout <minutes> [seconds]. The default setting disables sessions after ten minutes; exec-timeout 0 disables the timeout altogether.
Router1#enable
Password:
Router1#configure terminal
Enter configuration commands, one per line. End with CNTL/Z.
Router1(config)#line con 0
Router1(config)# exec-timeout 5
Router1(config)#line vty 0 4
Router1(config)# exec-timeout 5
Router1(config)#end
In addition to setting a timeout on these settings, you can force vty sessions to be encrypted via SSH. This is easy to implement with the following code example:
Router1#enable
Password:
Router1#configure terminal
Enter configuration commands, one per line. End with CNTL/Z.
Router1(config)#line vty 0 4
Router1(config)# transport input ssh
Router1(config)#end
However, if you do not need to have remote terminal access to these devices, the better option is transport input none, which disables all vty access. In addition to this inbound access, you can create management SSH sessions from one device to another. So by connecting to one device, you can then launch a connection from that device to connect to another device. Limiting this connection may be accomplished with transport output ssh, which limits you to an outgoing SSH session, whereas transport output none can prevent all outbound connections.
Keeping alive TCP
Transmission Control Protocol (TCP) sessions eventually timeout, whereas the TCP keepalive command sends periodic packets to keep these sessions alive and available. Another benefit of this command is that half-opened or orphaned connections are also dropped.
The TCP sessions that are monitored can be inbound or outbound. You can specify which direction you want these keepalive commands to operate. The following set of commands run them in both directions:
Router1#enable
Password:
Router1#configure terminal
Enter configuration commands, one per line. End with CNTL/Z.
Router1(config)#service tcp-keepalive-in
Router1(config)#service tcp-keepalive-out
Router1(config)#end
Leaving room for management
With recent versions of the Cisco IOS, you can reserve memory space for access to the console. When your device is under attack, the typical attack profile attempts to overflow the available memory on the device to exploit weaknesses. The side effect of this is that when you attempt to connect to the console to see what is happening to the device, you find that you cannot get access because there is no memory for even the console session to operate.
Cisco provides a method to reserve a block of memory for the console. This means that when you need to launch the console session, memory is always available. In this example, I reserve 4MB of space for the console session:
Router1#enable
Password:
Router1#configure terminal
Enter configuration commands, one per line. End with CNTL/Z.
Router1(config)#memory reserve console 4096
Router1(config)#end
Securing SNMP
Simple Network Management Protocol (SNMP) is one of the small IP-based services that runs on your Cisco devices. If you use SNMP on your network, you can increase your security by using strong community names (which are like passwords) or by disabling the services if you are not using them. In the following example, I set the community names to understandable names; however, in production, community names are treated like strong alphanumeric passwords.
Router1#enable
Password:
Router1#configure terminal
Enter configuration commands, one per line. End with CNTL/Z.
Router1(config)#snmp-server community READONLYPW RO
Router1(config)#snmp-server community READWRITEPW RW
Router1(config)#end
To then properly secure this traffic further, you can implement an ACL such as the following two ACLs, which restrict access to the ReadOnly connections to one segment of the network (192.168.8.0/24) and access to the ReadWrite connections to a single host (192.168.8.10).
Router1#enable
Password:
Router1#configure terminal
Enter configuration commands, one per line. End with CNTL/Z.
Router1(config)#access-list 90 permit 192.168.8.0 0.0.0.255
Router1(config)#access-list 91 permit 192.168.8.10
Router1(config)#
Router1(config)#snmp-server community READONLY RO 90
Router1(config)#snmp-server community READWRITE RW 91
Router1(config)#end
Replacing and rolling back
Current Cisco IOS versions allow you a few new commands to manage your configuration backups and archiving. Backup and archiving give you an easier recovery process for configuration errors. Remember, a good configuration management process (such as the IT Infrastructure Library (ITIL) configuration) helps, but backup and archiving are tools to help you as well.
If you have archived a configuration, you can replace the current running configuration with an archived copy manually or automatically. The manual process makes use of the configure replace command issued in Privileged EXEC mode. This command replaces the running configuration with the contents of the file. If you use the command copy <filename> running-config, you actually merge the two files.
To enable the archiving feature, which is strongly recommended by Cisco for all supported devices, you need only issue five easy commands. The following command set saves the archives to the specified path, automatically creates a new archive every 1,440 minutes (once a day), saves the last 14 files, and takes an extra archive when you issue the write memory command:
Router1#enable
Password:
Router1#configure terminal
Enter configuration commands, one per line. End with CNTL/Z.
Router1(config)#archive
Router1(config-archive)# path flash:archived-config
Router1(config-archive)# maximum 14
Router1(config-archive)# time-period 1440
Router1(config-archive)# write-memory
Router1(config-archive)#end
![]() If you are low on space on your devices, you may want to reduce the number of archives you save on your device.
If you are low on space on your devices, you may want to reduce the number of archives you save on your device.
After the archiving system is configured, you can force an archive to be generated with archive config command and see the list of archives using the show archive command. Both of these commands are executed in Privileged EXEC mode. Here is what the commands looks like:
Router1#archive config
Router1#show archive
There are currently 5 archive configurations saved.
The next archive file will be named flash:archived-config-5
Archive # Name
0
1 flash:archived-config-1
2 flash:archived-config-2
3 flash:archived-config-3
4 flash:archived-config-4 <- Most Recent
5
6
7
8
9
10
11
12
13
14
Taking the talking stick with terminal lock
In larger IT shops, having several people who make configuration changes on your network devices is common. One thing that can happen is that they start tripping over each other in making the changes. Nothing can be more annoying than starting to make a configuration change that someone else is in middle of making. This can lead to a lot of confusion, and worse, corrupt the configuration. To avoid this problem, Cisco provides an exclusive editing option so that only one user or session can make configuration changes on a device at a time, by implementing configuration mode exclusive.
The configuration mode exclusive system operates in either Manual or Automatic mode. In Automatic mode, exclusive access is granted automatically to the first user who enters Configuration mode using the configure terminal command. In Manual mode, the user needs to issue the command configure terminal lock. To enable Automatic mode, use these commands:
Router1#enable
Password:
Router1#configure terminal
Enter configuration commands, one per line. End with CNTL/Z.
Router1(config)#configuration mode exclusive auto
Router1(config)#end
Router1#configure terminal
Enter configuration commands, one per line. End with CNTL/Z.
Router1(config)#
*Apr 22 19:31:44.825: Configuration mode locked exclusively. The lock will be cleared once you exit out of configuration mode using end/exit
Router1(config)#exit
Router1#
*Apr 22 19:32:09.617: %SYS-5-CONFIG_I: Configured from console by console
In the following code, notice that after enabling the Manual mode, you can still enter Configuration mode without engaging the lock. Enable the Manual mode as follows:
Router1#enable
Password:
Router1#configure terminal
Enter configuration commands, one per line. End with CNTL/Z.
Router1(config)#configuration mode exclusive manual
Router1(config)#end
Router1#configure terminal
Enter configuration commands, one per line. End with CNTL/Z.
Router1 (config)#hostname NewRouter1
NewRouter1(config)#exit
NewRouter1#
*Jun 24 20:20:44.079: %SYS-5-CONFIG_I: Configured from console by console
NewRouter1#configure terminal lock
Enter configuration commands, one per line. End with CNTL/Z.
NewRouter1(config)#
*Jun 24 20:21:04.051: Configuration mode locked exclusively. The lock will be cleared once you exit out of configuration mode using end/exit
NewRouter1(config)#hostname Router1
Router1(config)#exit
Router1#
*Jun 24 20:21:31.567: %SYS-5-CONFIG_I: Configured from console by console
Using logs to tell you what is going on
Cisco allows newer IOS versions to log configuration changes that have been made on your Cisco devices. Many of the configuration management changes that have been incorporated into the IOS make it easier for IT departments to be ITIL-oriented and compliant. ITIL places a heavy focus on configuration management and change management on all your IT resources.
The hidekeys and logging size commands can improve the default settings by removing password data from the logs and increasing the size of the change log. Additionally, you can have this change information sent to your Syslog server. Doing so is all recommended by Cisco as part of configuration management.
Router1#enable
Password:
Router1#configure terminal
Enter configuration commands, one per line. End with CNTL/Z.
Router1(config)#archive
Router1(config-archive)# log config
Router1(config-archive-log-cfg)# logging enable
Router1(config-archive-log-cfg)# logging size 200
Router1(config-archive-log-cfg)# hidekeys
Router1(config-archive-log-cfg)# notify syslog
Router1(config-archive)#end
To view your current configuration for logging, use the following command in Privileged EXEC mode:
Router1#show archive log config all
idx sess user@line Logged command
1 1 console@console | logging enable
2 1 console@console | configure terminal
3 1 console@console | archive
4 1 console@console | log config
5 1 console@console | logging enable
6 1 console@console | logging size 200
7 1 console@console | hidekeys
8 1 console@console | notify syslog
Managing network features
Many default network features are not typically necessary and can be exploited by unnamed people who attack your network. Here are some commands you need to consider running to secure your devices:
• Router1(config)#no ip source-routing
• Router1(config-if)#no ip redirects
• Router1(config)#ip dhcp snooping
• Router1(config)#ip dhcp snooping vlan <vlan-range>
• Router1(config-if)#ip verify source
In addition to these useful commands, consider enabling some of the port security features available on your Cisco devices. These are particularly good for your switches to prevent users from doing things they should not be doing.
Port security
Port security allows you to enable several security options related to the ports on your switch. This includes settings like the number of devices that are connected to each switch port, which can prevent users from connecting unauthorized network switches or access points. The following code example performs several actions, which include:
• Configuring ports for connecting to access devices rather than switches
• Having the device remember devices connected by a Media Access Control (MAC) address
• Setting a maximum number of possible devices
• Setting an action for violation of the restrictions, such as protect, restrict, shutdown, and shutdown VLAN
Switch1#enable
Password:
Switch1#configure terminal
Enter configuration commands, one per line. End with CNTL/Z.
Switch1(config)#interface fastEthernet 0/1
Switch1(config-if)# switchport
Switch1(config-if)# switchport mode access
Switch1(config-if)# switchport port-security
Switch1(config-if)# switchport port-security mac-address sticky
Switch1(config-if)# switchport port-security maximum 2
Switch1(config-if)# switchport port-security violation shutdown
Switch1(config-if)#end
When the port has been shutdown or disabled, you can re-enable the port or interface by issuing the shutdown and no shutdown commands in succession.
Anti-spoofing ACLs
Some attempted break-ins to your network are done by spoofing an IP address so that the attacker attempts to make his own outside address look like an address in your network. To deal with this issue, you can configure your router to drop or discard packets that come in from outside interfaces with purported internal addresses. This can be done with the following commands in which the external interface of the router is FastEthernet0/1, and the internal addresses encompass the 192.168.0.0/24 and 10.0.0.0/8 networks.
Router1#enable
Password:
Router1#configure terminal
Enter configuration commands, one per line. End with CNTL/Z.
Router1(config)#ip access-list extended ACL-ANTISPOOF-IN
Router1(config-ext-nacl)# deny ip 10.0.0.0 0.255.255.255 any
Router1(config-ext-nacl)# deny ip 192.168.0.0 0.0.255.255 any
Router1(config-ext-nacl)# exit
Router1(config)#interface fastEthernet0/1
Router1(config-if)# ip access-group ACL-ANTISPOOF-IN in
Router1(config-if)#end
Getting Physical with Security
Obvious, but often disregarded, advice is to always secure the physical access to your network infrastructure. There are uncounted methods of disrupting your network if an attacker gains physical access to your switches and routers. Many companies either do not realize their risk or choose to ignore it by inadequate physical security.
Physical security need not be complex: Simply installing locks on doors is the key to physical security. An inexpensive lock from the hardware store is an easy start to this security process. Figure 4-3 shows a more complex (and more secure) lock that uses proximity cards.
As your security needs increase, systems, such as the one shown in Figure 4-3, allow you to control access to all areas of your building and offer logging of who opens which doors and when.
![]() If your networking equipment needs to be out in the open (not in a dedicated room with a secure lock), make sure you have the equipment secured in a lockable communications rack that is mounted to a wall. These are standard 19-inch racks about 2 feet in height that are mounted to a wall but come with a locking door on the front of the unit, such as the APC NetShelter WX 13U Wall Mounted Rack (AR100HD) available from
If your networking equipment needs to be out in the open (not in a dedicated room with a secure lock), make sure you have the equipment secured in a lockable communications rack that is mounted to a wall. These are standard 19-inch racks about 2 feet in height that are mounted to a wall but come with a locking door on the front of the unit, such as the APC NetShelter WX 13U Wall Mounted Rack (AR100HD) available from www.apc.com.
Figure 4-3: A standard proximity card and card reader.
