Chapter 5 Understanding Contexts
A context on a Firewall Services Module (FWSM) is analogous to a virtual machine in VMware or to a switch that supports multiple VLANs. Although you are using the same physical hardware, you can logically separate the firewall functionality into unique instances. This is also known as virtualization. Each context has a unique set of interfaces, rules, and/or policies applied.
Mixed mode contexts are also allowed, which enables the support of transparent and routed mode contexts simultaneously.
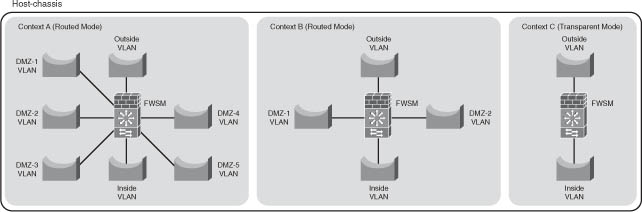
Figure 5-1 illustrates three separate contexts: “Context A,” a routed mode firewall with seven interfaces, “Context B,” a routed mode firewall with four interfaces, and “Context C,” a transparent mode firewall. These contexts can be managed separately with completely distinct configurations.
Virtualization gives you the advantage of the separation of multiple physical devices but provides tremendous flexibility that you will learn about in this chapter.
Figure 5-1 Context Overview
Benefits of Multiple Contexts
The benefits of using multiple contexts are the logical separation of security policies and leveraging the investment in hardware.
Separating Security Policies
Many organizations support multiple customers, departments, agencies, applications, and so on that not only require unique security policies but also require separation of those security policies. These security policies may be managed by different groups, which may need to be isolated.
Managing a single context with a single configuration and multiple groups will create a very complex rule set. Mistakes are more likely when working with a complex configuration. Separating the configurations into smaller more manageable components will make the job of administration much easier and consequently make your network more secure.
There might be other more compelling arguments to separate contexts, which could be driven by industry compliance or government regulations. Whatever the reason, supporting multiple firewall instances on the FWSM is a simple process.
Leveraging the Hardware Investment
Rather than install a new firewall every time a new customer, department, agency, application, and so on is added, creating a new context is very simple and does not require any additional rack space. The footprint of a device is a huge concern in locations where customers lease space by the rack unit (RU). Multiple contexts do not require additional space.
The “green” initiative is concerned with the impact on our environment. Reducing the amount of power consumed by leveraging multiple contexts and consequently reducing the hardware will help us do our part in being ecologically responsible.
If you have already made the investment in hardware, it makes sense to get your money’s worth by taking full advantage of the resources available.
Disadvantages of Multiple Contexts
With the previous section touting what an incredible device the FWSM is, you are probably ready to install several of them right now. If you can believe it, there are some limitations. These are throughput, being limited to 1 gigabit/sec per flow, and the reduction in allocation of resources, because they are now shared. Fortunately, these issues will be addressed, at least to some degree, in Chapters 24, “FWSM 4.x Performance and Scalability Improvements,” and Chapter 25, “Understanding FWSM 4.x Routing and Feature Enhancements.”
Adding and Removing Contexts
The first step in adding contexts is to configure the FWSM for multiple-context mode using the following command:
FWSM(config)# mode multiple
WARNING: This command will change the behavior of the device
WARNING: This command will initiate a Reboot
Proceed with change mode? [confirm]
If you have a configuration worth saving, be sure to create a backup.
The number of security contexts is based on the license key. To verify the number of supported contexts on the FWSM, use the following command:
FWSM# show version
Look for the line that indicates the number of contexts:
Security Contexts : 50
The primary context used for administration is the admin-context. From this context, access to the system execution space and all other contexts are available. Although the admin-context behaves like a regular context, extra precaution should be taken if you use it for anything other than a way to access management functions. As a best practice, use the admin-context for management only!
WARNING | The admin-context has full access to all the other contexts, extra precaution should be exercised if you use it for anything other than management access. |
To specify which context will be the admin-context, use the following command:
FWSM(config)# admin-context ADMIN
The ADMIN name is a user-defined variable and can be named anything within the confines of the FWSM supported characters. That is, up to 32 characters in length and the words “system” and “null” are reserved.
NOTE | Throughout this book you might have noticed that user-defined parameters in configurations are capitalized. This makes the configuration much easier to understand, especially for those who are not as familiar with the FWSM configuration. |
To create the admin context, use the following command:
FWSM(config)# context ADMIN
Again, the name that is defined must match the previous command.
Assign interfaces to the ADMIN context with the following command:
FWSM(config-ctx)# allocate-interface vlan# name_of_interface
FWSM(config-ctx)# allocate-interface vlan# name_of_interface
If the previous command is used with the optional “visible” parameter, the virtual local area network (VLAN) identifiers are displayed.
The config-url specifies the location of the configuration file. Unique to the admin-context is the requirement to have the configuration file stored locally. Other contexts may have configurations stored on Hypertext Transfer Protocol (HTTP), Hypertext Transfer Protocol Secure (HTTPS), Trivial File Transfer Protocol (TFTP), File Transfer Protocol (FTP) servers, or on the local flash.
FWSM(config-ctx)# config-url disk:/ADMIN.CFG
Interface assignment must happen before the config-url. If config-url loads the configuration file and the interfaces are not defined, commands specific to the interfaces will not function properly.
Configuring the FWSM to support multiple contexts is relatively easy, but don’t forget that a reboot is required. Pay close attention to the “admin” context because it provides full access to all other contexts and shouldn’t be used for controlling user traffic.
Adding a Context
Now that the admin-context has been created and a way exists to administer the FWSM directly, additional contexts can be added. Each new context will now have the benefit of unique policies associated to control the flow of traffic, besides being able to be managed individually.
New contexts are added with the following commands:
FWSM(config)# context context_name
FWSM(config-ctx)# allocate-interface vlan# name_of_interface
FWSM(config-ctx)# allocate-interface vlan# name_of_interface
FWSM(config-ctx)# config-url location_of_file file_name
The number of contexts you are allowed to create is based on the “Security Contexts” license; use the show version command if you are curious how many you can create. Don’t forget to add the config-url statement, or you will not be able to manage the context.
Removing a Context
Be extremely cautious when removing contexts, or you may be scrambling to get services back up and functional. There is one command to remove a context, as follows:
FWSM(config)# no context context_name
WARNING: Removing context ’context_name’
Proceed with removing the context? [confirm]
Removing context ’context_name’ (4) … Done
If you do inadvertently remove a context and need to get it back, hopefully you saved the configuration file. When you re-create the context, the previous configuration will be installed when you add the config-url statement—just be sure to have the interfaces allocated or the entire configuration will not be added.
Storing Configuration Files
The configuration file can be stored on the local flash, FTP, HTTP, HTTPS, or TFTP servers. If the configuration files are stored anywhere other than the local flash, the server(s) must be accessible by the admin-context.
The location of the configuration file is stored under the context as follows:
FWSM(config)# context context_name
FWSM(config-ctx)# config-url location_of_file file_name
The usage for the options are the following:
Flash
disk:/[path/]filename]
FTP
ftp://[user[:password]@]server[:port]/[path/]filename[;type=xx]
type=xx, where xx represents one of the following options:
ap - ASCII passive mode
an - ASCII normal mode
ip - Binary passive mode
in - Binary normal mode
HTTP and HTTPS
http[s]://[user[:password]@]server[:port]/[path/]filename]
TFTP
tftp://[user[:password]@]server[:port]/[path/]filename[;int=interface_name]
If the TFTP server is connected beyond a Layer 3 boundary, the interface parameter
will override the route statement and send traffic out the specified interface.
To display a list of contexts that have been created, from the system execution space use the following command:
FWSM# show context [name | detail| count]
Following is an example of an admin context and two user contexts. Both ADMIN and CustA are in routed mode, and CustB is in transparent mode. Notice also the VLAN assignments and the URL location.
FWSM# show context
Context Name Class Interfaces Mode URL
*ADMIN default Vlan10,Vlan11 Routed disk:/ADMIN.cfg
CustA CRITICAL-A Vlan12,Vlan13,Vlan14 Routed disk:/CustA.cfg
CustB NON-CRITIC Vlan15,Vlan16 Transparent disk:/CustB.cfg
Total active Security Contexts: 3
You have several options for where to save the configuration file. The most important item to mention is that you should always maintain a current copy of the configuration in the event of a catastrophic failure.
Changing Between Contexts
Changing between contexts is a very simple process. The changeto command has two options: changing to the system execution space using the following command:
changeto system
or changing to a user-defined context, including the admin-context, with the following command (the context name is case sensitive):
changeto context context_name
To change between contexts, you must have initially connected to the admin context or the system execution space from the switch.
If command authorization has been configured on the target context and adequate privileges are not available, you can change login user with the login command.
In a context, you can verify which context you are currently in by looking at the prompt and the show context detail command, which provides details including the state of the context, where the configuration file is maintained, the assigned interfaces, and the resource management class:
FWSM/CustA(config)# show context detail
Context “CustA”, is active
Config URL: disk:/CustA.cfg
Interfaces: Vlan12, Vlan13, Vlan14
Class: default, Flags: 0x00001855, ID: 2
Comparing the output with the system configuration section for that context, you notice that the interfaces use the VLAN description, this is because of the keyword visible.
context CustA
allocate-interface Vlan12 visible
allocate-interface Vlan13 visible
allocate-interface Vlan14 visible
config-url disk:/CustA.cfg
Context for CustB does not use the visible option; consequently, the interfaces use names defined in the system configuration.
FWSM/CustB(config)# show context detail
Context “CustB”, is active
Config URL: disk:/CustB.cfg
Interfaces: INSIDE_CustA, OUTSIDE_CustA
Class: default, Flags: 0x00001855, ID: 3
This is the system configuration for context CustB:
context CustB
allocate-interface Vlan15 INSIDE_CustA
allocate-interface Vlan16 OUTSIDE_CustA
config-url disk:/CustB.cfg
As an administrator of the FWSM using the command-line interface (CLI), the changeto command will become second nature. Depending on how you would like to view the interfaces of a context, you can use the “visible” option to display the actual VLAN identifier. This may save you a couple of commands to verify the associated VLANs in a context.
Understanding Resource Management
Resource management is one of the most critical aspects to the administration of the FWSM. Although the FWSM is a very high-performance device, it does have a finite limit of resources. As contexts are added, it becomes even more imperative to understand and allocate resource appropriately, or some services may suffer.
Classes are used to specify resource limits. After the limits have been defined, they can then be associated to a context or group of contexts. The FWSM will not prevent you from oversubscribing resources! This can be beneficial if you are providing firewall services for contexts that are not mission critical or where a service level agreement (SLA) does not warrant providing that degree of service.
WARNING | Resources associated with a group of contexts can be oversubscribed. |
All contexts are assigned to the “default” class, which has unlimited access to the FWSM resources, unless explicitly changed. When new classes are created and options have not been defined, the undefined values are taken from the “default” class. For example, if you create a new context and configure only options for the number of Adaptive Security Device Manager (ASDM) connections, all the other parameters are inherited from the “default” class.
To create a class, use the following command in the system execution space:
FWSM(config)# class class_name
The limit-resource options are available for the total number using the limit-resource command with the option keyword, and the rate per second, using the limit-resource rate command with the option keyword for the following parameters:
• ASDM: Adaptive Security Device Manager, graphical user interface (GUI)
• All: All resources
• Conns: The total number of connections allowed
• Fixups: The legacy name for inspection
• Hosts: The number of host entries
• IPsec: The number of Internet Protocol Security (IPsec) sessions for management
• Mac-addresses: The number of Media Access Control (MAC) address entries
• SSH: The number of Secure Shell (SSH) sessions for management
• Syslogs: The number of syslog events
• Telnet: The number of Telnet sessions for management
• Xlates: The total number of translations allowed
Now that the class has been created, it can be applied to a context using the following commands in system execution space:
FWSM(config)# context context_name
FWSM(config-ctx)# member class_name
As you begin to utilize resource on the FWSM to its full potential, how they are allocated among classes and how contexts are associated with each class become important.
Memory Partitions
The FWSM has a pool of resources (memory) in which to allocate ACL memory to partitions. In multicontext mode, there are 12 memory partitions and two trees used for security policy rules exclusively: Uniform Resource Locator (URL) filtering statements, configured inspections, established rules, authentication, authorization, and accounting (AAA) authentication policies, remote access to the FWSM (SSH, Telnet, HTTP), Internet Control Message Protocol (ICMP) to the FWSM (configured using the ICMP CLI), policy Network Address Translation (NAT) configuration, and access list entries. Each of the 12 partitions receives an equal distribution of those resources. There are primary (active) and backup trees that maintain the information in the partitions. The backup tree is a mirror of the active tree. It is switched to active mode after the compilation process is running. This process can run in the background without interrupting traffic currently switched by the FWSM. When the compilation has finished, trees are switched back again.
Starting with release 2.3, it is possible to modify the ACL memory space carving scheme. Instead of the default 12-pool model + 2 trees for downloadable ACLs, the administrator can choose to divide the space as business needs require.
A detail item list is located in Table 2-4 of Chapter 2, “Overview of the Firewall Services Module.” Looking at the output of the show resource acl-partition from the system execution space, as demonstrated in Example 5-1, you can see that 14,173 rules are supported for each partition of the 12 partitions and that the three contexts that have been created each use one-twelfth of the total pool.
Example 5-1 Default Access Control List (ACL) Resource Allocation
Partitions 3 through 11 are just sitting there waiting for a context to be added. Yes, it is a waste of valuable resources if you do not plan to add more contexts. If there is a possibility of running out of resources, the partition space can be reallocated using the resource acl-partition command and specifying the number of partitions. This command requires a reboot of the FWSM.
After a reboot, the resource allocation has changed significantly: It went from 14,173 to 46,077, as Example 5-2 shows.
Example 5-2 Modified Access Control List (ACL) Resource Allocation
Notice that the partition 0,1, and 2 have ADMIN, CustA, and CustB assigned (respectively). You can specify which context is associated with a partition using the allocate-acl-partition command in the system execution space under a context.
context CustB
allocate-acl-partition 2
What happens when another context is added? Glad you asked! It will share the resources of the next partition in the list. In this case it would be partition 0. Now, two contexts are sharing a partition. Because resources are allocated on a first come, first served basis, if one of the contexts is hogging resources, the other one is out of luck. Use caution when modifying these parameters.
Partition #0
Mode : non-exclusive
List of Contexts : ADMIN, CustC
Number of contexts : 2(RefCount:2)
Number of rules : 19(Max:46077)
Now that the allocation has changed, you may be wondering how those resources are actually used. This can be viewed using the show resource rule command, as shown in Example 5-3.
Example 5-3 Resource Rule Allocation
Now you can see exactly how memory is allocated for each resource. Your next question might be, “Can I reallocate those resources as well?” The answer is yes.
To determine where the resources are being allocated, use the show np 3 acl count command and specify the partition number, as shown in Example 5-4.
Example 5-4. Resource Rule Allocation
If you need to increase a particular value for a feature, use the resource rule command in the system execution space. After the option parameter, you can use a numeric value or the keywords current, default, or max. The following options are available:
NAT: The number of NAT entries
ACL: The number of ACL entries
Filter: The number of filter rules
Fixup: The legacy name for inspection
Established (EST): The number of established commands
AAA: The number of AAA rules
Console: The number of management access and ICMP rules
Following are some specifics when you use this command:
You cannot exceed the “absolute max” for any value from the show resource rule command.
When resources are reallocated, the total cannot exceed the “total default limit” from the “show resource rule” command. For example, if you need to add 1000 ACL rules, you will need to decrease the total of the other options by 1000.
A change will affect all partitions! Make sure that a change in parameters will not adversely impact the FWSM.
The changes take effect immediately.
Software release 3.1 significantly increases memory utilization—up to a 31 percent improvement. Table 5-1 provides a comparison between 2.3(4) and 3.1(2):
Table 5-1 Memory Utilization: Software Release 2.3(4) and 3.1(2) Comparison

Summary
Virtualization is one of the fundamental elements of the FWSM. It provides the ability to logically separate firewall instances into contexts, consequently providing separation of policies and leveraging the investment in hardware. Be aware that a finite number of resources can be allocated to contexts; this may require some thoughtful consideration before implementation.