

Applying a policy
This chapter introduces IBM Customer Information Control System (CICS) policies. It explains the benefits and capabilities that policies can provide to IBM CICS Transaction Server (CICS TS) platforms and CICS TS applications. By using working examples, this chapter guides you through the creation, deployment, and effects of adding policies into a CICS TS cloud environment.
For further information and design considerations for CICS Policy, see Chapter 8, “Managing by policy” on page 181.
The following list describes reasons that a user would create a CICS Policy:
•Protect the CICS TS platform from erroneous applications.
•Identify early in the development lifecycle if an application meets its service level agreements (SLAs).
•Enforce rules that applications must adhere to at run time.
This chapter contains the following topics:
5.1 CICS Policy
Policies support the management of operations by the control of critical resource thresholds. You can deploy policies to monitor the resource usage of user tasks, and to deliver automated control when resource usage exceeds defined thresholds.
Policy definitions can include one or more policy rules. Each policy rule consists of a defined threshold and an associated action that is taken if the threshold is breached, as shown in Figure 5-1.

Figure 5-1 A breach of a CICS TS policy triggers an action to be taken
You can create, deploy, and search for deployed CICS policies using the Cloud Explorer view in the CICS Explorer or CICS Explorer software development kit (SDK).
5.1.1 Policy rule thresholds
Policy rules define the threshold conditions for which an action can be taken. Policy rules were introduced in CICS TS V5.1 and extended in CICS TS V5.2. In CICS TS V5.2, you can define threshold conditions to limit the following types of resources:
•Databases
– The number of database requests (Structured Query Language (SQL) commands)
•Files
– The number of file access requests, such as Read, Read update, Write, Rewrite, Delete, Start browse, Read next, or Read previous requests
•Programs
– The number of program link requests
•Start requests
– The number of start requests
•Storage
– The amount of task or user storage below the line (24-bit), above the line (31-bit), or above the bar (64-bit)
– The number of requests for task or user storage below the line (24-bit), above the line (31-bit), or above the bar (64-bit)
•Sync points
– The number of sync point or sync point rollback requests
•Time
– The amount of processor time that is used by a task
– The elapsed time on a user task
•Temporary Storage
– The number of temporary storage requests, such as ReadQ or WriteQ requests
– The amount of data written to temporary storage
•Transient Data
– The number of transient data requests, such as ReadQ or WriteQ requests
5.1.2 Policy rule actions
Policy rules can perform the following actions when a threshold is exceeded:
•Issue message DFHMP3001, which is the default policy action.
•End the task by issuing either the default abnormal end (abend) code AMPB, or a user-specified abend code.
•Emit an event.
5.1.3 Policy rule scope
Policy definitions are created using the CICS Explorer, and are defined within CICS bundles. These CICS bundles are then deployed to a CICS TS cloud environment by one of two deployments:
•Deployed as part of a CICS TS platform or added into a deployed platform
•Deployed along with a CICS TS application
The method of deployment used affects the scope of the policy.
Policies deployed into CICS TS platforms
CICS bundles containing policy can be deployed as part of a CICS TS platform. This deployment is achieved by including the CICS bundle in the list of bundles to be deployed along with the platform during the creation of the platform project. Alternatively, a CICS bundle containing policy can be deployed into an installed platform using the ADDBUNDLE function.
Policies deployed in a platform apply to all workloads where the application context of the running user tasks specifies the named platform. Therefore, platform policies will scope to all applications deployed to a specific platform. An example of a policy being deployed into an installed platform can be seen in section 5.2.1, “Platform policy example” on page 100.
Policies deployed into CICS TS applications
CICS bundles containing policies can be deployed as part of a CICS TS application. This is achieved by including, in either the application or application binding project, the CICS bundle in the list of bundles to be deployed along with the application. A CICS bundle cannot be installed dynamically into an installed application.
|
Important: One of the premises of a CICS TS application is that it remains unchanged throughout its promotion from the development platform, through various test platforms, and into one or more production platforms. Therefore, when adding a policy to a CICS TS application, there is a choice of whether to define it within the CICS TS application or within the CICS application binding.
The decision is based on whether the policy remains the same in all of the different platforms on which it runs. If it remains the same, define it in the application. If it needs to change between different platforms, define it in the application binding.
|
Policies deployed with an application apply to all workloads where the application context of the running user tasks matches the deployed application. For example, the application name, application version, and platform name all match. Therefore, application policies will scope to all operations for a specific version of an application deployed to a specific platform.
Application policies can be scoped to a specific application operation. This scoping is achieved by including a Policy Scope definition in the CICS bundle. Application operation policies apply to a specific operation for a specific application deployed to a specific platform.
An example of an application operation policy can be seen in section 5.2.2, “Application operation policy example” on page 109.
5.2 Example CICS policies
You have been introduced to CICS policies. This section provides information about the creation, deployment, and threshold triggering of two example policies in the context of the GENAPP application.
The following list describes the results of completing the steps in this section:
•An active policy in the CICS TS platform that provides automated control and protection against the use of 24 bit storage by CICS TS applications.
•An active policy to monitor resource usage for a particular operation.
•The ability to search active policies for a CICS TS platform, CICS TS application, and an application operation.
5.2.1 Platform policy example
This section describes the steps required to create and deploy a platform-wide policy. A policy is created that prevents any application within the GeneralInsuranceDev platform from using 24-bit task storage. If an application in the platform attempts to use 24-bit storage, the policy forces an abend of the task.
The following list describes the steps in this section:
•Create and define the policy.
•Export the policy project to the platform.
•Deploy the policy into an active platform.
•View the outcome of exceeding the policy threshold.
Prerequisites
The prerequisites include the following software setup:
•CICS TS regions running V5.1 or later. The walkthrough is done using CICS TS V5.2.
•CICS Explorer V5.2 or later, or CICS Explorer V5.2 SDK or later.
The platform policy is deployed into the active platform GeneralInsuranceDev created in Chapter 3, “Creating a platform” on page 25.
The creation and deployment of the platform policy example uses the CICS Explorer CICS Cloud perspective.
Create and define the policy
Perform the following steps to create the GeneralInsurancePlatformPolicy CICS Bundle Project, and define the policy, using the CICS Cloud perspective in CICS Explorer:
1. Right-click in the Project Explorer view and select New → Project. The New Project wizard displays.
2. In the New Projects wizard expand CICS Resources, click CICS Bundle Project, then click Next. The CICS Bundle Project wizard displays.
Alternatively, to create a project to contain the files to be referenced by a CICS bundle definition, click the bundle plus ( ) icon in the toolbar to start the new CICS Bundle Project wizard.
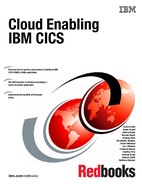
3. Enter general.insurance.platform.policy as the Project name.
4. Enter GeneralInsurancePlatformPolicy as the ID.
5. Enter 1.0.0 as the Version.
Figure 5-2 shows the completed CICS Bundle Project wizard.
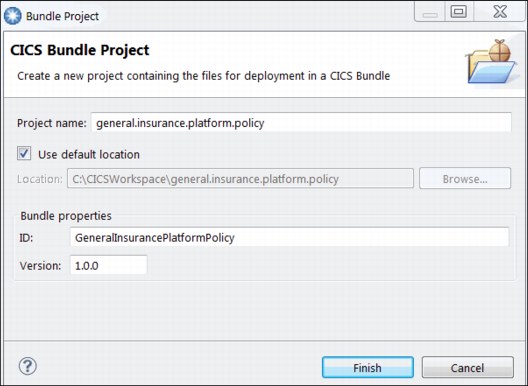
Figure 5-2 Create GeneralInsurancePlatformPolicy Bundle Project wizard
6. Click Finish. The bundle project is created and the CICS Bundle Manifest Editor displays.
The GeneralInsurancePlatformPolicy CICS Bundle Project has been created. Now create the policy definition in the CICS bundle using the CICS Bundle Manifest Editor.
7. The CICS Bundle Manifest Editor will automatically start after the creation of the CICS Bundle Project in the previous step. If the editor is not open, locate the bundle manifest file to start the editor. In the Project Explorer view, expand the general.insurance.platform.policy project, expand the META-INF subdirectory, and then double-click the cics.xml manifest file to start the CICS Bundle Manifest Editor.
8. On the Overview tab in the CICS Bundle Manifest Editor, for the GeneralInsurancePlatformPolicy bundle, click New in the Defined Resources section.
9. Select Policy Definition to open the Create Policy Definition wizard.
Figure 5-3 illustrates how to start the Create Policy Definition wizard from the bundle manifest editor.
Figure 5-3 Starting the Create Policy Definition wizard from the CICS Bundle Manifest Editor
10. Enter GeneralInsurancePlatformPolicies as the Policy name.
11. Enter Policies for the General Insurance platform as the Policy description.
12. Enter Prevent24bitStorage as the Rule name.
13. Enter Prevent 24 bit Storage use as the Rule description.
14. Select the threshold Type Storage.
15. Select the threshold Item 24-bit Task storage.
16. Select threshold Operator Greater Than, enter Value 0, and select Unit Bytes.
17. Select the policy to Abend task with abend code AMPB.
18. Clear Open Editor.
Figure 5-4 shows the completed Create Policy Definition wizard.

Figure 5-4 Create GeneralInsurancePlatformPolicy wizard
19. Click Finish. The policy is defined in the CICS bundle.
You have now created the GeneralInsurancePlatformPolicy CICS bundle, and defined the GeneralInsurancePlatformPolicies policy.
Export the policy project to the platform
Perform the following steps to export the CICS bundle containing the example policy to the GeneralInsuranceDev platform home directory using the CICS Bundle Manifest Editor:
1. If the CICS Bundle Manifest Editor for the general.insurance.platform.policy project is not open, locate the bundle manifest file to start the editor. In the Project Explorer view, expand the general.insurance.platform.policy project, expand the META-INF subdirectory, and then double-click the cics.xml manifest file to start the CICS Bundle Manifest Editor.
2. On the Overview tab in the CICS Bundle Manifest Editor, for the GeneralInsurancePlatformPolicy bundle, click Export the bundle to a platform or specific location in zFS in the Actions section. The Export to z/OS UNIX File System wizard opens.
3. In the Export to z/OS UNIX File System wizard, select Export to the home directory of a Platform, as shown in Figure 5-5.
|
Remember: The user is not asked for a specific location on the z/OS UNIX file system to deploy the CICS bundle. This location has already been established by the CICS TS platform and the platform home directory.
|

Figure 5-5 Export the CICS bundle to the home directory of a platform on the z/OS UNIX file system
4. Click Next.
5. If required, connect to your CICS TS environment’s CICS Management Client Interface (CMCI) connection. Select the GeneralInsuranceDev platform.
|
Tip: An active connection is required to discover the platform home directories for installed platforms. Only installed platforms are listed. If the GeneralInsuranceDev platform is not listed, then ensure that the correct connection is connected, and that the platform is installed.
|
Figure 5-6 shows the completed page of the Export to z/OS UNIX File System wizard.

Figure 5-6 Export Bundle project general.insurance.platform.policy
6. Click Next.
7. If required, connect to your CICS TS Environment’s z/OS File Transfer Protocol (FTP) connection. Click Finish.
The CICS bundle containing the policy is exported to the file system.
Deploy the policy into an active platform
Perform the following steps to install the exported GeneralInsurancePlatformPolicy CICS bundle into the installed platform.
1. In the Cloud Explorer view, expand the GeneralInsuranceDev platform and expand the subdirectory Region Types. You should see the region types that compose the GeneralInsuranceDev platform listed.
2. Right-click the ApplicationServices region type.

Figure 5-7 Using the Cloud Explorer view to add a CICS bundle to an installed platform
4. In the Perform ADDBUNDLE Operation dialog, ensure that the ApplicationServices RegionType is selected in the drop-down list.
5. Select the GeneralInsurancePlatformPolicy_1.0.0 Platform bundle.
Figure 5-8 shows the completed Perform ADDBUNDLE operation dialog to add the GeneralInsurancePlatformPolicy CICS bundle to the GeneralInsuranceDev platform.
Figure 5-8 Perform ADDBUNDLE Operation action to add a CICS bundle into an installed platform
6. Click OK.
The GeneralInsurancePlatformPolicy CICS bundle is deployed to all CICS TS regions in the ApplicationServices region type for the GeneralInsuranceDev platform.
|
Tip: The ADDBUNDLE operation attempts to set the status of the CICS bundle to the intended status for the platform. In this case, the bundle is installed into a disabled state. The status can also take a short amount of time to settle while data is collected across the CICSPlex. If the status is not as you expect, wait for 15 seconds and refresh the Cloud Explorer view.
|
7. The CICS bundle can be enabled if the platform has previously been instructed to become enabled. If the platform status is not enabled, in the Cloud Explorer view, right-click the GeneralInsuranceDev platform and select Enable. The Perform Operation dialog displays.
8. In the Perform ENABLE Operation dialog, click OK. The platform enables all of the CICS bundles that compose the CICS TS platform, including the GeneralInsurancePlatformPolicy bundle.
Figure 5-9 shows the updated Cloud Explorer view displaying the enabled platform and CICS TS policy bundle.
Figure 5-9 Cloud Explorer view of an active and enabled CICS TS platform
The GeneralInsurancePlatformPolicy CICS bundle includes a policy definition, and has been deployed to the GeneralInsuranceDev platform.
View the outcome of exceeding the policy threshold
The GeneralInsurancePlatformPolicy CICS bundle contains the GeneralInsurancePlatformPolicies policy and the associated Prevent24bitStorage policy rule. The policy has been deployed to the GeneralInsuranceDev platform for user tasks for applications deployed to the platform that attempt to obtain 24-bit storage.
Figure 5-10 shows the CICS TS MSGUSR data set resulting from an application attempting to obtain 24-bit storage on the GeneralInsuranceDev platform. The application task undergoes an abend with the code AMPB due to running an EXEC CICS GETMAIN BELOW API command.

Figure 5-10 CICS TS MSGUSR data set after exceeding the threshold for policy GeneralInsurancePlatformPolicies
5.2.2 Application operation policy example
This section describes the creation and deployment of an application operation policy. A policy is deployed for the inquireCustomer operation in the GeneralInsuranceCustomer application. The policy outputs a message if the operation takes longer then expected. An example use of this message is an indicator to the application provider that the response times are not as expected.
|
Important: In our example, we have decided that the policy needs to change while the application moves from development into production. We might want to make the enforcement tougher in pre-production test, and force tasks that take too long to an abend. Therefore, the decision is made to add the policy into the application binding rather than the application, which enables us to leave the application unchanged through the move from development and into production.
|
The following list describes the steps in this section:
•Create and define the policy.
•Include the policy in the application binding.
•Discard the active application.
•Deploy the updated application.
•View the outcome of exceeding the policy threshold.
Prerequisites
The prerequisites include the following software setup:
•CICS TS regions running V5.1 or later. The walkthrough is done using CICS TS V5.2.
•CICS Explorer V5.2 or later, or CICS Explorer V5.2 SDK or later.
|
Tip: It is possible to follow the steps in this chapter if you are using CICS TS V5.1 and CICS Explorer V5.1. If this is the case, you can skip the instructions on making an application Available or Unavailable, because this capability was added in CICS TS V5.2.
|
The policy is added to the GeneralInsuranceCustomer application created in Chapter 4, “Creating an application” on page 51. The updated application is deployed to the GeneralInsuranceDev platform created in Chapter 3, “Creating a platform” on page 25.
The creation and deployment of the application operation policy example uses the CICS Explorer CICS Cloud perspective.
Create and define the policy
Perform the following steps to create the GeneralInsuranceCustomerPolicy CICS Bundle Project to define the policy, using the CICS Cloud perspective in CICS Explorer:
1. Right-click in the Project Explorer view and select New → Project. The New Project wizard displays.
2. In the New Projects wizard, expand CICS Resources, click CICS Bundle Project, and then click Next. The CICS Bundle Project wizard displays.
Alternatively, to create a project to contain the files to be referenced by a CICS bundle definition, click the bundle plus ( ) icon in the toolbar to start the new CICS Bundle Project wizard.
3. Enter general.insurance.customer.policy as the Project name.
4. Enter GeneralInsuranceCustomerPolicy as the ID.
Figure 5-11 Create GeneralInsuranceCustomerPolicy bundle wizard
6. Click Finish. The bundle project is created and the CICS Bundle Manifest Editor appears.
|
Note: For the purpose of this example, to ensure that the policy threshold is met, the policy rule will be set for a very short interval.
|
The GeneralInsuranceCustomerPolicy CICS Bundle Project has been created. Next, create the policy definition in the CICS bundle using the CICS Bundle Manifest Editor.
7. The CICS Bundle Manifest Editor will automatically start after the creation of the CICS Bundle Project in the previous step. If the editor is not open, locate the bundle manifest file to start the editor. In the Project Explorer view, expand the general.insurance.customer.policy project, expand the META-INF subdirectory, and then double-click the cics.xml manifest file to start the CICS Bundle Manifest Editor.
8. Access the Overview tab in the CICS Bundle Manifest Editor for the GeneralInsuranceCustomerPolicy bundle. Click New in the Defined Resources section and select Policy Definition to open the Create Policy Definition wizard.
9. Enter GeneralInsuranceInquireCustomerPolicies as the Policy name.
10. Enter Policies for the general insurance inquire customer application operation as the Policy description.
11. Enter ExcessiveCPUTime as the Rule name.
12. Enter Rule to highlight inquire customer operation using excessive CPU time as the Rule Description.
13. Select the threshold Type Time.
14. Select the threshold Item CPU Time.
15. Select threshold Operator Greater Than, enter Value 1, and select Unit Microseconds.
16. Select the policy to Issue message DFHMP3001.
17. Clear Open Editor.
Figure 5-12 shows the completed Create Policy Definition wizard for the GeneralInsuranceInquireCustomerPolicies policy.
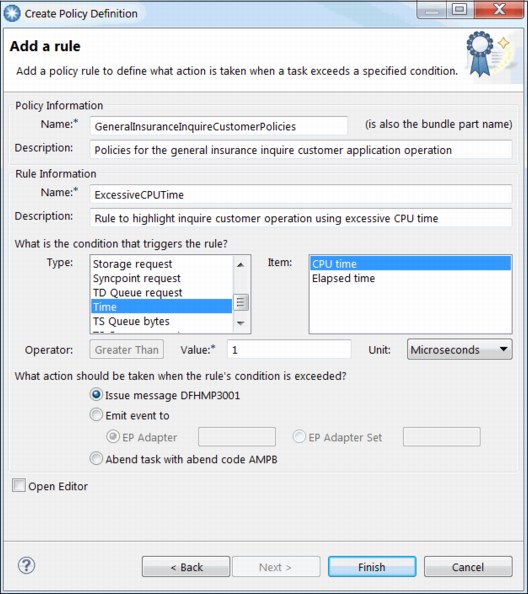
Figure 5-12 Completed Create Policy Definition wizard for the GeneralInsuranceInquireCustomerPolicies policy
18. Click Finish. The policy will be defined in the CICS bundle.
|
Important: The threshold and actions for the policy definition have been added to the CICS bundle. If this CICS bundle was deployed with the application, the policy would apply to all tasks in the application. Define a policy scope in the CICS bundle to identify a particular application operation for this policy.
|
19. In the CICS Bundle Manifest Editor for GeneralInsuranceCustomerPolicy, click the Policy Scopes tab.
20. In the Policy Scope section, click Add. The Create Policy scope wizard will appear.
21. In the Create Policy scope wizard, enter the Operation inquireCustomer.
22. Enter the Policy name GeneralInsuranceInquireCustomerPolicies.
Figure 5-13 shows the completed Create Policy scope wizard.
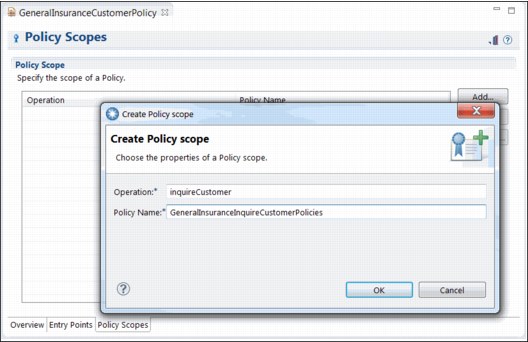
Figure 5-13 Create Policy scope wizard to associate the inquireCustomer operation with GeneralInsuranceInquireCustomerPolicies policy
23. Click OK. The policy scope association will be added to the CICS bundle.
As shown in Figure 5-14, a new entry will appear in the Policy Scope table to bind the scope of the GeneralInsuranceInquireCustomerPolicies policy to the inquireCustomer operation.

Figure 5-14 GeneralInsuranceCustomerPolicy CICS Bundle Manifest Editor Policy Scopes view
24. Press Ctrl+S to save the updated CICS bundle.
The GeneralInsuranceCustomerPolicy CICS Bundle Project has now been created with the GeneralInsurancePlatformPolicies policy associated with the inquireCustomer application operation.
Re-version the application binding and the application
By adding a new policy to the application, there is the potential for new CICS TS messages to be emitted if the policy threshold is exceeded. To help identify the cause of the new message if it is seen in test or production, we have chosen to increase the version number of the application binding and of the application itself.
To re-version, follow these steps:
1. If required, open the Application editor for the GeneralInsuranceCustomer application.
In the Project Explorer view, expand the general.insurance.customer.application application project, expand the META-INF subdirectory, and double click application.xml to open the Application editor.
2. On the Overview tab in the Application editor for GeneralInsuranceCustomer, in the General Information section, update the version from 1.0.0 to 1.0.1.
3. Press Ctrl+S to save updates in the Application editor.
Figure 5-15 shows the updated Application editor for the GeneralInsuranceCustomer application.
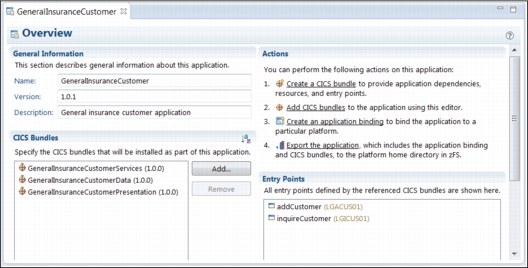
Figure 5-15 Completed Application editor changes for GeneralInsuranceCustomer
|
Remember: Errors will be reported in the application binding editor because it still refers to version 1.0.0 of the application. This will be corrected in the next steps.
|
4. If required, open the application binding editor for the GeneralInsuranceCustomerToDev application binding.
In the Project Explorer view, expand the general.insurance.customer.to.dev.platform.binding application binding project, expand the META-INF subdirectory, and double-click the appbinding.xml file to open the application binding editor.
5. On the Overview tab in the application binding editor for GeneralInsuranceCustomerToDev, in the General Information section, update the version from 1.0.0 to 1.0.1.
6. In the General Information section, click Browse next to Application: GeneralInsuranceCustomer (1.0.0). The Application Selection dialog displays.
7. In the Application Selection dialog, select GeneralInsuranceCustomer (1.0.1) and click OK.
8. Press Ctrl+S to save updates in the application binding editor.
Figure 5-16 shows the updated application binding editor for the GeneralInsuranceCustomerToDev application binding.
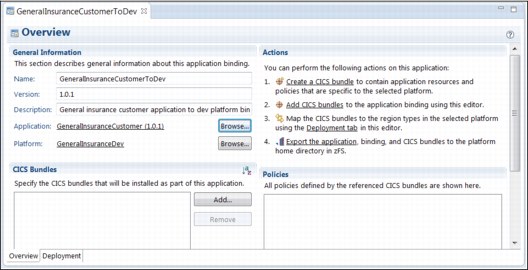
Figure 5-16 Completed application binding editor changes for GeneralInsuranceCustomerToDev
You have updated the micro version of the application and the application binding, due to the addition of a new policy into the CICS TS application, which can result in new messages being emitted.
Include the policy in the application binding
Perform the following steps to include the example policy in the application binding project for deployment to the dev platform:
1. In the Project Explorer view, expand the general.insurance.customer.to.dev.platform.binding application binding project, expand the META-INF subdirectory, and then double click the bundles.xml file to start the application binding editor.
2. On the Overview tab in the GeneralInsuranceCustomerToDev application binding editor, in the CICS bundles section, click Add. The CICS Bundle Selection dialog will appear.
3. In the CICS Bundle Selection dialog, select GeneralInsuranceCustomerPolicy (1.0.0).
Figure 5-17 shows the GeneralInsuranceCustomerPolicy bundle selected in the CICS Bundle Selection dialog for addition to the CICS Application Binding Project.
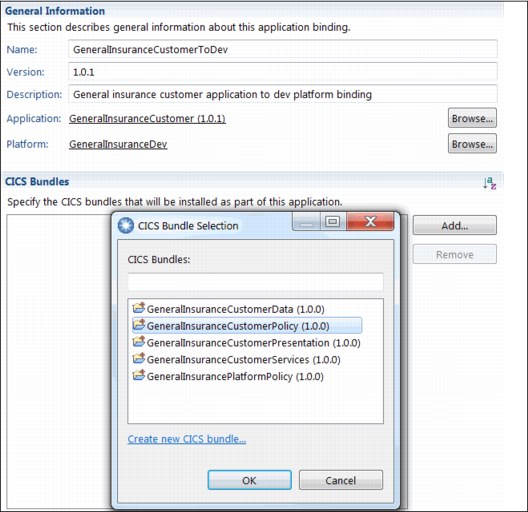
Figure 5-17 CICS Bundle Selection dialog to add a CICS bundle to an application binding project
4. Click OK in the CICS Bundle Selection to add the bundle to the application binding.
|
Remember: Errors will be reported in the application binding editor, because the deployment rules have not been defined for the policy bundle within the binding project. This will be corrected in the next steps.
|
5. Click the Deployment tab in the GeneralInsuranceCustomerToDev application binding editor.
6. Access the application binding editor Deployment tab. In the Region Types section, select ApplicationServices.
7. Again, access the application binding editor Deployment tab and, in the CICS bundles section, select the check box for the GeneralInsuranceCustomerPolicy (1.0.0) CICS bundle, in addition to any CICS bundles that are already selected.
You have now declared the deployment rule for the GeneralInsuranceCustomerPolicy bundle to the ApplicationServices region type in the GeneralInsuranceDev platform.
Figure 5-18 shows the updated deployment rules for the application binding. This includes the deployment rules for the GeneralInsuranceCustomerPolicy policy bundle to be deployed to a platform region type.
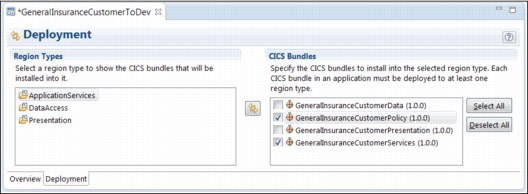
Figure 5-18 Deployment rules for CICS bundles in the application binding editor
8. Press Ctrl+S to save the updates made in the application binding editor.
The GeneralInsuranceCustomerPolicy CICS bundle, which contains the application operation policy, has been added to the application binding project, and the deployment rules have been defined.
Deploy the CICS TS application and create the application definition
Use the following steps to deploy the CICS TS application, CICS application binding, and CICS Bundle Projects using the application editor. Because we have increased the version number of the application and the application binding projects, we will create a new application definition to represent the new version:
1. If the Application editor for the general.insurance.customer.application project is not open, locate the application files to start the application editor.
In the Project Explorer view, expand the general.insurance.customer.application project, and expand the META-INF subdirectory. Then, double click the application.xml file to start the Application editor.
2. In the Actions section of the Application editor, click Export the application.
The Export Application to the home directory of a platform wizard displays. This wizard enables you to specify the CICSPlex and CICS TS platform to which you want to deploy your CICS TS application. This action identifies the CICS application binding that will be used for deployment of the application.
3. If required, connect to your CICS TS environment’s CMCI connection.
4. In GNAPPLEX, under GeneralInsuranceDev, select GeneralInsuranceCustomerToDev (1.0.1), as shown in Figure 5-19.
|
Important: The export can only be made to an installed platform using this wizard. This enables the CICS Explorer to ensure that the artifacts are exported to the correct locations for use in the selected platform.
|
5. Select Create Application Definition after export finishes.
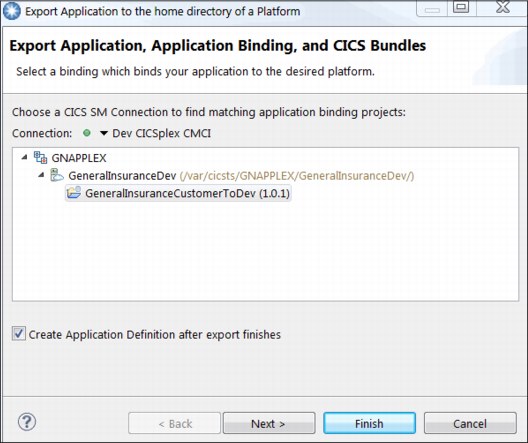
Figure 5-19 Export Application to the home directory of a platform
6. Click Next.
7. If required, connect to your CICS TS environment’s z/OS FTP connection. Click Finish.
The CICS Explorer begins to export the CICS TS application, CICS application binding, and CICS Bundle Projects to the z/OS UNIX File System. The projects are deployed to the platform home directory of the CICS TS platform in the applications, bindings, and bundles subfolders, where appropriate.
8. When the export has completed, the New Application Definition wizard displays. This wizard can be used to define the CICS TS application to your CICS TS environment. All fields except the Name field are filled in using information found during the export process.
Use the following steps to define the CICS TS application definition:
1. Enter GENACUST in the Name field.
2. Enter General insurance customer application in the Description field. The New Application Definition wizard should look like Figure 5-20.
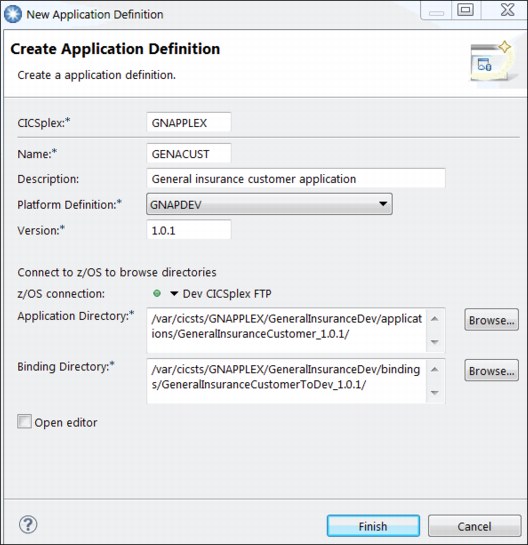
Figure 5-20 New Application Definition wizard for V1.0.1 of the application
3. Click Finish. The CICS TS application definition has now been created. The Cloud Explorer view should now look similar to Figure 5-21.
Figure 5-21 Cloud Explorer view after the CICS TS application definition has been created
The CICS TS application, CICS application binding, and CICS bundle that compose the GeneralInsuranceCustomer application have been created and deployed to the GeneralInsuranceDev platform. The application definition has been created and is ready to be installed into the GeneralInsuranceDev platform.
Make Unavailable, Disable, and Discard V1.0.0 of the application
Because both version 1.0.0 and version 1.0.1 of the GeneralInsuranceCustomer application need to modify the same CICS system definition (CSD)-defined CICS TS programs as their application entry points, it is not possible for them both to be enabled at the same time.
|
Tip: In Chapter 6, “Packaging an application for multiversion deployment” on page 127, we demonstrate how to package your CICS TS application resources, so that it is possible to make more than one version of the CICS TS application available at the same time.
|
Perform the following steps to Make Unavailable and Disable the installed GeneralInsuranceCustomer V1.0.0 Application:
1. In the Cloud Explorer view, expand the GeneralInsuranceDev platform and expand subdirectory Applications to view the applications in the platform. Double-click the GeneralInsuranceCustomer (1.0.0) application to start the Online Application editor for the GeneralInsuranceCustomer application.
2. On the Overview tab in the Online Application editor for the GeneralInsuranceCustomer application, click Make Unavailable in the General Information section. The Perform UNAVAILABLE Operation dialog displays.
3. In the Perform UNAVAILABLE Operation dialog, click OK.
The application will be made unavailable, and external callers will not be able to start new tasks associated with the application.
4. On the Overview tab of the Online Application editor for the GeneralInsuranceCustomer application, in the General Information section, expand the drop-down menu next to the Disable button and select Disable and Discard, as shown in Figure 5-22. The Perform DISABLE Operation dialog displays.
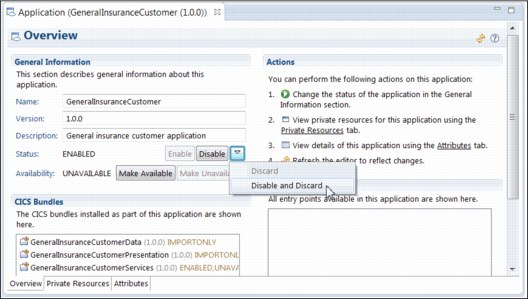
Figure 5-22 Drop-down menu to disable and discard the application in the Online Application Editor
5. Click OK. The application is disabled. The Perform DISCARD Operation dialog displays.
6. Click OK. The application is discarded. The Online Application Editor closes. Figure 5-23 shows the updated Cloud Explorer view after the discard of the installed application.
Figure 5-23 After the discard of the installed application GeneralInsuranceCustomer version 1.0.0, the application definition GENACUST is displayed in the Cloud Explorer view
The application has been discarded from the platform.
5.2.3 Installing the updated application
Use the following steps to install the GeneralInsuranceCustomer V1.0.1 application using the CICS Cloud perspective in CICS Explorer:
1. In the Cloud Explorer view, expand the GeneralInsuranceDev platform and expand the Applications subdirectory. Right-click the GENACUST (1.0.1) CICS TS application definition and click Install. The Perform INSTALL Operation dialog displays.
2. In the Perform INSTALL Operation dialog for the installation action, click OK.
The CICS TS application and all associated CICS bundles now install into the CICS TS regions in the CICS TS platform. The GeneralInsuranceCustomer application is visible in the Cloud Explorer view, as shown in Figure 5-24.
Figure 5-24 GeneralInsuranceCustomer V1.0.1 visible in the Cloud Explorer after being installed
|
Tip: The installation action on the CICS TS application installs the CICS bundles that compose the application into the CICS TS regions in the platform region types, as defined by the deployment bindings. If the CICS TS application state does not immediately display as DISABLED, then wait for 15 seconds and refresh the Cloud Explorer view.
|
The CICS TS application installs all associated bundles into a disabled and unavailable state.
Use the following steps to enable the GeneralInsuranceCustomer V1.0.1 CICS TS application:
1. Double-click the GeneralInsuranceCustomer (1.0.1) application in the Cloud Explorer view. The Online Application editor for the GeneralInsuranceCustomer application displays, as shown in Figure 5-25.

Figure 5-25 Online Application editor for GeneralInsuranceCustomer application version 1.0.1
2. Access the Overview tab of the Online Application editor for the GeneralInsuranceCustomer V1.0.1 application. In the General Information section, click Enable. The Perform ENABLE Operation dialog displays.
3. Click OK.
The CICS TS application now attempts to become enabled. After a short amount of time, the status of the CICS TS application will reflect the status of the dependencies that were declared in the CICS bundles. Therefore, the status of the CICS TS application reflects the status of the GENAPP application in the CICS TS environment.
The application is now enabled in an unavailable state. The unavailable state means that the application’s entry points are not yet applied, so the new threshold policy is not active.
Use the following steps to make available the GeneralInsuranceCustomer V1.0.1 CICS TS application using the online application editor:
1. Access the Overview tab of the online application editor for the GeneralInsuranceCustomer V1.0.1 application. In the General Information section, click Make Available. The Perform AVAILABLE Operation dialog displays.
2. Click OK. The application is made available.
The CICS Cloud Explorer view should look similar to Figure 5-26.

Figure 5-26 The Cloud Explorer view showing the deployed version 1.0.1 of CICS TS application GeneralInsuranceCustomer
The GeneralInsuranceCustomer V1.0.1 application is now available for users to start through the identified application entry points. The application entry points set the application context on tasks, which enables the new threshold policy to be applied.
View the outcome of exceeding the policy threshold
The GeneralInsuranceInquireCustomerPolicies policy, and the associated ExcessiveCPUTime policy rule, have been deployed to the GeneralInsuranceCustomer V1.0.1 application. This policy has been scoped to apply only to tasks associated with the inquireCustomer operation. The policy outputs a message if the tasks associated with the operation take longer then the set threshold.
For this example, the policy threshold has been set to a low trigger point. To exceed the policy threshold, the GENAPP application must run a customer inquiry.
Use the following steps to trigger the policy in CICS TS:
1. Run the SSC1 transaction to start the General Insurance Customer menu.
2. Enter a Customer Number, for example 0000000001.
3. Select option 1 for Customer Inquiry and click Enter.
By driving the customer inquiry action, the policy exceeds the defined threshold and results in a message being outputted.
Figure 5-27 shows the emitted message resulting from the GENAPP inquireCustomer operation exceeding the policy threshold. This can be used by an application provider as an indicator that the application response times are not as expected.

Figure 5-27 CICS MSGUSR data set after exceeding the threshold for policy GeneralInsuranceInquireCustomerPolicies
5.2.4 View active policy
This section shows how to view policies that have been deployed into a platform or application.
The example policies shown in this section are based on the GENAPP example and policies deployed in the following sections:
View deployed policy
Use the Search menu action in the Cloud Explorer view to identify which policies are deployed. Searching for deployed policies can be conducted at four resource levels:
•On a platform
In the Cloud Explorer, right-click the GeneralInsuranceDev platform and select Search → Policy rules for platform.
•On a region type
In the Cloud Explorer, expand the GeneralInsuranceDev platform, expand Region Types, and right-click the ApplicationServices region type. Select Search → Policy rules for region type.
•On an application
In the Cloud Explorer, expand the GeneralInsuranceDev platform, expand Applications, and right-click the GeneralInsuranceCustomer V1.0.1 application. Select Search → Policy rules for application.
•On an application operation
In the Cloud Explorer, expand the GeneralInsuranceCustomer V1.0.1 application, expand Operations, and right-click the inquireCustomer operation. Select Search → Policy rules for operation.
Notice that the platform policy example is returned for searches at the platform and region type level. Platform policies are also returned for searches at the application level, because the policy is in effect for tasks associated with the application on the GeneralInsuranceDev platform.
Figure 5-28 shows the results of a search for policies conducted on the GeneralInsuranceDev platform.
Figure 5-28 Search results for policies deployed to platform GeneralInsuranceDev
Operation-level searches return results for the application operation policy example. The search results also include the platform policy example. This indicates that both example policies are in effect for tasks associated with the inquireCustomer operation and GeneralInsuranceDev platform.
Figure 5-29 shows the results of a search for policies conducted on the inquireCustomer application operation.
Figure 5-29 Search results for policies deployed to operation inquireCustomer
5.3 Results of adding a policy
This chapter introduced CICS TS policies, and stepped through two examples of policies working with the GENAPP example application.
The first example was a platform-level policy that abnormally ends application tasks
that attempt to use 24-bit task storage. This is an example of how a policy can deliver automated control.
that attempt to use 24-bit task storage. This is an example of how a policy can deliver automated control.
The second example alerted the application provider to tasks in the inquire customer operation that are deemed to take an excessive amount of execution time. This is an example of how a policy can monitor critical thresholds, and provide alerts when usage exceeds defined limits.
For further information and design considerations for CICS TS policies, see Chapter 8, “Managing by policy” on page 181.
..................Content has been hidden....................
You can't read the all page of ebook, please click here login for view all page.