

Packaging an application for multiversion deployment
Chapter 4, “Creating an application” on page 51 showed how to create a virtual application representation of the General Insurance Application (GENAPP). It does not make any changes to the underlying application. However, it provides business value with the description of application entry points.
The application entry points identify when tasks running in IBM Customer Information Control System (CICS) Transaction Server (CICS TS) are entering into your application, and associates application context data with the workload. The chapter also demonstrated how you can view the health and availability of required resources within a single view, with no changes to the underlying application.
This chapter walks you through the steps of the typical process of developing the CICS TS application for application multiversion deployment. By using the application multiversioning support, introduced in CICS TS V5.2, you can have numerous versions of your application running at the same time.
The benefits of application multiversioning include the following abilities:
•Have more than one version of the application running concurrently.
•Maintain support for particular versions of applications for migrating users.
•Showcase new application features to a subset of your users.
•Prepare and verify the installation of a new application without deprovisioning the in-service application.
•Bring a new version of the application into service with no service outage.
•Roll back versions of the application.
This chapter centers around two worked examples for the GeneralInsuranceCustomer CICS TS application. Focused on the application multiversion support, these examples require a minimum level of CICS TS V5.2:
•The first example prepares the application for adoption of application multiversioning.
You repackage key resources into the application for lifecycle management. These resources include the programs identified as the application entry points, and version-specific load libraries.
•The second example uses the application multiversion support.
You provide a source code update and deploy a new version of the application. You deploy the next version of the application and migrate all users to the new version with no service interruptions.
This chapter contains the following topics:
6.1 Prerequisites
The following sections build on previous instructions described in Chapter 2, “GENAPP introduction” on page 15, and Chapter 3, “Creating a platform” on page 25. To proceed, you need the following components:
•CICS TS regions running V5.2 or later
•CICS Explorer V5.2 or later, or CICS Explorer V5.2 SDK or later
•The GeneralInsuranceDev platform defined and installed from Chapter 3, “Creating a platform” on page 25
•The GENAPP application available and installed into a single managed CICS TS region, as described in Chapter 2, “GENAPP introduction” on page 15 and Appendix A, “Setup and environment” on page 207
•(optional) Created policy definitions from Chapter 5, “Applying a policy” on page 97
6.2 Example 1: Repackaging CICS TS resources into the GeneralInsuranceCustomer CICS TS application
In this example, you prepare the application for adoption of multiversioning support. You repackage key resources into the application for lifecycle management. These key resources include the programs identified as application entry points and application version-specific load libraries.
By bringing CICS TS resource definitions into a CICS TS application, you provide better management for the application throughout its lifecycle. During application development, it is beneficial to have the resources described in a single development environment, and editable by the application developers.
When the application is in source code management, it can encompass and track all related artifacts through application deployment. The application can be provisioned and deprovisioned through a single control point, while the states of all of the related CICS TS resources are managed by the system.
In this example, you provision an update to the CICS TS application. You step through the process of repackaging the CICS TS resources related to the ApplicationServices CICS TS regions (the application-owning region (AOR) CICS TS regions) in preparation for application multiversioning. You move definitions from the CICS system definition (CSD) into the GeneralInsuranceCustomer CICS TS application for application entry point resources.
The change in the CICS TS application does not change any external characteristics of the application, and you want all users of the application to use the updated version. Therefore, this will be a micro version increment of the application, from version 1.0.1 to version 1.0.2.
The following list describes the steps that you undertake:
6.2.1 Discarding the existing application and resources
In the previous chapter, you deployed the GeneralInsuranceCustomer version 1.0.1 CICS TS application. In this chapter, you update the application to version 1.0.2, while repackaging CICS TS resources for multiversion support.
Version 1.0.1 relied on key CICS TS resources to be provided by the CSD. You cannot have application entry points for different versions of an application share the same resource name while the resource is provided by CSD/CICSPlex SM Business Application Services (BAS). The application multi-version support enables multiple versions of an application to declare CICS TS resources with the same name.
This can result in multiple programs in CICS TS with the same name, each being unique, and private to the application version instance. This is only possible for program resources defined using a CICS bundle associated with an application (or auto-installed using an application private LIBRARY). As a result, you discard GeneralInsuranceCustomer version 1.0.1.
Perform the following steps, using the CICS Cloud perspective in CICS Explorer to discard the existing application:
1. In the Cloud Explorer view, expand the GeneralInsuranceDev platform and the Applications subfolder to view the currently deployed CICS TS applications, as shown in Figure 6-1.
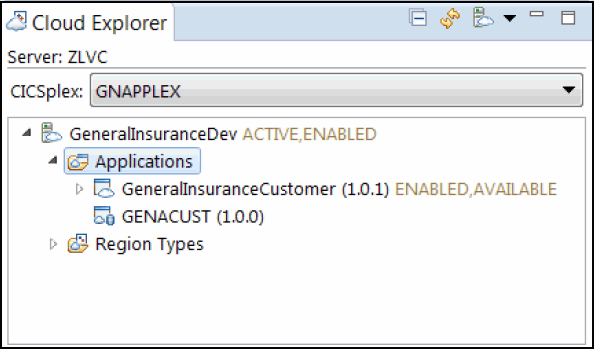
Figure 6-1 Cloud Explorer view showing existing deployed CICS TS applications
2. Right-click (CICS TS application) GeneralInsuranceCustomer (1.0.1) and select Make Unavailable.
The Perform Operation dialog appears. Click OK to make the application unavailable.
3. Right click (CICS TS application) GeneralInsuranceCustomer (1.0.1) and select Disable.
The Perform Operation dialog appears. Click OK to disable the application.
4. Right click (CICS TS application) GeneralInsuranceCustomer (1.0.1) and select Discard.
The Perform Operation dialog appears. Click OK to discard the application.
The GeneralInsuranceCustomer version 1.0.1 CICS TS application has been discarded. The Application entry in the Cloud Explorer view is replaced with the application definition, as shown in Figure 6-2.

Figure 6-2 Cloud Explorer view showing application definition after discard of the GeneralInsuranceCustomer version 1.0.1 application
You repackage the ApplicationServices layer CICS TS programs (LGACUS01 and LGICUS01) in to the CICS TS application. Perform the following steps to remove the resources that were created during the initial installation of GENAPP described in Appendix A, “Setup and environment” on page 207:
1. Use the CICS Explorer CICS SM perspective to manage CICS TS resources and CSD definitions.
2. From the menu, click Window → Open Perspective → Other. The Open Perspective dialog appears.
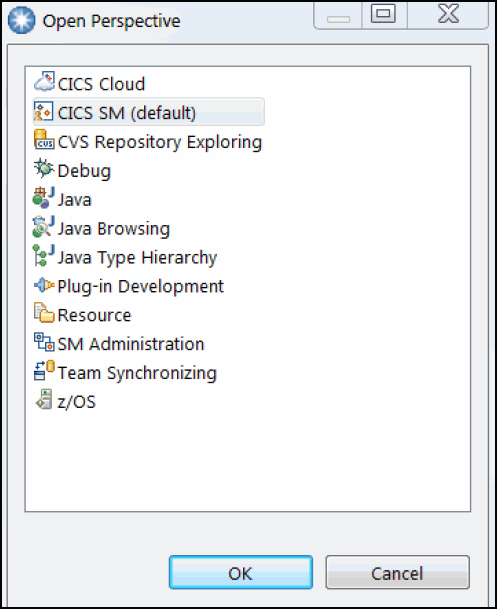
Figure 6-3 Dialog to open the CICS SM perspective in CICS Explorer
4. From the menu, click Operations → Programs. The Programs view displays.
5. In the Programs view, add the filter LGACUS01 and press Enter. The Programs view refreshes and only displays the results of the LGACUS01 program, as shown in Figure 6-4.

Figure 6-4 Program Operations view with applied filter name LGACUS01
6. Right-click LGACUS01 and select Disable. The Perform Operation dialog displays. Click OK to disable the program.
7. Right-click LGACUS01 and select Discard. The Perform Operation dialog displays. Click OK to discard the program.
You have discarded the CICS TS LGACUS01 program resource. Repeat the process for the LGICUS01 program.
8. In the Programs view, replace the filter with LGICUS01 and press Enter. The Programs view refreshes and displays only the results of the LGICUS01 program.
9. Right-click LGICUS01 and select Disable. The Perform Operation dialog displays. Click OK to disable the program.
10. Right-click LGICUS01 and select Discard. The Perform Operation dialog displays. Click OK to discard the program.
11. Clear the filter text and close the Programs view. You have discarded the two CICS TS program resources that are packaged into the CICS TS application.
Optionally, you can delete the CSD definitions for the LGACUS01 and LGICUS01 program definitions in the GENASAP group to prevent the programs from being re-installed on future
group installs. Using these steps, you have removed the CICS TS program resources originating from the CSD for the GENAPP ApplicationServices regions, in order for the definitions to be provided by the application.
group installs. Using these steps, you have removed the CICS TS program resources originating from the CSD for the GENAPP ApplicationServices regions, in order for the definitions to be provided by the application.
6.2.2 Allocating a new data set, preparing load modules, and creating a dynamic load library definition
In “Building the application environment” on page 212, all of the GENAPP program load modules are provided in one data set load library, <USERHLQ>.CB12.LOAD. This data set is referenced by a dynamic load library in CICS TS called GENALIB.
You will now allocate a new data set to provide the program load modules that will be private to a particular version of the application. The new data set load library contains the application programs specifically for the ApplicationServices region type that we plan to repackage in to the CICS TS application. The new data set load library will be <USERHLQ>.CB12.APPLSERV.#1.#0.#2. You will then create a new dynamic load library definition called GENAAPSV to add this newly allocated data set to the application.
This section contains the following tasks:
Allocating a new data set and copying load modules
Perform the following steps to create a new load library data set to serve application programs specifically for the ApplicationServices CICS TS application region type:
1. Allocate the following load library, replacing <USERHLQ> with your high-level qualifier that you used for the installation of GENAPP. You can base the data set characteristics rules on the existing <USERHLQ>.CB12.LOAD data set, <USERHLQ>.CB12.APPLSERV.#1.#0.#2. You have now created a load library data set to contain the program load modules for the ApplicationServices region type in the GeneralInsuranceApplication V1.0.2 CICS TS application.
2. Copy the following load modules from the <USERHLQ>.CB12.LOAD data set to the <USERHLQ>.CB12.APPLSERV.#1.#0.#2 data set:
– LGACUS01
– LGICUS01
You have now provided an instance of the program load module for a particular version of the CICS TS application to reference.
Creating a CICS bundle and defining a dynamic load library definition
You have created a load library data set <USERHLQ>.CB12.APPLSERV.#1.#0.#2, which contains the program load modules for application resources in the ApplicationServices region type. You next prepare the resources required to associate the load library with the application.
Perform the following steps to create a new CICS bundle and LIBRARY definition (steps later in this example associate the CICS bundle with the application binding project):
1. Right-click in the Project Explorer view and select New → Project. The New Project wizard displays.
2. In the New Project wizard, expand CICS Resources. Click CICS Bundle Project, then click Next. The CICS Bundle Project wizard displays.
Alternatively, to create a project to contain the files to be referenced by a CICS bundle definition, click the bundle plus ( ) icon in the toolbar to start the new CICS Bundle Project wizard.
3. Enter general.insurance.customer.applicationservices.to.dev.bundle as the Project name.
4. Enter GeneralInsuranceCustomerApplicationServicesDev as the ID.

Figure 6-5 Completed new CICS Bundle Project wizard for GeneralInsuranceCustomerApplicationServicesDev
6. Click Finish. The bundle project is created and the CICS Bundle Manifest Editor appears.
The GeneralInsuranceCustomerApplicationServicesDev CICS Bundle Project has been created. Now create the LIBRARY definition in the CICS bundle using the CICS Bundle Manifest Editor.
7. On the Overview tab in the Defined Resources section, click New. A list of CICS TS resources appears. Select LIBRARY Definition in the list of CICS TS resources, as shown in Figure 6-6. The New LIBRARY Definition wizard displays.
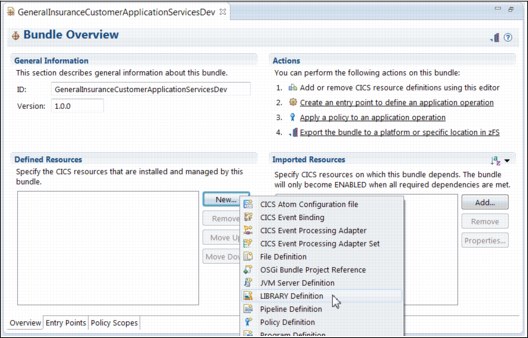
Figure 6-6 Starting the new LIBRARY Definition wizard from the CICS Bundle Manifest Editor
8. Enter the following details in the New LIBRARY Definition wizard:
a. Name: GENAAPSV.
b. Description: Development load libraries for ApplicationServices.
c. Keep the default for Ranking: 50.
d. Data set Name 01: <USERHLQ>.CB12.APPLSERV.#1.#0.#2.
Replace the high-level qualifier <USERHLQ> with the user ID that you used during the installation of GENAPP.
e. Clear the Open editor check box.
Figure 6-7 shows the completed New LIBRARY Definition wizard.
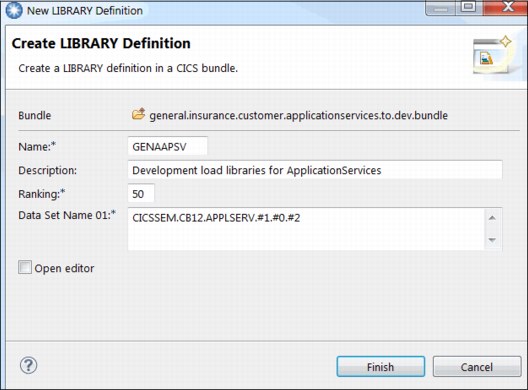
Figure 6-7 Completed New LIBRARY Definition wizard for GENAAPSV
9. Click Finish. The Create LIBRARY Definition wizard closes, and the definition is added to the CICS bundle.
10. Press Ctrl+S to save changes.
Figure 6-8 shows the CICS Cloud perspective after the creation of the CICS bundle.
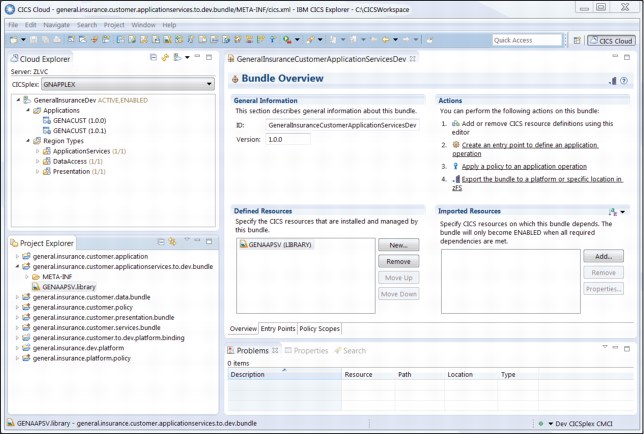
Figure 6-8 The CICS Cloud perspective in CICS Explorer
You have created a new CICS bundle that contains the definition for a dynamic load library. This load library contains the program load modules for the application entry point resources in the ApplicationServices region type. You will later associate this new CICS bundle with the application binding resource.
|
Tip: During application execution, private dynamic load libraries, such as GENAAPSV, take preference over the system-provided libraries, such as GENALIB. Therefore, it is OK to leave a copy in the system library data set (as opposed to moving the load module), because the application private data sets are prioritized.
|
6.2.3 Updating CICS TS resources
You can define CICS TS resources within CICS bundles (rather than expressing dependencies on them in the system as you did in Chapter 4, “Creating an application” on page 51). This enables you to manage them together with your application as a single entity.
Perform the following steps to define the program resources for the Application Services layer of the GeneralInsuranceCustomer application:
1. Open the GeneralInsuranceCustomerServices CICS Bundle Manifest Editor.
2. In the Project Explorer view, expand the general.insurance.customer.services.bundle project and expand the META-INF subdirectory.
3. Then, double-click the cics.xml manifest file to start the CICS TS Bundle Manifest editor. The CICS Bundle Manifest Editor for GeneralInsuranceCustomerServices is shown in Figure 6-9.
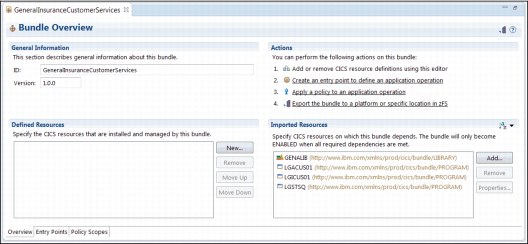
Figure 6-9 The GeneralInsuranceCustomerServices bundle manifest editor expressing numerous dependencies on the system
Currently, the bundle has a dependency on the CICS TS system to provide the program resources. You remove this dependency and define them using the CICS bundle for selected resources.
4. At the Entry Points tab in the Entry points section, click the addCustomer entry point for the LGACUS01 program resource, as shown in Figure 6-10.
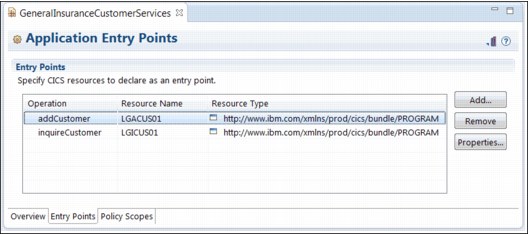
Figure 6-10 The current view of application entry points in the GeneralInsuranceCustomerServices bundle
5. Click Remove. A confirmation dialog box displays.
6. Click Yes to remove the selected entry point. The entry point declaration is removed from the CICS bundle.
7. Press Ctrl+S to save changes.
8. On the Overview tab in the Imported Resources section, click the LGACUS01 program resource.
9. Click Remove.
The dependency declaration of the LGACUS01 program is removed from the CICS bundle. You now add the program definition to the CICS bundle.
10. On the Overview tab in the Defined Resources section, click New. A list of CICS TS resources that can be defined in a CICS bundle displays.
11. Select Program Definition in the list of CICS TS resources, as shown in Figure 6-11. The New Program Definition wizard displays.
Figure 6-11 Starting the New Program Definition wizard from the bundle manifest editor
12. Enter the following details into the New Program Definition wizard:
a. Name: LGACUS01.
b. Description: Business logic for adding a new customer.
c. Program Type: Assembler, C/C++, COBOL, or PL/I.
d. Leave the Remote System and Remote Program Name entries empty.
e. Select the Create an application entry point check box.
f. Operation name: addCustomer.
g. Clear the Open editor check box.
The completed New Program Definition wizard is shown in Figure 6-12.

Figure 6-12 Completed New Program Definition wizard for program LGACUS01
13. Click Finish. The Create Program Definition closes and the definition is added to the CICS bundle.
You have removed the dependency on the CICS bundle for an externally defined program resource, LGACUS01. You have also added a definition for the LGACUS01 program in the CICS Bundle Project. When the bundle is deployed as part of the application, the LGACUS01 program resource is dynamically managed with the application, and does not need to be defined or managed using the CSD.
Repeat the previous steps for the LGICUS01 program:
1. If you have closed the window, open the GeneralInsuranceCustomerServices CICS Bundle Manifest Editor.
2. On the Entry Points tab in the Entry points section, click the inquireCustomer entry point for the LGICUS01 program resource.
3. Click Remove. A confirmation dialog box displays.
4. Click Yes to remove the selected entry point. The entry point declaration is removed from the CICS bundle.
5. Press Ctrl+S to save changes.
6. On the Overview tab in the Imported Resources section, click the LGICUS01 program resource.
7. Click Remove. The dependency declaration is removed from the CICS bundle.
8. On the Overview tab in the Defined Resources section, click New. A list of CICS TS resources appears. Select Program Definition in the list of CICS TS resources. The New Program Definition wizard displays.
9. Enter the following details into the New Program Definition wizard:
a. Name: LGICUS01.
b. Description: Business logic for inquiring on a customer.
c. Program Type: Assembler, C/C++, COBOL, or PL/I.
d. Leave the Remote System and Remote Program Name entries empty.
e. Select the Create an application entry point check box.
f. Operation name: inquireCustomer.
g. Clear the Open editor check box.
The completed New Program Definition wizard is shown in Figure 6-13.

Figure 6-13 Completed New Program Definition wizard for program LGICUS01
10. Click Finish. The Create Program Definition closes and the definition is added to the CICS bundle.
11. Press Ctrl+S to save the changes.
The LGACUS01 and LGICUS01 programs are loaded from a load library data set specified by the GENAAPSV LIBRARY resource. The GENAAPSV LIBRARY resource was defined in “Creating a CICS bundle and defining a dynamic load library definition” on page 134.
To add a dependency on this dynamic LIBRARY resource in the GeneralInsuranceCustomerServices CICS bundle, perform the following steps:
1. If you have closed the window, open the GeneralInsuranceCustomerServices CICS Bundle Manifest Editor.
2. On the Overview tab in the Imported Resources section, click Add. The Create Bundle Import dialog displays.
3. In the Create Bundle Import dialog box for the Resource Type, type LIBRARY. As you type, a drop-down list of matching resources appears. In the list, double-click LIBRARY to supply the fully qualified resource type name.
4. In the Name field, type GENAAPSV. The completed Create Bundle Import dialog is shown in Figure 6-14.

Figure 6-14 Creating a bundle dependency on LIBRARY resource GENAAPSV
5. Click OK. The dialog window closes and the resource dependency is added to the CICS bundle.
6. Press Ctrl+S to save changes.
|
Note: You might notice that the dependency for the LGSTSQ program still exists in the CICS bundle, and has not been replaced with a definition for the program resource. This is because, even though it is required in the Application Services region type, it is a shared program resource and, as such, you do not want to tie its lifecycle to that of the other resources in the CICS bundle.
This is an example of a CICS bundle that can define multiple resources and manage those resources as a single entity, while also expressing a dependency on other externally required resources while enabling them to be managed separately.
|
You have now updated the GeneralInsuranceCustomerServices CICS bundle to define two CICS TS program resources, rather than expressing them as dependencies on the CICS TS system.
As a result of modifying the CICS bundle, you will now update the bundle version by performing the following steps:
1. If you have closed the window, open the GeneralInsuranceCustomerServices CICS Bundle Manifest Editor.
2. On the Overview tab in the General Information section, update the version from 1.0.0 to 1.0.1.
3. Press Ctrl+S to save changes.
The CICS bundle version has been updated to track changes made to the bundle. You might notice that errors are reported after the version change to the CICS bundle. This is because the application and application binding projects are expecting a different version of the CICS bundle. The next steps will rectify these errors.
Figure 6-15 shows the updated Overview tab of the GeneralInsuranceCustomerServices CICS bundle.
Figure 6-15 GeneralInsuranceCustomerServices bundle with two program definitions
Figure 6-16 shows the updated Entry Points tab of the GeneralInsuranceCustomerServices CICS bundle.

Figure 6-16 GeneralInsuranceCustomerServices bundle with two program application entry point declarations
6.2.4 Updating the application version
In this example, we are providing a micro-level version update to the CICS TS application. In the example steps so far, you have created a new CICS bundle and updated the version of another CICS bundle. In this section, you update the version of the application to reflect the changes that have been made, and include the new CICS bundle into the application binding.
Perform the following steps to the application to update the references of the CICS bundle which was modified earlier:
1. In the Project Explorer view, expand the general.insurance.customer.application application project. Then, expand the META-INF subdirectory and double-click bundles.xml to open the Application editor.
2. In the CICS bundles section, click GeneralInsuranceCustomerServices (1.0.0) and click Remove, as shown in Figure 6-17. The prior version of the bundle is disassociated from the CICS TS application.
Figure 6-17 Removing a CICS bundle association using the CICS bundles section of the Application Editor
3. In the CICS bundles section, click Add. The CICS Bundle Selection dialog displays.
4. In the CICS Bundle Selection dialog, select GeneralInsuranceCustomerServices (1.0.1), as shown in Figure 6-18.

Figure 6-18 Selecting the updated CICS bundle in the CICS Bundle Selection dialog
5. Click OK. The CICS Bundle Selection dialog closes and returns to the Application Editor. The updated version of the bundle is associated with the CICS TS application.
The GeneralInsuranceCustomerServices bundle version change has been reflected in the CICS TS application GeneralInsuranceCustomer.
Next, update the version of the CICS TS application to indicate that changes have occurred to the CICS TS application
6. In the GeneralInsuranceCustomer application editor, increment the micro level of the CICS TS application. In the Application Editor, in the General Information section, change the value of the Version from 1.0.1 to 1.0.2.
Figure 6-19 Updated GeneralInsuranceCustomer version 1.0.2 application editor view
The GeneralInsuranceCustomerServices bundle version has been updated, and so has the references to the bundle in the GeneralInsuranceCustomer application project. The workspace still displays errors in the GeneralInsuranceCustomerToDev application binding due to references of the CICS bundle and application prior versions.
You will now update the binding project to perform the following actions:
•Reference the updated version of the application project (version 1.0.2).
•Add the new CICS bundle to the application binding.
•Provide the deployment rules for the new and updated CICS bundles.
•Update the version of the application binding project to reflect the changes being made.
Perform the following steps to reference the updated CICS TS application version:
1. In the Project Explorer view, expand the general.insurance.customer.to.dev.platform.binding application binding project. Then, expand the META-INF subdirectory and double-click appbinding.xml to open the application binding editor.
2. In the General Information section, click Browse next to Application: GeneralInsuranceCustomer (1.0.1). The Application Selection dialog displays.
3. In the Application Selection dialog, select GeneralInsuranceCustomer (1.0.2) and click OK.
4. Press Ctrl+S to save changes.
Perform the following steps to add the new CICS bundle created in “Creating a CICS bundle and defining a dynamic load library definition” on page 134:
1. In the GeneralInsuranceCustomerToDev application binding editor on the Overview tab in the CICS bundles section, click Add. The CICS Bundle Selection dialog displays.
2. In the CICS Bundle Selection dialog, select GeneralInsuranceCustomerApplicationServicesDev (1.0.0) and click OK.
3. Press Ctrl+S to save changes.
|
Important: The GeneralInsuranceCustomerApplicationServicesDev CICS bundle contains the definition for a LIBRARY resource. It is likely that the data sets associated with the LIBRARY resource will require updating when the application is promoted through development through to production. Therefore, the bundle is added to the application binding rather than the application.
|
Perform the following steps to provide the deployment rules for the updated GeneralInsuranceCustomerServices bundle and the new GeneralInsuranceCustomerApplicationServicesDev bundle:
1. In the Application Binding Editor, click the Deployment tab.
2. In the Region Types section, select the ApplicationServices region type.
Notice that there are two errors shown in the list of CICS bundles associated with the GeneralInsuranceCustomerServices CICS bundle. The error marking on the GeneralInsuranceCustomerServices (1.0.0) bundle is due to that version of the bundle being disassociated with the application. The error marking on the GeneralInsuranceCustomerServices (1.0.1) bundle is because there are no deployment rules associated with that version of the bundle.
3. In the list of CICS bundles, clear the selection box next to GeneralInsuranceCustomerServices (1.0.0). That version of the bundle is not referenced in the application or the binding, and will be removed from the list.
4. In the list of CICS bundles, select the box next to GeneralInsuranceCustomerServices (1.0.1). The updated version of the bundle is now associated with the ApplicationServices region type.
You have updated the deployment reference of the GeneralInsuranceCustomerServices CICS bundle. There is still an error reported due to the fact that there is no deployment rule specified for the GeneralInsuranceCustomerApplicationServicesDev CICS bundle.
5. In the list of CICS bundles, select the box next to GeneralInsuranceCustomerApplicationServicesDev (1.0.0). The deployment rule for the new CICS bundle to the ApplicationServices region type has been created.
6. Press Ctrl+S to save changes.
Figure 6-20 shows the updated deployment rules for the ApplicationServices region type.

Figure 6-20 GeneralInsuranceCustomerToDev application binding deployment rules for ApplicationServices region type
The references to the correct versions of the bundle and application have been made in the application binding. The bundle containing the LIBRARY definition has been added to the application binding.
To track the changes made in the application binding, you increment the application binding version by performing the following steps:
1. In the GeneralInsuranceCustomerToDev Application Binding Editor, on the Overview tab in the General Information section, change the Version from 1.0.1 to 1.0.2.
2. Press Ctrl+S to save changes.
The updated application binding editor is shown in Figure 6-21.

Figure 6-21 Updated version 1.0.2 of application binding GeneralInsuranceCustomerToDev
6.2.5 Exporting, installing, and enabling the application
In this example, you have updated the GeneralInsuranceCustomer CICS TS application. You provided a micro version update to the CICS TS application, and in the process repackaged the CICS TS resources related to the AOR (ApplicationServices) region type. In the previous version of GeneralInsuranceCustomer, the ApplicationServices program resources were provided through the CSD and had to be managed separately from the application.
In the updated version of the application, with the program resources packaged with the application, the programs can be managed together with the application as a single entity. The relationship between the programs and the application is kept, from the Explorer modeling environment, through source code management, and then through to lifecycle deployment and management in a CICS TS system.
Perform the follow steps to export the Explorer projects and install the application into the CICS TS platform:
1. Using the CICS Explorer CICS Cloud perspective, in the Project Explorer view, right-click general.insurance.customer.application and select Export Application Project to z/OS UNIX File System. The Export Application to the home directory of a platform wizard displays.
2. In the wizard, ensure that the correct CICS Management Client Interface (CMCI) connection is specified.
3. Select the GeneralInsuranceCustomerToDev (1.0.2) application binding.
4. Select the Create Application Definition after export finishes check box, as shown in Figure 6-22.

Figure 6-22 Export application GeneralInsuranceCustomer version 1.0.2
5. Click Next.
6. Ensure that the correct File Transfer Protocol (FTP) connection is specified.
7. Click Finish.
The application, application binding, and required CICS bundles are transferred to the IBM z/OS UNIX file system. The export process transfers files in the correct format, and puts them in the correct subfolders in the platform home directory.
When the export process is complete, the New Application Definition dialog appears.
8. Specify the following details in the New Application Definition dialog:
a. Name: GENACUST.
b. Description: General insurance customer application.
c. Keep the supplied values for the platform definition, version, application directory, and the binding directory. These values have been completed by the wizard using the values specified by the exported artifacts.
d. Clear the Open editor check box.
Figure 6-23 shows the completed New Application Definition dialog.

Figure 6-23 Completed dialog to create the application definition for version 1.0.2 of GeneralinsuranceCustomer application
9. Click Finish in the new Application Definition dialog.
Figure 6-24 shows the updated Cloud Explorer view after the creation of the application definition.
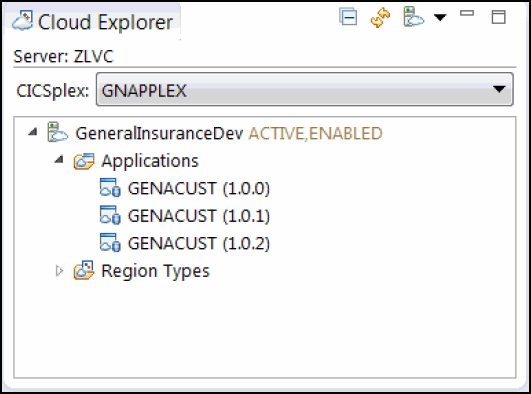
Figure 6-24 Cloud Explorer view displaying the application definition for version 1.0.2
The application-related projects have been exported to the z/OS file system, and an application definition has been created to instruct CICS TS on their location in the file system. Next, install the application definition and enable the application.
10. In the Cloud Explorer view, expand the GeneralInsuranceDev platform and expand the Applications subfolder to view the installed applications and application definitions, as shown in Figure 6-24.
11. Right-click the GENACUST (1.0.2) application definition and select Install. The Perform Operation dialog displays.
12. Click OK to install the application.
The application is installed to the platform CICS TS regions. This includes the installation of the program definitions that are now included in the CICS TS application. The application installs into a disabled state. If the state displays a state other then disabled, wait a short amount of time and refresh the Cloud Explorer view.
The Cloud Explorer view updates to display the installed application rather than the application definition for version 1.0.2, as shown in Figure 6-25.
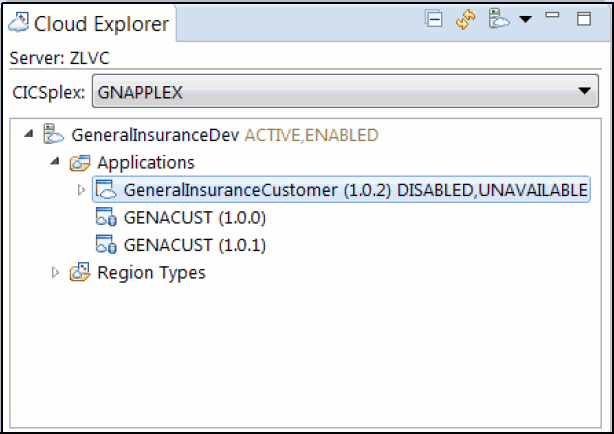
Figure 6-25 Cloud Explorer view showing installed application version 1.0.2
13. Right-click the GeneralInsuranceCustomer (1.0.2) application and select Enable. The Perform Operation dialog appears. Click OK to enable the application.
Figure 6-26 shows the installed and enabled CICS TS application.

Figure 6-26 Cloud Explorer view after the installation and enablement of application version 1.0.2
You have repackaged the ApplicationServices region type resources from the CSD into the CICS TS application. The updated application has been installed into the platform, and has been enabled. This also installs and enables the application program and LIBRARY resources in the application. As the deployer of the application, you have the ability to check that the enablement has been successful before allowing users to access the application.
6.2.6 Making the application available and running it
The application has been installed and enabled on the CICS TS platform. It is currently in an unavailable state, which ensures that the application cannot be started through its application entry points. The programs and LIBRARY resources packaged with the application are private to the application and cannot be linked to.
Perform the following steps to make the application available to users:
1. In the Cloud Explorer view, right-click the GeneralInsuranceCustomer (1.0.2) application and select Make Available. The Perform Operation dialog displays.
2. Click OK to make the application available through the application entry points.
The Cloud Explorer view updates, and the GeneralInsuranceCustomer application version 1.0.2 displays an enabled and available state, as shown in Figure 6-27.

Figure 6-27 Application GeneralInsuranceCustomer is now available to end-users
The updated version of the GeneralInsuranceCustomer CICS TS application has now been deployed. Along with the application actions, the LIBRARY and program resources defined in the application have also been deployed, ready for use.
Perform the following steps to test the deployment:
1. At a CICS TS terminal session, enter the transaction SSC1. The GENAPP application displays.
2. Enter a valid customer number. For example, Cust Number: 0000000001.
3. Select Option 1 for a customer inquiry action and submit.
The panel updates with the customer details for the inquired customer, as shown in Figure 6-28.

Figure 6-28 The GeneralInsuranceCustomer application being run at a terminal
The application has been successfully deployed.
6.3 Example 2: Provisioning a logic change to the GeneralInsuranceCustomer CICS TS application
In 6.2, “Example 1: Repackaging CICS TS resources into the GeneralInsuranceCustomer CICS TS application” on page 128, you deployed an update to the application, version 1.0.2. In version 1.0.2, you packaged the program definitions for the application entry points, and provided a private load library for their load modules. This prepares the AOR layer for application multiversioning, and provides a single point of control for the application with the management of all of the packaged resources.
In this second example, you provide a coding update to the application. This new version of the application is compatible with a previous version, yet provides a functional change to the user. Therefore, the update is a minor version upgrade. You deploy this updated version alongside the prior version of the application. You deploy the updated version of the application with no loss-of-service to the user.
6.3.1 Fixing the bug and compiling
You step through the process of a logic change to the GENAPP application.
In this example scenario, your company has mandated a stricter control of all clients’ personal data. The inquire customer operation in the GeneralInsuranceCustomer application has the ability to retrieve customer-sensitive data to the operator. The operator needs to obtain the address details for the customer, but the business considers the date of birth field as personal, sensitive data that should not be displayed.
In this example, you provide an update to the source code for the CICS TS application to mask the customer date of birth. You then compile and provide the program load modules through a minor update to the GeneralInsuranceCustomer CICS TS application as version 1.100.0. You deploy the updated version of the application with no application service downtime, alongside the older version of the application.
|
Note on semantic versioning: You might have noticed that the version of the application has been proposed to change from 1.0.2 to 1.100.0. There are several reasons for this:
•The major version part, 1, remains the same, because the application maintains the same interfaces and is compatible with an earlier version.
•The minor version changes from 0 to 100. The version update would also be valid if we changed the minor version from 0 to 1. However, leaving a gap between the numbers provides you the flexibility to add minor version updates in between if needed. For example, during an application bug fix to an earlier version, the update might force an interface change, resulting in a minor version update.
•The micro version will reset to 0, because this is the first version at 1.100.<n>.
•Providing a minor version update enables you to provision both applications concurrently in CICS TS V5.2, and later by using the application multi-versioning support.
For more details about semantic versioning, see 9.1.1, “Semantic versioning” on page 194.
|
|
Note for the following steps: The following instructions assume that you have installed GENAPP per the instructions in Appendix A, “Setup and environment” on page 207. Where appropriate, replace the high-level qualifier <USERHLQ> with the user ID that you used during the installation of GENAPP.
The following steps update the source code and job control language (JCL) files for GENAPP. It is advisable to take a backup copy of the following files before performing the following steps. You can then restore the files to their initial state after you have completed this example:
•<USERHLQ>.CB12.SOURCE(LGICUS01)
•<USERHLQ>.CB12.CNTL(@COBOL)
|
Perform the following steps to update and compile the required GENAPP source code into a new data set load library:
1. Allocate the following load library, replacing <USERHLQ> with the high-level qualifier that you used for the installation of GENAPP. You can base the data set characteristic rules on the existing <USERHLQ>.CB12.LOAD data set, <USERHLQ>.CB12.APPLSERV.#1.#100.#0.
You have now created a load library data set to contain the program load modules for the updated programs in the GeneralInsuranceApplication V1.100.0 CICS TS application.
Next, update the source code for the inquireCustomer operation to mask the date of birth (DOB) field.
2. Open the USERHLQ.CB12.SOURCE member (LGICUS01) for editing.
3. Directly after the PERFORM GET-CUSTOMER-INFO statement, insert the following Common Business Oriented Language (COBOL) statement, at approximately line 135:
MOVE '****-**-**' TO CA-DOB.
Example 6-1 shows an extract of the updated source code for the LGICUS01 program.
Example 6-1 Update to the LGICUS01 program to mask the date of birth field
*----------------------------------------------------------------*
* Process incoming commarea *
*----------------------------------------------------------------*
* check commarea length
MOVE WS-CUSTOMER-LEN TO WS-REQUIRED-CA-LEN
ADD WS-CA-HEADERTRAILER-LEN TO WS-REQUIRED-CA-LEN
IF EIBCALEN IS LESS THAN WS-REQUIRED-CA-LEN
MOVE '98' TO CA-RETURN-CODE
EXEC CICS RETURN END-EXEC
END-IF
MOVE CA-CUSTOMER-NUM TO EM-CUSNUM
PERFORM GET-CUSTOMER-INFO.
MOVE '****-**-**' TO CA-DOB.
4. Save the update to the LGICUS01 member.
The source code for the inquireCustomer operation has been updated. You will now update the compilation JCL to compile the updated code into the new load library.
5. Open the <USERHLQ>.CB12.CNTL(@COBOL) member for editing.
6. In the @COBOL file, replace the two instances of <USERHLQ>.CB12.LOAD with <USERHLQ>.CB12.APPLSERV.#1.#100.#0.
7. In the @COBOL file, delete the final block of statements to process the various program files, leaving just the following single entry:
//LGICUS01 EXEC DB2PROC,MEM=LGICUS01
Example 6-2 shows an extract of the final section of the @COBOL JCL file.
Example 6-2 Update to JCL @COBOL to only compile the updated LGICUS01 COBOL file
//*-------------------------------------------------------------------*
//* start THE MVS LINKAGE-EDITOR PROGRAM *
//*-------------------------------------------------------------------*
//*
//LKED EXEC PGM=HEWL,COND=(7,LT,COBL),
// PARM='LIST,XREF,RENT,NAME=&MEM'
//SYSLIB DD DISP=SHR,DSN=CTS520.CICS690.SDFHLOAD
// DD DSN=SYS2.DB2.V11.SDSNLOAD,DISP=SHR
// DD DSN=CEE.SCEELKED,DISP=SHR
// DD DISP=SHR,DSN=CICSSEM.CB12.APPLSERV.#1.#100.#0
//SYSLMOD DD DISP=SHR,DSN=CICSSEM.CB12.APPLSERV.#1.#100.#0(&MEM)
//SYSUT1 DD UNIT=SYSDA,DCB=BLKSIZE=1024,
// SPACE=(CYL,(1,1))
//SYSPRINT DD SYSOUT=*
//SYSLIN DD DISP=(OLD,DELETE),DSN=&©LINK
// DD DISP=(OLD,DELETE),DSN=&&LOADSET
// DD DISP=SHR,DSN=CICSSEM.CB12.SOURCE(LINKPARM)
// PEND
//*
//*
//LGICUS01 EXEC DB2PROC,MEM=LGICUS01
8. Save the update to the @COBOL member.
9. Submit the @COBOL JCL to recompile the updated LGICUS01 program into the <USERHLQ>.CB12.APPLSERV.#1.#100.#0 data set load library. This job has a return code
of 4.
of 4.
You have now provided an updated program load module, in a new load library location, for reference by the new version of the CICS TS application. Note that you have only provided the programs that have been modified in the new data set, and the CICS TS application can load the unchanged modules from the prior data set locations.
6.3.2 Updating data set name in LIBRARY
In this example, you have coded an update to the GENAPP application source code. The updated program algorithm hides the customer’s date of birth during the customer inquiry function. The updated program (LGICUS01) was compiled, and the program load module was supplied in a new data set location (<USERHLQ>.CB12.APPLSERV.#1.#100.#0).
Perform the following steps to add the load library data set to the application, in order for the application to pick up the updated program load modules:
1. Locate the GeneralInsuranceCustomerApplicationServicesDev bundle manifest file to start the editor. Using the CICS Cloud perspective, in the Project Explorer view, expand the general.insurance.customer.applicationservices.to.dev.bundle project. Expand the META-INF subdirectory, then double-click the cics.xml manifest file to start the CICS Bundle Manifest Editor.
The CICS Bundle Manifest Editor is shown in Figure 6-29.
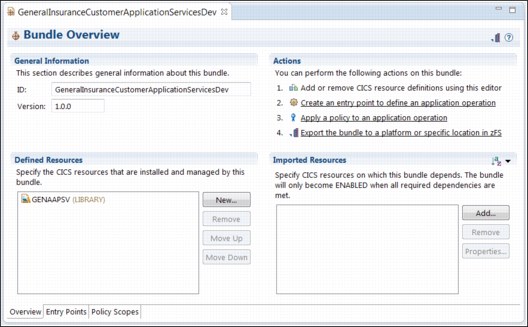
Figure 6-29 CICS Bundle Manifest Editor for the GeneralInsuranceCustomerApplicationServicesDev bundle
2. On the Overview tab in the Defined Resources section, double-click the GENAAPSV (LIBRARY) resource to open the editor.
The Attributes editor appears, as shown in Figure 6-30.

Figure 6-30 Attributes editor for LIBRARY resource GENAAPSV
The LIBRARY definition contains an ordered list of 16 possible data set names, called data set Name 01 through data set Name 16. Currently, a value appears for the Name 01 data set only. You add the data set for the updated programs ahead of the others.
3. Copy the value <USERHLQ>.CB12.APPLSERV.#1.#0.#2 from data set name 01 to data set name 02.
|
Tip: In the Attributes editor, double-click a Value field to edit the content.
|
4. Enter the value <USERHLQ>.CB12.APPLSERV.#1.#100.#0 into data set name 01.
|
Hint: In the Attributes editor, after you have edited a field, click elsewhere on the view to signify the end of the field editing.
|
5. Press Ctrl+S to save changes. The completed updates to the LIBRARY attributes are shown in Figure 6-31.

Figure 6-31 Updated attributes for LIBRARY resource GENAAPSV
The GeneralInsuranceCustomer application defines the LGICUS01 program. The application also defines a LIBRARY resource called GENAAPSV, which provides the location for the program load modules. During execution, the dynamic LIBRARY resources installed by the application are searched. Even though the LGICUS01 load module appears more than once in the data sets included in the application, you have ensured that the updated version appears ahead of the older versions in the GENAAPSV LIBRARY resource.
You have now updated the GeneralInsuranceCustomerApplicationServicesDev CICS bundle to update the LIBRARY resource. As a result of modifying the CICS bundle, you now update the bundle version to reflect the minor version increase by performing the following steps:
1. If you have closed the window, open the GeneralInsuranceCustomerApplicationServicesDev CICS Bundle Manifest Editor.
2. On the Overview tab in the General Information section, update the version from 1.0.0 to 1.100.0.
3. Press Ctrl+S to save changes. Figure 6-32 shows the updated CICS Bundle Manifest for the GeneralInsuranceCustomerApplicationServicesDev bundle.
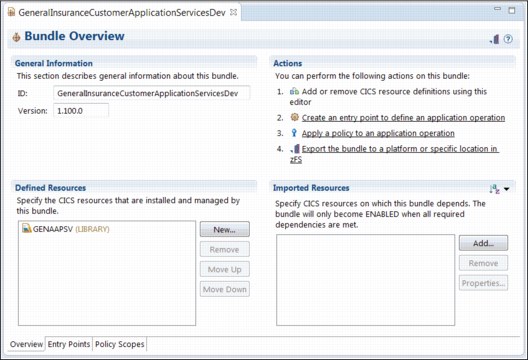
Figure 6-32 CICS Bundle Manifest Editor for version 1.100.0 of bundle GeneralInsuranceCustomerApplicationServicesDev
The CICS bundle version has been updated to track changes made to the bundle. You might notice that errors are reported after the version change to the CICS bundle. This is because the application and application binding projects are expecting a different version of the CICS bundle. The next steps will rectify these errors.
6.3.3 Updating the application version
In this example, you are providing a minor version update to the GeneralInsuranceCustomer application. Perform the following steps to increment the versions of the CICS TS application and application binding project, and to update projects to reference the updated CICS bundle GeneralInsuranceCustomerApplicationServicesDev:
1. In the Project Explorer view, expand the general.insurance.customer.application application project, expand the META-INF subdirectory, and double-click bundles.xml to open the Application Editor.
2. In the Application Editor, in the General Information section, change the value of the Version from 1.0.2 to 1.100.0.
3. Press Ctrl+S to save changes. Figure 6-33 shows the updated Application Editor for the GeneralInsuranceCustomer application.
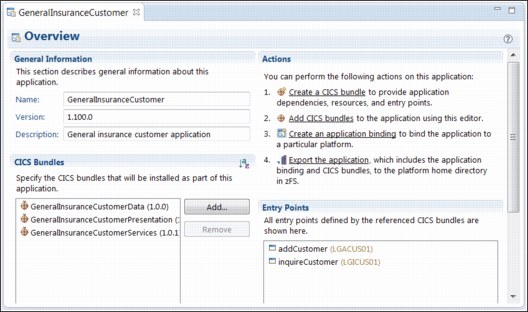
Figure 6-33 Application Editor for version 1.100.0 of the GeneralInsuranceCustomer application
The workspace still displays errors in the GeneralInsuranceCustomerToDev application binding due to references of the CICS bundle and application prior versions. Next, fix the workspace errors.
4. In the Project Explorer view, expand the general.insurance.customer.to.dev.platform.binding application binding project, expand the META-INF subdirectory, and double-click appbinding.xml to open the Application Binding Editor.
You see that the application binding still refers to the old version of the application, as shown in Figure 6-34.
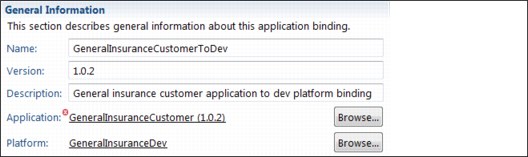
Figure 6-34 General Information section of the Application Binding Editor displaying the old version of the application
5. In the General Information section, click Browse next to Application: GeneralInsuranceCustomer (1.0.2). The Application Selection dialog displays.
6. In the Application Selection dialog, select GeneralInsuranceCustomer (1.100.0), and click OK.
7. Press Ctrl+S to save changes.
Now, fix the reference to the updated version of the CICS bundle.
8. On the Application Binding Editor in the CICS bundles section, click GeneralInsuranceCustomerApplicationServicesDev (1.0.0) and click Remove. The prior version of the bundle is disassociated from the CICS TS application.
9. On the Application Binding Editor in the CICS bundles section, click Add. The CICS Bundle Selection dialog appears.
10. In the CICS Bundle Selection dialog, select GeneralInsuranceCustomerApplicationServicesDev (1.100.0), as shown in Figure 6-35.
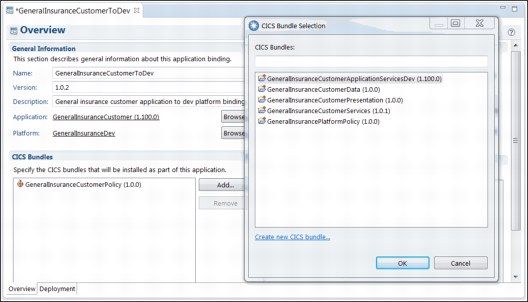
Figure 6-35 Adding the updated version of the bundle to the application binding
11. Click OK. The CICS Bundle Selection dialog closes and returns to the Application Binding Editor.
The GeneralInsuranceCustomerApplicationServicesDev bundle version change has been reflected in the CICS application binding application binding GeneralInsuranceCustomerToDev. Now, update the deployment rules for the CICS bundle.
12. In the Application Binding Editor, click the Deployment tab.
13. In the Region Types section, select the ApplicationServices region type.
14. In the list of CICS bundles, clear any check box next to GeneralInsuranceCustomerApplicationServicesDev (1.0.0). That version of the bundle is not referenced in the application or the binding, and is removed from the list.
15. In the list of CICS bundles, select the box next to GeneralInsuranceCustomerApplicationServicesDev (1.100.0). The updated version of the bundle is now associated with the ApplicationServices region type.
Figure 6-36 shows the updated deployment rules for the ApplicationServices region type.

Figure 6-36 Application binding version 1.100.0 deployment rules for the ApplicationServices region type
All references to the correct versions of the bundle and application have been made in the application binding. To track the changes made in the application binding, increment the application binding version.
16. In the Application Binding Editor, click Overview tab.
17. In the GeneralInsuranceCustomerToDev Application Binding editor, in the General Information section, change the Version from 1.0.2 to 1.100.0.
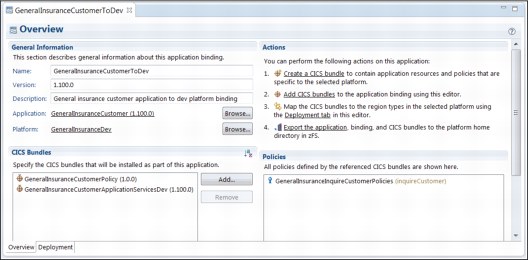
Figure 6-37 Application binding GeneralInsuranceCustomerToDev version 1.100.0
You have updated the versions of the updated CICS bundle, application, and application binding bundles.
6.3.4 Exporting, installing, and enabling
In this example, you have updated your application logic, updating the program source code, compiling it into a new load library, and then updating the CICS TS application to load programs from the new data set location. In the next steps, you will deploy this application.
The following steps describe the process to export, install, and enable the application. The scenario takes advantage of the application multiversion support in CICS TS. In particular, the ability to define program and LIBRARY resources that are private to a particular version of an application. Versions 1.0.2 and 1.100.0 of GeneralInsuranceCustomer both define program resources, LIBRARY resources, application entry points and dependencies with the same names.
In this example, the two versions of the application are deployed simultaneously. The GeneralInsuranceCustomer application version 1.0.2 is already enabled and available in the CICS TS development platform.
Perform the following steps to export the updated version of the CICS TS application, GeneralInsuranceCustomer version 1.100.0:
1. Using the CICS Explorer CICS Cloud perspective, in the Project Explorer view, right-click general.insurance.customer.application and select Export Application Project to z/OS UNIX File System. The Export Application to the home directory of a Platform wizard displays.
2. In the wizard, ensure that the correct CMCI connection is specified.
4. Select the Create Application Definition after export finishes check box.

Figure 6-38 Selecting the correct application binding for exporting version 1.100.0 of GeneralInsuranceCustomer application
5. Click Next.
6. Ensure that the correct FTP connection is specified.
7. Click Finish.
The application, application binding, and required CICS bundles are transferred to the z/OS UNIX file system. The export process transfers files in the correct format, and puts them in the correct subfolders within the platform home directory.
When the export process is complete, the new Application Definition dialog appears.
8. Specify the following information in the new Application Definition dialog:
a. Name: GENACUST.
b. Description: General insurance customer application.
c. Keep the supplied values for the platform definition, version, Application directory, and binding directory. These values have been completed by the wizard using the values specified by the exported artifacts.
d. Clear the Open editor check box.
Figure 6-39 shows the completed New Application Definition dialog.
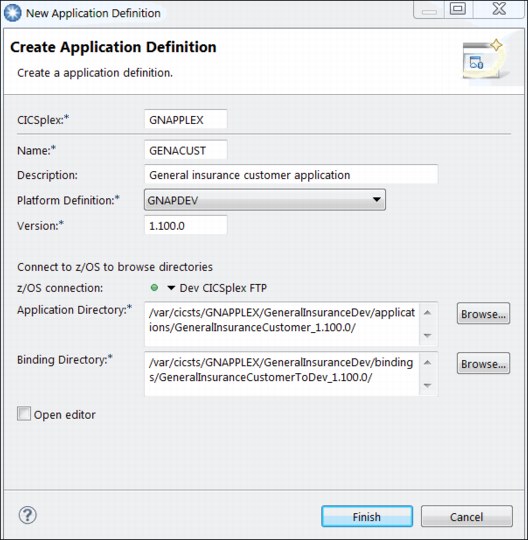
Figure 6-39 Creating the application definition for version 1.100.0 of GeneralInsuranceCustomer application
9. Click Finish in the New Application Definition dialog. Figure 6-40 shows the updated Cloud Explorer view after the creation of the application definition.

Figure 6-40 Cloud Explorer view after the creation of the application definition for version 1.100.0
The application-related projects have been exported to the z/OS file system, and an application definition has been created to instruct CICS TS on their location in the file system. Next, install the application definition and provision the application.
10. In the Cloud Explorer view, expand the GeneralInsuranceDev platform. Then, expand the Applications subfolder to view the installed applications and application definitions, as shown in Figure 6-40.
11. Right-click the GENACUST (1.100.0) application definition and select Install. The Perform Operation dialog appears.
12. Click OK to install the application.
The application is installed to the platform CICS TS regions. This includes the installation of the program definitions that are now included in the CICS TS application. The application installs into a disabled state. If the state displays a state other than disabled, wait a short amount of time and refresh the Cloud Explorer View.
The Cloud Explorer view refreshes, and the application definition is replaced with the installed application entry for version 1.100.0, as shown in Figure 6-41.
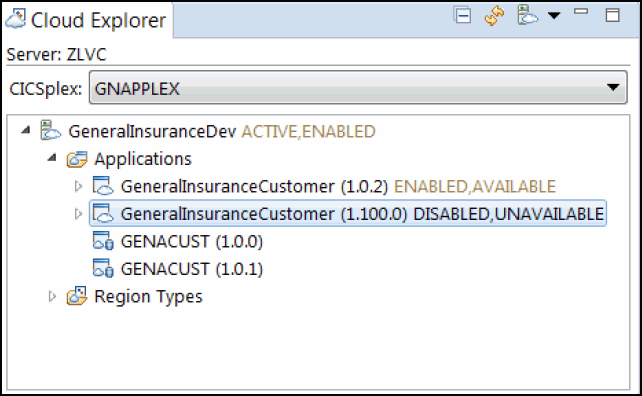
Figure 6-41 Cloud Explorer view showing the installed application, GeneralInsuranceCustomer version 1.100.0
13. Right-click the GeneralInsuranceCustomer (1.1000.0) application and select Enable. The Perform Operation dialog displays. Click OK to enable the application.
You have exported the GeneralInsuranceCustomer V1.100.0 application, in addition to installing and enabling the application, as shown in Figure 6-42 on page 168. You now have two versions of the application (version 1.0.2 and version 1.100.0) concurrently enabled. However, there is an additional step required to make the application version 1.100.0 available to callers. Until this step is undertaken, users continue to use version 1.0.2, and are unaffected by the concurrent version enablement.
Figure 6-42 shows two enabled versions of the application.

Figure 6-42 Cloud Explorer view showing two versions of the application enabled simultaneously
6.3.5 Validating that application version 1.0.2 is still operational
During the installation and enablement of an application, the CICS TS resources are created and enabled, but the application entry points are not made available. This state enables
the application deployer to check the health of the deployment so far, without affecting application users. In previous CICS TS releases, the application was fully provisioned after the enablement.
the application deployer to check the health of the deployment so far, without affecting application users. In previous CICS TS releases, the application was fully provisioned after the enablement.
However, had there been problems during the enablement, the entire application might need to be disabled and discarded while the problem was resolved, resulting in service outages. By having the additional step of making the application available, you have the opportunity to verify that all of the resources have successfully reached the enabled state.
Also, dependencies can be checked before the application is made available to callers. At this stage in the example, V1.0.2 is available but V1.100.0 is not available. Therefore, running GENAPP now should continue to behave as before.
Perform the following steps to run the GeneralInsuranceCustomer application to prove that the enablement of version 1.100.0 of the application has not affected the user:
1. At a CICS TS terminal session, enter the transaction SSC1. GENAPP displays.
2. Enter a valid customer number. For example, Cust Number: 0000000001.
3. Select Option 1 for a customer inquiry action and submit.
The panel updates with the customer details for the inquired customer, as shown in Figure 6-43. Note that the date of birth is still being returned to the user, and version 1.0.2 of the application is still being run.
The enablement of version 1.100.0 has not affected application version 1.0.2, which is currently in service.

Figure 6-43 Terminal execution of version 1.0.2 of the GeneralInsuranceCustomer application
6.3.6 Making application version 1.100.0 available and running it
In this second example, you have provided an updated version of the GeneralInsuranceCustomer application. In version 1.100.0, the application has been updated to mask the inquiry of customer date of birth details. The application has been installed and enabled in the CICS TS platform but has not been made available to users.
Perform the following steps to quickly deploy version 1.100.0 of the CICS TS application:
1. In the Cloud Explorer view, expand the GeneralInsuranceDev platform, and expand the Applications subfolder to view the installed applications and application definitions.
2. Right-click the GeneralInsuranceCustomer (1.100.0) application and select Make Available. The Perform Operation dialog displays. Click OK to make the application available through the application entry points.
The updated version of the GeneralInsuranceCustomer CICS TS application has now been deployed and is available for use by users. Figure 6-44 on page 170 shows the updated Cloud Explorer view displaying the multiple versions of the application currently available. With multiple versions of an application concurrently available in a platform, users can target which version of the application to run by using the EXEC CICS start APPLICATION application programming interface (API).
In situations where this API is not used, such as with existing usage of EXEC CICS LINK or the target program of a transaction resource, the resource from the highest available application version is started. In this example, the EXEC CICS LINK PROGRAM(LGICUS01) command targets the LGICUS01 program deployed by the highest available version of the application, which in this case is version 1.100.0.
Figure 6-44 shows two available versions of the application.
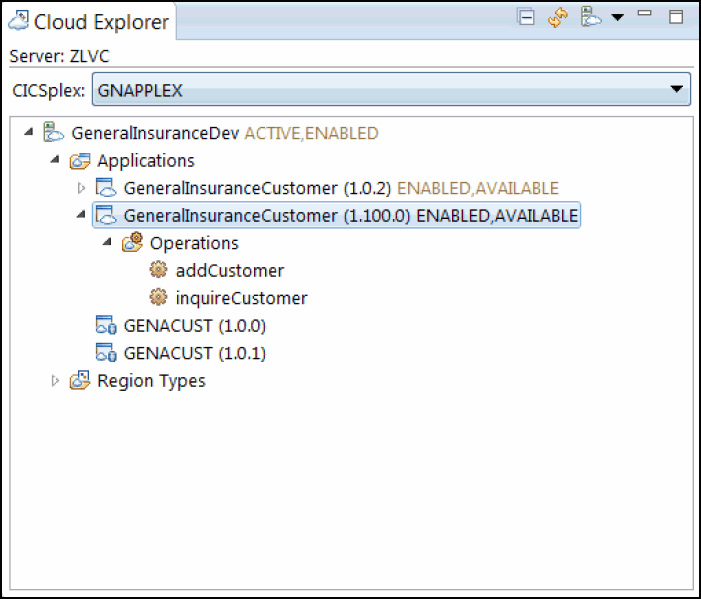
Figure 6-44 Cloud Explorer view displaying two available versions, 1.0.2 and 1.100.0, of the GeneralInsuranceCustomer application
You have deployed version 1.100.0 of the GeneralInsuranceCustomer application. Perform the following steps to test the deployment:
1. At a CICS TS terminal session, enter the transaction SSC1. GENAPP displays.
2. Enter a valid customer number. For example, Cust Number: 0000000001.
3. Select Option 1 for a customer inquiry action and submit.
The window updates with the customer details for the inquired customer, as shown in Figure 6-45. Note that the date of birth field has now been masked after the program updates.

Figure 6-45 Terminal execution of version 1.100.0 of the GeneralInsuranceCustomer application
The application has been successfully deployed. You have provided an update to an application with no service outage to users.
6.4 Possible extensions for the application examples
You have deployed multiple versions of the GeneralInsuranceCustomer CICS TS application. You can try to experiment with the deployed applications using the CICS Cloud perspective in CICS Explorer.
You can observe the ease with which you can roll back to an earlier version of an application. Currently, you have version 1.0.2 and 1.100.0 of the application available. Running the application, you see customer details being returned by version 1.100.0, as shown in Figure 6-45. Make the application version 1.100.0 unavailable. After this single action, the user then sees the customer details being returned by version 1.0.2, as shown in Figure 6-43 on page 169.
With both application versions 1.0.2 and 1.100.0 available, you can use the EXEC CICS start APPLICATION API to choose which version of the application to run. Using this API, you can programmatically route work to a particular version of the application. In the GENAPP application, you can replace the EXEC CICS LINK PROGRAM(LGICUS01) instructions in the LGTESTC1 program for EXEC CICS start APPLICATION statements.
The start APPLICATION statement takes attributes of the application name and operation to start, and the intended version of the application. As an example, you can try to write conditional logic in LGTESTC1 (such as testing the User ID), and then choose which subset of users can start version 1.0.2 or 1.100.0.
6.5 Summary
In this chapter, you have been shown steps to transition from the initial adoption of cloud enabling your CICS TS applications. The GeneralInsuranceCustomer application began forming dependencies on the key artifacts of GENAPP, through to defining the resources related to the AOR (ApplicationServices) layer.
With the resources now defined within the CICS TS application and CICS Bundle Projects, you are able to control the lifecycle of the application as an entirety. Using the application multiversioning support added in CICS TS V5.2, you have been able to deploy multiple versions of an application concurrently, provide updates with no service outage, and easily roll back application versions.
You have been shown the different roles that the CICS TS application and CICS application binding can play in cloud enabling your CICS TS application. By correctly using the CICS application binding, you can move your CICS TS application through development, test, and production without the need to modify the core of the application. This enables you to more easily implement DevOps.
You give the application developer the possibility to package code as an application that can be versioned, declare dependencies, and manage the application as an entity through the lifecycle. Alternatively, you enable the operator to give an abstraction of the underlying topology and complexity using a platform. The bindings fill the gap and provide everything specific for that one application on that one platform.
..................Content has been hidden....................
You can't read the all page of ebook, please click here login for view all page.