

Creating a platform
This chapter reviews what a IBM Customer Information Control System (CICS) Transaction Server (CICS TS) platform is, and the benefits of using it. Defining platforms on to which the General Insurance Application (GENAPP) can be deployed is a prerequisite to the activities described in the following chapters:
3.1 The CICS TS platform
CICS TS platforms greatly simplify the deployment of CICS TS applications by providing a clear, well-defined abstraction of a topology that applications can deploy to with confidence. Platforms can both create or reuse existing environments. Platform services can be introduced to support applications by providing infrastructure-focused resources, such as Transmission Control Protocol/Internet Protocol (TCP/IP) services.
Benefits of using platforms include the following abilities:
•View the status of platform system activity from a single point.
•View the status of platform services and declared dependencies from a single point.
•Host applications and platform services.
•Provision policies to all applications installed in the platform.
•Dynamically add and remove services and dependencies while a platform is installed.
•Share systems between region types and platforms in a controlled way.
•Scale hosted applications while the platform is already installed without changes.
3.2 The role of a CICS TS platform
The region is the basic unit of server deployment in a CICS TS installation. CICS TS supports large workloads by employing more regions, which communicate between each other. Within the network of active CICS TS regions, certain regions are devoted to particular functions, and to accessing particular resources.
CICS TS regions are IBM z/OS address spaces defined to run as Jobs or Started Tasks. They are identified by various attributes, including their job names, their IBM VTAM Applid, or their CICS TS SysID, according to context. Regions require various dedicated resources, such as data sets. Small installations might only require a very small number of regions to run their workloads, and with so few regions their purposes are often obvious.
As workloads grow and the number of required regions increases, the functions of a single region need to be provided by groups of regions for scale and availability. These regions are clones of the original single region. It makes sense to operate on these clones as a single group. Each action performed against the group is performed against all regions in that group. Inside a platform, a group of cloned regions providing the same capability is called a
region type.
region type.
A platform’s primary purpose is to provide an environment that many applications can be deployed into. It must provide one or more region types for the application resources to be installed into, and can provide services that the application might depend on to operate.
3.3 The components of a CICS TS platform
A platform provides a capable hosting environment for applications and platform services, providing both activity and service status information from a single place. They provide a lifecycle that minimizes the impact of environmental change on applications, and policies that enforce the contract between the application and that platform. Additionally, platforms support a more descriptive method for grouping regions, providing new opportunities to consolidate without compromising on control of the services that applications depend on.
3.3.1 Status
The platform resource reflects the current state of the platform. It determines both the overall activity of the regions within the region types, and the overall state of installed platform services.
A platform is ACTIVE if at least one region in each region type is active and connected to CICSPlex SM, as shown in Figure 3-1. With the platform in the ACTIVE state, work is able to flow between region types.
Figure 3-1 An active platform hosting the GENAPP Application
If any region type in the platform has zero active regions, the platform enters a PARTIAL state. In this state, deploying applications to the platform should be done only if the application does not depend on that region type. If the application is installed into a PARTIAL platform and does install bundles into the region type with zero regions, the application takes on the INCOMPLETE state to indicate that part of the application was not installed, as shown in Figure 3-2.
Figure 3-2 A partial platform hosting the now incomplete GENAPP
The platform becomes INACTIVE when all regions in all region types are shut down, or are otherwise unavailable to IBM CICSPlex System Manager (CICSPlex SM). Applications installed into an empty platform take on the empty state because nothing is installed, as shown in Figure 3-3.

Figure 3-3 An inactive platform hosting the now empty GENAPP application
The platform also tracks the services that it manages, and any declared dependencies. Platform services and dependencies are installed using bundles, and it is the health of these bundles that is reflected by the platform ENABLESTATUS. When all bundles are enabled across the platform region types, the platform states that it is ENABLED. If any bundle fails to become ENABLED, the platform reports a state of SOMEDISABLED. If all bundles are disabled, the platform reports a state of DISABLED.
3.3.2 Lifecycle
Applications require protection from environment change, and this is reflected in the lifecycle of the platform. After a platform is installed, it cannot be discarded until all applications installed within it are also discarded.
While the platform is installed, the region types cannot be modified or discarded. However, using the ADDREGION and REMOVEREGION actions against an installed platform enables regions to be added and removed from region types. This enables the platform capacity to be expanded in the case of an unplanned growth in workload capacity. Before a region can be removed from a platform, it must be shut down.
Platform services also follow the lifecycle of the platform. When platforms are installed, enabled, disabled, or discarded, all defined services take the same action. For example, when you install a platform and are satisfied that all platform services have been installed, you can enable all platform services immediately by enabling the platform. When all applications have been discarded from a platform, disabling and discarding the platform causes the disabling and discarding of all platform services bundles, ready to be installed again.
If a new region joins the platform or is restarted, the platform services are reinstalled to match the platform’s current state.
3.3.3 Scope
Previous to CICS TS V5.1, describing the extent of your infrastructure was only possible using either a CICSPlex or a System Group to mark the boundaries. Platforms also provide this capability, but enable a more descriptive and more distinct boundary to be specified.
A CICSPlex supports separation of environments, such as production and test or different business units. Within a CICSPlex you can define multiple platforms. Compared to the CICSPlex, the platform follows a more descriptive route, providing a set of region types to encapsulate the required regions within the scope of the platform. Additionally, platforms can support sharing of regions between region types.
You can use platforms to separate your concerns within a CICSPlex. In the development CICSPlex, you can choose to allocate a platform per developer, as shown in 3.4, “Example single-region platform project” on page 30. In the test and production CICSPlex, you might choose to have a separate application for each line of business.
Finally, if you want to consolidate regions, you can choose to take advantage of a platform’s ability to share regions with other platforms. This could be used, for example, to combine your routing regions for a subset of platforms within the same CICSPlex.
When considering whether a CICSPlex or a platform would be the best option to scope your regions, consider the following issues:
•If the regions should be isolated from other regions because they are for a different part of the business or, for example, for development and test regions, using a CICSPlex is usually the correct choice. Using a separate CICSPlex in this instance ensures that changes made in one scope do not affect the other.
•If the regions are not required to be isolated, platforms might be a better choice. Platforms can also share resources and regions with other platforms, but only where requested.
3.3.4 Region types
Region types group regions of the same capability and configuration. For example, you can add all routing regions to a single region type, and target regions to another. They define the interface to the platform that applications must be bound to before deployment. When a platform is installed and the region type is created, it creates the region definitions for all defined regions. Alternatively, a region type can also adopt an existing System Group and the regions within it, enabling the reuse of an existing environment.
Where it is beneficial to reuse regions, region types can share regions between each other in the same or different platforms. This is valuable for consolidation scenarios where you might have a group of routing regions servicing several different platforms, or a file owning region hosting files for each platform.
3.3.5 Services
Applications can require specific services. Platforms can install and manage resources to be supplied to the application. For example, a platform might provide a TCP/IP service that the application can consume using a URIMAP. All services installed in this manner can be added, enabled, disabled, and removed from the platform in a single action.
Platform services can be installed with the platform, or added and removed from the platform as required using the ADDBUNDLE and REMOVEBUNDLE actions. These actions add and remove the bundles associated with a region type in the platform. After an ADDBUNDLE action has been issued, the bundle is installed into all regions within the region type. This bundle is then enabled if the platform has previously been enabled. The REMOVEBUNDLE action reverses this process by disabling and discarding the bundle in all regions within the region type.
Platform services are not required to be provided by the platform itself. As with applications, platforms can use bundle imports to declare dependencies on existing services provided outside of the platform. For example, if multiple platforms need to share the same File, one platform could create the File definition within a bundle, while the other platforms would import the File definition within their own bundles.
This would enable the platform resource status to also take into account the state of the File. Declared dependencies can be installed with the platform, or added to the platform in the same way as a normal platform service.
For an example of adding a bundle to a platform, see 5.2.1, “Platform policy example” on page 100.
3.3.6 Policies
In addition to providing services, a platform can also install CICS TS policies. These provide a contract for the execution of tasks running in the context of any application within that specific platform. For example, a policy could force an abnormal end of task (abend) if the task exceeds the contracted processor consumption.
Policies are discussed in more detail in Chapter 5, “Applying a policy” on page 97.
3.4 Example single-region platform project
This section provides information about the implementation of CICS TS platforms. After completing the procedures in this section, you will have a CICS TS platform, GeneralInsuranceDev, which is used as a single-region development platform for GENAPP in the following scenarios:
The following sections build on previous instructions described in Chapter 2, “GENAPP introduction” on page 15. You need either IBM CICS Explorer V5.2 or CICS Explorer V5.2 software development kit (SDK) software.
The single region development platform is a useful configuration for getting started with any new development. Any complexities, such as remote resource definitions or IBM z/OS Workload Manager (WLM) routing, can be overlooked at this stage, because all of the resources are installed locally.
Additionally, because the platform is still split into three separate region types all sharing the same single region, it encourages good development practices. For example, it promotes separating the presentation, business logic, and data access tiers of your application.
3.4.1 Defining the development topology
In a multi-region platform, each region type contains one or more regions. In this development platform, each region type contains the same single region, which a developer will install all resources into.
This development platform will adopt our existing infrastructure, meaning that the region types created by the platform map to existing CICSPlex SM System Groups. For a test or production environment, these would have already been created as part of the work to assemble the environment for the application. In our development environment, an ad hoc platform must be created quickly for hosting our GENAPP application.
Below the created System Groups are their given simple names, such as GENATOR (the GENAPP presentation layer, also known as the terminal-owning region (TOR), system group). However, in a real development CICSPlex, you will most likely give each set of System Groups region-specific or developer-specific names, such as DEV3TOR (Developer 3 TOR System Group).
If they are unique within the CICSPlex and fit with business naming guidelines, the name of the System Group is unimportant. Regardless of the name chosen, the region type provides the necessary abstraction so that the underlying System Group name is inconsequential.
Perform the following steps to create the GENATOR, GENAAOR, and GENADOR System Groups using the CICSPlex SM Administration perspective in CICS Explorer:
1. In the CICSPlex Explorer view, left-click the CICSPlex name that you want to work with. In this instance, select GNAPPLEX CICSPlex.
2. In the main menu, left-click the Definitions menu, and then select System Group Definitions. The System Group Definitions view displays.
3. Right-click in the System Group Definitions view and then select New, as shown in Figure 3-4. The New System Group wizard displays.

Figure 3-4 Using the System Group Definitions view to create a new System Group
4. In the New System Group wizard, validate that the CICSPlex name pre-entered into the CICSPlex field is the CICSPlex that you want to work with. If not, go back to step 1 and re-select the correct CICSPlex.
5. Enter GENATOR into the Group field.
6. Enter General insurance terminal owning regions into the Description field.
Figure 3-5 Completed create New System Group wizard for terminal owning regions
8. Click Finish.
9. Confirm that the System Group Definitions view now contains the new GENATOR System Group.
10. Return to step 3 and continue until the GENAPP application-owning region (AOR) System Group (GENAAOR) and GENAPP data-owning region (DOR) System Group (GENADOR) have been created. The System Group Definitions view appears as shown in Figure 3-6.

Figure 3-6 The terminal, application, and data owning region groups are displayed
Now that the System Groups have been created, the next step is to define the single development region. If the System Definition for the development region has already been created, this part can be skipped.
Use the following steps to create the GENADEV1 System Definition using the CICSPlex SM Administration perspective in CICS Explorer:
1. In the CICSPlex Explorer view, left-click the CICSPlex name that you want to work with. In this instance, select the GNAPPLEX CICSPlex.
2. In the main menu, left-click the Definitions menu and then select System Definitions. The System Definitions view displays.
3. Right-click in the System Definitions view and then select New, as shown in Figure 3-7. The New System Definition wizard displays.

Figure 3-7 Using the System Definitions view to create a new System Definition
4. In the New System Definition wizard, validate that the CICSPlex name pre-entered into the CICSPlex field is the CICSPlex that you want to work with. If not, go back to step 1 and re-select the correct CICSPlex.
5. Enter GENADEV1 into the Name field.
6. Enter Development region into the Description field.
7. Enter GENADEV1 into the Appl ID field.
8. Enter DEV1 into the Sys ID field.
9. Ensure that the Open editor option is cleared. The New System Definition wizard should appear as shown Figure 3-8.

Figure 3-8 Create New System Group wizard
10. Click Finish.
11. Confirm that the System Definitions view now contains the new GENADEV1 System Definition.
All System Groups and the System Definition for the development region are now in place. The next step is to add the System Definition to each of the System Groups. This enables the platform region types to point all resources to be installed at the same development region.
Use the following steps to add the GENADEV1 System Definition to the GENATOR, GENAAOR, and GENADOR System Groups using the CICSPlex SM Administration perspective in CICS Explorer:
1. In the CICSPlex Explorer view, left-click the CICSPlex name that you want to work with. In this instance, select the GNAPPLEX CICSPlex.
2. In the main menu, left-click the Definitions menu and select System Definitions. The System Definitions view displays.
3. Right-click the GENADEV1 System Definition and select Add to Group, as shown in Figure 3-9. The Perform Operation wizard displays.

Figure 3-9 Using the System Definitions view to add a System Definition to a System Group
4. In the Perform Operation wizard, enter GENATOR into the Group Name field.
5. Click OK.
6. Repeat from step 3 until the GENADEV1 System Definition has been added to all three System Groups.
The GENATOR, GENAAOR, and GENADOR System Groups should each now contain a single System Definition, GENADEV1.
Use the following steps to confirm that the GENADEV1 System Definition was added to each of the GENATOR, GENAAOR, and GENADOR System Groups using the CICSPlex SM Administration perspective in CICS Explorer:
1. Refresh the CICSPlex Explorer view by pressing the refresh ( ) button beside the CICSPlex Explorer title.
2. In the CICSPlex Explorer view, left-click the twistie left of the CICSPlex name that you want to work with. In this instance, open the twistie left of the GNAPPLEX CICSPlex.
This will expand the CICSPlex entry to show the System Groups sub-folder, as shown in Figure 3-10.

Figure 3-10 Using the CICSPlex Explorer view to show information about a specific CICSPlex
3. Left-click to open the twistie left of the System Groups sub-folder. This will expand to show a further list of sub-folders with the names of the newly created GENATOR, GENAAOR and GENADOR System Groups.
4. Expand each of the System Groups by opening the twistie left of it.
5. If the System Definition GENADEV1 was added correctly, it should appear as a subitem under each group, as shown in Figure 3-11.

Figure 3-11 Using the CICSPlex Explorer view to show System Definitions in System Groups
The development GENADEV1 System Definition has been correctly created and added to the System Groups. In the following section, these System Groups will be mapped onto platform region types. Application or platform resources installed into these region types will now install all resources into the development region GENADEV1, regardless of the region type chosen.
3.4.2 Defining the platform
Perform the following steps to create the GeneralInsuranceDev CICS TS platform project using the CICS Cloud perspective in CICS Explorer:
1. Right-click in the Project Explorer view and then select New → Project, as shown in Figure 3-12. The New Project wizard displays.
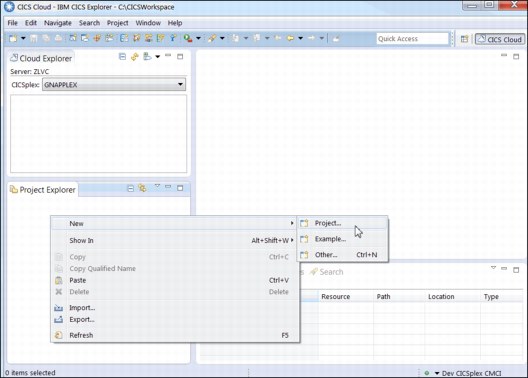
Figure 3-12 Using the Project Explorer view to create a new Project
2. In the New Projects wizard expand CICS Resources, click CICS Platform Project (see Figure 3-13), then click Next. The CICS Platform Project wizard displays.
Alternatively, to create a project for a CICS TS platform, click the files plus cloud ( ) icon in the tool bar to launch the CICS Platform Project wizard.
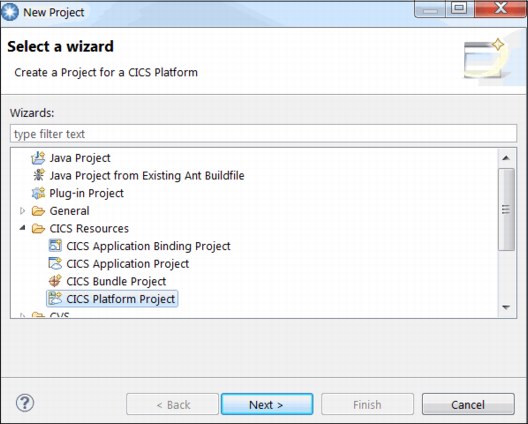
Figure 3-13 Selecting a CICS Platform Project in the New Project wizard
3. Enter general.insurance.dev.platform in the Project name field.
4. Enter GeneralInsuranceDev in the Name field.
5. Enter General insurance dev platform in the Description field. The New Platform project wizard should look like Figure 3-14.

Figure 3-14 Create New CICS Platform Project wizard
6. Click Next.
The wizard now enables you to define the region types that will compose this CICS TS platform.
Next, you define the ApplicationServices region type.
7. Click Add. The Add a Region Type dialog shows.
8. Enter ApplicationServices into the Name field.
9. Select the Adopt an existing system group radio button.
If required, connect to your CICS TS environment’s CICS Management Client Interface (CMCI) connection.
10. Select GNAPPLEX in the CICSPlex drop-down box.
11. Select GENAAOR in the CICS system group drop-down box. The dialog should look as shown in Figure 3-15.
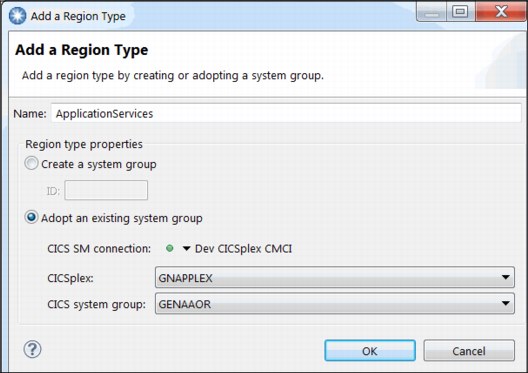
Figure 3-15 Adding the ApplicationServices region type to the platform
12. Click OK. The ApplicationServices region type has been defined in the CICS Platform Project.
Next, define the DataAccess region type.
13. Click Add.
14. Enter DataAccess into the Name field.
15. Select the Adopt an existing system group radio button.
16. Select GNAPPLEX in the CICSPlex drop-down box.

Figure 3-16 Adding the DataAccess region type to the platform
18. Click OK. The DataAccess region type has been defined in the CICS Platform Project.
Next, define the Presentation region type.
19. Click Add.
20. Enter Presentation into the Name field.
21. Select Adopt an existing system group.
22. Select GNAPPLEX in the CICSPlex drop-down box.
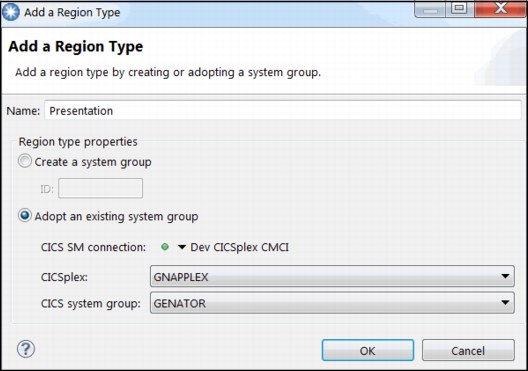
Figure 3-17 Adding the Presentation region type to the platform
24. Click OK. The Presentation region type has been defined in the CICS Platform Project.
The CICS Platform Project wizard should look like Figure 3-18.
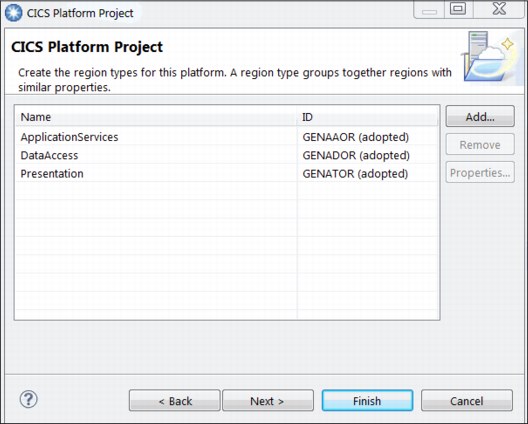
Figure 3-18 Platform GeneralInsuranceDev region types
25. Click Next.
The wizard shows the CICS Bundle Projects that have been found in the workspace that can be included into the CICS TS platform.
No CICS bundles are required in this CICS TS platform, as shown in Figure 3-19.
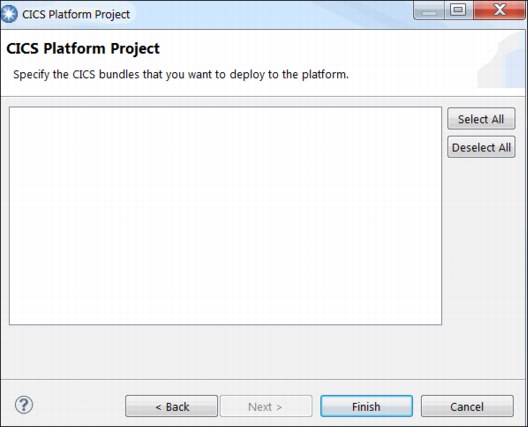
Figure 3-19 List of bundles in the Explorer workspace to include in the platform
26. Click Finish. The platform project is created.
The Project Explorer view should look similar to Figure 3-20.
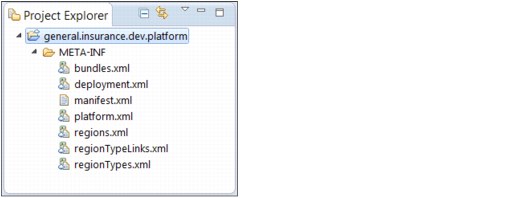
Figure 3-20 Project Explorer view after creating the GeneralInsuranceDev CICS Platform Project
The platform editor for the GeneralInsuranceDev platform launches, and should look similar to Figure 3-21.
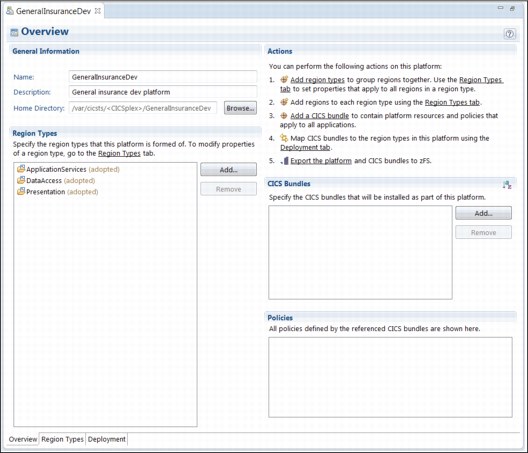
Figure 3-21 GeneralInsuranceDev platform in the platform editor
A CICS Platform Project has now been created. The project defines the name of the CICS platform when it is installed, and it also defines the region types that will be created along with the CICS platform. You have now created the CICS Platform Project for the General Insurance dev platform that represents a development environment ready for deployment to your CICSPlex. At this stage, your project only exists locally in the CICS Explorer workspace.
3.4.3 Deploy the platform
This section describes how to deploy your new CICS Platform Project from the local workspace into IBM z/OS Distributed File Service zSeries File System (zFS). The CICS TS platform will then be installed into the CICSPlex.
Perform the following steps to deploy the GeneralInsuranceDev CICS TS platform using the platform editor:
1. If the platform editor for the general.insurance.dev.platform project is not open, locate the platform files to start the platform editor.
In the Project Explorer view, expand the general.insurance.dev.platform project and expand the META-INF subdirectory, then double-click the platform.xml file to start the platform editor. The platform editor for the GeneralInsuranceDev platform starts, and should look similar to Figure 3-21.
2. On the Overview tab in the platform editor for the GeneralInsuranceDev platform, click Export the platform in the Actions section. The Export Platform wizard displays.
If required, connect to your CICS TS environment’s CMCI connection.
3. Select GNAPPLEX from the CICSPlex selection box.
4. Select the Create CICS Platform Definition after export finishes check box.
Figure 3-22 shows the completed first page of the Export Platform wizard for the development platform.

Figure 3-22 Export Platform wizard for development platform GeneralInsuranceDev
5. Click Next.
6. Verify that the correct File Transfer Protocol (FTP) connection details are connected. See Figure 3-23.
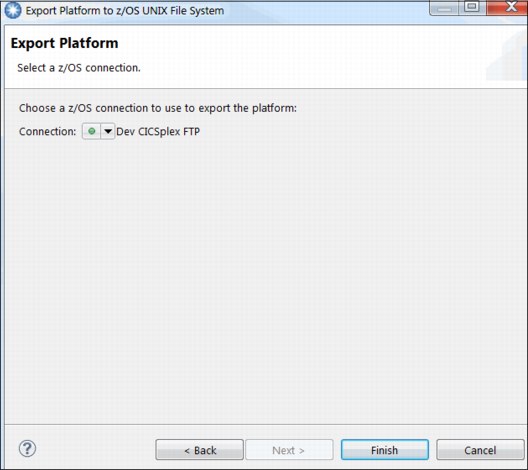
Figure 3-23 An established FTP connection in the platform export wizard
7. Click Finish.
The CICS Platform Project begins to export to the z/OS UNIX file system. The CICS Explorer ensures that the correct directory structure is created so that the CICS Platform Project is ready to be used. After the export finishes, the New Platform Definition wizard displays. The CICS Explorer will automatically complete the detail obtained through the export process.
8. Enter GNAPDEV in the Name field.
9. Enter General insurance dev platform in the Description field. Figure 3-24 shows the completed New Platform Definition wizard for the development platform.

Figure 3-24 New Platform Definition wizard for development platform GeneralInsuranceDev
10. Click Finish. The CICS Platform Definition has now been created.
The CICS TS cloud view should appear as in Figure 3-25.
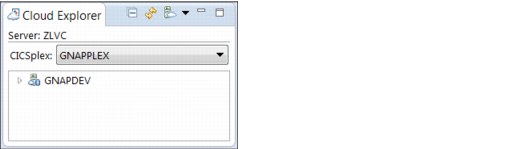
Figure 3-25 Cloud Explorer view after creating the CICS Platform Definition GNAPDEV
11. Right-click GNAPDEV in the Cloud Explorer view.
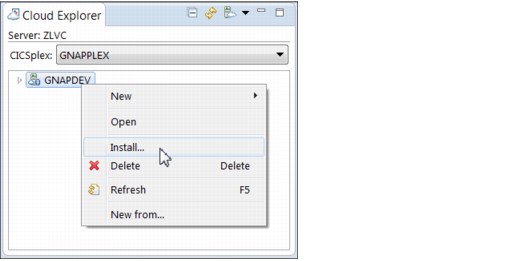
Figure 3-26 Menu to install a platform using the Cloud Explorer View
13. Click OK in the Perform Operation dialog, as shown in Figure 3-27. The GeneralInsuranceDev CICS TS platform begins to install.
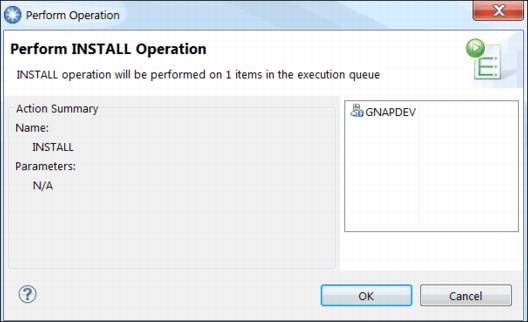
Figure 3-27 Perform operation dialog to install a platform
14. Confirm the contents in the Cloud Explorer view, as shown in Figure 3-28.

Figure 3-28 Cloud Explorer view after installing the platform
You have now successfully installed the GeneralInsuranceDev platform into your CICS TS environment. The GeneralInsuranceDev CICS TS platform has now been created, deployed, and installed.
3.4.4 Multi-region platform for test or production
9.5, “Promoting GeneralInsuranceCustomer from dev to test” on page 203 describes the technique for promoting your application from this single region development platform into a multi-region platform suitable for test or production environments. The creation of this GeneralInsuranceTest platform is easily accomplished using the same technique described previously.
The only difference is that you should replace all references to “test” with “dev”. In a multi-region platform, the system groups that you adopt each contain one or more regions, rather than the same single region as is the case here.
3.5 Outcome
In this chapter, you have deployed and installed a CICS TS platform (GeneralInsuranceDev) on top of an existing CICSPlex topology designed for an existing active application (GENAPP), as described in Chapter 4, “Creating an application” on page 51. In this instance, the topology was a single region. By using the flexibility of platforms, a development environment was created that simplifies creating resource definition while still providing developers with a tiered topology.
From this simple platform, applications can now be deployed and managed. The platform can be extended to provide more services to those applications, or to apply policies that affect all applications installed into this platform. Additionally, for a new CICSPlex, the platform itself can define and create the region and system group definitions for you. This enables your complete topology to follow the platform lifecycle.
When test and production environments are required, the same platform deployment techniques can be used to deploy platforms to multi-region environments with only minor changes.
For further information about platform design, visit the IBM Knowledge Center on the following website:
..................Content has been hidden....................
You can't read the all page of ebook, please click here login for view all page.