

Creating an application
This chapter introduces the IBM Customer Information Control System (CICS) Transaction Server (CICS TS) application resource, highlighting how it can provide business value. We then demonstrate how to create a CICS TS application resource for the General Insurance Application (GENAPP), which was introduced in Chapter 2, “GENAPP introduction” on page 15, and is used for all of the walkthroughs in this book.
The following list includes reasons why a user would create a CICS TS application:
•Easily determine the status of application resources and dependencies.
•Measure resource usage. See Chapter 7, “Measurement by application” on page 175.
•Enable threshold policies to be scoped to an application. See Chapter 5, “Applying a policy” on page 97.
•Enable multiple versions of an application to be made available on the same CICS TS platform at the same time. See Chapter 6, “Packaging an application for multiversion deployment” on page 127.
This chapter contains the following topics:
4.1 The CICS TS application
In CICS TS V5.1, CICS TS applications provide business value by simplifying application lifecycle management, and enabling performance measurements and threshold policies to be applied at the application level. In CICS TS V5.2, the value of CICS TS applications was further enhanced by enabling multiple versions of the same CICS TS application to be installed and running at the same time, on the same CICS TS regions. This enables rollout of new application versions without any downtime.
The following list describes the benefits of CICS TS applications in more detail:
•You can start to measure, at the application level, the cost of your existing applications. By creating a CICS TS application resource that represents an existing application, and enabling CICS TS performance monitoring, you can report on overall application usage for all tasks across all regions where the application is deployed.
This is described in further detail in Chapter 7, “Measurement by application” on page 175.
•By applying threshold policies, you can protect your CICS TS regions against problematic applications using too many resources. For example, you could issue a message if an update to a CICS TS application resulted in it making too many Structured Query Language (SQL) calls, or using too much processor time.
This is described in further detail in Chapter 8, “Managing by policy” on page 181.
•You can use a CICS TS application as a single point of reference that indicates whether all of the resources required by an existing CICS TS application are enabled. If any resource gets disabled, the CICS TS application reflects that state. If all resources are enabled, the CICS TS application shows an enabled state.
This is demonstrated later in this chapter.
•You can simplify application management by using CICS TS applications to deploy and manage the CICS TS resources that your application is composed of, as a single entity, throughout the lifecycle, and across every CICS TS region in which your application runs. By moving the definition of resources from the CICS TS system definition (CSD) data set or IBM CICSPlex System Manager (CICSPlex SM) Business Application Services (BAS), and into the CICS TS application, they are bundled with the application for its lifecycle.
When you install the application, the resources are installed across all CICS TS regions that the application uses. When you enable the application, the resources are enabled, and so on.
This is described in further detail in Chapter 6, “Packaging an application for multiversion deployment” on page 127.
•You can deploy multiple versions of the same CICS TS application to the same CICS TS regions, which enables rollout of new application versions without any downtime. CICS TS applications can contain private program and library resources, so each application version can run different versions of programs even when the CICS TS program resources have the same names.
This is described in further detail in Chapter 6, “Packaging an application for multiversion deployment” on page 127.
•You can deploy different applications to the same CICS TS regions, even if they have clashing program names. This can be especially useful for vendor products over which you have no control of the naming conventions used. CICS TS applications can contain private program and library resources, so each application can run different copies of programs even when the CICS TS program resources have the same names.
•CICS TS programs can be isolated by making them private to a CICS TS application. By making the programs private, you can ensure that other applications can only use the CICS TS programs that you want them to use. This in turn can make it easier to manage application interdependencies.
•The CICS TS application, after it is created, can remain unchanged as it is promoted from development, through to test, and into production. Keeping the CICS TS application unchanged provides a greater level of confidence in the promotion of the application, and decreases the risk of errors being introduced during the promotion process.
This is described further in Chapter 9, “Application lifecycle management” on page 193.
4.1.1 Gaining value for existing CICS TS applications
In this chapter, we examine how you can start to gain value from CICS TS applications, by creating a CICS TS application resource that represents an existing CICS TS application. The resources for the existing application are defined on the CICS TS CSD, and this remains unchanged.
Perform the steps described in this chapter to complete the following tasks:
•Create a CICS TS application resource that enables you to measure the application usage.
•Apply policies to protect against errors in the application.
•Use the CICS TS application as a single point of reference for the overall status of all of the resources that make up the application.
4.2 The components of a CICS TS application
A deployed CICS TS application consists of the following components:
•A CICS TS application that has been exported to IBM z/OS Distributed File Service zSeries File System (zFS)
•One or more CICS bundles that have been exported to zFS
•A CICS application binding that has been exported to zFS
•An APPLDEF resource definition
•One or more application entry points
•Optional dependencies declared on resources external to the application
•Optional threshold policies that ensure that the application runs within defined limits
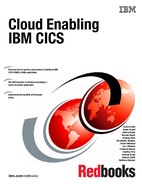
Figure 4-1 shows how these components fit together.
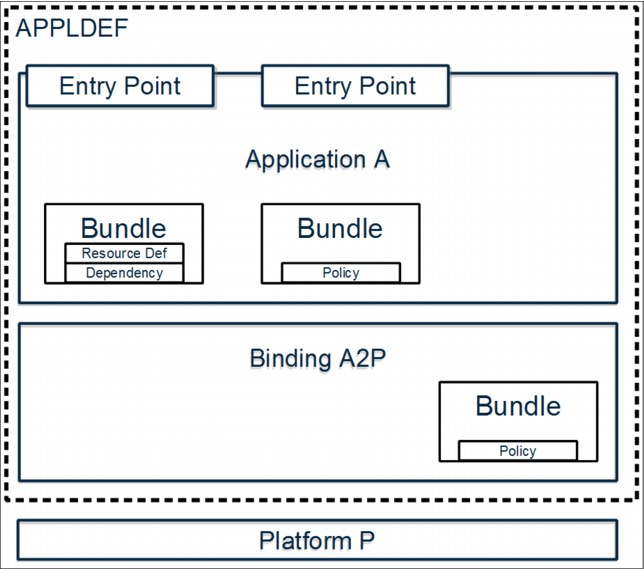
Figure 4-1 How the components of a CICS TS application fit together
The CICS TS application artifacts that have been exported to zFS are read by CICS TS during install of an APPLDEF resource definition. They provide the necessary information to enable the creation of the application resource.
The CICS TS application contains one or more CICS bundles. A CICS bundle is a container for a set of CICS TS resources. When a CICS bundle is installed into a CICS TS region, the set of resources that it contains also get installed.
A CICS TS application might span several different types of CICS TS regions. For example, the application might process requests in a web-owning region (WOR) and then run business logic in an application-owning region (AOR). If this is the case, the CICS TS application can contain a CICS bundle of resources for the WOR, and a second CICS bundle of resources for the AOR. The CICS bundles must be available on zFS at application install time.
A CICS TS application is deployed into a platform. The application should remain unchanged when it is deployed into different platforms (for example, a development platform and a test platform). To enable this, a CICS application binding is used. The application binding maps the needs of the application to the specific platform into which it is to be deployed. The application binding can add more CICS bundles to the application.
The APPLDEF resource definition tells CICS TS where to find the application and application binding on zFS. On installation of the APPLDEF, the application is installed.
Application entry point declarations in your CICS TS application identify when tasks running in CICS TS are entering into your application. As a task passes through an application entry point, application context data is associated with the task. The application context data is propagated forwards to other CICS TS regions that the task uses. The application context data can be made available in monitoring records, to provide a way of measuring how much system resources an application is using.
Threshold policies use a tasks application context to identify when a task is in an application, and therefore when to apply policies associated with that application. CICS TS V5.1 enables a CICS TS PROGRAM resource to be set as an entry point. Therefore, when a task runs a CICS TS PROGRAM identified as an entry point, the application context is associated with the task.
In CICS TS V5.2, CICS TS URIMAP resources were added as an extra type of entry point. When an inbound request is mapped by a URIMAP identified as an entry point, the application context is associated with the task processing the inbound request.
Optional dependencies can be expressed within CICS bundles that are part of the CICS TS application. A dependency is checked by CICS TS at installation time and, if it is not available, the application will not enable. For example, if an application has a requirement on a particular CICS TS file being available, a dependency on the CICS TS file could be created. If the file is not installed, the application will not enable.
Optional threshold policies can be defined within CICS bundles that are a part of the CICS TS application. These policies can enforce that the application meets particular requirements. For example, it might need to complete within a specified amount of time. Threshold policies are discussed more in Chapter 5, “Applying a policy” on page 97.
4.3 Developing a CICS TS application
Development of the CICS TS application is done using CICS Explorer. Projects are created in CICS Explorer that represent components of the CICS TS application. These projects can be treated like program source code and shared using a source code management system.
The following list describes the different projects:
•Application Project
•Bundle Project
•Platform Project
•CICS Application Binding Project
An Application Project describes the application itself, including its name and version. The application project also describes the CICS bundles that make up an application. When the application is ready for testing, it is exported to zFS, where it is used by CICS TS at run time.
A Bundle Project represents a CICS bundle resource. In it, various CICS TS resources can be defined, application entry points can be created, and dependencies can be expressed on other CICS TS resources.
A Platform Project describes a CICS TS platform and the region types that it consists of. Chapter 3, “Creating a platform” on page 25 demonstrated the creation of a Platform project. The platform project does not need to be changed during creation of a CICS TS application, but it is required within the CICS Explorer environment for the creation of the application binding that maps that application to the platform.
A CICS Application Binding Project describes which CICS bundles within an Application map to particular region types. It can also be used to specify additional CICS bundles that need to be installed during installation of the application. For example, a resource needed by the application that requires different attributes in a test platform and a production platform, could be defined in the application binding.
4.4 Example
This section provides information about how we can create a CICS TS application that represents the existing GENAPP application.
After completing the procedures in this section, you will have created the following components:
•Two defined entry points in your GENAPP application that enable you to monitor the resource usage of the application across your environment, or to apply threshold policies at the application level
•A running CICS TS application resource that encompasses dependencies on the GENAPP application, and enables you to see the running status of the application as
a whole
a whole
4.4.1 Prerequisites
The following sections build on previous instructions described in Chapter 2, “GENAPP introduction” on page 15 and Chapter 3, “Creating a platform” on page 25. To proceed, you need the following software:
•CICS TS regions running V5.1 or later. The walkthrough is done using CICS TS V5.2.
•CICS Explorer V5.2, or CICS Explorer V5.2 software development kit (SDK).
|
Tip: It is possible to follow the steps in this chapter if you are using CICS TS V5.1. If this is the case, you can skip the instructions on making an application Available or Unavailable, because this capability was added in CICS TS V5.2.
|
•The GeneralInsuranceDev platform defined and installed from Chapter 3, “Creating a platform” on page 25.
•The GENAPP application, available and installed into a single managed CICS TS region, as described in Chapter 2, “GENAPP introduction” on page 15 and Appendix A, “Setup and environment” on page 207.
4.4.2 Creating application entry points
Our initial goal is to create a CICS TS application resource, containing the application entry points for the GENAPP application. On completion of this initial goal, the application resource can be installed, and could be used for monitoring or for applying threshold policies.
Our secondary goal is to enhance the CICS TS application to reflect the status of the CICS TS resources that the application relies upon, by adding dependencies. These enable us to determine, at installation, whether the resources needed by the application are available. Checking dependencies is not required for monitoring or applying threshold policies.
Identifying application entry points
There are some factors to consider when identifying entry points:
•The earlier in the transaction flow that you identify that a task is part of an application, the sooner you can apply policies and start monitoring for the cost of the application. This can be of particular importance if the application spans multiple CICS TS regions. To monitor the application across all of the CICS TS regions that it touches, the entry points should be defined on the CICS TS region that first accepts the inbound request.
•An application can have different functions that it performs. These are referred to as the operations of the application. For example, GENAPP can inquire on a customer, or add a customer. There can be value in identifying these operations, and monitoring or applying policies to individual operations.
|
Remember: In CICS TS V5.1, an entry point can be a CICS TS PROGRAM resource. In CICS TS V5.2, URIMAPs were added as an additional type of entry point.
|
Figure 2-6 on page 20 describes how the GENAPP customer application artifacts are separated between presentation logic, application services logic, and data access logic. In our GeneralInsuranceDev platform created in Chapter 3, “Creating a platform” on page 25, all three of these roles are performed by a single CICS TS region.
However, if we were to promote the application to the GeneralInsuranceTest platform, which we also created in Chapter 3, “Creating a platform” on page 25, the application would then have separate CICS TS regions for presentation logic, application services logic, and data access logic.
In terms of identifying our GENAPP entry points, we have three possible options:
1. The first program resource run for GENAPP is LGTESTC1. This is part of the presentation layer. If we identify this as our entry point, we can ensure that tasks in the CICS TS regions, running the presentation layer of our application, are monitored as a part of the application, and that threshold policies can apply in these CICS TS regions.
2. If we wanted to differentiate between adding a customer and inquiring on existing customers, we could use the programs LGICUS01 (inquire) and LGACUS01 (add) as our application entry points. These programs run in the application services logic layer.
Therefore, if we choose these entry points, we can apply more selective threshold policies, and can separately account for the cost of the inquire customer and add customer operations through monitoring. However, the cost of the presentation logic would not
be included.
be included.
3. We could consider an architectural change to GENAPP, such that different CICS TS programs are driven in the presentation logic layer for the inquire customer and add customer operations. We could then define these new programs as the application entry points, which would give us the benefits of both option 1 and option 2.
In this example, we decided to proceed with option 2, and to create two application entry points in the application services logic layer of the application. This enables us to demonstrate applying policies to a single operation of an application, as shown in Chapter 5, “Applying a policy” on page 97.
GeneralInsuranceCustomerServices Bundle
Before creating the CICS TS application project, we create a CICS bundle to contain the application entry points. The CICS bundle represents the application services layer of the GENAPP application.
Use the following steps to create the GeneralInsuranceCustomerServices CICS Bundle Project:
1. In the CICS Explorer, ensure that you are in the CICS Cloud perspective. (If the top bar of the CICS Explorer window starts with the words CICS Cloud, you are in the CICS Cloud perspective.) If not, click the drop-down menu called Window. Select Open Perspective → Other. Select CICS Cloud and click OK.
2. Right-click the Project Explorer view, then select New → Project. The New Project wizard displays.
3. Expand CICS Resource, click CICS Bundle Project (see Figure 4-2), then click Next. The CICS Bundle Project wizard displays.
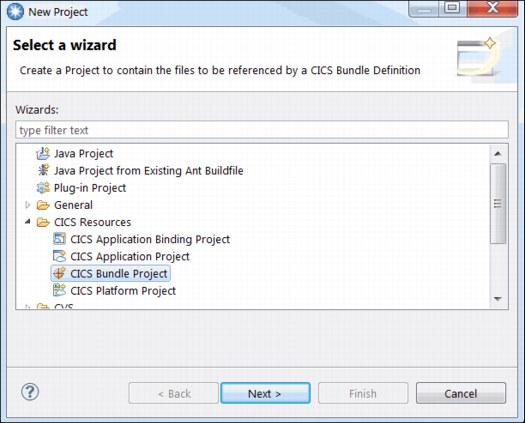
Figure 4-2 Selecting a CICS Bundle Project in the New Project wizard
Alternatively, to create a project to contain the files to be referenced by a CICS bundle definition, click the bundle plus ( ) icon in the toolbar to start the CICS Bundle Project wizard.
4. Enter general.insurance.customer.services.bundle as the Project name.
5. Enter GeneralInsuranceCustomerServices as the ID.
6. Enter 1.0.0 in Version. See Figure 4-3 for an example of the completed CICS Bundle Project wizard. Click Finish. The bundle project is created and the CICS bundle Manifest editor displays.
Figure 4-3 Completed CICS Bundle Project wizard for GeneralInsuranceCustomerServices bundle
7. The CICS bundle Manifest editor will automatically start after the creation of the CICS Bundle Project in the previous step, as shown in Figure 4-4. If the editor is not open, locate the bundle manifest file to start the editor. In the Project Explorer view, expand the general.insurance.customer.services.bundle project, and expand the META-INF subdirectory, then double-click the cics.xml manifest file to start the CICS bundle
Manifest editor.
Manifest editor.
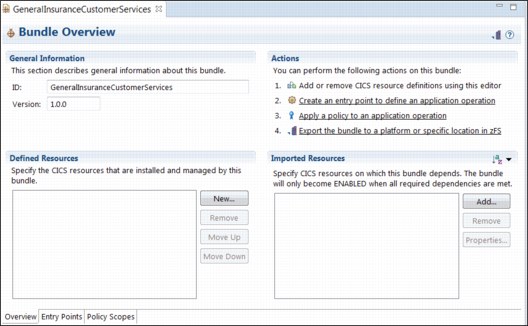
Figure 4-4 CICS bundle Manifest Editor for GeneralInsuranceCustomerServices bundle
8. In the GeneralInsuranceCustomerServices CICS Bundle Manifest Editor, select the Entry Points tab.
9. In the Application Entry Points tab, click Add. The Create Application Entry Point dialog displays.
10. Enter addCustomer in the Operation field.
11. Select the Resource type of PROGRAM (for example, http://www.ibm.com/xmlns/prod/cics/bundle/PROGRAM) in the drop-down box.
12. Enter LGACUS01 in the Resource Name field.

Figure 4-5 Create Application Entry Point dialog for addCustomer operation
14. In the Application Entry Points tab, click Add.
15. Enter inquireCustomer in the Operation field.
16. Select the Resource type of PROGRAM (for example, http://www.ibm.com/xmlns/prod/cics/bundle/PROGRAM) in the drop-down box.
17. Enter LGICUS01 in the Resource Name field. The Create Application Entry Point dialog should look like Figure 4-6.
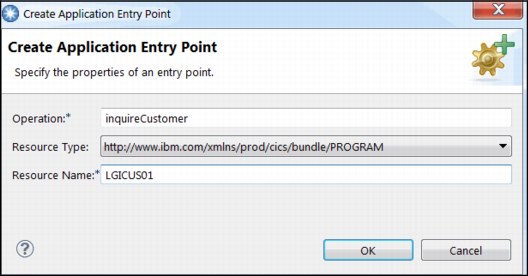
Figure 4-6 Create Application Entry Point dialog for inquireCustomer operation
18. Click OK.
19. Press Ctrl+S to save the changes.
The GeneralInsuranceCustomerServices CICS Bundle Manifest Editor should look like Figure 4-7.

Figure 4-7 GeneralInsuranceCustomerServices CICS Bundle Manifest Editors Entry Points view
The bundle creation is complete.
4.4.3 CICS Application Project
This section describes how to create a CICS Application Project that associates the CICS bundle we have created into a CICS TS application.
Use the following steps to create the GeneralInsuranceCustomer CICS Application Project using the CICS Cloud perspective in CICS Explorer:
1. Right-click in the Project Explorer view, then select New → Project. The New Project wizard displays.
2. Expand CICS Resource, click CICS Application Project (see Figure 4-8 on page 63), then click Next. The new Application Project wizard appears.

Figure 4-8 Selecting a CICS Application Project in the New Project wizard
Alternatively, to create a project for a CICS TS application, click the window plus cloud ( ) icon in the toolbar to start the new Application Project wizard.
3. Enter general.insurance.customer.application in the Project name field.
4. Enter GeneralInsuranceCustomer in the Name field.
5. Enter General insurance customer application in the Description field.
6. Enter 1.0.0 in the Version field.
The New Application Project wizard should look like Figure 4-9.
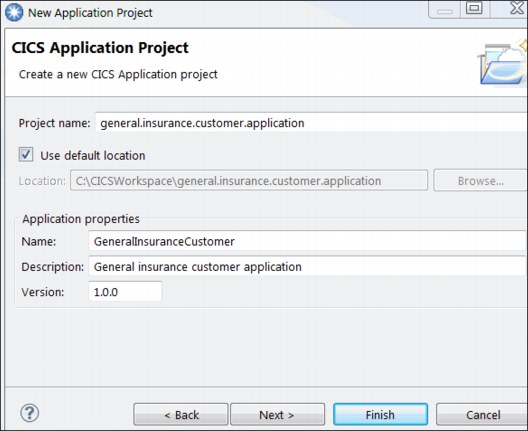
Figure 4-9 New Application Project wizard for GeneralInsuranceCustomer application
7. Click Next.
The wizard shows the CICS Bundle Projects that have been found in the workspace that can be included by the CICS TS application.
8. Select the GeneralInsuranceCustomerServices CICS bundle.
The new Application Project wizard should look like Figure 4-10.
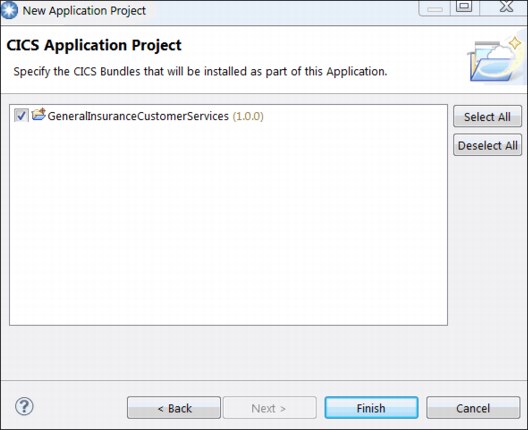
Figure 4-10 New Application Project CICS bundle selection dialog
9. Click Finish. The application project is created.
The Project Explorer view should look similar to Figure 4-11.
Figure 4-11 Project Explorer view after creating the CICS Application Project
10. The Application editor for the GeneralInsuranceCustomer application will start and should look similar to Figure 4-12.
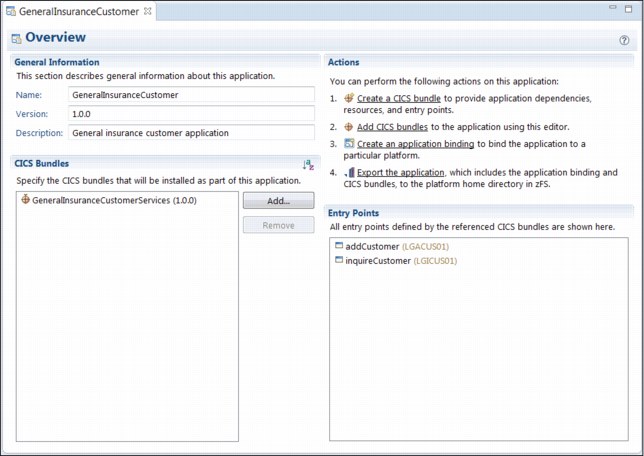
Figure 4-12 GeneralInsuranceCustomer application in the Application Editor
A CICS Application Project has now been created.
4.4.4 CICS Application Binding Project
The CICS application binding is the link between a CICS TS application and a CICS TS platform. It is the mechanism for defining how the associated CICS bundles in a CICS TS application should be installed into the region types of a CICS TS platform. CICS bundles can also be incorporated into CICS application binding, as discussed in Chapter 6, “Packaging an application for multiversion deployment” on page 127.
Use the following steps to create the general.insurance.customer.to.dev.platform.binding project using the CICS Cloud perspective in CICS Explorer:
1. Right-click the Project Explorer view, then select New → Project. The New wizard displays.
2. Expand CICS Resource, click CICS Application Binding Project, then click Next. The New Application Binding Project wizard displays.
Alternatively, to create a project for a CICS application binding, click the cloud plus window ( ) icon in the toolbar to start the New Application Binding Project wizard.
3. Enter general.insurance.customer.to.dev.platform.binding in the Project name field.
4. Enter GeneralInsuranceCustomerToDev in the Name field.
5. Enter General insurance customer application to dev platform binding in the Description field.
6. Enter 1.0.0 in the Version field.
7. Select GeneralInsuranceCustomer (1.0.0) in the Application field.
8. Select GeneralInsuranceDev in the Platform field.
The New Application Binding Project wizard should look like Figure 4-13.
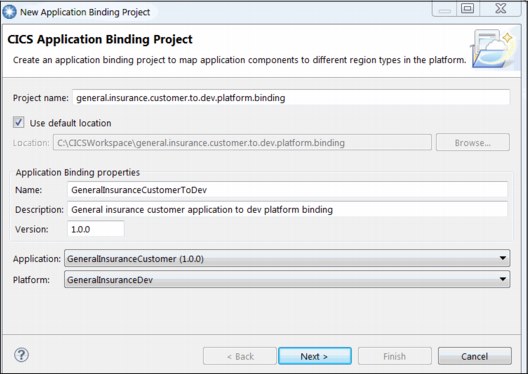
Figure 4-13 New Application Binding Project wizard
9. Click Next.
The wizard shows the CICS Bundle Projects that have been found in the workspace that can be included into the application binding. At this point, you do not want to add any additional CICS bundles to the CICS application binding that you are creating.
10. Click Next.
The wizard now enables you to bind the CICS bundles that have been associated to the CICS TS application, or incorporated in this binding, to the region types that have been defined in the CICS TS platform.
11. In CICS bundles, select GeneralInsuranceCustomerServices (1.0.0). In Region Types, select ApplicationServices. The wizard should look similar to Figure 4-14.

Figure 4-14 Deployment bindings of CICS bundles to region types
12. Click Finish. The application binding project is created.
The Project Explorer view should look similar to Figure 4-15.

Figure 4-15 Project Explorer view after creating the GeneralInsuranceCustomerToTest CICS Application Binding Project
13. The application binding editor for the GeneralInsuranceCustomerToDev binding will start and should look similar to Figure 4-16.

Figure 4-16 GeneralInsuranceCustomerToTest application binding in the application binding editor
The CICS Application Binding Project has now been created. This project defines how the CICS TS application, GeneralInsuranceCustomer, is bound to the CICS TS platform, GeneralInsuranceDev.
4.4.5 Deploying the CICS TS application and creating the application definition
The CICS Application Project, CICS Application Binding Project, and all associated CICS Bundle Projects can be deployed to the z/OS UNIX file system in a single export step. When deployed, the CICS TS application can then be installed and managed in your CICS TS environment.
Use the following steps to deploy the CICS TS application, CICS application binding and CICS Bundle Projects using the application editor:
1. If the Application editor for project general.insurance.customer.application is not open, locate the application files to start the application editor.
In the Project Explorer view, expand project general.insurance.customer.application and expand the subdirectory META-INF. Next, double-click the application.xml file to start the application editor, as shown in Figure 4-12 on page 66.
2. In the Actions section of the Application editor, click Export the application.
The Export Application to the home directory of a Platform wizard displays. This wizard enables you to specify the CICSPlex and CICS TS platform to which you want to deploy your CICS TS application. This action identifies the CICS application binding that is used for deployment of the application.
3. If required, connect to your CICS TS environment’s CMCI connection.
4. In GNAPPLEX, under GeneralInsuranceDev, select GeneralInsuranceCustomerToDev, as shown in Figure 4-17.
5. Select Create Application Definition after export finishes.
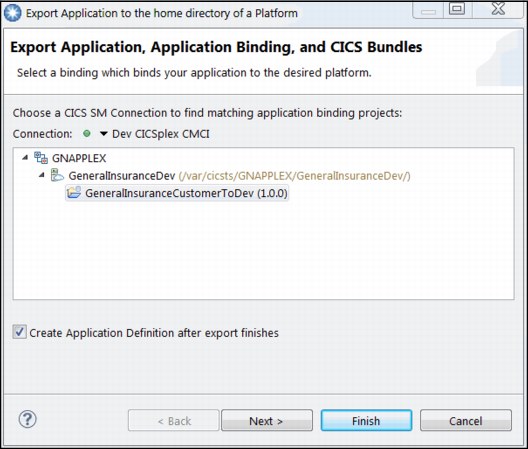
Figure 4-17 Export Application to the home directory of a platform
6. Click Next.
7. If required, connect to your CICS TS environment’s z/OS FTP connection, as shown in Figure 4-18. Click Finish.
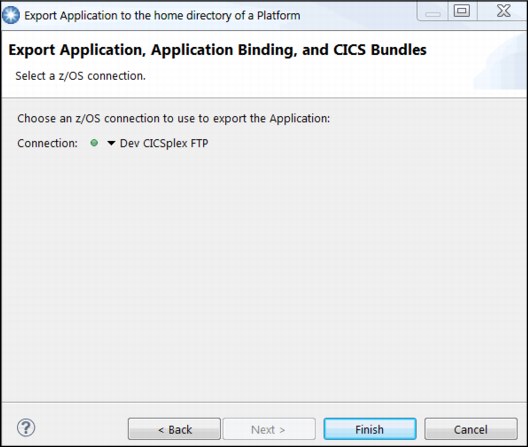
Figure 4-18 Established FTP connection for exporting files to the z/OS UNIX file system
The CICS Explorer begins to export the CICS TS application, CICS application binding, and CICS Bundle Projects to the z/OS UNIX file system. The projects are deployed to the platform home directory of the CICS TS platform in the applications, bindings, and bundles subfolders, where appropriate.
When the export has completed, the New Application Definition wizard displays. This wizard can be used to define the CICS TS application to your CICS TS environment. All fields except the Name field have been completed using information found during the export process.
Use the following steps to define the CICS TS application definition:
1. Enter GENACUST in the Name field.
2. Enter General insurance customer application in the Description field.
The New Application Definition wizard should look like Figure 4-19.

Figure 4-19 Completed New Application Definition wizard
3. Click Finish. The CICS TS application definition has now been created. The Cloud Explorer view should now look similar to Figure 4-20.
Figure 4-20 Cloud Explorer view after the CICS TS application definition has been created
The CICS TS application, CICS application binding and CICS bundle that comprises the GeneralInsuranceCustomer application have been created and exported to the GeneralInsuranceDev platform. The application definition has been created and is ready to be installed into the GeneralInsuranceDev platform.
4.4.6 Installing and managing the CICS TS application
This section shows how easy it is to install a CICS TS application, and therefore all CICS bundles associated with your CICS TS application across all CICS TS regions in the CICS TS platform’s region types.
Use the following steps to install the GeneralInsuranceCustomer application using the CICS Cloud perspective in CICS Explorer:
1. In the Cloud Explorer view, expand the GeneralInsuranceDev platform and expand the Applications subdirectory. Right-click the GENACUST (1.0.0) CICS TS application definition and click Install, as shown in Figure 4-21. The Perform INSTALL Operation dialog displays.

Figure 4-21 Menu to install an application using the Cloud Explorer view
2. In the Perform INSTALL Operation dialog, click OK.
The CICS TS application and its associated CICS bundle will now install into the CICS TS regions in the CICS TS platform. The GeneralInsuranceCustomer application is visible in the Cloud Explorer, as shown in Figure 4-22 on page 74.
|
Tip: The installation action on the CICS TS application installs the CICS bundles that comprise the application, into all of the CICS TS regions in the platform region types, as defined by the deployment bindings. If the CICS TS application state does not immediately display as DISABLED, then wait for 15 seconds and refresh the Cloud Explorer view.
|
The installed application is visible, as shown in Figure 4-22.
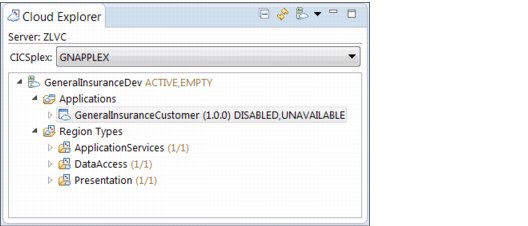
Figure 4-22 Application GeneralInsuranceCustomer visible in the Cloud Explorer view after being installed
The CICS TS application installs all associated bundles into a disabled and unavailable state. This enables the application to install across all of the CICS TS regions before any of its resources are enabled.
Use the following steps to enable the GeneralInsuranceCustomer CICS TS application:
1. Double-click the GeneralInsuranceCustomer (1.0.0) application in the Cloud Explorer view. The Online Application editor for the GeneralInsuranceCustomer application appears, as shown in Figure 4-23.
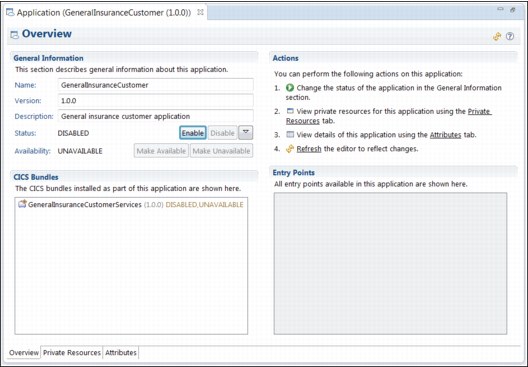
Figure 4-23 Online Application editor for the Installed GeneralInsuranceCustomer application
2. On the Overview tab of the Online Application editor for the GeneralInsuranceCustomer application, in the General Information section, click the Enable button. The Perform ENABLE Operation dialog displays, as shown in Figure 4-24.

Figure 4-24 perform Operation dialog to enable application GeneralInsuranceCustomer
3. Click OK.
The CICS TS application will now attempt to become enabled.
The application is now enabled in an unavailable state. The unavailable state means that the application’s entry points are not yet applied.
|
Important: The value of the additional Make Available/Unavailable step is demonstrated in Chapter 6, “Packaging an application for multiversion deployment” on page 127, where application multi-versioning is demonstrated.
|
Next, Make Available the GeneralInsuranceCustomer CICS TS application using the Online Application editor.
4. On the Overview tab of the Online Application editor for the GeneralInsuranceCustomer application, in the General Information section, click Make Available. The Perform AVAILABLE Operation dialog displays.
5. Click OK. The application is made available, and the CICS Cloud perspective looks similar to Figure 4-25.
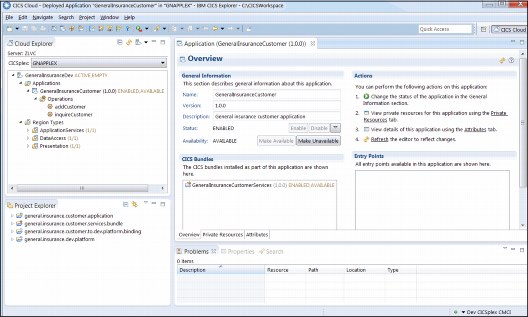
Figure 4-25 The CICS Cloud perspective showing a provisioned CICS TS application
The GeneralInsuranceCustomer application is now available for users to start through the identified application entry points. The application entry points set the application context on tasks, which supports monitoring of resource consumption and policing of threshold policies for the application.
4.4.7 Adding dependencies into the CICS TS application
An additional optional step that can be performed is to configure the CICS TS application to include dependencies on CICS TS resources that the application relies upon. We can add dependencies on the GENAPP resources, so that our application’s enabled state reflects the state of the underlying resources.
Before updating the CICS Application Project, we create additional CICS bundles that reflect the state of resources in the GENAPP presentation layer and the data access layer:
•general.insurance.customer.presentation.bundle
•general.insurance.customer.data.bundle
GeneralInsuranceCustomerPresentation Bundle
The first CICS bundle represents the presentation layer of the GENAPP application. To accurately reflect the status of this layer of the application, the CICS bundle has a dependency on the following CICS TS resources:
•TRANSACTION SSC1
•PROGRAM LGTESTC1
•PROGRAM SSMAP
•LIBRARY GENALIB
You can add bundle dependencies as imports in the Bundle manifest file (cics.xml). Bundle dependencies are CICS TS resources that must be present in the CICS TS region for the CICS bundle to become enabled.
Use the following steps to create the GeneralInsuranceCustomerPresentation CICS Bundle Project using the CICS Cloud perspective in CICS Explorer:
1. Right-click the Project Explorer view, then select New → Project. The New Project wizard displays.
2. Expand CICS Resource, click CICS Bundle Project, then click Next. The CICS Bundle Project wizard displays.
Alternatively, to create a project to contain the files to be referenced by a CICS bundle definition, click the bundle plus ( ) icon in the toolbar to start the CICS Bundle Project wizard.
3. Enter general.insurance.customer.presentation.bundle as the Project name.
4. Enter GeneralInsuranceCustomerPresentation as the ID.
5. Enter 1.0.0 as the Version. Figure 4-26 shows the completed Bundle Project wizard for the GeneralInsuranceCustomerPresentation bundle.
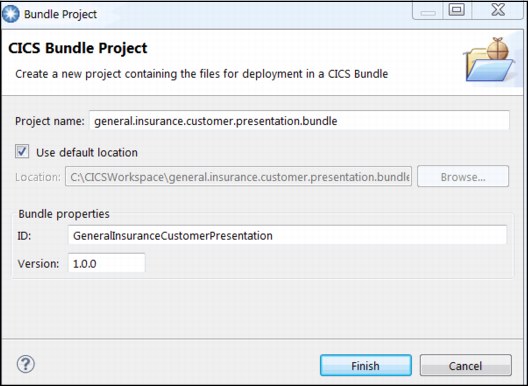
Figure 4-26 New CICS Bundle Project wizard for GeneralInsuranceCustomerPresentation bundle
6. Click Finish. The bundle project is created and the CICS Bundle Manifest Editor appears.
7. The CICS Bundle Manifest Editor will automatically start after the creation of the CICS Bundle Project in the previous step. If the editor is not open, locate the bundle manifest file to start the editor. In the Project Explorer view, expand the general.insurance.customer.presentation.bundle project and expand the META-INF subdirectory, then double-click the cics.xml manifest file to start the CICS Bundle Manifest Editor.
8. On the Overview tab in the CICS Bundle Manifest Editor for the GeneralInsuranceCustomerPresentation bundle, in the Imported Resources section,
click Add.
click Add.
9. Select PROGRAM in Resource Type, then enter LGTESTC1 as the Name.

Figure 4-27 Create Bundle Import dialog for program LGTESTC1
11. In Imported Resources, click Add. Select PROGRAM as the Resource Type, then enter SSMAP in Name. Figure 4-28 shows how the Create Bundle Import dialog should look. Click OK.
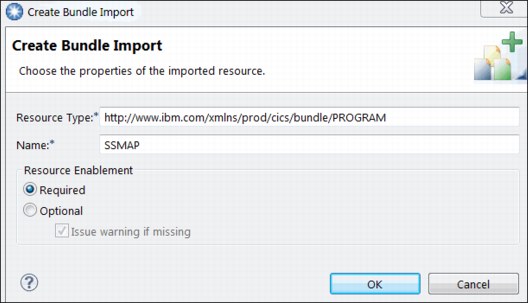
Figure 4-28 Create Bundle Import dialog for program SSMAP
12. In Imported Resources, click Add. Select TRANSACTION as the Resource Type, then enter SSC1. Figure 4-29 shows how the Create Bundle Import dialog should look. Click OK.

Figure 4-29 Create Bundle Import dialog for transaction SSC1
13. in Imported Resources, click Add. Select LIBRARY as the Resource Type, then enter GENALIB.
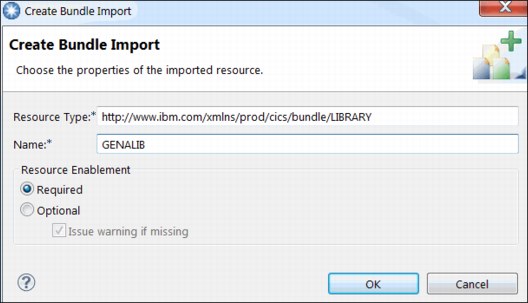
Figure 4-30 Create Bundle Import dialog for LIBRARY GENALIB
15. Press Ctrl+S to save changes.
The GeneralInsuranceCustomerPresentation CICS Bundle Manifest Editor should look as shown in Figure 4-31.
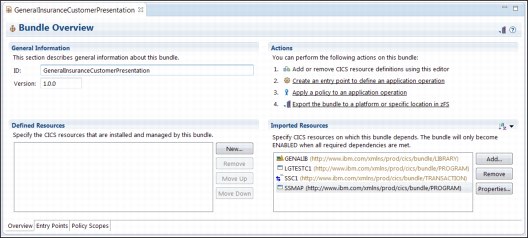
Figure 4-31 GeneralInsuranceCustomerPresentation CICS Bundle Manifest Editor
GeneralInsuranceCustomerData Bundle
The second CICS bundle represents the data layer of the GENAPP application. The GeneralInsuranceCustomerData Bundle has dependencies on the following CICS TS resources:
•LIBRARY GENALIB
•FILE KSDSCUST
•PROGRAM LGICDB01
•PROGRAM LGACDB01
•PROGRAM LGSTSQ
|
Tip: We could also add a dependency on a DB2ENTRY resource used by GENAPP. However, the name of that resource varies depending on the GENAPP installation options, so for simplicity it has been left out here.
|
Use the following steps to create the GeneralInsuranceCustomerData CICS Bundle Project:
1. Right-click the Project Explorer view, then select New → Project. The New Project wizard displays.
2. Expand CICS Resource, click CICS Bundle Project, then click Next. The CICS Bundle Project wizard displays.
Alternatively, to create a project to contain the files to be referenced by a CICS bundle definition, click the bundle plus ( ) icon in the toolbar to start the CICS Bundle Project wizard.
3. Enter general.insurance.customer.data.bundle as the Project name.
4. Enter GeneralInsuranceCustomerData as the ID.
5. Enter 1.0.0 in Version.
6. Figure 4-32 shows the completed Bundle Project wizard for the GeneralInsuranceCustomerData bundle. Click Finish. The bundle project is created and the CICS Bundle Manifest Editor appears.

Figure 4-32 New CICS Bundle Project wizard for GeneralInsuranceCustomerData bundle
7. The CICS Bundle Manifest Editor will automatically start after the creation of the CICS Bundle Project in the previous step. If the editor is not open, locate the bundle manifest file to start the editor. In the Project Explorer view, expand the general.insurance.customer.data.bundle project and expand the META-INF subdirectory, then double-click the cics.xml manifest file to start the CICS Bundle Manifest Editor.
8. In Imported Resources, click Add. Select LIBRARY as the Resource Type, then enter GENALIB as the Name. Click OK.
9. In Imported Resources, click Add. Select FILE as the Resource Type, then enter KSDSCUST as the Name.

Figure 4-33 Create Bundle Import dialog for file KSDSCUST77
11. In Imported Resources, click Add. Select PROGRAM as the Resource Type, then enter LGICDB01 in Name. Click OK.
12. In Imported Resources, click Add. Select PROGRAM as the Resource Type, then enter LGACDB01 in Name. Click OK.
13. In Imported Resources, click Add. Select PROGRAM as the Resource Type, then enter LGSTSQ in Name. Click OK.
14. Press Ctrl+S to save changes.
The GeneralInsuranceCustomerData CICS Bundle Manifest Editor should look like Figure 4-34.

Figure 4-34 GeneralInsuranceCustomerData CICS Bundle Manifest Editor
GeneralInsuranceCustomerServices Bundle
We can also add dependencies into the GeneralInsuranceCustomerServices bundle that we created to contain the following application entry points:
•PROGRAM LGSTSQ
•PROGRAM LGICUS01
•PROGRAM LGACUS01
•LIBRARY GENALIB
Perform the following steps to add dependencies:
1. Locate the GeneralInsuranceCustomerServices bundle manifest file to start the editor. In the Project Explorer view, expand the general.insurance.customer.services.bundle project, expand the META-INF subdirectory, then double-click the cics.xml manifest file to start the CICS Bundle Manifest Editor.
2. Select the Overview tab.
3. In Imported Resources, click Add. Select PROGRAM as the Resource Type, then enter LGSTSQ as the Name. Click OK.
4. In Imported Resources, click Add. Select PROGRAM as the Resource Type, then enter LGICUS01 in Name. Click OK.
5. In Imported Resources, click Add. Select PROGRAM as the Resource Type, then enter LGACUS01 in Name. Click OK.
6. In Imported Resources, click Add. Select LIBRARY as the Resource Type, then enter GENALIB as the Name. Click OK.
7. Press Ctrl+S to save changes.
The GeneralInsuranceCustomerServices CICS Bundle Manifest Editor should look like Figure 4-35.
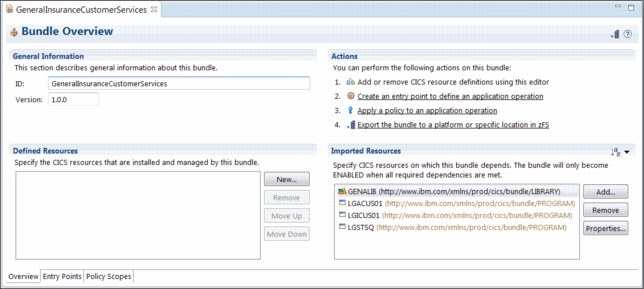
Figure 4-35 GeneralInsuranceCustomerServices CICS Bundle Manifest Editor
After following the steps in this section, you now have three CICS Bundle Projects in your workspace.
Your workspace should look similar to Figure 4-36. These CICS bundles represent the three logical layers of the GENAPP application:
•Presentation
•Application services
•Data manipulation and access
The GeneralInsuranceCustomerServices Bundle also creates two application entry points, so that the resource usage can be monitored with the use of application context data.
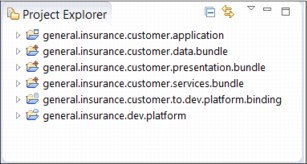
Figure 4-36 Project Explorer view after creating the three CICS Bundle Projects, along with the platform, application, and application binding projects
Chapter 6, “Packaging an application for multiversion deployment” on page 127 describes the reasons for and the methods to define CICS TS resources in the CICS bundles associated to your CICS TS applications and CICS TS platforms.
4.4.8 Updating the CICS Application Project
This section describes the methods involved in updating the CICS Application Project to include the two extra CICS bundles for the presentation and data access layers of the GENAPP application.
Use the following steps to update the GeneralInsuranceCustomer CICS Application Project using the CICS Cloud perspective in CICS Explorer:
1. Locate the GeneralInsuranceCustomer application manifest file to start the application editor. In the Project Explorer view, expand the general.insurance.customer.application project, expand the META-INF subdirectory, then double-click application.xml manifest file to start the CICS TS application editor.
2. In the CICS bundles section of the editor, click the Add button to add a new CICS bundle.
3. In the CICS Bundle Selection dialog, select bundle GeneralInsuranceCustomerData (1.0.0) as shown in Figure 4-37. Click OK.
Figure 4-37 CICS Bundle Selection dialog to add bundle GeneralInsuranceCustomerData to the CICS TS application
Repeat this process to add the presentation layer CICS bundle.
4. In the CICS bundles section of the editor, click Add to add a new CICS bundle.
5. In the CICS Bundle Selection dialog, select the GeneralInsuranceCustomerPresentation (1.0.0) bundle, as shown in Figure 4-38.
Figure 4-38 CICS Bundle Selection dialog to add the GeneralInsuranceCustomerPresentation bundle to the CICS TS application
6. Click OK. The application project is updated.
7. Press Ctrl+S to save changes.
|
Note: At this point, you might notice that the application binding for the GeneralInsuranceCustomer application is reporting an error. This is because the new CICS bundles that we have added to the application are not mapped to region types in the Application Binding. We will resolve this issue in the next section.
|
4.4.9 Update the CICS Application Binding Project
This section describes the methods to update the CICS Application Binding Project, so that the two new CICS bundles are mapped to the correct region types on the platform.
Use the following steps to update the general.insurance.customer.to.dev.platform.binding project using the CICS CloudCICS Cloud perspective in CICS Explorer:
1. Locate the general.insurance.customer.to.dev.platform.binding deployment file to start the application binding editor. In the Project Explorer view, expand project general.insurance.customer.to.dev.platform.binding and expand the META-INF subdirectory. Then double-click the deployment.xml file to start the CICS TS application binding editor.
2. In the Region Types section of the editor, select DataAccess. In the CICS bundles section, select GeneralInsuranceCustomerData (1.0.0).
3. In the Region Types section of the editor, select Presentation. In the CICS bundles section, select GeneralInsuranceCustomerPresentation (1.0.0).
4. Press Ctrl+S to save changes. Error messages resulting from the changes made in 4.4.8, “Updating the CICS Application Project” on page 84 should now disappear.
The application binding editor Deployment tab should look similar to Figure 4-39.

Figure 4-39 Three images of the GeneralInsuranceCustomerToDev application binding to show the CICS bundle deployment for each region type
The CICS Application Binding Project has now been updated. This project defines how the CICS TS application, GeneralInsuranceCustomer, is bound to the CICS TS platform, GeneralInsuranceDev.
4.4.10 Redeploying the CICS TS application
Before we can redeploy the CICS Application Project, CICS Application Binding Project, and all associated CICS Bundle Projects to the z/OS UNIX file system, we must first discard the installed GeneralInsuranceCustomer application from our GeneralInsuranceDev platform. This is because the CICS Explorer blocks any attempt to export files to the z/OS UNIX file system if they will overwrite files currently in use by an installed application.
|
Remember: We could have chosen to increase the version number of the GeneralInsuranceCustomer CICS TS application and the GeneralInsuranceCustomerServices bundle as we updated them.
This is a good practice for promoting application changes into production, and is a requirement for running multiple versions of the application simultaneously on the same CICS TS regions, which we describe in Chapter 6, “Packaging an application for multiversion deployment” on page 127.
However, while an application is under development, it is likely that the developer will want to make changes to the application without changing the version, until it is ready for promotion to test, and later into production.
|
Make unavailable, disable, and discard the installed application
Use the following steps to discard the CICS TS application installed in 4.4.6, “Installing and managing the CICS TS application” on page 73:
1. In the Cloud Explorer view, double-click the GeneralInsuranceCustomer (1.0.0) application. The Online Application editor for the GeneralInsuranceCustomer application displays.
2. On the Overview tab of the Online Application editor for the GeneralInsuranceCustomer application, in the General Information section, click Make Unavailable. The Perform UNAVAILABLE Operation dialog displays, as shown in Figure 4-40.
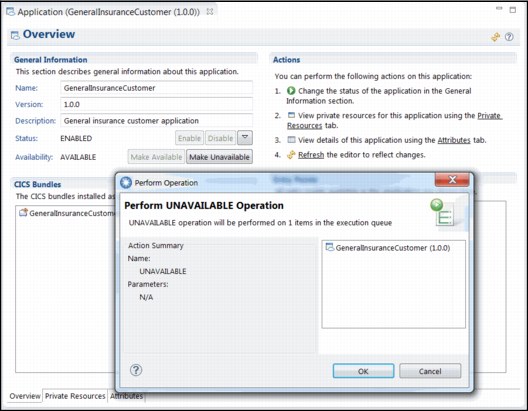
Figure 4-40 Using the Online Application Editor to make a CICS TS application unavailable
3. Click OK.
The application is now enabled in an unavailable state. The CICS TS programs named as entry points by the application are no longer entry points, so application-level monitoring and threshold policies will not be applied.
4. Access the Overview tab of the Online Application editor for the GeneralInsuranceCustomer application. In the General Information section, click Disable. The Perform DISABLE Operation dialog displays.
5. Click OK. The application will be disabled.
6. Access the Overview tab of the Online Application Editor for the GeneralInsuranceCustomer application. In the General Information section, expand the drop-down menu next to the Disable button and select Discard, as shown in Figure 4-41. The Perform DISCARD Operation dialog displays.
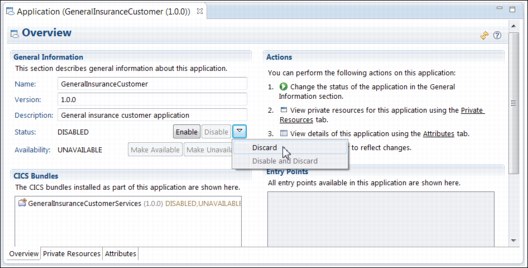
Figure 4-41 Drop-down menu to discard the application in the Online Application Editor
7. Click OK. The application is discarded.
Exporting the updated application
Use the following steps to export the updated CICS TS application, CICS application binding, and CICS Bundle Projects to the z/OS UNIX file system using the Application editor:
1. If the Application editor for the general.insurance.customer.application project is not open, locate the application files to start the Application editor.
In the Project Explorer view, expand the general.insurance.customer.application project, expand the META-INF subdirectory, and then double-click the application.xml file to start the Application editor.
2. In the Actions section of the Application editor, click Export the application.
The Export Application to the home directory of a Platform wizard displays. This wizard enables you to specify the CICSPlex and CICS TS platform to which you want to deploy your CICS TS application. This action identifies the CICS application binding that will be used for deployment of the application.
3. If required, connect to the CICS TS environment’s CICS Management Client Interface (CMCI) connection.
4. In GNAPPLEX, under GeneralInsuranceDev, select GeneralInsuranceCustomerToDev (1.0.0), as shown in Figure 4-42.
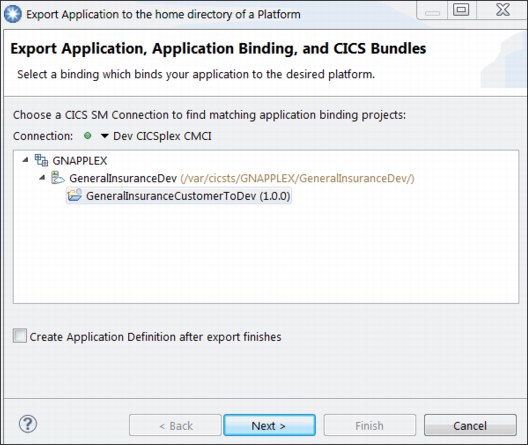
Figure 4-42 Export Application to the home directory of a platform
5. The application definition (APPLDEF) from the prior deployment can be reused. Therefore, leave Create Application Definition after export finishes cleared.
6. Click Next.
7. If required, connect to your CICS TS environment’s z/OS File Transfer Protocol (FTP) connection. Click Finish.
The CICS Explorer begins to export the CICS TS application, CICS application binding, and CICS Bundle Projects to the z/OS UNIX file system. The projects are deployed to the platform home directory of the CICS TS platform in the applications, bindings, and bundles subfolders, where appropriate.
4.4.11 Installing and managing the updated CICS TS application
The CICS TS application, CICS application binding, and CICS Bundle Projects have now been redeployed to the z/OS UNIX file system. Use the following steps to install the GeneralInsuranceCustomer application using the CICS Cloud perspective in CICS Explorer:
1. In the Cloud Explorer view, expand the GeneralInsuranceDev platform and expand the Applications subdirectory. Right-click the GENACUST (1.0.0) CICS TS application definition and click Install, as shown in Figure 4-43 on page 91. The Perform INSTALL Operation dialog displays.
Figure 4-43 installing an application definition using the Cloud Explorer view
2. In the Perform INSTALL Operation dialog for the installation action, click OK.
The CICS TS application and all associated CICS bundles install into the CICS TS regions in the CICS TS platform. The GeneralInsuranceCustomer application is visible in the Cloud Explorer, as shown in Figure 4-44.
Figure 4-44 GeneralInsuranceCustomer visible in the Cloud Explorer after being installed
|
Tip: The installation action on the CICS TS application installs the CICS bundles that compose the application into the CICS TS regions in the platform region types, as defined by the deployment bindings. If the CICS TS application state does not immediately display as DISABLED, then wait for 15 seconds and refresh the Cloud Explorer view.
|
The CICS TS application installs all associated bundles into a disabled and unavailable state. Use the following steps to enable the GeneralInsuranceCustomer CICS TS application:
1. Double-click the GeneralInsuranceCustomer (1.0.0) application in the Cloud Explorer view. The Online Application editor for the GeneralInsuranceCustomer application displays, as shown in Figure 4-45.

Figure 4-45 Online Application editor for GeneralInsuranceCustomer application
2. Access the Overview tab of the Online Application editor for the GeneralInsuranceCustomer application. In the General Information section, click Enable. The Perform ENABLE Operation dialog displays.
3. Click OK.
The CICS TS application will now attempt to become enabled. After a short amount of time, the status of the CICS TS application will reflect the status of the dependencies that were declared in the CICS bundles. Therefore, the status of the CICS TS application reflects the status of the GENAPP application in the CICS TS environment.
The application is now enabled in an unavailable state. The unavailable state means that the application’s entry points are not yet applied.
Next, Make Available the GeneralInsuranceCustomer CICS TS application using the Online Application editor.
4. On the Overview tab of the Online Application editor for the GeneralInsuranceCustomer application, in the General Information section, click Make Available. The Perform AVAILABLE Operation dialog displays.
5. Click OK. The application is made available.
The GeneralInsuranceCustomer application is now available again for users to start through the identified application entry points. The application entry points set the application context on tasks, which enables monitoring of resource consumption for the application. In addition, the added dependencies mean that the applications enabled state reflects the state of the resources on which the application relies.
If the application shows a state of Enabled, all of the resources on which it has dependencies are installed and enabled. If the application shows a different state, or is unable to Enable, this could be because a resource on which it relies is not available, and further diagnosis might
be required.
be required.
4.4.12 Diagnosing dependency errors
If your application does fail to enable, or at some point after enabling successfully, its state changes to SOMEDISABLED, or DISABLED, use the CICS Explorer to identify the cause of the error. In the example that follows, we first Made Unavailable and Disabled the GeneralInsuranceCustomer application. We then discarded the LGICUS01 CICS TS program from the CICS TS region on which the application is running, to force a dependency error.
To correct the error, perform the following steps:
1. Attempt to enable the GeneralInsuranceCustomer application again. The enable step highlighted that there was an error, and only some of the application’s bundles were enabled. Figure 4-46 shows that the state of the GeneralInsuranceCustomer application is set to SOMEDISABLED.

Figure 4-46 Cloud explorer view after enabling an application with a missing dependency
2. One way to perform further diagnosis into the cause of the error, is to start from the Online Application Editor shown in Figure 4-47. In the CICS bundles section of the online editor, you can see the combined state of each bundle for all of the CICS TS regions that the bundle is deployed in. In this example, the GeneralInsuranceCustomerServices bundle appears to be in error. It has a state of SOMEDISABLED.
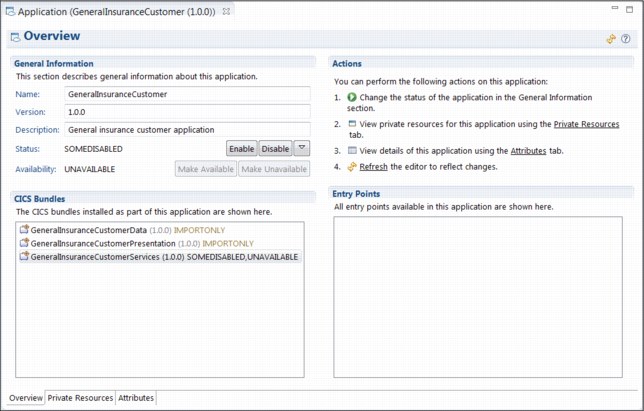
Figure 4-47 Application editor showing the GeneralInsuranceCustomerServices bundle has a state of SOMEDISABLED
3. Double-clicking the name of the CICS bundle. A new Bundles view opens, showing the state of the Bundle on each CICS TS region where it is installed.
In this example, the new view is called Bundles for Management Part ‘GeneralInsuranceCustomerServices (1.0.0)’. Because the bundle is only installed into a region type consisting of a single CICS TS region, there is only one row in the returned view, as shown in Figure 4-48. The view shows the APPLID of the CICS TS region in which the bundle is disabled.

Figure 4-48 Bundles view for GeneralInsuranceCustomerServices (1.0.0)
4. In the new Bundles view, right-click one of the Bundles and select Show Bundle Parts to show the status of each resource associated with the Bundle on a particular CICS TS region, and identify which resources are not in an Enabled state.
In our example, it opens a new view called Bundle Parts for Bundle ‘GeneralInsuranceCustomerServices (1.0.0)’. We can see that both the import for LGICUS01 and the entry point for LGICUS01 are disabled, as shown in Figure 4-49.

Figure 4-49 Bundle Parts for GeneralInsuranceCustomerServices (1.0.0)
The dependencies have highlighted that a component of the application has a problem. We have demonstrated how to determine the resources that are in error, and the CICS TS region on which those resources are in error. Finally, we could examine the MSGUSR output from the CICS TS region for error messages to help us understand why the problem occurred. In this example, some useful error messages are emitted:
•DFHRL0126 The import of resource LGICUS01 of type http://www.ibm.com/xmlns/prod/cics/bundle/PROGRAM for BUNDLE resource $0667181 has changed to a DISABLED state.
•DFHPG0306 BUNDLE $0667181 unable to enable PROGRAM LGICUS01 as an entry point for operation inquireCustomer because the PROGRAM does not exist.
4.5 The outcome
In this chapter, you have deployed a CICS TS application (GeneralInsuranceCustomer) based on an existing active application (GENAPP), as described in Chapter 2, “GENAPP introduction” on page 15.
Two operations of the application, addCustomer and inquireCustomer, were identified. Corresponding program resources in the application were identified as the application entry points for these operations, and declared in the application.
Using the CICS Explorer, you created a CICS bundle to contain the application entry points. A CICS TS application, which included the CICS bundle, was then created. An application binding was created to describe the deployment rules for the mapping of the CICS bundle to the correct region type of the GeneralInsuranceDev platform created in Chapter 3, “Creating a platform” on page 25.
After the application-related projects are created, the application, binding, and CICS bundles are managed as a single unit. The application was exported to the z/OS UNIX file system, and an application definition was created for the application. As a single point of control, the application was installed, enabled, and made available to users. These actions are controlled by CICS TS to provision resources across the CICS TS platform.
Two additional CICS bundles were then created to express dependencies on CICS TS resources used by GENAPP, and to reflect their state into the overall CICS TS application state. The CICS TS application was updated, as was the application binding. The installed application was discarded, and the updated application was redeployed and reinstalled.
You can create more application bindings to deploy the application to other platforms without modifying the application resources. By doing this, you can confidently promote an application through development, test, and production platforms.
The CICS TS application supports a single point of control for the resources in the application. The application entry points add application context data to tasks that run in CICS TS. Application context data is available in monitoring records to provide a way of measuring how much system resources an application is using. The application context data also supports the delivery of automated control when resource usage exceeds defined thresholds, which is further discussed in Chapter 5, “Applying a policy” on page 97.
..................Content has been hidden....................
You can't read the all page of ebook, please click here login for view all page.