
Chapter 3
Information Gathering and Vulnerability Identification
This chapter covers the following subjects:
Information Gathering and Vulnerability Identification
The first step a threat actor takes when planning an attack is to gather information about the target. This act of information gathering is known as reconnaissance. Attackers use scanning and enumeration tools along with public information available on the Internet to build a dossier about a target. As you can imagine, as a penetration tester, you must also replicate these methods to determine the exposure of the networks and systems you are trying to defend. This chapter begins with a discussion of what reconnaissance is in general and the difference between passive and active methods. You will briefly learn about some of the common tools and techniques used. From there, the chapter digs deeper into the process of vulnerability scanning and how scanning tools work, including how to analyze the vulnerability scanner results to provide useful deliverables and explore the process of leveraging the gathered information in the exploitation phase. The chapter concludes with coverage of some of the common challenges to consider when performing vulnerability scans.
“Do I Know This Already?” Quiz
The “Do I Know This Already?” quiz allows you to assess whether you should read this entire chapter thoroughly or jump to the “Exam Preparation Tasks” section. If you are in doubt about your answers to these questions or your own assessment of your knowledge of the topics, read the entire chapter. Table 3-1 lists the major headings in this chapter and their corresponding “Do I Know This Already?” quiz questions. You can find the answers in Appendix A, “Answers to the “Do I Know This Already?” Quizzes and Q&A Sections.”
Table 3-1 “Do I Know This Already?” Section-to-Question Mapping
Foundation Topics Section |
Questions |
1–3 |
|
Understanding Active Reconnaissance vs. Passive Reconnaissance |
4–5 |
6–8 |
|
9 |
|
10–11 |
|
12–13 |
Caution
The goal of self-assessment is to gauge your mastery of the topics in this chapter. If you do not know the answer to a question or are only partially sure of the answer, you should mark that question as incorrect for purposes of the self-assessment. Giving yourself credit for an answer you correctly guess skews your self-assessment results and might provide you with a false sense of security.
1. When an attacker is planning a course of action to gain access to a target, what is the initial phase the attacker performs?
Exploitation
Mapping
Discovery
Reconnaissance
2. When performing reconnaissance on a network, you determine which devices are alive. What would be the next thing you would want to enumerate on the live devices?
Services
Domains
Web pages
Usernames
3. Which of the following tools is primarily used to enumerate domain information?
DNSRecon
Nmap
Metasploit
Nikto
4. Which type of reconnaissance would involve using tools that send network probes directly at a target device?
Active reconnaissance
Passive reconnaissance
Open source reconnaissance
Domain reconnaissance
5. Which type of reconnaissance would be used when it is imperative that the target not be able to detect your activity?
Passive
Active
Network
Web page
6. When running an Nmap SYN scan, what will be the Nmap result if ports on the target device do not respond?
Open
Closed
Filtered
Listening
7. Which of the following Nmap options would you use to perform a TCP connect scan?
-sS
-sF
-sU
-sT
8. Which of the following Nmap options would you want to try if your SYN scans were being identified by network filters?
-sF
-sU
-sT
-sS
9. Which of the following tools is a framework used for active open source intelligence gathering?
Recon-ng
DNSRecon
Shodan
DNSdumpster
10. Which method of information gathering uses publicly available information sources to collect and analyze information about a target?
Open source intelligence
Vulnerability scanning
Port scanning
Packet crafting
11. Which Recon-ng module can be used to gather subdomains for a target?
hackertarget
ssltools
netcraft
mangle
12. Which of the following vulnerability scan types would you recommend for a company that is concerned with complying with HIPAA?
Compliance scan
Discovery scan
Authenticated scan
Unauthenticated scan
13. Which type of vulnerability scan would require the scanner to log in to the target system and run privileged-level commands to gather results?
Discovery scan
Unauthenticated scan
Authenticated scan
Web scan
Foundation Topics
Understanding Information Gathering and Reconnaissance
Reconnaissance is always the initial step in a cyber attack. An attacker must first gather information about the target in order to be successful. In fact, the term reconnaissance is widely used in the military world to describe the gathering of information (for example, location, capabilities, movements) about the enemy. This information is fundamental for performing an attack. When it comes to reconnaissance in a penetration testing engagement, we usually think of scanning and enumeration. But what does reconnaissance look like from an attacker’s perspective?
Suppose, for example, that an attacker has a target, h4cker.org, in its sights. h4cker.org has an Internet presence, as most companies do. This presence is a website hosted at www.h4cker.org. Just as a home burglar would need to determine which entry and exit points exist in a home before he could commit a robbery, a cyber attacker needs to determine which of the target’s ports and protocols are exposed to the Internet. A burglar might take a walk around the outside of the house, looking for doors and windows, and then possibly take a look at the locks on the doors to determine their weaknesses. Similarly, a cyber attacker would perform tasks like scanning and enumeration. Typically, an attacker would start with a small amount of information and gather more information while scanning, eventually moving on to performing different types of scans and gathering additional information. For instance, the attacker targeting h4cker.org might start by using DNS queries to determine the IP address or addresses used by www.h4cker.org and any other subdomains that might be in use. Let’s assume that those queries reveal that h4cker.org is using the IP addresses 172.217.8.19 for www.h4cker.org, 185.199.108.153 for mail.h4cker.org, and 185.199.110.153 for portal.h4cker.org. Example 3-1 shows an example of the DNSRecon tool in Kali Linux being used to query the DNS records for h4cker.org.
Example 3-1 DNSRecon Example
root@kali:/# dnsrecon -d h4cker.org
[*] Performing General Enumeration of Domain: h4cker.org
[*] Checking for Zone Transfer for h4cker.org name servers
[*] Resolving SOA Record
[-] Error while resolving SOA record.
[*] Resolving NS Records
[*] NS Servers found:
[*]      NS ns-cloud-c2.googledomains.com 2001:4860:4802:34::6c
[*]      NS ns-cloud-c1.googledomains.com 216.239.32.108
[*]      NS ns-cloud-c1.googledomains.com 2001:4860:4802:32::6c
[*]      NS ns-cloud-c4.googledomains.com 216.239.38.108
[*]      NS ns-cloud-c4.googledomains.com 2001:4860:4802:38::6c
[*]      NS ns-cloud-c3.googledomains.com 216.239.36.108
[*]      NS ns-cloud-c3.googledomains.com 2001:4860:4802:36::6c
[*] Removing any duplicate NS server IP Addresses...
[*]
[*] Trying NS server 216.239.36.108
[+] 216.239.36.108 Has port 53 TCP Open
[-] Zone Transfer Failed!
[-] No answer or RRset not for qname
[*]
[*] Trying NS server 2001:4860:4802:34::6c
[-] Zone Transfer Failed for 2001:4860:4802:34::6c!
[-] Port 53 TCP is being filtered
[*]
[*] Trying NS server 2001:4860:4802:36::6c
[-] Zone Transfer Failed for 2001:4860:4802:36::6c!
[-] Port 53 TCP is being filtered
[*]
[*] Trying NS server 2001:4860:4802:32::6c
[-] Zone Transfer Failed for 2001:4860:4802:32::6c!
[-] Port 53 TCP is being filtered
[*]
[*] Trying NS server 216.239.32.108
[+] 216.239.32.108 Has port 53 TCP Open
[-] Zone Transfer Failed!
[-] No answer or RRset not for qname
[*]
[*] Trying NS server 2001:4860:4802:38::6c
[-] Zone Transfer Failed for 2001:4860:4802:38::6c!
[-] Port 53 TCP is being filtered
[*]
[*] Trying NS server 216.239.38.108
[+] 216.239.38.108 Has port 53 TCP Open
[-] Zone Transfer Failed!
[-] No answer or RRset not for qname
[*] Checking for Zone Transfer for h4cker.org name servers
[*] Resolving SOA Record
[+]  SOA ns-cloud-c1.googledomains.com 216.239.32.108
[*] Resolving NS Records
[-] Could not Resolve NS Records
[*] Removing any duplicate NS server IP Addresses...
[*]
[*] Trying NS server 216.239.32.108
[+] 216.239.32.108 Has port 53 TCP Open
[-] Zone Transfer Failed!
[-] No answer or RRset not for qname
[-] DNSSEC is not configured for h4cker.org
[*]       SOA ns-cloud-c1.googledomains.com 216.239.32.108
[*]       NS ns-cloud-c1.googledomains.com 216.239.32.108
[*]       NS ns-cloud-c1.googledomains.com 2001:4860:4802:32::6c
[*]       NS ns-cloud-c3.googledomains.com 216.239.36.108
[*]       NS ns-cloud-c3.googledomains.com 2001:4860:4802:36::6c
[*]       NS ns-cloud-c4.googledomains.com 216.239.38.108
[*]       NS ns-cloud-c4.googledomains.com 2001:4860:4802:38::6c
[*]       NS ns-cloud-c2.googledomains.com 216.239.34.108
[*]       NS ns-cloud-c2.googledomains.com 2001:4860:4802:34::6c
[*]       MX mx2.zoho.com 8.39.54.121
[*]       MX mx3.zoho.com 8.40.222.121
[*]       MX mx.zoho.com 204.141.32.121
[*]       A h4cker.org 216.239.34.21
[*]       A h4cker.org 216.239.36.21
[*]       A h4cker.org 216.239.38.21
[*]       A h4cker.org 216.239.32.21
[*] Enumerating SRV Records
[-] No SRV Records Found for h4cker.org
[+] 0 Records Found
root@kali:/#
From there, an attacker can begin to dig deeper by scanning the identified hosts. Once the attacker knows which hosts are alive on the target site, he or she would then need to determine what kind of services the hosts are running. To do this, the attacker might use the tried-and-true Nmap tool. Before we discuss this tool and others in depth, we need to look at the types of scans and enumerations you should perform and why.
Tip
Nmap was once considered a simple port scanner; however, it has evolved into a much more robust tool that can provide additional functionality, thanks to the Nmap Scripting Engine (NSE).
Understanding Active Reconnaissance vs. Passive Reconnaissance
Active reconnaissance is a method of information gathering in which the tools used actually send out probes to the target network or systems in order to elicit a responses that are then used to determine the posture of the network or system. These probes can use various protocols and multiple levels of aggressiveness, typically based on what is being scanned and when. For example, you may be scanning a device such as a printer that might not have a very robust TCP/IP stack or network hardware. By sending active probes, you might crash such a device. Most modern devices do not have this problem; however, it is possible, so when doing active scanning, you should be conscious of this and adjust your scanner settings accordingly.
Passive reconnaissance is a method of information gathering in which the tools do not interact directly with the target device or network. There are multiple methods of passive reconnaissance. Some involve using third-party databases to gather information. Others might also use tools in such a way that they will not be detected by the target. These tools, in particular, work by simply listening to the traffic on the network and using intelligence to deduce information about the device communication on the network. This approach is much less invasive on a network, and it is highly unlikely for this type of reconnaissance to crash a system such as a printer. Because it does not produce any traffic, it is also unlikely to be detected and does not raise any flags on the network that it is surveying. Another scenario in which a passive scanner would come in handy would be for a penetration tester who needs to perform analysis on a production network that cannot be disrupted.
Common active reconnaissance methods include the following:
Host enumeration
Network enumeration
User enumeration
Group enumeration
Network share enumeration
Web page enumeration
Application enumeration
Service enumeration
Packet crafting
Common passive reconnaissance methods include the following:
Domain enumeration
Packet inspection
Open source intelligence (OSINT)
Recon-ng
Eavesdropping
Understanding Active Reconnaissance
As mentioned earlier, with each step of the information gathering phase, the goal is to gather additional information about the target. The act of gathering this information is called enumeration. So, let’s talk about what kind of enumeration you would typically be doing in a penetration test. In an earlier example, we looked at the enumeration of hosts exposed to the Internet by h4cker.org. External enumeration of hosts is usually one of the first things you would do in a penetration test. Determining the Internet-facing hosts of a target network can help you identify the systems that are most exposed. Obviously, having a device that is publicly accessible over the Internet opens it up to attack from malicious actors all over the world. After you identify those systems, you then need to identify which services are accessible. The device should be behind a firewall, allowing minimal exposure to the services it is running. Sometimes, however, services that are not expected are exposed. To determine this, you can run a port scan to enumerate the services that are running on the exposed hosts.
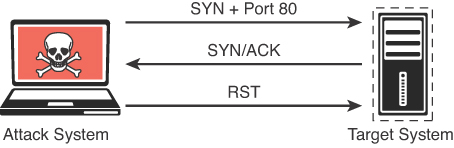
A port scan is an active scan in which the scanning tool sends various types of probes to the target IP address and then examines the responses to determine whether the service is actually listening. For instance, with an Nmap SYN scan, the tool sends a TCP SYN packet to the TCP port it is probing. This is also referred to as half-open scanning because it does not open a full TCP connection. If the response is a SYN/ACK, this would indicate that the port is actually in a listening state. If the response to the SYN packet is an RST (reset), this would indicate that the port is closed or not in a listening state. If the SYN probe does not receive any response, Nmap marks it as filtered because it cannot determine if the port is open or closed. Table 3-2 defines the SYN scan responses.
Nmap Port Status Reported |
Response from Target |
Nmap Analysis |
Open |
TCP SYN-ACK |
The service is listening on the port. |
Closed |
TCP RST |
The service is not listening on the port. |
Filtered |
No response from target or ICMP destination unreachable |
The port is firewalled. |
Figure 3-1 illustrates how a SYN scan works, and Figure 3-2 displays the output of a SYN scan.
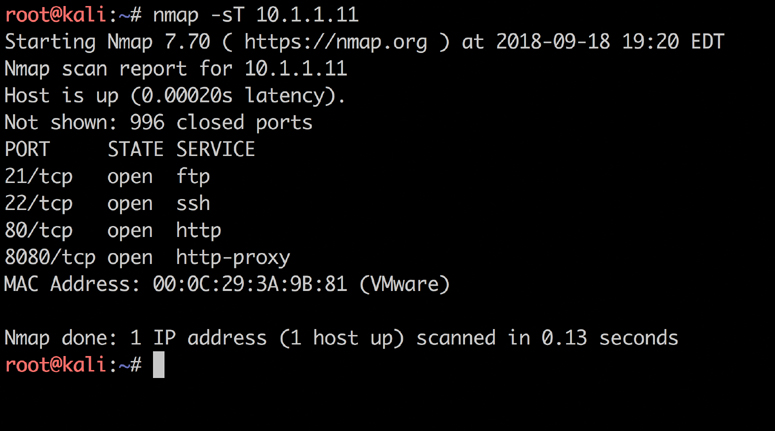
This example shows how to run an Nmap SYN scan by specifying the -sS option against a Linux web server. As you can see, this system has a number of ports listening. In some situations you will want to use the many different Nmap options in your scans to get the results you are looking for. The sections that follow take a look at some of the most common options and types of scans available in Nmap.
Nmap Scan Types
The following sections cover some of the most common Nmap scanning options. These various scanning techniques would be used for specific scenarios, as discussed in the following sections.
TCP Connect Scan (-sT)
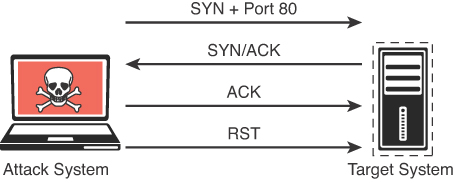
A TCP connect scan actually makes use of the underlying operating systems networking mechanism to establish a full TCP connection with the target device being scanned. Because it creates a full connection creates more traffic (and thus takes more time to run), it is the default scan type that is used if no scan type is specified with the nmap command. However, it should typically be used only when a SYN scan is not an option, such as when a user who is running the nmap command does not have raw packet privileges on the operating system because many of the Nmap scan types rely on writing raw packets. This section illustrates how a TCP connect scan works and provides an example of a scan from a Kali Linux system. Table 3-3 defines the TCP connect scan responses.
Table 3-3 TCP Connect Scan Responses
Nmap Port Status Reported |
Response from Target |
Nmap Analysis |
Open |
TCP SYN-ACK |
The service is listening on the port. |
Closed |
TCP RST |
The service is not listening on the port. |
Filtered |
No response from target |
The port is firewalled. |
Figure 3-3 illustrates how a TCP connect scan works. Figure 3-4 displays the output of a TCP connect scan.
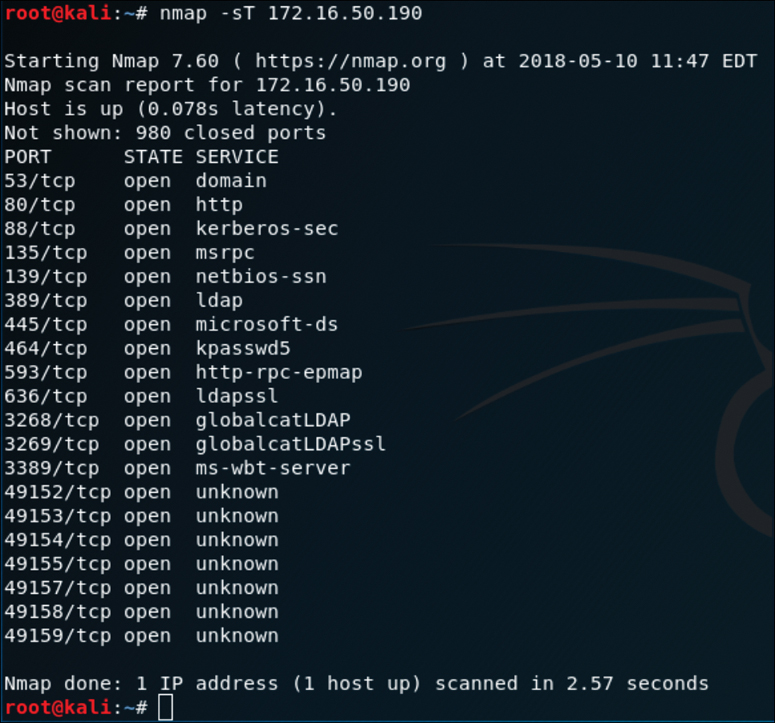
The output in Figure 3-4 shows the results of an Nmap TCP connect scan. As you can see, the results indicate that a number of TCP ports are listening on the target device.
UDP Scan (-sU)
The majority of the time, you will be scanning for TCP ports, as this is how you connect to most services running on target systems. However, you might encounter some instances in which you need to scan for UDP ports—for example, if you are trying to enumerate a DNS, SNMP, or DHCP server. These services all use UDP for communication between client and server. To scan UDP ports, Nmap sends a UDP packet to all ports specified in the command-line configuration. It waits to hear back from the target. If it receives an ICMP port unreachable message back from the target, the port is marked as closed. If it receives no response from the target UDP port, Nmap marks the port as open/filtered. Table 3-4 defines the UDP scan responses.
Nmap Port Status Reported |
Response from Target |
Nmap Analysis |
Open |
Data returned from port |
The service is listening on the port. |
Closed |
ICMP error message received |
The service is not listening on the port. |
Open/filtered |
No ICMP response from target |
The port is firewalled or timed out. |
Note
You should be aware that ICMP unreachable messages can sometimes be rate limited, and when they are, a UDP port scan can take much longer. A default rate-limit configuration was implemented starting with Cisco IOS 12.0.
Figure 3-5 illustrates how a UDP scan works, and Figure 3-6 displays the output of a UDP scan specifying only port 53 on the target system.
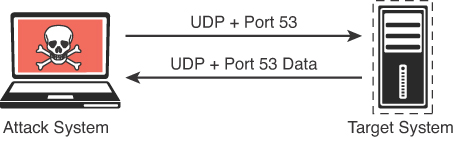
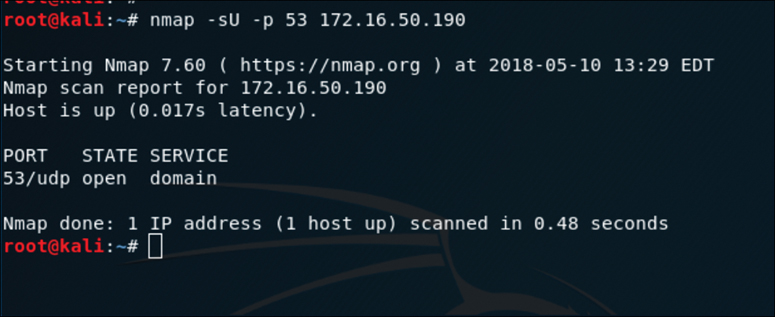
The output in Figure 3-6 shows the results of an Nmap UDP scan on port 53 of the target 172.16.50.190. As you can see, the results indicate that this port is open.
TCP FIN Scan (-sF)
There are times when a SYN scan might be picked up by a network filter or firewall. In this case, you would need to employ a different type of packet in a port scan. With the TCP FIN scan, a FIN packet is sent to a target port. If the port is actually closed, the target system sends back an RST packet. If nothing is received from the target port, you could consider the port open because the normal behavior would be to ignore the FIN packet. Table 3-5 defines the TCP FIN scan responses.
Table 3-5 TCP FIN Scan Responses
Nmap Port Status Reported |
Response from Target |
Nmap Analysis |
Filtered |
ICMP unreachable error received |
Closed port should respond with RST. |
Closed |
RST packet received |
Closed port should respond with RST. |
Open/Filtered |
No response received |
Open port should drop FIN. |
Note
A TCP FIN scan is not useful when scanning Windows-based systems, as they actually respond with RST packets regardless of the port state.
Figure 3-7 illustrates how a TCP FIN scan works. Figure 3-8 displays the output of a TCP FIN scan against port 80 of the target.
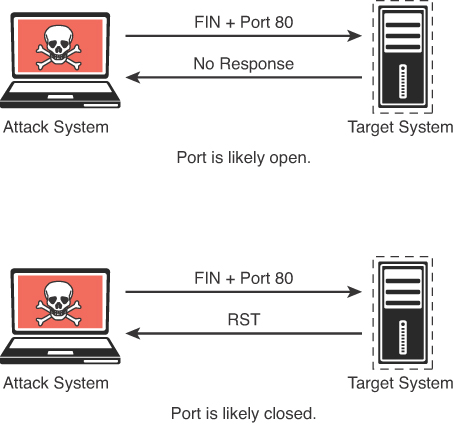
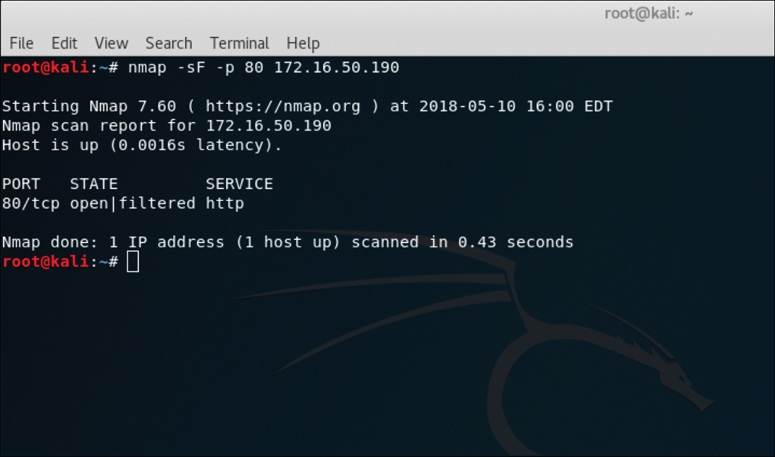
The output in Figure 3-8 shows the results of an Nmap TCP FIN scan, specifying port 80 on the target. The response from the target indicates that the port is open/filtered.
Ping scan (-sn)
A ping scan is one of the most common types of scans used to enumerate hosts on a network because it can use different types of ICMP messages to determine whether a host is online and responding on a network. The default for the -sn scan option is to send an ICMP echo packet to the target. If the target responds to the ICMP echo, then it is considered alive. Figure 3-9 illustrates how the ICMP echo request and reply work in an Nmap ping scan. Figure 3-10 shows an example of a ping scan of the 172.16.50.0/24 subnet. A scan of an entire subnet is sometimes referred to as a ping sweep.
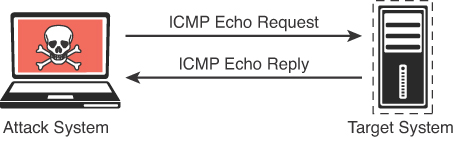
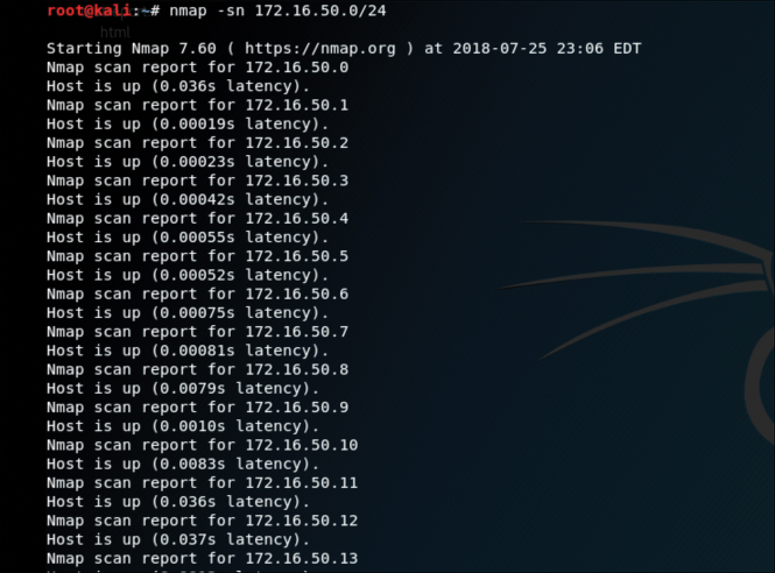
The output in Figure 3-10 shows the results of an Nmap ping scan. This is a very basic scan that can be performed to determine what devices on a network are live.
Exploring the Different Types of Enumeration
This section covers enumeration techniques that should be performed in the information-gathering phase of a penetration test. You will learn how and when these enumeration techniques should be used. This section also includes examples of performing these types of enumeration by using Nmap.
Host Enumeration
The enumeration of hosts is one of the first tasks you need to perform in the information-gathering phase of a penetration test. Host enumeration is performed internally and externally. When performed externally, you typically want to limit the IP addresses you are scanning to just the ones that are part of the scope of the test. This reduces the chance of inadvertently scanning an IP address that you are not authorized to test. When performing an internal host enumeration, you typically scan the full subnet or subnets of IP addresses being used by the target. Host enumeration is usually performed using a tool such as Nmap or Masscan; however, vulnerability scanners also perform this task as part of their automated testing. Example 3-2 shows a sample Nmap ping scan being used for host enumeration on the network 172.16.50.0/24. In earlier versions of Nmap the -sn option was known as -sP. For additional information about the Nmap host discovery capabilities visit: https://nmap.org/book/man-host-discovery.html
Example 3-2 Using Nmap for Host Enumeration
root@kali:~# nmap -sP 172.16.50.0/24

Starting Nmap 7.60 ( https://nmap.org ) at 2018-05-10 16:12 EDT
Nmap scan report for 172.16.50.0
Host is up (0.011s latency).
Nmap scan report for 172.16.50.1
Host is up (0.011s latency).
Nmap scan report for 172.16.50.2
Host is up (0.011s latency).
Nmap scan report for 172.16.50.3
Host is up (0.012s latency).
Nmap scan report for 172.16.50.4
Host is up (0.0061s latency).
Nmap scan report for 172.16.50.5
Host is up (0.0018s latency).
Nmap scan report for 172.16.50.6
Host is up (0.0025s latency).
Nmap scan report for 172.16.50.7
Host is up (0.0029s latency).
Nmap scan report for 172.16.50.8
Host is up (0.00056s latency).
Nmap scan report for 172.16.50.9
Host is up (0.0036s latency).
Nmap scan report for 172.16.50.10
Host is up (0.0083s latency).
Nmap scan report for 172.16.50.11
Host is up (0.0087s latency).
Nmap scan report for 172.16.50.12
Host is up (0.0052s latency).
Nmap scan report for 172.16.50.13
Host is up (0.0055s latency).
User Enumeration
Gathering a valid list of users is the first step in cracking a set of credentials. When you have the username, you can then begin brute-force attempts to get the account password. You perform user enumeration when you have gained access to the internal network. On a Windows network, you can do this by manipulating the Server Message Block (SMB) protocol, which uses TCP port 445. Figure 3-11 shows an illustration of how a typical SMB implementation works.
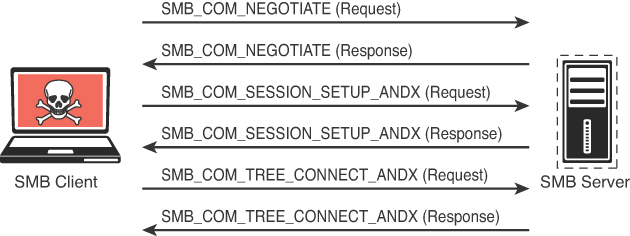
The information contained in the responses to these messages enables you to reveal information about the server:
SMB_COM_NEGOTIATE: This message allows the client to tell the server what protocols, flags, and options it would like to use. The response from the server is also an SMB_COM_NEGOTIATE message. This response is relayed to the client which protocols, flags, and options it prefers. This information can be configured on the server itself. A misconfiguration sometimes reveals information that you can use in penetration testing. For instance, the server might be configured to allow messages without signatures. You can determine if the server is using share- or user-level authentication mechanisms and whether the server allows plaintext passwords. The response from the server also provides you with additional information, such as the time and time zone the server is using. This is necessary information for many penetration testing tasks.
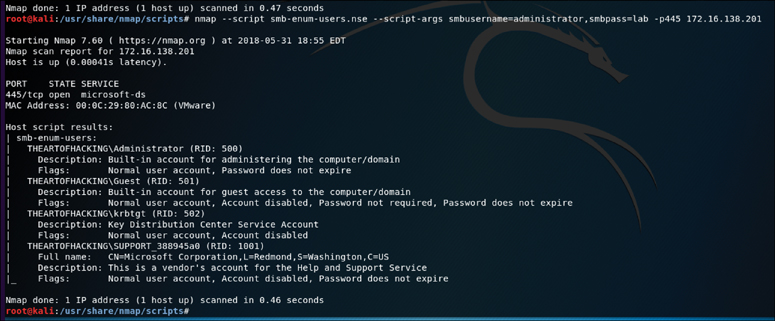
SMB_COM_SESSION_SETUP_ANDX: After the client and server have negotiated the protocols, flags, and options they will use for communication, the authentication process begins. Authentication is the primary function of the SMB_COM_SESSION_SETUP_ANDX message. The information sent in this message includes the client username, password, and domain. If this information is not encrypted, it is easy to sniff it right off the network. Even if it is encrypted, if the mechanism being used is not sufficient, the information can be revealed using simple tools (such as Lanman and NTLM in the case of Microsoft). An example of this being utilized is the smb-enum-users.nse script shown below:
nmap --script smb-enum-users.nse -p445 <host>
The output shown in Figure 3-12 shows the results of the Nmap smb-enum-users script run against the target 172.16.138.201. As you can see, the results indicate that the script was able to enumerate the users that are configured on this Windows target.
Group Enumeration
For a penetration tester, enumerating groups is helpful in determining the authorization roles that are being used in the target environment. The Nmap NSE script for enumerating SMB groups is smb-enum-groups. This script attempts to pull a list of groups from a remote Windows machine. You can also reveal the list of users that are members of those groups. The syntax of the command is as follows:
nmap --script smb-enum-groups.nse -p445 <host>
Figure 3-13 displays the sample output of this command run against a Windows server. This example uses known credentials to gather information.
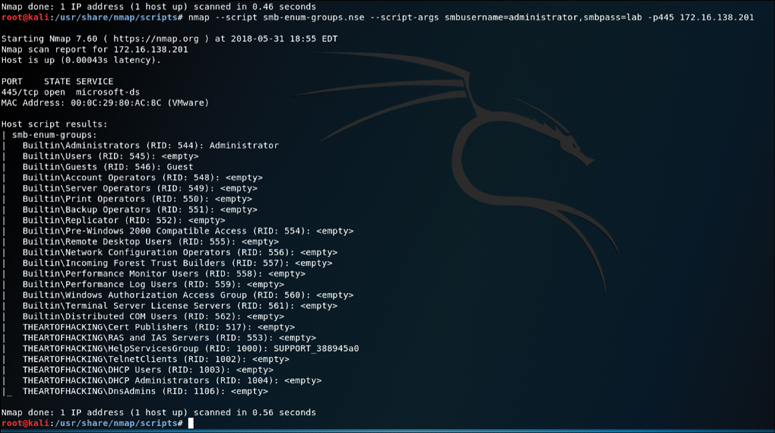
The output in Figure 3-13 shows the results of the Nmap smb-enum-groups script run against the target 172.16.138.201. As you can see, the results indicate that the script was able to enumerate the groups that are configured on this Windows target domain.
Network Share Enumeration
Identifying systems on a network that are sharing files, folders, and printers is helpful in building out an attack surface of an internal network. The Nmap smb-enum-shares NSE script uses Micorsoft Remote Procedure Call (MSRPC) to retrieve information about remote shares. The syntax of the Nmap smb-enum-shares.nse script is as follows:
nmap --script smb-enum-shares.nse -p445 <host>
Figure 3-14 shows sample output from running the smb-enum-shares.nse script against a Windows server at 172.16.138.201.
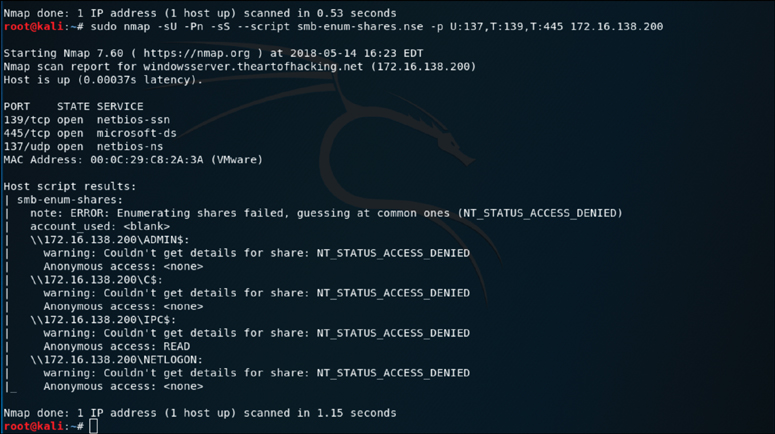
The output in Figure 3-14 shows the results of the Nmap smb-enum-shares script run against the target 172.16.138.201. As you can see, the results indicate that the script was able to enumerate the file shares that are accessible on the Windows system.
Web Page Enumeration/Web Application Enumeration
Once you have identified that a web server is running on a target host, the next step is to take a look at the web application and begin to map out the attack surface. You can map out the attack surface of a web application in a few different ways. The handy Nmap tool actually has an NSE script available for bruteforcing the directory and file paths of web applications. Armed with a list of known files and directories used by common web applications, it probes the server for each of the items on the list. Based on the response from the server, it can determine whether those paths exist. This is handy for identifying things, like the Apache or Tomcat default manager page, that are commonly left on web servers and can be potential paths for exploitation. The syntax of the http-enum NSE script is as follows:
nmap -sV --script=http-enum theartofhacking.org
Figure 3-15 displays the results of running the script against http://www.theartofhacking.org/.
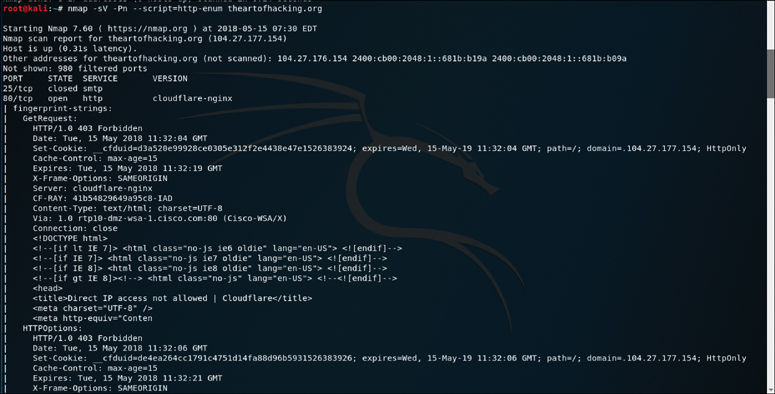
The output in Figure 3-15 shows the results of running the Nmap http-enum script against the target theartofhacking.org. As you can see, the results indicate some basic information about the web server being targeted here. This is a good place to start in attacking a web application.
Another web server enumeration tool we should talk about is Nikto. Nikto is an open source web vulnerability scanner that has been around for many years. It’s not as robust as the commercial web vulnerability scanners; however, it is very handy for running a quick script to enumerate information about a web server and the applications it is hosting. Because of the speed at which Nikto works to scan a web server, it is very noisy. It provides a number of options for scanning, including the capability to authenticate to a web application that requires a username and password. Figure 3-16 shows an example of the output of a Nikto scan being run against https://www.theartofhacking.org.

The output in Figure 3-16 shows the results of the Nikto scan run against the target www.theartofhacking.org. As you can see, the results indicate some interesting information that can be a starting point for web application/server hacking.
Service Enumeration
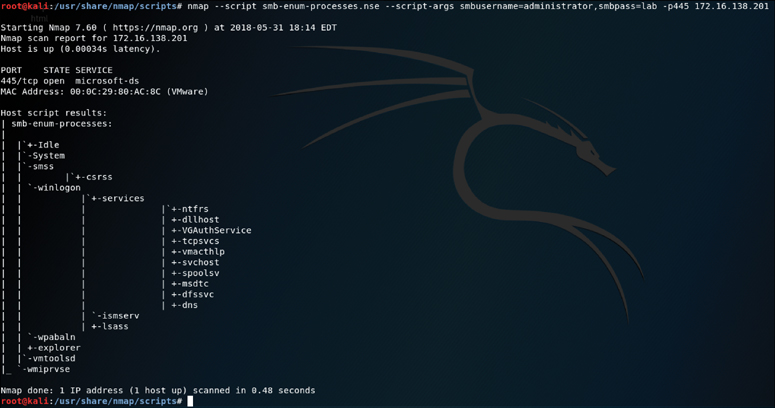
Identifying the services running on a remote system is the main focus of what Nmap does as a port scanner. Earlier discussion in this chapter highlights the various scan types and how they can be used to bypass filters. When you are connected to a system that is on a directly connected network segment, you can then begin to run some additional scripts to enumerate further. The perspective of a port scan is that of a credentialed remote user. The Nmap smb-enum-processes NSE script enumerates services on a Windows system, but it does so by using credentials of a user that has access to read the status of services that are running. This is a handy tool for remotely querying a Windows system to determine the exact list of services that are running. The syntax of the command is as follows:
nmap --script smb-enum-processes.nse --script-args smbusername=<usern
ame>,smbpass=<password> -p445 <host>
Figure 3-17 shows the output of running this command against the Windows system 172.16.138.201.
Exploring Enumeration via Packet Crafting
Although Nmap is the most well-known tool used for network reconnaissance, others can be used in similar ways to obtain the same results. For example, Scapy is a very handy tool that is typically used for packet crafting. When Nmap sends a SYN scan, it must modify the way it sends a normal TCP packet to send only the SYN first. The only difference is that with Nmap, you provide a simple option like -sS, and it does the rest. If you wanted more control than this over what you are sending, you might want to use Scapy. This section looks at some of the simple ways you can use this tool to perform basic network reconnaissance.
Tip
Scapy must be run with root permissions to be able to modify packets.
Using Scapy for reconnaissance involves the following steps:
Step 1. Open a terminal window.
Step 2. Become root by typing su -i on the command line.
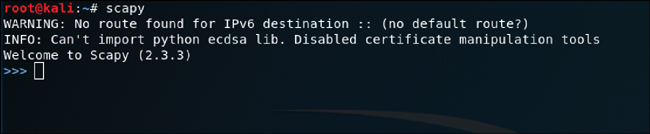
Step 3. Type scapy on the command line, as shown in Figure 3-18, and you are taken to the scapy command line.
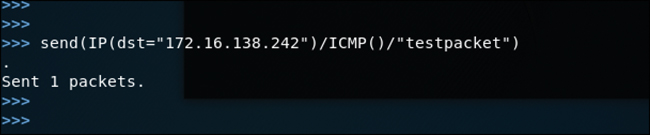
Step 4. Begin crafting packets, as shown in Figure 3-19, where a simple ICMP packet is crafted with testpacket as the payload being sent to the destination host 172.16.138.242.
As mentioned earlier, the goal with host discovery is to simply determine what devices are alive on the network. Host discovery allows you to focus your continued scanning efforts on only those hosts and not send a lot of unnecessary traffic. Figure 3-20 shows an example of a TCP SYN ping using scapy.

Figure 3-21 shows a TCP ACK ping being run against the host 172.16.138.242.

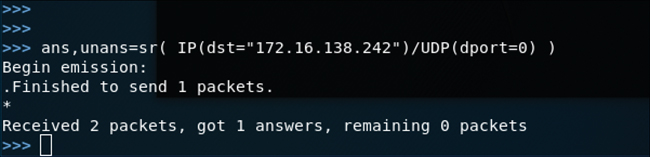
The output in Figure 3-22 shows the results of a UDP ping scan run against the target 172.16.138.242 using scapy.
Understanding Passive Reconnaissance
At this point, you should be familiar with a number of active reconnaissance tools; however, there are situations in which active reconnaissance is not possible or there is a reason to be concerned about detection. Often if a systems administrator identifies reconnaissance efforts coming from a specific IP address, he or she will block the IP address. As a penetration tester, this could be game over—and at the very least, it would slow down your efforts to gather information. For this reason, you need to have alternative methods to gather information about your targets. This is where passive reconnaissance is applicable.
Passive reconnaissance enables you to harvest information without directly interacting with the target system. One example of passive reconnaissance is using open source intelligence (OSINT) (discussed in the upcoming section “Understanding Open Source Intelligence (OSINT) Gathering”). Other examples include domain enumeration, packet inspection, and eavesdropping. We begin this discussion with domain enumeration and then briefly touch on packet inspection and eavesdropping and finish up with an in depth look at OSINT, including a look at how to use the Recon-ng tool.
Domain Enumeration
When performing a penetration test, you often start with only the domain names of the target that is in scope. In this case, one of the first things you need to do is to determine all the subdomains that are being used by the target. This helps you to determine what kinds of systems the target is running and where your testing should go next. You are likely to uncover subdomains that may have been forgotten and that can open up a path to exploitation. One way you can begin to enumerate subdomains is simply by using search engines like Google or Bing. Using site: method in a Google search as shown in Figure 3-23 will bring up a list of sites related to the domain theartofhacking.org.

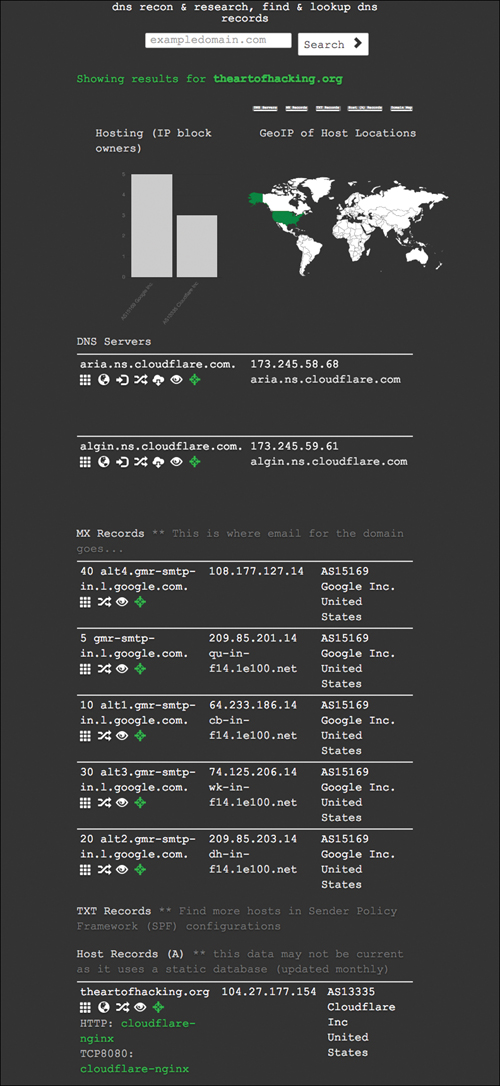
You can use a number of other online tools to enumerate domain information. One of them, DNSdumpster (see https://dnsdumpster.com), provides a significant amount of information about the domain you provide, including DNS servers, MX records, host records, and IP addresses used. Figure 3-24 shows the output of a DNSdumpster search performed on theartofhacking.org.
Of course, you can also gather subdomain information by doing a zone transfer with the dig or nslookup commands; however, most of the time zone transfers are not allowed. Example 3-3 shows a zone transfer initiated for the domain theartofhacking.org.
Example 3-3 Zone Transfer Using dig
root@kali:~# dig +multi AXFR @173.245.58.68 theartofhacking.org
; <<>> DiG 9.11.2-5-Debian <<>> +multi AXFR @173.245.58.68
theartofhacking.org
; (1 server found)
;; global options: +cmd
; Transfer failed.
root@kali:~#
Packet Inspection and Eavesdropping
Anyone who has been involved with networking or security has at some point used a tool like Wireshark or TCPDUMP to capture and analyze traffic on a network. For a penetration tester, such tools can be convenient for performing passive reconnaissance. Of course, this type of reconnaissance requires either a physical or wireless connection to the target. If your concern is being detected, you are probably safer to attempt a wireless connection as this would not require you to be inside the building. Many times, a company’s wireless footprint bleeds outside its physical walls. As a penetration tester, this gives you an opportunity to potentially collect information about the target and possibly gain access to the network to sniff traffic. Chapter 5, “Exploiting Wired and Wireless Networks,” covers this topic in depth.
Understanding Open Source Intelligence (OSINT) Gathering
OSINT gathering is a method of gathering publicly available intelligence sources to collect and analyze information about a target. Open source intelligence is “open source” because collecting the information does not require any type of covert methods. Typically, the information can be found on the Internet. The larger the online presence of the target, the more information that will be available. This type of collection can often start with a simple Google search, which can reveal a significant amount of information about a target. It will at least give you enough information to know what direction to go with your information-gathering process. The following sections look at some of the sources that can be used for OSINT gathering.
Exploring Reconnaissance with Recon-ng
This chapter covers a number of individual sources and tools used for information gathering. These tools are all very effective for their specific uses; however, wouldn’t it be great if there were a tool that could pull together all these different functions? This is where Recon-ng comes in. It is a framework developed by Tim Tomes of Black Hills Information Security. This tool was developed in Python with Metasploit msfconsole in mind. If you have used the Metasploit console before, Recon-ng be familiar and easy to understand.
Recon-ng is a modular framework, which makes it easy to develop and integrate new functionality. It is highly effective in social networking site enumeration because of its use of APIs to gather information. It also includes a reporting feature that allows you to export in different report formats. Because you will always need to provide some kind of deliverable in any testing you do, Recon-ng is especially valuable.
Let’s get started with this very powerful and well-organized framework. The examples in this section show how to run Recon-ng from a Kali Linux system because Recon-ng is installed there by default.
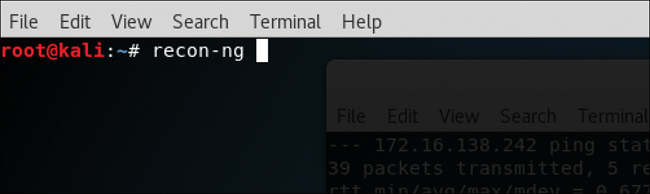
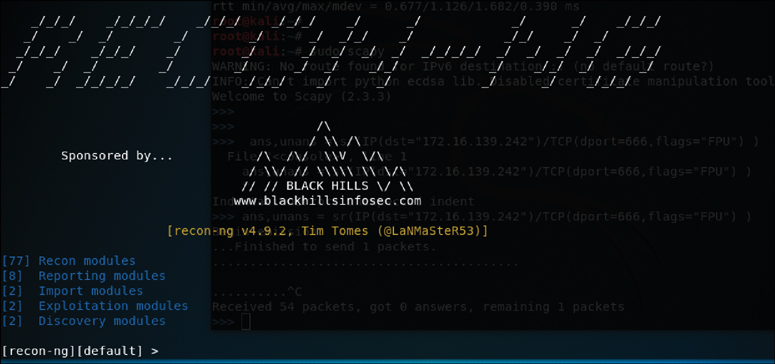
To start using Recon-ng, you simply run recon-ng from a new terminal window. Figure 3-25 shows the command, and Figure 3-26 shows the splash screen and initial menu that Recon-ng starts with.
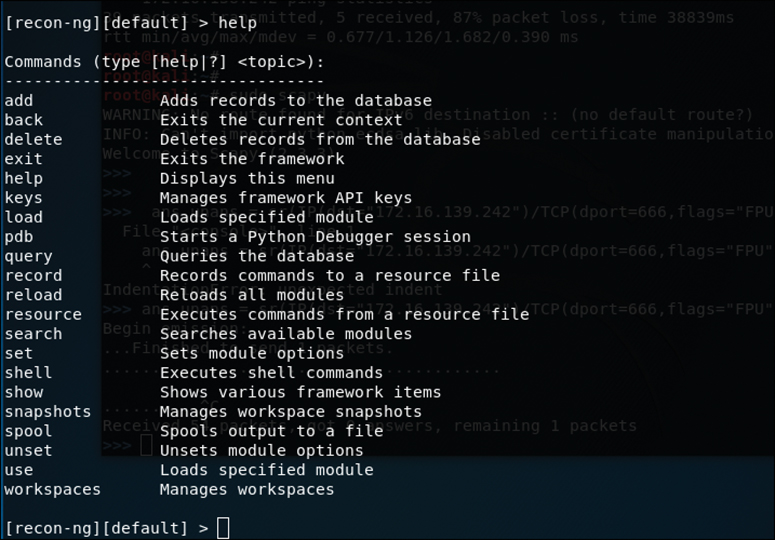
You can see from the initial screen the current number of modules that are included in Recon-ng. To get an idea of what commands are available in the Recon-ng command-line, tool you can simply type help and press Enter. Figure 3-27 shows a screenshot of the output of the help command.
Before you can start gathering information using the Recon-ng tool, you need to understand what modules are available. You saw from the initial screen that there are more than 77 modules in all. Inside Recon-ng, you can run the show modules command to list all the modules currently loaded, as demonstrated in Example 3-4.
Example 3-4 Recon-ng show modules Output
[recon-ng][default] > show modules
  Discovery
  ---------
    discovery/info_disclosure/cache_snoop
    discovery/info_disclosure/interesting_files

  Exploitation
  ------------
    exploitation/injection/command_injector
    exploitation/injection/xpath_bruter

  Import
  ------
    import/csv_file
    import/list

  Recon
  -----
    recon/companies-contacts/bing_linkedin_cache
    recon/companies-contacts/jigsaw/point_usage
    recon/companies-contacts/jigsaw/purchase_contact
    recon/companies-contacts/jigsaw/search_contacts
    recon/companies-contacts/linkedin_auth
    recon/companies-multi/github_miner
    recon/companies-multi/whois_miner
    recon/contacts-contacts/mailtester
    recon/contacts-contacts/mangle
    recon/contacts-contacts/unmangle
    recon/contacts-credentials/hibp_breach
    recon/contacts-credentials/hibp_paste
    recon/contacts-domains/migrate_contacts
    recon/contacts-profiles/fullcontact
    recon/credentials-credentials/adobe
    recon/credentials-credentials/bozocrack
    recon/credentials-credentials/hashes_org
    recon/domains-contacts/metacrawler
    recon/domains-contacts/pgp_search
    recon/domains-contacts/whois_pocs
    recon/domains-credentials/pwnedlist/account_creds
    recon/domains-credentials/pwnedlist/api_usage
    recon/domains-credentials/pwnedlist/domain_creds
    recon/domains-credentials/pwnedlist/domain_ispwned
    recon/domains-credentials/pwnedlist/leak_lookup
    recon/domains-credentials/pwnedlist/leaks_dump
    recon/domains-domains/brute_suffix
    recon/domains-hosts/bing_domain_api
    recon/domains-hosts/bing_domain_web
    recon/domains-hosts/brute_hosts
    recon/domains-hosts/builtwith
    recon/domains-hosts/certificate_transparency
    recon/domains-hosts/google_site_api
    recon/domains-hosts/google_site_web
    recon/domains-hosts/hackertarget
    recon/domains-hosts/mx_spf_ip
    recon/domains-hosts/netcraft
    recon/domains-hosts/shodan_hostname
    recon/domains-hosts/ssl_san
    recon/domains-hosts/threatcrowd
    recon/domains-vulnerabilities/ghdb
    recon/domains-vulnerabilities/punkspider
    recon/domains-vulnerabilities/xssed
    recon/domains-vulnerabilities/xssposed
    recon/hosts-domains/migrate_hosts
    recon/hosts-hosts/bing_ip
    recon/hosts-hosts/freegeoip
    recon/hosts-hosts/ipinfodb
    recon/hosts-hosts/resolve
    recon/hosts-hosts/reverse_resolve
    recon/hosts-hosts/ssltools
    recon/hosts-locations/migrate_hosts
    recon/hosts-ports/shodan_ip
    recon/locations-locations/geocode
    recon/locations-locations/reverse_geocode
    recon/locations-pushpins/flickr
    recon/locations-pushpins/instagram
    recon/locations-pushpins/picasa
    recon/locations-pushpins/shodan
    recon/locations-pushpins/twitter
    recon/locations-pushpins/youtube
    recon/netblocks-companies/whois_orgs
    recon/netblocks-hosts/reverse_resolve
    recon/netblocks-hosts/shodan_net
    recon/netblocks-ports/census_2012
    recon/netblocks-ports/censysio
    recon/ports-hosts/migrate_ports
    recon/profiles-contacts/dev_diver
    recon/profiles-contacts/github_users
    recon/profiles-profiles/namechk
    recon/profiles-profiles/profiler
    recon/profiles-profiles/twitter_mentioned
    recon/profiles-profiles/twitter_mentions
    recon/profiles-repositories/github_repos
    recon/repositories-profiles/github_commits
    recon/repositories-vulnerabilities/gists_search
    recon/repositories-vulnerabilities/github_dorks

  Reporting
  ---------
    reporting/csv
    reporting/html
    reporting/json
    reporting/list
    reporting/proxifier
    reporting/pushpin
    reporting/xlsx
    reporting/xml
[recon-ng][default] >
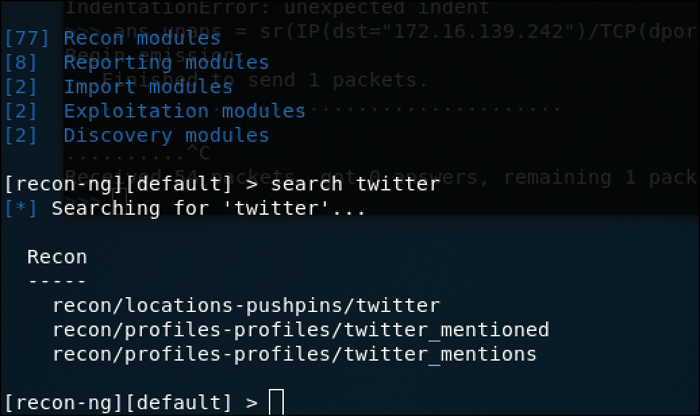
As you can see, there are a lot of modules available to you in Recon-ng, and because this is an open framework, new ones are being added all the time. It is also possible for users to create and share modules that do not make it into the main development branch. One valuable function available in the tool to identify modules you would like to use is the search function. For instance, if you want to find all modules related to Twitter, you can run the command search twitter. Figure 3-28 shows the results of running this command.
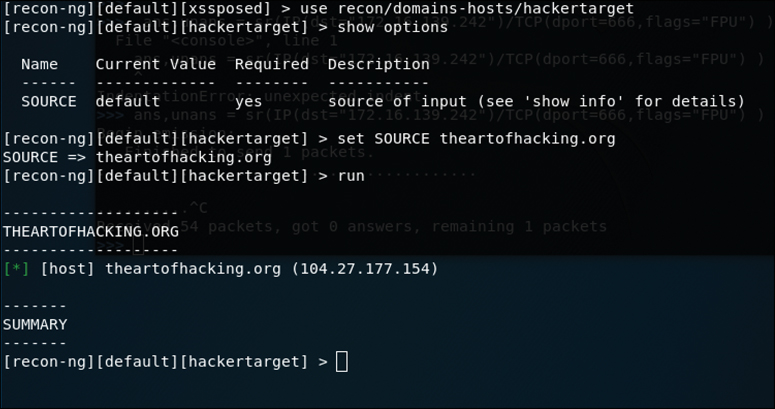
Let’s look at a simple module used to gather subdomains, called hackertarget. To run this module, you simply need to tell Recon-ng that you want to use the hackertarget module, and then you provide it the source domain that you would like to target. From there, you can execute the module by typing run. Figure 3-29 shows this module being run against the target theartofhacking.org.
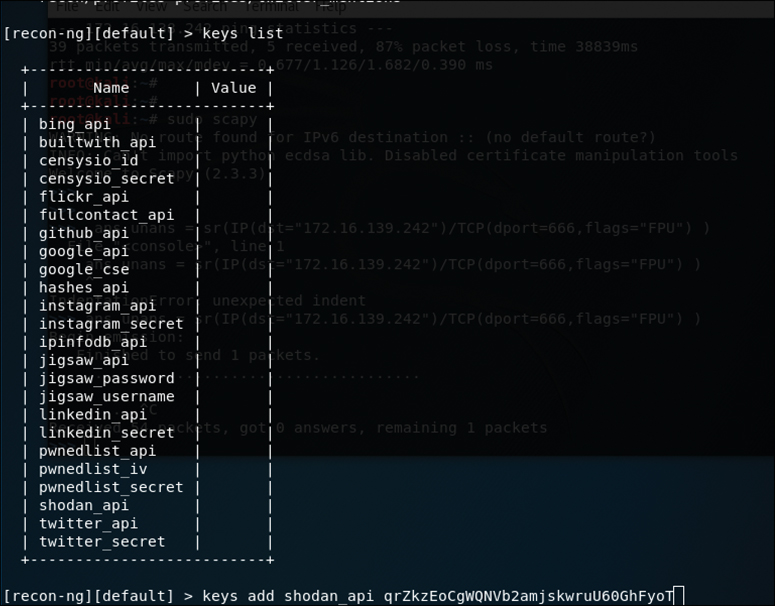
What makes Recon-ng so powerful is the way it is able to use the application programming interfaces (APIs) of various OSINT resources to gather information. Modules included are able to query sites such as Facebook, Indeed, Flickr, Instagram, Shodan, LinkedIn, and YouTube. With the modular framework, new capabilities are added regularly. To use these modules, you must first acquire and set up an API key for any of the sources that require one. Let’s take a look at how you would go about listing and adding new API keys to Recon-ng. Figure 3-30 shows the output command keys list, which is used to simply list the current API keys that have been registered in Recon-ng.

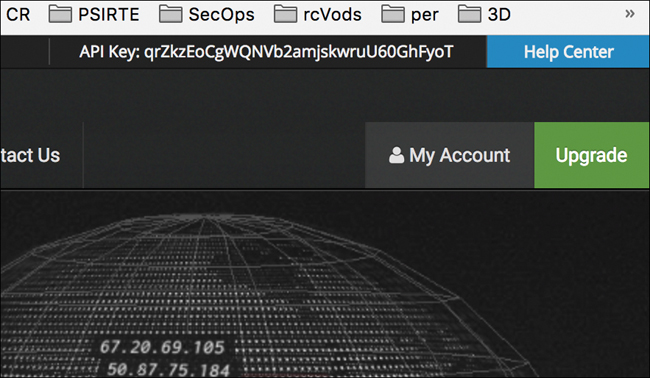
As you can see, there are currently no API keys for Recon-ng to use. Keep in mind that some of the sources that require API keys are paid sites. For such a site, obtaining the API key would mean paying for access to that site; however, some sites are free to use. Figure 3-31 shows an example of one of them, Shodan, whose initial page is at http://shodan.io.

To obtain an API key for Shodan, you simply follow these instructions:
Step 1. Create an account
Step 2. Log in to the web interface at http://shodan.io.
Step 3. On the right side of the screen, click Show API Key. Figure 3-32 shows what the site look like when the API key appears.
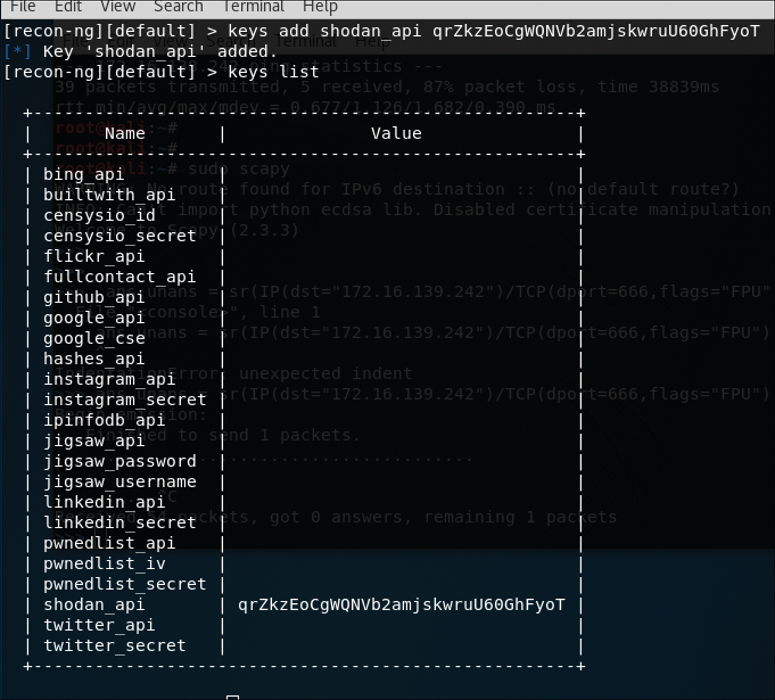
Now that you have a key that you can use for Shodan, you can go back into Recon-ng and add it there. To do this, you use the keys add shodan_api command, as shown in Figure 3-33.
As you can see, the key is successfully added to Recon-ng. Now if you run the keys list command again, you see the API key listed for shodan_api (see Figure 3-34).
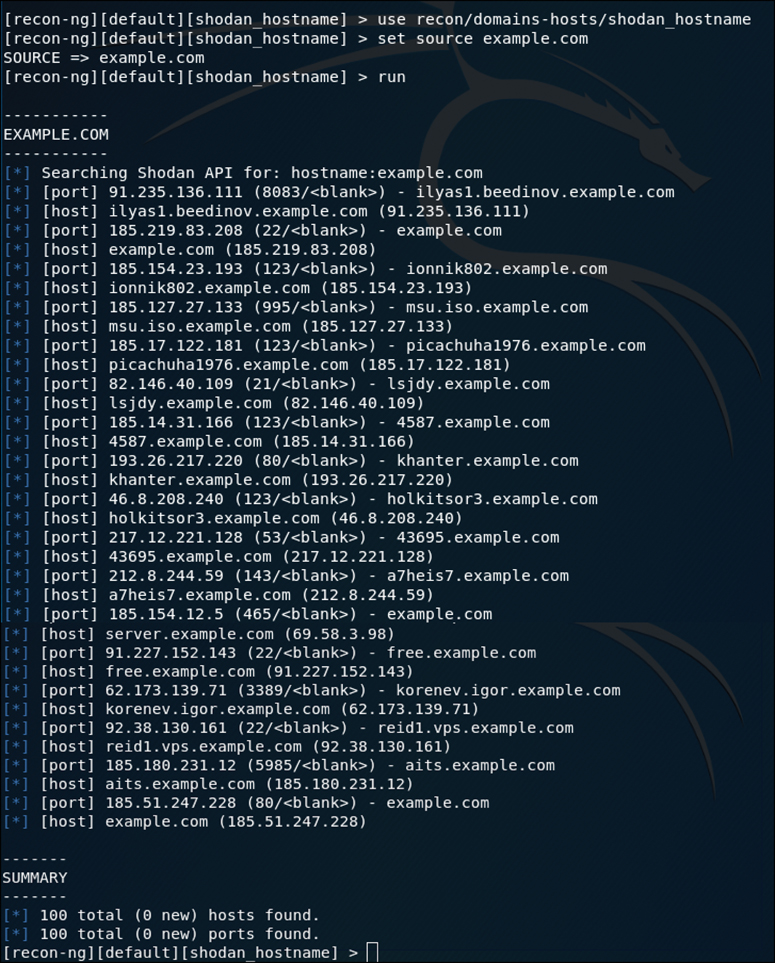
Now that you have added the API key for Shodan, you can give this module a try by using the shodan_hostname module to enumerate the domains for example.com. This module retrieves hostnames from the Shodan API by using the hostname search function. You can see the output of this module in Figure 3-35.
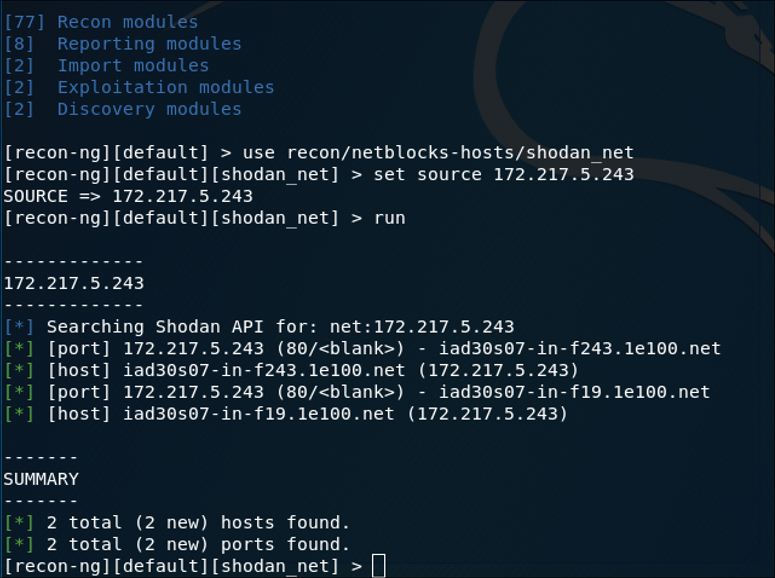
Another handy Recon-ng module that uses the Shodan API is the Shodan Network Enumerator module. This module retrieves hosts from the Shodan API by using the net search function. Figure 3-36 shows this module when run with the IP address www.h4cker.org as the source.
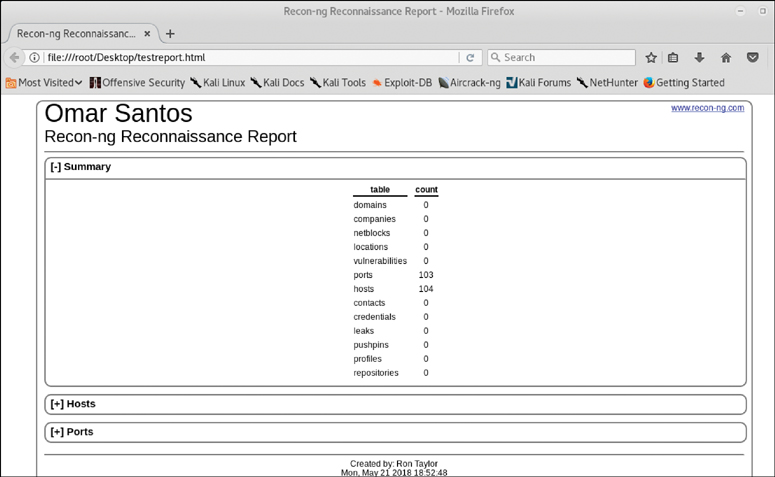
Now that you’ve been exposed to a few of the modules, you should have an idea of how powerful the Recon-ng tool is and how easy it is to use. The more API keys you add to it, the more information you will be able to acquire. Before moving on from Recon-ng, let’s take a quick look at the reporting modules available today. Figure 3-37 shows a list of the current reporting modules.
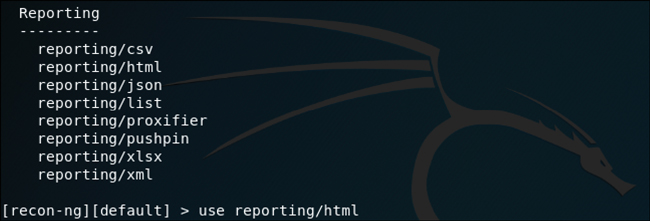
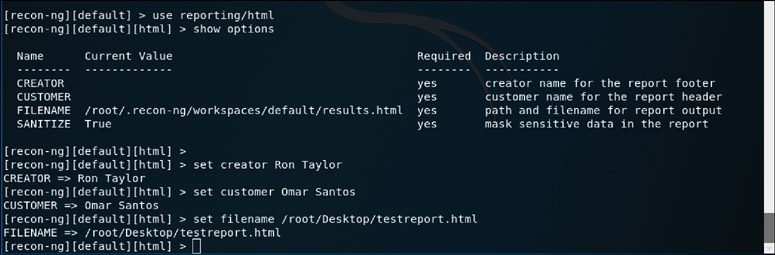
As you can see, a number of report formats are available. The JSON module is very handy for exporting the results of Recon-ng to another tool that can ingest the JSON data format. If you are just looking to view the results for the purpose of reading the output locally on your computer, then the HTML format is probably the most useful. For each reporting module, there are also some options available for customizing your reports. Figure 3-38 shows the options available for the reporting/html module, and Figure 3-39 shows the sample report in HTML format.
Understanding the Art of Performing Vulnerability Scans
Once you have identified the target hosts that are available and the services that are listening on those hosts, you can then begin to probe those services to determine if there are any weaknesses; this is what vulnerability scanners do. Vulnerability scanners use a number of different methods to determine whether a service is vulnerable. The primary method is to identify the version of the software that is running on the open service and try to match it with an already known vulnerability. For instance, if a vulnerability scanner determines that a Linux server is running an outdated version of the Apache web server that is vulnerable to remote exploitation, it reports that vulnerability as a finding.
Of course, the main concern with automated vulnerability scanners is false positives; the output from a vulnerability scan can sometimes be useless if there is no validation done on the findings. T turning over a report full of false positives to a developer or an administrator who is then responsible for fixing the issues can really cause conflicts. You don’t want someone chasing down findings in your report just to find out that they are false positives.
Now let’s take a look at how typical vulnerability scanners work. They are all different in some ways, but most follow a similar process, described in the next section.
How a Typical Automated Vulnerability Scanner Works
Let’s take a look at how a typical automated vulnerability scanner works (see Figure 3-40). Keep in mind that they are all different, but most follow a process like this:
Step 1. In the discovery phase, the scanner use a tool such as Nmap to perform host and port enumeration. Using the results of the host and port enumeration, the scanner begins to probe open ports for more information.
Step 2. When the scanner has enough information about the open port to determine what software and version are running on that port, it records that information in a database for further analysis. The scanner can use various methods to make this determination, including banner information.
Step 3. The scanner tries to determine if the software that is listening on the target system is susceptible to any known vulnerabilities. It does this by correlating a database of known vulnerabilities against the information recorded in the database about the target services.
Step 4. The scanner produces a report on what it suspects could be vulnerable. Keep in mind that these results are often false positive and need to be validated.
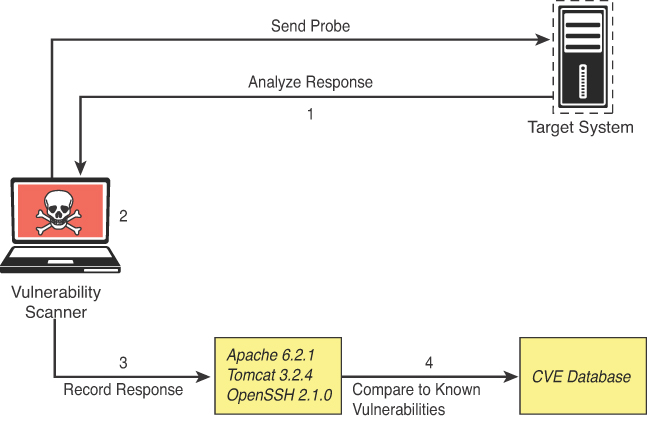
At the very least, this type of tool gives you an idea of where to look for vulnerabilities that might be exploitable.
Understanding the Types of Vulnerability Scans
The type of vulnerability scan to use is usually driven by scan policy that is created in the automated vulnerability scanning tool. Each tool has many options available for scanning. You can often just choose to do a full scan that will operate all scanning options, although you might not be able to use every option (for instance, if you are scanning a production environment or a device that is prone to crashing when scanning occurs). In such situations, you must be careful to select only the scan options that are less likely to cause issues. The sections that follow take a closer look at the typical scan types.
Unauthenticated Scans
By default, vulnerability scanners do not use credentials to scan a target. If you provide only the IP address of the target and click Scan, the tool will begin enumerating the host from the perspective of an unauthenticated remote attacker. You would use this method of scanning if you were performing a “black-box” penetration test. An unauthenticated scan shows only the network services that are exposed to the network. The scanner attempts to enumerate the ports open on the target host. If the service is not listening on the network segment that the scanner is connected to, or if it is firewalled, the scanner will report the port as closed and move on. However, this does not mean that there is not a vulnerability. Sometimes it is possible to access ports that are not exposed to the network via SSH port forwarding and other tricks. It is still important to run a credentialed scan, when possible.
Authenticated Scans
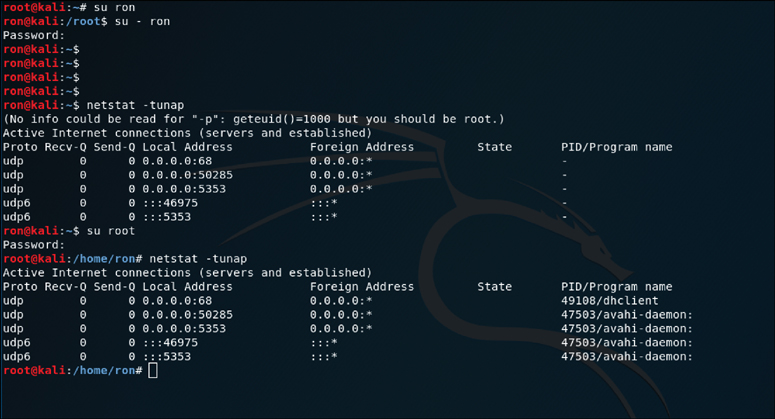
As just mentioned, an unauthenticated scan is best when you are looking for a black-box perspective on the target device; however, most of the time it is best to run a credentialed scan against a target to get a full picture of the attack surface. An authenticated scan requires you to provide the scanner with a set of credentials that have root-level access to the system. The reason for this is that the scanner actually logs in to the target via SSH or some other mechanism. It then runs commands like netstat to gather information from inside the host. Many of the commands that the scanner runs require root-level access to be able to gather the correct information from the system.
Figure 3-41 shows the netstat command run by a non-privileged user and then run again by a root user. You can see that the output is different for the different user-level permissions. Specifically, notice that when running as the user ron, the PID/Program name is not available, and when running as the user root, that information is displayed.
Discovery Scans
A discovery scan is primarily meant to identify the attack surface of a target. A port scan is a major part of what a discovery scan performs. A scanner will often actually use a tool like Nmap to perform the port scan process. It then pulls the results of the port scan into its database to use for further discovery. For instance, the result of the port scan might come back showing that ports 80, 22, and 443 are open and listening. From there the scanning tool probes those ports to identify exactly what service is running on each port. For example, say that it identifies that an Apache Tomcat 8.5.22 web server is running on ports 80 and 443. Knowing that a web server is running on the ports, the scanner can then perform further discovery tasks that are specific to web servers and applications. Now say that, at the same time, the scanner identifies that OpenSSH is listening on port 22. From there, the scanner can probe the SSH service to identify information about its configuration and capabilities, such as preferred and supported cryptographic algorithms. This type of information is useful for identifying vulnerabilities in later phases of testing.
Full Scans
As mentioned previously, a full scan typically involves enabling every scanning option in the scan policy. The actual options vary based on the scanner, but most vulnerability scanners have their categories of options defined similarly. For instance, they are typically organized by operating system, device manufacturer, device type, protocol, compliance, and type of attack, and the rest might fall into a miscellaneous category. Example 3-5 shows a sample list of the plugin categories from the Nessus vulnerability scanner. As you can see from this list, there are a lot of plugins available for the scanner to run. It should also be obvious, based on the names of the plugin categories, that there will never be a single device that all of these plugins apply to. For instance, plugins for a Mac OS X device would not be applicable to a Windows device. That is why you normally need to customize your plugin selection to reflect the environment that you are scanning: Doing so will reduce unnecessary traffic and speed up your scanning process.
Example 3-5 Examples of Plugin Categories from Nessus
Family                                          Count
AIX Local Security Checks                       11416
Amazon Linux Local Security Checks              1048
Backdoors                                       114
Brute force attack                              26
CGI abuses                                      3841
CGI abuses : XS                                 666
CISCO                                           918
CentOS Local Security Checks                    2585
DNS                                             172
Databases                                       577
Debian Local Security Checks                    5532
Default Unix Accounts                           168
Denial of Service                               109
F5 Networks Local Security Checks               607
FTP                                             255
Fedora Local Security Checks                    12634
Firewalls                                       240
FreeBSD Local Security Checks                   3957
Gain a shell remotely                           280
General                                         255
Gentoo Local Security Checks                    2650
HP-UX Local Security Checks                     1984
Huawei Local Security Checks                    563
Junos Local Security Checks                     212
MacOS X Local Security Checks                   1191
Mandriva Local Security Checks                  3139
Misc.                                           1661
Mobile Devices                                  76
Netware                                         14
Oracle Linux Local Security Checks              2806
OracleVM Local Security Checks                  459
Palo Alto Local Security Checks                 49
Peer-To-Peer File Sharing                       90
Policy Compliance                               49
Port scanners                                   7
RPC                                             38
Red Hat Local Security Checks                   4864
SCADA                                           300
SMTP problems                                   139
SNMP                                            33
Scientific Linux Local Security Checks          2493
Service detection                               431
Settings                                        85
Slackware Local Security Checks                 1067
Solaris Local Security Checks                   4937
SuSE Local Security Checks                      11377
Ubuntu Local Security Checks                    4130
VMware ESX Local Security Checks                118
Virtuozzo Local Security Checks                 191
Web Servers                                     1092
Windows                                         4053
Windows : Microsoft Bulletins                   1509
Windows : User management                       28
Stealth Scans
There are sometimes situations in which you must scan an environment that is in a production state. In such situations, there is typically a requirement for running a scan without alerting the defensive position of the environment. In this case, you will want to implement a vulnerability scanner in a manner that makes the target less likely to detect the activity. Vulnerability scanners are pretty noisy; however, there are some options you can configure to make a scan quieter. For example, as discussed earlier in this chapter, there are different types of Nmap scans, and they can be detected by network intrusion prevention systems (IPSs) or host firewalls. You learned that a SYN scan is a fairly stealthy type of scan to run. This same concept applies to vulnerability scanners because they all use some kind of port scanner to enumerate the target. These same options are available in the vulnerability scanner’s configuration. You can also disable any plugins/attacks that might be especially likely to generate noisy traffic, such as any that perform denial-of-service attacks, which would definitely arouse some concerns on the target network.
Aside from the modifications to a traditional vulnerability scanner just described, there is also the concept of a passive vulnerability scanner. A passive vulnerability scanner monitors and analyzes the network traffic. Based on the traffic it sees, it can determine what the topology of the network consists of and what service the hosts on the network are listening on. From the detailed information about the traffic at the packet layer, a passive vulnerability scanner can determine if any of those services or even clients have vulnerabilities. For instance, if a Windows client with an outdated version of Internet Explorer is connecting to an Apache web server that is also outdated, the scanner will identify the versions of the client and server from the monitored traffic. It can then compare those versions to its database of known vulnerabilities and report the findings based on only the passive monitoring it performed. Figure 3-42 shows a diagram of how this type of scanner typically works.

Compliance Scans
Scanning for compliance purposes is typically driven by the market or governance that the environment serves. An example of this would be the information security environment for a healthcare entity, which must adhere to the requirements sent forth by the Health Insurance Portability and Accountability Act (HIPAA). This is where a vulnerability scanner comes into play. It is possible to use a vulnerability scanner to address the specific requirements that a policy requires. Vulnerability scanners often have the capability to import a compliance policy file. This policy file can typically map to specific plugins/attacks that the scanner is able to perform. Once the policy is imported, the specific set of compliance checks can be run against a target system.
The challenge with compliance requirements is that there are many different types for different industries and government agencies, and they can all be interpreted in various ways. Some of the checks might be straightforward. If a requirement check is looking for a specific command to be run and that the output be a 1 instead of a 0, that is very simple for a vulnerability scanner to determine; however, many requirements leave more to be interpreted. This makes it very difficult for a tool like a vulnerability scanner to make a determination. Most vulnerability scanners also have the capability to create custom compliance policies. This is a valuable option for penetration testers, who typically want to fine-tune the scanner policy for each engagement.
Challenges to Consider When Running a Vulnerability Scan
The previous sections have touched on a number of different things that should factor into how you perform your scanning. The sections that follow go into further detail about some of the specific things that should be considered when building a scanning policy and actually performing scans.
Considering the Best Time to Run a Scan
The timing of when to run a scan is typically of most concern when you are scanning a production network. If you are scanning a device in a lab environment, there is normally not much concern because a lab environment is not being used by critical applications. There are a few reasons running a scan on a production network should be done carefully. First, the network traffic that is being generated by a vulnerability scan can and will cause a lot of noise on the network. It can also cause significant congestion, especially when your scans are traversing multiple network hops. (We talk about this further shortly.)
Another consideration in choosing a time to run a scan is the fact that many of the options or plugins that are performed in a vulnerability scan can and will crash the target device as well as the network infrastructure. For this reason, you should be sure that when scanning on a production network, you are scanning at times that will have less impact on end users and servers. Most of the time scanning in the early hours of the day, when no one is using a network for critical purposes, is best.
Determining What Protocols Are in Use
One of the first things you need to know about a network or target device before you begin running vulnerability scans is what actual protocols are being used. If a target device is using both TCP and UDP protocols for services that are running, and you only run a vulnerability scan against TCP ports, then you are going to miss any vulnerabilities that might be found on the UDP services.
Network Topology
As mentioned previously, the network topology should always be taken into consideration when it comes to vulnerability scanning. Of course, scanning across a WAN connection is never recommended because it would significantly impact any of the devices along the path. The rule of thumb when determining where in the network topology to run a vulnerability scan is that it should always be performed as close to the target as possible. For example, if you are scanning a Windows server that is sitting inside your DMZ, the best location for your vulnerability scanner is adjacent to the server on the DMZ. By placing it there, you can eliminate any concerns about impacting devices that your scanner traffic is traversing.
Aside from the impact on the network infrastructure, another concern is that any device that you traverse could also affect the results of your scanner. This is mostly a concern when traversing a firewall device; in addition, other network infrastructure devices could possibly impact the results as well.
Bandwidth Limitations
Let’s take a moment to consider the effects of bandwidth limitations on vulnerability scanning. Obviously, any time you flood a network with a bunch of traffic, it is going to cause an issue with the amount of bandwidth that is available. As a penetration testing professional, you need to be cognizant of how you are affecting the bandwidth of the networks or systems you are scanning. Specifically, depending on the amount of bandwidth you have between the scanner and the target, you might need to adjust your scanner settings to accommodate lower-bandwidth situations. If you are scanning across a VPN or WAN link that most likely has limited bandwidth, you will want to adjust your scanning options so that you are not causing bandwidth consumption issues. The settings that need to be adjusted are typically those related to flooding and denial-of-service type attacks.
Query Throttling
To work around the issue of bandwidth limitations and vulnerability scanning, slowing down the traffic created by your scanner can often help. This is something that can typically be achieved by modifying the options of the scanning policy. One way to do this is to reduce the number of attack threads that are being sent to the target at the same time. There isn’t a specific rule of thumb for the number of threads. It really depends on the robustness of the target. Some targets more fragile than others. Another way to accomplish this is to reduce the scope of the plugins/attacks that the scanner is checking for. If you know that the target device is a Linux server, you can disable the attacks for other operating systems, such as Windows. Even though the attacks won’t work against the Linux server, it still needs to receive and respond to the traffic. This additional traffic can cause a bottleneck in processing and network traffic consumption. Limiting the number of requests that the target would need to respond to would reduce the risk of causing issues on the target such as crashing. Resulting in a more successful scan.
Fragile Systems/Nontraditional Assets
When using a vulnerability scanner against your internal network, you must take into consideration the devices on the network that might not be able to stand up to the traffic that is hurled at it by a vulnerability scanner. For these systems, you might need to either adjust the scanning options to reduce the risk of crashing the device or completely exempt the specific device from being scanned. Unfortunately, by exempting the specific device, you reduce the overall security of the environment.
Printers are often considered “fragile systems.” Historically, they have been devices that have not been able to withstand vulnerability scanning attempts. With the surge in IoT devices, today there are many more devices that may be considered fragile, and you need to consider them when planning for vulnerability scanning. The typical way to address fragile devices is to exempt them from a scan; however, these devices can pose a risk to the environment and do need to be scanned. To address this issue, you can “throttle” the scan frequency as well as the options used in the scan policy to reduce the likelihood of crashing the device.
Understanding How to Analyze Vulnerability Scan Results
As you might already know, running a vulnerability scan is really the easy part of the process. The majority of the work goes into analyzing the results you obtain from the tools you use for vulnerability scanning. These tools are not foolproof; they can provide false positives, and the false positives need to be sorted out to determine what the actual vulnerabilities are. For example, say that you are part of an information security team doing internal vulnerability scans on your network. You run your vulnerability scanning tool of choice and then export a report of the findings from the scan. Next, you turn over the report to the endpoint team to address all the issues noted in the report. The endpoint team takes begins to address the issues one by one. Its process would likely include an investigation of an endpoint to determine how to best mitigate a finding about it. If the report that you provide includes false positives, the endpoint team will end up wasting a lot of time chasing down issues that don’t actually exist. This can obviously cause some problems between the security team and the endpoint team. This scenario can also be applied to other situations. It is especially important when you are providing a report as a deliverable of a paid penetration testing assignment that the report be accurate. Say that you have been hired to identify vulnerabilities on a customer’s network. Your deliverable is to provide a full report of security issues that need to be addressed to protect the customer’s environment. Turning over a report that includes false positives will waste your customer’s time and will likely result in your losing the customer’s repeat business. As you can see from this discussion, reducing the false positives from vulnerability scans is very important.
So how do you go about eliminating false positives? The process involves a detailed and thorough look into the results that your vulnerability scanning tool has provided. Suppose that the results of your scan reveal that there is a possible remote code execution vulnerability in the Apache web server that is running on the target server. This type of finding is likely to be flagged as a high-severity vulnerability, and it should therefore be prioritized. To determine if this is a valid finding, you would first want to take a look at what the vulnerability scanner did to come to this conclusion. Did it pull the version information directly from the system by using a credentialed scan, or was it determined by remotely connecting to the port? As you know, the results of a credentialed scan are more likely to be valid than remote analysis. Because the method of harvesting version information varies based on the actual scanner and the service, you should be able to take a look at the details of the finding in the report to determine how the information was gathered. From there, if possible, you would want to connect directly to the target that is reporting this vulnerability and try to manually determine the version information of this service. Once you validate that the version reported by the scanner does actually match what is on the system, you also need to dig deeper into the details of the vulnerability. Each vulnerability will typically map to one or many items in the Common Vulnerabilities and Exposures (CVE) list. You need to take a look at the particulars of those CVE items to understand the criteria because a vulnerability may be flagged based on only one piece of information (such as the version number of the Apache server pulled from the banner). When you dig into the CVE details, you might find that for the vulnerability to be exploitable, this version of Apache must be running on a specific version or distribution of Linux. Most vulnerability scanners are able to correlate multiple pieces of information to make the determination. However, some Linux operating systems, such as Red Hat, report an older version of a service that has actually been patched for the specific vulnerability. This is called backporting. So, as you can see, there is more to it than just running a scan. Of course, the number-one method of validating a finding from a vulnerability scan is to exploit the vulnerability, which will be discussed in many of the upcoming chapters.
The following sections list helpful sources for further investigation of vulnerabilities that you might find during your scans.
US-CERT
The U.S. Computer Emergency Readiness Team (US-CERT) was established to protect the Internet infrastructure of the United States. The main goal of US-CERT is to work with public- and private-sector agencies to increase the efficiency of vulnerability data sharing. The work done by US-CERT is meant to improve the nation’s cybersecurity posture. It operates as an entity under the Department of Homeland Security as part of the National Cybersecurity and Communications Integration Center (NCCIC). You can access US-CERT resources by visiting https://www.us-cert.gov.
The CERT Division of Carnegie Mellon University
The CERT Division of the Software Engineering Institute of Carnegie Mellon University is a cybersecurity center with experts that help coordinate vulnerability disclosures across the industry. CERT also research security vulnerabilities and contribute to many different cybersecurity efforts in the industry. CERT also develop and deliver training to many organizations to help them improve their cybersecurity practices and programs. You can obtain additional information about CERT at https://cert.org
NIST
The National Institute of Standards and Technology (NIST) is an agency of the U.S. Department of Commerce. Its core focus is to promote innovation and industrial competitiveness. NIST is responsible for the creation of the NIST Cybersecurity Framework (NIST CSF; see https://www.nist.gov/cyberframework). This framework includes a policy on computer security guidance. Version 1 of the NIST framework was published in 2014 for the purpose of guiding the security of critical infrastructure; however, it is commonly used by private industry for guidance in risk management. In 2018, NIST released version 1.1, which is designed to assist organizations in assessing the risks they encounter. In general, the framework outlines the standards and industry best practices that can be used to improve organizations’ cybersecurity posture. Anyone who is responsible for making decisions related to cybersecurity in an organization should consult this framework for guidance on standards and best practices.
JPCERT
Similar to the US-CERT, the Japan Computer Emergency Response Team (JPCERT) is an organization that works with service providers, security vendors, and private-sector and government agencies to provide incident response capabilities, increase cybersecurity awareness, conduct research and analysis of security incidents, and work with other international CERT teams. The JPCERT is responsible for Computer Security Incident Response Team (CSIRT) activities in the Japanese and Asia Pacific region.
You can access JP-CERT resources by visiting http://www.jpcert.or.jp/english/.
CAPEC
The Common Attack Pattern Enumeration and Classification (CAPEC) is a community-driven effort. The idea is to catalog the attack patterns seen in the wild so that they can be used to more efficiently identify active threats. CAPEC is a standard maintained by MITRE. The best way to think of CAPEC is that it is a dictionary of known attacks that have been seen in the real world.
CVE
Common Vulnerabilities and Exposures (CVE) is an effort that reaches across international cybersecurity communities. It was created in 1999 with the idea of consolidating cybersecurity tools databases. CVE IDs are identified by the letters CVE followed by the year of publication and 4 or more digits in the sequence number portion of the ID. For example, CVE-YYYY-NNNN with 4 digits in the sequence number, CVE-YYYY-NNNNN with 5 digits in the sequence number, CVE-YYYY-NNNNNNN with 7 digits in the sequence number, and so on.
CWE
Common Weakness Enumeration (CWE), at a high level, is a list of software weaknesses. The purposes of CWE is to create a common language to describe software security weaknesses that are the root cause of a given vulnerability. CWE provides a common baseline for weakness identification to aid the mitigation process.
How to Deal with a Vulnerability
As a penetration tester, your goal is to identify weaknesses that can be exploited. As previously discussed, vulnerability scanning is a method of identifying potential exploits. After you identify a vulnerability, you need to verify it. There are many ways to determine if a vulnerability scanner’s findings are valid. The ultimate validation is exploitation.
To determine if a vulnerability is exploitable, you need to first identify an exploit for a vulnerability. Suppose your vulnerability scanner reports that there is an outdated version of Apache Struts that is vulnerable to a remotely exploitable unauthenticated defect. One of the first things you would want to do is to determine if there is a readily available exploit. Many times, this can be found with an exploitation framework such as Metasploit. As a general rule, if a vulnerability has a matching module in Metasploit, it should almost always be considered high severity. That being said, there are also other methods for finding exploits, and you can always write your own exploits. (These topics are discussed in later chapters.)
How do you prioritize your findings for the next phase of your penetration test? To determine the priority, you need to answer a few questions:
What is the severity of the vulnerability?
How many systems does the vulnerability apply to?
How was the vulnerability detected?
Was the vulnerability found with an automated scanner or manually?
What is the value of the device on which the vulnerability was found?
Is this device critical to your business or infrastructure?
What is the attack vector, and does it apply to your environment?
Is there a possible workaround or mitigation available?
Answering these questions can help you determine the priority at which you should address the vulnerabilities found. Standard protocol would have you start with the highest-severity vulnerabilities that have the greatest likelihood of being exploited. If these vulnerabilities are actually valid, they might already be compromised. (If at any time during a penetration test, you find that a system is being actively exploited, you should report it right away to the system owner.) Next, you should address any vulnerabilities that are on critical systems, regardless of the severity level. It is possible that there might be an exploit chain that is available to an attacker that would allow a lower-severity vulnerability to become critical. You need to protect critical systems first. Next, you might want to prioritize based on how many systems are affected by the finding. If a large number are affected, then this would raise the priority because this exploits on this vulnerability would have a higher impact on your environment. These are suggested guidelines, but when it comes to prioritization of vulnerability management and mitigation, it really depends on the specific environment.
Exam Preparation Tasks
As mentioned in the section “How to Use This Book” in the Introduction, you have a couple choices for exam preparation: the exercises here, Chapter 11, “Final Preparation,” and the exam simulation questions in the Pearson Test Prep software online.
Review All Key Topics
Review the most important topics in this chapter, noted with the Key Topics icon in the outer margin of the page. Table 3-6 lists these key topics and the page number on which each is found.
Table 3-6 Key Topics for Chapter 3
Key Topic Element |
Description |
Page Number |
Paragraph |
Understanding information gathering and reconnaissance |
|
Paragraph |
Understanding active reconnaissance vs. passive reconnaissance |
|
Paragraph |
Understanding active reconnaissance |
|
List |
Nmap scan types |
|
Paragraph |
Exploring the different types enumeration |
|
Paragraph |
Group enumeration |
|
Paragraph |
Network share enumeration |
|
Paragraph |
Web page enumeration/web application enumeration |
|
Paragraph |
Service enumeration |
|
Paragraph |
Exploring enumeration via packet crafting |
|
Paragraph |
Understanding passive reconnaissance |
|
Paragraph |
Packet inspection and eavesdropping |
|
Paragraph |
Understanding open source intelligence (OSINT) gathering |
|
Paragraph |
Exploring reconnaissance with Recon-Ng |
|
Paragraph |
Understanding the art of performing vulnerability scans |
|
Paragraph |
Understanding the types of vulnerability scans |
|
Paragraph |
Challenges to consider when running a vulnerability scan |
|
Paragraph |
Understanding how to analyze vulnerability scan results |
|
Paragraph |
How to deal with a vulnerability |
Define Key Terms
Define the following key terms from this chapter and check your answers in the glossary:
web page enumeration/web application enumeration
open source intelligence (OSINT) gathering
compliance scan
Q&A
The answers to these questions appear in Appendix A. For more practice with exam format questions, use the Pearson Test Prep software online.
1. An Nmap _________scan is also known as a “half-open” scan because it doesn’t open a full TCP connection.
SYN
TCP
Ping
FIN
2. An Nmap _______ scan uses the underlying operating systems networking mechanisms and is typically very noisy.
TCP
FIN
SYN
Ping
3. The Nmap __________ script uses MSRPC to enumerate valid account information about the target.
smb-eunm-users.nse
http-enum.nse
smb-enum-shares.nse
smb-enum-services.nse
4. The _______ tool can be used to enumerate information about targets by using packet-crafting commands.
Metasploit
Scapy
DNSrecon
Recon-ng
5. ________ enumeration can be accomplished using various tools or simply using Google searches with site: method.
User
Group
Domain
Token
6. ___________ reconnaissance is a method of information gathering in which the attacker uses techniques that are not likely to be detected by the target.
Passive
Active
Network
Web
7. __________________ is the method of enumeration used by the Scapy tool.
Packet crafting
Passive reconnaissance
Packet inspection
Open source
8. You are running an Nmap port scan, and it is being blocked by a network filter. Which of the following options could you try to avoid the filters?
-sP
-sU
-sT
-sS
9. You are running an Nmap TCP FIN scan against a target device. The result of the scan indicates that port 80 is filtered. What response was likely received from the target that led to Nmap making this determination?
RST packet received
No response received
TCP FIN received
No ICMP response received
10. A _______ vulnerability scan would typically be focused on a specific set of requirements.
Full
Stealth
Compliance
Discovery