
Chapter 7
Exploiting Local Host and Physical Security Vulnerabilities
This chapter covers the following subjects:
In this chapter you will learn about exploiting local host vulnerabilities, as well as physical security flaws. This chapter provides details on how to take advantage of insecure services and protocol configurations during a penetration testing engagement. You will also learn how to perform local privilege escalation attacks as part of penetration testing. This chapter provides details to help you gain an understanding of Set-UID, Set-GID, and Unix programs, as well as ret2libc attacks. This chapter also covers privilege escalation attacks against Windows systems and the security flaws of Android and Apple iOS mobile devices. In this chapter you will also gain an understanding of physical security attacks such as piggybacking, tailgating, fence jumping, dumpster diving, lock picking, and badge cloning.
“Do I Know This Already?” Quiz
The “Do I Know This Already?” quiz allows you to assess whether you should read this entire chapter thoroughly or jump to the “Exam Preparation Tasks” section. If you are in doubt about your answers to these questions or your own assessment of your knowledge of the topics, read the entire chapter. Table 7-1 lists the major headings in this chapter and their corresponding “Do I Know This Already?” quiz questions. You can find the answers in Appendix A, “Answers to the ‘Do I Know This Already?’ Quizzes and Q&A Sections.”
Table 7-1 “Do I Know This Already?” Section-to-Question Mapping
Foundation Topics Section |
Questions |
1–8 |
|
9–10 |
Caution
The goal of self-assessment is to gauge your mastery of the topics in this chapter. If you do not know the answer to a question or are only partially sure of the answer, you should mark that question as incorrect for purposes of the self-assessment. Giving yourself credit for an answer you correctly guess skews your self-assessment results and might provide you with a false sense of security.
1. Which of the following is not an insecure service or protocol?
Cisco Smart Install
Telnet
Finger
Windows PowerSploit
2. Consider the following example:
omar@ares:~$ ls -l topsecret.txt
-rwxrwxr-- 1 omar omar 15 May 26 21:15 topsecret.txt
What permissions does the user omar have in the topsecret.txt file?
Read only
Write only
Read, write, execute
Write, execute
3. Which of the following is not true about sticky bits?
A restricted deletion flag, or sticky bit, is a single bit whose interpretation depends on the file type.
For directories, the sticky bit prevents unprivileged users from removing or renaming a file in the directory unless they own the file or the directory; this is called the restricted deletion flag for the directory, and is commonly found on world-writable directories such as /tmp.
If the sticky bit is set on a directory, files inside the directory cannot be renamed or removed by the owner of the file, the owner of the directory, or the superuser (even though the modes of the directory might allow such an operation).
For regular files on some older systems, the sticky bit saves the program’s text image on the swap device so it will load more quickly when run.
4. Which of the following is a type of attack in which a subroutine return address on a call stack is replaced by an address of a subroutine that is already present in the executable memory of the process?
Ret2libc
ASLR bypass
CPassword
Sticky-bit attack
5. Which of the following is a component of Active Directory’s Group Policy Preferences that allows administrators to set passwords via Group Policy?
Ret2libc
CPassword
Sticky-bit
GPO crack
6. Which of the following tools allows an attacker to dump the LSASS process from memory to disk?
John the Ripper
SAMsploit
Sysinternals ProcDump
Windows PowerShell
7. The SELinux and AppArmor security frameworks include enforcement rules that attempt to prevent which of the following attacks?
Lateral movement
Sandbox escape
Cross-site request forgery (CSRF)
Cross-site scripting (XSS)
8. Which of the following is not one of the top mobile security threats and vulnerabilities?
Cross-site request forgery (CSRF)
Insecure data storage
Insecure communication
Insecure authentication
9. Which of the following is an attack in which the attacker tries to retrieve encryption keys from a running operating system after using a system reload?
Hot-boot
Rowhammer
Cold boot
ASLR bypass
10. Which of the following is the term for an unauthorized individual following an authorized individual to enter a restricted building or facility?
Lockpicking
Dumpster diving
Badge cloning
Tailgating
Foundation Topics
Exploiting Local Host Vulnerabilities
Threat actors take advantage of numerous local host vulnerabilities to carry out different attacks. In this section, you will learn about exploits against local host vulnerabilities such as taking advantage of specific operating system flaws, escalating local privileges, stealing credentials, installing key loggers, and abusing physical device security. You will also learn about different virtual machine and container vulnerabilities, and you will learn about cold boot attacks, JTAG debugging, and different attacks that can be carried out over the serial console of a device.
Insecure Service and Protocol Configurations
Many attacks materialize because unused or insecure protocols, services, and associated ports, which are low-hanging fruit opportunities for attackers. In addition, many organizations don’t patch vulnerabilities for the services, protocols, and ports they don’t use—despite the fact that vulnerabilities may still be present for months or even years.
Tip
A best practice is to clearly define and document the services, protocols, and ports that are necessary for business. An organization should ensure that all other services, protocols, and ports are disabled or removed. As a penetration tester, you should always go after insecure protocols, services, and associated ports.
Some protocols should never be used, such as Telnet and Cisco Smart Install. Telnet is a clear-text protocol that exposes the entire contents of any session to anyone who can gain access to the traffic. Secure Shell (SSH) should be used instead. If a switch is running the Cisco Smart Install protocol, any unauthenticated attacker can modify the configuration and fully compromise the switch.
Note
You can obtain more information about Smart Install and related features from the following Cisco security advisory: https://tools.cisco.com/security/center/content/CiscoSecurityAdvisory/cisco-sa-20180409-smi.
Other protocols, like Telnet, transfer sensitive data in clear text. Examples of these clear-text protocols include SNMP (versions 1 and 2), HTTP, syslog, IMAP, POP3, and FTP.
Tip
In some cases, there is no secure alternative to otherwise insecure management protocols. In such a case, it is very important to understand what is at risk and what mitigation techniques could be implemented.
All insecure protocols are subject to man-in-the-middle (MITM) attacks or to IP traffic capture (sniffing). Example 7-1 shows how easy it is to capture a password from an FTP transaction by just sniffing the traffic using the Linux Tcpdump tool.
Example 7-1 Capturing Passwords and Sniffing Traffic from Clear-Text Protocols by Using Tcpdump
root@kube1:~# tcpdump -nnXSs 0 host 10.1.1.12
tcpdump: verbose output suppressed, use -v or -vv for full protocol decode
listening on ens160, link-type EN10MB (Ethernet), capture size 262144 bytes
22:50:23.958387 IP 10.1.1.12.50788 > 10.1.1.11.21: Flags [S], seq
314242458, win 29200, options [mss 1460,sackOK,TS val 1523378506 ecr
0,nop,wscale 7], length 0
   0x0000:  4500 003c 1cd0 4000 4006 07d4 0a01 010c  E..<..@.@.......
   0x0010:  0a01 010b c664 0015 12ba f59a 0000 0000  .....d..........
   0x0020:  a002 7210 acf1 0000 0204 05b4 0402 080a  ..r.............
   0x0030:  5acc e94a 0000 0000 0103 0307            Z..J........
22:50:23.958455 IP 10.1.1.11.21 > 10.1.1.12.50788: Flags [S.], seq
4230935771, ack 314242459, win 28960, options [mss 1460,sackOK,TS val
1523511322 ecr 1523378506,nop,wscale 7], length 0
   0x0000:  4500 003c 0000 4000 4006 24a4 0a01 010b  E..<..@.@.$.....
   0x0010:  0a01 010c 0015 c664 fc2e f4db 12ba f59b  .......d........
   0x0020:  a012 7120 1647 0000 0204 05b4 0402 080a  ..q..G..........
   0x0030:  5ace f01a 5acc e94a 0103 0307            Z...Z..J....
22:50:23.958524 IP 10.1.1.12.50788 > 10.1.1.11.21: Flags [.], ack
4230935772, win 229, options [nop,nop,TS val 1523378506 ecr 1523511322],
length 0
   0x0000:  4500 0034 1cd1 4000 4006 07db 0a01 010c  E..4..@.@.......
   0x0010:  0a01 010b c664 0015 12ba f59b fc2e f4dc  .....d..........
   0x0020:  8010 00e5 10e4 0000 0101 080a 5acc e94a  ............Z..J
   0x0030:  5ace f01a                              Z...
22:50:23.961422 IP 10.1.1.11.21 > 10.1.1.12.50788: Flags [P.], seq
4230935772:4230935792, ack 314242459, win 227, options [nop,nop,TS val
1523511323 ecr 1523378506], length 20: FTP: 220 (vsFTPd 3.0.3)
   0x0000:  4500 0048 04c6 4000 4006 1fd2 0a01 010b  E..H..@.@.......
   0x0010:  0a01 010c 0015 c664 fc2e f4dc 12ba f59b  .......d........
   0x0020:  8018 00e3 1653 0000 0101 080a 5ace f01b  .....S......Z...
   0x0030:  5acc e94a 3232 3020 2876 7346 5450 6420  Z..J220.(vsFTPd.
   0x0040:  332e 302e 3329 0d0a                      3.0.3)..
22:50:23.961485 IP 10.1.1.12.50788 > 10.1.1.11.21: Flags [.], ack
4230935792, win 229, options [nop,nop,TS val 1523378507 ecr 1523511323],
length 0
   0x0000:  4510 0034 1cd2 4000 4006 07ca 0a01 010c  E..4..@.@.......
   0x0010:  0a01 010b c664 0015 12ba f59b fc2e f4f0  .....d..........
   0x0020:  8010 00e5 10ce 0000 0101 080a 5acc e94b  ............Z..K
   0x0030:  5ace f01b                              Z...
22:50:26.027005 IP 10.1.1.12.50788 > 10.1.1.11.21: Flags [P.], seq
314242459:314242470, ack 4230935792, win 229, options [nop,nop,TS val
1523379024 ecr 1523511323], length 11: FTP: USER omar
   0x0000:  4510 003f 1cd3 4000 4006 07be 0a01 010c  E..?..@.@.......
   0x0010:  0a01 010b c664 0015 12ba f59b fc2e f4f0  .....d..........
   0x0020:  8018 00e5 6a32 0000 0101 080a 5acc eb50  ....j2......Z..P
   0x0030:  5ace f01b 5553 4552 206f 6d61 720d 0a    Z...USER.omar..
22:50:26.027045 IP 10.1.1.11.21 > 10.1.1.12.50788: Flags [.], ack
314242470, win 227, options [nop,nop,TS val 1523511839 ecr 1523379024],
length 0
   0x0000:  4500 0034 04c7 4000 4006 1fe5 0a01 010b  E..4..@.@.......
   0x0010:  0a01 010c 0015 c664 fc2e f4f0 12ba f5a6  .......d........
   0x0020:  8010 00e3 163f 0000 0101 080a 5ace f21f  .....?......Z...
   0x0030:  5acc eb50                                Z..P
22:50:26.027343 IP 10.1.1.11.21 > 10.1.1.12.50788: Flags [P.], seq
4230935792:4230935826, ack 314242470, win 227, options [nop,nop,TS val
1523511839 ecr 1523379024], length 34: FTP: 331 Please specify the password.
   0x0000:  4500 0056 04c8 4000 4006 1fc2 0a01 010b  E..V..@.@.......
   0x0010:  0a01 010c 0015 c664 fc2e f4f0 12ba f5a6  .......d........
   0x0020:  8018 00e3 1661 0000 0101 080a 5ace f21f  .....a......Z...
   0x0030:  5acc eb50 3333 3120 506c 6561 7365 2073  Z..P331.Please.s
   0x0040:  7065 6369 6679 2074 6865 2070 6173 7377  pecify.the.
   0x0050:  6f72 642e 0d0a                           password...
22:50:26.027393 IP 10.1.1.12.50788 > 10.1.1.11.21: Flags [.], ack
4230935826, win 229, options [nop,nop,TS val 1523379024 ecr 1523511839],
length 0
   0x0000:  4510 0034 1cd4 4000 4006 07c8 0a01 010c  E..4..@.@.......
   0x0010:  0a01 010b c664 0015 12ba f5a6 fc2e f512  .....d..........
   0x0020:  8010 00e5 0c98 0000 0101 080a 5acc eb50  ............Z..P
   0x0030:  5ace f21f                                Z...
22:50:30.053380 IP 10.1.1.12.50788 > 10.1.1.11.21: Flags [P.], seq
314242470:314242485, ack 4230935826, win 229, options [nop,nop,TS val
1523380030 ecr 1523511839], length 15: FTP: PASS badpass1
   0x0000:  4510 0043 1cd5 4000 4006 07b8 0a01 010c  E..C..@.@.......
   0x0010:  0a01 010b c664 0015 12ba f5a6 fc2e f512  .....d..........
   0x0020:  8018 00e5 c455 0000 0101 080a 5acc ef3e  .....U......Z..>
   0x0030:  5ace f21f 5041 5353 2062 6164 7061 7373  Z...PASS.badpass
   0x0040:  310d 0a                                  1..
22:50:30.085058 IP 10.1.1.11.21 > 10.1.1.12.50788: Flags [P.], seq
4230935826:4230935849, ack 314242485, win 227, options [nop,nop,TS val
1523512854 ecr 1523380030], length 23: FTP: 230 Login successful.
   0x0000:  4500 004b 04c9 4000 4006 1fcc 0a01 010b  E..K..@.@.......
   0x0010:  0a01 010c 0015 c664 fc2e f512 12ba f5b5  .......d........
   0x0020:  8018 00e3 1656 0000 0101 080a 5ace f616  .....V......Z...
   0x0030:  5acc ef3e 3233 3020 4c6f 6769 6e20 7375  Z..>230.Login.
   0x0040:  6363 6573 7366 756c 2e0d 0a              successful...
In Example 7-1 a host at IP address 10.1.1.12 initiates an FTP connection to an FTP server with IP address 10.1.1.11. In the packet capture, you can see the initial login transaction where the user (omar) successfully logs in using the password (badpass1), as demonstrated in the highlighted lines in Example 7-1. It is possible to use similar utilities, such as Tshark, to capture data from a live network (see https://www.wireshark.org/docs/man-pages/tshark.html).
The following are also some of the services that are considered insecure:
The following services should be carefully implemented and not exposed to untrusted networks:
Authd (or Identd): https://linux.die.net/man/3/ident
Netdump: https://linux.die.net/man/8/netdump
Netdump-server: https://linux.die.net/man/8/netdump-server
Yppasswdd: https://linux.die.net/man/8/yppasswdd
Tip
RedHat provides a great resource that goes over Linux server security; see https://access.redhat.com/documentation/en-US/Red_Hat_Enterprise_Linux/4/html/Security_Guide/ch-server.html.
Local Privilege Escalation
Privilege escalation is the process of elevating the level of authority (privileges) of a compromised user or a compromised application. This is done to further perform actions on the affected system or any other systems in the network, typically post-exploitation (that is, after gaining a foothold in the target system and exploiting a vulnerability).
Note
In Chapter 8, “Performing Post-Exploitation Techniques,” you will learn about additional post-exploitation methodologies and tactics.
The main focus of the post-exploitation phase is to maintain access to the compromised systems and move around in the network while remaining undetected. In many cases, privilege escalation is required to perform those tasks.
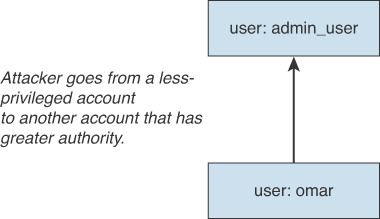
It is possible to perform privilege escalation in a few different ways. An attacker may be able to compromise a system by logging in with a non-privileged account. Subsequently, the attacker can go from that unprivileged (or less privileged) account to another account that has greater authority, as shown in Figure 7-1.
It is also possible to perform privilege escalation by “upgrading,” or elevating, the privileges of the same account, as shown in Figure 7-2.

In Figure 7-2, the user (omar) belongs to the engineering group (eng) and does not have administrative rights on the system. The attacker then exploits a vulnerability and is able to manipulate the system to put the same user (omar) in the admin group, subsequently giving the user administrative rights on the system.
Understanding Linux Permissions
This book assumes that you have familiarity with Linux and user accounts. As a refresher, in some cases users must be able to accomplish tasks that require privileges (for example, when installing a program or adding another user). This is why sudo exists. Example 7-2 shows the first few lines and description of the sudo man page.
Example 7-2 The Linux sudo Command
     sudo, sudoedit — execute a command as another user

SYNOPSIS
     sudo -h | -K | -k | -V
     sudo -v [-AknS] [-a type] [-g group] [-h host] [-p prompt] [-u user]
     sudo -l [-AknS] [-a type] [-g group] [-h host] [-p prompt] [-U user]
[-u user] [command]
     sudo [-AbEHnPS] [-a type] [-C num] [-c class] [-g group] [-h host]
[-p prompt] [-r role] [-t type] [-u user] [VAR=value] [-i | -s] [command]
     sudoedit [-AknS] [-a type] [-C num] [-c class] [-g group] [-h host]
[-p prompt] [-u user] file ...
DESCRIPTION
     sudo allows a permitted user to execute a command as the superuser
or another user, as specified by the security policy.  The invoking user's
real (not effective) user ID is used to determine the user name with which
to query the security policy.
     sudo supports a plugin architecture for security policies and input/
output logging.  Third parties can develop and distribute their own policy
and I/O logging plug-ins to work seamlessly with the sudo front end.  The
default security policy is sudoers, which is configured via the file /etc/
sudoers, or via LDAP.  See the Plugins section for more information.
     The security policy determines what privileges, if any, a user has
to run sudo.  The policy may require that users authenticate themselves
with a password or another authentication mechanism.  If authentication
is required, sudo will exit if the user's password is not entered within
a configurable time limit.  This limit is policy-specific; the default
password prompt timeout for the sudoers security policy is unlimited.
     Security policies may support credential caching to allow the user
to run sudo again for a period of time without requiring authentication.
The sudoers policy caches credentials for 15 minutes, unless overridden
in sudoers(5).  By running sudo with the -v option, a user can update the
cached credentials without running a command.
     When invoked as sudoedit, the -e option (described below), is implied.
     Security policies may log successful and failed attempts to use sudo.
If an I/O plugin is configured, the running command's input and output may
be logged as well.
. . . <output omitted for brevity>. . .
On Unix-based systems, you can use the chmod command to set permissions values on files and directories.
Note
You can set permissions of a file or directory (folder) to a given user, a group of users, and others.
With Linux you can set three basic permissions:
Read (r)
Write (w)
Execute (x)
You can apply these permissions to any type of files or to directories. Example 7-3 shows the permissions of a file called omar_file.txt. The user executes the ls -l command, and in the portion of the output on the left, you see -rw-rw-r--, which indicates that the current user (omar) has read and write permissions.
Example 7-3 Linux File Permissions
omar@dionysus:~$ ls -l omar_file.txt
-rw-rw-r-- 1 omar omar 15 May 26 23:45 omar_file.txt
Figure 7-3 explains the Linux file permissions.

Example 7-4 shows how a user belonging to any group can change the permissions of the file to be read, write, executable by using the chmod 0777 command.
Example 7-4 Changing File Permissions
omar@dionysus:~$ chmod 0777 omar_file.txt
omar@dionysus:~$ ls -l omar_file.txt
-rwxrwxrwx 1 omar omar 15 May 26 23:45 omar_file.txt
omar@dionysus:~$
As documented in the chmod man pages, the restricted deletion flag, or sticky bit, is a single bit whose interpretation depends on the file type. For directories, the sticky bit prevents unprivileged users from removing or renaming a file in the directory unless they own the file or the directory; this is called the restricted deletion flag for the directory, and it is commonly found on world-writable directories such as /tmp. For regular files on some older systems, the sticky bit saves the program’s text image on the swap device so it will load more quickly when run.
Tip
The sticky bit is obsolete with files, but it is used for directories to indicate that files can be unlinked or renamed only by their owner or the superuser. Sticky bits were used with files in very old Unix machines due to memory restrictions. If the sticky bit is set on a directory, files inside the directory may be renamed or removed only by the owner of the file, the owner of the directory, or the superuser (even though the modes of the directory might allow such an operation); on some systems, any user who can write to a file can also delete it. This feature was added to keep an ordinary user from deleting another’s files from the /tmp directory.
There are two ways that you can use the chmod command:
Symbolic (text) method
Numeric method
When you use the symbolic method, the structure includes who has access and the permission given. The indication of who has access to the file is as follows:
u: The user that owns the file
g: The group that the file belongs to
o: The other users (that is, everyone else)
a: All of the above (that is, use a instead of ugo)
Example 7-5 shows how to remove the execute permissions for all users by using the chmod a-x omar_file.txt command.
Example 7-5 Symbolic Method Example
omar@dionysus:~$ ls -l omar_file.txt
-rwxrwxrwx 1 omar omar 15 May 26 23:45 omar_file.txt
omar@dionysus:~$ chmod a-x omar_file.txt
omar@dionysus:~$ ls -l omar_file.txt
-rw-rw-rw- 1 omar omar 15 May 26 23:45 omar_file.txt
omar@dionysus:~$
The chmod command allows you to use + to add permissions and - to remove permissions. The chmod commands clears the set-group-ID (SGID or setgid) bit of a regular file if the file’s group ID does not match the user’s effective group ID or one of the user’s supplementary group IDs, unless the user has appropriate privileges. Additional restrictions may cause the set-user-ID (SUID or setuid) and set-group-ID bits of MODE or FILE to be ignored. This behavior depends on the policy and functionality of the underlying chmod system call. When in doubt, check the underlying system behavior. This is clearly explained in the man page of the chmod command (man chmod). In addition, the chmod command retains a directory’s SUID and SGID bits unless you explicitly indicate otherwise.
You can also use numbers to edit the permissions of a file or directory (for the owner, group, and others), as well as the SUID, SGID, and sticky bits. Example 7-4 shows the numeric method. The three-digit number specifies the permission, where each digit can be anything from 0 to 7. The first digit applies to permissions for the owner, the second digit applies to permissions for the group, and the third digit applies to permissions for all others.
Figure 7-4 demonstrates how the numeric method works.

As shown in Figure 7-4, a binary number 1 is put under each permission granted and a 0 under each permission not granted. On the right in Figure 7-4, the binary-to-decimal conversion is done. This is why in Example 7-4, the numbers 777 make the file omar_file.txt world-writable (which means any user has read, write, and execute permissions).
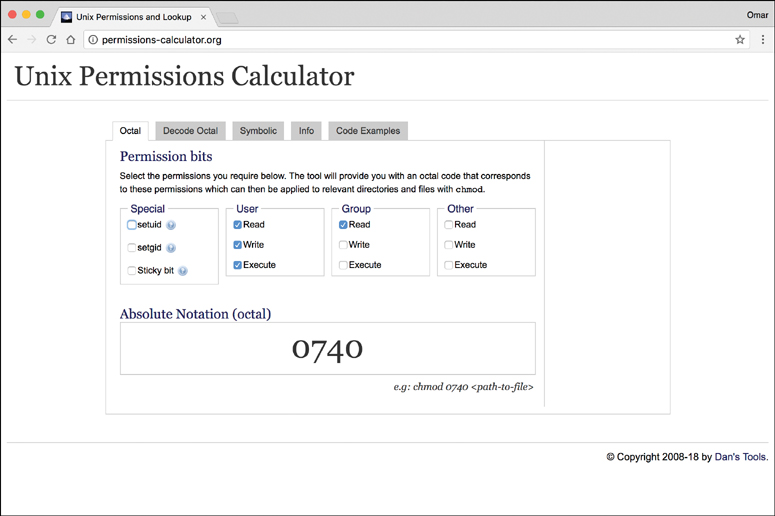
A great online tool that you can use to practice setting the different parameters of Linux permissions is the Permissions Calculator, at http://permissions-calculator.org (see Figure 7-5).
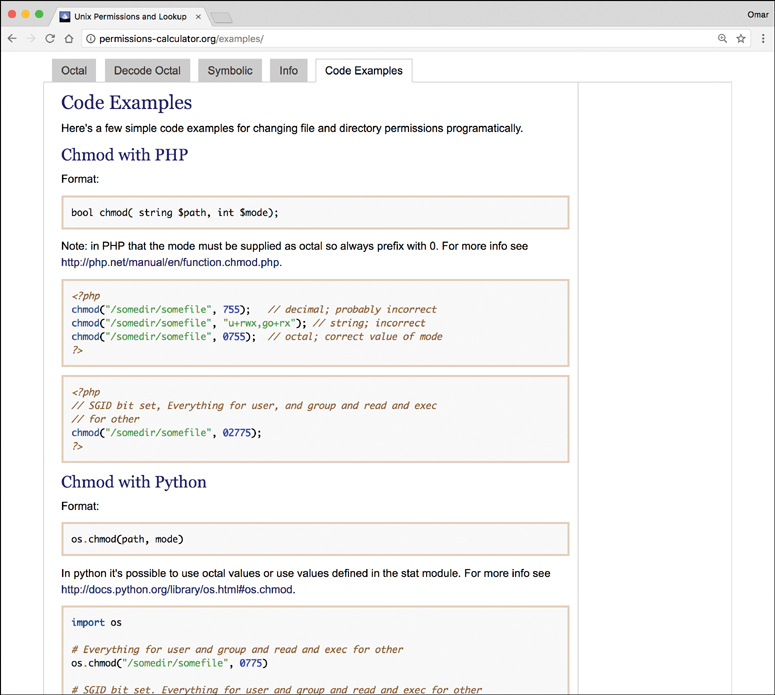
The Permissions Calculator website also provides several examples using PHP, Python, and Ruby to change file and directory permissions programmatically, as shown in Figure 7-6.
Understanding SUID or SGID and Unix Programs
A program or a script in which the owner is root (by setting its Set-UID bit) will execute with superuser (root) privileges. This introduces a security problem: If the system is compromised and that program is manipulated (as in the case of monolithic embedded devices), an attacker may be able to run additional executions as superuser (root).
Modern Unix and Linux-based systems ignore the SUID and SGID bits on shell scripts for this reason.
Tip
An example of a SUID-based attack is the vulnerability that existed in the program /usr/lib/preserve (or /usr/lib/ex3.5preserve). This program, which is used by the vi and ex editors, automatically made a backup of the file being edited if the user was unexpectedly disconnected from the system before writing out changes to the file. The system wrote the changes to a temporary file in a special directory. The system also sent an email to the user using /bin/mail with a notification that the file had been saved. Because users could have been editing a file that was private or confidential, the directory used by the older version of the Preserve program was not accessible by most users on the system. Consequently, to let the Preserve program write into this directory and let the recovery program read from it, these programs were made SUID root.
You can find all the SUID and SGID files on your system by using the command shown in Example 7-6.
Example 7-6 Finding All the SUID and SGID Files on a System
omar@dionysus:~$ sudo find / ( -perm -004000 -o -perm -002000 ) -type f -print
[sudo] password for omar: ************
find: '/proc/3491/task/3491/fdinfo/6'/usr/sbin/postqueue
/usr/sbin/postdrop
/usr/lib/eject/dmcrypt-get-device
/usr/lib/dbus-1.0/dbus-daemon-launch-helper
/usr/lib/policykit-1/polkit-agent-helper-1
/usr/lib/x86_64-linux-gnu/utempter/utempter
/usr/lib/x86_64-linux-gnu/lxc/lxc-user-nic
/usr/lib/snapd/snap-confine
/usr/lib/openssh/ssh-keysign
/usr/bin/dotlock.mailutils
/usr/bin/pkexec
/usr/bin/chfn
/usr/bin/screen
/usr/bin/newgrp
/usr/bin/crontab
/usr/bin/at
/usr/bin/chsh
/usr/bin/ssh-agent
/usr/bin/gpasswd
/usr/bin/expiry
/usr/bin/wall
/usr/bin/sudo
/usr/bin/bsd-write
/usr/bin/mlocate
/usr/bin/newgidmap
/usr/bin/chage
/usr/bin/newuidmap
find: '/proc/3491/fdinfo/5': No such file or directory
/sbin/mount.cifs
/sbin/unix_chkpwd
/sbin/pam_extrausers_chkpwd
/sbin/mount.ecryptfs_private
/bin/fusermount
/bin/ping6
/bin/mount
/bin/umount
/bin/ntfs-3g
/bin/su
/bin/ping
In Example 7-6, the find command starts in the root directory (/) and looks for all files that match mode 002000 (SGID) or mode 004000 (SUID). The -type f option limits the search to files only.
Tip
Security Enhanced Linux (SELinux) is a collection of kernel modifications and user-space tools that are now part of several Linux distributions. It supports access control security policies, including mandatory access controls. SELinux aims to provide enforcement of security policies and simplify the amount of software required to accomplish such enforcement. Access can be constrained on variables such as which users and applications can access which resources. In addition, SELinux access controls are determined by a policy loaded on the system that cannot be changed by uneducated users or insecure applications. SELinux also allows you to configure more granular access control policies. For instance, SELinux lets you specify who can unlink, append only, or move a file instead of only being able to specify who can read, write, or execute a file. It also allows you to configure access to many other resources in addition to files. For example, it allows you to specify access to network resources and interprocess communication (IPC).
Insecure SUDO Implementations
Sudo, which stands for “super user do,” Is a Linux utility that allows a system administrator to give certain users or groups of users the ability to run some or all commands as root or superuser. The Sudo utility operates on a per-command basis, and it is not a replacement for the shell. You can also use the Sudo utility to restrict the commands a user can run on a per-host basis, to restrict logging of each command to have an audit trail of who did what, and to restrict the ability to use the same configuration file on different systems.
Example 7-7 shows the Linux command groups being used. The command shows the group that the user omar belongs to. You can see in this example that sudo is one of the groups that the user omar belongs to.
Example 7-7 The groups Command
omar@dionysus:~$ groups
omar adm cdrom sudo dip plugdev lxd sambashare lpadmin
Another command you can use to see the groups a user belongs to is the id command, as shown in Example 7-8.
Example 7-8 The id Command
omar@dionysus:~$ id
uid=1000(omar) gid=1000(omar) groups=1000(omar),4(adm),24(cdrom),
27(sudo),30(dip),46(plugdev),110(lxd),113(sambashare),117(lpadmin)
Example 7-9 shows the same commands used when a different user (ron) is logged in. In this case, you can see that ron belongs only to the group ron.
Example 7-9 The Groups to Which User ron Belongs
ron@dionysus:~$ groups
ron
ron@dionysus:~$ id
uid=1001(ron) gid=1001(ron) groups=1001(ron)
ron@dionysus:~$
Certain Linux systems call this group the “wheel” group. If you want to add an existing user to the wheel (or sudo) group, you can use the usermod command with the -G option. You might also want to use the -a option, to avoid removing the user from other groups to which he or she belongs, as shown in Example 7-10.
Example 7-10 The usermod Command
$ sudo usermod -a -G wheel ron
You can also add a user account to the wheel group as you create it, as shown in Example 7-11.
Example 7-11 Adding a User to the wheel Group at Creation
$ sudo useradd -G wheel chris
In many different Linux systems, you can also use the visudo command. Figure 7-7 shows the first few lines of the description of the visudo man page (man visudo).

Example 7-12 shows the contents of the sudoers file after the visudo command is invoked.
Example 7-12 The sudoers File
# This file MUST be edited with the 'visudo' command as root.
#
# Please consider adding local content in /etc/sudoers.d/ instead of
# directly modifying this file.
#
# See the man page for details on how to write a sudoers file.
#
Defaults        env_reset
Defaults        mail_badpass
Defaults        secure_path="/usr/local/sbin:/usr/local/bin:/usr/
               sbin:/usr/bin:/sbin:/bin:/snap/bin"
# Host alias specification

# User alias specification

# Cmnd alias specification

# User privilege specification
root    ALL=(ALL:ALL) ALL

# Members of the admin group may gain root privileges
%admin ALL=(ALL) ALL

# Allow members of group sudo to execute any command
%sudo   ALL=(ALL:ALL) ALL

# See sudoers(5) for more information on "#include" directives:
#includedir /etc/sudoers.d
The first highlighted line in Example 7-12 means that the root user can execute commands from ALL terminals, acting as ALL (that is, any) users, and can run the ALL command (any commands). The second highlighted line specifies that members of the admin group may gain root privileges and can also execute commands from all terminals, acting as ALL (any) users, and can run the ALL command (any commands). The third highlighted line specifies the same for any members of the group sudo.
A huge mistake that some people make is to copy and paste the root privileges and assign them to a user, as shown in Example 7-13.
Example 7-13 Improper sudoers File Entry
ben ALL=(ALL:ALL) ALL
In Example 7-13 the user ben has been assigned all the privileges of root. Attackers can take advantage of misconfigured sudoers files, like this one, to cause severe negative effects on a system. In most cases, you probably want a specific user to power off the system or just execute certain commands that will be required for the user to do certain tasks. Example 7-14 shows a better setup than Example 7-13: Because ben only needs to be able to power off the system, he has only been given that sudo capability.
Example 7-14 Allowing ben to Power Off the System
ben ALL= /sbin/poweroff
As demonstrated in Example 7-15, you can also create aliases for users (User_Alias), run commands as other users (Runas_Alias), specify the host or network from which they can log in (Host_Alias), and specify the command (Cmnd_Alias).
Example 7-15 sudoers File Using Aliases
User_Alias     COOLGUYS = ben, chris, ron
Runas_Alias    LESSCOOL = root, operator
Host_Alias     COOLNET = 192.168.78.0/255.255.255.0
Cmnd_Alias     PRINT = /usr/sbin/lpc, /usr/bin/lprm

omar ALL=(LESSCOOL) ALL
# The user omar can run any command from any terminal as any user in the LESSCOOL group (root or operator).

trina COOLNET=(ALL) ALL
# The user trina may run any command from any machine in the COOLNET network, as any user.

ben ALL=PRINT
# The user ben may run lpc and lprm from any machine.
In Example 7-15 the alias COOLGUYS includes the users ben, chris, and ron. The alias LESSCOOL includes the users root and operator. The alias COOLNET includes the network 192.168.78.0/24, and the command alias PRINT includes the commands lpc and lprm.
Tip
Sudo has been affected by several vulnerabilities that allow users to overwrite system configurations, run additional commands that should not be authorized, among other things. You can stay informed of any new vulnerabilities in Sudo at https://www.sudo.ws/security.html.
Ret2libc Attacks
A “return-to-libc” (or ret2libc) attack typically starts with a buffer overflow. In this type of attack, a subroutine return address on a call stack is replaced by an address of a subroutine that is already present in the executable memory of the process. This is done to potentially bypassing the no-execute (NX) bit feature and allow the attacker to inject his or her own code.
Operating systems that support non-executable stack help protect against code execution after a buffer overflow vulnerability is exploited. On the other hand, non-executable stack cannot prevent a ret2libc attack because in this attack, only existing executable code is used. Another technique, called stack-smashing protection, can prevent or obstruct code execution exploitation because it can detect the corruption of the stack and can potentially “flush out” the compromised segment.
A technique called ASCII armoring can be used to mitigate ret2libc attacks. When you implement ASCII armoring, the address of every system library (such as libc) contains a NULL byte (0x00) that you insert in the first 0x01010101 bytes of memory. This is typically a few pages more than 16 MB and is called the ASCII armor region because every address up to (but not including) this value contains at least one NULL byte. When this methodology is implemented, an attacker cannot place code containing those addresses using string manipulation functions such as strcpy().
Of course, this technique doesn’t protect the system if the attacker finds a way to overflow NULL bytes into the stack. A better approach is to use the address space layout randomization (ASLR) technique, which mitigates the attack on 64-bit systems. When you implement ASLR, the memory locations of functions are random. ASLR is not very effective in 32-bit systems, though, because only 16 bits are available for randomization, and an attacker can defeat such a system by using brute-force attacks.
Windows Privileges
The following sections cover several methodologies and attacks for performing privilege escalation in Windows systems.
CPassword
Legacy Windows operating systems were susceptible to CPassword attacks. CPassword was a component of Active Directory’s Group Policy Preferences that allowed administrators to set passwords via Group Policy. Microsoft patched this vulnerability in MS14-025 (see https://docs.microsoft.com/en-us/security-updates/securitybulletins/2014/ms14-025). Microsoft also released a document explaining the vulnerability details, as well as well-known mitigations (see https://support.microsoft.com/en-us/help/2962486/ms14-025-vulnerability-in-group-policy-preferences-could-allow-elevati).
If administrators use CPassword to perform common tasks (such as changing the local administrator account), any user with basic read rights to the SYSVOL directory can obtain the authentication key and crack it by using tools such as John the Ripper and Hashcat.
Tip
A CPassword attack is also referred to as a GPP attack. To test and find vulnerable systems, you can just perform a keyword search for “cpassword” through all the files in the SYSVOL directory and modify or remove any Group Policy Objects (GPOs) that reference them. A GPO is a virtual compilation of policy settings. Each GPO is configured with a unique name, such as a GUID. You can obtain more information about GPOs at https://msdn.microsoft.com/en-us/library/aa374162(v=vs.85).aspx. Microsoft has also published an article describing the SYSVOL implementation at https://social.technet.microsoft.com/wiki/contents/articles/24160.active-directory-back-to-basics-sysvol.aspx.
You can automatically decrypt passwords that are stored in the Group Policy Preferences by using Metasploit, and you can use the Meterpreter post-exploitation module to obtain and decrypt CPassword from files stored in the SYSVOL directory. In addition, a number of PowerShell scripts can be used to perform this type of attack, such as the ones at https://github.com/PowerShellMafia/PowerSploit/blob/master/Exfiltration/Get-GPPPassword.ps1.
Clear-Text Credentials in LDAP
Unfortunately, many organizations still configure their Windows domain controllers to receive credentials in clear text over the network. One easy way to determine whether a system is affected by sending credentials in the clear is to look for event IDs 2886 and 2887 in the Active Directory Service log. Example 7-16 shows an example of Event 2886.
Example 7-16 Directory Service Event 2886
Log Name: Directory Service
Source: Microsoft-Windows-ActiveDirectory_DomainService
Date: 6/12/2018 3:08:11 AM
Event ID: 2886
Task Category: LDAP Interface
Level: Warning
Keywords: Classic
User: hacker
Computer: omar_workstation.sd.lan
Description:
The security of this directory server can be significantly enhanced
by configuring the server to reject SASL (Negotiate, Kerberos,
NTLM, or Digest) LDAP binds that do not request signing (integrity
verification) and LDAP simple binds that are performed on a cleartext
(non-SSL/TLS-encrypted) connection. Even if no clients are using such
binds, configuring the server to reject them will improve the security
of this server.

Some clients may currently be relying on unsigned SASL binds or LDAP
simple binds over a non-SSL/TLS connection, and will stop working
if this configuration change is made. To assist in identifying these
clients, if such binds occur this directory server will log a summary
event once every 24 hours indicating how many such binds occurred. You
are encouraged to configure those clients to not use such binds. Once no
such events are observed for an extended period, it is recommended that
you configure the server to reject such binds.
If any domain controller has the 2886 event present, this indicates that LDAP signing is not being enforced by the domain controller, and it is possible to perform a simple (clear-text) LDAP bind over a non-encrypted connection.
Tip
The tool at https://github.com/russelltomkins/Active-Directory/blob/master/Query-InsecureLDAPBinds.ps1 can be used to query logs for insecure LDAP binds and clear-text passwords. Furthermore, the following post includes additional information about how such an attack could be performed: https://www.harmj0y.net/blog/powershell/kerberoasting-without-mimikatz.
Kerberoasting
Kerberoast is a series of tools for attacking Microsoft Kerberos implementations and Windows service accounts. The tool can be obtained from https://github.com/nidem/kerberoast.
Tip
The post https://www.blackhillsinfosec.com/a-toast-to-kerberoast/ provides step-by-step instructions for remotely running a Kerberoast attack over an established Meterpreter session to a command and control server and cracking the ticket offline using Hashcat.
You will learn more about Meterpreter and Hashcat in Chapter 9, “Penetration Testing Tools.”
Credentials in Local Security Authority Subsystem Service (LSASS)
Another attack commonly performed against Windows systems involves obtaining user and application credentials from the Local Security Authority Subsystem Service (LSASS). It is possible to dump the LSASS process from memory to disk by using tools such as Sysinternals ProcDump. Attackers have been successful using ProcDump because it is a utility digitally signed by Microsoft. Therefore, this type of attack can evade many antivirus programs. ProcDump creates a minidump of the target process. An attacker can then use tools such as Mimikatz to mine user credentials
Tip
You can use the VMware tool vmss2core to dump memory from a suspended virtual machine (VM). You can easily identify a suspended VM by the file extension .vmss. You can also use the VMware tool vmss2core to dump memory from snapshotted VMs (*.vmsn). You can then use the Volatility Framework to extract the hashes. For more information about the Volatility Framework, see http://www.volatilityfoundation.org.
The following are additional resources related to the aforementioned attacks:
ProcDump and Windows Sysinternals: https://docs.microsoft.com/en-us/sysinternals/downloads/procdump
Mimikatz: http://blog.gentilkiwi.com/mimikatz
The Volatility Foundation: http://www.volatilityfoundation.org
Vmss2core: https://labs.vmware.com/flings/vmss2core
VMware Snapshot and Saved State Analysis: http://volatility-labs.blogspot.be/2013/05/movp-ii-13-vmware-snapshot-and-saved.html
SAM Database
Microsoft Active Directory plays an important role in many organizations. Active Directory provides a directory service for managing and administering different domain activities. Active Directory is based on a client/server architecture. Understanding how Active Directory works and the underlying architecture is very important for any pen tester tasked with testing Windows environments.
Of course, one of the common tasks in a penetration testing engagement is to retrieve passwords from a Windows system and ultimately try to get domain administrator access. In Chapter 5, “Exploiting Wired and Wireless Networks,” you learned about the pass-the-hash attack technique and other attacks against Windows systems. As a refresher, Windows stores password hashes in three places:
The Security Account Manager (SAM) database
The LSASS
The Active Directory database
All versions of Windows store passwords as hashes, in a file called the Security Accounts Manager (SAM) database.
Note
The SAM database stores only hashes the passwords. Windows itself does not know what the passwords are.
The SAM database stores usernames and NT hashes in a %SystemRoot%/system32/config/SAM file. This file contains all the hash values for accounts that are local to the computer.
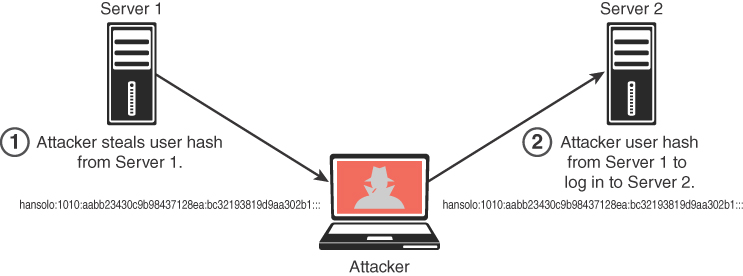
Microsoft created its own hash process for its Windows operating systems. This is where the NT LAN Manager (NTLM) comes into play. NTLM is a suite of Microsoft security protocols that have been proven to be vulnerable and used by many penetration testers as well as threat actors to compromise machines. Because password hashes cannot be reversed, instead of trying to figure out a user’s password, you (or an attacker) can just use a password hash collected from a compromised system and then use the same hash to log in to another client or server system. This technique, called pass-the-hash, is illustrated in Figure 7-8.
Microsoft now uses Kerberos in Windows domains, but NTLM is still used when the client is authenticating to a server in a different Active Directory forest that has a legacy NTLM trust instead of a transitive inter-forest trust. NTLM is also used when the client is authenticating to a server that doesn’t belong to a domain and when Kerberos is blocked by a firewall or a similar device.
Understanding Dynamic Link Library Hijacking
Dynamic link libraries (DLLs) are common components in all versions of Windows. Some DLLs are loaded into applications when they start (if needed). DLLs interact with APIs and other operating system procedures. If you tamper with a system in order to control which DLL an application loads, you may be able to insert a malicious DLL during the DLL loading process to compromise the system. An application can decide the order of the directories to be searched for a DLL to load, depending on the configuration of the system. The following list shows the order of the Windows DLL search process:
Step 1. Windows searches the working directory from which the application is loaded.
Step 2. Windows searches the current directory (from which the user is working).
Step 3. Windows searches the system directory (typically WindowsSystem32). The GetSystemDirectory function is called to obtain this directory.
Step 4. Windows searches the 16-bit system directory.
Step 5. Windows searches the Windows directory. The GetWindowsDirectory function is called to obtain this directory.
Step 6. Windows searches directories that are listed in the PATH environment variable.
In this process, the attack relies on a program making a decision to load a DLL from the current directory (step 2). An attacker can manipulate that step and perform a DLL hijacking attack. For instance, if the user is opening an Excel spreadsheet, Microsoft Office attempts to load its DLL component from the location of that document file. An attacker can put a malicious DLL in that directory. Subsequently, Microsoft Office can carelessly load the malicious DLL.
Tip
DLL hijack attacks are not as effective as they used to be. This is because Microsoft has released several patches and features that help prevent these types of attacks. The following article explains some of the mitigations: https://docs.microsoft.com/en-us/windows/desktop/dlls/dynamic-link-library-search-order.
Exploitable Services
You as a pen tester can take advantage of exploitable services such as the following:
Unquoted service paths: If an executable (application binary) is enclosed in quotation marks (“”), Windows knows where to find it. On the contrary, if the path where the application binary is located doesn’t contain any quotation marks, Windows will try to locate it and execute it inside every folder of this path until it finds the executable file. An attacker can abuse this functionality to try to elevate privileges if the service is running under SYSTEM privileges. A service is vulnerable if the path to the executable has a space in the filename and the filename is not wrapped in quotation marks; exploitation requires write permissions to the path before the quotation mark.
Writable services: Administrators often configure Windows services that run with SYSTEM privileges. This could lead to a security problem because an attacker may obtain permissions over the service or over the folder where the binary of the service is stored (or both). Services configured this way are also often found in third-party software (TPS) and may be used for privilege escalation.
Insecure File and Folder Permissions
An attacker can take advantage of unsecured and misconfigured file and folder permissions. Files and folders in Windows can have read and write permissions. These permissions are established strictly to specific users or groups. In contrast, Unix and Linux-based systems grant file and folder permissions to the owner, the group owner, or everybody. Windows uses specific permissions to allow users to access folder content. Windows does not use execute permissions on files. Windows uses the filename extension to determine whether a file (including a script file) can be run.
Tip
For details on how Windows file security and access rights work, see https://docs.microsoft.com/en-us/windows/desktop/fileio/file-security-and-access-rights. Microsoft has also published a detailed document explaining Windows access control lists at https://docs.microsoft.com/en-us/windows/desktop/secauthz/access-control-lists.
Table 7-2 compares the permissions between Unix/Linux systems and Windows.
Table 7-2 A Comparison Between Permissions for Unix/Linux-Based Systems and Windows Systems
Unix/Linux |
Windows |
Read and write permissions on a folder in Unix is the same as the read and write permissions in Windows. |
|
The read and execute permissions on a file in Unix are the same as the read and execute permissions in Windows. |
|
Write permission on a file |
Modify permission on a file |
Execute permission on a folder |
List Folder Contents permission |
Read, write, and execute permissions on a file or folder |
Full Control permission |
Understanding Windows Group Policy
In Windows, Group Policy is a centralized administration feature for systems belonging to a Windows domain. This functionality allows you to create policies in Active Directory and assign them to users or systems. You create policies to configure specific settings and permissions within the Windows operating system. The item inside Active Directory that contains these settings is called a Group Policy Object (GPO). GPOs can be used for user accounts, for client computer settings, or for configuring policies in servers. Typically, the goal is to configure GPOs in such a way that they cannot be overridden by users.
Tip
Microsoft provides a series of spreadsheets and other documentation to help manage GPOs; see http://www.microsoft.com/en-us/download/details.aspx?id=25250. These spreadsheets list the policy settings for computer and user configurations that are included in the Administrative template files delivered with the specified Windows operating system. You can configure these policy settings when you edit GPOs. A brief example of one of these spreadsheets is shown in Figure 7-9.

Keyloggers
An attacker may use a keylogger to capture every key stroke of a user in a system and steal sensitive data (including credentials). There are two main types of keyloggers: keylogging hardware devices and keylogging software. A hardware (physical) keylogger is usually a small device that can be placed between a user’s keyboard and the main system. Software keyloggers are dedicated programs designed to track and log user keystrokes.
Note
Keyloggers are legal in some countries and designed to allow employers to oversee the use of their computers. However, recent regulations like GDPR have made keyloggers a very sensitive and controversial topic. Threat actors use keyloggers for the purpose of stealing passwords and other confidential information.
There are several categories of software-based keyloggers:
Kernel-based keylogger: A program on the machine obtains root access to hide itself in the operating system and intercepts keystrokes that pass through the kernel. This method is difficult both to write and to combat. Such keyloggers reside at the kernel level, which makes them difficult to detect, especially for user-mode applications that don’t have root access. They are frequently implemented as rootkits that subvert the operating system kernel to gain unauthorized access to the hardware. This makes them very powerful. A keylogger using this method can act as a keyboard device driver, for example, and thus gain access to any information typed on the keyboard as it goes to the operating system.
API-based keylogger: With this type of keylogger, compromising APIs reside inside a running application. Different types of malware have taken advantage of Windows APIs, such as GetAsyncKeyState() and GetForeground Window(), to perform keylogging activities.
Hypervisor-based keylogger: This type of keylogger is effective in virtual environments, where the hypervisor could be compromised to capture sensitive information.
Web form–grabbing keylogger: Keyloggers can steal data from web form submissions by recording the web browsing on submit events.
JavaScript-based keylogger: Malicious JavaScript tags can be injected into a web application and then capture key events (for example, the onKeyUp() JavaScript function).
Memory-injection-based keylogger: This type of keylogger tampers with the memory tables associated with the browser and other system functions.
Scheduled Tasks
Threat actors can take advantage of the Windows Task Scheduler to bypass User Account Control (UAC) if the user has access to its graphical interface. This is possible because the security option runs with the system’s highest privileges. When a Windows user creates a new task, the system typically doesn’t require the user to authenticate with an administrator account. You can also use this functionality for post-exploitation and persistence.
Note
You can access the scheduled tasks of a Windows system by navigating to Start -> Programs -> Accessories -> System Tools -> Scheduled Tasks.
Escaping the Sandbox
The term sandbox can mean different things depending on to the field. In cybersecurity, a sandbox allows you to isolate running applications to minimize the risk of software vulnerabilities spreading from one application to another. Figure 7-10 illustrates this sandboxing concept.

Sandboxes can also be used to run untested or untrusted software from unverified or untrusted third parties, suppliers, users, or websites. In addition, they can be used to test malware without allowing the software to compromise the host system.
Tip
Sandbox implementations typically operate and provide a controlled set of resources for guest applications to run in. These resources include a “scratch space” on disk and memory. Typically, network access is disallowed or highly restricted.
In web development, a sandbox is a mirrored production environment that developers use to create an application before migrating it to a production environment. Companies like Amazon, Google, and Microsoft, among others, provide sandboxing services.
Note
For the purpose of this book, we of course concentrate on sandboxes related to cybersecurity.
The following are examples of sandbox implementations:
A jail: This implementation is commonly used in mobile devices where there is restricted filesystem namespace and rule-based execution to not allow untrusted applications to run in the system. This is where the term jail-braking comes in. Users may “jail-break” their phones to be able to install games and other applications. With a jail-broken phone, an attacker can more easily impersonate applications and deliver malware to the user because a jail-broken device does not have the security controls in place to prevent malware from running on the system.
Rule-based execution in SELinux and AppArmor security frameworks: This implementation restricts control over what processes are started, spawned by other applications, or allowed to inject code into the system. These implementations can control what programs can read and write to the file system.
Virtual machines: Virtual machines can be used to restrict a guest operating system to run sandboxed so that the applications do not run natively on the host system and can only access host resources through the hypervisor.
Sandboxing on native hosts: Security researchers may use sandboxing to analyze malware behavior. Even commercial solutions such as Cisco’s ThreatGrid use sandbox environments that mimic or replicate the victim system to evaluate how malware infects and compromises such a system.
Secure Computing Mode (seccomp) and seccomp-bpf (seccomp extension): These are sandboxes built in the Linux kernel to only allow the write(), read(), exit(), and sigreturn() system calls.
Software fault isolation (SFI): This implementation uses sandboxing methods in all store, read, and jump assembly instructions to isolated segments of memory.
Web browsers: Browsers provide sandboxing capabilities to isolate extensions and plugins.
HTML5: HTML5 has a sandbox attribute for use with iframes.
Java virtual machines: These VMs include a sandbox to restrict the actions of untrusted code, such as a Java applet.
.NET Common Language Runtime: This implementation enforces restrictions on untrusted code.
Adobe Reader: This implementation runs PDF files in a sandbox to prevent them from escaping the PDF viewer and tampering with the rest of the computer.
Microsoft Office: Office has a sandbox mode to prevent unsafe macros from harming the system.
If an attacker finds a way to bypass (escape) the sandbox, he or she can then compromise other applications and potentially implement a full system compromise. Several sandbox escape vulnerabilities in the past have allowed attackers to do just that.
Virtual Machine Escape
In the previous section, you learned that VMs can be used to restrict a guest operating system to run sandboxed. This is because the applications do not run natively on the host system and can only access host resources through the hypervisor.
If an attacker finds a way to escape the VM, he or she can then compromise other VMs and potentially compromise the hypervisor. This is catastrophic in cloud environments, where multiple customers can be affected by these types of attacks. A VM escape attack is illustrated in Figure 7-11.

Understanding Container Security
A lot of people immediately think about Docker when they hear the word containers, but there are other container technologies out there. Linux Containers (LXC) is a well-known set of tools, templates, and library and language bindings for Linux containers. It’s pretty low level and very flexible, and it covers just about every containment feature supported by the upstream kernel.
Note
You can learn more about LXC at https://linuxcontainers.org.
Docker is really an extension of LXC’s capabilities. A high-level API provides a lightweight virtualization solution to run different processes in isolation. Docker was developed in the Go language and utilizes LXC, cgroups, and the Linux kernel itself.
Note
You can learn more about Docker at https://www.docker.com.
Another popular container technology or package is rkt (or Rocket). rkt aims to provide a feature and capability that its creators call “secure-by-default.” It includes a number of security features such as support for SELinux, TPM measurement, and running app containers in hardware-isolated VMs.
Note
You can learn more about Rocket at https://github.com/rkt/rkt.
Cri-o is a lightweight container technology used and designed with Kubernetes. It provides support for containers based on the Open Container Initiative specifications (see https://www.opencontainers.org), a set of two specifications: the Runtime Specification (runtime-spec) and the Image Specification (image-spec). The runtime-spec outlines how to run a filesystem bundle that is unpacked on disk.
Note
You can learn more about Cri-o at http://cri-o.io.
Another container package is called OpenVz. It is not as popular as Docker or Rocket, but it is making the rounds.
Note
You can learn more about OpenVz at https://openvz.org.
What is a container? A container image is a lightweight, standalone, executable package of a piece of software that includes everything you need to run it, including code, the runtime, system tools, system libraries, and settings. Containers are available for Linux, Mac OS X, and Windows applications.
Note
Containerized software will always run the same, regardless of the environment.
Containers isolate software from its surroundings and help reduce conflicts between teams running different software on the same infrastructure.
So what is the difference between a container and a virtual machine? Figure 7-12 provides a comparison.
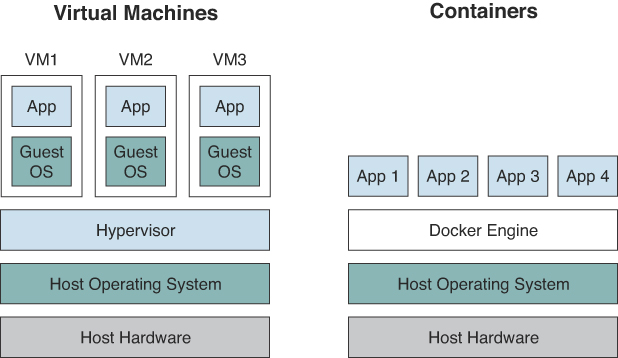
Figure 7-12 shows the architectural differences between container and VM environments. A VM generally includes an entire operating system along with the application. It also needs a hypervisor running along with it to control the VM. VMs tend to be pretty big in size, since they include whole operating systems. Because of this, they take up several minutes to boot up the operating system and initialize the application they are hosting. Containers are much smaller; they perform much better than VMs and can start almost instantly.
One of the biggest advantages of container technologies is that containers can be created much faster than VM instances. Their lightweight footprint means less overhead in terms of performance and size. Containers increase developer productivity by removing cross-service dependencies and conflicts. Each container can be seen as a different microservice, and you can very easily upgrade them independently.
Each image of a container can be version controlled, so you can track different versions of a container. Containers encapsulate all the relevant details, such as application dependencies and operating systems. This makes them extremely portable across systems.
Docker and container technologies are supported by all major cloud providers, including Amazon Web Services (AWS), Google Cloud Platform, and Microsoft Azure. In addition, Docker can be integrated with tools like Ansible, Chef, Puppet, Jenkins, Kubernetes, OpenStack, Vagrant, and dozens of other tools and infrastructures.
Tip
Of course, this is not a book about Docker and containers. However, if you have never played with containers, you can easily download your favorite Linux distribution and install Docker. For example, in Ubuntu or even Kali Linux, you can simply install Docker with the apt install docker.io command.
Some of the most challenging issues with containers and DevOps are operational in nature. For example, due to the convenience and agility that containers bring to the table, developers often pull Docker containers from community repositories and stores not knowing what vulnerabilities they are inheriting in those containers. Asset discovery and container vulnerability management are therefore very important.
The following are a few examples of tools and solutions that have been developed throughout the years for container security:
Anchore: Anchore is used to analyze container images for the presence of known security vulnerabilities and against custom security policies. It has both open source and commercial versions. You can obtain the open source code and more information about it from https://github.com/anchore/anchore-engine.
Aqua Security: This is a commercial tool for securing container-based applications (see https://www.aquasec.com).
Bane: This is an AppArmor profile generator for Docker containers. You can download it from https://github.com/genuinetools/bane.
CIS Docker Benchmark: This tool provides an automated way to test containers against well-known security best practices. You can download the CIS Docker Benchmark from https://github.com/dev-sec/cis-docker-benchmark.
Dev-Sec.io: This tool allows you to automatically apply hardening best practices to different types of servers (see https://dev-sec.io).
Clair: This is an open source static analysis for Docker containers from Core-OS. You can download Clair from https://github.com/coreos/clair.
Dagda: This is another tool for performing static analysis of known vulnerabilities. You can download Dagda from https://github.com/eliasgranderubio/dagda.
docker-bench-security: This script, created by Docker, checks for common security best practices when deploying Docker containers in production. You can download this tool from https://github.com/docker/docker-bench-security.
docker-explorer: This tool was created by Google to help analyze offline Docker file systems. It can be useful when performing forensic analysis of Docker containers. You can download it from https://github.com/google/docker-explorer.
Notary: This open source project includes a server and a client for running and interacting with trusted containers. Notary is maintained by The Update Framework (TUF). You can obtain more information about Notary from https://github.com/theupdateframework/notary and information about TUF from https://theupdateframework.github.io.
oscap-docker: OpenSCAP (created by RedHat) includes the oscap-docker tool, which is used to scan Docker containers and images. OpenSCAP and the oscap-docker tool can be downloaded from https://github.com/OpenSCAP/openscap.
Mobile Device Security
Mobile device security is a hot topic today. Individuals and organizations are increasingly using mobile devices for personal use and to conduct official business. Because of this, the risk in mobile devices and applications continues to increase.
The OWASP organization created the Mobile Security Project to provide mobile application and platform developers, as well as security professionals, resources to understand cybersecurity risks and to build and maintain secure mobile applications. The OWASP Mobile Security Project website can be accessed at https://www.owasp.org/index.php/OWASP_Mobile_Security_Project.
OWASP often performs studies of the top mobile security threats and vulnerabilities. According to OWASP, the top 10 mobile security risks at the time of this writing are:
Improper platform usage
Insecure data storage
Insecure communication
Insecure authentication
Insufficient cryptography
Insecure authorization
Client code quality
Code tampering
Reverse engineering
Extraneous functionality
Mobile applications (apps) run either directly on a mobile device, on a mobile device web browser, or both. Mobile operating systems (such as Android and Apple iOS) offer software development kits (SDKs) for developing applications (such as those for games, productivity, business, and more). These mobile apps, referred to as native apps, typically provide the fastest performance with the highest degree of reliability and adhere to platform-specific design principles.
Mobile web apps are basically websites designed to look and feel like native apps. These apps are accessed by a user via a device’s browser and are usually developed in HTML5 and responsive mobile frameworks. Another option, a hybrid app, executes like a native app, but a majority of its processes rely on web technologies.
A lot of attacks against mobile apps start with reverse engineering and then move into tampering with the mobile app. Reverse engineering involves analyzing the compiled app to extract information about its source code. The goal of reverse engineering is to understand the underlying code and architecture. Tampering is the process of changing a mobile app (either the compiled app or the running process) or its environment to affect its behavior. In order to perform good reverse engineering of mobile apps, you should become familiar with the mobile device processor architecture, the app executable format, and the programming language used to develop a mobile app.
Modern apps often include controls that hinder dynamic analysis. Certificate pinning and end-to-end (E2E) encryption sometimes prevent you from intercepting or manipulating traffic with a proxy. Root detection could prevent an app from running on a rooted device, preventing you from using advanced testing tools.
Note
Mobile apps that implement the protections specified in the Mobile AppSec Verification Standard (MASVS) Anti-Reversing Controls should withstand reverse engineering to a certain degree. Details about MASVS can be accessed at https://www.owasp.org/images/6/61/MASVS_v0.9.4.pdf.
There are a few basic tampering techniques:
Binary patching (“modding”): This involves changing the compiled app in binary executables or tampering with resources. Modern mobile operating systems such as iOS and Android enforce code signing to mitigate binary tampering.
Code injection: This allows you to explore and modify processes at runtime. Several tools, including Cydia Substrate (http://www.cydiasubstrate.com), Frida (https://www.frida.re), and XPosed (https://github.com/rovo89/XposedInstaller), give you direct access to process memory and important structures such as live objects instantiated by the app.
Static and dynamic binary analysis: This is done using disassemblers and decompilers to translate an app’s binary code or bytecode back into a more understandable format. By using these techniques on native binaries, you can obtain assembler code that matches the architecture for which the app was compiled.
Debugging and tracing: It is possible to identify and isolate problems in a program as part of the software development life cycle. The same tools used for debugging are valuable to reverse engineers even when identifying bugs is not their primary goal. Debuggers enable program suspension at any point during runtime, inspection of the process’s internal state, and even register and memory modification.
Understanding Android Security
Android is a Linux-based open source platform developed by Google as a mobile operating system. Android is not only used in mobile phones and tablets but also in wearable products, TVs, and many other smart devices. Android-based solutions come with many pre-installed (“stock”) apps and support installation of third-party apps through the Google Play store and other marketplaces.
Android’s software stack is composed of several different layers (see https://source.android.com/devices/architecture). Each layer defines interfaces and offers specific services. At the lowest level, Android is based on a variation of the Linux kernel. On top of the kernel, the Hardware Abstraction Layer (HAL) defines a standard interface for interacting with built-in hardware components. Several HAL implementations are packaged into shared library modules that the Android system calls when required. This is how applications interact with the device’s hardware (for instance, how a phone uses the camera, microphone, and speakers).
Android apps are usually written in Java and compiled to Dalvik bytecode, which is somewhat different from the traditional Java bytecode. The current version of Android executes this bytecode on the Android runtime (ART). ART is the successor to Android’s original runtime, the Dalvik virtual machine. The key difference between Dalvik and ART is the way the bytecode is executed (see https://source.android.com/devices/tech/dalvik/).
Android apps do not have direct access to hardware resources, and each app runs in its own sandbox (see https://source.android.com/security/app-sandbox). The Android runtime controls the maximum number of system resources allocated to apps, preventing any one app from monopolizing too many resources.
Even though the Android operating system is based on Linux, it doesn’t implement user accounts in the same way other Unix-like systems do. In Android, the multiuser support of the Linux kernel extends to sandbox apps: With a few exceptions, each app runs as though under a separate Linux user, effectively isolated from other apps and the rest of the operating system.
Tip
The file android_filesystem_config.h includes a list of the predefined users and groups to which system processes are assigned. User IDs (UIDs) for other applications are added as they are installed.
Android apps interact with system services such as the Android Framework and related APIs. Most of these services are invoked via normal Java method calls and are translated to IPC calls to system services that are running in the background. Examples of system services include the following:
Network connectivity, including Wi-Fi, Bluetooth, and NFC
Cameras
Geolocation (GPS)
Device microphone
The framework also offers common security functions, such as cryptography.
The Android Package Kit (APK) file is an archive that contains the code and resources required to run the app it comes with. This file is identical to the original signed app package created by the developer. The installed Android apps are typically located at /data/app/[package-name].
The following are some key Android files:
AndroidManifest.xml: This file contains the definition of the app’s package name, target, and minimum API version, app configuration, components, and user-granted permissions.
META-INF: This file contains the application’s metadata and the following three files:
MANIFEST.MF: This file stores hashes of the app resources.
CERT.RSA: This file stores the app’s certificate(s).
CERT.SF: This file lists resources and the hash of the corresponding lines in the MANIFEST.MF file.
assets: This directory contains app assets (files used within the Android app, such as XML files, JavaScript files, and pictures), which the AssetManager can retrieve.
classes.dex: This directory contains classes compiled in the DEX file format that the Dalvik virtual machine/Android runtime can process. DEX is Java bytecode for the Dalvik virtual machine, and it is optimized for small devices.
lib: This directory contains native compiled libraries that are part of the APK, such as the third-party libraries that are not part of the Android SDK.
res: This directory contains resources that haven’t been compiled into resources.arsc.
resources.arsc: This file contains precompiled resources, such as XML files for layout.
AndroidManifest.xml is encoded into binary XML format, which is not readable with a text editor. However, you can unpack an Android app by using Apktool. When you run Apktool with the default command-line flags, it automatically decodes the manifest file to text-based XML format and extracts the file resources. The following are the typical decoded and extracted files:
AndroidManifest.xml: This is the decoded manifest file, which can be opened and edited in a text editor.
apktool.yml: This file contains information about the output of Apktool.
original: This folder contains the MANIFEST.MF file, which stores information about the files contained in the JAR file.
res: This directory contains the app’s resources.
smalidea: This is a Smali language plugin. Smali is a human-readable representation of the Dalvik executable. Every app also has a data directory for storing data created during runtime. Additional information about smalidea can be obtained from https://github.com/JesusFreke/smali/wiki/smalidea.
cache: This location is used for data caching. For example, the WebView cache is found in this directory.
code_cache: This is the location of the file system’s application-specific cache directory that is designed for storing cached code. On devices running Lollipop or later Android versions, the system deletes any files stored in this location when the app or the entire platform is upgraded.
databases: This folder stores SQLite database files generated by the app at runtime (for example, user data files).
files: This folder stores regular files created by the app.
lib: This folder stores native libraries written in C/C++. These libraries can have one of several file extensions, including .so and .dll (x86 support). This folder contains subfolders for the platforms for which the app has native libraries, including the following:
armeabi: Compiled code for all ARM-based processors
armeabi-v7a: Compiled code for all ARM-based processors, version 7 and above only
arm64-v8a: Compiled code for all 64-bit ARM-based processors, version 8 and above only
x86: Compiled code for x86 processors only
x86_64: Compiled code for x86_64 processors only
mips: Compiled code for MIPS processors
shared_prefs: This folder contains an XML file that stores values saved via the SharedPreferences APIs.
Android leverages Linux user management to isolate apps. This approach is different from user management in traditional Linux environments, where multiple apps are often run by the same user. Android creates a unique UID for each Android app and runs the app in a separate process. Consequently, each app can access its own resources only. This protection is enforced by the Linux kernel. Typically, apps are assigned UIDs in the range 10000 and 19999. An Android app receives a user name based on its UID. For example, the app with UID 10188 receives the username u0_a188. If the permissions an app requested are granted, the corresponding group ID is added to the app’s process. For example, the user ID of the app in this example is 10188. It belongs to the group ID 3003 (inet). That group is related to the android.permission.INTERNET permission in the application manifest.
Apps are executed in the Android Application Sandbox, which separates the app data and code execution from other apps on the device. This separation adds a layer of security. Installation of a new app creates a new directory named after the app package (for example, /data/data/[package-name]). This directory holds the app’s data. Linux directory permissions are set such that the directory can be read from and written to only with the app’s unique UID.
The process Zygote starts up during Android initialization. Zygote is a system service for launching apps. The Zygote process is a base process that contains all the core libraries the app needs. Upon launch, Zygote opens the socket /dev/socket/zygote and listens for connections from local clients. When it receives a connection, it forks a new process, which then loads and executes the app-specific code.
In Android, the lifetime of an app process is controlled by the operating system. A new Linux process is created when an app component is started and the same app doesn’t yet have any other components running. Android may kill this process when the process is no longer necessary or when it needs to reclaim memory to run more important apps. The decision to kill a process is primarily related to the state of the user’s interaction with the process.
Android apps are made of several high-level components, including the following:
Activities
Fragments
Intents
Broadcast receivers
Content providers and services
All these elements are provided by the Android operating system, in the form of predefined classes available through APIs.
Tip
During development, an app is signed with an automatically generated certificate. This certificate is inherently insecure and is for debugging only. Most stores don’t accept this kind of certificate for publishing; therefore, a certificate with more secure features must be created. When an application is installed on the Android device, PackageManager ensures that it has been signed with the certificate included in the corresponding APK. If the certificate’s public key matches the key used to sign any other APK on the device, the new APK may share a UID with the preexisting APK. This facilitates interactions between applications from a single vendor. Alternatively, specifying security permissions for the Signature protection level is possible; this restricts access to applications that have been signed with the same key.
To perform detailed analysis of Android applications, you can download Android Studio. It comes with the Android SDK, an emulator, and an app to manage the various SDK versions and framework components. Android Studio also comes with the Android Virtual Device (AVD) Manager application for creating emulator images. You can download Android Studio from https://developer.android.com/studio.
Figure 7-13 shows a screenshot of an application called OmarsApplication being developed using Android Studio.
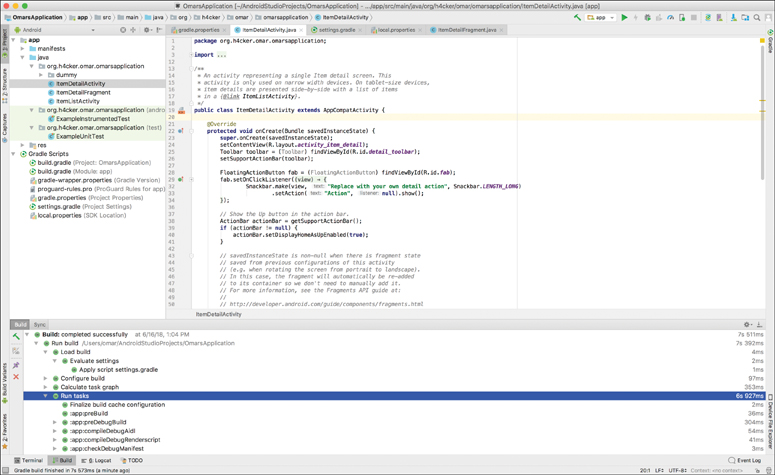
For dynamic analysis, you need an Android device to run the target app. In principle, however, you can do without a real Android device and test on the emulator. Figure 7-14 shows the Android emulator that comes with Android Studio.
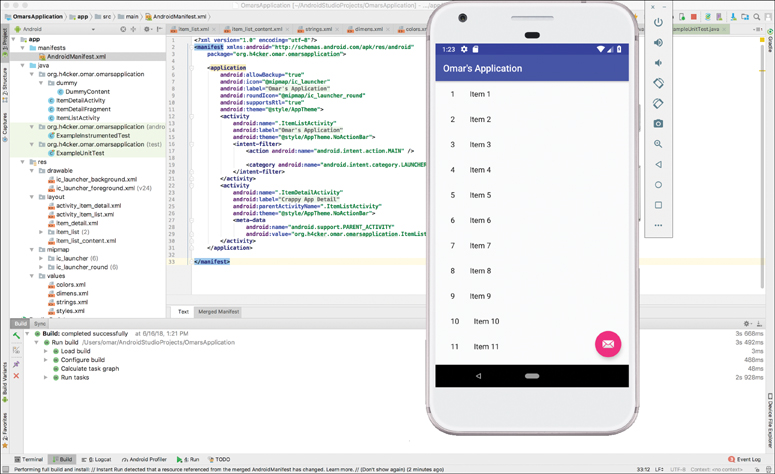
Testing on a real device makes for a smoother process and a more realistic environment. However, emulators provide a lot of convenience and flexibility.
Developers and users often root their real devices to get full control over the operating system and to bypass restrictions such as app sandboxing. These privileges in turn allow individuals to use techniques like code injection and function hooking more easily. Rooting is risky and can void the device warranty. You might end up “bricking” a device (rendering it inoperable and unusable) if you run into problems when rooting the device. More importantly, rooting a device creates additional security risks because built-in exploit mitigations are often removed.
Tip
You should not root a personal device on which you store your private information. It is recommended to use a cheap, dedicated test device instead.
Figure 7-15 demonstrates how to use Apktool to decode and analyze the Android application OmarsApplication.
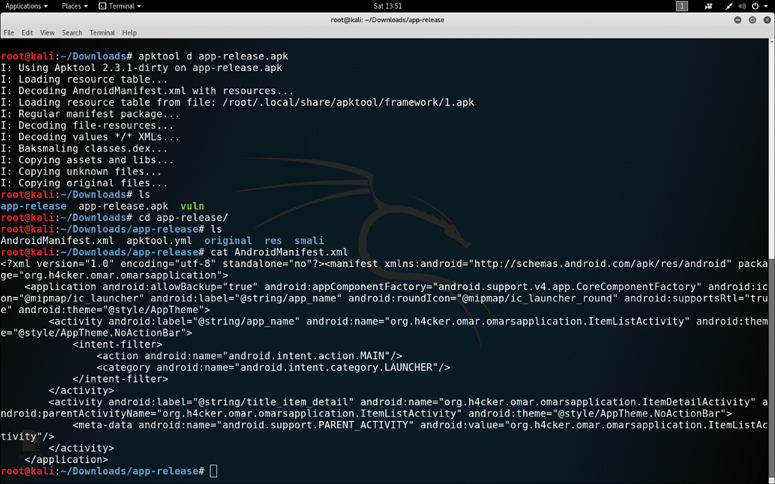
Note
The source code for this sample application can be accessed at https://github.com/The-Art-of-Hacking/art-of-hacking.
A few tools and frameworks are designed to test Android-based systems and related applications:
Androick: This collaborative research project allows any user to analyze an Android application. You can download Androick from https://github.com/Flo354/Androick.
NowSecure App Testing: This is a mobile app security testing suite for Android and iOS mobile devices. There are two versions: a commercial edition and a community (free) edition. You can obtain more information about NowSecure from https://www.nowsecure.com/solutions/mobile-app-security-testing.
OWASP SeraphimDroid: This privacy and device protection application for Android devices helps users learn about risks and threats coming from other Android applications. SeraphimDroid is also an application firewall for Android devices that blocks malicious SMS or MMS from being sent, Unstructured Supplementary Service Data (USSD) codes from being executed, or calls from being called without user permission and knowledge. You can obtain more information about SeraphimDroid from https://www.owasp.org/index.php/OWASP_SeraphimDroid_Project.
Understanding Apple iOS Security
The iOS operating system runs only in Apple mobile devices, including the iPhone, iPad, and iPods. Apple tvOS has inherited many architectural components and features from iOS. iOS apps run in a restricted environment and are isolated from each other at the file system level. iOS apps are also significantly limited in terms of system API access compared to macOS and other operating systems. Apple restricts and controls access to the apps that are allowed to run on iOS devices. The Apple App Store is the only official application distribution platform.
iOS apps are isolated from each other via the Apple sandbox and mandatory access controls defining the resources an app is allowed to access. iOS offers very few IPC options compared to Android, which significantly reduces the attack surface. Uniform hardware and tight hardware/software integration create another security advantage.
The iOS security architecture consists of six core features:
Hardware security
Secure boot
Code signing
Sandbox
Encryption and data protection
General exploit mitigations
Every iOS device has two built-in Advanced Encryption Standard (AES) 256-bit keys (GID and UID). These keys are included in the application processor and secure enclave during manufacturing. There’s no direct way to read these keys with software or debugging interfaces such as JTAG. The GID is a value shared by all processors in a class of devices that is used to prevent tampering with firmware files. The UID is unique to each device and is used to protect the key hierarchy that’s used for device-level file system encryption. UIDs are not created during manufacturing, and not even Apple can restore the file encryption keys for a particular device.
The Apple secure boot chain consists of the kernel, the bootloader, the kernel extensions, and the baseband firmware. Apple has also implemented an elaborate DRM system to make sure that only Apple-approved code runs on Apple devices. FairPlay Code Encryption is applied to apps downloaded from the App Store. FairPlay was developed as a DRM for multimedia content purchased through iTunes.
The App Sandbox is an iOS sandboxing technology. It is enforced at the kernel level and has been a core security feature since the first release of iOS. All third-party apps run under the same user (mobile), and only a few system applications and services run as root. Regular iOS apps are confined to a container that restricts access to the app’s own files and a very limited number of system APIs. Access to all resources (such as files, network sockets, IPCs, and shared memory) is controlled by the sandbox. In addition, iOS implements address space layout randomization (ASLR) and the eXecute Never (XN) bit to mitigate code execution attacks.
iOS developers cannot set device permissions directly; they do so by using APIs. The following are a few examples of APIs and resources that require user permission:
Contacts
Microphone
Calendars
Camera
Reminders
HomeKit
Photos
HealthKit
Motion activity and fitness
Speech recognition
Location Services
Bluetooth
Media library
Social media accounts
There are a few tools you can use to practice security testing on mobile devices. One of the most popular is the Damn Vulnerable iOS application, a project that provides an iOS application to practice mobile attacks and security defenses. It has a set of challenges that can be completed by an individual. Each challenge area corresponds to an in-depth article designed to teach the fundamentals of mobile security on the iOS platform. The following are examples of the challenges in the Damn Vulnerable iOS application:
Insecure Data Storage
Jailbreak Detection
Runtime Manipulation
Transport Layer Security
Client-Side Injection
Broken Cryptography
Binary Patching
Side Channel Data Leakage
Security Decisions via Untrusted Input
A learning tool for iOS security that is very popular and maintained by OWASP is iGoat. iGoat was inspired by the OWASP WebGoat project and has a similar conceptual flow. iGoat is free software, released under the GPLv3 license. iGoat can be downloaded from https://www.owasp.org/index.php/OWASP_iGoat_Tool_Project.
Another tool is the MobiSec Live Environment Mobile Testing Framework. MobiSec is a live environment for testing mobile environments, including devices, applications, and supporting infrastructure. The purpose is to provide attackers and defenders the ability to test their mobile environments to identify design weaknesses and vulnerabilities. MobiSec can be downloaded from https://sourceforge.net/projects/mobisec.
MITRE started a collaborative research project focused on open source iOS security controls called iMAS. iMAS was created to protect iOS applications and data beyond the Apple-provided security model and reduce the attack surface of iOS mobile devices and applications. The source code for iMAS is available on GitHub at https://github.com/project-imas.
Understanding Physical Security Attacks
Physical security is a very important element when defending an organization against any security risk. The following sections provide an overview of physical device security and facilities/building security concepts.
Understanding Physical Device Security
Attackers with physical access to a device can perform a large number of attacks. Of course, device theft is one of the most common risks and the main reason it is important to encrypt workstations, laptops, and mobile devices as well as to enable remote wipe and remote recovery features. On the other hand, a few more sophisticated attacks and techniques can be carried out, including the following:
Cold boot attacks: Cold boot is a type of side channel attack in which the attacker tries to retrieve encryption keys from a running operating system after using a cold reboot (system reload). Cold boot attacks attempt to compromise the data remanence property of DRAM and SRAM to retrieve memory contents that could remain readable in the seconds to minutes after power has been removed from the targeted system. Typically, this type of attack by using removable media to boot a different operating system used to dump the contents of pre-boot physical memory to a file.
Serial console debugging, reconnaissance, and tampering: Many organizations use terminal servers (serial console servers) to allow remote access to the serial port of another device over a network. These devices provide remote access to infrastructure devices (for example, routers, switches), servers, and industrial control systems. They are also used to provide out-of-band access to network and power equipment for the purpose of recovery in the case of an outage. Many serial devices do not require authentication and instead assume that if you are physically connected to a serial port, you probably are assumed to be allowed to configure and connect to the system. Clearly, this can be abused by any attacker to gain access to a victim system. Even if terminal servers may allow you to connect using a non-privileged account, attackers can use unprotected serial consoles for reconnaissance and debugging to then perform further attacks on the targeted system.
JTAG debugging, reconnaissance, and tampering: JTAG is a hardware access interface that allows a penetration tester to perform debugging of hardware implementations. Debuggers can use JTAG access registers, memory contents, and interrupts, and they can even pause or redirect software instruction flows. JTAG can be an effective attack research tool because it allows debugging software (such as OpenOCD) control over a JTAG interface. OpenOCD can be used to manipulate the JTAG’s TAP controller and to send bits to a state machine with the goal of the chip being able to interpret them as valid commands. These types of tools allow you to debug firmware and software in devices via the GNU Project Debugger (GDB) or even interact with other tools like IDA Pro and other disassemblers and debuggers.
Clearly, an attacker with physical access to the targeted system has an advantage. Physical security to protect buildings and facilities is therefore crucial. In the next section, you will learn details about different physical security threats and attacks against buildings and facilities.
Protecting Your Facilities Against Physical Security Attacks
Numerous types of attacks can be carried to infiltrate facilities and to steal sensitive information from an organization. The following are some of the most common of them:
Piggybacking/tailgating: An unauthorized individual may follow an authorized individual to enter a restricted building or facility.
Fence jumping: An unauthorized individual may jump a fence or a gate to enter a restricted building or facility.
Dumpster diving: An unauthorized individual may search for and attempt to collect sensitive information from the trash.
Lockpicking: An unauthorized individual may manipulate or tamper with a lock to enter a building or obtain access to anything that is protected by a lock. Lock bypass is a technique used in lockpicking. Locks may be bypassed in many ways, including by using techniques such as simple loiding attempts (using a “credit card” or similar items against self-closing “latch” locks) and bypassing padlocks by shimming.
Egress sensors: Attackers may tamper with egress sensors to open doors.
Badge cloning: Attackers may clone the badges of employees and authorized individuals to enter a restricted facility or a specific area in a building. One of the most common techniques is to clone radio-frequency identification (RFID) tags (refer to Chapter 5).
Exam Preparation Tasks
As mentioned in the section “How to Use This Book” in the Introduction, you have a couple of choices for exam preparation: the exercises here, Chapter 11, “Final Preparation,” and the exam simulation questions in the Pearson Test Prep software online.
Review All Key Topics
Review the most important topics in this chapter, noted with the Key Topics icon in the outer margin of the page. Table 7-3 lists these key topics and the page number on which each is found.
Table 7-3 Key Topics for Chapter 7
Key Topic Element |
Description |
Page Number |
Summary |
Understanding insecure service and protocol configurations |
|
Summary |
Understanding local privilege escalation |
|
Summary |
Understanding Linux permissions |
|
Summary |
Changing Linux permissions and understanding sticky bits |
|
Summary |
Understanding SUID or SGID and Unix programs |
|
Summary |
Identifying insecure Sudo implementations |
|
Summary |
Understanding ret2libc attacks |
|
Summary |
Defining CPassword |
|
Summary |
Abusing and obtaining clear-text LDAP credentials |
|
Summary |
Understanding Kerberoasting |
|
Summary |
Compromising credentials in Local Security Authority Subsystem Service (LSASS) implementations |
|
Summary |
Understanding and attacking the Windows SAM database |
|
Summary |
Understanding dynamic link library (DLL) hijacking |
|
Summary |
Abusing exploitable services |
|
Summary |
Exploiting insecure file and folder permissions |
|
Summary |
Defining and understanding keyloggers |
|
Summary |
Defining and understanding scheduled tasks |
|
Summary |
Understanding sandbox escape attacks |
|
Summary |
Understanding virtual machine (VM) escape attacks |
|
Summary |
Identifying container security challenges |
|
Summary |
Understanding the top mobile security threats and vulnerabilities |
|
Summary |
Understanding Android security |
|
Summary |
Understanding Apple iOS security |
|
Summary |
Understanding cold boot attacks, serial console, and JTAG debugging reconnaissance and tampering |
|
Summary |
Understanding physical security attacks |
Define Key Terms
Define the following key terms from this chapter and check your answers in the glossary:
Q&A
The answers to these questions appear in Appendix A. For more practice with exam format questions, use the Pearson Test Prep software online.
1. Which of the following involves an unauthorized individual searching and attempting to collect sensitive information from the trash?
Piggybacking
Fence jumping
Dumpster diving
Lockpicking
2. Which of the following is a technique that is executed using disassemblers and decompilers to translate an app’s binary code or bytecode back into a more or less understandable format?
Static and dynamic binary analysis
Static and dynamic source code analysis
Binary patching, or “modding”
Binary code injection
3. Which of the following is a sandbox built in the Linux kernel to only allow the write(), read(), exit(), and sigreturn() system calls?
SUDI
Seccomp
SELinux
Linux-jail
4. Which of the following statements is not true?
Modern web browsers provide sandboxing capabilities to isolate extensions and plugins.
HTML5 has a sandbox attribute for use with iframes.
Java virtual machines include a sandbox to restrict the actions of untrusted code, such as a Java applet.
Microsoft’s .NET Common Language Runtime cannot enforce restrictions on untrusted code.
5. Which of the following can attackers use to capture every keystroke of a user in a system and steal sensitive data (including credentials)?
RATs
Keybinders
Keyloggers
Ransomware
6. Which of the following functionalities can an attacker abuse to try to elevate privileges if the service is running under SYSTEM privileges?
Unquoted service paths
Unquoted PowerShell scripts
Writable SYSTEM services using the GetSystemDirectory function
Cross-site scripting (XSS)
7. Which of the following is not a place where Windows stores password hashes?
SAM database
LSASS
PowerShell hash store
AD database
8. Which of the following is an open source tool that allows an attacker to retrieve user credential information from the targeted system and potentially perform pass-the-hash and pass-the-ticket attacks?
SAM Stealer
Mimikatz
Kerberoast
Hashcrack