
Creating a mask is a core competency for any compositor. There is a constant need to isolate an object out of the frame for some kind of special treatment, such as color correction, blurring, regraining, and many, many others. The challenge here is that the object of interest has not been neatly shot on a bluescreen for easy isolation. It is an arbitrary object within an arbitrary background. This process is distinctly different than creating a matte for a bluescreen composite where the matte is created by a keyer and the purpose is to composite two layers. Here a mask is created in any number of ways, by hook or by crook, without using a keyer. Because the target object and its background are arbitrary this is an especially challenging part of digital compositing. To meet this challenge the digital compositor must have a wide array of techniques at his disposal to take advantage of any unique aspect of the background or target object to isolate it.
5.1 KEY, MATTE, ALPHA, AND MASK
Before we get too deep into the magic of creating a mask let us first take a moment to deconflict our nomenclature. As the title for this section implies, there are many terms used in the industry—key, matte, mask, and alpha. So which is which? The truth is, they are all basically the same. They are all a one-channel black and white image that tells the computer to do one thing in the white parts and something else in the black parts. The reason for the different names is that many different industries developed this same solution but each gave it their own name.
Having said all that, custom has generally assigned the different names based on either how they were created or what they are used for, a tradition we will try to honor. Following is a definition of each term as used in this book and its etymology (historical source).
• Key—used interchangeably with “matte.” It is used in a composite to demark which pixels are to be used from the foreground layer and which from the background. The historical source is the video industry that developed luma-Keys and chroma-keys for compositing but also to isolate color correction operations.
• Matte—used interchangeably with “key.” It is used in a composite to demark which pixels are to be used from the foreground layer and which from the background. The historical source is the film industry that used mattes with optical printers and in-camera composite shots.
• Alpha—used in a composite to demark which pixels are to be used from the foreground layer and which from the background. The historical source is the 3D world of CGI where the computer automatically renders a matte for the CGI object and places it in the fourth channel of the image, which was named the “alpha” channel by CGI folk.
• Mask—used to limit or “mask off” an image processing operation such as color correction, a blur or a regrain to a specific region of the picture. The historical source is probably Adobe Photoshop that popularized the term for masking off regions of the picture for special treatment.
What key, matte, and alpha all have in common is that they are the “matte” for a composite. Their differences are that keys and mattes are created by the compositor, while the alpha is automatically rendered by the CGI computer. Their method of creation may differ, but their use is the same.
The mask is the one odd man out. It is used to limit an image processing operation and can be created by the compositor in any number of ways. It might be a hand-drawn shape, a luma-key, or an imported image. However, one could always use the alpha channel to mask off an area of the screen. Or a mask might be drawn by hand and then used as the matte in a composite. Just when you thought it was getting clear! Anyway, let us take a look at a variety of methods of creating masks for isolating objects of interest.
5.2 CREATING A LUMA-KEY
A luma-key is a key that has been created from the luminance, or brightness part of a picture. Once the key has been created it can be used for a variety of purposes, but a very common use is to mask off a region of a picture for color correction. A key virtue of a luma-key is that it can work on moving footage. That is, once you get a good luma-key set up it will usually generate a key for every frame of the shot—unless the target object changes its luminance over the length of the shot, or another object of equal luminance enters the frame, or the lighting changes. A good luma-keyer will allow its settings to be animated over the length of a shot, which will help with this problem of continuously pulling a key on a target with changing luminance.

Figure 5-1 Original picture
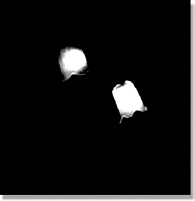
Figure 5-2 Luma-key
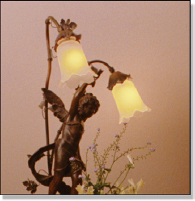
Figure 5-3 Yellow lamps
Figure 5-1 shows a pair of lamps that we want to change the color from white to yellow. The lamps will have to be isolated so that the color correction operation does not affect the entire picture. The first step is to “pull” (create) a luma-key from the original picture. The luma-keyer has settings for the upper and lower limits of the luminance, or brightness values in the original image that are to be isolated. A good luma-keyer will also have additional settings for the softness of the edges of the key. The luma-keyer settings are adjusted until the lamps turn white and the rest of the key turns black like the example in Figure 5-2. The color correction operation then uses the luma-key as a mask to isolate the yellow color correction only to affect the lamps. Figure 5-3 shows the resulting color corrected plate with yellow lamps.
(Download the folder at www.compositingVFX.com/CH05/Figure 5-1 and try your luck at making a luma-key for this clip.)
The key point about the luma-key is that it is created from the luminance, or brightness part of the picture. Therefore if the target object is the brightest part of the picture, as in this example, it can work very nicely. If it is the darkest part of the picture it can also work very well. However, if it is a middle gray then there will be other parts of the picture that share the same brightness values and the luma-key might not work so well at all. If other objects show up in the luma-key the target object can often be further isolated using a simple garbage matte.
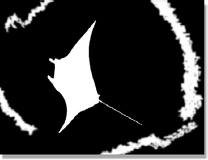
Figure 5-4 Luma-key

Figure 5-5 Garbage matte
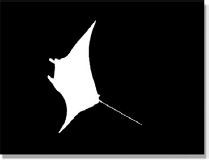
Figure 5-6 Multiplied
The use of a garbage matte to isolate the target object of a luma-key is shown starting with Figure 5-4. The raw manta ray luma-key has some unwanted contamination from the water’s surface surrounding the manta ray. The garbage matte in Figure 5-5 was quickly drawn using a simple shape, and then multiplied by the manta ray lumakey. The results of the multiply operation are shown in Figure 5-6. The zero black parts of the garbage matte cleared out the contamination while retaining the original manta ray luma-key. This type of operation is done all the time when creating keys and mattes. When two mattes are multiplied like this only the pixels that are white in both survive the multiply operation.
5.3 CREATING A CHROMA-KEY
A chroma-key is a key that has been created from the color, or (in video-speak) the chrominance part of a picture. In truth, the chroma-key is made by selecting all three aspects of the image simultaneously—the hue (color), saturation, and brightness, where the luma-key only worked with the brightness. Because the chroma-key considers three aspects of the image instead of just one, it is more selective than the lumakey at isolated parts of the picture.
Once the key is made it can be used for a variety of purposes, the most common being to isolate a region of the picture for color correction. Like the luma-key, the chroma-key is often good over the length of a shot, unless the target’s color changes, or a similar colored object enters frame, or the lighting changes. By animating its settings the chroma-keyer can often be coaxed into delivering a good key in spite of a changing target, and a garbage matte can be added to exclude undesirable objects caught in the same key.
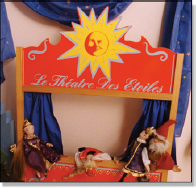
Figure 5-7 Original picture
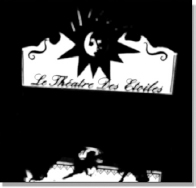
Figure 5-8 Chroma-key
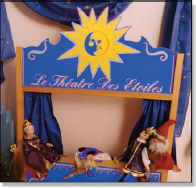
Figure 5-9 Blue puppet theater
Figure 5-7 shows a very red children’s puppet theater that an impulsive art director suddenly wants changed to blue. Since the target red is a unique color in the picture a chroma-key is a good choice for isolating it. The original picture is processed through a chroma-keyer to produce the chroma-key seen in Figure 5-8. The chroma-key operator has settings for selecting the narrow range of color, saturation, and brightness that make up the red parts of the theater and exclude the other parts of the picture. The chroma-key is then used as a mask by the color correcting operation so it only turns the selected parts of the picture blue.
As fine as all of this sounds, things are not completely copasetic. Note the little puppet laying face down on the center of the stage. The chroma-keyer saw its red costume as the same range of red as the theater and promptly included it in the key so it is now colored blue too. Also, the edges of a chroma-key are often not very nice, and if there is a shadow over part of the target the chroma-keyer can get confused. Sometimes multiple chroma-keys must be combined to cover the target object. However, regardless of its shortcomings, the chroma-key is a staple of the digital compositing business and an essential tool for pulling a key to mask off operations.
(Download the folder at www.compositingVFX.com/CH05/Figure 5-7 and try your luck at making a chroma-key for this clip.)
5.4 CREATING A MASK
In the sections above we saw how a luma-key or chroma-key can often be generated to be used as a mask for isolating an operation such as color correction. Many times, however, the target object will not succumb gracefully to a luma-key or chroma-key and other, more radical techniques have to be used. The challenge is to isolate a random object out of a random picture. The solution is to create a mask. The question is, which method to use.
The methods for creating a mask divide into two basic types—procedural and manual. A procedural method is one that gives the computer a rule or procedure to follow to create the mask. The luma-key is a good example. The manual method is to literally draw the mask by hand. Drawing a mask by hand might be done two different ways. One uses splines and control points to define the outer edges of the mask and the other is to literally paint the mask. Following are several alternative methods for creating a mask with their strengths and weaknesses.
5.4.1 The Difference Mask
The difference mask is one of the truly magical things that only a computer can do. It is also one of those things that sounds a lot better than it really is. Here’s the concept: there is a target object you would like to isolate with a mask, such as the boy in Figure 5-10. You start with a clean plate, which is the same picture without the target object (Figure 5-11) and task the computer with finding the difference between the two pictures, which is obviously the boy, and voila! You have a difference mask.
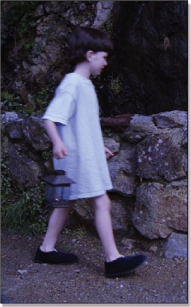
Figure 5-10 Target object
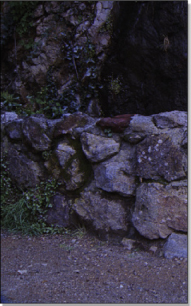
Figure 5-11 Clean plate
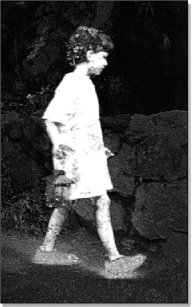
Figure 5-12 Raw difference mask
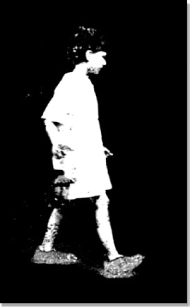
Figure 5-13 Final difference mask
Back in the real world, there are many problems with this idea that are nicely illustrated by the raw difference mask in Figure 5-12. This is the raw image produced by the computer when asked to take the difference between the two images. Ideally, we would have a clean white mask where the boy is with a clean black surround, but this is clearly not the case.
There are two basic problems. The first is that the boy’s mask is not a solid white everywhere. This is because the difference between the boy’s pixels and the clean plate’s pixels were very small, resulting in dark pixels in the mask. This is especially noticeable in the hair, which is dark, and the same region of the clean plate, which is also dark. Therefore the computer found very little difference between the target and clean plates in that area. The second problem is the black surrounding the mask is not very black. This is caused by small differences between the target and the clean plates in the areas outside the boy that you would expect were identical. These differences are introduced by anything that changes between the two plates—the wind blew the plants, the boy’s shadow on the ground, the bounce light from the boy’s shirt onto the rocks, the camera moved a bit, a light source shifted, the grain, space quarks—you get the picture.
The final difference mask in Figure 5-13 simply increases the contrast of the raw difference mask in order to firm up the white areas and clear out the black areas. Unfortunately it also exaggerates the flaws in the raw difference mask and we end up with virtually no mask for the hair and lantern, semi-transparent feet, and chewed edges on the legs and under the chin. This is rather typical for a difference mask.
Sometimes you will get lucky and the target object will be very different to the clean plate, and the surround regions will match perfectly (except for grain). Under those idyllic circumstances you will get a decent difference mask. However, even under those idyllic conditions the matte edges will be harsh and will require some blurring and smoothing to be useful. Another difficulty is that over the length of the shot the target can move over different areas of the background so different parts of the mask disintegrate from frame to frame. Like I said, it sounds better than it is.
5.4.2 The Color Difference Mask
The color difference mask is a simple but powerful method for creating a mask for an object in a picture, and is one of my personal favorites. In fact, very sophisticated and nuanced variations on this basic method are the basis for most of the keyers that are used to pull mattes for bluescreens and greenscreens that we saw in Chapter 4. The main virtues of this technique are that it is very simple and easy to try, and it is useful in a great variety of situations. The basic idea is very simple. Simply subtract one color channel of an image from another and something pops out of the picture as a mask. What pops out depends on the colors in the picture and which channel is subtracted from which.
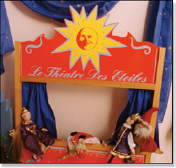
Figure 5-14 Source image
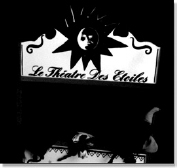
Figure 5-15 Red minus green
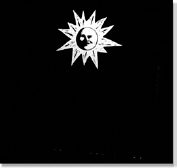
Figure 5-16 Green minus blue
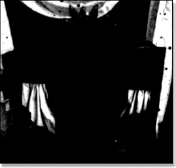
Figure 5-17 Blue minus green
Consider the source image in Figure 5-14, cleverly chosen for its colorful and varied content. By simply subtracting the green channel from the red channel (red minus green) the mask in Figure 5-15 was created. Subtracting the blue channel from the green channel (green minus blue) produced the mask in Figure 5-16 which isolated the yellow star. By subtracting the green channel from the blue channel (blue minus green) a mask for the blue curtains was created in Figure 5-17.
One of the great virtues of the color difference mask is that it usually has good edge quality—not too hard or jaggy. Another virtue of the color difference mask is its ability to survive variations in the lighting over the length of the shot. As we saw with the luma-key and chroma-key, if the appearance of the target changes at all the key can quickly break down. The color difference key, however, is remarkably tolerant to changes in appearance. If a shadow moves over a red object its luminance is seriously altered but the red minus green color difference will only be slightly affected. The color difference mask—try it. You’ll like it.
(Download the folder at www.compositingVFX.com/CH05/Figure 5-7 and try your luck at making a color difference mask for this clip.)
A geometric primitive is simply a basic geometric shape like a circle or square. However, if we just use the words circle or square we will not keep the client impressed with our esoteric terminology—which would be bad. Maintaining the priesthood is every compositor’s responsibility. All compositing systems can make a geometric primitive, and circles can be squeezed into ovals and squares into rectangles. Unfortunately, darn few objects in the universe are perfect circles or squares, so the geometric primitive has limited uses. Add the likelihood of the target object moving during the shot and its prospects grow dimmer.
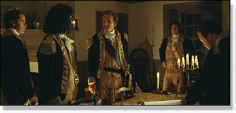
Figure 5-18 Original image

Figure 5-19 Geometric primitive
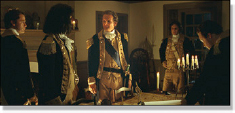
Figure 5-20 Enhanced hero
Beyond masking geometrically perfect objects like the moon or a building shot with a perfect lens, geometric primitives can also be used to good effect for color correcting. In fact, geometric primitives with big soft edges are the “power windows” used all over the digital intermediate color timing process of a feature film. Note the client-dazzling terminology—POWER WINDOWS! Much more impressive than “big fuzzy circle.” Good marketing here.
Returning to our story, consider the dark interior shot in Figure 5-18. Although our hero is appropriately centered in the frame, he is somewhat lost in the dim lighting. With the aid of the geometric primitive mask—excuse me, POWER WINDOW!—in Figure 5-19, the center of the frame in Figure 5-20 has been brightened up dramatically enhancing the presence of our hero. For moving targets or a moving camera the geometric primitive has to be key framed over the length of the shot to stay on target. The good news is that this is normally easy to do because the big fuzzy shape is very forgiving of minor misalignment so only a few key frames over the length of the shot are usually required.
5.4.4 Drawing Shapes
When all else fails, the time-honored tradition is to just draw the darn mask yourself using what is often called a shape. All modern compositing programs have tools for doing this in one form or another. The upside is that it unambiguously isolates the item of interest regardless of how similar it is to other parts of the picture. The downside is that if the target has a complex outline (a tree, for example) the task can take the better part of a lifetime. Another downside is that if the target moves from frame to frame, which things tend to do in movies and commercials, you have to draw a new shape every few frames. You have now entered the realm of rotoscoping, which is a large subject in its own right covered in exquisite detail in Chapter 6 so it is not covered here. We can, however, explore the key points of drawing a shape to be used as a mask.
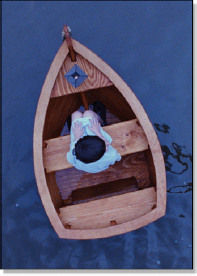
Figure 5-21 Target object
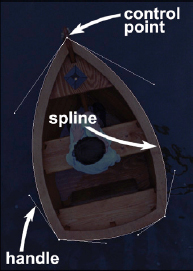
Figure 5-22 Spline-based shape
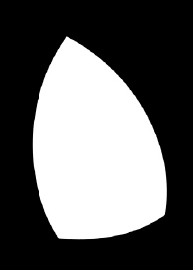
Figure 5-23 Resulting mask
Drawing a shape is done with splines, which are mathematical lines that can be straight or bent into graceful curves, like a stiff piano wire. Let’s say we want to draw a shape around the boat in Figure 5-21. Three control points are clicked over the picture, dropping one at each corner of the boat (see Figure 5-22), and then the control point “handles” are pulled out and adjusted for angle and tension (stiffness). As the control points are adjusted by the artist, the spline lines can be bent around the boat edges exactly matching their curvature. The resulting mask is then rendered by the computer like the example in Figure 5-23.
(Download the folder at www.compositingVFX.com/CH05/Figure 5-23 and try your hand at rotoscoping the boat.)
While the shape for a simple object like this boat will only take half a minute to draw, you can see how a complex object would take a great deal longer. Shapes with their splines are appropriate for objects of limited complexity such as the human form or man-made objects like boats and buildings. If the object has smooth mechanical edges like a car or the boat above then the spline is an ideal method of creating a matching smooth curve.
If the object is static and unmoving, then we are done. But what if it moves? If the object does not change shape over the length of the shot and only moves slowly it might be possible to track the original shape to move with the object over the length of the shot. Otherwise, it’s over to Chapter 6 and rotoscoping.
5.4.5 Painting a Mask
Sometimes you will encounter a situation like Figure 5-24 where drawing a shape is hopelessly complex. The mission here is to create a mask for the pink tree, but there is so much fiddly little detail around all the leaves and small branches that pulling the control points of thousands of splines would be a hopeless task. Perhaps the parts of the tree that overlap the sky could be used to create a luma-key, but that would only take care of a portion of the problem. The picture will have to be loaded into a paint program and the mask painted by hand.
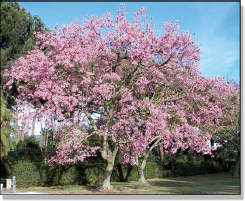
Figure 5-24 Hopelessly complex target
If the wind is blowing and the tree is moving over the length of the shot then the paint solution encounters two serious new problems. The first is the enormous number of man-hours required to hand paint such a complex mask frame by frame. The other is the difficulty in maintaining “temporal coherency”—where the mask moves smoothly from frame to frame like the blowing tree without chattering or twitching. While there are digital paint artists out there with the skill and patience to pull it off, there are darn few clients out there with the budget to pay for it.
There are paint systems that support keyframe animation which are called procedural paint systems. Following along with Figure 5-25, the top row shows five frames of a thick red paint line. Only the first and last frames were actually painted—keyframe 1 and keyframe 2. The three frames in between were interpolated by the computer. The bottom row in Figure 5-25 shows how it was done. The operator’s paint stroke actually “painted” a spline with control points which is hidden from view, and then the spline is “stroked” with the thick red line by the computer. When the splines are made visible like this the operator can go in and touch up the control points to keep the paint line right on target. With some systems motion trackers can be connected to the spline control points so that the brush stroke actually tracks a moving object across the frame.
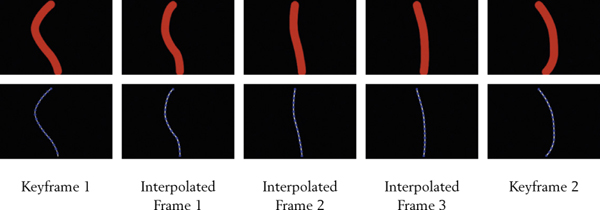
Figure 5-25 Procedural paint strokes
Very often the effort to create a mask with one method will only be met with partial success. The solution is to create several masks and combine them like we saw for compositing mattes in Chapter 4. Divide and conquer. For example, a luma-key might create a good mask for most of the target, but still leave a hole. Perhaps a color difference mask could also be created and combined with the luma-key to fill in part of the hole. The last bit might be filled in by drawing a shape. Perhaps you are drawing a shape over an object but there are portions of it that are too complex for the splines. Spline what you can, and then paint the rest.
These combination techniques are also important for Adobe Photoshop artists. Many artists will just start in painting a mask without first trying to pull a luma-key or chroma-key. Very often the computer can be made to do most of the work by first pulling a key, and then the artist just paints the parts the computer can’t do. Key what you can, and then paint the rest.