

As we saw in Chapter 1, when a character or object is filmed for later compositing it is photographed over a bluescreen. By filming an object in front of a uniform solid blue backing the computer can more easily detect it from the background and create or “pull” a matte for compositing. Pulling the matte for a composite is a very high art and is the cornerstone of digital compositing. The starting point of a good composite is a good matte, and in the real production world you are constantly trying to pull good mattes from bad bluescreens. While we may call the process bluescreen, the color of the backing screen can also be green or red, the other two primary colors. For the sake of simplicity we will refer to all of them as bluescreens regardless of their actual color.
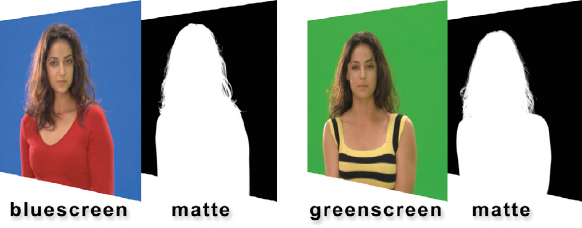
Figure 4-1 A matte can be made from a bluescreen or a greenscreen
Bluescreen compositing is much more challenging than CGI compositing. The reason for this is that the element you are working with, the bluescreen, is a piece of live action film photographed by someone instead of a mathematically perfect CGI element. As a result it can come to you infected with a host of photographic problems. These problems can range from over- or underexposure, out of focus, excessive grain, bad lighting, wrong bluescreen color, and even bad composition. Of course, the digital compositor is expected to pull a good matte anyway, fix all of these problems, and make a beautiful composite regardless of how pitiful the elements are. By comparison, I have never seen an overexposed, grainy, or badly focused CGI render.
The main tool for pulling a matte is the keyer, a sophisticated program that isolates the foreground object from the bluescreen and composites it over the background. In the process the keyer must perform many complex internal operations such as despill and color correction in addition to pulling the matte. These keyers have many adjustments and settings that the compositor must understand and master to get the best results. The keyer often fails to do a good job and it must be helped, so a variety of techniques are shown that you can use to assist the keyer in its job. Sometimes the keyer just cannot do the job and the only solution is to composite the shot outside of the keyer using heroic rescue efforts to salvage the situation. On the off chance that you are actually asked how to shoot the bluescreen plates the last section in this chapter contains a list of tips.
4.1 THE BLUESCREEN COMPOSITE
Like CGI compositing, bluescreen compositing requires three elements: a foreground image (the bluescreen), a background image, and a matte. The difference here is that a mathematically perfect matte automatically comes with the CGI, but for bluescreen compositing the digital compositor must create one. Creating a matte from a bluescreen is a precarious operation due to the wild variations from shot to shot. Some bluescreens are shot well and create lovely mattes while others are poorly shot and must be wrestled to the ground and coerced into giving up their mattes. In this first section we will get an overview of the bluescreen compositing process to introduce some key concepts, which will then be elaborated in the subsequent sections. While all the examples and discussion here are for bluescreens these same principles apply to greenscreens as well.
4.1.1 Pulling the Matte
Creating a matte from a bluescreen is often called pulling the matte and it is done with a marvelous program called a keyer. Figure 4-2 shows a whimsical illustration of this keying process. The keyer gets it name from the fact that it is going to create the key, or matte, for the bluescreen composite. All compositing programs come with keyers, and they often have more than one. In addition to that, third party keyers can be purchased and added to the compositing program. The reason for so many different keyer designs is that pulling a matte from a bluescreen is a difficult task, and some keyers work better than others on different bluescreens. In other words, if you used three different keyers to pull a matte on the same bluescreen you would get three different results.

Figure 4-2 The bluescreen plus a keyer makes a matte
The keyer processes the bluescreen images and generates a matte, while the digital artist adjusts sliders and tunes parameters trying to coax the best possible matte out of the keyer. The keyer may also need assistance by giving it garbage mattes to help it identify the blue parts of the bluescreen as well as holdout mattes to help it identify the objects to be isolated. Like I said, pulling a matte from a bluescreen is a difficult task and even the best keyers need some help. But keyers do so much more than just pull the matte.
4.1.2 The Basic Composite
On the face of it, the bluescreen composite process illustrated in Figure 4-3 is remarkably similar to the CGI composite illustrated in Chapter 2. One obvious difference is that the target objects in the bluescreen composite (the pensive maidens, in this example) are surrounded by blue while the foreground object in the CGI composite is surrounded by black. This difference is solved by another operation done by the keyer, and that is to scale the foreground RGB by the matte. This results in the target object being surrounded by black and ready for composite, just like CGI. Almost.
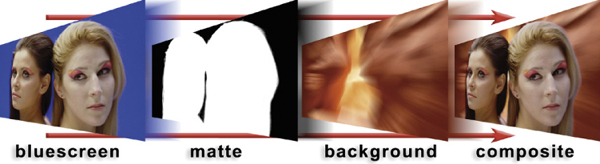
Figure 4-3 The keyer pulls the matte and performs the composite
Figure 4-4 Blue spill contamination
One problem with filming (or videotaping) things in front of bluescreens is the spill light. Blue light bounces (spills) off the bluescreen and contaminates the target object. The blue backing color also mixes with the edge of the target object giving its outer edge an unpleasant blue fringe like the example in Figure 4-4. Further, any semi-transparent regions such as hair, thin cloth, or motion blur allow the blue to show through so these regions also pick up a blue tint. To cope with these spill problems digital keyers perform the additional service of despill which removes the blue tints and fringes introduced by the bluescreen photography.
Of course, the bluescreen layer must be color corrected before it is composited over the background if it is to look right. Unfortunately, you cannot color correct the bluescreen layer before giving it to the keyer because that would alter the blue backing color, which would in turn confound the keyer trying to pull the matte. You cannot color correct it after the composite because it is now mixed with the background layer. What is a compositor to do? The answer is that the bluescreen layer must be color corrected inside the keyer—after it pulls the matte but before it lays it down over the background. Therefore all digital keyers also have internal color correcting capabilities. The background layer can be color corrected before it is given to the keyer, so no problem there.
The two remaining operations, which are scaling the background and summing the layers together, are also performed by the keyer. As you can see, the digital keyer actually performs a long list of operations to do a bluescreen composite while the compositing node that composites CGI only does a couple of operations. Further, there are a great many adjustments that must be mastered by the compositor in order to get a good composite out of the keyer. Just to drive the point home, Table 4-1 lists all of the operations performed by a typical digital keyer compared with a simple compositing operation used to composite CGI.
Table 4-1 Comparison of operations performed by a keyer vs. a composite operation
| Digital Keyer | CGI Compositing Operation |
|---|---|
| Pull the matte | Scale the background RGB |
| Despill the bluescreen layer | Sum the layers |
| Color correct the foreground | |
| Scale the bluescreen RGB | |
| Scale the background RGB | |
| Sum the layers |
4.2 ABOUT KEYERS
The keyers that come with a sophisticated compositing program are themselves a sophisticated program. Some compositing programs come with more than one, and there are even more keyers that can be purchased from third party developers and added to a compositing program. The reason for so many different keyers made by so many different companies is that it is in fact very difficult to pull a good matte from a bluescreen, so each manufacturer has its own special design that is better than all the others.
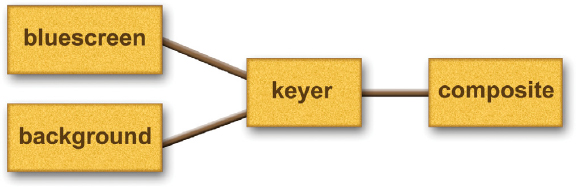
Figure 4-5 Flowgraph of a keyer performing a composite
Figure 4-5 is a flowgraph that illustrates connecting the bluescreen and the background layers to the keyer and its output, the finished composite. If it were only that simple! The keyer must perform several complex internal functions to pull this off. First, it must pull the matte from the bluescreen, perform an operation on the bluescreen layer called “despill” (which we met briefly in a previous chapter), composite the two layers, and offer some way for the artist to color correct the bluescreen layer. So there is a lot going on inside of a keyer, and each of them has their own unique way of performing these various operations. Next, we will peer inside a keyer to see the operations that go on in there.
4.2.1 How Keyers Work
Regardless of their differences, most keyers work on the same basic principle, which is that the red, green, and blue channels will have important differences between the target object (the item we are trying to composite) and the colored backing region. The pixels in the blue backing region will have blue values much greater than their red and green values, while the pixels in the target object will have blue values that are less than the red and green values. The key is not that the blue values are large and the other two are small. The key is the relationship between the three values—that the blue values are greater than the red and green. The bluescreen could be dark, as in a shadowed area, with low blue values. But if its blue values are greater than its red and green then it will be considered part of the backing region in the matte.
This relationship between the values of the three channels can be used to “sort” the pixels of the bluescreen layer into three groups—those that are 100% the backing color (the bluescreen), those that are 100% the target object, and those that are somewhere in between. The pixels that are 100% target object become the white part of the matte, the 100% backing pixels become black, and the somewhere in-between pixels become gray, or the semi-transparent parts of the matte.

Figure 4-6 The color channels of a bluescreen
The green arrows in Figure 4-6 point out the critical differences in the three channels between the target object and the backing region. The top green arrow starts at a pixel in the blue backing region of the bluescreen image. Following it through to each color channel, at the red channel it hits a dark region with low pixel values, then to the green channel which is also dark, but the blue channel has higher pixel values so it is brighter. The blue value at this point is greater than the red or green, so the keyer considers it part of the backing region. This part of the matte will become black.
Conversely, the bottom green arrow points to a bright red pixel in the target object of the bluescreen image. Following it through each channel reveals the red channel to be bright while the green and blue channels are dark. Here the blue value will be less than the red or green, so this area will be considered part of the target object. This part of the matte will become white.
In fact, in a properly photographed bluescreen every pixel in the target object will have a blue value that is less than its red and green values. Even in the skin tones the blue channel is darker than the red or green channels. The fact that the blue channel is greater than the red and green channels only in the backing region is the principle upon which keyers create the matte. This underscores the importance of a uniform and saturated bluescreen. The more saturated it is, the greater the difference between the blue channel and the other two, the better the matte. These types of keyers are therefore known as color difference keyers.
As we saw in Figure 4-4 above the problem of blue spill contamination requires the keyer to perform another operation called despill. Blue light from the bluescreen backing bounces onto the target object contaminating it with blue, such as on the skin tones. Blue contamination also occurs around the edges of the target, any semitransparent regions, any motion blurred elements, plus any shiny surfaces that might partially reflect the bluescreen. All of this excess blue light must be removed as part of the keyer’s overall bluescreen compositing operation.
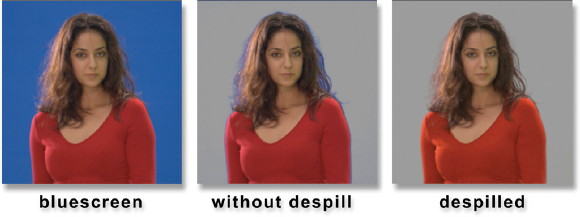
Figure 4-7 The need for despill
Figure 4-7 illustrates the importance of the despill operation for the composite. The center image shows the bluescreen composited over a neutral gray background without a despill operation. There is a blue outline around the edge of the girl plus a lot of blue spill mixed with her semi-transparent hair. The last image shows the fine results of performing a despill operation to remove the excess blue spill.
While the despilled composite looks very nice, there is a dark side to the despill operation. If you look closely at the color of the red sweater in the despilled image of Figure 4-7 you will see that it is not exactly the same red as the image without despill. The sweater naturally had a little excess blue, which was inadvertently removed along with the blue spill. This shifted the color of the sweater a bit. Whenever an undesirable side effect of an operation like this occurs it is called an artifact. So be advised—the despill operation, while essential, can introduce color artifacts.
4.2.3 Color Correction
As we saw earlier, color correcting the bluescreen layer has to be done at exactly the right place in the processing flow within the keyer. It cannot be done prior to the keyer because any change in the RGB values of the bluescreen layer introduced by a color correction operation will disturb the relationship between the red, green, and blue channels that the keyer counts on to pull the matte. This would result in a degraded matte and a poor composite. In addition to that, the despill operation must also be performed before any color correction. It is trying to remove the excess blue from just those pixels that have been contaminated by the backing color. If the RGB relationships have been disturbed by a previous color correction operation then it is no longer clear which pixels are contaminated from the blue spill.
Figure 4-8 shows the user interface for Keylight, a world-class keyer. Of the entire interface, only the area outlined in red is for color correcting the foreground and represents a typical case for the color correctors built into bluescreen keyers. It offers a foreground RGB scaling operation labeled “fgMult,” a gamma correction labeled “fgGamma,” and a saturation adjustment. The RGB scaling and gamma operations can be set for each color channel individually, which allows shifts in the color of the foreground in addition to its brightness.
This nicely illustrates how the color correction operation is “embedded” within the keyer because it must be an integral part of the keying process since it cannot be done before or after the keyer does its work. One of the problems with this arrangement is that you are obviously limited to only doing the color correction operations that the keyer’s designers built into their keyer. If you need something different or need to add a blur operation, for example, you are out of luck. In those situations the answer is to use the keyer only to pull a nice matte, but then to perform all of the other operations normally done within the keyer externally using individual operations. Compositing outside the keyer like this will be demonstrated in a later section.
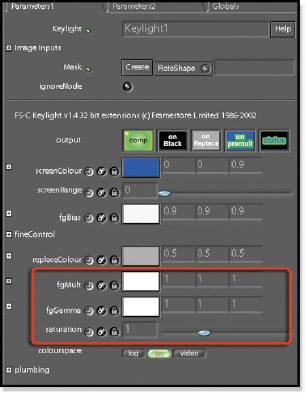
Figure 4-8 Keylight color corrector
4.2.4 Scaling the Foreground and Background
We have already seen how a CGI element is already scaled by its alpha channel and is normally delivered to compositing premultiplied. With bluescreen compositing, however, the foreground layer is not scaled by the matte so this step must be added to the keyer’s internal operations. Figure 4-9 shows a greenscreen being scaled by its matte to produce the scaled foreground, which prepares it for the final composite. It now looks just like a premultiplied CGI element. Within the internal logic of the keyer, the greenscreen is despilled prior to being scaled by the matte.
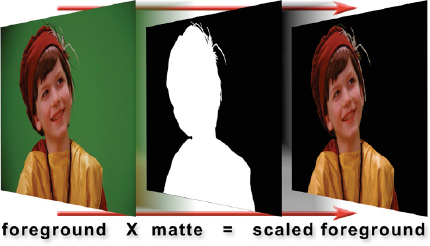
Figure 4-9 The foreground layer is scaled by the matte (film elements courtesy of Sylvia Binsfeld of DreamWeaver Films and Dorme)
The keyer must also scale the background, of course. As with compositing CGI, the matte is inverted (black and white are swapped) before multiplying it with the background. The inverted matte is shown in Figure 4-10 to produce the scaled background. Again, inverting the matte before multiplying the background is necessary because we want that black “hole” where the target object will go.
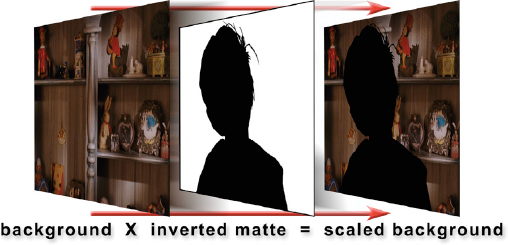
Figure 4-10 The background layer is actually scaled by the inverted matte
Now that we have both the scaled foreground and scaled background the keyer can simply sum the two layers together to create the final composite as shown in Figure 4-11. This step now looks very like Figure 3-5 in Chapter 3 where we added the CGI jet and scaled background to make the final composite. We just had to do a lot more work with a bluescreen to get a matte and create the scaled foreground first.
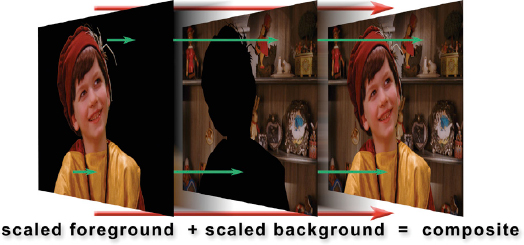
Figure 4-11 Sum the scaled layers to make the composite
Again, if you follow the top green arrow in Figure 4-11, starting with the scaled foreground layer, you will see its black pixel will be added to a colored pixel in the background resulting in a background pixel in the composite. Following the lower arrow shows that a foreground colored pixel will be added to a black pixel in the background resulting in a foreground pixel in the composite.
4.2.6 The Final Composite
The flowgraph in Figure 4-12 maps out the sequence of operations that the keyer must perform. Starting with the bluescreen layer it pulls the matte and performs the despill and color correction. It then performs the actual compositing operation by scaling the foreground and background layers and then summing them together. That is a lot of work for a keyer to do, so all keyers have a variety of buttons, dials, and sliders to adjust the settings of its internal workings so that the operator (that’s you) can “tweak” the finished composite for best results.
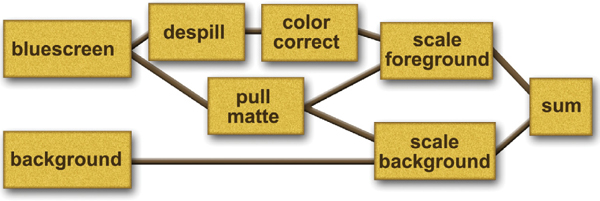
Figure 4-12 Flowgraph of the internal operations of a keyer
But this is a lot to ask even if a keyer has a dozen or more adjustments. Sometimes the keyer doesn’t do such a good job—hence the many available brands of keyers, each better than the next. If the compositing program has more than one keyer you might try a different one and hope for better results. Regardless of which keyer you use, there are many operations you can do to assist the keyer to pull better mattes and make a better composite. You can help the keyer.
4.3 HELPING THE KEYER
As we have seen, pulling a good matte from a bluescreen is often difficult. It is rare to plug in the bluescreen and background layers, adjust a few settings, and viola!—a great composite. The problems can be in the backing region (the blue- or greenscreen) or the target object, or both. The backing region might be unevenly lit, off color, or might be made up of several mismatched panels of color. The target object may have very transparent areas or contain colors that baffle the keyer. On top of all this the grain of the film (or the noise of the video) can add its own problems to the shot. Here we will take a look at how we may assist a struggling keyer to output a better composite.
4.3.1 Garbage Mattes
The garbage matte helps the keyer to clear out the blue or green backing region. The backing material may not extend all the way to the edges of the frame, there might be props or other obstructions, it could be unevenly lit, or it might be made up of a patchwork quilt of off-color panels that the keyer cannot cope with. Figure 4-13 illustrates how a very simple, loose fitting matte is drawn around the greenscreen target object (yellow outline) and used to composite it over a clean plate of solid color that matches the backing color. The light colored outline still around the boy in the composite comes from the fact that the lower part of the backing is lighter than the upper part. However, a good keyer will be able to cope with this minor variation in the backing region.
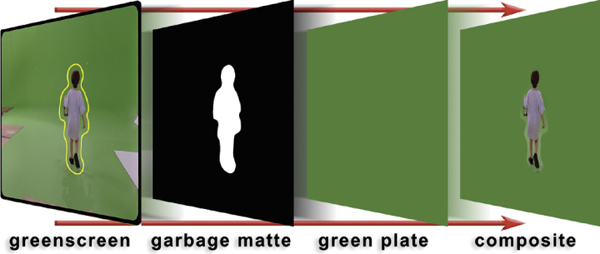
Figure 4-13 Garbage matting the greenscreen
The key words here for the garbage matte were “very simple”—a simple matte that does not come too close to the edges of the target object. There are two reasons for this. First, the keyer must be the one to extract the matte at the target’s edges. If the garbage matte touches the target’s edge then it overrides the keyer and extracts the matte at the edge instead, introducing a hard edge in that area. Second, by keeping the garbage matte a “loose fit” around the target it may not need to be redrawn for several frames. If the action is minimal this might be only every 10 or 20 frames, making the garbage matte very quick and easy to draw. The tighter the garbage matte is drawn around the target the more key frames will be needed.
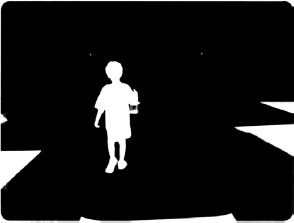
Figure 4-14 Original matte
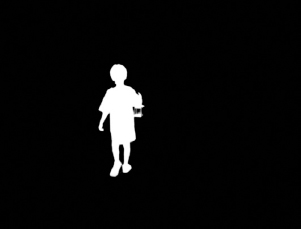
Figure 4-15 Garbage matted
The example in Figure 4-13 illustrates how to clean up the greenscreen prior to giving it to the keyer. A second alternative is that some keyers will accept a garbage matte as a separate input image and then use it internally to clean up the matte. If your keyer supports this option it is usually the best approach.
Yet a third way to apply the garbage matte is to use it to clean up the matte after the keyer has created it. This approach is only used when you are using the keyer just to pull the matte and plan to do your own composite external to the keyer. Figure 4-14 shows the original matte created from the greenscreen in Figure 4-13 without any garbage matting. The props and floor panels have shown up in the matte along with the boy and need to be cleared out. The original matte in Figure 4-14 is simply multiplied by the garbage matte from Figure 4-13 to produce the cleaned-up matte in Figure 4-15.
4.3.2 Procedural Garbage Mattes
There is another way to create a garbage matte that does not require drawing it by hand, and that is a procedural garbage matte. A procedural garbage matte is actually created by the computer based on a “procedure,” or rule. The most common procedural garbage matte for bluescreens is a chroma-key where the “procedure” is for the computer to find all the bright blue pixels in each frame and make a matte of them. We will learn more about chroma-keys in Chapter 5.
While the chroma-key garbage matte may sound like a slick way to create a bluescreen matte for compositing, it is not. Compared with a color difference matte the chroma-key has ragged edges, lack of fine detail around hair, and miserable transparency characteristics. It is far too crude to be used in any serious composite. However, it is just the thing for crudely blocking out the nasty parts of the backing region.
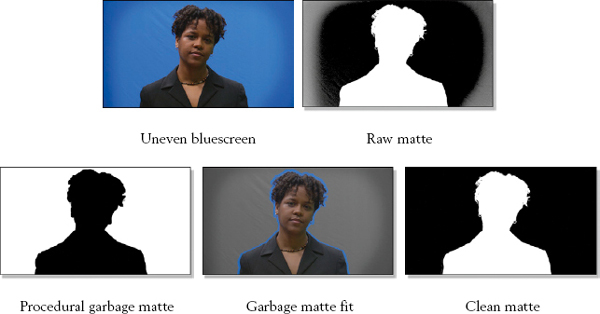
Figure 4-16 Procedural garbage matte used to clean up the backing region
Figure 4-16 shows a sequence of frames that illustrate how the procedural garbage matte works to clean up the uneven backing region of a bluescreen. The uneven bluescreen gets dark near the edges of the frame, a very common problem. The raw matte next to it shows the problem the keyer has without a garbage matte. The bottom left picture in Figure 4-16 shows the procedural garbage matte that was created using a chroma-key. It was adjusted so it would not come too close to the edges of the target (the lady). A test of the garbage matte fit is shown next to it using a desaturation operation to turn the backing region gray so you can see how far away the garbage matte is from the edges. Finally, the clean matte (bottom right) shows the results of using the garbage matte to clean up the backing region compared to the raw matte above it.
4.3.3 Holdout Mattes
We saw how a garbage matte helps the keyer to produce a clean matte in the backing region. A holdout matte does the same job, but for the target object. The target object may have some colors that confuse the keyer, which then thinks that those colors are part of the backing region so it creates a semi-transparent region right in the middle. Not good. Another problem can come from reflective objects like belt buckles, rings, or any shiny surface. They will reflect the backing color towards the camera, which punches a hole in the target object. A lot can go wrong when pulling a bluescreen matte so the keyer needs all the help it can get.
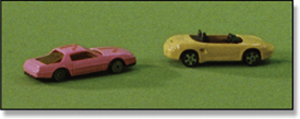
Figure 4-17 Greenscreen
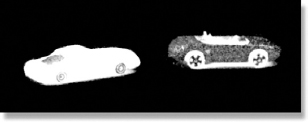
Figure 4-18 Raw matte
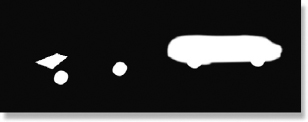
Figure 4-19 Holdout mattes
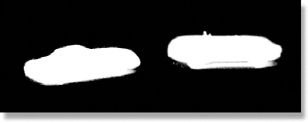
Figure 4-20 Fixed matte
Figure 4-17 illustrates multiple things going wrong with one greenscreen shot. These toy cars have color contamination problems in three different areas. Looking at the raw matte in Figure 4-18, it has holes in the wheels where the chrome rims have reflected the greenscreen, the pink car’s hatchback is semi-transparent because it too reflects the greenscreen, and the entire yellow car body is semi-transparent because the keyer is confused by its color. A holdout matte will be needed for each problem area.
Figure 4-19 shows the holdout matte created to address each problem area. When it is applied to the raw matte in Figure 4-18 it results in the fixed matte in Figure 4-20. A remaining problem area is the shadows under the cars. They are so dark that the keyer did not see them as part of the backing so it filled in the matte. A garbage matte will be needed to fix that problem.
Like a garbage matte, a holdout matte can be hand-drawn as was done in Figure 4-19 or generated procedurally, whatever works best. Also, just like the garbage matte, it can be used three ways – to clean up the greenscreen before the keyer gets it, to clean up the matte that the keyer produces, or it can be input to the keyer directly if it has an input option for a holdout matte.
4.3.4 Degrain
One of the banes of bluescreen compositing is “sizzling” edges. The edge of the composite where the target object merges with the background layer has a noisy “chatter” to it as if the grain (or video noise) were cranked up to “high.” Actually, that is literally what is going on. This is most noticeable with bluescreens because, in a cruel twist of physics, the blue channels of both film and video have the most grain (or noise). This noise becomes incorporated in the matte and is exaggerated at the matte edges. Greenscreens can have sizzling edges too, but to a much lesser degree because of the normally finer grain of the green channel.
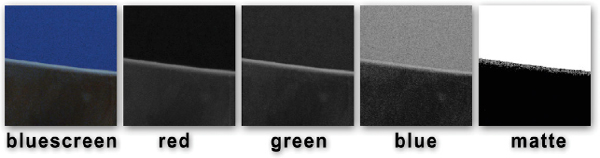
Figure 4-21 The heavy blue grain makes for sizzling matte edges
Figure 4-21 is a closeup of an actual feature film bluescreen that reveals how the blue grain turns up in the matte edges. You can see that the red and green channels have a much smaller, finer grain structure compared with the blue channel. Since this is a bluescreen the keyer will use a lot of the blue channel in its calculations of the matte so the blue grain ends up in the matte. Part of the internal calculations of the keyer is to scale the matte up in brightness, which then literally scales up the blue grain embedded in the matte edges. The white flecks of grain visible in the matte on the right will change from frame to frame and cause the edge to sizzle.
The fix for this is to degrain the bluescreen before pulling the matte. One could even conceivably degrain just the blue channel. This degrained version would then be used to pull the matte, but is not used in the composite because its grain structure would not match the background layer. Some keyers even have an internal degrain feature to save you the trouble. If not, you may have to manage your own grain and composite outside the keyer.
4.4 COMPOSITING OUTSIDE THE KEYER
It often happens that no matter how sincerely you adjust the settings of a keyer it just will not make a good composite. The problem might be in the matte quality, the despill operation, or perhaps the color correction is just not working. Discolored edges, dark edges, hard edges, chewy edges, sizzling edges, loss of fine edge detail (typically in hair), hue shifts in critical areas, semi-transparent regions, holes in the target object, grain added to the background— these are just a few of the problems that you may not be able to adjust from within the keyer. Keyers are wonderful and keyers are brilliant, but they are designed to work on elements that are “in spec.” Your elements may be less than ideal or you may have special issues that the keyer was not designed to cope with. It is time to composite outside the keyer.
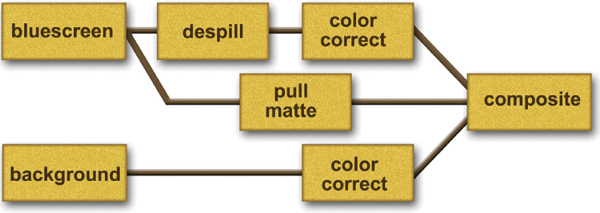
Figure 4-22 Sequence of operations for compositing outside the keyer
The basic strategy here is to use the keyer just to pull the matte, and then do your own despill, color correction, and compositing outside the keyer. The sequence of operations is shown in the flowgraph of Figure 4-22. Starting with the bluescreen (or greenscreen), it is first despilled using the despill operation that comes with the compositing program, and then it is color corrected. The original bluescreen is also presented to a keyer to pull its best matte—more on this in the next section. Starting at the background plate, it is first color corrected, and then all three elements—the despilled and color corrected bluescreen, the matte, and the color corrected background—are composited together. The keyer is used to pull the matte, but does not perform the actual composite.
4.4.1 Merging Multiple Mattes
One of the main causes of having to composite outside the keyer is the inability to get a good matte. The adjustments and settings of the keyer are global—they affect the entire matte the same. Sometimes (very often, actually) what is really needed are different keyer settings for different parts of the matte. One setting is good for the hair, but the torso has problems. Another setting gets a good solid matte for the torso, but the hair turns ugly. One solution is to let the keyer pull a matte and “export” it. This exported matte can then be combined with other mattes that were pulled with other keyers using different settings, or mattes drawn by hand in an attempt to create a good looking final matte. Divide and conquer.
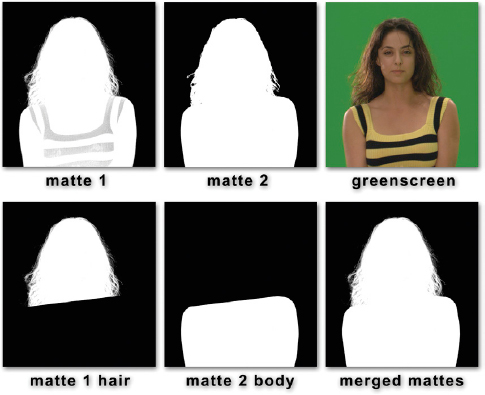
Figure 4-23 Combine mattes from more than one keyer
This approach is illustrated in Figure 4-23 where two different mattes were pulled and then combined. Matte 1 in Figure 4-23 has very nice hair, but the yellow sweater stripes have flummoxed the keyer, which has responded by making the stripes semitransparent. A second keyer was set up with completely different settings to make matte 2. This fixed the holes in the sweater, but the hair is just too ugly for words. The good hair from matte 1 and the good body from matte 2 were split at the hair line and merged to make the final merged mattes in Figure 4-23. Of course, the line where the two mattes meet must be carefully managed so as not to reveal the seam.
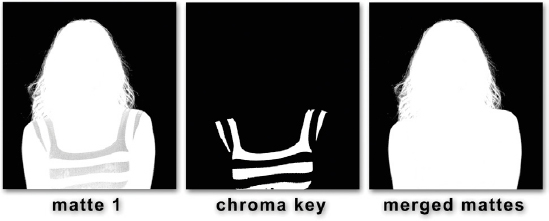
Figure 4-24 Pull different keys and combine them
Figure 4-24 illustrates yet another approach for combining multiple mattes. In this approach two different keyers were used to fix the yellow stripe problem in matte 1. A chroma-key was used to create a matte of just the yellow stripes and then it was merged with matte 1 to create the final merged matte. One virtue of this approach is that there is no seam that has to be carefully managed.
Edge mattes are yet another strategy favored by some. With this approach the edges are isolated with a separate edge matte so they can be finessed directly. The core (center) matte and the backing region mattes can then be simple and solid.
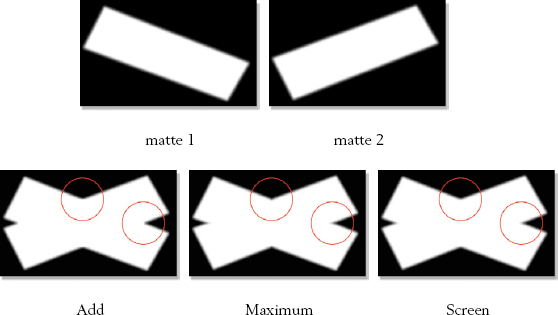
Figure 4-25 Methods of merging mattes
Once you have the multiple mattes required to cover the situation the next question becomes which method to use to merge them together. Figure 4-25 demonstrates the merging of matte 1 and matte 2 on the top row using three different matte merging methods. The visual difference between the three methods is shown in the bottom row where clear differences can be seen at the intersections of the two mattes—their “crotches,” if you will. The “Add” operation on the left tends to fill in the crotch. The “Maximum” operation next to it looks much better and is the operation of choice if you want a clean, sharp intersection. The “Screen” operation offers a more blended union of the two mattes and has a more organic look. More about these three image blending operations can be found in Chapter 7, Image Blending.
4.4.2 Performing the Despill
Once a good matte has been extracted we can turn our attention to the despill operation. Any compositing program worth its pixels will have a separate despill operation that can be applied to the bluescreen. There will be a selection for either blue- or greenscreen, plus some settings that can be adjusted for best effect. Figure 4-26 illustrates how greenscreens and bluescreens appear after they have been despilled. Your results may vary.
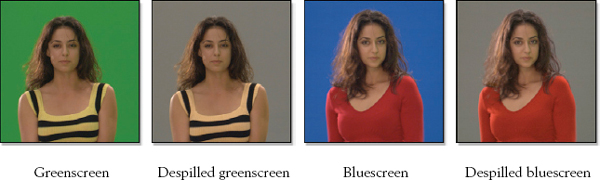
Figure 4-26 Despilled greenscreen and bluescreen
The despill adjustments should be made while looking at the final composite because the despill must be judged in context of the composite, not simply the appearance of the despilled bluescreen. Compare the finished composite with the original bluescreen to check for hue shifts, the main artifact of the despill. You will likely see some. Do not despair, for these shifts may not be problematic. You don’t have to fix a hue shift just because it is there. You only have to fix it if it is a problem. Be sure to point it out to the client. You don’t want the client suddenly noticing a problem just as the job is finished.
Should you be cursed with a compositing program that does not have a dedicated despill operation there are two fallback positions. One is to create your own despill operation from discrete operations, a description of which is outside the scope of an introductory book like this. The other fallback position is to use hue curves. Hue curves are a color correction operation that uses a curve to adjust the hues of an image within a selected range and are a common feature of virtually all compositing programs. By lowering the curve over the hue that represents the backing region (blue or green) the despill can be minimized. Note that this is not an ideal solution. The hue curve is altering every pixel that the curve affects, whether it is a despill pixel or not. A dedicated despill operation is much more selective and only goes after pixels that are contaminated with spill. Mostly.
4.4.3 Color Correcting
Again, following the sequence of operations from the flowgraph of Figure 4-22, the despilled version of the bluescreen can now be color corrected. The main objective here is to color correct the despilled foreground so that it blends naturally with the background. This is a high art so there is an entire chapter devoted to it—Chapter 9, The Art of Compositing.
But we do need to talk about the background for a minute. What should be done here depends on the situation. If the shot stands alone and is not one of several similar shots, then the background should most likely not be color corrected. The reason is that there will be an overall color correction of the finished project (movie, television show, commercial, whatever) by a colorist down the road and you do not want to second-guess that work. Make the composited elements blend as naturally as possible with the background and let the colorist give the thing its final look. An exception would be if the background plate were obviously out of whack. In this case a conservative color correction to make it appear “normal” might be appropriate. Be sure to check with the client lest you inadvertently turn a night shot into day.
However, if the background is part of a sequence of similar shots a different approach is usually used. All five of the background plates will normally be “color graded” first so that they match each other, and then the compositing is done over the color graded versions. If this color grading step is not done then each of the five background plates can have very different exposures—one too dark, one too bright, one too warm, etc. These variations in the background plates will require variations in color correcting the foreground element to match, which is not good. When the finished shots go to the colorist, small mismatches between the foreground and background can become exaggerated and suddenly a crisis erupts. Again, the color grading operation of the background plates is simply intended to “even them up” to give them a more uniform look. It is not intended to give them the final color correction. That is the colorist’s job.
4.4.4 The Composite
We now have all the pieces we need for a composite outside of the keyer—a fine matte, a color corrected foreground, and a color corrected (or not) background. The last step is to give all three elements to the compositing operation and let it do its thing. Note that this compositing operation will be different to the one used for compositing CGI. That one expected two inputs—a four-channel image that has already been premultiplied by its alpha plus a background. You need the compositing operation that expects three inputs—a foreground (our prepped bluescreen), a matte, and a background. This type of compositing operation will use the matte to scale the foreground (perform the premultiply operation in CGI-speak), invert it and scale the background, and then sum the layers together.
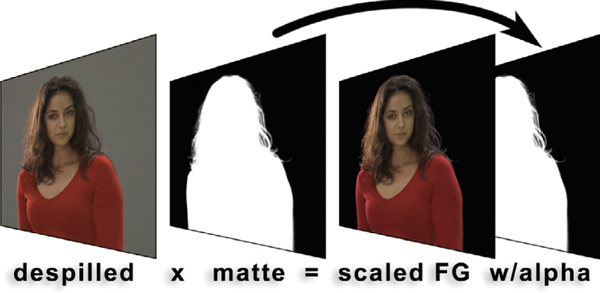
Figure 4-27 Creating a four-channel premultiplied bluescreen layer
Should you be unable to find a compositing operation that will take the three inputs, all is not lost. You can turn the bluescreen layer into a four-channel premultiplied image just like CGI and then use the same compositing operation that is used for CGI. The way to do that is illustrated in Figure 4-27. The first step is to multiply the despilled and color corrected foreground by the matte, creating the scaled or “premultiplied” foreground. Then simply copy the matte into the alpha channel of the scaled foreground as indicated by the arrow. You now have a premultiplied four-channel image that the compositing operation thinks is CGI and it will cheerfully composite it for you.
(Download the folders at www.compositingVFX.com/CH04/Greenscreen and Bluescreen plus BG. tif and try your hand at compositing them.)
4.5 SHOOTING BLUESCREENS (AND GREENSCREENS)
The starting point of a good bluescreen composite is a good bluescreen plate. While it is true that modern digital compositors can perform cinematic miracles and create beautiful visual effects shots from tawdry elements, it is also true that the better the bluescreen, the better the composite. So let’s take a look at what is needed on the set to shoot quality bluescreens for today’s visual effects pipeline. While the discussion cites bluescreens, the issues apply equally well to greenscreens. Where there are differences they are so noted.
The entire point in shooting a good bluescreen is to get a good composite in post. Fussing over the lighting of the fleshtones at the expense of good lighting of the bluescreen is a very poor trade. With modern digital compositing tools and heroic rescue efforts even a poorly shot greenscreen can be made into a good composite, but it will take more time (schedule) and more money (budget) and the results will still not be as good as with a well-shot bluescreen. The fleshtones can always be restored during compositing with color correction. The photographic objective for the backing region (whether blue, green or red) is purity of color (saturation), sufficient brightness, and uniformity so that the digital keyer can pull a good key.
4.5.1 Lighting the Backing
• The number one issue is uniformity of lighting—within 1/2 stop of uniformity all over.
• The number two issue is purity of the backing color. The photographed backing must be as close to 100% of its primary color, with 0% of the other two colors, as is technically possible. Of course, this is not technically possible, but as close as possible, please.
• The brightness level should be 1 to 1.5 stops under the key light. Two bad things happen with too much light on the backing. The backing looses purity (saturation) and it throws more spill onto the talent.
• The careful, uniform lighting is only needed in the area where the talent appears. If they don’t go near an edge then don’t worry about the lighting there. It can easily be garbage matted in post.
• Tungsten lights on a properly colored backing can produce very good results. Expensive colored lights are not a requirement.
• Blue or green colored gels on the lights improve the purity of the backing color, but can be dangerous. They lower the light levels of the light source and if they shine on the talent they add to the spill problems. Use with caution.
• Similarly, blue or green colored lights improve the purity of the backing color, but can be dangerous. If they shine on the talent they also add to the spill problems.
• Don’t use dimmers. They shift the color temperature of the lights towards red, which reduces the purity of the backing color.
4.5.2 Lighting the Talent
• Light the talent for the intended background they are to be composited into—dark interior, sunny outdoors, and high contrast, whatever. The talent lighting is independent of the backing lighting.
• To set up the lighting for the talent, turn off the backing lighting. After the lighting is set up for the talent, turn the backing lights back on and re-meter.
• Keep the talent 8 to 10 feet from the backing. The closer they get to the backing the more spill light will land on them.
• Make sure the talent lighting does not hit the backing.
• Watch out for reflective objects on the talent such as rings, belt buckles, etc. They will reflect the backing color and make that part of the key transparent, which will punch a hole in the talent.
• Never counter-light the edges of the talent with a complementary color of the backing (yellow for bluescreen and magenta for greenscreen) as an on-set spill suppression technique. This was useful in the old days when video chroma-key was the only keying technology. Today’s digital keyers routinely cope very well with spill and will become flummoxed if you try to help them with edge lighting.
• If a cove (cyclorama) is used then the talent will have to be lit with the same lights as the backing. Since the backing must be lit evenly that means that the talent will also be lit bright and flat.
4.5.3 The Backing Material
• The backing might be made by painting a wall with special paint or the use of special colored fabric.
• If paint is used it needs to be a specialty paint made for keying, not just some blue or green paint from the hardware store. More than one coat will probably be necessary to get uniform coverage. It needs to be a “flat” paint (not shiny), and watch out for glare spots.
• You can use paint from the hardware store if you do it right. Pick up some paint chips and photograph them with the same camera and lights to be used for the shoot. Give the digitized frames to the compositor to pull test keys on the various chips to find the best paint color to use.
• If fabric is used it needs to be a specialty fabric made for keying, not just some blue or green fabric. It should not have any wrinkles, seams, or folds. If several panels must be used then they must be the same color and joined with matching colored tape.
• The backing need not fill the frame; just cover the talent from the camera. It can be easily fixed in post with a garbage matte. Make certain that the talent does not go off the backing, of course, or you will endure some extra costs for rotoscoping.
4.5.4 Bluescreen vs. Greenscreen
• The choice of backing color may be dictated by the colors in the objects being filmed. If the foreground objects contain a lot of green then you should use bluescreen. If the foreground objects have a lot of blue then you should use greenscreen.
• It is not true that a digital keyer “prefers” blue or green. They work equally well on equally well-shot plates.
• Skin tones work equally well with green or blue backings when using modern digital keyers.
• Green is easier to light brightly than blue, requiring less lighting on the set.
• Bluescreens lit by natural sunlight work well. Throw up a large diffusion silk to kill shadows if needed, or schedule an overcast sky for the day of the shoot.
• Blue spill is less of a problem than green spill due to both its less offensive hue and its lower intensity. However, digital keyers have excellent despill tools that normally render this point moot.
• The blue channels of both film and video have by far the most noise, so a bluescreen produces mattes with the noisiest matte edges.
• The green channels of both film and video have low noise content so it produces the smoothest matte edges. This is one very compelling reason to shoot greenscreen, all else being equal.
4.5.5 Bluescreen Floors
• Bluescreen floors are often necessary to key the talent all the way to their feet, but they introduce two problems:
1. A great deal of blue light will bounce from the floor up onto the talent causing keying problems for the digital keyer.
2. Walking on the paint will scuff and discolor it, making the key more difficult to pull in post. Care must be taken on set to keep the floor as clean as possible.
• A reflective mirror (such as Mylar) on the floor that reflects the backing will create a blue floor without any “up-spill” onto the talent. However, the price is that the talent’s reflection will have to be removed by roto in post.
4.5.6 Film Issues
• The finest grain film stock possible should be used. Grain becomes exaggerated in the keying process and can introduce noise problems in the matte edges or in the despilled regions.
• It’s expensive, but Kodak’s SFX 200 film stock is made specifically for bluescreen and greenscreen photography and produces superior results.
• 16mm is not pin registered and has gate weave which is bad for compositing, as the layer will drift around when composited. However, this can be solved in post using an image stabilizing program.
• 16mm has much larger grain structure than 35mm film, which can create mattes with noisy edges.
• Film is a highly consistent medium, but there are many types, flavors and formats of video encompassing an astounding range of quality from excellent to “don’t bother.” It is essential to know the characteristics of the camera before shooting bluescreens with video for there are many video cameras that cannot shoot a good bluescreen.
• Video cameras all have an “edge enhancement” feature to artificially sharpen the picture. This introduces edge artifacts that flummox the keyer. Turn off all edge enhancement features in the camera.
• Do not shoot bluescreens with DVcam. They have both low sampling in chrominance (the very basis of a good key) plus they compress the video data unmercifully, which introduces compression artifacts that further enrage the keyer. Chapter 13 explains these issues in detail.
• Shoot greenscreens with 4:2:2 or 4:4:4 video cameras with as little compression as possible, preferably none. Again, see Chapter 13.
4.5.8 Photography Tips
• Shooting a clean plate of the backing screen considerably boosts the keyer’s ability to pull a good matte. If the camera is moving this is not practical. However, if the camera is locked off or it is a motion control shot then it should be done.
• For motion tracking shots make sure that there are at least three tracking markers in frame at all times, preferably more. Watch out for the talent covering up the markers.
• Tracking markers:
1. Make tracking markers shaped like a “+” (plus sign). This provides a strong vertical and horizontal edge for the motion tracker to lock onto.
2. Don’t let them get too small in frame. You should still be able to discern their shape in the final photography, rather than just a tiny blob. They may become out of focus due to depth of field, but what can you do.
3. Their color is not important as they will most likely be painted out anyway. If they are to be keyed out, then make them either green or blue, whichever is not the backing color.