
The first thing to do is to create the player ship object, both visually and with a physics presence. That will require turning physics on in the scene so that the player's ship can be simulated. Once the object appears, we'll specify how it will respond to certain inputs from the player, in abstract terms; events which specifically describe the desired actions. This will get us ready to supply those events based on physical events produced by the user's handling of the device.
Create a new folder called Deep Black, and copy the contents of the version 0 folder from the Project 4 project pack directory: the build.settings and config.lua files that go with any typical Corona project; the visuals.lua and explosion.lua library files that we used in Project 1, Bat Swat – an Introduction to App Event Cycles; the sprite, background, effect, and image folders and the art files in them; the main.lua file; and the splash.lua and game.lua files. This version of game.lua is a bare scene file, a copy of the scenetemplate.lua file provided by Corona in new scene-based projects. The step of copying this file into new scenes should be familiar from previous projects.
The build.settings file included in this folder is set to launch our game in landscape orientation.
We'll start by creating an almost blank scene that contains just the player. Open the game.lua file and find the createScene event handler.
We'll start by creating a plain colored background. We'll use a color that matches the overall look of the background image we'll use later:
function scene:createScene( event )
  local group = self.view

  display.newRect(group, 0, 0, display.contentWidth, display.contentHeight)
    :setFillColor(0x5E, 0x3F, 0x6B)
end
We'll create a single group to hold any objects that are meaningful in the world (later, we'll replace this with a full-fledged World object):
    :setFillColor(0x5E, 0x3F, 0x6B)
  self.World = display.newGroup()
  group:insert(self.World)
end
Because an asteroids game needs a certain amount of space, our sprites are a bit big compared to the screen. As a quick fix, we'll make the world twice as big by scaling it down:
  group:insert(self.World)
  self.World.xScale, self.World.yScale = 0.5, 0.5
endWe'll be using physics to move ships and bullets around, so go to the beginning of the file and perform the following steps:
- Load the required module:
local storyboard = require( "storyboard" ) local scene = storyboard.newScene() local physics = require "physics" - The setup of a new game will be done in the
willEnterSceneevent for the game scene; this event is the last warning we get before the scene starts to become visible:self.World.xScale, self.World.yScale = 0.5, 0.5 end function scene:willEnterScene( event ) end function scene:enterScene( event )
- Because the new scene has no guarantees about anything that might have been using the physics environment before, the first thing it will do on starting is wipe any previous physics simulation:
function scene:willEnterScene( event ) physics.stop() end - Once we know that the old physics environment, if any, has been cleared, we can set up a new one so that we can use our sprites as physics objects. We'll pause it right away so that the simulation won't run physics during any opening transition:
function scene:willEnterScene( event )
  physics.stop()
  physics.start()
  physics.pause()
end
- Since this is a top-down game with no gravity, we configure that fact on the physics environment before proceeding:
physics.start() physics.pause() physics.setGravity(0, 0) end - Finally, once the scene is fully loaded, we'll start the physics simulation in response to the scene's
enterSceneevent:function scene:enterScene( event ) physics.start() end
First, we'll specify the sprite and physics information for the player's ship. Create a new file in your project folder, spaceship.lua, and open it for editing.
- This module will be responsible for adding physics to the ship sprite, so we'll require that module:
local physics = require "physics"
- The ship will be a sprite with four different views contained in one image sheet. We'll start by specifying the basic form of the image sheet:
local physics = require "physics"

local sheet = graphics.newImageSheet("sprite/player.png",
  {
    sheetContentWidth = 80, sheetContentHeight = 98;
  }
)
Unlike our previous image sheets, this one is not uniform in its layout, so we specify the positions of the four frames individually:
local sheet = graphics.newImageSheet("sprite/player.png", { frames = { { x = 41, y = 1; width = 38, height = 50; }, { x = 1, y = 1; width = 38, height = 50; }, { x = 1, y = 52; width = 39, height = 45; }, { x = 40, y = 52; width = 39, height = 45; }, }; sheetContentWidth = 80, sheetContentHeight = 98; - To make a sprite from the sheet, we need a sequence definition, which explains which frames are used for which purposes. In this case, the sprite is not actually animated, so each sequence is only one frame long:
    sheetContentWidth = 80, sheetContentHeight = 98;
  }
)

local sequences = {
  {
    name = 'level';
    start = 1, count = 1;
  };
  {
    name = 'left';
    start = 4, count = 1;
  };
  {
    name = 'right';
    start = 3, count = 1;
  };
  {
    name = 'damaged';
    start = 2, count = 1;
  };
}
- This lets us fill in the basic function that will generate a sprite from these definitions:
    start = 2, count = 1;
  };
}

return function(parent)
  local self = display.newSprite(parent, sheet, sequences)
  return self
end
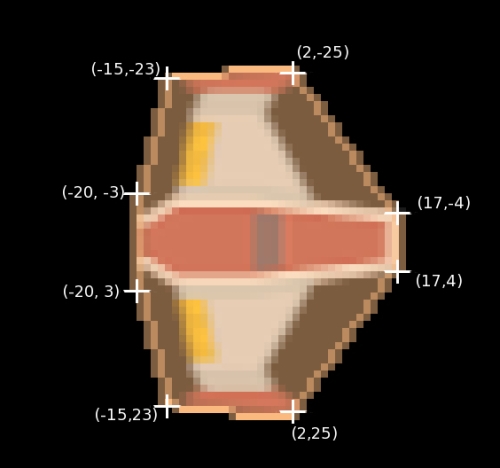
The default shape for a new physics body on an object is a rectangle with the dimensions of the object's bounding box; using this would lead to frustrated players when rocks appear to collide with the empty space around the ship's corners and destroy it. We'll define an octagonal shape that comes closer to the ship's visible shape.
  };
}

local body = {
  shape = {-20, -3; -15, -23; 2, -25; 17, -4; 17, 4; 2, 25; -15, 23; -20, 3};
}

return function(parent)
Note
You can define arbitrary shapes as an array of values, alternating between x and y values. There are two rules; the points should be defined in clockwise order (given that Corona's coordinate system is upside-down from Box2D's, which specifies counter-clockwise points), and the shape should be convex, with no places where a point is dimpled in between two of its neighbors.
- We'll specify this shape definition for the body when we add it to the sprite:
return function(parent)
  local self = display.newSprite(parent, sheet, sequences)
  physics.addBody(self, "dynamic", body)
  return self
end
Now that we have the basic physical and visual definition of a ship, we need to define how it responds to certain game events. To keep our code modular and easy to modify later, we'll do this in a separate file. Save spaceship.lua, create a new empty file player.lua, and open it.
- The player constructor function will take arguments indicating the event source that the player will listen to for input events, as well as the world group that the player object will belong to, and where to place the player ship in that world:
return function(input, world, x, y)
end
- It will construct a spaceship object in that world, and move it to the indicated point:
return function(input, world, x, y)
  local self = require "spaceship" (world)
  self.x, self.y = x, y
  return self
end
- Because the sprite image is pointed right, but we want it pointed up, we'll rotate it to face that direction. Setting
isFixedRotationmay seem counterintuitive for a ship that will spin around, but this only specifies to the physics engine that it is not allowed to turn the object when we accelerate it:self.x, self.y = x, y self.rotation = -90 self.isFixedRotation = true return self
Tip
In games where sprites rotate freely, it's often helpful to create the image files so that the sprites face right by default. This means that we can easily use the rotation angle of the player sprite to calculate things like which direction a bullet fired by the player should travel. If the sprite image faced a different way, we would have to correct the angles each time we made a calculation.
- We'll register the player to receive commands and other events that it needs from the input object, as well as detect time passing in the world:
  self.isFixedRotation = true
  world:addEventListener('clock', self)
  input:addEventListener('Thrust', self)
  input:addEventListener('Yaw', self)
  input:addEventListener('Fire', self)
  input:addEventListener('Jump', self)
  return self
- Whenever time passes in the game (clock events), we'll apply any specified thrust force to the player ship, and rotate it by any input amount. We'll preset these values to
0:self.rotation = -90 self.Burn, self.Turn = 0.0, 0.0 function self:clock(event) if self.Burn ~= 0 then local angle = math.rad(self.rotation) self:applyForce(self.Burn * math.cos(angle), self.Burn * math.sin(angle), self.x, self.y) end self:rotate(self.Turn * event.delta / 1000) end input:addEventListener('clock', self)
- To keep gameplay sane, the design specifies a top speed for the player ship, so we'll enforce that:
  self.isFixedRotation = true
  self.TopSpeed = 400
  self.Burn, self.Turn = 0.0, 0.0
  function self:clock(event)
    local dX, dY = self:getLinearVelocity()
    if math.pythagorean(dX, dY) > self.TopSpeed then
      local angle = math.atan2(dY, dX)
      self:setLinearVelocity(self.TopSpeed * math.cos(angle), self.TopSpeed * math.sin(angle))
    end
    if self.Burn ~= 0 then
- When the input source provides new input values for the thrust on the ship or turning angle, based on the tilt of the device, we have to capture those values so that they can be applied by the clock processor:
input:addEventListener('clock', self) function self:Thrust(event) self.Burn = event.value end input:addEventListener('Thrust', self) function self:Yaw(event) self.Turn = event.value end input:addEventListener('Yaw', self) - And finally, we also need to set the player sprite to correctly display its tilted animations for left and right turns:
  function self:Yaw(event)
    local direction = 'level'
    if event.value < 0 then
      direction = 'left'
    elseif event.value > 0 then
      direction = 'right'
    end
    self:setSequence(direction)
    self.Turn = event.value
  end
The pythagorean function, which calculates total distance between two points based on their x and y distances, isn't part of the math library as pre-loaded, so we'll require it at the start of the player module.
require "math.pythagorean"

return function(input, world, x, y)
  local self = require "spaceship" (world)
Now we just need to provide that module. Lua automatically assumes that prefixes in package names separated by periods correspond to folder names in your project, so after you save player.lua, create a folder math in your project directory and make a new empty file in it called pythagorean.lua. Open this file and frame in the addition of a new function to the math module:
module 'math'

function pythagorean(a, b)
end
This function is fairly simple; it applies the a² + b² = c² logic of the Pythagorean theorem to find the total distance between two points:
function pythagorean(a, b)
  return sqrt(a * a + b * b)
end
Tip
Given how small this function is, why is it in a module by itself? Mostly because it's a simple, abstract function which isn't naturally a part of one of the other core elements of the game. Several of the game elements can use it, so redefining it for each one doesn't make sense. While it could simply be a module of its own at the top level of the project, it's clearly math-related, so it makes sense to add it to the standard module.
At this point, you should be able to run the code, although all it will do is show you a ship on a purple background. Right now nothing is sending the events that it's waiting to respond to; addressing that will be our next task.
So far we've established the basics of an environment for our player object to occupy, constructed a sprite with a physics identity, and prepped it to receive control events. We've also created a general-purpose helper function that can be reused in other modules or projects.