
At a high level, DVDs have two components: content and menus. Content primarily takes the form of videos, slideshows, and audio files; while menus are the pages that allow the viewer to navigate to and play the content. From the same 50,000-foot view, DVD authoring comes down to two simple activities: creating the menus and linking the menus to the content so the desired video for example, plays when the viewer presses the button. Once you’ve linked your video content to a menu, the DVD authoring program does the rest—encoding the video into MPEG-2 format and recording menus and content to your DVD recorder.
Many consumer-oriented DVD authoring programs are just that simple—even a first-timer can create a DVD in about 10 minutes (this doesn’t include the time it takes for rendering and burning, and treating the capture and editing as separate processes, even though some DVD authoring tools include those functions). As you add features to your menus, and start to customize the viewer’s navigation through the disc, the creation and testing cycle gains complexity, and takes more time.
In this chapter, I discuss DVD basics like disc capacity and audio/video formats, and explore some of the advanced design and navigation options available in the more advanced authoring tools. I’ve structured the chapter as a large FAQ covering the most common questions I’ve been asked about DVD authoring and DVD-Recordable technology.
I’ve chosen screens from multiple programs. To best illustrate the concepts under discussion. While the concepts are consistent from program to program, the interfaces will certainly be different, and the terminology may vary slightly. My hope is that once you understand the concept, you’ll know how to apply it within your authoring program of choice. For guidance specific to your authoring program, check the list of available workbooks at www.doceo.com/dv101.html.
I’m going to assume that most readers will be producing DVDs to record on DVD recorders, rather than for mastering at a DVD replication facility. If you’re preparing a title for mastering and replication, I recommend reading DVD Authoring and Production, by Ralph LaBarge (CMP Books, 2001). If you’re burning your own discs, read on.
As much as you want to, within a few basic parameters. MPEG-2 is a scalable technology, which means you can compress to any desired bitrate. For example, to fit one hour of video on a DVD, you might encode at 8 Megabits per second (Mbps); to fit 2 hours, at 4Mbps; or to fit 4 hours, at 2Mbps.
Of course, the video starts to look pretty awful below 4 to 5Mbps unless you have stellar source material and a top-of-the-line hardware VBR encoder (typically, only Hollywood movies can go this low and get away with it). Some encoders simply won’t compress below a certain rate. There are other factors mitigating the number of minutes of video you can place on disc. If you want a quick look at the bitrate you’ll need to fit between 60 and 120 minutes of video on a disc, flip to Table 8.2.
That depends upon the type of recorder you have, as shown in Table 8.1. However, let’s start with the mastered discs, so you’ll understand the advantage Hollywood enjoyed over most smaller producers until very recently. (There are five kinds of mastered discs; the three not mentioned here, DVD-10, DVD-14, and DVD-18, are rarely used and we’re not going to concern ourselves with them here.)
Table 8.1. Capacity of mastered and recordable discs.
Mastered Discs | Recordable Discs | |||
|---|---|---|---|---|
Disc type | DVD-5 | DVD-9 | DVD±R/RW | Dual-Layer |
Number of layers | 1 | 2 | 1 | 2 |
Capacity | 4.7GB | 8.5GB | 4.7GB | 8.5GB |
Video at 8Mbps (in minutes) | 74 | 135 | 74 | 135 |
Mastered discs are mass-produced in a DVD replication facility, and most Hollywood DVDs that contain any kind of “extras” beyond the movie itself use the dual-layer DVD-9. Dual-layer discs contain data on two separate physical layers on a single side of the disc for a total disc capacity of 8.5GB. During playback, all set-top and computer DVD players first read the top data layer from the center of the disc outward. After reading all the content in the top layer, the player automatically refocuses and starts reading the bottom layer from the outside of the disc inward. This is called opposite track DVD, because the laser reads the two layers in opposite directions. The first layer has to contain at least as much content as the second layer so the laser can refocus without repositioning itself to make a seamless transition to the video on the second layer. You may notice a slight hiccup in the video when the player switches layers (although the latest players handle the layer break better than older players). Hollywood producers typically attempt to hide the break by placing it during a fade to black.
Some discs are designed to be read in the same direction on both layers, usually because the primary content of the disc is not a linear movie, but shorter video clips randomly accessed by the user. This is called parallel track; it’s much less common, and always makes a player hiccup if read sequentially, because the laser has to refocus and reposition itself.
Until mid-2004, the maximum capacity of DVD-Recordable discs was 4.7GB, roughly 55 percent of the capacity of a mastered DVD-9. This huge difference started to become relevant to projects involving around 2 hours of video, because you had to drop the bitrate (and, thus, the quality) to squeeze the video onto the disc. For example, with 8.5GB of capacity, you can encode two hours of video at about 8.5Mbps, which should deliver absolutely flawless video quality. To fit 2 hours of video on 4.7GB, however, you’d have to encode at 4.7Mbps, a much lower rate that would visibly degrade the video.
In 2004, however, several vendors started to ship new DVD-Recordable drives that supported recording to dual-layer (DVD+R DL) discs with a storage capacity of 8.5GB, the same as a mastered DVD-9. Early adopters were punished with the usual incompatibility problems that plague most new formats, but the second-generation drives and discs improved matters considerably. Reviewing a first-generation drive, EMedia magazine reported about a 35 percent success rate in terms of playback of recorded dual-layer discs with consumer DVD players in June 2004. By September, second-generation drives were returning about a 65 percent success rate, which looks better, but still means you should proceed with caution. What’s more, the price difference between single and dual-layer media remained quite large, with dual-layer media costing more than $15 per disc compared to less than $1 for recordable media in high quantities.
Surprisingly, the price difference between single-layer and dual-layer recorders isn’t that significant. Since all dual-layer recorders can also record to single-layer recordable and rewritable discs, buying a dual-layer recorder is a no-brainer for all but the most thrifty. There is a risk that you may have to upgrade the firmware of the drive going forward, but generally it’s fairly simple.
It’s also worth noting that the terminology surrounding these discs and drives is fairly confusing. For all practical purposes, the two “competing” DVD-Recordable formats, DVD+R and DVD-R, are the same (see next section), but they’re a little more divergent in the dual-layer scene than on the single-layer side. For one thing, as of November 2004, there are no dual-layer DVD-R discs or drives that will write them; dual-layer DVD-R isn’t expected to see the light of day until sometime in 2005. The dual-layer discs you will find are “plus” family discs, called “DVD+R DL.” And to make matters more confusing, they’re officially known as “double-layer” discs, even though the accepted term for DVDs with two layers has been “dual layer” ever since DVD first appeared in 1997. If you’re looking for a DL-capable drive or DL media, unfortunately, you’ll have to keep your eye out for all of these terms.
The biggest current difference (as of late 2004) is that there are no dual-layer DVD-R products yet available. That said, there are many drives that support DVD-R/RW and DVD+R/RW, as well as DVD+R dual-layer (usually designated as DVD+R DL). Virtually all currently shipping DVD-Recordable drives support both the plus (+) and minus (–) formats, although some of the older drives integrated into new PCs may only support one format or the other. Drives that support both single-layer standards double your media options, and improve your chances of producing a disc that will play on any given player (more on this in the next question). Since there is no price premium for drives that support both -R/RW and +R/RW, I would definitely recommend buying a drive that supports both formats, whether you’re buying a single- or dual-layer recorder.
No. Compatibility appears to be improving, with some studies placing single-layer DVD-R and DVD+R compatibility well over 90 percent, but that still means that if you send your DVDs to 100 viewers, five to ten won’t be able to play the disc. For this reason, when sending a disc, I always inform the recipient of the potential for compatibility issues, and tell them to contact me if this occurs.
You can minimize the risk of compatibility issues by:
Using name-brand media. I use exclusively Verbatim and Ridata.
Keeping the combined audio/video data rate below 8Mbps, since many players will sputter on media encoded at higher rates and burned to recordable media (go with 7Mbps to be truly conservative).
Deliver your projects on DVD-R, not DVD-RW; disc/player compatibility is always better with write-once media than with rewritable media.
Never apply paper disc labels on DVDs. Printing directly on the media with an inkjet or similar printer is fine.
I like DVD recorders that support both DVD-R/RW and DVD+R/RW because if I produce a disc in one format that won’t play on a DVD player, I simply produce another using the other format. Invariably, the second disc is compatible with the player in question.
Now let’s talk about the types of content you can use in your DVD productions.
DVDs can contain video in MPEG-1 and MPEG-2 formats. Most authoring programs can input a wide variety of video formats, such as MPEG, AVI, and MOV, and convert to MPEG-1 or 2 as necessary before burning the disc.
In terms of audio, DVDs can contain an uncompressed LPCM (linear pulse code modulated, same as CD-Audio) format as well as Dolby Digital (also known as AC-3) and MPEG-2 audio compression.
In the United States, DVD players are not required to play back MPEG-2 audio compression, just LPCM and AC-3. While most newer DVD players can play discs with MPEG-2 audio, there’s a risk that older players won’t be able to decode the audio. For this reason, few if any Hollywood DVDs ship solely with MPEG-2 audio compression; they all use Dolby Digital.
If you’re producing for business use, Dolby is the only viable audio compression option, though not all authoring products can output Dolby audio streams. If your authoring program doesn’t support Dolby, you’re at a significant disadvantage quality-wise, even if disk capacity isn’t an issue. Here’s why.
If you’re starting with DV video, your uncompressed audio data rate may be as high as 1,500Kbps. To achieve the optimal 8Mbps bitrate for the mixed audio/video stream, you’ll have to encode the video at 6,500Kbps. In contrast, with Dolby you can produce a high-quality compressed audio stream at around 200Kbps, leaving 7,800 for video, which is 20 percent higher than the maximum bitrate with PCM audio. With high-motion video, the higher bitrate could produce noticeably better quality.
The difference gets even more significant as you store more video minutes on the DVD. With two hours of video to store on a 4.7GB disc, the producer using Dolby Digital audio can encode the video to about 4,700Kbps, a challenging rate, but probably acceptable for lower-motion video. Without Dolby, however, the producer must encode to 3,300Kbps, at which point it starts to look pretty awful.
You can see why then using Dolby Digital audio is a critical feature for anyone producing DVDs for professional use.
Yes. You can combine digital pictures and audio, and many DVD authoring programs provide dedicated slideshow creation interfaces. How the program renders the slideshow has a dramatic impact on slideshow bitrate and file size.
Some programs convert the slideshow to a video at 30 frames per second, and encode it just like any other video file. If each image in the slideshow displays for five seconds, and your average video bit rate is 7Mbps, each slide will consume 35 megabits of data (7Mbps times 5 seconds) or close to 4.4 megabytes of space on the disc.
Other programs create “true” DVD slideshows that instruct the player to display a single frame for the entire duration specified in the slideshow. Since a single frame of video might only be about 60 kilobytes in size, five seconds of video consumes 60 kilobytes on the disc. Also, if you take this approach, or avoid the compression artifacts that often accompany still images encoded into MPEG-2 format, and achieve a more crisp display.
If your productions are slideshow-intensive, and require precise bit-budgeting, find out which of the above methods your authoring program uses; otherwise your calculations will be off. If the manual or product FAQ doesn’t provide the answer, build and render a 10-minute slideshow to DVD and see how much space it consumes.
Many video and DVD tools are now incorporating basic “pan and zoom” capabilities for spicing up slideshows with motion effects—think of how Ken Burns uses this technique in his documentaries. With “true” DVD slideshows, involving only MPEG-2 (I-Frame) stills, the only place you can add effects is during transitions. So if you want to pan and zoom your images, converting the slideshow to a video is your only option.
The DVD specification supports up to 32 text tracks for karaoke and subtitling. But not all DVD authoring programs can insert text subtitles. See Chapter 11 for more on subtitles.
The DVD specification supports up to eight tracks of digital audio, encoded in PCM, AC-3, or MPEG-2. Again, not all DVD authoring programs can insert multiple audio tracks.
VOB stands for Video Object. After rendering all your audio and video files into their required formats, your authoring program creates one or more VOB file, which also contain the menus along with the content. Essentially, it’s your MPEG-2 video plus all the descriptive and navigational information that makes your content DVD-compatible. These are the files that are actually burned to disc.
Menus provide three basic functions. First, they provide an aesthetic introduction to the content on the disc, which is why we attempt to make our menus as attractive as possible. Second, they provide a link to the content, as in, “click this button and watch the video.” Finally, menus control how the viewer navigates through the content, typically via menu-to-menu links.
In terms of aesthetics, all authoring programs include menu design capabilities, but they vary dramatically in terms of the features and design flexibility. All authoring programs provide various ways to link content to menu buttons—it’s more of a mechanical function so there’s little tangible difference between the programs.
Where there is significant difference is between consumer and professional authoring programs and the amount of navigational freedom each provides. If you want to create an intuitive and efficient path to your content, you’re probably going to have to go for a prosumer authoring tool, which will put you above the $100 price range.
All menus share a core set of common characteristics. Let’s explore these in Figures 8.1 and 8.2.
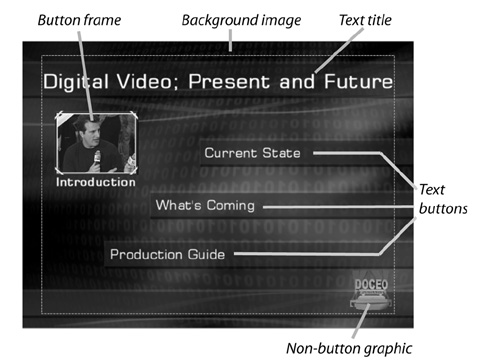
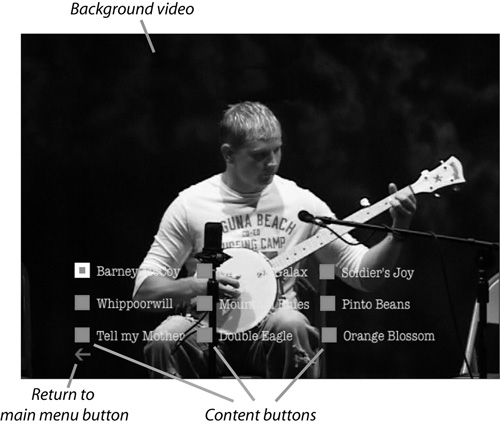
Figure 8.1 is a simple DVD menu with a bitmapped image as the background. Most authoring programs supply images such as the one shown to serve as a background, or you can create and insert your own. Alternatively, you can use a solid-color background or a video background such as that shown in Figure 8.2.
All other menu components fall neatly into two categories: buttons, which are linked components that display content or jump to another menu when clicked; and everything else. As you can see in Figure 8.1, text can be a button linking to other menus (text buttons) or simply a title that doesn’t link to anything. Graphics can also be linked to content, (see the button frame on the upper left, which plays a video file when clicked), or serve as garnish, (see the logo in the bottom right corner).
All authoring programs supply text-creation and editing tools to create text titles and labels. Most also include simple drawing tools to create background boxes or circles as well as libraries of clip art you can use as buttons or additional garnish.
Most authoring programs also allow you to customize the appearance of buttons in each of their three states: Normal, Selected, and Activated. For example, in Figure 8.2, the button and text “The Wreck” is in selected state, while all other buttons are in normal state.
As the viewer clicks through the buttons using the arrow keys on the DVD remote control, each button in turn will show its selected state. When clicked, the button will display the activated state, and then play the song. Usually, you can tell you’re in an activated state by color, but some programs also allow you to change graphics, underline the text, place a box around the button or similar effects. Figure 8.2 also contains a menu button that takes the viewer back to the main menu (shown on the lower left).
Figure 8.2 also shows a menu with a video background—this option is available on almost all authoring programs. Operationally, the video plays behind the menu buttons from the time the menu loads until the viewer clicks on a button. Another interesting common feature is the ability to insert an audio file, which plays until the viewer clicks on a button; you can also animate button frames, (like that shown in Figure 8.1) so that animation video audio starts playing within the frame when the menu appears.
The key point to remember about these audio and visual baubles is that they cost you both disc space and rendering time. That is, if you add a two-minute video background to your menu, that’s two additional minutes of video the authoring program must encode and store on disc, extending your production time and leaving less disc space for other content.
Navigation refers to how the viewer moves through the content on a DVD, and your ability to customize navigational structure varies greatly by program. The most flexible products—usually those costing $300 and more (with some exceptions)—allow you complete navigational flexibility, to guide your viewers as you see fit. An example of this is shown in Figure 8.3.
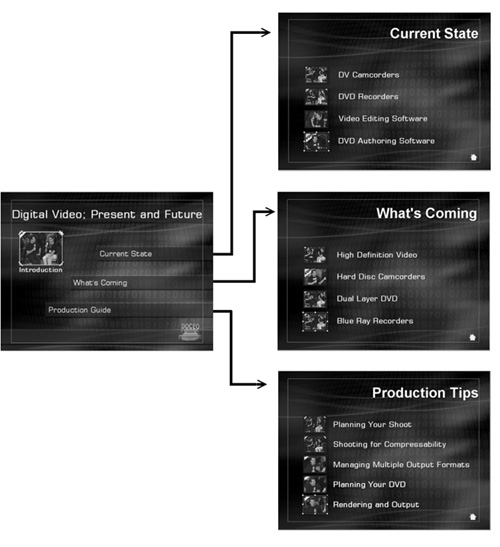
Let me set the project up for you. The videos were a composite of two interviews performed by Ken Santucci at a recent National Association of Broadcasters convention. The conversation began with the current state of the digital video market, then moved on to what new technologies were coming, and finished with some production tips.
When creating the DVD, my goal was to allow the viewer to move through the project as efficiently as possible. So I created separate menus covering each general topic we discussed, with specific button frames to launch more discrete topics. As you can see in Figure 8.3, this is called a branched menu structure because it resembles the branches of a tree.
Navigation though the title is logical and intuitive, and the viewer is never more than two clicks away from the desired content. The only negative here is that, as designer, I am in charge of creating all menu-to-menu and button-to-content links. This means more time developing and more risk of production errors. For example, when designing menus and titles from scratch, it’s easy to forget to create a home button to link the viewer back to the main menu, or to forget to create the link between button and menu.
In contrast, with template-based, sequential menu designs—the only option with most consumer authoring programs—the program creates all menu-to-menu and button-to-content links automatically. All you do is choose a template and identify the desired video and chapter points, and the program does the rest. The result is shown in Figure 8.4.
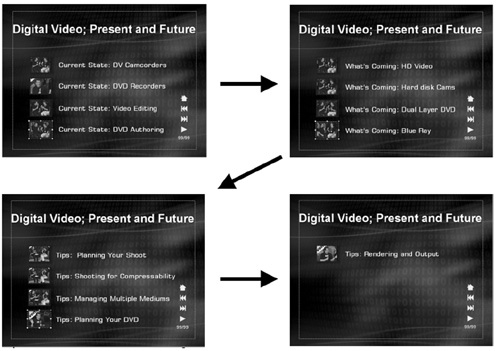
The little white icons on the bottom right of all the menus in Figure 8.4 are links to the menu immediately before and after the current menu, as well as a home button to get you back to where you started. The authoring program created all these links automatically, as it did links to all separate videos in the project. This reduces your authoring time significantly, and helps prevent design errors.
The obvious downside is the end-user experience. All menus and videos are presented in sequential order; it’s logical enough, but lacks the organization that guides the viewer through the disc, as well as the customization that might make a particular menu structure a better fit for a specific project. It’s not the additional one or two clicks it takes the viewer to get to the desired content; it’s the blind paging, which leaves viewers with no clue what’s on the final menu page until they arrive. As you would expect, most consumer DVD authoring products in the sub-$100 price range are limited to template-based, sequential projects, which are clearly inferior to branched designs for professional use.
Good question, and the current project is a perfect example. We filmed the interview live in two sessions and performed no editing, leaving two large video files to input into the DVD authoring program. Obviously, you can link to the start of any video (or slideshow for that matter), but how do you create links to sections within the video file? Figure 8.5 provides the answer.

Figure 8.5. The chapter markers shown at the top provide specific points in the video to link to buttons on the menu.
Virtually all DVD authoring programs let you create what are called “chapter points” in your videos, usually by moving to the desired frame and selecting “insert chapter point” or a similarly named function from the right-click menu. Once it’s created, you can link a chapter point to any menu button just as you would with the start of the video.
Chapter points are very effective when converting long video files to DVD—in fact, virtually all Hollywood movies converted to DVD use chapter points to link movie sections to menu buttons. In addition to being simple and fast to create, chapter points within a movie don’t interrupt the flow of playback from one chapter point to another.
In the video shown in Figure 8.5, for example, if the viewer started watching at the first chapter point, the movie would flow through each subsequent chapter point without interruption until that video finished playing or the viewer interrupted by clicking the DVD remote. In contrast, if you produced each section as a separate video file, and then attempted to play sequentially from file to file, the player would pause for a second or two between each separate video file, showing a black screen in the interim. Not quite the track-switch thunk of an 8-track tape (boy, am I dating myself), but definitely something to avoid whenever possible.
For this reason, whenever producing a video you expect viewers to watch from start to finish, outputting one long video file from your editor and adding chapter points to create discrete entry points is usually the preferred method. In fact, when working with long, sequential videos, the only reason to output separate files from your editor is if you need separate files to produce a playlist.
I thought this question was coming. Let me explain in the context of a recent project, where I shot, edited, and produced a DVD of a concert hosted by a local music association. The concert was about 60 minutes in length, consisting of 11 songs, each about three minutes long, with the rest of the time taken up by the performers chatting and telling stories.
Just to add a little context, performers were two of the surviving members of the Stoneman family, who’d played at the White House, hosted their own network television show in the ’50s and ’60s, and recorded at the historic 1928 Bristol sessions, which arguably launched commercial country music. They were country music before country music was cool, and for many in the audience, it was the stories—more than the music itself—that made the concert. So I wasn’t about to cut the talk from the DVD.
But I did want to offer DVD viewers the ability to see just the music portion—click one button and see all 11 songs in a row, minus the stories. The answer? Playlists. Briefly, playlists (called “stories” in some programs), let you link together noncontiguous chunks of DVD content and combine them into a sequential presentation.
Without playlists, I’d have had to create and render a separate video file containing just the songs in my video editor and add that video to the DVD, piling on another 30 minutes of video to an already crowded DVD. In contrast, playlists work with content already inserted into the project, and thus add minimal extra content to the disc.
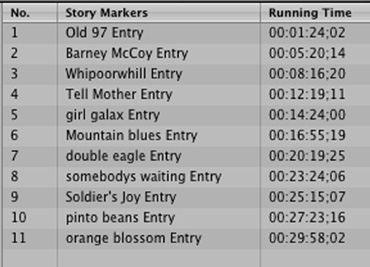
However, playlists work differently in different programs. Some authoring programs start playing at a chapter point in the video and automatically stop playing at the next chapter point. As shown in Figure 8.6, to prepare the converted video for the playlist, I created a chapter point at the start of every song, and then added a chapter point at the end of each song, basically when the applause died down. For example, “Barney McCoy” is the start of a song, “Barney end” is the end of the song.

Basically, to create the playlist, I created a list of the chapter points (called story markers in the authoring program I used, as shown in Figure 8.7) that marked the beginning of each song. During playback, this list instructs the DVD player to start the song, exit at the next chapter point, then re-enter at the next designated chapter point, the start of the next song.
When watching the playlist from DVD, the viewer experiences about a one-second delay between songs, but that’s expected, because the viewer knows the video is jumping from song to song. However, since I used chapter points to create the links for the playlist, viewers watching the concert from start to finish would experience smooth, uninterrupted playback.
It may sound minor, but the key feature offered by this program was the ability for a playlist to exit at a chapter point. Not all programs can do this. If this is the case for you; and you create a playlist that includes a chapter point within a video file, the video will play from the chapter point until the end of the video file.
Clearly, this wouldn’t work if the concert video was one long file accessed via chapter points. Applying this to my project, I would have to split the concert into 22 separate files—one containing a song, the next containing the post-song discussion, then another song, more discussion, and so on.
Then I would link the songs together into a playlist that simply pointed to each song in sequential order. During playback, the viewer would experience short breaks between the songs, just as with the other technique, which would be fine.
However, because I had to break the concert into separate video files, viewers choosing to watch the entire concert sequentially would experience a short break during each transition between songs. At the end of the applause to “Barney McCoy,” for example, there would be a short pause until the performers started chatting, then a short break before the next song started. This would not sit well with the viewer, because the breaks come between linear segments of the concert, and are clearly artificial.
Going forward, I’m sure most programs will boost their playlist functions with the ability to exit at a chapter point. If your program doesn’t support this feature, you’ll have to balance the value of the playlist against the value of uninterrupted playback of the sequential video. If you don’t expect many viewers to watch the video, from start to finish, breaking your video into the pieces necessary to support a playlist won’t be an issue. But if you’re expecting sequential viewing, you’ll have a much tougher decision.
Menu structure is a major issue, but there are other factors involved in controlling how your viewers navigate through the content on the disc. When planning a DVD, ask yourself the following questions to fine-tune the user experience.
(Note that while most $300-plus authoring programs include the features discussed here, playlists and many other sophisticated navigational capabilities are simply not available authoring program under $100.)
When you play a Hollywood DVD, the first thing you typically see is the friendly FBI warning describing the penalties for copying the DVD. The technical term for this is the First Play video, and many authoring programs allow you to add a First Play video to the DVD. This is a completely artistic decision, with one caveat—if you insert a First Play video, it’s usually best to keep it short, generally around a minute or so, since your viewers will be forced to watch it every time they play the disc.
If you opt not to include a First Play video, the first menu in the project (also called the Top menu) should appear after the viewer inserts the disc. Some programs automatically assign Top menu status to the first menu in the project; with others, you’ll specifically have to identify a menu as the Top menu.
If you do insert a First Play video into your project, you may have to designate what happens after the video finishes playing. Typically, you accomplish this by assigning the Top menu as the “end action” for the First Play video. I’ll explain this further two questions down.
OK, the viewer is now at the Top menu, either because there was no First Play video, or because it’s already played through. Now you have to plan what happens if no buttons are clicked. This is often a concern for discs produced for trade shows, kiosks, or other unattended uses (not to mention inexperienced DVD viewers). In the event of a power outage at the show, or a nontechnical user running the computer or player, you want the DVD to start playing the desired content automatically after a few moments.
The mechanism used to start the content playing is typically a menu timeout. You set duration, as shown in Figure 8.8, and then enter an End Action to tell the DVD where to go after the timeout period. In Figure 8.8, I’m telling the DVD to wait one minute, then jump to the menu Current State and activate the DV Camcorders button, which will start that video playing.
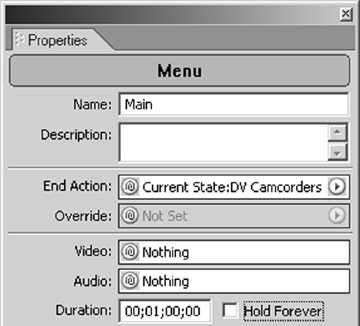
Figure 8.8. Setting a menu duration and End Action so the content on the DVD automatically starts playing.
If we didn’t assign the menu a duration and End Action, the menu would remain onscreen until a viewer clicked a button, which is also acceptable for many applications. If you include a video background or audio file, you can typically have these files play again and again (called looping) until the viewer interrupts by clicking.
I’ve mentioned end actions twice, so let’s explore the subject more fully. Basically, the End Action is where the viewer goes next, either after a video or slideshow finishes playing, or if viewer interrupts playback, or a menu simply times out. For example, in Figure 8.8, after the one-minute menu timeout, the DVD will play the DV Camcorders video in the Current State menu. If you check Figure 8.3, you’ll see that this is the first video in the first menu with content.
Even though your flexibility regarding end actions is very limited in consumer programs, with most prosumer packages you can create an End Action that jumps to any menu or other content in the DVD. If the primary application for the DVD is unattended operation, you’d link all videos via sequential end actions, and then link the last video to the first video to start the loop anew.
With most other DVDs, you may want to choose a different behavior. For example, in my interview DVD, which is not really intended for unattended operation, I wanted the viewer to play through all the videos on each content menu and then return to the Top menu. I accomplish this by setting a return-to-menu flag after the video from the fourth chapter point finishes as shown in Figure 8.9.

Figure 8.9. Setting a return-to-menu flag to go back to the menu after the video from the fourth chapter point stops playing.
The basic rule of thumb is, you ask the same question—“what happens next?”—for each menu and video or slideshow included in the project, going from button to button, menu to menu. When the end action is to send your viewer to a menu, you of course must revisit the question “what happens if no one clicks anything?” and then deal with the timeout issue.
If you look at Figure 8.3, you’ll notice that all three content menus have little home buttons on the bottom right, which the viewer clicks to return to the Top menu. In addition, I could have inserted links on each menu with videos to the other menu with videos—just as most Web pages contain links to other pages on the site. I chose not to, forcing the viewer to return to the main menu to view other content pages. However, if you feel the inclusion of menu-to-menu links would enhance the viewing experience for your viewers, by all means include them.
Good question, if not the question. Unfortunately, getting all your content to fit on disc is often harder than you think, and certainly harder than it needs to be.
Let’s quickly review. You’ve added menus, audio, video, and slideshows to your disc. If your authoring software gives you a Dolby audio compression option, you’ll almost certainly use it, so that data rate is fixed. This leaves the data rate of the video as the most significant variable you need to adjust to fit the contents on disc.
Some programs figure out the required video data rate internally, and automatically compress the video to the bitrate necessary to fit it all on disc. Obviously, this is the preferred approach. Other programs, however, force you to calculate the necessary rate, though, generally, not without some assistance.
Specifically, when starting a project, you’ll usually set the project encoding parameters, using a control such as that shown in Figure 8.10. Then, as you add content to the project, you’ll see the contents accumulate in some kind of meter, such as the one shown in Figure 8.11.
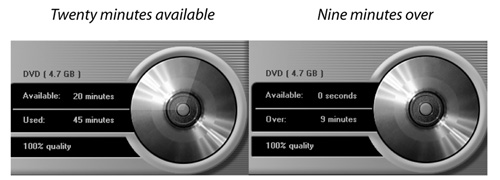
Figure 8.11. A capacity meter that tells you how much room remains (on the left), or when you’re out of space (on the right).
If you exceed the capacity of the disc, you have two choices: lower the video bitrate or delete content. This type of scrambling occurs more often than you think, and why I recommend encoding all assets as part of the final rendering and burning process.
Specifically, if you’re working with a separate video editor and authoring program, don’t encode into MPEG-2 format when outputting from the editor, because you may later discover that the bitrate was too high or too low. Rather, output in DV format and encode as part of the final rendering process.
Similarly, some authoring programs let you encode video files into MPEG-2 format as an interim production step. Unless your disc contents are absolutely nailed down, however, you may find yourself having to encode again to a different bitrate. Again, I can’t, recommend enough waiting until the project is finished, and the optimal bitrate conclusive, before you encode your video.
Bit budgeting is for Type A personalities who want to know how much video will fit on their discs and at what rate before they start authoring. Not a bad thing (hey, I’m definitely Type A), but a bit difficult to explain in the abstract, because bit-budgeting is both project- and authoring program-specific. Let’s review some general principles.
The first principle is that all content counts. It’s not just video, audio, and slideshows; it’s all of that plus audio menus, video menus, animated button frames, multiple audio tracks for languages, and multiple subtitle tracks. To perform a precise bit-budget allocation, you need to know the following:
The bitrate used for audio menus (generally the bitrate applied to other audio files).
The bitrate the program uses for video menus (generally, the bitrate applied to video files).
How the program encodes slideshows (whether it converts the slideshow into a video file or displays the still images).
The bitrate used for language tracks (generally, the bitrate applied to other audio files).
The second principle is that authoring programs typically can’t use the same asset multiple times. For example, suppose you have four menus in your project and use the same two-minute video behind each menu. In a perfect world, the authoring program would encode and store the video once on disc and tell the DVD player to play that file behind each menu. Unfortunately, most authoring programs don’t work that way; they produce the video file four times and store all four files on the disc.
Sounds good to me. Table 8.2 shows the bitrate for five projects, ranging in size from 60 minutes to 120 minutes. Included are encoding parameters for programs both with Dolby encoding (at 192Kbps) and with LPCM output (at 44.1kHz, 16-bit stereo, or 1,408Kbps).
Table 8.2. Video-only bitrates for five project sizes using Dolby and PCM encoding.
Disc capacity | 4.7GB | 4.7GB | 4.7GB | 4.7GB | 4.7GB |
Minutes of video | 120 | 105 | 90 | 75 | 60 |
Video-only bitrate (Dolby) | 4700 | 5400 | 6400 | 7700 | 7808 |
Video-only bitrate (LPCM) | 3500 | 4200 | 5200 | 6500 | 6592 |
Let me add a couple of explanatory notes. First, the combined audio/video bitrate on any project burned to a DVD-Recordable disc should never exceed 8Mbps, and I’ve limited the video bitrates for both 60-minute projects to reflect this. Put another way; if your project has less than 60 minutes of video, bit budgeting isn’t really an issue.
Second, if you’re using MPEG-2 audio compression at a similar 192Kbps rate, the results will obviously be the same as those shown in Table 8.2. That said, I don’t recommend using MPEG-2 audio for discs built for business use because of the compatibility issues I’ve already described.
Third, these numbers assume only one audio track and no audio or video menus. If you are including these in your project, you’ll have to factor this content into the equation.
OK, we’ve gotten most of the tough planning issues out of the way, and imported and added chapter points to our video. Now let’s get back to work and finish this project. First up is linking our buttons to content and other menus.
Generally, there are two ways to link buttons to either menus or content. Most programs use drag and drop, as shown in Figure 8.12. Typically, you grab the chapter point or menu you want to link to with your mouse, drag it onto the button, and release, usually guided by symbols such as the plus sign visible in Figure 8.12.

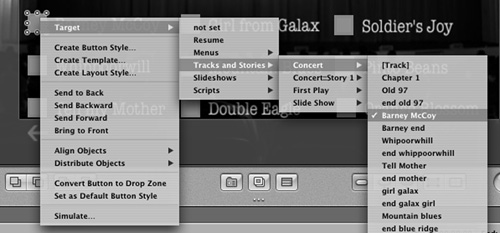
Alternatively, some programs use right-click menus to allow you to choose the target video and chapter point, as shown in Figure 8.13; it’s less visual, but gets the job done.
Once you identify your preferred method of linking, link all buttons to their targets. The next step is to preview your DVD and check your work.
All DVD authoring programs allow you to simulate the playback of your DVD in preview mode or a similar with simulated controls containing all the controls normally found on a DVD remote. This is demonstrated in Figure 8.14.
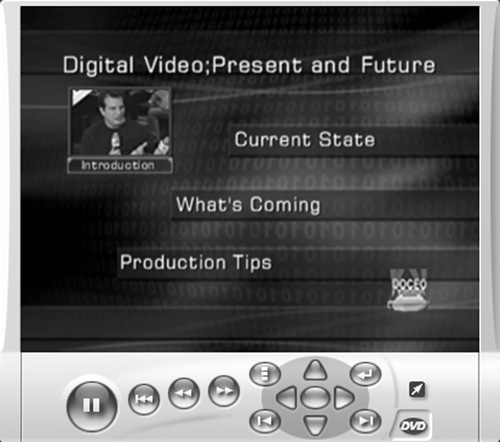
Using this control, test all project links to verify their accuracy—tedious but critical. For example, while some programs automatically check to make sure a button is linked, there’s no way the program can ensure it’s linked to the right target. There’s also no automatic way to verify that chapter points are set to the right location. During preview, you’ll also discover whether all menus have links back to the main menu (otherwise, you’ll be left hanging), and check that all menu timeouts and end actions are working as you planned.
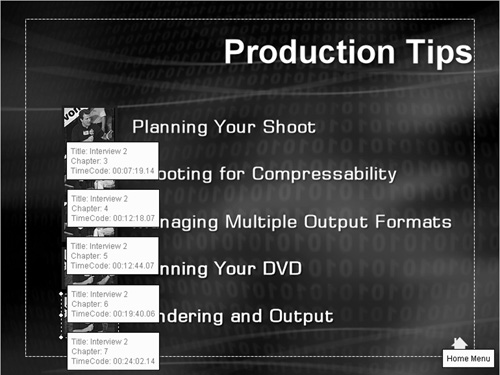
Note that some programs offer a view that displays the target of each button on the menu, as shown in Figure 8.15. This is a really helpful to quickly identify mistakes.
As you move up in price, authoring programs offer increasing ranges of error detection, from “orphan menus” that aren’t linked to any other menu, to unlinked buttons, missing assets, and far, far beyond. As mentioned before, however, these functions can’t detect when you’ve made a mistake and linked to the wrong content, so you’re still going to have to perform your own comprehensive preview and manual error-checking.
At this point, it’s time to burn, which is generally a fairly mechanical option, especially if you’re already selected your video encoding parameters. Figure 8.16 shows a typical DVD burning screen. If you’re concerned with options such as copy protection and region encoding, check the manual of your authoring program.
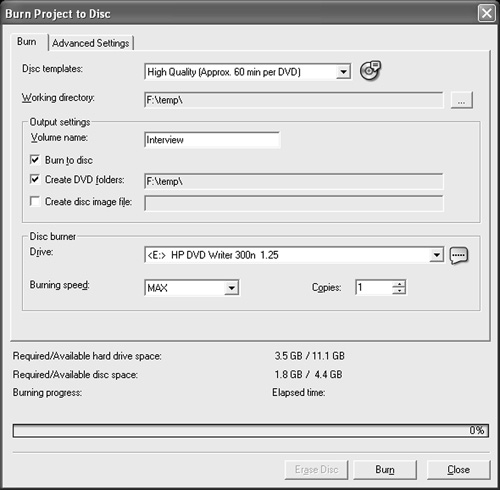
If you plan to make multiple copies of the DVD, have the program create the necessary files and store them to disc before burning; that way you won’t have to re-render the entire project to create another copy. At this stage, most programs will advise you if you have too much content for the disc using the current encoding settings, which isn’t a problem here.
I don’t know about you, but after I’ve spent hours working on a DVD, scribbling the title with a permanent Sharpie on the disc just doesn’t cut it. Fortunately, the cost of tricking out your disc and jewel case covers has really dropped over the last few years.
The most critical tool in your arsenal is a printer capable of printing directly on the surface of your DVD blanks. I’ve used the Epson Stylus R200 (about $99 direct) shown in Figure 8.17 as a disc and label printer offering great results; the ink consumption also has been quite reasonable. The unit has individual ink cartridges, which you can replace when they run out. This is more efficient than cartridges that contain multiple colors which you have to replace when any color runs out.
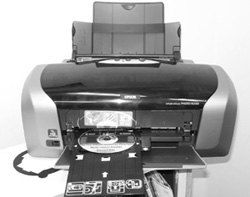
You’ll need to get special “printable” DVDs, which generally come with a plain white surface. Fortunately these are now widely available from many vendors including Verbatim and Ridata, and only slightly more expensive than blank DVDs with nonprintable surfaces. Once again, I recommend strongly against using paper labels on DVDs—it really hurts their playback compatibility.
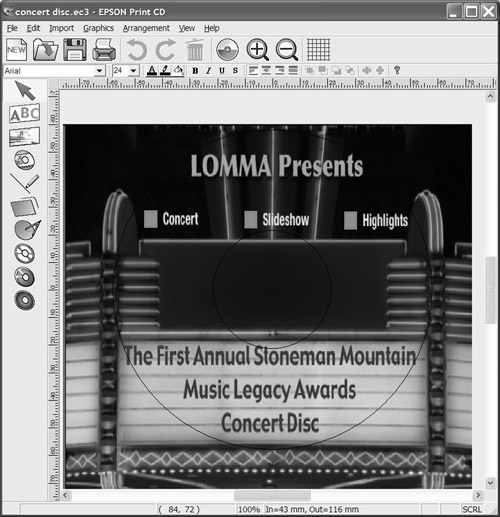
To create your artwork, Epson includes its own Print CD software, which can import a background image and provides a good range of drawing and text-entry tools. As you can see in Figure 8.18, I used a screen shot from the DVD as the label, moving it about strategically so the hole in the middle of the disc wouldn’t obscure anything critical.
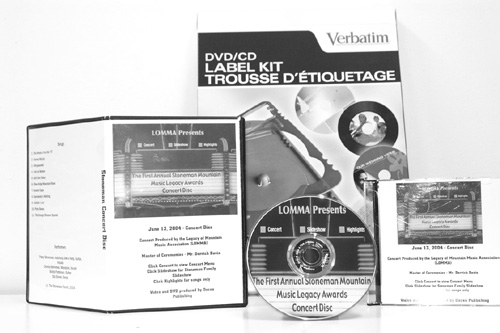
Epson’s software doesn’t create jewel-case covers so I turned to Verbatim for print supplies, software, and (of course) blank printable media. The software is surprisingly feature-rich, with support for tables, background images, and multiple themes, and made short work of the multiple jewel-case covers shown in Figure 8.19. You can see the Verbatim DVD/CD label kit in the background.
If you’re delivering your DVDs to a client, whether internal, external, or family, I definitely recommend investing $100 in a label printer. These professional labels make an awesome first impression for any project.
The workbook for this chapter includes:
A description of the program’s navigational controls.
A description of the program’s menu timeout, end action, and playlist capabilities.
A step-by-step workflow for producing the interview DVD shown in Figure 8.3, complete with menu creation, linking, previewing, and burning.
Go to www.doceo.com/DV101.html for a list of currently supported products.