
So, your production is finished, and it’s time to render your video and send it off. In years past, this was the time when your knees really started shaking, because rendering your file involved multiple obscure parameters such as GOP order and M and N values presented as life-or-death decisions in your video editor.
Recently, software developers recognized that most key compression decisions can be reduced to templates and presented in plain English. Unfortunately, just because a video editor has a template doesn’t make that template right for your project. Some editors implement bad decisions, such as using nonsquare-pixel output resolutions (explained later) and some simply choose poor output parameters, such as resolutions that are too small, or data rates that are too high.
For these reasons, you must understand compression basics to guarantee producing top-quality files. To address this, I’ll cover some basic concepts first, then describe how to produce video for specific uses—such as distribution via streaming or for desktop playback—and how to produce files that you can import into a DVD authoring program.
We covered basic file parameters in Chapter 4, but now it’s time to apply them, so let’s review. Any time you encode a file, you’ll choose a number of output parameters. Figure 7.1 presents many of these parameters in a screenshot from Sorenson Squeeze. This is a popular encoding program used by many producers, particularly those producing multiple files in multiple distribution formats such as MPEG-2, RealVideo, Windows Media, QuickTime, and MPEG-4.
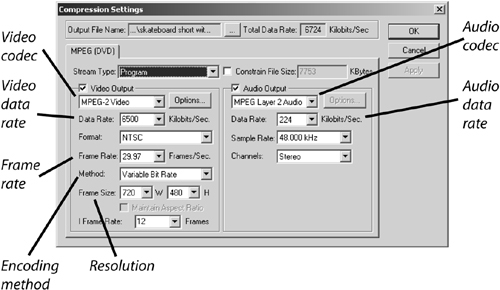
Figure 7.1. Encoding parameters from Sorenson Squeeze 3.5, a easy to use high-quality encoding tool.
From a workflow perspective, producers using Squeeze typically output video from their video editors in DV format, and then import these files into Squeeze to produce video in the ultimate target format. If you’re encoding directly from your video editor, or using a third-party encoding tool, the key parameters discussed below will be presented in a different interface, but should be easy enough to find.
Figure 7.1 displays the most relevant encoding parameters you’ll typically access when rendering files for distribution.
Video codec—. This is your choice of video compression technology, such as MPEG-2, MPEG-4, or Windows Media video. In Figure 7.1, I’m encoding using MPEG-2.
Video data rate—. This is the amount of video data associated with each second of video (also called bitrate). All video codecs are lossy and visually degrade as the data rate gets smaller, so the video data rate is a key determinant of video quality. The data rate is also critical when distributing your video over fixed-bandwidth media, such as over modems that can only send and receive data up to 56Kbps. If the data rate of your video exceeds the capacity of the distribution medium, the video will stop in mid-transmission. Note that while Squeeze lets you input audio and video data rates separately, some programs include audio and video in one overall data rate.
Resolution—. This is the width and height of the pixels in each video frame. Sometimes resolution is dictated by format, as with DV files, which are always 720×480. When producing streaming files, however, many producers opt for a lower resolution such as 320×240.
Frame rate—. This is the number of frames per second displayed in the video file. All NTSC (the standard for video in North America) DV files start with 29.97 frames per second (fps), but when producing for streaming, you’ll reduce the frame rate to 15fps or lower. To achieve this rate, the editor will exclude (or drop) every other frame in the video from the rendered file during encoding, which improves the quality of the surviving frames.
Audio codec—. This is the compression technology applied to the audio track. Often, this decision is buried within a template, though sometimes—primarily in DVD production—you’ll have the ability to choose a separate audio codec. (MPEG Layer 2 isn’t necessarily your best choice for audio compression—see Chapter 8 for more on audio codecs—but Sorenson Squeeze offers limited audio encoding options.)
Audio data rate—. Generally, when you can choose an audio codec option, you can also choose the audio data rate.
Encoding method—. You have two choices for encoding, constant bitrate (CBR) and variable bitrate (VBR). You should choose VBR whenever possible.
These are the basic file parameters presented in most encoding decisions. I’ll discuss these parameters and others such as keyframe setting and selecting the audio sample rate and channel in the following sections.
As well as the basics mentioned above, you’ll often see additional encoding controls that impact the quality and/or the compressed file size. Take CBR encoding compared to VBR encoding. As the names suggest, CBR applies a consistent data rate over the entire video file, while VBR adjusts the bitrate according to scene complexity. Both deliver a similar total file size, though the data rate at any given point in the file will probably be different.
Figure 7.2 illustrates the differences between the two, showing one CBR stream and one VBR stream, both produced at an average data rate of 6Mbps (megabits per second); this is the typical data rate for MPEG-2 streams prepared for DVD. As you can see, the CBR stream stays at 6Mbps throughout the entire file, while the VBR stream changes frequently. During the first talking-head sequence, which has little motion, the data rate may drop to 4Mbps or less, while increasing to 8Mbps for subsequent higher motion sequences.

Figure 7.2. VBR varies the bitrate according to the scene’s complexity, while CBR encoding applies a consistent bitrate throughout.
VBR can steal bits from the low-motion sequences to give to the high motion sequences, delivering a more consistent quality over the duration of the video. In contrast, CBR produces a consistent bitrate, but quality varies according to scene complexity.
What are the downsides of VBR? For this type of encoding to work well, the codec must scan through the video file twice (called two-pass encoding)—once to identify the high- and low-motion sequences and compute the optimal data rate allocation—and then to encode the video. This means that VBR encoding usually takes longer than CBR.
It’s also worth noting that VBR encoding only starts to pay dividends with longer files, usually 10 minutes or longer. When encoding shorter files,—those one or two minutes long—you probably won’t notice any quality difference at all.
There are several varieties of VBR and those differences require further explanation. For example, VBR works best with two-pass encoding, but many programs also provide an option for “one-pass” VBR—this encodes more quickly but produces an inferior data rate allocation between high- and low-motion sequences. Unless you’re in a terrible hurry, always opt for two-pass encoding.
The three types of VBR encoding, are shown in Figure 7.3 and explained here:
Quality VBR—. Quality VBR is a one-pass VBR technique where you choose a quality metric, usually a number between 1 and 100, which the encoder then translates to a quality value that’s consistently applied to the entire video. As you would expect, this means a lower data rate for low-motion sequences and a higher data rate for high-motion sequences. In Figure 7.3, you set the quality value using the slider bar currently set to 100. Quality VBR produces consistent quality, which is ideal for archival purposes, but not practical for delivering video over bandwidth-limited media such as DVD.
Bitrate VBR (Peak)—. This two-pass technique allows you to choose a target bitrate and a maximum bitrate, making it ideal for DVD delivery. In Figure 7.1, I chose 6,500Kbps for the target video data rate. In Figure 7.3, I chose a maximum data rate of 20 percent over that value, or a total video data rate of 7,800Kbps. When combined with the audio data rate of 224Kbps, this keeps the maximum total data rate to around 8,000Kbps, the maximum you should use for DVD production, because many DVD players will sputter on video encoded at higher rates.
Bitrate-based VBR—. If I didn’t check the Constrain Maximum bitrate checkbox, Squeeze would have produced a file that averaged 6,500Kbps, but might also include regions with data rates beyond the 8,000Kbps limit. Since these data “spikes” can prevent smooth playback on certain DVD players, bitrate-based VBR is not a good choice for output to DVD.

Now that you know what VBR is and how and when to use it, let’s tackle the optimal resolution for your video output—a surprisingly complex topic with some unexpectedly simple answers. Feel free to read ahead to the takeaways if you’re familiar the explanation.
It all starts with DV, which has a pixel resolution of 720×480 and a pixel aspect ratio of 4:2.66. (To calculate the aspect ratio, divide 720 by 4 and get 180, and then divide 180 into 480 to get 2.66). However, NTSC television has a display aspect ratio of 4:3. That’s why if you measure the active screen on your television set, you’ll get results like 8”×6” for the 10” diagonal TV set in the kitchen, and 16”×12” for the 20” set in the bedroom. Do the math on both of these sizes, and you get 4:3 (divide 16 by 4, which equals 4, then 12 by 4, which equals 3).
So how does DV, with a frame aspect ratio of 4:2.66, display on a TV set with a 4:3 display aspect ratio? During display, the television set squeezes each line horizontally by about 11 percent. For this reason, NTSC pixels are said to be rectangular. In contrast, computer monitors display each video pixel at an even height and width, creating the so-called square pixels.
Here’s the problem. Display a 720×480 DV frame on a television set, and the set squeezes the frame to look like it’s about 640×480 in resolution. Display the same frame on a computer screen and it looks 720×480.
This is shown in Figure 7.4, which contains two pictures of my good friend Lisa. On the left is a frame extracted from the original DV file, which has a resolution of 720×480. On the right is a digital image of a television displaying the same frame. As you can see, Lisa looks noticeably more slender on the right, courtesy of the 11 percent squeeze that occurs when you display DV on a television set.

Figure 7.4. The original DV frame shown on the computer screen left; the same shot squeezed by a television on the right.
In essence, DV displayed on a television set looks “right” because it’s squeezed by 11 percent before display. However, computers don’t squeeze the pixels before display, so they look stretched in appearance, (shown on the left in Figure 7.4), unless you correct them.
Now you understand the background, what are the takeaways?
First, when producing video for display on a television set, you should produce the video files at 720×480, the original resolution of DV and the resolution of MPEG-2 video used for creating DVDs.
Second, when producing for display on a computer screen, you should always squeeze the video into an aspect ratio of 4:3, whether 640×480, 480×320, 320×240, or 176×132. You don’t crop out a 4:3 region; you simply render each frame at the 4:3 ratio; this essentially duplicates the same 11 percent squeeze that televisions perform when displaying the same frame.
It’s really a no-brainer as most templates default to 4:3 aspect ratios. However, some templates still default to a nonsquare resolution such as 176×144 or 352×240, and need to be corrected. In addition, when producing MPEG-2 video for computer display, say for using in a PowerPoint presentation, you need to use 648×480 rather than 720×480 to improve the look of the video inside the presentation.
For more on this subject, go to
Most DV footage is captured in interlaced mode, which means that the camera shoots and displays 60 fields per second. The first field in the frame contains all the odd lines in the video frame (1,3,5), spread over the entire vertical height of the television set, while the second field contains all the even lines (2,4,6). This technique produces 60 visual impressions per second, promoting the appearance of smoothness.
In contrast, computer monitors display in “progressive” mode, which means that each line displays in order (1,2,3) each time the entire screen refreshes, usually between 60 to 85 times a second. You can display interlaced video on a computer screen, but the slicing artifacts evident on the left in Figure 7.5 typically mar the output.

Figure 7.5. The footage on the left is in interlaced mode, while the image on the right is in progressive mode after applying a deinterlacing filter. (Video courtesy of Travis White, Ulead Systems, Inc.)
These artifacts are caused by the computer’s attempt to display a complete frame comprised of two fields shot 1/60th of a second apart. In high-action footage such as this skateboard video, there’s a lot of movement in a short period, producing two very dissimilar images, as you can see the frame on the left in Figure 7.5.
Surprisingly, the video on the right was produced by the same video editor at the same data rate as the video on the left. The only difference is I rendered the video file on the right in progressive mode, which combined the two fields into one frame, and applied a deinterlacing filter.
Interestingly, doing one without the other isn’t enough. Simply choosing progressive output wouldn’t eliminate the deinterlacing artifacts shown on the left, and deinterlacing without combining the two fields would have no effect.
In short, when rendering video from interlaced sources like DV for display on a computer, always do the following:
Render the file using progressive, rather than interlaced output.
Apply a deinterlacing filter, if available. Some programs offer different processing options such as “blend fields,” “interpolate fields,” or “adaptive-fields.” In these instances, check the program’s help files to determine the most is appropriate method for your footage.
Interlacing artifacts are most prominent in high-motion footage, where the difference between the two fields shot 1/60th of a second apart is most pronounced. That’s why I used a skateboard video to illustrate the point. If you’re shooting an interview or group discussion, with low-motion footage, these issues are less relevant.
Finally, understand that not all programs allow you to output progressive video or feature deinterlacing filters. For this reason, if higher-motion sequences display the type of artifacts shown in Figure 7.4, you may have to purchase another editor or third-party tool to produce top-quality video.
One term you’ll encounter frequently during encoding is “key frame interval.” All streaming media encoders use both interframe compression, which eliminates redundancy between frames, and intraframe compression, which compresses data within a frame. For example, JPEG is an intraframe technique, and is used by several streaming codecs to supply the intraframe component of their technologies.
All interframe compression techniques use at least two kinds of frames, key frames and delta frames. Key frames (usually elided as one word, “keyframes”) are compressed entirely with intraframe compression and don’t reference any other frame in the video. In contrast, Delta frames store only the information that changed between itself and the immediately preceding frame, discarding information that’s similar in the two frames.
For example, in a newsroom setting, a keyframe stores the entire image, including the background wall, the set, and all details of the newscaster. In contrast, a delta frame contains only the information that changed from the immediately preceding frame. Since the background and large parts of the speaker’s head and body don’t change between frames, delta frames can be very small in these low-motion sequences, which is why talking-head sequences compress so effectively.
During playback, the player first displays a keyframe to get the complete picture, and then displays the updated information from the successive delta frames. When viewers use the slider bar or other controls to move randomly through the video file, video playback must start on a keyframe, since delta frames don’t contain the necessary information to display the entire frame.
We like keyframes because they add quality to the video file and make it easier for viewers to randomly play the file. We don’t like keyframes because they’re substantially larger than delta frames, and the more keyframe there are, the harder it is for the encoder to reach the target data rate.
In most high bitrate compression, such as MPEG-2, you typically have one keyframe (note, a keyframe is called an I-frame in MPEG-speak, as you can see on the bottom left of Figure 7.1 where the control to I Frame Rate.) In contrast, most streaming encoders insert a keyframe once every eight to ten seconds, with intervals of 40 seconds or longer fairly common. In general, I almost always accept the default values for keyframe intervals, or if a default value isn’t supplied, insert a keyframe every eight seconds.
Once you move past encoding templates and start setting parameters manually, you’ll find yourself frequently challenged with a confusing array of audio compression options—not only bitrate, but foreign concepts such as sampling rate and bit depth. When choosing these parameters, it’s important to know what comprises an audio file.
Most audio starts out as analog, meaning the spoken word or music. When an analog signal is converted to digital, whether by using your DV camera or your computer’s sound card, the signal has three characteristics, each of which affects the ultimate size of the digital audio file.
The first characteristic is sampling frequency, or the number of times per second an incoming signal is “sampled.” When an audio file has a sampling frequency of 44.1kHz, it means that each second of audio is split into 44,100 chunks during digitization. As you might expect, the higher the sampling frequency, the more accurate the recording, but each chunk must be stored separately, which increases the size of the digital file. Files recorded at 44.1kHz (the standard for CD-Audio) are twice as large as files recorded at 22kHz (considered FM-quality) and four times larger than files sampled at 11kHz (AM-quality). According to Nyquist’s theorem—the governing principle of digital audio sampling—for an analog audio clip to be reconstructed accurately as a digital waveform, the sampling rate must be at least twice the highest audio frequency in the clip. The good news is, your video editor will almost always spare you such calculations simply by limiting your options to the 11 to 44.1kHz (or higher) range for your sampling rate.
The next characteristic is bit depth, which describes the amount of data allocated to each sample, generally either 8 bits or 16 bits. Obviously, a 16-bit recording will be twice as large as an 8-bit recording. However, when analog audio is recorded at 8 bits, there are only 256 possible values available to store the signal 256=28. In contrast, at 16 bits, there are 65,216 possible values (216).
To put this in context, imagine you were recording an orchestra complete with strings, woodwinds, brass, and percussion, with many instruments capable of an incredible range of subtle tones. If you record that orchestra at 8 bits, all samples, from alto flute to xylophone, must be slotted into one of 256 possible values. Not much room for subtlety there. At 16 bits, the number expands to 65,216, which is much more reasonable. As you would expect, CD-Audio discs use 16 bits; with a sampling rate of 44.1kHz, that means 705,600 bits for each second of sound—ample breathing room.
The last characteristic is the number of channels—stereo for left and right channels, or monaural, for one signal containing all sound. Assuming sampling frequency and bit depth are the same for both channels, a stereo signal is twice as large as a monaural (or mono) signal.
CD-quality digital audio is 44.1kHhz, 16-bit stereo, and has a data rate of 176 Kilobytes per second (1,408 kilobits per second). It’s far smaller than the uncompressed data rate of video, but CD-quality audio is still huge, especially when you compare it to the bandwidths used to deliver video to certain target viewers.
For a visual explanation of these digital audio concepts, go to: www.animemusicvideos.org/guides/avtech/audio1.html
Let’s put this background to work. Note that many encoding schemes let you change these parameters during encoding. For example, Figure 7.6 shows QuickTime Pro’s audio encoding screen, with the QDesign Music 2 codec selected. To set the audio bitrate, click Options on the screen on the left, which opens the screen on the right, showing a data rate of 24 Kilobits per second (Kbps).
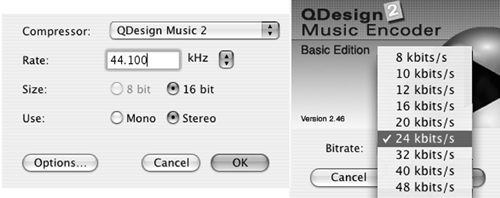
Figure 7.6. Whenever possible, adjust sampling rate, bitrate, and number of channels before choosing a data rate (on the right).
In addition to setting the bitrate, I can also adjust the sampling rate and choose between mono and stereo. In essence, if I reduce the sampling rate from 44.1kHz to 11kHz, I reduce the number of audio samples by a factor of four. Therefore, QDesign should be able to allocate four times as much compressed data to each sample.
If you’re encoding high-quality music, you may find it worthwhile to experiment with different sampling rates and numbers of channels to see if overall quality improves. At a high level, this is almost identical to your decision to reduce the video resolution from 720×480 and frame rate from 30 to 15. In both cases, you’re decreasing the amount of information that the compressed data rate must describe, which should boost overall quality.
Remember, though, converting from 16-bit to 8-bit audio is generally a bad idea when it comes to music, as the trained ear can pick up the vastly reduced subtlety of the sound. For this reason, many programs, like QuickTime Pro with the QDesign plug-in, simply won’t permit you to change these parameters.
As we’ll see below, most compression technologies have different codecs are optimized for voice and music. Obviously, you should choose the codec best suited to your source material.
At low bitrates, audio quality is generally more important than video quality, since most viewers expect poor-quality video at these delivery rates. So at low bitrates such as 32Kbps (to stream to a 56Kbps modem), allocating as much as 8Kbps to audio, which is 25 percent of total bandwidth, is a good decision.
As data rates increase, the allocation is largely content-driven. With most audio codecs, the quality of compressed speech doesn’t really improve when you boost the data rate beyond 32 to 64Kbps. So even if I were producing a 1Mbps Windows Media stream, I would probably limit my audio data rate to 32Kbps, or around 3 percent of the total.
However, music is more difficult to compress than speech because the range of sounds is greater; when music is a significant component of the video, as in a concert, music quality becomes paramount. For both these reasons, when encoding a music video at 1Mbps, I might allocate 192Kbps of bandwidth to audio, perhaps even more.
In this regard, the optimal data rate allocation between audio and video will always be project- and content-specific. Now that you know the parameters and tradeoffs involved, I’m sure that the best allocation for your project will quickly become apparent.
With this as background, let’s visit our various output options.
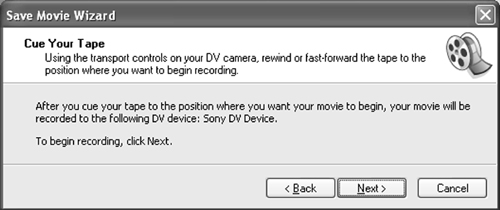
After you’ve completed your project, you should output to DV tape to create an archival copy of the finished video or to dub your video to other formats such as VHS or Hi8. Outputting to tape requires the same hardware setup as video capture: connect your camcorder to your computer and turn it to VCR mode. From there, locate the appropriate menu command (“Output to Tape” or “Print to Tape”) and follow the onscreen directions. A typical example is shown in Figure 7.7, a screen from Microsoft’s Movie Maker 2.
Under the hood, programs handle the write-to-tape function in different ways. Some programs use the files you originally captured or imported into the program as the starting point, and render separate “temporary” files for each effect added to your production. For example, if you added a transition between two clips on the timeline, the editor would render that transition into a temporary DV file on your hard disk.
After rendering all necessary temporary files, the program will output the entire production to the camera, reading from both the original captured files and the newly created temporary files. Other programs render a completely new DV file containing the entire project from start to finish.
Either way, producing these files can be time-consuming, easily an hour or more for every hour of video in your project. After rendering, the editor starts writing to tape in real time, so an hour of video would take an hour to write.
Writing to tape is a demanding process; if the video editor can’t retrieve the necessary data from your hard disk, it will stop and display an error message. For this reason, don’t store your temporary files on a network drive, and don’t use your computer for other tasks while writing to tape.
Once you’ve finished writing to tape, you can delete all the temporary files to restore disk space, but you’ll likely have to find and delete the files manually, since few programs have a function that does this on command. When you write to tape, you overwrite any previous content on the DV tape, so check the tape’s contents before starting the process.
Streaming files are generally produced for displaying over the Internet or on intranets. The three most dominant streaming technologies are Apple’s QuickTime, Microsoft’s Windows Media, and Real Networks’ Real. If you’re working in an organization, chances are your IT experts or video department have set standards regarding which technology to use and which encoding parameters to apply. So, before encoding, determine if there is a standard and, if so, follow it.
Unlike QuickTime, Windows Media and Real enable the creation of a single file with multiple bitrates. This allows one file to serve viewers connecting at multiple connection speeds.
For example, the file about to be produced in Figure 7.8 would contain a 148Kbps stream for viewers who connect via broadband, a 43Kbps stream the (solitary!) viewers connecting via 56Kbps modems, and a 28Kbps stream for viewers connecting at 28.8Kbps (heaven help him). This is convenient for webmasters, as it allows them to post one file instead of three. However, for this book, I’ll assume most readers are interested in producing single-bitrate files, and I’ll focus most of my attention there.

Figure 7.8. Microsoft’s Windows Media Encoder encoding a video clip at multiple bitrates in a single file.
Whatever streaming technology you select, there are some general resolution and frame-rate guidelines you should follow, which I present in Table 7.1. (These are suggested values, not absolute requirements.) If your encoding tool provides templates that are similar but not identical, your results should still be acceptable.
Table 7.1. Suggested resolution and frame rate for target data rates.
Target Data Rate | Video Resolution | Frame Rate |
|---|---|---|
≤56Kbps | 160×120 | ≤15fps |
64-100Kbps | 176×132 | ≤15fps |
100-500Kbps | 320×240 | 15-30fps |
500Kbps-2Mbps | 640×480 | 30fps |
Also, understand that not all encoding tools provide access to all these parameters. Even when they do, file output doesn’t always match the input parameters, particularly the compressed frame rate. Specifically, if you encode a high-motion file at 56Kbps or lower, most streaming codecs will reduce the frame rate dramatically to preserve individual frame quality; it’s not unusual to see video compressed at very low data rates displaying only a frame or two per second.
In general, when it comes to encoding at lower bitrates, my take is that the codec developers know best. When presets are available I use them, and if the frame rate drops below the rate I’ve input, so be it. In some instances there may be workarounds to force a specific frame rate, but generally you’re better off just going with the presets.
With these basics covered, let’s start encoding files in the specific formats.
In terms of codec selection, Apple’s QuickTime is going through a changing of the guard. Historically, the most popular QuickTime video codec has been Sorenson Video 3, which is still the dominant format used by movie studios for producing trailers (Figure 7.9).

However, despite Sorenson Video’s popularity in these circles, Apple has recently cast its lot with MPEG-4, a standard that has yet to deliver video quality near Sorenson Video 3, or RealVideo or Windows Media Video for that matter. As a result, if you’re producing video in iMovie, you can’t easily produce Sorenson Video 3 files, and you have to work pretty hard to produce Sorenson Video 3 output in Final Cut Pro or Compressor, Final Cut Pro’s batch encoding tool. Your choices are to use QuickTime Player, a general-purpose tool that may be confusing to beginners, or a third-party encoding tool such as Sorenson Squeeze.
Let’s work through the encoding screens in QuickTime Player. To encode a file, load the video file into QuickTime Player and choose File > Export from the main menu. Then click Options to open the Movie Settings screen shown on the left in Figure 7.10. Click Size to adjust the resolution of the output file, and Sound Settings to adjust audio parameters (see Figure 7.6).

The bottom parameter in the Movie Settings screen is the checkbox for preparing the file for Internet streaming. Use Fast Start when creating a file that will be delivered without a QuickTime streaming server, which will allow the viewer to start watching the file before it’s completely downloaded. In contrast, when producing a file for streaming from a QuickTime Streaming Server, use Hinted Streaming so the server can most effectively stream the file.
With these decisions made, let’s choose and configure our video codec. Click the Settings button on the top left of the Movie Settings window to open the Compression Settings screen, shown on the right. Most parameters should be familiar, save for the Quality slider. Briefly, most quality sliders either do nothing, since quality is controlled via the data rate setting, or try to improve quality by using more complex encoding algorithms that take longer to encode. Typically, documentation is sparse and you can’t tell whether the quality slider actually improves quality or not, so my practice is always to set quality to the maximum setting.
I’ve set keyframes at one every ten seconds, and am limiting the data rate to 25KBps, which translates to 200KBps. QuickTime Player is one of the few encoding tools that uses kilobytes per second rather than kilobits, so remember to adjust your encoding parameters accordingly.
Click OK twice to close the two windows, then type the name of the encoded file, and hit Save to complete the process.
Microsoft’s Windows Media technology provides very high-performance audio and video codecs, and as you’d expect, it’s easily integrated with Microsoft applications such as PowerPoint and FrontPage. For this reason, Windows Media is generally my “go to” codec option for everything from streaming to high-bitrate files for desktop playback. Note, however, that Windows Media doesn’t play on many UNIX operating systems, so if your target viewers include Linux desktop users, use RealVideo or MPEG-1 or 2.
Microsoft has done a nice job of making Windows Media technology accessible to both consumers and technology professionals. Most consumer tools provide data rate-driven templates such as those shown in Figure 7.11. After choosing a template, always check to make sure that the resolution is 4:3, since some templates output at 720×480 rather than 640×480, and some at 176×144 rather than 176×132. Usually, you’ll see some type of information screen that provides these options, such as the Settings box shown on the bottom left of Figure 7.11.
Bytes | Bits | |
|---|---|---|
KB/s | kb/s | |
or | ||
KBps | Kbps | |
1 Byte | = | 8 Bits |

Figure 7.11. Encoding to Windows Media format in Movie Maker 2. Note the option to produce a DV-AVI file.
Movie Maker 2 has no custom encoding parameters, so if you can’t find a template you like, you’re out of luck. As you can see from Figure 7.12, higher-end programs such as Sorenson Squeeze provide an extensive range of Windows Media format encoding options, which includes all three types of VBR encoding we discussed earlier. Here, you’re free to customize encoding parameters to your liking, following the guidelines set in Table 7.1.

You can download Microsoft’s Windows Media Encoder, for free at:
www.microsoft.com/windows/windowsmedia/download/default.asp.
As you would expect, the tool provides complete access to all Windows Media encoding parameters, but it’s definitely targeted towards experts and may confuse novices. If you can’t access the necessary encoding parameters in your consumer video editor, I recommend that you step up to either a prosumer editor or a third-party encoder such as Sorenson Squeeze.
Real Networks’ Real technology offers arguably the best video quality at modem streaming rates, and comparable quality to Windows Media at all higher rates. This makes it very popular among large corporations and networks such as CNN and CBS. However, Real files don’t integrate with PowerPoint or FrontPage (both Microsoft products) as well as Windows Media video files, so I tend to use it less for day-to-day, knock-around use.
Producing Real files is relatively straightforward, with a few twists we haven’t seen before. First, when encoding within RealProducer, the company’s own encoding tool (which I recommend), all rendering is template-based. Templates are called “audiences,” and for each audience you can configure not only the audio/video data rate, but also alternate audio codecs and data rates to use when the audio is primarily voice or music. This is shown in Figure 7.13.

After you select an audience, you choose either Voice or Music mode, and RealProducer applies the selected codec and bitrate. You can also see in the figure that Real offers VBR encoding with the ability to set a maximum bitrate, which Real implements in two passes. Though not shown, RealProducer also offers a Video mode option that lets you choose between a high frame rate, with each individual frame possibly degraded (Smoothest Motion option), or a low frame rate with crisp images (Sharpest Image option). You can even produce a slideshow that will display one or two very crisp frames per second.
MPEG-2 is the video codec used in DVD discs, and until recently, it was my codec of choice for desktop playback. After comparing the quality of MPEG-2 to other technologies, however, I’ve abandoned MPEG-2 for most desktop use, and use Windows Media instead. I recommend that you do the same (test results are here: www.emedialive.com/Articles/ReadArticle.aspx?ArticleID=8422). This leaves producing for DVD playback as MPEG-2’s primary use.
However, when outputting a video file from an editor for input into a DVD authoring program, you should consider outputting DV files rather than MPEG-2 for several reasons. First, producing an MPEG-2 file generally takes a lot longer than producing DV. If you decide to change your video file for some reason during authoring, you’ll have to re-encode the file, and waste extra time encoding.
More important, once you produce an MPEG-2 file you’re locked into that data rate. Suppose, for example, that you produce your MPEG-2 files at 8Mbps, anticipating only about 60 minutes of video on your DVD. Then you decide to add some additional content, which doesn’t fit because you’ve already encoded your video files too high. Now you’re forced to either re-encode the MPEG-2 files you produced, which means double compression and quality loss, or go back to your editor and render again at a lower bitrate.
Thankfully, all this is avoided when you delay all encoding until just before producing the DVD it saves time and provides maximum design flexibility. For this reason, when working with separate editing and authoring programs, I typically output in DV format, not MPEG-2. The only caveat is that DV files are generally at least three times larger than MPEG-2, so you’ll need lots of extra disk space. We’ll cover producing DV files in the next section.
When producing an MPEG-2 file for DVD authoring, keep the following points in mind:
Before encoding, check the help file of your authoring program to determine the required specifications for MPEG-2 files input into the program. For example, on the upper left of Figure 7.14, you see the option for Stream Type, which can either be Program (combined audio/video) or elementary (separate files for audio and video). Some authoring programs accept both, some one or the other, so check the specs beforehand to make sure you get it right.
Use a DVD preset when available, and use default parameters whenever you can (in Figure 7.14, for example, leave the I-Frame Rate alone). The DVD specification for video is very precise, and if you adjust a parameter the wrong way, the authoring program won’t accept the file.
Always output at 720×480 resolution, in interlaced (rather than progressive) mode. Don’t apply a deinterlacing filter.
Always use VBR with a maximum data rate of no more than 8Mbps.
Unless file size is an issue, don’t use any audio compression, and output in PCM (Pulse Code Modulation) mode, the uncompressed format used for CD-Audio. If space is an issue, use the Dolby AC-3 audio codec rather than the MPEG-2 codec if both are available. I’ll discuss the space available on DVD and bit-budgeting in Chapter 8.

When producing MPEG-2 files solely for computer playback, remember to output at 640×480 in progressive mode and to deinterlace the video when the option is available.
From about 1997 to 2002, MPEG-1 was probably the most popular video codec in the universe. Today, however, it’s surpassed in quality by many different technologies, including MPEG-2, Windows Media, RealVideo, and Sorenson Video 3. Its sole advantage today is that MPEG-1 files are almost universally playable, on Macs, Windows PCs, Linux desktops, and pretty much any other UNIX flavor. So, if your audience includes a broad range of playback systems, consider MPEG-1.
When rendering to MPEG-1 format, the interface should look much like Figure 7.14. Use a video resolution of 320×240, not 352×240, which is a nonsquare pixel resolution incorrectly used by many encoders. You should be able to produce very good quality at a combined audio/video data rate of 1,600 to 2,000Kbps—slightly higher if your video has very high-motion sequences.
DV format is the highest-quality, most compatible format on both the Windows and Macintosh platforms. I produce DV files for a number of purposes, including the following:
when rendering a video file to input into a separate DVD authoring program.
when producing a video file to input into a separate encoding program.
when producing a video file to input into another video editor for additional processing.
In most Windows programs, you produce a DV file by first selecting the AVI format and then choosing the DV encoder. DV files are very tightly controlled to maintain compatibility between computers and camcorders, and the only encoding option you typically can configure is the audio sample rate, which can be either 32kHz or 48kHz. I always set my camcorder to capture 48kHz audio and produce my DV files at that sampling rate.
On the Mac front, both iMovie and Final Cut (Pro and Express) have presets for outputting to DV format. These make it simple to produce DV files for any of the three purposes identified above.
The workbook for this chapter includes a description of each program’s encoding capabilities and screenshots and information detailing the most common compression tasks.
Go to www.doceo.com/dv101.html for a list of currently supported video editors.