
It generally takes a couple of video shoots before you realize that the weakest link on your camcorder is the microphone. Don’t worry; it’s not you, or your camcorder for that matter. It’s just a simple fact of life that all onboard microphones are lousy.
This leaves you with two alternatives for capturing higher-quality audio: Get really close to your subject, or use an external microphone. Assuming that close proximity is not always an option, we’ll look at a variety of microphone options that should provide a significant improvement over what you get with your camcorder.
We’ll start with a brief inventory of your camcorder, which will tell us the type of microphones you can connect to and the equipment you’ll need to do so. Then we’ll survey the most popular types of microphones and their uses, and conclude with a brief look at several common shooting scenarios and recommend a specific microphone setup for each.
The good news is there are myriad options for working around your camcorder’s microphone. For the most part, we’ll look at the least expensive options, which can be operated by the cameraperson, and traveled with, or attached to, the camera. If you’re permanently mike-ing up a room, you should consider a different range of options; but if you’re assembling a kit you can afford and are able to take on the road at a moment’s notice, you’re in the right place.
BeachTek, Shure, and Sony provided most of the equipment we tested in this chapter, which is why their names keep popping up in the recommended equipment list. While they’re certainly not the only suppliers out there, we’re more comfortable recommending equipment that we’ve used multiple times and in the tests described below and several other shoots.
There are two ways to connect external microphones to camcorders, though not all camcorders offer either or both options. First is the microphone port, which comes in the two general categories shown in Figure 2.1.

On the left is an XLR connector, which is typically available only on high-end prosumer and professional camcorders. On the right is the more typical 3.5mm stereo connector (also called 1/8” connector), which is found on most consumer camcorders.
If you study the image on the right in Figure 2.1, you’ll note that the connector on this particular camcorder, a Sony DCR-VX2000, offers both MIC and LINE input, while the vast majority of consumer cameras offer only microphone input. Here’s the difference.
Microphone-level input (MIC) is the sound produced by the inexpensive, primarily unpowered microphones such as those you may have used to record audio to your computer. They’re inexpensive, and push out a very weak signal, only a few ten-thousandths of a volt. In contrast, line-level (LINE) power is produced by a powered sound system such as your stereo or a professional sound system. The signal is much, much stronger.
If your camcorder has MIC-level input (which it probably does if it doesn’t say LINE), it should work well with many of the microphones we’ll discuss here. However, if you ever try to connect your camera to a professional sound system, such as those that used at a speech or conference, you’ll need to reduce the line-level output to microphone-level (more on this in the scenarios below). If you don’t, the signal will be too strong for your camera and will produce distortion and possibly damage your camera.
The other detail you’ll notice on the right in Figure 2.1 is the notation PLUG IN POWER beneath the MIC/LINE switch. Some microphones use “condenser” pick-ups to acquire and convert sound to electrical signals. Unlike dynamic microphones, which are driven by magnets and sound waves, condenser microphones need electrical power to produce a signal.
Connect a condenser-type microphone to a camcorder without plug-in power and you won’t get a signal; that’s all there is to it. There are alternatives for powering these types of microphones, but before choosing one, figure out whether your camcorder has plug-in power or not. Generally, if it doesn’t say so on the microphone port, it doesn’t have it, but check your camera’s documentation to be sure.
Note that plug-in power supplies only 3.5 volts of power, sufficient for small consumer microphones using a mini-jack connector. However, most professional microphones require what is known as “phantom power,” which supplies 48 volts. If you plan to connect a professional microphone to your camcorder, you’ll need a device to supply this added power such as BeachTek’s DXA-8, discussed below.
On the right in Figure 2.2, you can see the metal connectors beneath the covering I’ve pulled back, which indicates that the accessory shoe is intelligent and can power and communicate with a microphone and flash attachment.

Typically, if the accessory shoe is intelligent, the camera vendor will offer at least one optional microphone, but check with the seller to be sure. When available, these microphones are easy to install and use, relatively inexpensive, and can noticeably boost the sound quality over that of the embedded microphone. Let’s take a look at the types of microphones you should consider.
Figure 2.3 shows a good cross section of the types of microphones you will use on your shoots. Let’s briefly identify them, and then cover the three characteristics of microphones you need to learn more about before buying.

On the bottom of Figure 2.3 is a handheld microphone, the Shure SM63 ($198 list), and similar to the mikes frequently seen on game shows and news broadcasts. As the name suggests, it’s meant to be held in your hand during operation.
When you can use a handheld microphone, it’s almost always the best alternative, with a great blend of quality and ease of use. It works well in many one- or two-person shoots, or when one interviewer is talking to multiple interviewees. You can also attach them to stands for hands-free operation in speeches, concerts, and conferences.
Just above the handheld microphone is a boundary microphone, the Shure EZB/O ($188 list). These microphones, also known as surface-mount mikes, are designed to be attached to desks or stage floors to pick up sound from multiple speakers and are typically used in conference rooms and theatrical plays.
Moving clockwise are two lavaliere microphones. These are designed to be attached to a single individual, and used hands-free. The Shure SM 11 Lavaliere ($175 list) is a “wired” lavaliere connected to the camera via a cable, while the Sony Wireless Lavaliere is part of the Sony WCS-999 wireless microphone system ($149.99 list) that sends the sound over a wireless signal to a receiver mounted on the camera.
Lavalieres are an excellent choice when you have one or two individuals speaking; they offer a great blend of quality and unobtrusive, hands-free operation. However, they’re tough to transfer smoothly from person to person during the shoot. And, because they’re smaller, lavalieres are less robust than handheld microphones, so they typically don’t last as long.
To the right of the lavaliere are two microphones for mounting on a camera’s accessory shoe. On top is the Sony ECM-HS1 ($69.99 list), which you connectvia an intelligent accessory shoe, and beneath it is the Sony ECM-Z37C ($149.99 list), which you connect via the attached cable using a 3.5mm adapter.
While the HS1 can only work on Sony camcorders with intelligent accessory shoes, the Z37C can work with any camcorder with an accessory shoe and a microphone port. If the camera’s microphone port doesn’t supply plug-in power, a small battery can power the Z37C.
These two Sony microphones share several characteristics. First, they are both “shotgun” microphones designed primarily to pick up sound from directly in front of the camera and eliminate sound from the sides and behind the microphone. Interestingly, in addition to “shotgun” mode, you can also switch the HS1 into “zoom” mode, where the pattern of sound picked up by the microphone mimics the current view of the camera’s zoom lens. When the zoom lens is pulled completely back into a wide-angle view—say, to show an entire stage—the sound pickup pattern is also very wide. When the lens is zoomed in telephoto mode to focus on a single performer, the microphone pattern is similarly focused, eliminating all sound except that directly in front of the camera.
As we’ll see, shotgun microphones produce better sound than most camcorder microphones, but are inferior to handheld and lavaliere microphones. While generally more flexible and easier to use than handhelds or lavalieres, shotguns aren’t your best choice if quality is your primary goal.
This leads us to the three questions you need to ask before buying a microphone. Note that you have to ask the same questions whether the microphone is wired or wireless, since the same issues arise with each.
The pickup pattern, or directionality, of the microphone defines which sounds the microphone picks up and which ones it ignores. At one extreme are the “omnidirectional” microphones built into your camcorder that pick up sound equally from all sides of the camcorder. At the other extreme are “unidirectional” microphones that pick up sound from a single direction, and shut out all other noises.
For some microphones, like the shotguns we’ve been discussing, the pickup pattern is obvious. Shotgun microphones are designed to ignore ambient sound, and are extremely one-directional. In specification sheets for shotgun microphones, you’ll frequently see terms like cardioid, super-cardioid, or even hyper-cardioid pickup patterns, which designate increasingly greater exclusions of ambient sound to focus more completely on the sound directly in front of the microphone.
Most other microphones come in either omnidirectional or cardioid patterns, and you need to be careful to get the right microphone for the intended use. For example, if you’re buying a boundary microphone for use on a lectern where you want just the speaker’s voice picked up, choose a cardioid pattern. However, if you’re buying a boundary microphone for a conference room where all participants must be heard, an omnidirectional microphone is a better option.
It’s also critical to know the pickup pattern when using the microphone. For example, if you’re using a hyper-cardioid shotgun microphone to pick up a group discussion, you probably won’t capture the panelists at the periphery of the group. Similarly, a handheld microphone with a cardioid pattern will eliminate sounds not emanating from directly in front of the top of the microphone.
The next essential fact is whether the microphone requires power or not. As we discussed previously, if the microphone requires power, and your camcorder’s microphone doesn’t offer plug-in power, you’ll have to figure out another way to power the microphone.
Most microphones that need power simply list “Phantom Power Requirements” or something similar on the specification sheet. All condenser-type microphones need power, either from the camcorder or battery. In contrast, dynamic microphones do not need power and can run even if your camcorder doesn’t offer plug-in power—assuming your camera gives you some way to connect it, of course. Which leads to our next essential consideration: connector type.
Virtually all professional microphones connect via an XLRM connector, which is shorthand for XLR male. This means that the three XLR pins are sticking out of the connector and that your cable will need a corresponding female connector to attach to the microphone. Birds and bees at eleven.
XLR is a favored technology because it is “balanced,” which means cables can run long distances without picking up noise from electrical wires and other sources. In contrast, unbalanced cables, such as those typically terminated with 3.5mm jacks, pick up noise easily, especially as cable lengths grow.
For this reason, you’ll rarely see microphones that connect via 3.5mm plug—apart from the shotgun microphones that mount directly on your camcordes. The other primary exceptions are wireless microphones such as the Sony WCS-999 shown in Figure 2.3, which uses a 3.5mm jack to connect to your camcorder. However, since the receiver mounts on your camcorder, the distance traveled over the unbalanced wiring is relatively short.
If you want to use a high-end microphone with your camcorder, you’ll have to find a way to convert from the XLR cable to the 3.5mm connector on your camera. Let’s explore two alternative ways to achieve this.
The first is a “line-matching transformer” from Radio Shack—specifically the A3F XLR Jack-to-¼” Plug Adapter/Transformer (part number 274-016c). Since this product outputs to a ¼” plug, I added a ¼”-to-3.5mm converter (part number 274-875A) to connect to my camcorder. The total cost was less than $20, not including the XLR cable. This rig is shown in Figure 2.4.
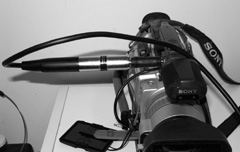
In my lab, this setup generally works well, though it doesn’t supply the phantom power required for many microphones. Ergonomically, however, it’s clearly not a field solution, since one inadvertent bump would probably rip my camera into multiple pieces.
If I took the line-matching transformer route in the future, I would choose the Shure A96F transformer, which inputs XLR and outputs 3.5mm, with a flexible cable to avoid the awkward right-angle attachment shown in Figure 2.4. The mail order price for the A96F is around $40.
An even better alternative is the BeachTek DXA-8 “Ultimate Adapter” which lists at $399 but can be found for a few dollars less via mail order. Figure 2.5 shows the two faces of the product, back and front. It screws into the tripod mount beneath your ocrew-camcorder, with a similar mount on the bottom so you can continue to use a tripod.

Figure 2.5. Plug your cables into the front (top) of BeachTek’s excellent DXA-8, with controls on the back (shown on bottom here).
On top, as you can see, the unit has three connectors, two for XLR cables and one for an unbalanced 3.5mm connector. The output is a 3.5mm connector with microphone power, so you can plug it into any camcorder with a microphone jack.
With the twin XLR connectors, you can use the DXA-8 to mix together two microphone signals, controlling respective volume with the two volume dials shown on the bottom of Figure 2.5. If you have two microphones, you can capture stereo audio. Even if you capture a monaural signal, as we did in our tests, the DXA-8 outputs the signal to both the left and right audio tracks. This doesn’t create true stereo, but it does make sure that you have sound coming out of both speakers.
The 48V switch to the right of both volume controls indicates that the DXA-8, which is powered by a 9-volt battery, can supply phantom power to condenser microphones. In addition, the LMT buttons engage a “limiter” function that prevents distortion from hot inputs—this is a critical feature when accepting line-level input from a sound system. The unit also has preamplifiers to boost the low signal from microphones, which can also eliminate hiss.
After trying all these different approaches to converting XLR input, I have to say I like the BeachTek’s under-the-camera approach the best. If you don’t need all the functionality of the DXA-8, consider the DXA-2, which sells for around $125 and provides one XLR port and one unbalanced 3.5mm input, with volume control but no phantom power or limiters. I would definitely recommend this over the Radio Shack or even Shure A96F approach.
Now you’re well-versed on microphones and how to connect them to your camcorder, the obvious next question is how they perform in terms of quality. To test performance, we used a high-quality, digitized recording of a woman speaking, and played back over computer speakers at a standardized volume. To create ambient sound, we left all office equipment running, which created a distinct hum of background noise.
We set up the Sony VX2000 approximately 10 feet from the speakers, and then recorded the audio using the various microphones shown in Figure 2.3. During each recording, we used the VX2000’s manual-gain controls to boost the audio to an acceptable level. While you’ll notice some minor volume differences in the waveforms you’re about to review, the most significant differences are found in the detail captured by the microphone and the amount of noise in the signal.
Let’s start by looking at the difference between the best and the worst, shown in Figure 2.6, which contains waveforms produced by the camcorder microphone and the Shure Lavaliere microphone. You’ll notice that the waveform on the bottom shows higher peaks and valleys, indicating higher volume. You’ll also see that when there was no speech, on the right side of the waveform, the line of noise produced by the camcorder was thicker, indicating that it picked up more ambient noise from the room than the lavaliere, which translated to a more noticeable hum during playback.

Figure 2.6. Comparing the quality of audio captured by the VX2000’s microphone with the Shure Lavaliere.
Most striking, however, is the degree of detail missed by the camcorder. As shown in the picture, the speaker says the word “tutorial,” and there are noticeable peaks at the Ts and I with the Shure Lavaliere. There are no such peaks in the camcorder’s waveform, indicating that the onboard microphone’s recording of the speech was muffled and hard to understand. If you listened to the results, you would find the Shure audio clear, crisp, and natural, while the camcorder audio would sound tinny—almost like it was shot in a barrel.
Overall, the results produced by the Sony wireless Lavaliere system, and the three Shure wired microphones were very similar and all of them clearly superior to the results produced by the two shotgun microphones. This is illustrated in Figure 2.7.

Again, the Shure solution produced a higher volume, a crisper signal, and slightly less noise. Overall, while the ECM-HS1 and ECM-Z37C produced better audio than the camcorder microphone, the difference was much less striking than that produced by the microphones used closer to the source.
Don’t take this as a sweeping indictment of all shotgun microphones. Both the Sony models are relatively inexpensive and rather small, and Shure, Sony, and other vendors offer larger, more sensitive models that would likely produce better results. In the price range we surveyed in this review, however, you’ll produce the best results if you use or attach a mike at the source.
Now let’s turn our attention to the difference in quality produced by connecting through the Radio Shack Line-Matching Transformer and the quality output by the BeachTek DXA-8. This is shown in Figure 2.8.

Figure 2.8. Comparing the Lavaliere microphones output captured via Radio Shack and BeachTek products.
As you can see, the Radio Shack approach doesn’t duplicate the monaural signal to both tracks, which is why there is only one waveform. To work around this, there are hardware adapters you can buy to duplicate the audio, otherwise you’ll have to duplicate the channels in your audio editor to make sure you have sound coming from both speakers. The detail on the mono signal is quite good and slightly less noisy than the bottom signal, which was produced using the BeachTek unit.
The Radio Shack waveform creates less noise because its signal is lower than the BeachTek’s, which sounds much more vibrant. The BeachTek signal is also much more nuanced than the Radio Shack signal, which sounds a bit flat. Overall, most listeners would clearly find the BeachTek audio the more pleasing of the two.
With this as background, let’s look at audio strategies for the shooting scenarios introduced in Chapter 1, as well as one or two others, and discuss the different microphone alternatives. I’ll assume that your camera has a single 3.5” microphone connector that accepts microphone-level audio.
Rig 1: Sony WCS-999 wireless lavaliere system ($149.99 list). This system is easy to operate and connect to your camcorder, produces high-quality audio, and can move around with the speaker. Total Cost: $149.99.
When using a lavaliere microphone, don’t let the wire hang straight down, which can damage the microphone/cable connection. Instead, loop it upwards as shown on the right in Figure 2.9, and clip the cable to your shirt with the alligator clip. Mount the microphone as close to the speaker’s mouth as possible for the best results.

Your needs here will vary with the number of cameras you use. If you’re shooting with one camera, you can mount a lavaliere microphone on the subject during the interview, and then on the interviewer for the noddies and questions. A handheld microphone will deliver better quality than the camera’s microphone, but is more intrusive than a lavaliere.
In a multiple-camera shoot, you’ll need either two live microphones and a mixer unit, or a boundary microphone mounted on a table or desk between the two speakers.
Rig 1: Shure handheld microphone ($198 list), Shure AF96F ($40 list), 15-foot XLR cable ($14.99, Radio Shack). Speakers share the handheld microphone. Functional, good-quality audio, but not very elegant. Total Cost (approximate): $260.
Rig 2: Shure omnidirectional boundary microphone ($188 list), Shure AF96F ($40 list), 15-foot XLR cable ($14.99, Radio Shack). Hands-free operation; functional, good-quality audio. Room must be otherwise quiet, and the boundary microphones work best when placed on a raised desk or table. Total Cost (approximate): $250.
Rig 3: Two Shure SM 11 wired lavaliere microphones ($350 total, list), two 15-foot XLR cables ($30 total, Radio Shack), BeachTek DXA-8 ($399 list). Killer system with great quality and flexibility. Total Cost (approximate): $800.
Unlike the interview scenario, here we want both speakers on camera all the time, even if you only have one camera. The cheapest alternative is to have the speakers trade a handheld microphone, although for discussions longer than a few moments, this gets tiring pretty fast. Figure 2.10 shows the dual-microphone approach.

Figure 2.10. Dual handheld microphones work well in discussion settings, but look less elegant than dual lavalieres.
Rig 1: Shure handheld microphone ($198 list), Shure AF96F ($40 list), 15-foot XLR cable ($14.99, Radio Shack). Speakers share the handheld microphone. Functional, good-quality audio, but not very elegant. Total Cost (approximate): $260.
Rig 2: Shure omnidirectional boundary microphone ($188 list), Shure AF96F ($40 list), 15-foot XLR cable ($14.99, Radio Shack). Hands-free operation; functional, good-quality audio. Room must be otherwise quiet, and the boundary microphones work best when placed on a raised desk or table. Total Cost (approximate): $250.
Rig 3: Two Shure SM 11 wired lavaliere microphones ($350 total, list), two 15-foot XLR cables ($30 total), BeachTek DXA-8 ($399). Killer system with great quality and flexibility. Total Cost (approximate): $800.
Wedding requirements vary dramatically over the course of the celebrations—not to mention from venue to venue—and it’s very difficult to propose one setup that works in all instances. At the very least, you’ll need a microphone on the groom—either a wireless microphone like the WCS-999 or a MiniDisc or Digital Audio Tape recorder—and a shotgun microphone for the reception (or cabled or wireless handheld).
Since you may need to use the shotgun and lavaliere microphone simultaneously, you’ll need a mixer like the DXA-8. The DXA-8 offers only one 3.5mm input, which you’ll use for the wireless microphone, so you’ll also need a shotgun microphone with XLR output—neither of the Sony units offers this.
If you’re shooting a concert or conference, you’ll get the best sound by connecting to the output of the on-site production sound system. In most instances, you’ll have to solve at least two problems: physically connecting the soundboard to the camcorder, and dropping the line-level output to microphone-level input for your camera (assuming that it doesn’t accept line-level input).
Depending on the soundboard, the outputs can be anything from RCA connectors such as those on your stereo, to 1/4” jacks or XLR connectors; make sure you’re prepared for all three possibilities. We assumed XLR output for our suggested systems-setups.
Rig 1: The Shure A15LA Line Input Adapter ($42 retail) to drop the line-level output to microphone input and the Shure AF96F ($40) to convert from XLR to 3.5mm. This approach is less expensive, but there’s no ability to adjust the sound coming from the sound system, which may still be pretty hot. Total Cost (approximate): $80.
Rig 2: BeachTek DXA-8 ($399). This unit can perform both conversions (XLR-to-3.5mm and line-to-microphone); it also offers limiters that help to ensure distortion-free audio, plus a ton of utility in other shooting environments. Total Cost: $399.
When we created our test setup for this project, we deliberately left our computers, routers, printers, and monitors running, producing a consistent din of ambient noise. Our thinking was pretty obvious: how can you possibly test a shotgun microphone’s ability to ignore ambient sound without lots of ambient sound? Also, since few interviews or other types of videos are shot in sound booths, the noise also provided a lovely dose of reality.
Once we heard the background noise present in even our highest-quality recordings, our thoughts quickly turned to noise-reduction software. The software generally works best with regular, consistent background noise such as machine hum or tape rumble, as opposed to irregular noises such as cheering crowds or traffic noises. We surveyed our labs and checked recent press reviews, and rounded up three products.
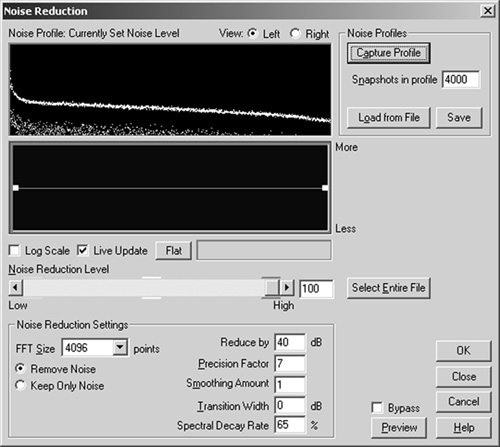
First on our list was Sony’s vaunted Noise Reduction filter for Sound Forge, which costs $280 direct, but requires Sound Forge ($399 direct) or another DirectX-compatible audio editor to run. Second was BIAS’ newly released SoundSoap Pro for Windows ($599 retail) from BIAS, a DirectX plug-in we ran within Sound Forge. Third was the noise-reduction capability that comes with Adobe Audition, a complete audio editor that retails for $299, though it’s much cheaper in several Adobe bundles.
Note that true noise-reduction filters work differently from inexpensive functions typically called noise gates. Briefly, the machine hum from my office equipment was most noticeable during the short periods between spoken words in the original recordings, though you can also hear it throughout the recording.
Noise gates work by setting thresholds for noise. When the audio exceeds the threshold, the noise gate filter assumes it’s audio that is supposed to be heard and leaves it alone. When the volume goes under the threshold, it assumes the audio is noise, and simply eliminates it, reducing volume to zero.
When the speaker paused for breath in our test recording, a noise gate reduced the volume to zero, eliminating the hum during the otherwise silent period. However, noise gates do nothing to reduce the audible hum while the subject’s speaking. This produces a noticeably artificial effect, since you can hear the hum when the subject’s speaking, but not when she’s quiet.
In contrast, all three noise-reduction technologies try to identify the background noise and eliminate it throughout the entire recording. You start by selecting an otherwise blank stretch in the audio file—one that’s devoid of speech, music, or other audio that’s supposed to be there, and contains only the background hum. Then you tell the noise-reduction filter to capture a noise “print” or profile of that hum, and eliminate it from the entire audio file. Figures 2.11 to 2.13 show the noise profile captured by all three products.


We tested each noise-reduction technology on three audio files. We highlighted the same segment in the three original files to identify the noise print and then ran each filter using the default settings.
Two of the audio samples came from this project—first, the low-quality audio recorded with the embedded microphone on the Sony camcorder, and second, the excellent audio captured with the Shure handheld microphone. We also tested an audio file recorded from a cassette player.
On the high-quality recording, all three technologies virtually eliminated the machine noise, making it sound like it was recorded in a sound studio. The Shure microphone produced a great original signal, and all three filters made it sound positively pristine.
The results with the lower-quality recording were less impressive; basically, you can’t turn a sow’s ear into a silk purse, no matter how good your software is. Though all three programs removed most of the background noise, the detail that wasn’t captured by the camcorder’s microphone was not magically restored. While the recording sounded better, the improvement was incremental, not exponential. The lesson is clear: get a good microphone setup and don’t expect to fix it in post.
The results from the cassette tape were simply fantastic, with all three products dramatically reducing tape hiss and rumble. If you’re doing this type of conversion, noise-reduction technology should be in your budget.
Which product performed best? Very tough call and my instincts are to be politically correct on this one and say they were all equal, especially given the focused nature of our tests. In addition, since we used the default setting on all three products, it’s impossible to say whether a bit of fiddling with any of the products would have produced significantly different results. However, if you held a gun to my head (or threatened to crush my beloved three-chip DCR-VX2000) I’d have to say that SoundSoap was shockingly good.
Happily, you don’t have to put your money down based on this extorted recommendation; all three vendors offer free, downloadable trial versions that you can run on your own noise problems.
Here are the rules I’ve learned to live by when working with audio equipment in the field:
The first time you use a new piece of equipment you’re going to screw it up. So, you should perform at least one test shoot with anything new before you actually use it in an important shoot.
You can’t capture good audio without a good set of headphones. Ear buds are tempting because they’re portable and unobtrusive, but they let the outside noise in, making it tough to differentiate between what the microphone is picking up and what you’re actually hearing. For best results, get big, clunky “noise-canceling” headphones that block outside sound.
If you’re working a concert or conference, bring a small flashlight and some kind of tape to secure your audio wires or power cables.
If you’re picking up audio from the sound system, test out the system a few days before the event to make sure you have the proper connectors. Then arrive early the day of the event, to hook up and test again.
The workbook for this chapter includes program-specific instructions on how to apply noise-filtering effects in each video editing program. Go to www.doceo.com/dv101.html for a list of currently supported video editors.