
Incorporating video into presentations is the great grassroots business use of video—not quite as sexy as DVD or as hip as streaming, but the bread and butter of road warriors around the globe. In this chapter, we describe how to insert video into PowerPoint (for Windows and Mac) and Apple Keynote.
As you would expect, each program has its own peculiarities. There are also red flags to be aware of, especially if I’ve been creating a presentation on one computer and playing it from another.
Let’s start with Keynote: you can embed the video file into the presentation itself, so wherever the presentation goes, the video file goes. This makes it simple to create a presentation on one computer and display it on another.
In contrast, you can’t embed video files into PowerPoint. The PowerPoint project files may stay smaller, but also complicates transferring your presentation to a different computer. Not only must you transfer the video file(s) to the target computer, but they also must reside in the exact same folder on that computer.
To make things as easy as possible, I create all presentations in a drive called c:apresent on my video workstation in the lab, and copy all video files into that folder before linking them inside PowerPoint. Then, I transfer the files to a similarly named subdirectory on my laptop.
Why c:apresent instead of just c:present? Because the odds are that during the presentation I’ll have to find the folder to locate a demo file or two, and if I use c:apresent, the folder will generally fall at the top of the list in Windows Explorer, and therefore be easier to find.
My other prepresentation essential is to create a desktop shortcut to the PowerPoint or Keynote file itself. This way, if either program crashes—quite likely since I’ve usually got multiple video players and two or three authoring, editing, or encoding programs open at the same time—it takes just one click to get it started again.
Finally, if your presentation is displayed on a projector, test its performance on the same projector beforehand if possible. If you can’t, remember that most projectors are still limited to 1,024×768 or even 800×600 resolution, and projects developed on 1,280×1024 and especially 1,920×1,200 will look vastly different at these lower resolutions.
Housekeeping issues aside, let’s examine our integration options, starting with PowerPoint for Windows. Just for the record, and in the absence of other considerations (such as cross-platform delivery), I use 640×480 Windows Media video files, encoded to about 4Mbps, for most Windows-based PowerPoint use.
The Insert Action button gives you the broadest range of integration options, including Windows Media, QuickTime, RealVideo, MPEG-1 and 2, and MPEG-4. You start by clicking the Insert Action button as shown in Figure 9.1.

Figure 9.1. Action buttons can insert any program into PowerPoint, including RealVideo and QuickTime.
This in turn creates a button on the PowerPoint page—presenters click to launch a separate application such as the QuickTime, RealPlayer, or Windows Media Player, which loads your target video file (Figure 9.2). Once PowerPoint launches the player program, you control the operations exactly as you would normally during playback.

This is your best option if you have multiple files to present from a single page, as both the other options use embedded windows, limiting you in terms of real-estate, to two or three videos at most. It’s also your only option if you’re attempting to play either RealVideo or QuickTime video files without a separate third-party plug-in.
Linking files in this manner is fairly simple. You start by clicking Slide Show > Action Button > Movie, which turns your pointer into a cross you use to draw the button on the slide. Once you finish, PowerPoint launches an Action Setting dialog (Figure 9.3). Click the Hyperlink to Radio button and then click the adjoining list box and select Other File. PowerPoint opens a standard File Open dialog, which you can use to navigate to the correct folder to click on the target file. Click OK to close the Action Settings window.

I usually test my links each time by running the slideshow and then clicking the button, since it’s easy enough to mistype a file name or location. Also, if you’re transferring your presentation to another computer, beware of applications loaded in other locations.
For example, Real used to install the Player at c: eal before they got with the program and started using c:program files eal. But this created a new problem. Once, I’d installed the new player (which uninstalled the old player) at the right location, none of my links would work—something I found out in real time onstage. So, my motto is test, test, test, and tell your roving presenters to do the same.
The next alternative is to select the Insert > Movies and Sounds > Movie from File demonstrated in Figure 9.4. This launches an Insert Movie dialog used to navigate to and select the video file. PowerPoint then lets you choose whether to launch the file automatically when the slide opens, or by clicking on the embedded movie window. With both alternatives, you click on the window to stop playback.

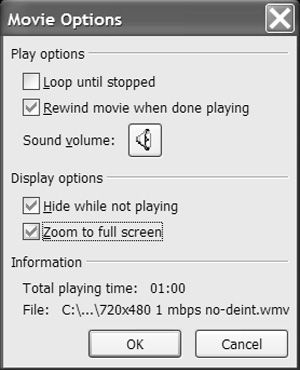
The video window you create in PowerPoint is easy to resize, but you have to use the aspect ratio of the video itself, to avoid distortion. If you right-click on the movie window, you can select Edit Movie Object to loop the video, zoom it to full screen, or rewind it after completion (this is shown in Figure 9.5). You can also create a Custom Animation for the start or end of playback.
This mechanism works for Windows Media, MPEG, and AVI files, but not for QuickTime or Real. The only negative is the lack of onscreen-player options; basically, all you can do is click the video to stop and start playback. I prefer the control enabled by the next alternative, which is Inserting an Object.
Fortunately this alternative does allow you to apply PowerPoint effects to your videos, such as fading the video from black. To access these effects, right-click the video window and choose Custom Animations. Then click the Add Effect Button, which will appear in the upper right corner of your screen, and select Entrance > Fade (shown in Figure 9.6). If Fade is not listed, or you want to see a greater range of options, click More Effects on the bottom of the menu.
When Microsoft developed Windows Media Player, it created both a standalone application and an object that other applications could link to and functionally access. Briefly, an object is a small program with a well-defined function (such as playing video) and programming interface—both making it simple for other developers to use and access from whatever program they are using. With object support within Media Player, any developer who wants to add video to an application can support object linking, rather than write a video application from scratch.
To put this functionality into use, choose Insert > Insert Object, which opens the Insert Object dialog. You then scroll down the list until you find the Windows Media Player (Figure 9.7). Select it and press OK, and PowerPoint will display a freely resizable movie window, complete with controls such as Stop, Start, volume adjustments, and a slider bar for moving through the video.

Right-click on the window and select Properties, and you’ll see a dialog such as that shown in Figure 9.8.
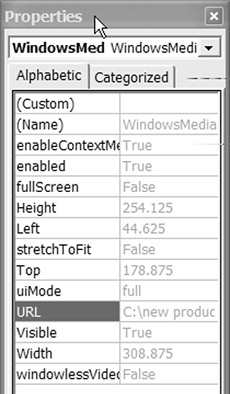
Figure 9.8. Click Custom to see video object properties, organized either alphabetically or by category.
Click Custom on top of the dialog to launch the Windows Media Player Properties dialog, which includes a browse button so you can locate your file, along with other layout, playback, and volume settings (Figure 9.9).

Figure 9.9. Here are the key controls for Windows Media Player when you insert video via object linking.
The Advanced Tab includes controls for invoking scripts, so playback can also launch your browser to a specific Web site. This is also the feature you would use to launch SAMI closed-captioned text files (I’ll cover this in detail in Chapter 11).
I really like the control provided by object linking. Although it’s a little more complicated than other methods and can’t be used with either Real or QuickTime files, it produces the most professional-looking work.
If your embedded videos are long, it’s often helpful to provide direct access to key segments so your presenters can jump directly to the critical area and skip over unnecessary footage. For example, wouldn’t it be great to insert direct links into a 30-minute marketing video that would allow sales reps to go directly to the first frame of segments showing testimonials, Return on Investment, competition, and the like?
This is simple with Windows Media files. When you download Microsoft’s Windows Media Encoder (available here: www.microsoft.com/windows/windowsmedia/9series/encoder/default.aspx), the setup routine automatically installs a utility called the Windows Media File Editor. Load your file into the File Editor (Figure 9.10) and then move to the start of a key segment, using either the slider bar beneath the video window or the start and pause controls (the play button converts to pause after playback starts).

Figure 9.10. Use the File Editor to add markers allowing your presenters to jump directly to key segments.
Then, click Markers to open the dialog shown in Figure 9.11. Click Add, type the name, and press OK, and File Editor will create the marker at the current playback location in the video file. Then press OK to return to the main screen to move to another key segment. To accelerate your work, you can scan the video file in advance, noting the timecodes for all markers, and create them all at once.

Figure 9.11. Insert markers at key points in your video file for better access segments during playback.
During playback, your presenters can jump directly to these key segments by right-clicking and choosing File Markers, as shown in Figure 9.12. This can be a huge timesaver during high-pressure presentations.
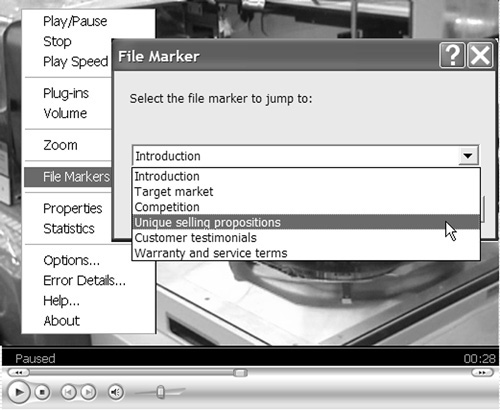
Figure 9.12. File markers let your presenters get right to the point when working with longer videos.
Remember that videos embedded using Object Linking can jump to file markers during playback, but not those embedded using the Insert Movie method. If you use the Insert Action technique, the video is played in Media Player, so you can access file markers.
You have two options when inserting video files into PowerPoint:Mac—one easy, one hard. The easy way is to use the Insert Movies and Sounds command, which allows you to bring in QuickTime, MPEG, and AVI files, but not Windows Media Video files.
The hard way is to insert a hyperlink to a Windows Media video or RealVideo file, which only works if you have RealPlayer and/or Windows Media Player for OSX installed. It’s hard because unless you configure PowerPoint to run the presentation in a window, as detailed below, PowerPoint will exit the slideshow when you click the hyperlink and run either player.
Interestingly, MPEG-2 is the only video format that you can play from within a window in PowerPoint for Windows, PowerPoint:Mac, and Keynote, making it the lingua franca for cross-platform presentations. Fortunately, MPEG-2 holds up quite well at higher data rates (like 4Mbps), so as long as you have the disk space on all computers, your video quality should not be affected.
If you’re producing videos for Macintosh use only, I recommend you encode them to QuickTime, using the Sorenson Video 3 codec. Encode at 640×480 resolution and at about 70 to 80KB/sec, which translates to around 5.6 to 6.4Mbps.
Start by clicking Insert > Movies and Sounds from PowerPoint:Mac’s main menu (Figure 9.13). Using the Insert Movie dialog, select the target file.

PowerPoint will give you the option to play the video once you enter the slide (Figure 9.14); otherwise you’ll have to click the video window to play it. Choose the desired option and PowerPoint inserts the video file at near full screen. Size and position the video window as you would any graph (or text object for that matter) into PowerPoint.

Now it’s time to start configuring the video file. Click View > Toolbars > Movie to open the Movie Toolbar shown in Figure 9.15.
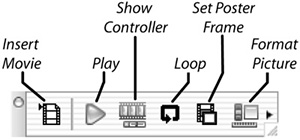
You can use the Insert Movie command as the starting point to insert your next video file. Click Play to start the video playing in design mode, and Show Controller to display the player controls and slider bar located on the bottom of the video and shown in Figure 9.16. You can set a poster frame—the frame that appears in the movie window before the video starts playing—by dragging the controller to the target frame and clicking Set Poster Frame. These controls don’t appear when you play the slideshow in PowerPoint; they’re just to help you work with the file when creating the slideshow.

Clicking Loop will play the video file within the slide until you click the video window to stop playback, a nice option for kiosks and other unattended presentations. Click Format Picture to expose PowerPoint’s regular formatting controls for resizing, positioning, and otherwise changing the appearance of the video frame.
In the PowerPoint Preferences window, General Tab, there’s a Movie Options button, which when clicked, will reveal the screen shown in Figure 9.17.
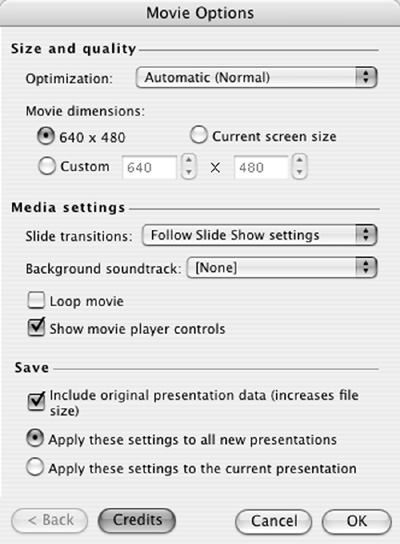
Despite making sure that the Show movie player controls checkbox was enabled, PowerPoint:Mac did not insert player controls in any of the inserted movies, whether QuickTime or MPEG-2. Instead, when playing the videos in Slide Show mode, we clicked the movie frame to start playback, and clicked it again to stop playback.
Bear in mind that although it looks like the Save controls on the bottom of the screen (include original presentation data) would store the video file in the PowerPoint presentation file, it didn’t in our tests. There’s always a chance that our results are specific to our computer, so if you want to show the player controls with your inserted movies or store the video file with the PowerPoint presentation, give these controls a try.
PowerPoint:Mac lets you create a hyperlink from any text or image object in a slide to any external file. When you click the link in Slide Show mode, PowerPoint will run the program necessary to play the file, such as Media Player or Real Player, and load the file into the program. From there, you play the file as normal.
As we’ve discussed already, if you run an external program while playing a PowerPoint presentation in normal Slide Show mode, PowerPoint closes the presentation. To keep the presentation open, you must switch the PowerPoint display from full screen to window mode, which changes the controls used to move through the slide show.
Start by clicking Slide Show > Action Buttons > Movie (Figure 9.18). PowerPoint will convert the cursor to a plus sign you drag to create the movie icon shown on the left in Figure 9.19, and will open the Action Settings screen also shown in the figure.


In the Action Settings dialog, Click Hyperlink to: then go to the drop-down list box and choose Other File. PowerPoint opens the standard Choose a File dialog that you can use to choose the target video file. Then click OK to close the Action Settings dialog, and the hyperlink is set.
Now you have to tell PowerPoint to play the presentation in a window to avoid shutting down the presentation when you play your video file. Click Slide Show > Set Up Show to open the dialog shown in Figure 9.20.
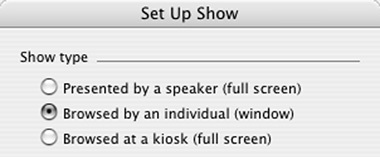
Click the Browsed by an individual (window) checkbox and then OK to close the dialog. Note that when you’re playing a presentation in this window mode, clicking on a slide does not advance to the next slide. Instead, you have to use your right arrow key to move forwards, and the left arrow key to move backwards.
When you select Slide Show mode, and click the movie button, PowerPoint:Mac attempts to run the program required to play the selected file. Before doing so, however, it will open the warning shown in Figure 9.21. Though the PowerPoint:Mac help file tells you that you can disable this message by disabling macro virus protection in the General Preferences dialog (click PowerPoint > Preferences, then the General tab), this didn’t work in our tests (PowerPoint:Mac Service Release 1).
Click OK, however, and the program should run with the file loaded (Figure 9.22). From there, you can use the normal controls to play the video file.
Keynote can play QuickTime and MPEG files in a simple embedded window. You can drag and drop the file into the slide or choose Edit > Place > Choose to browse and select the file. Once the file is inserted, you can resize the video window by clicking and dragging any edge, and drag the frame to any location in the slide.
Click the Inspector icon atop the Keynote interface to open the Inspector (Figure 9.23). You can drag the Poster Frame slider to display a different poster frame, control whether the file plays once or repeats continuously, and adjust volume. Note that you’ll see the player controls shown on the Inspector control when you’re creating the slideshow, but they do not appear in the slideshow. Also, you can’t stop video playback in presentation mode without closing the slideshow and reverting back to design mode.
When saving the presentation file, Keynote gives you the option to save the movie files within the presentation, which is very useful when moving the presentation from one computer to another. This worked well in our tests.