
OK, who out there has created a presentation in PowerPoint and then travelled somewhere far away to present it? Hmmm, many hands showing. I thought so.
OK, now how many people have travelled to multiple places to give the same PowerPoint presentation? Hmmm, even more hands. Well, unless travel is a bonus for you, this is your chapter.
Here we’ll run through how to use Microsoft’s free Producer for PowerPoint 2003 to create a presentation, complete with video and PowerPoint slides, then package it up for placing on a CD-ROM, Web site, or intranet server. You can also add Web pages and digital pictures, trim and split your videos, and even add special effects, though obviously these may degrade the compressed quality of your video (Go back to Chapter 6 for more on that). Producer is a great tool for training, communications, marketing. and sales—basically, any activity for which you’ve already created and given a PowerPoint presentation.
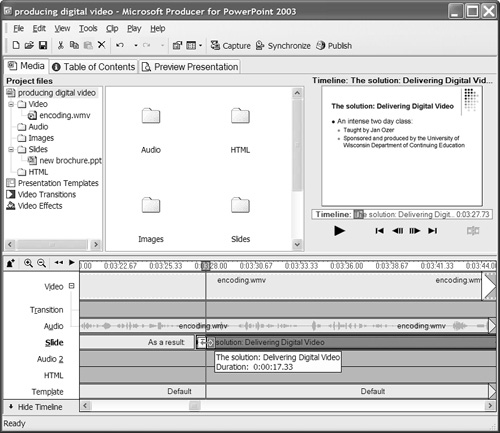
I used Producer for PowerPoint to create an explanation of the materials covered in the Delivering Digital Video class I teach for the University of Wisconsin-Madison, culminating in the presentation shown in Figure 10.1. On the upper right is the PowerPoint slide, and beneath the player on the left are slide titles the viewer can click and jump to. The viewer can also use the two double-arrow buttons beneath the video window to jump 10 seconds backwards and forwards.

At a high level, to create a Producer presentation, you videotape the presenter giving the presentation, either live or in the studio. You then capture or import the video (or just the audio, if desired) into Producer, import the PowerPoint slides, and synchronize them to the video. There are a few design options, such as template and font size, but overall the process is straightforward and efficient.
Producer for PowerPoint is a free download; you can read more about the program and download it here: www.microsoft.com/office/powerpoint/producer/prodinfo/default.mspx. Of course, there ain’t no such thing as a free lunch, even from Mother Microsoft, so you will need to have purchased either PowerPoint 2002 or 2003 to use it. You’ll also need a PC with a 400mHz or faster processor, 128MB RAM or more, an 800×600-capable monitor and graphics card, and Windows 2000 Professional, XP Home, XP Professional, or XP Tablet Editions.
I’ll assume that you’ve met the basic requirements, downloaded the program, and installed it. By default, you run the program by clicking Start > Programs > Microsoft Office > Microsoft Producer for PowerPoint 2003.
If you’re creating a presentation to stream at low bitrates, you should film the video to make it low bitrate-friendly. As you can see from Figure 10.1, I’m shooting against a black screen, a technique for producing high-quality, low bitrate video discussed back in Chapter 6.
Producer includes a wizard interface that simplifies the process immensely, especially for your first few presentations. So let’s start there. With Producer running, choose File > New Presentation Wizard to open the wizard. The initial screen is simply informational, so click Next to open the presentation template window shown in Figure 10.2.
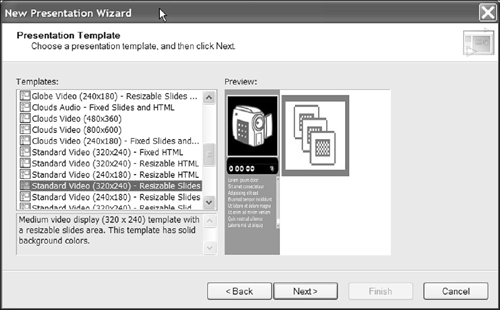
Templates are visual containers that allow you to package your content differently. It may seem like just another of the many decisions in the wizard, template choice is critical. For example, over and above appearance, your template choice dictates the ultimate resolution of the video window, and whether the PowerPoint slides and HTML pages are resizable by the viewer. In Figure 10.2, I’ve selected the template with a 320×240 video window with resizable slide area, which will expand to fit the size of the viewer’s screen.
You can change templates during the course of the presentation; perhaps showing only video during the introduction, then switching to video or even audio only along with your PowerPoint slides during the main presentation. The user will experience a short stoppage of the video while the templates are changing, but otherwise it works fairly well.
The template I chose includes video and PowerPoint slides, but there are templates for audio-only presentations, Web page presentations, and the like. Make sure you choose a template that includes the types of content you plan to use, and nothing more. For example, don’t choose a template with HTML if you don’t plan to add Web links.
Click each template on the left and Producer will display a description on the bottom and a preview on the right. After choosing a template, click Next to customize font and background color options (not shown).
A quick note on font size. The default is 12 points, which is highly readable, but only allows room for about 30 letters in each slide description. I needed longer descriptions in my titles, so I chose a 10-point font. You can change the template and adjust font sizes later, once you’ve previewed.
After customizing your font, click Next again to add the information that appears on the title of your presentation before the content starts to play. Then click Next to start loading your content.
Nothing exotic about bringing assets into Producer; operation is still-wizard driven and straightforward. First you’ll import still images along with your PowerPoint project (not shown), then you either capture or insert your video files.
Note that you can choose multiple files to load, and Producer will place them sequentially on the timeline in the order shown in the files box. If you have multiple files, you can use the Move Up and Move Down buttons (not activated in Figure 10.3) to reorder the files.

Click the Capture button to capture video from within Producer, which is the only way to prevent Producer from re-encoding your video during final rendering. For example, if you edit your video in another program and output a Windows Media file into Producer, the program will re-encode the video during final rendering even if it matches the target resolution and bitrate perfectly.
Since double compression always degrades quality, it’s best to capture within Producer if you can. Fortunately, Producer offers simple splitting and trimming controls that allow you to edit your video to a certain degree, as well as transitions and effects. But if you need to insert titles, you’re out of luck.
If you have to produce your video in a third-party editor, you have two choices. First, you can output the finished file back to your DV camera and capture anew from inside Producer. Alternatively, you can output a high-bitrate Windows Media file from your video editor, which will minimize the degradation caused by the double compression. If you choose this route, make sure you output at the resolution used by your template; otherwise Producer will have to scale the video as well as recompress it.
Click the capture button in the Import or Capture Audio and Video dialog to open Producer’s capture wizard. Most screens are straightforward, so I won’t detail them here.
To avoid double compression of the captured file during final rendering, you must make sure the captured file matches the ultimate target output parameters. For this you have to meet three requirements:
You must capture using the Target audience you intend to select during rendering (in this case Corporate LAN connection at 300Kbps, as shown in Figure 10.4).
You must capture at the resolution used by your template (in this case, 320×240).
You must capture using the codec you plan to use during publishing (in this case, Windows Media 9).
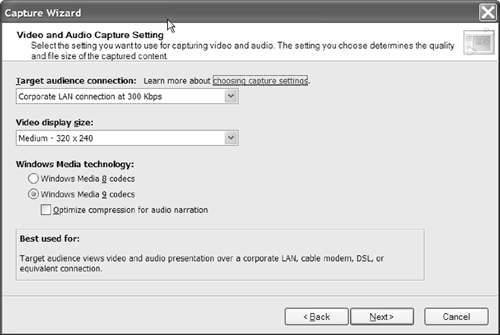
Unless all three conditions are met, Producer will re-encode the file during final production.
If you’ve imported slides, the next dialog will ask if you’d like to synchronize their appearance to the audio and/or video. Answer Yes; otherwise Producer will simply assign default time values to the slides and build the presentation.
Click Next and then Finish and Producer starts loading your content into the program. If you clicked Yes in the Synchronize Presentation dialog shown in Figure 10.5, Producer will display the screen shown in Figure 10.6 after loading all selected content into the program. This is how you’ll synchronize your slides to the inserted audio or video.


Operation is simple. Use the player controls shown in Figure 10.6 to move to each point in the audio or video file where you want the new slide to appear. Typically, I play the video in real time to hear the verbal cues, then pause the video and use the previous frame or next frame controls to back up or move forwards as necessary.
Then click the Next Slide button, and move to the next insertion point. The controls provide frame-accurate positioning, so you should be able to position the appearance of the new slide when the speaker first refers to it. Take the time to get the positioning right at this stage, because changing synchronization later is not as efficient.
Click Finish, and Producer opens the main Producer interface, shown in Figure 10.7. The program has a basic four-window interface, with a Windows Explorer file manager on the left (Tree pane), a library window in the top center for selecting content (Contents pane), transitions and effects, a preview window on the upper right (Monitor), and a timeline on the bottom.
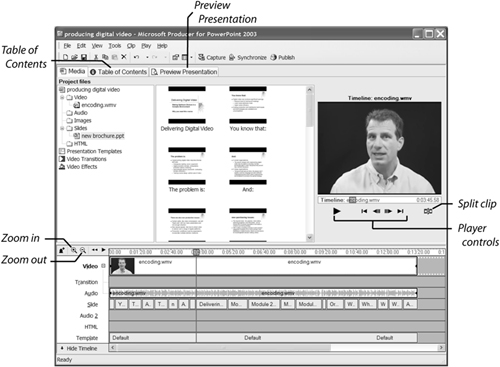
Take a look at the different tracks on the timeline. As you can see, the Video and Audio tracks contain the respective tracks from the imported video file, with the Transition track available when the video timeline contains multiple clips. The Slide track contains the PowerPoint slides; alternatively, you can insert digital pictures here to create a simple slideshow.
You can add another audio track to Audio 2. To adjust the relative volume of the two tracks, choose Tools > Audio Levels. The HTML track can contain Web pages to display in the presentation, or Web links; this is discussed below in Inserting Web Links. Finally, the template track contains the template chosen at the first stage of producing this presentation.
A few points about working in Producer’s timeline:
First, as in most timelines, you can zoom in to set details, and zoom back out for the big picture. Use the two magnifying lenses located on the left, just above the video track, to zoom in and out.
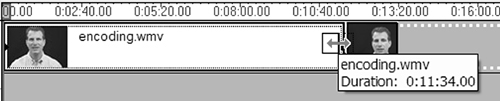
Second, locate the Split video button just beneath the video window on the right. To edit content from an audio or video file, use the player controls beneath the video window to move to the desired split point. Then, click the split button, and trim away unwanted video by dragging the edge to the desired frame, as shown in Figure 10.8. Producer automatically closes any gap you create to prevent gaps in the presentation.
Third, you can drag any asset on the timeline by simply grabbing it with your cursor and dragging it to the target location. I’m making this sound way too hard; if you’re at all familiar with video editors, you’ll find Producer’s timeline a snap to use.
During the production process, Producer uses the titles from your PowerPoint slides to create the list shown beneath the player window in Figure 10.1. However, sometimes these titles provide little guidance regarding the contents of the slide. For this reason, Producer allows you to change the title text and also organize your titles into sections for enhanced interactivity.
For example, in Figure 10.9—accessed by clicking the Table of Contents button on the upper left of the main screen (see Figure 10.7)—you can see the titles as originally imported from PowerPoint. The fourth title simply says “And:,” which tells the viewer nothing about the content of the slide. To change this, click Change in the middle of the screen, which opens the Table of Contents Entry window shown on the bottom right of Figure 10.9. Don’t change the selected value in the Associate with: list box; use the existing value.

Use the Demote and Promote buttons to organize your content. Demote moves your text 15 pixels to the right, while Promote moves your text 15 pixels to the left. When you’re done, click the Media tab to return to the main screen, or the Preview Presentation tab to preview.
Before I preview, however, there’s one piece of content to add—a link to the Web page containing the course brochure and signup information. It would be a pretty sorry sales video without a specific call to action.
First, a few preliminary points. I’m adding an HTML screen near the end of the presentation, and don’t want it to appear during the presentation. However, all content added to the timeline snaps back to the beginning of the timeline to prevent content gaps (even if you intended to have gaps). So even if I insert it at Minute 14, the HTML page will snap back to the start of the timeline.
To work around this default, I used a template that displays PowerPoint slides (not HTML) during the main presentation, then switched to a template that displayed HTML (not PowerPoint slides) when I wanted the HTML page to appear. Fortunately, Microsoft includes templates with these combinations in the same video window. Though it sounds complicated, it’s simple once you know what you have to do, and pretty easy to set up.
To switch templates, click Presentation Templates in the Tree pane to display all templates in the Contents pane. Drag the new template down to the Template track in the timeline, and drag the edges so it’s positioned correctly.
To add the link, choose File > Add Web Link, which opens the dialog shown in Figure 10.10. You can display the Web page within the presentation by checking Display live page, or display only the link by clicking that option. Then, Producer will activate the Text field so you can type a description.

After you press OK, Producer adds the new link to the HTML folder. Click HTML in the Tree pane, and you should see the new link in the Contents pane. Drag it down to the HTML track to add it to the project.
At this point, you’re ready to preview, so click the Preview Presentation tab shown on the top of Figure 10.9. If you have lots of titles, many will likely be obscured by the timeline. To close the timeline for complete preview, select View > Timeline, or click Ctrl+T on your keyboard.
When you preview, your primary concern is synchronizing the slides with the audio, so click each title and make sure it appears about the time the speaker first refers to it. To adjust the synchronization of a slide, click the Media tab to return to the timeline.
Follow these steps to the fastest way to adjust your synchronization, as shown in Figure 10.11:
Click the video track to display the video in the upper right preview window.
Use the player controls to move to the point in the video where you want the slide to appear. This will also move the edit line on the timeline to the new target position.
Click and activate the slide track.
Hover your cursor over the edges of the slides you need to adjust, and when the drag cursor appears, drag the edge to the edit line, which Producer will automatically snap to. Producer will adjust the edges of the two slides as necessary, without changing their total duration so your adjustment doesn’t change the synchronization of subsequent slides.
After polishing and previewing, it’s time to publish. Start by clicking the Publish button in the Producer toolbar, which opens the screen shown in Figure 10.12.
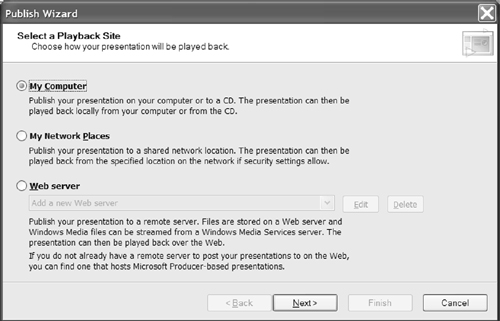
It’s simple to publish onto your hard disk (for potentially transferring to CD) or to any place on your network where you have sharing rights. If you want to write directly to a Web server, it must be a Windows Media Services streaming server, either hosted by your organization, or by a third party. If you click Web Server in the Publish Wizard, a “Learn More” button appears which you can click to see a list of Producer-compatible service providers.
You can also post your presentation to Microsoft’s SharePoint Services Web site or SharePoint Portal Server. For details on all these Web-based uploads, see the Microsoft white paper located here:
After choosing your playback site, you’ll page through a screen for posting information about the presentation and then a Publish Settings screen where you’ll choose your encoding parameters. The default setting is optimized for your content, and will vary from project to project. If it’s acceptable, click Next, otherwise check Choose Publish Settings for Additional Audiences, and then click Next to open the window shown in Figure 10.13. Here you have a number of options that require explaining.

In the Windows Media Technology dropdown box, you can select Windows Media 9 codecs, Windows Media 8 codecs, or both. Use Windows Media 8 if you’re concerned about playback compatibility with older computers, Windows Media 9 if your audience is exclusively Windows 98 SE and above on the Windows side, and OS X on the Mac, or you can choose both; in this case Producer will create different files for both codecs.
Check the Enable Rich-Media Streaming checkbox if you’re streaming from a Windows Media Streaming server, and Producer will customize the encoded files automatically. If your audio is speech-only, check Optimize Compression for Audio Narration, and Producer will use a codec optimized for voice.
If you choose multiple target audiences, Producer will output multiple files and provide a viewer with different bitrate alternatives. Click Next and Producer displays the encoding progress screen (Figure 10.14) but won’t actually begin encoding until you click Next again.

Once the presentation is published, Producer will allow you to preview how the file will look in three different browsers: Internet Explorer 5.0 for Windows, Internet Explorer 5.2.2 (or later) for Mac OS X, and Netscape Navigator 7.0 for Windows. I saw some minor differences, and suggest you test thoroughly if you’re distributing to Macintosh and Netscape clients.
We’ve covered a fair amount of Producer’s capabilities, but there are a couple of additional functions you should know about. First, as a default, Microsoft displays a link to the Producer Web page on its Web site in all presentations. You can eliminate this by selecting Tools > Options and then uncheck the Display a Web Link on the Introduction Page checkbox.
Once you’re in the Options window, click the Timeline tab and adjust default durations if desired. I found the defaults too long for my liking.
Finally, to get a good feel for the capabilities of Producer, check out the samples on Microsoft’s Producer Web site here:
www.microsoft.com/office/powerpoint/producer/prodinfo/default.mspx.