
Good lighting is absolutely essential to shooting good video. However, if you’re like me, 90 percent of the time you shoot your video without separate lights, using the sun (outdoors) or available lighting (indoors) as best you can.
Fortunately, a lack of lighting equipment doesn’t prevent you from producing great video. However, though it might sound paradoxical (if not downright Zen), you must know how to work with lighting equipment to understand how to do without it; this allows you to optimize results by positioning your subjects or the available light for maximum effect.
I’ll start by examining the two most common lighting combinations used on location and in the studio today. Then I’ll discuss some lighting fundamentals to help arrive at a definition of what “good lighting” is. After all, you can’t hit a target unless you know what it is.
Once we have a target, I’ll discuss the tools available to help produce good lighting. Interestingly, one lovely characteristic of all video cameras is an absolutely egalitarian approach to lighting. Your camera doesn’t care whether you spent thousands of dollars on your lighting equipment, or a few hundred, so long as the light is adequate and appropriately positioned. Accordingly, for those with $100 or so to spend, I’ll describe how to buy highly effective lighting equipment at a fraction of the price of professional gear.
Finally, with all this as background, I’ll describe how to apply what we’ve learned so far to our three scenarios and other common shooting situations you’ll likely encounter in the field.
Three-point lighting has its roots in lighting as art, rather than lighting as a necessary evil for a camera to do its work. The basic theory goes like this: Video is a two-dimensional medium served on a flat screen. Flat lighting, which lights each scene area equally, is visually uninteresting and serves only to emphasize video’s two-dimensional nature.
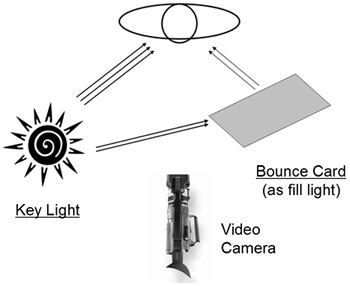
To get around this, lighting should create “depth” within the video image and contrast between the foreground speaker and the background. The basic tool for accomplishing both goals is three-point lighting, as shown in Figure 3.1.
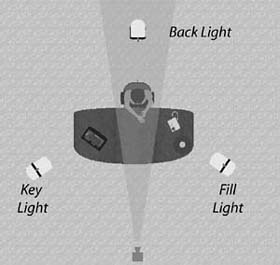
As the name suggests, three-point lighting uses three lights. The key light is the primary light, and its job is to expose the shape of the subject; it does this by shining down on the subject from an angle, producing shadows, a technique also known as modeling.
As you can see in Figure 3.1, you position the key light at an angle of approximately 45 degrees from the camera, pointing directly on the subject. The light should be above the subject and shining down at an angle of about 45 degrees. A key light must be a “hard light” that produces shadows, but not so harsh that it creates excessive contrast between the lighted and the shadowed regions. I’ll discuss hard and soft lights and lighting contrasts in depth in the Video Fundamentals section.
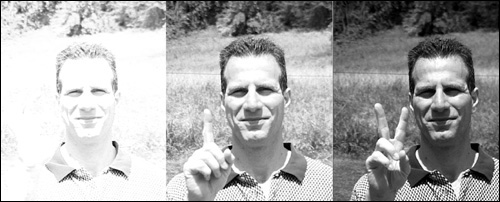
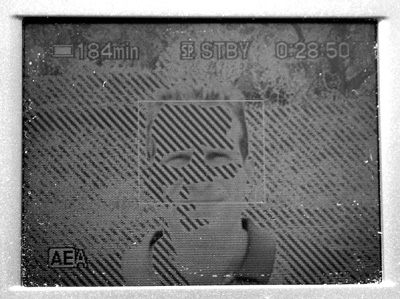
Positioning the key light is more art than science. When positioning this light, take note of the shadow cast by the nose, also referred to as the “nose caret,” clearly visible in the key light image (left) in Figure 3.2. As a rule of thumb, the nose caret should never touch the lip (which means the light is too high) or protrude into the cheek area (which means the light is too far to the side).

You can position the key light slightly higher to produce shadows that hide a double or triple chin, but make sure the eyes remain clearly visible. This is a problem for me because my bushy eyebrows can block the light, making my eyes difficult to discern.
As you can see on the left in Figure 3.2, the key light did its job, producing a shadow that adds depth to my face. However, the contrast between the lighted area on the right side of my face and the shadows on the left is a little too strong. To moderate this, we’ll add a fill light to “fill” the shadows.
Where the effect of the key light is obvious, the fill light is more subtle, softly reducing the shadows produced by the key light rather than announcing the presence of another light. To accomplish this, the intensity of the fill light must be less than the key light, an effect you can produce by using a softer light or less powerful bulb, or by placing the light further from the subject.
As shown in Figure 3.1, the fill light should be placed at approximately the same angle as the key light, but on the other side of the camera. Placing the fill light at a different height from the key light will produce an asymmetry that enhances the desired modeling effect.
Compare the key light image in Figure 3.2 with the key and fill light image. You’ll notice that the fill light did its job, softening the dark shadows produced by the key light, and revealing some of the detail on the left side of my face.
The back light is placed behind and shines down the subject. Rather than provide true lighting for the scene, the back light should produce a subtle halo on the top and back of the subject that provides contrast and visually separates the subject from the background, enhancing the three-dimensional appearance of the scene.
Ideally, you should place the back light directly opposite the camera and it should have the same intensity as the key light. If it’s impossible to place the light directly behind the subject, place it on the side and shine the light down on the subject, or place a light on either side—both, of course, shining down onto the back of the subject. Be careful when positioning the light so that it does not also shine down on the camera lens—this can produce lens flares and even burn out pixels in the LCD viewfinder or panel.
If you look at the key, fill, and back light image in Figure 3.2, you’ll notice that my hair and shoulders are lighted, providing contrast from the background. As discussed in the next section, though many television producers eschew three-point lighting for flat lighting, virtually all employ back lights to create this contrast.
So what are the takeaways of three-point lighting?
First, shadows are acceptable, if not desired. This is critical, because you can drive yourself crazy, especially out in the field, if you try to get rid of all facial shadows. By strategically placing the lighting and the subject, you can ensure that the shadows will enhance, rather than disrupt the image.
Second, uneven lighting is acceptable, if not desired. Again, don’t go nuts trying to get even lighting on each subject’s face. Rather, for reasons discussed more completely in Video Fundamentals, it’s critical to limit the contrast between the brightest and darkest regions in the video.
Third, back lights are essential to separate the subject from the background, especially (in my experience) with indoor shots.
Open any book or article on lighting and you’ll see a chapter or section on three-point lighting, usually identifying this technique as optimal, if not the be-all and end-all of professional lighting. However, there’s one dark secret about three-point lighting that few sources reveal: most television programs don’t use it.
Why? The reasons are plentiful. Three-point lighting usually requires high-powered incandescent lamps that consume capacious quantities of electricity, produce massive heat, and are tough on the subject’s eyes. Three-point lighting is also very difficult to pull off when you have multiple subjects on screen simultaneously—especially if they’re moving around.
Plus; with today’s high-resolution, large-screen television sets, depth is more apparent, lessening the importance of three-point lighting. Finally, some producers obviously prefer to eliminate (or minimize) the nose carets and other shadows that three-point lighting produces.
So, while you may see three-point lighting in use in dramatic interviews on 60 Minutes, you typically won’t on broadcasts from ESPN, CNN, the Tonight Show with Jay Leno, the Golf Channel, and on most local news productions. All these programs use flat lighting, which minimizes shadows but retains the back lighting.
Producing flat lighting is very simple, as shown in Figure 3.3. Rather than using key and fill lights with different intensities, you use two key lights of identical intensity. And, rather than using hard lights that produce shadows, you use soft lights that produce less intense shadows.
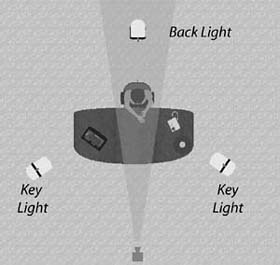
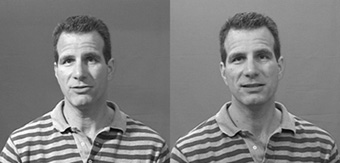
Flat lighting produces the image shown on the left in Figure 3.4, which has even lighting throughout the face and the characteristic shadow beneath the chin. On the right, I placed a bounce card (see Lighting Fundamentals section) on my lap to reflect the light back up to my face, noticeably reducing the chin shadow. Some producers use a fourth light, directly behind the camera, to accomplish this, but this approach places the light directly in the subject’s eyes, which is tough going even for the pros.

Figure 3.4. Flat lighting: on the right used with a matte reflecting light under my chin to reduce shadow. Note to self: try some face powder to get rid of the shine.
So, what are the takeaways? Primarily, that flat lighting (casting no or minimal shadows) is certainly an acceptable way to go—an important consideration as it may be your only alternative in some indoor shoots. Some may find this contradictory to what we learned from examining three-point lighting, but I consider it supplementary.
While a documentary filmmaker may criticize your video if you use flat lighting, few, if any, nonprofessional viewers will even notice, any more than they notice the use of flat lighting on the evening news or Jay Leno. So when you’re making do in the field, if flat lighting is all that’s available—or the best option for providing good, consistent coverage—go with it. If you can implement three-point lighting effectively, go with that too.
Now let’s take a quick look at some lighting fundamentals which will help round out our definition of good lighting.
As you’ve seen, the mechanics of three-point lighting are fairly simple. However, unless you know what kind of lights to set up and why, your results will be suboptimal, if not downright disappointing. Here’s what you need to know.
Just because your eyes can perceive details in a shot, doesn’t mean that your camera can. Video is definitely not a What You See Is What You Get affair.
This reality causes problems primarily in scenes with “high-contrast” lighting— in other words the very significant differences between the brightest area in the shot and the darkest. Typically, you get excessive contrast when you’re shooting a subject with extremely bright lights in the background, whether produced by the sun or a spotlight.
When you’re looking at the scene with your eyes, you can see good detail at both extremes because your eyes have a contrast range of around 1,000:1. This compares to a contrast range of about 250:1 for the best video cameras, approximately 64:1 for cameras in the Sony VX2000 or Canon XL1 class, and as low as 30:1 in consumer camcorders.
Without getting too technical, this means that while your eyes will be able to perceive detail at both the darkest and lightest extremes, your video camera will not. This is why the left side of my face lost detail in the key light-only image in Figure 3.2. Simply stated, the contrast range between the darkest and lightest regions was too dramatic.
If too much lighting contrast exists in your scene, you have no good choices. If your exposure favors the darker area, the more lighted areas become washed-out blobs with no detail. If you adjust exposure to favor the lighter areas, darker regions turn completely black, and show no detail. Use an average exposure and you’ll lose both extremes.
Interestingly, the “spotlight” or “backlight” control found on most camcorders doesn’t really fix the problem. Rather, it simply tells the camera to ignore the bright background, and choose the best exposure for the face. While this restores some facial detail, you lose detail in the background, usually causing it to look slightly washed out. Spotlight and backlight controls are a great solution when you can’t manage the lighting, but when you can, it’s better to reduce the contrast range to acquire good detail and color throughout the scene.
Alarm bells should start to ring if there are stark differences between the lightest and darkest regions in your video frame. This often occurs when shooting in direct sunlight around midday (which can produce very dark shadows), or when shooting subjects against bright windows or bright floodlights.
You should also hear alarm bells when your subjects wear clothing with extreme ranges of contrast, such as a dark blue or black suit with a white shirt, or when people of color wear very light clothing or stand against a very light background. Once again, your camera can’t preserve detail at both extremes, forcing you into damage-control mode.
When it’s practical, bring a television to help you judge scene lighting more effectively. It’s very difficult to detect a loss of detail on your camcorder’s 2.5” LCD, and most camcorder LCDs tend to produce brighter results than what actually appears on a television or computer. Relying on your camcorder’s LCD panel, then, is a scary proposition.
Let’s start with two fairly common situations to explain what this means:
Situation 1: You’re shooting indoors, using sunlight streaming in from a window as your key light, and a lamp in the room as a fill light.
Situation 2: You’re shooting indoors, lighting the scene primarily with fluorescent lights in the office ceiling, using an incandescent lamp to reduce facial shadows.
Now, as they say in law school, what result and why? Situation 1 is hopeless, and your subject’s face will be either blue or orange. Same result in Situation 2 (unless you’re very lucky), except that the face will be either overly green or orange. Now, the why.
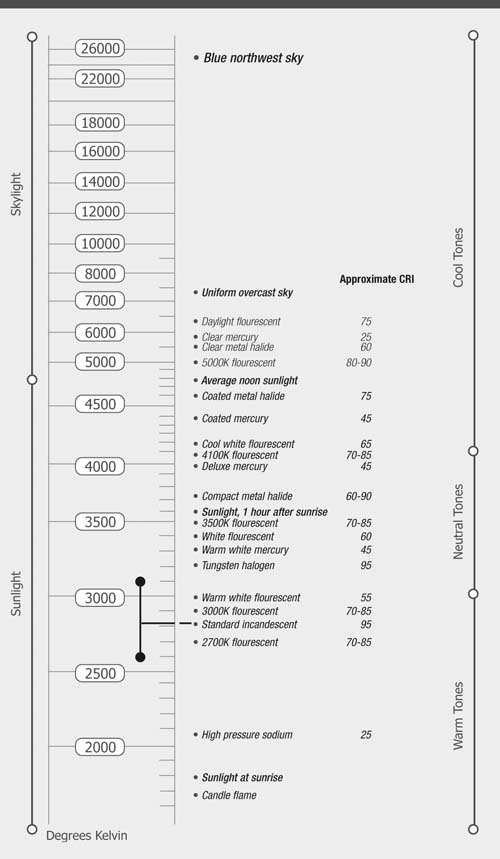
Simply stated, white is not “white” under all types of light. As shown in Figure 3.5, different lights produce slightly different coloring on the Kelvin scale, named after renowned Scottish physicist Lord Kelvin. The bottom of the scale, between 2,000 and 3,000K, occupied by candles, and incandescent (normal light bulbs) and tungsten (shop lights and many pro lighting fixtures) sources is slightly orange, and generally considered one of the “warm tones.” At the other end of the spectrum is the bluish color produced by the blue sky, and generally considered one of the “cool tones.” In between is the noon sun and “cool, white” fluorescent light bulbs.
The mere existence of this scale may surprise many readers. After all, our eyes see “white” irrespective of the color of the light. As it turns out, however, this is a case where our brain overrules our eyes. We see white paper, poster board, or other objects that we know are white, and our brain tells us they are white. Unfortunately, video cameras aren’t that smart; you have to tell them what is white; and you do this when you set the camera’s white balance.
Most video cameras have at least two white balance settings: one for outdoors, which assumes that the prevailing light is slightly bluish, and one for indoors, which assumes that the light is tinted slightly orange. In both instances, the camera corrects for the prevailing tint and makes white objects white.
In addition, most prosumer and all professional cameras have a manual white balance control; this obviously adds great flexibility when you’re shooting somewhere between daylight and incandescent light—say, under cool, white fluorescent bulbs. However, if you have two light sources with conflicting color temperatures, white balance doesn’t help, and the colors on some part of your image will be distorted.
Now, back to our scenarios. In the first scenario, you’re mixing sunlight (5,600K) with an incandescent lamp (3,000K). If the white balance is set to indoors, the portion of the face lighted by the sun through the window will be blue. If it’s set to outdoors, the portion of the face lighted by the indoor lamp will appear slightly orange.
The second scenario is more interesting. First, recognize that today’s fluorescent bulbs have much more range color-wise, so just because you’re using fluorescent lighting doesn’t doom your subjects to a sickly green coloring. Second, while you can buy “cool white” fluorescents that produce light in the 4,000K range, you can also buy warmer lights that output close to the 2,700 to 3,000K produced by incandescent bulbs.
If the color output of your incandescent and fluorescent bulbs match, you’ve eliminated the white balance issue, and picture quality should be good. While color temperature values are seldom listed on a bulb’s packaging, stores such as Lowe’s often provide this information at the point of sale, and it’s generally available on the manufacturer’s Web site. I’ll describe how to avoid problems in both scenarios in the Problem Solving section.
Whenever you use different sources to light a scene, make sure the sources produce a consistent color temperature. Otherwise, your white balance will be incorrect for one or more sources, and distort your colors.
When you’re buying bulbs for your portable lighting gear, or for offices where you frequently shoot video, purchase bulbs that output similar color temperatures. If you’re mixing incandescent with fluorescent bulbs, note that while there are fluorescent bulbs that match the color temperature of incandescent lighting, the reverse isn’t true. If you have to mix, your only option is to buy fluorescents that match your incandescent.
In addition to the color temperature of common lighting types, Figure 3.5 also shows the Color Rendering Index (CRI) of these lights. Briefly, CRI is a measure of how accurately the light portrays color, with 100 being ideal. Lights in the 60 to 65 range can make people and objects appear washed out, while lights in the 80 to 100 range bring out the colors.
The difference is too subtle to detect on the grayscale pages of this book, but General Electric has comparison shots posted at www.gelighting.com/na/institute/quality.html. If you browse around the web site, you’ll find it’s a solid resource for additional information on lighting temperature and CRI. Scan the lighting racks at Lowe’s or Web sites such as www.bulbs.com and you’ll see that lights with higher CRIs cost a bit more. But in my experience they’re well worth it.
Hard light is light transmitted from a lighting source in sharp, parallel rays that produce hard edges and dark, clearly defined shadows. Typically, hard light sources produce high quantities of light from a very compact space, accompanied by lots of heat, which causes problems in many environments.
The sun is a classic “hard light,” as are unfrosted incandescent light bulbs and spotlights. In Figure 3.6, I used a hard light to produce the shot on the left. In addition to producing a slight shine on my forehead, the hard lighting produces significant contrast between the bright, right side of my face, and the left side, cast in dark shadows. This is the same effect we saw in the key light-only image in Figure 3.2. Without the fill light to minimize the shadows, details become lost in the darker regions of the frame.
Look at the effect the soft light has on the right in Figure 3.6. As you can see, it produces even lighting across my face and over the background, and minimal shadows. This makes soft light your only real choice for flat lighting, and for lighting backgrounds for chromakeying. (I’ll explain chromakeying later.)
You can produce soft light (at least) three ways. First, you can use lights that are naturally softer, such as fluorescent lights. Second, you can “bounce” a hard light off of a light surface, such as a bounce card, which removes the hard edge, but typically requires either another person to hold the card or a dedicated stand.
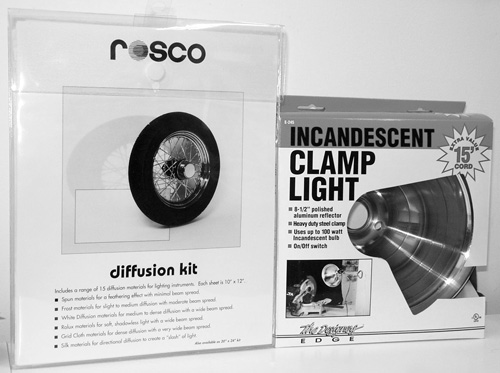
Finally, you can install a diffuser, as shown on the left in Figure 3.7, over a hard light source, as shown on the right in the figure. I’ll cover both bounce cards and diffusion kits in the upcoming Lighting Toolset section. For now, note that diffusers are pieces of cloth or other material that disperse the harsh light from a tungsten or incandescent source, converting hard light to soft light. In this instance, I used a cloth sheet from a Rosco diffusion kit that cost about $30 at Wolf Camera. Applied over one lamp of the $35 tungsten shop light I bought at Lowe’s, it produces good, even lighting that can’t be beat in terms of bang for the buck.
Many television stations such as CNN are moving to fluorescent lights, which produce soft light and run much cooler than incandescent lights. The downside is that you need many more bulbs to create the same light as hard light sources such as the tungsten halogen lighting they are replacing. This makes fluorescent a great option for permanent studios, but less attractive for portable lighting. If you need to move your lights around, consider a hard light source such as tungsten or incandescent converted to soft light via a bounce card or diffuser.
Finally, while soft light is very flattering in many “people” shots; it can obscure detail in product or object-oriented shots. If you plan to shoot both objects and people, you’ll probably need both hard and soft light sources.
When planning your lighting, remember that soft lights are generally better for lighting faces and backgrounds than hard lights.
Typically, hard lights are much more compact than soft lights, making them easier to carry and use. And, since you can easily convert hard light to soft light with diffusers or bounce cards, they make great additions to your lighting kit.
With this as background, let’s briefly touch on what constitutes good lighting. In this regard, I find a quick review of Maslow’s hierarchy very instructive.
Briefly, Maslow’s hierarchy defines a range of human needs: from food, water, and sleep (physiological) to self-actualization. According to Maslow, human beings can’t address higher-level needs until the more basic needs are satisfied.
Lighting has a similar hierarchy. It’s lovely to consider how different lighting schemes can create moods or convey emotions, but in most business or academic shoots, our needs are much simpler.
Here is my hierarchy of good lighting:
First and most important, good lighting enables the camera to produce a high-quality image; though be careful not to overexpose the scene with too much light. Job Number 1 is to provide enough light so that critical scene elements can be clearly captured by the camera. Forget art, forget mood, and forget emotion.
Second, good lighting produces an image with reasonable contrast ratios. No areas should be so light or dark that detail is lost. Typically, if you have only one light, position it as a key light, but soften the light to minimize shadowing and contrast ratio. Alternatively, position a bounce card to catch light from the key light and serve as a fill light (see more on bounce cards in the Lighting Toolset section).
Third, good lighting has a consistent color temperature. When using multiple lights, their color temperatures should be close, if not identical.
Fourth, good lighting can be flat or three-point lighting, but in all cases should be back-lighted.
Fifth, when shooting one subject under ideal conditions, go for three-point lighting (OK, so I’m a snob). When shooting multiple subjects, three-point lighting is very complicated—even in studio conditions—so go with flat lighting.
Now, let’s examine the tools at our disposal to help produce good lighting.
Unless you’re buying exotic professional lighting gear, your choice of bulb and fixture is limited to incandescent, quartz-halogen, and fluorescent. Let’s briefly discuss each type.
There are the common household light bulbs that screw into most lamps and light fixtures. Incandescent bulbs are also called tungsten bulbs because they use a tungsten filament; this is the element that glows and creates brightness or light glows when heated with electricity. Unlike fluorescent lights, incandescent bulbs run very hot, which contributes to their short life (750 to 1,000 hours). When the light burns out, the filament breaks into small chunks, creating the noise you hear when you shake the bulb. Some incandescent bulbs use heavy-duty filaments or different gases-side in the bulb, which can give you four times the longevity.
Incandescent bulbs give off a hard, yellowish light—typically referred to as “warm” —and have a very high CRI of 95. Overall, these bulbs are convenient because they’re available in most offices and homes, but when they’re your primary light source, be sure to white balance your camera accordingly.
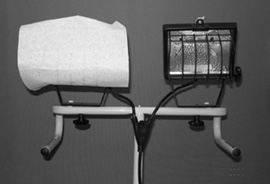
These bulbs are also called quartz-halogen or tungsten-halogen (as shown in Figure 3.2). Basically, halogen bulbs use a tungsten filament like standard incandescent bulbs, but halogen gas in the bulb helps preserve the filament and boost the bulb’s lifespan. These bulbs burn at more than 480 degrees Fahrenheit, which is too hot for a standard glass bulb, so they either require a quartz bulb (hence, the name quartz-halogen) or a special heat-resistant glass bulb.
These bulbs burn so hot manufacturers recommend installing them with gloves as the skin’s oil on the bulb can cause premature failure. The intense heat also makes halogen bulbs more of a fire hazard than incandescent bulbs, so be careful when using them around curtains, table cloths, or similarly flammable materials.
Halogen bulbs are generally more powerful than standard incandescent bulbs, which max out at about 100 watts. Halogens can be as powerful as 1,000 watts (120 volt) or 1,600 watts (240 volt). The ability to produce this power from a relatively small fixture makes halogen extremely efficient when you need lots of light, though you’ll need a special fixture such as the shop light shown in Figure 3.7 to use higher-powered halogen bulbs.
Halogen bulbs produce a hard light that is whiter and purer than incandescent bulbs, but shares the same high CRI.
Fluorescent bulbs run an electric current through a tube filled with argon and mercury gases; this combination produces ultraviolet radiation, and activates a phosphorous coating in the bulb to produce light. Fluorescents run cooler than incandescents or halogens, and last much longer.
You can purchase fluorescent bulbs with a variety of color temperatures: from “daylight” bulbs that mimic the color temperature of the sun to 3,000K bulbs that are close to incandescent bulbs—the CRI varying significantly from bulb to bulb.
Compact fluorescent bulbs fit into a standard lamp fixture, making them easier to use in the office and the home.
All fluorescents output a soft light that is great for flat lighting, or serving as a fill light, but probably not sufficiently focused for key lights.
Most camera-mounted lights tend to be halogen bulbs. They produce a hard light that frequently engenders a deer-in-the-headlights look and is definitely hard on the subject’s eyes. When a person is facing the camera, camera-mounted lights produce very flat lighting with no back light, which can create a very unattractive effect on the person being filmed.
These lights are invaluable when shooting night or during parties and receptions, but are best used only when no alternative is available.
Bounce card is the generic name for any surface that can reflect light from a direct light source—typically to serve as a fill light as shown in Figure 3.8. As discussed above, bounce cards are also effective for bouncing light up from a lap or table to fill facial shadows.
For casual use, a simple whiteboard from an arts & crafts store—or any hard white object for that matter—will work just fine. For heavy use, especially on the road, consider purchasing a professional reflector that you can fold up for easy storage. Professional reflectors, which generally cost less than $100, often have different colors on each side like white for sunlight and gold for sunset. Photoflex is a very popular manufacturer of reflector boards; check out their offerings at www.photoflex.com.
Diffusion kits contain packets of cloth and other materials that change the character of the light produced by your light fixture. Some variations are artistic, but the ones I find most valuable are those that convert hard light to soft light by diffusing the beam from the source light.
The Rosco kit I mentioned earlier has proven durable, easy to attach to my homegrown lighting kit, and heat-resistant—even when used on 500-watt halogen bulbs. Essentially, the kit enables every light in my kit to provide both hard and soft light, making the $30 I spent well worth the investment.
As a quick aside, some authors report using fabric-softener sheets to diffuse their light beams, but only after several drying cycles to eliminate the smell. As with all diffusion materials, you can’t place them directly on the glass—especially when stronger halogens are used—because they can catch fire.
Read more about diffusion materials and what’s inside the Rosco kit at www.rosco.com/main.html.
Gels are the plastic films placed in front of a light to change its characteristics. For example, if you were using the sun as the key light and needed a fill light to match its color, you would place a blue gel over a halogen or incandescent bulb to make it match the sun.
Conversely, if you needed the sunlight streaming into the room to match the halogen lighting in the scene, you would place an orange or straw-colored gel over the window. Similarly, if bright light streaming in from a window produced too much backlighting, you could apply a neutral-density gel to reduce the light’s intensity without changing the color.
To be honest, I’ve not worked that much with gels, primarily because rolls of gel suitable for covering windows are expensive, and the brittle gel sheets are tough to attach to my ad hoc lighting gear. For indoor shooting, it’s easier for me to match the color of my fluorescent and halogen bulbs.
You can download the excellent Rosco Guide to Color Filters from the Technotes section of the company’s Web site (www.rosco.com/main.html).
You can also use lenses attached to the camera (or in some cases, embedded in the camera) to help control lighting. For example, Neutral Density filters (also called ND filters or gray filters) reduce the amount of light entering your camera, but don’t change the color temperature. This gives much greater flexibility when working in direct sunlight, as shown in Figure 3.9.
The image on the left shows the Sony VX2000 shooting with the ND filter disabled; as you can see, the video is so bright it’s unusable. The middle figure shows the ND filter set to 1, while the figure on the right shows the ND filter set to 2.
Note that the results produced by ND filters will vary depending on what shooting mode you’re in. For example, in Figure 3.9, I’m in “aperture priority mode” (where I set the aperture manually), which prevents the camera from automatically adjusting the aperture to minimize the impact of the brightness. This maximizes the effect of the filter, which is what I was intending to show.
In fully automatic shooting modes, the filter allows the camera to shoot much clearer images, because it lets the camera eliminate what the Sony manual calls “diffraction off the small aperture” shown in Figure 3.10. Whatever mode I’m in, my VX2000 blinks to tell me whether I should engage the ND filter and at which value—a tremendous advantage over nonintegrated filters screwed onto the end of the lens. Whatever your filter/camera combination, you should experiment with the ND filter in all shooting modes before using it on a real shoot.
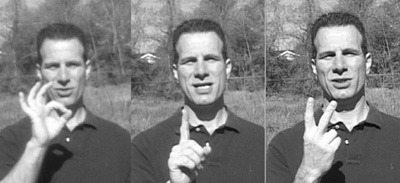
Figure 3.10. In automatic exposure mode, the neutral-density filter increases sharpness, though your mileage may vary.
Popular lens manufacturers, Tiffien, discusses ND filters on its Web site: www.tiffen.com/NEUTRAL%20DENSITY.htm.
This is a camcorder feature rather than a true accessory, but a great tool for shooting inside and out. Briefly, as you can see in Figure 3.11, the camcorder shows a zebra pattern on certain parts of the image when it is overexposed. Using my VX2000, I can set this feature to 70 IRE, which shows whether the video is appropriately exposed for Caucasian skin tones, or to 100 IRE, which is pure white, or too “hot” for NTSC viewing. In Figure 3.11, the zebra pattern is set to 100 IRE. At this setting, the video will be way overexposed, as you can see from the image on the left in Figure 3.9.
Just for the record, IRE stands for Institute of Radio Engineers, the folks who originally defined these video signal values.
Now that we’ve run through the basics and the tools, let’s review some common user scenarios, starting with the two situations mentioned in All Lights Have a Different Color Temperature on page 41. To save you a flipping back, I’ll recap them here.
Situation 1: You’re shooting indoors, using sunlight streaming in from a window as your key light, and a lamp in the room as a fill light.
Options:
Shut the curtains and use indoor lighting exclusively.
Switch off the indoor lighting and use a bounce card to reflect the sunlight from the window as a fill light (see Figure 3.8). Framing has to be tight using this alternative, because the card has to be close to the subject, and you’ll either need a stand or an assistant to hold the bounce card.
Use a fluorescent light with a daylight fluorescent bulb to match the color temperature of the sunlight.
Use an orange or straw-colored gel film to convert the incoming sunlight to incandescent levels.
Situation 2: You’re shooting indoors, lighting the scene primarily with fluorescent lights in the office ceiling, and using an incandescent lamp to reduce facial shadows.
Options:
Use 3,000K fluorescent lights in the office ceiling.
Use a compact fluorescent bulb in the lamp to match the color temperature of the ceiling fluorescents.
Gel the incandescent lamp to match the color temperature of the ceiling fluorescents.
Situation 3: Your subject is wearing glasses.
Options:
Ask the subject to remove her glasses.
Use soft key and fill lights and position them to the side of the subject, as shown in Figure 3.12.
Figure 3.12. When your subject won’t take off her glasses, position soft lights on either side, and in addition to the back light.
Situation 4: Your subject wants to be shot against a window during daylight.
Options:
Shoot early morning or late afternoon when the sun is weakest.
Use Gel rolls to cover the window to reduce the incoming light.
Situation 5: You have to shoot a subject in an office lighted by fluorescent lights.
Options:
I’ve used the setup shown in Figure 3.13 to good effect, though the lighting is flat. Position the subject slightly in front of one light, which then serves as the back light, with the other light serving as the sole key light. If shadowing is a problem, position a small fluorescent desk lamp upwards at the subject’s face, or use a bounce card.

Figure 3.13. When shooting in an office with fluorescent lights, position the subject between the overheads and use a bounce card or small fluorescent light pointing upwards to remove facial shadows.
Situation 6: You’re shooting in a home or office where lamps provide the only available lighting.
Options:
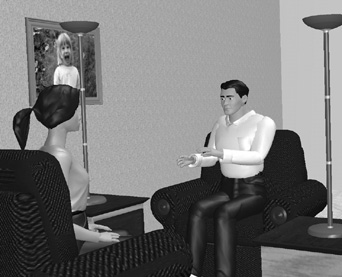
My approach here is simple: move the lights and lamps into the desired three-point positioning, removing the covers if possible, to achieve the best lighting. Look at the example shown in Figure 3.14 from the interview scenario, where floor lamps are moved into key and fill position. I usually carry clamp lights like that shown on the right in Figure 3.15 for hanging from curtain rods, chandeliers, or any other fixed item that gives me the positioning I need.
If you compared the bulb from the shop lamp in Figure 3.7 to the bulb in a professional lighting kit—say, the Lowel Tota-Light—you would find minimal differences, though the Tota-Light, without stand, retails at about $170. To replace my $35 shop lamp with Lowel equipment I’d need to invest more than $300, and I’d still need to find stands. Or, I could spend $1,000-plus and get a four-light Lowel system with all the accessories.
On its face, this may sound excessive. But it’s worth noting that the Lowel system comes with a convenient carrying case that simplifies shooting on the go. The Lowel gear also has “barn doors” and other accessories that simplify directing the light, and convenient clamps and knobs for attaching umbrella reflectors and hoods. And rather than using paper clips and other ad hoc connectors to attach your diffusion materials to the lamp, you’ll use a convenient stand. This all translates to convenience, time savings, and equipment durability.
The truth is, I salivate over these types of lighting rigs and if I were a full-time videographer, I’d definitely buy one. However, for the type of intermittent shooting I do, I can get by with much cheaper equipment. Though my homegrown kit won’t look as impressive to my customers as the branded gear, generally they care more about the quality of the video; if I’m careful, the customer won’t know (or care) whether I used Lowel gear or a shop lamp from Lowe’s.
Two other pieces of lighting gear I couldn’t live without are shown in Figure 3.15. The Rosco Diffusion Kit easily converts my halogen lamps to soft lights (for around $35), and the work lamp (right) with its own steel clamp, is marvelous for connecting to doors, lights, shelves, windows, cabinets, and pretty much everything else I’ve tried attaching it to. These clamp lights cost less than $10 and take both incandescent and compact fluorescent bulbs, providing great flexibility when attempting to match office lighting.
Bruce A. Johnson’s “Lighting on the Cheap,” originally published in DV Magazine (www.dv.com/print_me.jhtml?LookupId=/xml/feature/2001/bjohnson0401), and “Creating a Low-Cost Fluorescent Lighting System” from Studio 1 Productions (www.studio1productions.com/Articles/FL-Lights.htm) both offer great advice on creating low-cost lighting systems.